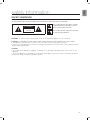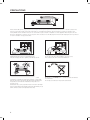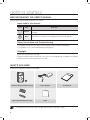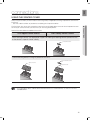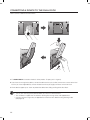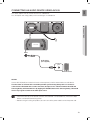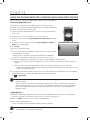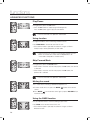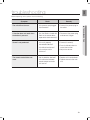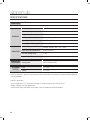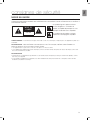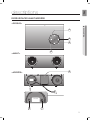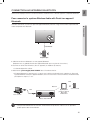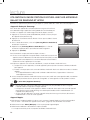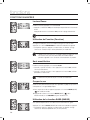
1
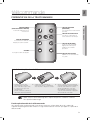
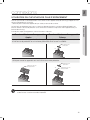
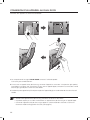
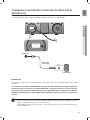
DA-E570 Wireless Audio with Dock user manual imagine the possibilities Thank you for purchasing this Samsung product. To receive more complete service, please register your product at www.samsung.com/register features Dual Docking Audio Speaker System Using the system's dual docking station, dock, charge, and then play either Samsung Galaxy devices or Apple devices through the system's built-in speakers. aptX® aptX enables high quality Bluetooth stereo audio, delivering wired audio quality wirelessly. License iPad, iPhone, iPod, iPod nano, iPod shuffle, and iPod touch are trademarks of Apple Inc., registered in the U.S. and other countries. 2 EnG safety information Safety Warnings TO REDUCE THE RISK OF ELECTRIC SHOCK, DO NOT REMOVE THE COVER(OR BACK). NO USER-SERVICEABLE PARTS ARE INSIDE. REFER SERVICING TO QUALIFIED SERVICE PERSONNEL. CAUTION RISK OF ELECTRIC SHOCK DO NOT OPEN This symbol indicates “dangerous voltage” inside the product that presents a risk of electric shock or personal injury. This symbol indicates important instructions accompanying the product. WARNING : To reduce the risk of fire or electric shock, do not expose this appliance to rain or moisture. CAUTION : TO PREVENT ELECTRIC SHOCK, MATCH WIDE BLADE OF PLUG TO WIDE SLOT, FULLY INSERT. • This apparatus shall always be connected to a AC outlet with a protective grounding connection. • To disconnect the apparatus from the mains, the plug must be pulled out from the mains socket, therefore the mains plug shall be readily operable. CAUTION • Do not expose this apparatus to dripping or splashing. Do not put objects filled with liquids, such as vases on the apparatus. • To turn this apparatus off completely, you must pull the power plug out of the wall socket. Consequently, the power plug must be easily and readily accessible at all times. 3 PrecaUtiOns 2.7 inch 3.9 inch 3.9 inch 3.9 inch Ensure that the AC power supply in your house complies with the power requirements listed on the identification sticker located on the back of your product. Install your product horizontally, on a suitable base (furniture), with enough space around it for ventilation (3~4 inches). Make sure the ventilation slots are not covered. Do not place the unit on amplifiers or other equipment which may become hot. This unit is designed for continuous use. To fully turn off the unit, disconnect the AC plug from the wall outlet. Unplug the unit if you intend to leave it unused for a long period of time. During thunderstorms, disconnect the AC plug from the wall outlet. Voltage peaks due to lightning could damage the unit. Do not expose the unit to direct sunlight or other heat sources. This could cause the unit to overheat and malfunction. Phones Protect the product from moisture (i.e. vases) , and excess heat (e.g.fireplaces) or equipment creating strong magnetic or electric fields Disconnect the power cable from the AC supply if the unit malfunctions. Your product is not intended for industrial use. This product is for personal use only. Condensation may occur if your product has been stored in cold temperatures. If transporting the unit during the winter, wait approximately 2 hours until the unit has reached room temperature before using. 4 The batteries used with this product contain chemicals that are harmful to the environment. Do not dispose of batteries in the general household trash. EnG contents features 2 3 6 7 9 safety information 2Features 2License 3 Safety warnings 4Precautions getting started 6 6 Before reading the user’s manual What’s included descriptions 7 Top/Front/Rear Panel remote control 9 Tour of the remote control power on and volume control 10 11 connections playing 16 18 19 20 functions troubleshooting appendix 10 Turning the Power on/off 10 Adjusting the volume 11 12 13 15 Using the Spacer Cover Connecting a device to the Dual Dock Connecting an audio device using AUX IN Connecting to Bluetooth devices 16 Using the docking mode with Samsung Galaxy and Apple Devices 17 Using the Bluetooth mode 18 Advanced functions 19Troubleshooting 20Specifications 5 getting started Before Reading the User’s Manual Note the following terms before reading the user manual. Icons used in this manual Icon Term Caution Note Definition Indicates a situation where a function does not operate or settings may be canceled. Indicates tips or instructions on the page that help a function operate. Safety Instructions and Troubleshooting 1) Familiarize yourself with the Safety Instructions before using this product. (See page 3) 2) If a problem occurs, check Troubleshooting. (See page 19) Copyright ©2012 Samsung Electronics Co.,Ltd. All rights reserved; no part or whole of this user’s manual may be reproduced or copied without the prior written permission of Samsung Electronics Co.,Ltd. WHAT’s inclUDED Check for the supplied accessories shown below. FUNCTION MUTE VOL BASS Remote Control / Lithium Battery (3V) Power Adapter Spacer Cover/Protection Cover Cloth User Manual ▪▪ The appearance of the accessories may differ slightly from the illustrations above. 6 EnG descriptions TOP/Front/Rear Panel <TOP> DOCK DOCK ● Descriptions 1 2 AUX IN AUX IN ONLY FO ONLY FO ONLY FO ONLY FO 3 4 <FRONT> AUX IN AUX IN ONLY FO ONLY FO PUSH AUX IN ONLY FOR SERVICE DC 12V 2A 5 ONLY FOR SERVICE <REAR> PUSH AUX IN ONLY FOR SERVICE DC 12V 2A ONLY FOR SERVICE PUSH AUX IN ONLY FOR SERVICE DC 12V 2A ONLY FOR SERVICE AUX IN PUSH DC 12V 2A ONLY FOR SERVICE AUX IN 6 DC 12V 2A 7 PUSH ONLY FOR SERVICE 7 1 PLAY/PAUSE BUTTON Play or pause a music file. 2 BASS BUTTON Optimize the sound based on your tastes. 3 VOLUME +/BUTTON Controls the volume level. 4 STANDBY LED 5 DUAL DOCK Provides a 5 pin dock for Samsung Galaxy devices and a 30 pin dock for Apple devices. 6 AUX IN Connect to the Analog output of an external device. 7 DC 12V Connect the unit's DC adapter to this jack. The standby LED lights up in standby mode. The standby LED turns off when the power of the unit turned on. ▪▪ When you turn on this unit, there will be a 4 to 5 second delay before it produces sound. ▪▪ This unit can connect to mobile devices with high audio output levels. When you connect this unit to external devices with high output levels, it may lower the audio output to protect the amp and speakers. ▪▪ When disconnecting the power cable from the wall outlet, hold the plug. Do not pull the cable. 8 EnG remote control Tour of the Remote Control FUNCTION ● remote control POWER BUTTON Turns the unit on and off. FUNCTION BUTTON Selects the Function mode. PLAY/PAUSE BUTTON Play or pause a music file. CONTROL BUTTON Search for the next or previous music file. MUTE VOL BASS VOLUME Adjusts the volume level of the unit. MUTE BUTTON Mutes the sound from this unit. Press again to restore the sound to the previous volume level. BASS BUTTON Optimize the sound based on your tastes. Installing battery in the Remote Control 1. Open the cover of the remote control by putting your fingernail into the gap between the cover and body of the remote control. Then, lift the cover and separate it completely. 2. Install a 3V Lithium battery. Insert the battery into the battery compartment with the + side facing up. 3. Fit the remote control's cover to the remote control. Next, lower the cover so that it is flush with the body of the remote, and then press the cover into the body by pushing the edges down with your hand. ▪▪ Be careful not to catch your fingernail in the gap when you lift the cover. You can damage your fingernail. Operation Range of the Remote Control You can use the remote control up to 23 feet (7 meters) in a straight line from the unit. You can also operate the remote at a horizontal angle of up to 30° from the remote control sensor. 9 power on and volume control DOCK tUrning tHe POWer On/Off DOCK DOCK PUSH AUX IN ONLY FOR SERVICE DC 12V 2A ONLY FOR SERVICE FUNCTION or FUNCTION MUTE VOL BASS MUTE VOL DOCK BASS DOCK 1. To turn on this unit, press any button on the unit's top panel when the unit is in Standby mode. or, Press power on the remote control. PUSH AUX IN DC 12V 2A ONLY FOR SERVICE 2. To turn off this unit, press the +# button on the unit's top panel for more than 3 seconds. or, Press power on the remote control again. DOCK DOCK ▪ The standby LED is on when AC Plug is connected to the wall outlet and the Power of the unit is off. The standby LED is off when the power of the unit is on. ▪ The power of the unit automatically turns off if there is no input for 20 minutes. aDJUsting tHe VOLUMe DOCK DOCK Use +, - buttons to adjust the volume. As you adjust the volume, the Input mode LED blinks. The LED remains on in case you increase the volume when it has already been set to maximum, or decrease the volume when it has already been set to minimum. DOCK PUSH FUNCTION AUX IN ONLY FOR SERVICE DC 12V 2A ONLY FOR SERVICE FUNCTION or MUTE MUTE VOL BASS VOL Press the +/– button on the right side of the top panel. or, Press vol +/– on the remote control. BASS PUSH AUX IN DC 12V 2A ONLY FOR SERVICE ▪ The volume level increases or decreases when you press VOL +/–. ▪ You can also use the volume controls of devices connected using the Dual Dock or Bluetooth to control the volume. However, your ability to control the volume using the volume controls of devices connected using Bluetooth may be limited. 10 EnG connections Using tHe sPacer cOVer Attach the space cover if you want to dock a Samsung Galaxy or Apple device having no protective case onto the Dual Dock. - Use it for stable installation of your device considering the shape of the device. See the illustrations below for additional instructions. <for apple Device Users> <for galaxy Device Users> When docking a device, use appropriate support considering the docking device’s protective case or the device’s shape for further stability. Protective Cover Used for docking devices having no protective case on it. Protective Cover Spacer Cover Spacer Cover ▪ It is impossible to attach a device to the Dual Dock that has a case thicker than 1.5 mm or an unusual rounded bottom. 11 ● connEctions The Dual Dock also comes with a protective cover for the 30-pin Apple device connector. Use the protective cover for the 30-pin connector when you attach the 5-pin Samsung Galaxy device. cOnnecting a DeVice tO tHe DUaL DOcK How to connect a device to the Dual Dock. SH PU E RVIC DC 12V 2A R SE LY FO X AU IN ON PUSH PUSH AUX IN ONLY FOR SERVICE AUX IN DC 12V 2A ONLY FOR SERVICE DC 12V 2A PUSH SH PU AUX IN ONLY FOR SERVICE DC 12V 2A E RVIC DC 12V 2A PUSH R SE E RVIC LY FO X AU IN DC 12V 2A R SE ON LY FO X AU IN ON 1. The DuAl DocK is located on the back of the product. To open, push it in gently. 2. If you have a Samsung Galaxy device, connect the device to the 5 pin (smaller) connector to connect to the Dual Dock. If you have a Apple device, connect the device to the 30 pin (larger) connector on the Dual Dock. 3. Lift the device support up as shown to prevent the device from sliding or falling off the Dual Dock. ▪ Turn on your Samsung Galaxy device before you attach it to the Dual Dock. ▪ This unit doesn't support the simultaneous docking of Samsung Galaxy and Apple devices. ▪ Connect your Samsung Galaxy or Apple device to the Dual Dock before starting Docking mode. PUSH (See page 16) E RVIC R SE LY FO X IN AU 12 ON DC 12V 2A EnG cOnnecting an aUDiO DeVice Using aUX in This section explains how to connect the unit to an audio device. This unit requires one analog audio jack for connecting to an audio device. PUSH AUX IN ONLY FOR SERVICE DC 12V 2A ONLY FOR SERVICE PUSH ONLY FOR SERVICE ● connEctions AUX IN DC 12V 2A ONLY FOR SERVICE PUSH AUX IN ONLY FOR SERVICE DC 12V 2A ONLY FOR SERVICE PUSH AUX IN DC 12V 2A ONLY FOR SERVICE AUX IN PUSH AUX IN DC 12V 2A ONLY FOR SERVICE audio cable (not supplied) Earphones jack external Device AuX in Connect AUX IN (Audio) on the back of the unit to the earphone jack of the external device or audio device. if connected to an external device via AuX input while your Samsung galaxy device is docked or connected to a bluetooth device at the same time, the input source switches between the AuX and Samsung galaxy or bluetooth device by tapping the pAuSe button on the Samsung galaxy / bluetooth device. tap it again to switch to the other input source. ▪ Use the Function key on the remote control to switch between connected devices, if there are multiple devices connected to the Docking station. PUSH ▪ Before moving or installing this product, be sure to turn off the power and disconnect the power cord. AUX IN DC 12V 2A ONLY FOR SERVICE 13 BLUETOOTH You can connect the Wireless Audio with Dock to Bluetooth devices and enjoy music with high quality stereo sound, all without wires! What is Bluetooth? Bluetooth technology lets Bluetooth-compliant devices interconnect easily with each other using a short wireless connection. • A Bluetooth device may cause noise or malfunction, depending on usage, when: -- A part of your body is in contact with the receiving/transmitting system of the Bluetooth device or the Wireless Audio with Dock. -- It is subject to electrical variation from obstructions caused by a wall, corner, or by office partitioning. -- It is exposed to electrical interference from same frequency-band devices including medical equipment, microwave ovens, and wireless LANs. • Keep the Wireless Audio with Dock and the Bluetooth device close together when pairing. • The further the distance between the Wireless Audio with Dock and Bluetooth device, the worse the quality. If the distance exceeds the Bluetooth operational range, the connection is lost. • In poor reception-sensitivity areas, the Bluetooth connection may not work properly. • The Bluetooth connection only works when the Bluetooth device is close to the set. The connection is automatically cut off if the Bluetooth device moves out of range. Even within range, the sound quality may be degraded by obstacles such as walls or doors. • This wireless device may cause electric interference during its operation. ▪▪ You may be required to enter a PIN code (password) when connecting the Bluetooth device to the Wireless Audio with Dock. If the PIN code input window appears, enter <0000>. ▪▪ The Wireless Audio with Dock supports SBC data (44.1kHz, 48kHz). ▪▪ The AVRCP feature is not supported. ▪▪ Connect only to a Bluetooth device that supports the A2DP (AV) function. ▪▪ You cannot connect to a Bluetooth device that supports only the HF (Hands Free) function. ▪▪ Only one Bluetooth device can be paired at a time. ▪▪ Once you have turned off the Wireless Audio with Dock and the pairing is disconnected, the pairing will not be restored automatically. To reconnect, you must pair the devices again. ▪▪ The Wireless Audio with Dock may not search or connect properly in the following cases: -- If there is a strong electrical field around the Wireless Audio with Dock. -- If several Bluetooth devices are simultaneously paired to the Wireless Audio with Dock. -- If the Bluetooth device is turned off, not in place, or malfunctions -- Note that such devices as microwave ovens, wireless LAN adaptors, fluorescent lights, and gas stoves use the same frequency range as the Bluetooth device, which can cause electric interference. 14 EnG CONNECTING TO BLUETOOTH DEVICES This section explains how to connect the Wireless Audio with Dock to Bluetooth compatible devices. To connect the Wireless Audio with Dock to a Bluetooth device Before you begin, confirm that your Bluetooth device supports the Bluetooth compliant stereo headset function. ● connections DOCK PUSH AUX IN ONLY FOR SERVICE DC 12V 2A ONLY FOR SERVICE Connect PUSH AUX IN DC 12V 2A ONLY FOR SERVICE External device 1.Select the Bluetooth menu on your Bluetooth device. (Refer to the Bluetooth device's user manual for instructions.) 2.Scan or search for All Devices or for Headsets. •You will see a list of devices. 3.Select "[Samsung]W_Audio XXXXXX" from the searched list. • If the Bluetooth device fails to pair with the Wireless Audio with Dock, delete the "[Samsung]W_Audio XXXXXX" found by the Bluetooth device, and search for the Wireless Audio with Dock again, and then repeat Steps 1, 2, and 3. Wi-Fi Bluetooth AUX A portable device supporting Wi-Fi and BT simultaneously Sound Source B Sound Source A Wireless Audio with Dock ▪▪ When the AUX and Bluetooth operate at the same time as shown above, the sound may come from both simultaneously. 15 playing DOCK Using the Docking mode with Samsung Galaxy and Apple Devices Connect the Samsung Galaxy or Apple device to the Dual Dock. (See page 12) <Samsung Galaxy Devices> To use your Samsung Galaxy series device with the Dual Dock, you must download and install the Docking Mode application from the Android Market on the device. To download, follow these steps: 1. Tap the Play Store (Android Market) icon on the Samsung Galaxy device's main screen. 2. Tap the search icon on the screen to access the search bar. 3. In the search bar, type in the [Samsung Wireless Audio Dock], and then search. 4. In the search result list, find, and then tap [Samsung Wireless Audio Dock] to start downloading. 5. Tap [install]. To play music, follow these steps: 1-1.If you start the app when the Wireless Audio with Dock is the only device for the Bluetooth connection, selecting PLAY in your device automatically establishes the Bluetooth connection to the Wireless Audio with Dock and the unit plays music. 1-2.If there are multiple devices for Bluetooth connection including Wireless Audio with Dock, 1) When you start the app, the list of the devices which you can connect to the Wireless Audio with Dock will appear. 2) Play music after connecting to the Wireless Audio with Dock by selecting it on the list of devices. -- If there exists a Bluetooth device paired to the Wireless Audio with Dock before, it will not appear in the list and be connected automatically. 2. If you replace the Wireless Audio with Dock which you have paired to your mobile device, you should delete the remaining settings saved in your device before pairing to the new one. • ; [Clear data]. ▪▪ Once you started the application, running is not disturbed by charging your mobile device with an ordinary charger. ▪▪ When you connect other device to the Wireless Audio with Dock after connecting Samsung Galaxy device in docking mode, you may have to turn off the Bluetooth mode of the Samsung Galaxy device. ▪▪ If you have trouble connecting the Samsung Galaxy device to the Dual Dock, turn off the devices's Bluetooth mode. <Apple Devices> 1.Select the mode as described above, and then connect the Apple device to the Dual Dock as described in Connecting a Device to the Dual Dock (Page 12). You will hear a ringing sound. 2.Select the <Music> menu in the main screen of the Apple device. 3.Select and play the desired music. •The music will play through the Wireless Audio with Dock's speakers. ▪▪ While playing a video with your device, Play/Pause/Next/Back operations may not be available. Use the button on your device to operate it. 16 EnG Compatibility list (Apple Device) Docking mode compatible iPod/iPhone models Update the software of your iPod/iPhone to the latest version before using it with this unit. -- iPod touch (4th generation) ● Playing -- iPod touch (3rd generation) -- iPod nano (6th generation) -- iPod nano (5th generation) -- iPhone 4S -- iPhone 4 -- iPhone 3GS -- iPod classic • Depending on its version of iPod Software, your device may not be compatible or may operate abnormally. If you connect an incompatible Apple device, the Standby LED will blink. USING THE BLUETOOTH MODE Connect the Bluetooth device to the Wireless Audio with Dock. (See page 15) To connect your Bluetooth device when the Wireless Audio with Dock is in Bluetooth mode, search for the Wireless Audio with Dock on the device's Bluetooth list. Select the Wireless Audio with Dock, and then connect. Once the Wireless Audio with Dock has connected, select and play the desired music. The music will play through the Wireless Audio with Dock's speakers. ▪▪ If you want to change the device which is connected through Bluetooth mode to other device, disconnect the existing device and try to connect to the other device which you want to use. ▪▪ While in Bluetooth communication, Play/Pause/Next/Back operations may not be available depending on used mobile device and application. ▪▪ Operating Bluetooth device paired to the Wireless Audio with Dock may cause stuttering if operated while the Wireless Audio with Dock is playing back from AUX input. To disconnect the Bluetooth device from the Wireless Audio with Dock You can cancel Bluetooth pairing from the Wireless Audio with Dock. For instructions, see the Bluetooth device's user manual. • The Wireless Audio with Dock will be disconnected. ▪▪ The Bluetooth connection only works when the Bluetooth device is close to the set. The connection is automatically cut off if the Bluetooth device moves out of range. Even within range, the sound quality may be degraded by obstacles such as walls or doors. ▪▪ If the Bluetooth device comes back into the effective range, you can restart to restore the pairing with the Bluetooth device. 17 functions advanced functions POWER FUNCTION VOL MUTE VOL BASS FUNCTION During playback, press the +# button. MUTE VOL Play/Pause BASS • Press the +# button to stop playing the file temporarily. Press the +# button again to play the selected file. ▪▪ This function does not operate in AUX mode. Using function FUNCTION FUNCTION VOL Change the mode to switch to Docking and AUX sources. Press FUNCTION on the remote control of this unit. MUTE BASS MUTE VOL BASS • Each time the button is pressed, the selection changes as follows : iPod (iPhone) ; Galaxy (Bluetooth) ; AUX mode ▪▪ Check the function you want to use by pressing the Function button on the remote control when multiple devices are connected to the product simultaneously. POWER FUNCTION VOL MUTE VOL BASS FUNCTION During playback, press the [,] button. MUTE VOL Skip Forward/Back BASS • When there is more than one file and you press the ] button, the next file is selected. • When there is more than one file and you press the [ button, the previous file is selected. ▪▪ This function does not operate in AUX mode. FUNCTION Muting the sound FUNCTION MUTE MUTE VOL BASS VOL BASS This is useful when answering a doorbell or telephone call. 1.To mute sound of this unit, press the MUTE ( control. ) button of the remote 2.Press MUTE ( ) on the remote control again (or press VOLUME +/–) to restore the sound. FUNCTION Using the BASS function FUNCTION MUTE MUTE VOL BASS VOL BASS Lets you optimize the bass sound according to your tastes. Press BASS on the remote control of this unit. • Each time the button is pressed, the selection changes as follows : BASS ON ; OFF 18 EnG troubleshooting Before requesting service, please check the following. Symptom Check Remedy • Is the power cord plugged into the outlet? • Connect the power plug to the outlet. A function does not work when the button is pressed. • Has the Wireless Audio with • Disconnect the power plug Dock or the remote been and connect it again. exposed to static electricity? Sound is not produced. • Is the unit properly connected to device? • Is the Mute function on? • Is the volume set to minimum? • Connect it correctly. • Press the Mute button to cancel the function. • Adjust the volume. The remote control does not work. • Are the batteries drained? • Is the distance between remote control and main unit too far? • Replace with new batteries. • Operate closer to the main unit. 19 ● troubleshooting The unit will not turn on. appendix Specifications Model name DA-E570 GENERAL AMPLIFIER Power supply DC 12V 2A Power consumption 11.2W Weight 4.4 Ibs Dimensions (W x D x H) 11.8 x 6.69 x 3.7 inches Operating temperature range +41°F to +95°F Operating humidity range 10 % to 75 % Rated output power 5W/CH, 4OHM, THD = 10%, 1kHz Input sensitivity/Impedance 800mV/20Kohm S/N ratio (analog input) 65 dB Separation(1kHz) 60 dB FREQUENCY Analog input RESPONSE DOCKING RATING 20Hz~22kHz(±3 dB) iPod 5 V 1.0 A Galaxy 5 V 1.0 A * S/N ratio, distortion, separation, and usable sensitivity are based on measurement using AES (Audio Engineering Society) guidelines. * Nominal specification - Samsung Electronics Co., Ltd reserves the right to change the specifications without notice. - Weight and dimensions are approximate. - For the power supply and Power Consumption, refer to the label attached to the product. 20 LIMITED WARRANTY TO ORIGINAL PURCHASER Samsung Electronics Canada Inc.(SECA), warrants that this product is free from defective material and workmanship. SECA further warrants that if this product falls to operate properly within the specified warranty period and the failure is due to improper workmanship or defective materials, SECA will repair or replace the product at its option. All warranty repairs must be performed by a SECA Authorized Service Center. (The name and address of the location nearest you can be obtained by calling toll free: 1- 800- SAMSUNG) LABOR PARTS One year (Carry- in) One year On carry-in models, transportation to and from the service center is the customer’s responsibility. The original dated sales receipt must be retained by the customer and is the only acceptable proof of purchase. It must be presented to the authorized service center at the time service is requested. EXCLUSIONS (WHAT IS NOT COVERED) This warranty does not cover damage due to accident, fire, flood and/ or other acts of God; misuse, incorrect line voltage, improper installation, improper or unauthorized repairs, commercial use or damage that occurs in shipping. Exterior and interior finish, lamps, glass are not covered under this warranty. Customer adjustments which are explained in the instruction manual are not covered under the terms of this warranty. This warranty will automatically be voided for any unit found with a missing or altered serial number. This warranty is valid only on products purchased and used in Canada. HEADQUARTERS SAMSUNG ELECTRONICS CANADA INC., CUSTOMER SERVICE 55 STANDISH COURT MISSISSAUGA, ONTARIO L5R 4B2 CANADA FABRIQUE EN CORÉE 1-800-SAMSUNG (1-800-7267864) www.samsung.com/ca Contact SAMSUNG WORLD WIDE If you have any questions or comments relating to Samsung products, please contact the SAMSUNG customer care center. Area ` North America Canada Mexico U.S.A Contact Centre 1-800-SAMSUNG (726-7864) 01-800-SAMSUNG (726-7864) 1-800-SAMSUNG (726-7864) Web Site www.samsung.com www.samsung.com www.samsung.com DA-E570 Wireless Audio with Dock guide d’utilisation imaginez les possibilités Merci d'avoir choisi ce produit Samsung. Pour avoir accès à davantage de services, veuillez enregistrer votre produit sur le site www.samsung.com/register caractéristiques Système audio de station d’accueil double avec haut-parleurs La station d'accueil double du système vous permet de connecter et de charger un appareil Galaxy de Samsung ou un appareil Apple, puis de lire le contenu par l’intermédiaire des haut-parleurs intégrés. aptX® aptX assure une audio stéréo Bluetooth de haute qualité, en procurant la qualité audio sur réseau câblé au moyen d’une connexion sans fil. Licence iPad, iPhone, iPod, iPod nano, iPod shuffle et iPod touch sont des marques de commerce de Apple Inc., déposées aux É.-U. et dans d’autres pays. 2 FRA consignes de sécurité MISES EN GARDE POUR LIMITER LES RISQUES DE CHOC ÉLECTRIQUE, NE RETIREZ JAMAIS LE COUVERCLE (OU LE CACHE ARRIÈRE). AUCUN DES COMPOSANTS INTERNES N’EST RÉPARABLE PAR L'UTILISATEUR. CONFIEZ L’ENTRETIEN DE CET APPAREIL À DU PERSONNEL QUALIFIÉ. MISE EN GARDE RISQUE DE CHOC ÉLECTRIQUE NE PAS OUVRIR Ce symbole signale la présence d'une « tension dangereuse » à l'intérieur du produit, susceptible de provoquer un choc électrique ou des blessures corporelles. Ce symbole signale que des consignes importantes accompagnent ce produit. AVERTISSEMENT : Pour limiter les risques d’incendie ou de choc électrique, n’exposez pas cet appareil à la pluie ou à l’humidité. MISE EN GARDE : POUR PRÉVENIR TOUT RISQUE DE CHOC ÉLECTRIQUE, INSÉREZ COMPLÈTEMENT LA BROCHE LARGE DE LA FICHE DANS LA FENTE LARGE. • Cet appareil doit toujours être connecté à une prise c.a. mise à la terre. • Pour débrancher l'appareil du réseau électrique, la fiche doit être retirée de la prise du réseau électrique; celle-ci doit donc être facilement accessible. MISE EN GARDE • N’exposez pas cet appareil aux égouttements ou aux éclaboussures. Ne placez pas d'objet contenant des liquides, comme des vases, sur l’appareil. • Pour éteindre complètement cet appareil, vous devez le débrancher de la prise murale. Par conséquent, la fiche doit être aisément accessible en tout temps. 3 PRÉcAUTiOnS 2.7 inch 3.9 inch 3.9 inch 3.9 inch Assurez-vous que l’alimentation c.a. de votre habitation répond aux exigences du produit en matière d’alimentation qui sont indiquées sur l’étiquette apposée sur la face arrière. Installez votre produit à l’horizontale, sur une surface appropriée (telle qu’un meuble), de façon à assurer un espace suffisant sur le pourtour pour la ventilation (3 à 4 inches). Veillez à ce que les orifices de ventilation ne soient pas obstrués. Ne placez pas l’appareil sur les amplificateurs ou sur un équipement qui pourrait devenir très chaud. Cet appareil est conçu pour une utilisation continue. Pour l’éteindre complètement, débranchez la fiche c.a. de la prise murale. Débranchez l’appareil si vous ne devez pas l’utiliser pendant une période prolongée. Pendant un orage, débranchez la fiche c.a. de la prise murale. Les pics de tension dus à la foudre pourraient endommager l’appareil. N’exposez pas l’appareil à la lumière directe du soleil ni à d’autres sources de chaleur. Cela pourrait faire surchauffer l’appareil et causer une défaillance. Phones Protégez le produit contre l’humidité (p. ex., les vases), l’excès de chaleur (p. ex., foyer) ou tout équipement qui crée de puissants champs magnétiques ou électriques. Dans le cas d’une défaillance de l’appareil, débranchez le câble d’alimentation électrique de l’alimentation c.a. Votre produit n’est pas destiné à un usage industriel. Il est uniquement réservé à un usage personnel. De la condensation pourrait se former si votre produit a été exposé à de basses températures. Si vous devez transporter le produit pendant l’hiver, attendez environ 2 heures avant de l’utiliser pour lui permettre d’atteindre la température de la pièce. 4 Les piles utilisées avec ce produit contiennent des produits chimiques dangereux pour l’environnement. Ne les jetez pas avec les déchets ménagers. Caractéristiques 2 3 6 7 9 CONSIGNES DE SÉCURITÉ 2Caractéristiques 2Licence 3 Mises en garde 4Précautions POUR VOUS AIDER À DÉMARRER 6 6 Avant de lire le guide d’utilisation Ce qui est inclus DESCRIPTIONS 7 Dessus/Faces avant/Arrière TÉLÉCOMMANDE 9 Présentation de la télécommande MISE SOUS TENSION ET RÉGLAGE DU VOLUME 10 11 CONNEXIONS LECTURE 16 18 19 20 FONCTIONS DÉPANNAGE ANNEXE FRA table des matières 10 Mise sous/hors tension 10 Réglage du volume 11 Utilisation du capuchon de cale d’espacement 12 Connexion d’un appareil au Dual Dock 13 Connexion d’un dispositif audio en utilisant AUX IN (ENTRÉE AUX) 15 Connection aux appareils Bluetooth 16 Utilisation du mode station d’accueil avec les appareils Galaxy de Samsung et Apple 17 Utilisation du mode Bluetooth 18 Fonctions avancées 19Dépannage 20 Caractéristiques techniques 5 pour vous aider à démarrer Avant de lire le guide d'utilisation Notez les termes suivants avant de lire le guide d’utilisation. Icônes utilisées dans ce guide Icône Terme Définition Mise en garde Signale un dysfonctionnement ou avertit que des paramètres pourraient être annulés. Remarque Renvoie à des conseils ou à des consignes donnés sur la page pour vous aider à utiliser une fonction. Consignes de sécurité et dépannage 1) Familiarisez-vous avec les consignes de sécurité avant d’utiliser ce produit. (Voir page 3.) 2) En cas de problème, consultez la section Dépannage. (Voir page 19.) Droit d’auteur © 2012 Samsung Electronics Co., Ltd. Tous droits réservés; ce guide d'utilisation ne peut être reproduit ou copié, partiellement ou dans son intégralité, sans l'autorisation écrite préalable de Samsung Electronics Co., Ltd. CE QUI EST INCLUS Vérifiez si vous avez reçu les accessoires fournis ci-dessous. FUNCTION MUTE VOL BASS Télécommande/ Pile au lithium (3V) Adaptateur de courant Capuchon de cale d’espacement/ Capuchon de protection Chiffon Guide d'utilisation ▪▪ L’apparence des accessoires peut légèrement différer des illustrations ci-dessus. 6 FRA descriptions DESSUS/Faces avant/arrière <DESSUS> ● DESCRIPTION DOCK DOCK 1 AUX IN AUX IN ONLY FOR SERVICE ONLY FOR SERVICE ONLY FOR SERVICE ONLY FOR SERVICE 2 3 4 <AVANT> AUX IN AUX IN ONLY FOR SERVICE ONLY FOR SERVICE PUSH AUX IN ONLY FOR SERVICE DC 12V 2A 5 ONLY FOR SERVICE <ARRIÈRE> PUSH AUX IN ONLY FOR SERVICE DC 12V 2A ONLY FOR SERVICE PUSH AUX IN ONLY FOR SERVICE DC 12V 2A ONLY FOR SERVICE AUX IN PUSH DC 12V 2A ONLY FOR SERVICE AUX IN 6 DC 12V 2A 7 PUSH ONLY FOR SERVICE 7 1 BOUTON LECTURE/PAUSE Pour lancer ou interrompre la lecture d’un fichier de musique. 2 BOUTON BASS (BASSE) Optimise le son en fonction de vos goûts. 3 BOUTON VOLUME +/- Règle le volume. 4 VOYANT DEL DE VEILLE 5 STATION D’ACCUEIL DOUBLE Fournit une station d’accueil à 5 broches pour appareils Galaxy Samsung et une station d’accueil à 30 broches pour appareils Apple. 6 ENTRÉE AUX Pour connecter à la sortie analogique d’un périphérique. 7 C.C. 12 V Connectez l’adaptateur c.c. du produit à cette prise. Le voyant DEL de veille s’allume en mode de veille. Le voyant DEL de veille s’éteint lorsque le produit est mis sous tension. ▪▪ Cet appareil produit le son dans un délai de 4 ou 5 secondes après avoir été mis sous tension. ▪▪ Ce produit peut être connecté aux appareils mobiles dont la sortie audio est de haut niveau. Lorsque vous connectez ce produit à des périphériques à haut niveau de sortie, la sortie audio pourrait être baissée afin de protéger l’ampérage et les haut-parleurs. ▪▪ Tenez la fiche lorsque vous débranchez le câble d’alimentation de la prise murale. Ne tirez pas le câble. 8 FRA télécommande PRÉSENTATION DE LA TÉLÉCOMMANDE FUNCTION TOUCHE FUNCTION (FONCTION) Pour sélectionner le mode Function (Fonction). TOUCHE LECTURE/PAUSE Pour lancer ou interrompre la lecture d’un fichier de musique. TOUCHE COMMANDE Pour rechercher le fichier de musique précédent ou suivant. MUTE VOL BASS VOLUME Pour régler le volume de l’appareil. TOUCHE MUTE (MUET) Coupe le son de ce produit. Appuyez de nouveau pour rétablir le son au volume précédent. TOUCHE BASS (BASSE) Optimise le son en fonction de vos goûts. Installation des piles dans la télécommande 1. Ouvrez le couvercle de la 2. Installez les piles au lithium 3 V. télécommande en insérant Insérez la pile dans le compartiment votre ongle dans l’espace entre avec l’électrode + dirigée vers le haut. le couvercle et le corps de la télécommande. Ensuite, soulevez le couvercle et détachez-le de la télécommande. 3. Fixez le couvercle de la télécommande à la télécommande. Insérez tout d’abord le dessus, puis abaissez le couvercle de sorte qu’il affleure le corps de la télécommande et enfoncez-le dans le corps de la télécommande en appuyant sur les bords avec votre main. ▪▪ Veillez à ne pas coincer votre ongle dans l'espace lorsque vous soulevez le couvercle. Vous pourriez l’endommager. Portée opérationnelle de la télécommande Vous pouvez utiliser la télécommande à une distance maximum, en ligne droite, de 23 pi (7 mètres) de l’appareil. Elle peut également être utilisée à un angle horizontal de 30° maximum par rapport au capteur de la télécommande. 9 ● TÉLÉCOMMANDE TOUCHE POWER (MISE SOUS/HORS TENSION) Pour mettre l’appareil sous ou hors tension. mise sous tension et réglage du volume DOCK DOCK MiSe SOuS/HOrS teNSiON DOCK PUSH AUX IN ONLY FOR SERVICE DC 12V 2A ONLY FOR SERVICE FUNCTION ou FUNCTION MUTE VOL BASS MUTE VOL BASS DOCK DOCK 1. Pour mettre ce produit sous tension, appuyez sur n’importe quel bouton situé sur le dessus du produit alors que le produit est en mode Standby (Veille). ou Appuyez sur la touche POWer de la télécommande. PUSH AUX IN DC 12V 2A ONLY FOR SERVICE DOCK DOCK 2. Pour mettre ce produit hors tension, appuyez pendant plus de 3 secondes sur le bouton +# situé sur le dessus du produit. ou Appuyez de nouveau sur la touche POWer de la télécommande. ▪ Le voyant DEL de veille est allumé lorsque la fiche c.a. est connectée à la prise murale et que le produit est hors tension. Le voyant DEL de veille s’éteint lorsque le produit est sous tension. ▪ Le produit se met automatiquement hors tension si aucune entrée n'est effectuée pendant 20 minutes. RÉGLAGe DU VOLUMe Utilisez les boutons +, - pour régler le volume. Pendant que vous réglez le volume, le voyant DEL du mode Input (Entrée) clignote. Le voyant DEL reste allumé au cas où vous augmenteriez le volume lorsqu’il est déjà réglé au maximum, ou au cas où vous le baisseriez lorsqu’il est déjà réglé au minimum. DOCK DOCK PUSH FUNCTION AUX IN ONLY FOR SERVICE DC 12V 2A ONLY FOR SERVICE FUNCTION ou MUTE MUTE VOL BASS VOL Appuyez sur le bouton +/– situé sur le côté droit du dessus du produit. ou Appuyez sur la touche VOL +/– de la télécommande. AUX IN BASS PUSH DC 12V 2A ONLY FOR SERVICE ▪ Le volume augmente ou baisse lorsque vous appuyez sur VOL +/–. ▪ Vous pouvez aussi vous servir des commandes de réglage du volume des appareils connectés en utilisant la station d’accueil double ou Bluetooth pour régler le volume. Notez que votre capacité à utiliser les commandes de réglage du volume des appareils connectés par l’intermédiaire de Bluetooth pour régler le volume pourrait être limitée. 10 DOCK FRA connexions UTiLiSATiOn DU cAPUcHOn De cALe D’eSPAceMenT Fixez le capuchon de la cale d’espacement si vous voulez ancrer l’appareil Galaxy de Samsung ou Apple non muni de housse de protection sur le Dock. - Utilisez-le pour installer votre appareil de façon stable, en fonction de sa forme. ● CONNEXIONS Le Dual Dock est également fourni avec un capuchon de protection pour le connecteur d’appareil Apple à 30 broches. Utilisez la housse de protection sur le connecteur à 30 broches lorsque vous fixez l’appareil Galaxy à 5 broches de Samsung. Pour de plus amples renseignements, voir les illustrations ci-dessous. <Pour les utilisateurs d’un appareil Apple> <Pour les utilisateurs d’un appareil Galaxy> Lorsque vous ancrez un appareil, utilisez le support approprié selon que l’appareil à ancrer est muni d’une housse de protection ou a une forme particulière, afin d’assurer sa stabilité. Capuchon de protection Utilisé pour ancrer les appareils non munis d'une housse de protection. Capuchon de cale d’espacement Capuchon de protection Capuchon de cale d’espacement ▪ Il est impossible d’ancrer sur le Dual Dock un appareil muni d’une housse de plus de 1,5 mm d’épaisseur ou dont la base à une forme arrondie inhabituelle. 11 cOnneXiOn D’Un APPAReiL AU DUAL DOcK Connexion d’un appareil à la station d’accueil double. SH PU E RVIC DC 12V 2A R SE LY FO X AU IN ON PUSH PUSH AUX IN ONLY FOR SERVICE AUX IN DC 12V 2A ONLY FOR SERVICE DC 12V 2A PUSH SH PU AUX IN ONLY FOR SERVICE DC 12V 2A E RVIC DC 12V 2A PUSH R SE E RVIC LY FO X AU IN DC 12V 2A R SE ON LY FO X AU IN ON 1. Le compartiment d’ancrage du DuaL DOCK se trouve à l’arrière du produit. Pour ouvrir, poussez délicatement. 2. Si vous avez un appareil Galaxy de Samsung, connectez l’appareil au connecteur à cinq broches (plus petites) pour établir la connexion avec la Dual Dock. Si vous avez un appareil Apple, connectez-le au connecteur à trente broches (plus grandes) de la station d’accueil double. 3. Soulevez le porte-appareil tel qu’illustré pour empêcher l’appareil de glisser ou de tomber de la station d’accueil double. PUSH ▪ Allumez votre appareil Galaxy de Samsung avant de le connecter au Dual Dock. ▪ Ce produit ne peut pas accueillir simultanément un appareil Galaxy de Samsung et un appareil Apple. ▪ Connectez l’appareil Galaxy de Samsung ou Apple au système Audio de la station d’accueil avant d’activer le mode Docking (Station d’accueil). (Voir page 16.) E RVIC R SE LY FO X IN AU 12 ON DC 12V 2A FRA cOnneXiOn D’Un DiSPOSiTiF AUDiO en UTiLiSAnT AUX in (enTRÉe AUX) Cette section explique comment connecter le produit à un dispositif audio. PUSH Ce produit requiert une prise audio analogique pour établir la connexion à un appareil audio. AUX IN ONLY FOR SERVICE DC 12V 2A ONLY FOR SERVICE PUSH ONLY FOR SERVICE ● CONNEXIONS AUX IN DC 12V 2A ONLY FOR SERVICE PUSH AUX IN ONLY FOR SERVICE DC 12V 2A ONLY FOR SERVICE PUSH AUX IN DC 12V 2A ONLY FOR SERVICE AUX AUX IN enTRÉe PUSH AUX IN DC 12V 2A ONLY FOR SERVICE câble audio (non fourni) Prise Earphones d’écouteurs jack Périphérique eNtrée auX Connectez la prise des écouteurs de périphérique ou de l’appareil audio à la prise AUX IN (Audio) située à l’arrière du produit. Si la connexion est établie à un périphérique au moyen de l’entrée auX alors que l’appareil Galaxy de Samsung est ancré ou connecté à un appareil Bluetooth, vous pouvez permuter les sources d’entrée entre la prise auX et l’appareil Galaxy de Samsung ou l’appareil Bluetooth en appuyant sur le bouton PauSe de l’appareil Galaxy de Samsung/Bluetooth. appuyez de nouveau pour passer à l’autre source d’entrée. ▪ Utilisez la touche Function (Fonction) de la télécommande pour permuterPUSH entre les appareils connectés si plusieurs appareils sont connectés à la station Docking. ONLY FOR SERVICE ▪ Avant de déplacer ou d'installer ce produit, assurez-vous de le mettre hors tension et de débrancher le cordon d’alimentation. AUX IN DC 12V 2A 13 BLUETOOTH Vous pouvez connecter le Wireless Audio with Dock à un appareil Bluetooth et écouter la musique en profitant d’un son stéréo de haute qualité, sans utiliser de fils! Qu’est-ce que Bluetooth? La technologie Bluetooth permet aux appareils compatibles avec Bluetooth de s’interconnecter facilement en utilisant une courte connexion sans fil. • Selon l'usage, un appareil Bluetooth peut entraîner des interférences ou des défaillances dans les cas suivants : -- Une partie du boîtier est en contact avec le système récepteur/émetteur de l’appareil Bluetooth ou avec le Wireless Audio with Dock. -- des variations électriques peuvent se produire en raison de l’obstruction d’un mur, d’un coin ou d’une cloison de bureau; -- il est exposé à des interférences électriques causées par des appareils fonctionnant sur la même bande de fréquence, notamment des équipements médicaux, des fours à micro-ondes ou des RL sans fil. • Maintenez le Wireless Audio with Dock et l’appareil Bluetooth rapprochés pendant la tentative de jumelage. • Plus la distance entre le Wireless Audio with Dock et l’appareil Bluetooth est grande, moins la qualité de la connexion est bonne. Si la distance dépasse la portée opérationnelle de Bluetooth, la connexion se perd. • Dans les zones de faible réception, il est possible que la connexion Bluetooth ne fonctionne pas correctement. • La connexion Bluetooth ne fonctionne que lorsque l'appareil Bluetooth se trouve près du produit. La connexion se coupe automatiquement lorsque l’appareil Bluetooth est déplacé hors de la portée opérationnelle. Même dans la portée, la qualité du son peut se dégrader à cause de certains obstacles tels que des murs ou des portes. • Cet appareil sans fil peut causer du brouillage électrique pendant son utilisation. ▪▪ Vous devrez peut-être entrer un code NIP (mot de passe) pour connecter l’appareil Bluetooth au Wireless Audio with Dock. Si la fenêtre d’entrée du code NIP s’affiche, entrez <0000>. ▪▪ Le Wireless Audio with Dock prend en charge les données SBC (44,1 kHz, 48 kHz). ▪▪ La fonction AVRCP n’est pas prise en charge. ▪▪ Connectez uniquement un appareil Bluetooth qui prend en charge la fonction A2DP (AV). ▪▪ Vous ne pouvez pas connecter un appareil Bluetooth qui ne prend en charge que la fonction ML (mains libres). ▪▪ Un seul appareil Bluetooth peut être jumelé à la fois. ▪▪ Lorsque vous avez éteint le Wireless Audio with Dock , le jumelage est déconnecté et ne sera pas restauré automatiquement. Pour rétablir la connexion, vous devez de nouveau jumeler les appareils. ▪▪ Le Wireless Audio with Dock pourrait ne pas effectuer correctement la recherche ou la connexion dans les cas suivants : -- Présence d’un puissant champ électrique autour du Wireless Audio with Dock. -- Plusieurs appareils Bluetooth sont jumelés simultanément avec le système Wireless Audio with Dock. -- L’appareil Bluetooth est éteint, défaillant ou il n'est pas en place. -- Notez que des appareils tel qu’un four à micro-ondes, un adaptateur de RL sans fil, une lampe fluorescente ou une chaudière à gaz qui utilisent la même gamme de fréquences que l'appareil Bluetooth peuvent causer du brouillage électrique. 14 Cette section explique comment connecter le Wireless Audio with Dock à d’autres appareils compatibles Bluetooth. FRA CONNECTION AUX APPAREILS BLUETOOTH Pour connecter le système Wireless Audio with Dock à un appareil Bluetooth DOCK PUSH AUX IN ONLY FOR SERVICE DC 12V 2A ONLY FOR SERVICE Connecter PUSH AUX IN DC 12V 2A ONLY FOR SERVICE Périphérique 1.Sélectionnez le menu Bluetooth sur votre appareil Bluetooth. (Reportez-vous au guide d’utilisation de l'appareil Bluetooth pour consulter les instructions.) 2.Scannez ou recherchez All Devices (Tous les appareils) ou Headsets (Écouteurs). •La liste des dispositifs s’affiche. 3.Sélectionnez «[Samsung]W_Audio XXXXXX» dans la liste de recherche. •Si l’appareil Bluetooth ne parvient pas à se jumeler avec le Wireless Audio with Dock, supprimez le «[Samsung] W_Audio XXXXXX» trouvé par l’appareil Bluetooth, faites-lui rechercher de nouveau le Wireless Audio with Dock, puis répétez les étapes 1, 2 et 3. Wi-Fi Bluetooth AUX Appareil portatif prenant en charge la Wi-Fi et BT simultanément Source sonore A Source sonore B Wireless Audio with Dock ▪▪ Lorsque AUX et Bluetooth fonctionnent simultanément tel qu’illustré ci-dessus, le son peut être produit par les deux simultanément. 15 ● CONNEXIONS Avant de commencer, assurez-vous que votre appareil Bluetooth prend en charge la fonction de casque d’écoute stéréo compatible avec Bluetooth. lecture DOCK UTILISATION DU MODE STATION D’ACCUEIL AVEC LES APPAREILS GALAXY de Samsung ET APPLE Connectez un appareil Galaxy de Samsung ou Apple au système Audio de la station d’accueil. (Voir page 12.) <Appareils Galaxy de Samsung> Pour utiliser votre appareil de la série Galaxy de Samsung avec le Dual Dock, vous devez télécharger l’application Docking Mode du marché Android, puis l’installer sur l’appareil. Pour la télécharger, exécutez les étapes suivantes : 1. Appuyez sur l’icône Play Store (Android Market) affichée à l’écran principal de l’appareil Galaxy de Samsung. 2. Appuyez sur l’icône de recherche affichée à l’écran pour accéder à la barre de recherche. 3. Dans la barre de recherche, saisissez le [Samsung Wireless Audio Dock] et effectuez la recherche. 4. Repérez le nom [Samsung Wireless Audio Dock] dans la liste de recherche et appuyez dessus pour effectuer le téléchargement. 5. Appuyez sur [Installer]. Pour écouter de la musique, exécutez les étapes suivantes : 1-1.Si vous lancez l’application lorsque le Wireless Audio with Dock est le seul appareil connecté à Bluetooth, le fait de sélectionner PLAY (LIRE) sur votre appareil établit automatiquement la connexion Bluetooth entre le Wireless Audio with Dock et l’appareil qui lit la musique. 1-2.Si plusieurs appareils sont connectés à Bluetooth, y compris le Wireless Audio with Dock : 1) Lorsque vous lancez l’application, la liste des appareils que vous pouvez connecter au Wireless Audio with Dock apparaît. 2) Écoutez la musique après avoir connecté le Wireless Audio with Dock en le sélectionnant dans la liste des appareils. - Si un appareil Bluetooth est déjà jumelé au Wireless Audio with Dock, il apparaît dans la liste et est automatiquement connecté. 2. Si vous remplacez le Wireless Audio with Dock que vous avez jumelé avec votre appareil mobile, vous devriez supprimer les paramètres restants qui ont été sauvegardés sur votre appareil avant de jumeler le nouveau. • ; [Clear data (Supprimer données)]. ▪▪ Une fois que vous avez lancé l’application, l’exécution n’est plus perturbée lors de la charge de l’appareil mobile au moyen d’un chargeur ordinaire. ▪▪ Lorsque vous connectez l’autre appareil au Wireless Audio with Dock après avoir connecté l’appareil Galaxy de Samsung en mode Docking, vous devrez peut-être désactiver le mode Bluetooth sur l’appareil Galaxy de Samsung. ▪▪ Si vous avez de la difficulté à connecter l’appareil Galaxy de Samsung au Dual Dock, désactivez le mode Bluetooth sur tous les autres appareils. <Appareil Apple> 1.Sélectionnez le mode tel que décrit ci-dessus, puis connectez l’appareil Apple au Dual Dock tel que décrit dans la section « Connexion d’un appareil au Dual Dock » (page 12). Vous entendrez une sonnerie. 2.Sélectionnez le menu <Music (Musique)> à l’écran principal de l’appareil Apple. 3.Sélectionnez et effectuez la lecture de la musique souhaitée. •La musique sera émise par les haut-parleurs du Wireless Audio with Dock. 16 FRA ▪▪ Pendant la lecture d’une vidéo par votre appareil, les fonctions Play/Pause/Next/Back (Lire/Pause/ Suivant/Retour) pourraient ne pas être disponibles. Utilisez le bouton de votre appareil pour les exécuter. Liste de compatibilité (Appareil Apple) ● lecture Modèles iPod/iPhone compatibles avec le mode Docking Mettez à niveau votre iPod/iPhone à la dernière version de logiciel avant de l’utiliser avec ce produit. -- iPod touch (4e génération) -- iPod touch (3e génération) -- iPod nano (6e génération) -- iPod nano (5e génération) -- iPhone 4S -- iPhone 4 -- iPhone 3GS -- iPod classic • Selon la version de logiciel iPod, votre appareil pourrait ne pas être compatible et fonctionner anormalement. Si vous connectez un appareil Apple incompatible, le voyant DEL du mode Standby (DEL) clignote. UTILISATION DU MODE BLUETOOTH Connectez l’appareil Bluetooth au Wireless Audio with Dock. (Voir page 15.) Pour connecter votre appareil Bluetooth lorsque le Wireless Audio with Dock est en mode Bluetooth, recherchez le Wireless Audio with Dock sur la liste Bluetooth de l’appareil. Sélectionnez le Wireless Audio with Dock, puis effectuez la connexion. Lorsque le Wireless Audio with Dock est connecté, sélectionnez et écoutez la musique choisie. La musique sera émise par les haut-parleurs du Wireless Audio with Dock. ▪▪ Si vous souhaitez remplacer l’appareil connecté en mode Bluetooth par un autre appareil, déconnectez-le et essayez de connecter le nouvel appareil que vous souhaitez utiliser. ▪▪ Pendant une communication en mode Bluetooth, selon l’appareil mobile ou l’application utilisés, il ne sera peut-être pas possible d’utiliser Play/Pause/Next/Back (Lire/Pause/Suivant/Retour). ▪▪ L’utilisation de l’appareil Bluetooth jumelé avec le Wireless Audio with Dock pourrait causer des hésitations si l’appareil fonctionne alors que le Wireless Audio with Dock effectue la lecture depuis l’entrée AUX. Pour déconnecter l'appareil Bluetooth du Wireless Audio with Dock Vous pouvez annuler le jumelage Bluetooth du Wireless Audio with Dock. Consultez les instructions dans le guide d’utilisation de l’appareil Bluetooth. • Le Wireless Audio with Dock sera déconnecté. ▪▪ La connexion Bluetooth ne fonctionne qu'à proximité de l'appareil. La connexion sera automatiquement coupée si la distance se situe en dehors de cette portée. Même dans cette portée, la qualité du son peut se dégrader à cause de certains obstacles tels que des murs ou des portes. ▪▪ Si l'appareil Bluetooth revient dans la portée opérationnelle, vous pouvez redémarrer l’appareil pour restaurer le jumelage avec l'appareil Bluetooth. 17 fonctions FONCTIONS AVANCÉES POWER FUNCTION VOL MUTE VOL BASS FUNCTION MUTE VOL BASS Lecture/pause Pendant la lecture, appuyez sur la touche +#. • Appuyez sur le bouton +# pour interrompre temporairement la lecture du fichier. Appuyez de nouveau sur le bouton +# pour lire la plage sélectionnée. ▪▪ Cette fonction pourrait ne pas s’activer en mode Aux. Utilisation de Function (Fonction) FUNCTION FUNCTION MUTE VOL BASS MUTE VOL Changez le mode pour passer au mode Docking et aux sources AUX. Appuyez sur la touche FUNCTION de la télécommande de cet appareil. • Chaque fois que vous appuyez sur cette touche, la sélection change comme suit : iPod (iPhone) ; Galaxy (Bluetooth) ; mode AUX BASS ▪▪ Vérifiez la fonction que vous souhaitez utiliser en appuyant sur la touche Function (Fonction) de la télécommande lorsque plusieurs appareils sont connectés simultanément au produit. POWER FUNCTION VOL MUTE VOL BASS FUNCTION Pendant la lecture, appuyez sur la touche [,]. MUTE VOL Saut avant/arrière BASS • Quand il y a plus d’un fichier, si vous appuyez sur la touche ], le fichier suivant est sélectionné. • Quand il y a plus d’un fichier, si vous appuyez sur la touche [, le fichier précédent est sélectionné. ▪▪ Cette fonction pourrait ne pas s’activer en mode Aux. FUNCTION Couper le son FUNCTION MUTE MUTE VOL BASS VOL BASS Cette fonction peut être utile lorsque vous répondez à quelqu’un qui sonne à votre porte ou à un appel téléphonique. 1.Pour couper le son de cet appareil, appuyez sur la touche MUTE (MUET) ( ) de la télécommande. 2.Appuyez de nouveau sur la touche MUTE (MUET) ( ) de la télécommande (ou sur VOLUME +/–) pour rétablir le son. FUNCTION Utilisation de la fonction BASS (BASSE) FUNCTION MUTE MUTE VOL BASS VOL 18 BASS Vous permet d’optimiser les sons de basse en fonction de vos goûts. Appuyez sur la touche BASS (BASSE) de la télécommande de cet appareil. • Chaque fois que vous appuyez sur cette touche, la sélection change comme suit : BASS ON (BASSE ACT.) ; OFF (DÉSAC.) FRA dépannage Avant de demander un service de réparation, vérifiez d'abord les points suivants. Problème Solution L’appareil ne se met pas sous tension. • Le cordon d’alimentation est-il branché dans la prise? • Branchez le cordon d'alimentation dans la prise. Une fonction ne s’active pas lorsque le bouton correspondant est pressé. • Le Wireless Audio with Dock • Débranchez le cordon ou la télécommande ont-ils d’alimentation de la prise, été exposés à l’électricité puis rebranchez-le. statique? Aucun son n’est produit. • Le produit est-il correctement connecté à l’appareil? • La fonction Mute (Muet) est-elle activée? • Le volume est-il réglé au minimum? • Connectez-le correctement. • Appuyez sur la fonction Mute (Muet) pour désactiver la fonction. • Réglez le volume. La télécommande ne fonctionne pas. • Les piles sont-elles épuisées? • La distance entre la télécommande et l’unité principale est-elle trop longue? • Remplacez les piles par des piles neuves. • Rapprochez-la du produit. 19 ● dépannage Vérifier annexe CARACTÉRISTIQUES TECHNIQUES Nom du modèle DA-E570 Poids 4,4 Ibs Dimensions (L x P x H) 11,8 x 6,69 x 3,7 inches CARACTÉRISTIQUES Plage de températures GÉNÉRALES d’utilisation AMPLIFICATEUR RÉPONSE EN FRÉQUENCE +41°F à +95°F Plage de taux d'humidité d’utilisation 10 % à 75 % Puissance de sortie nominale 5 W/CH, 4 OHM, THD = 10 %, 1 kHz Sensibilité d’entrée/ Impédance 800 mV/20 Kohm Rapport signal/bruit (entrée analogique) 65 dB Séparation (1 kHz) 60 dB Entrée analogique 20 Hz à 22 kHz (±3 dB) TENSION NOMINALE iPod DE LA STATION Galaxy D’ACCUEIL 5 V 1,0 A 5 V 1,0 A * Le rapport signal/bruit, la distorsion, la séparation et la sensibilité utilisable sont basées sur les mesures conformes aux directives de l’AES (Audio Engineering Society). * Caractéristiques nominales - Samsung Electronics Co., Ltd se réserve le droit de modifier les caractéristiques techniques sans préavis. - Le poids et les dimensions sont approximatifs. - Pour l’alimentation électrique et la consommation d'énergie, veuillez vous reporter à l’étiquette apposée sur le produit. 20 GARANTIE LIMITÉE À L’ACHETEUR INITIAL Samsung Electronics Canada Inc. (SECA) garantit ce produit contre tout défaut de fabrication. SECA garantit aussi que si cet appareil ne fonctionne pas convenablement durant la période de garantie SECA se réservera le droit de réparer ou de remplacer l’appareil défectueux. Toutes les réparations sous garantie doivent être effectuées par un Centre de service autorisé SECA. Le nom et l’adresse du Centre de service le plus près de chez vous peut être obtenu en composant sans frais le 1-800-268-1620 ou en visitant notre site web au www.samsung.ca Main-d’oeuvre Pièces un (1) an (au comptoir) un (1) an Pour tous les modèles portatifs, le transport de l’appareil sera la responsabilité du client. Le reçu de vente original doit être conservé par le client car cela constitue la seule preuve d’achat acceptée. Le client doit le présenter au Centre de service agréé au moment où il fait la demande d’une réparation sous garantie. EXCLUSIONS (CE QUI N’EST PAS COUVERT) Cette garantie ne couvre pas les dommages causés par un accident, un incendie, une inondation, un cas de force majeure, un mauvais usage ou une tension incorrecte. La garantie ne couvre pas une mauvaise installation, une mauvaise réparation, une réparation non autorisée et tout usage commercial ou dommages survenus durant le transport. Le fini extérieur et intérieur de même que les lampes ne sont pas couverts par cette garantie. Les ajustements par le client qui sont expliqués dans le guide de l’utilisateur ne sont pas couverts en vertu de cette garantie. Cette garantie sera automatiquement annulée pour tout appareil qui aurait un numéro de série manquant ou modifié. Cette garantie est valable seulement sur les appareils achetés et utilisés au Canada. SIÈGE SOCIAL SAMSUNG ELECTRONIQUE CANADA INC., SERVICE À LA CLIENTÈLE 55 STANDISH COURT MISSISSAUGA, ONTARIO L5R 4B2 CANADA FABRIQUE EN CORÉE 1-800-SAMSUNG (1-800-7267864) www.samsung.com/ca Contacter SAMSUNG À TRAVERS LE MONDE Si vous avez des questions ou commentaires concernant les produits Samsung, veuillez communiquer avec le service à la clientèle SAMSUNG. Pays ` North America Canada Mexico U.S.A Centre de contact 1-800-SAMSUNG (726-7864) 01-800-SAMSUNG (726-7864) 1-800-SAMSUNG (726-7864) Site Web www.samsung.com www.samsung.com www.samsung.com Code No. AH68-02475F (01)