1
Memory Camcorder
user manual
imagine the possibilities
Thank you for purchasing this Samsung product.
To receive more complete service, please
register your product at
www.samsung.com/global/register
SC-MX10
SC-MX10P
SC-MX10A
SC-MX10AU
key features of your memory camcorder
MPEG4 Encoding
Records enhanced quality video in MPEG4 ASP(Advanced Simple Profile) format
(720 x 480) onto memory cards at 30 fps for high resolution, life-like images.
High-capacity embedded Flash Memory (4GB) (SC-MX10A/MX10AU only)
The camcorder has built-in high capacity flash memory that allows you to
record movie images.
Various Recording Media
In addition to the built-in flash memory (SC-MX10A/MX10AU only),
this memory camcorder supports various storage media such as SDHC
(Secure Digital High Capacity) and MMCplus. (128 MB ~ 8 GB)
2.7" Wide (16:9) LCD Display (112K Pixels)
You can see the bigger picture by enlarging the 4:3 aspect ratio into 16:9 wide screen with the 2.7" wide (16:9) LCD
screen. The 112K pixel LCD monitor rotates up to 270 degrees for flexible viewing angles and provides sharp, detailed
image for monitoring and playback.
Capture Visions Farther Than The Eye Can See (34x Optical/1200x Digital Zoom)
Samsung's powerful optical zoom lenses bring the world closer without
sacrificing image quality. In addition, Digital Zoom interpolation means that
extreme digital zooming is clearer, with less distortion than previous types of
digital zooms.
Various Recording Features
The memory camcorder supports Anti-Shake(EIS) (Electronic Image Stabilizer), Digital Effects
and a wide range of other functions that you can select according to the scene you are recording.
➥pages 48 ~ 56
ii_English
Enjoying Various Playback Features
Unlike tape operation, playback is simple and easy in this memory camcorder since no time is needed for rewinding
or fast forward operations. Various functions are available for enjoying many different types of playback.
➥page 58 ~ 61
Play back on your PC
USB 2.0 enables the smooth transfer of movies you've recorded to a computer.
With the bundled software, you can easily transfer and play back movies on your PC.
➥page 75
PC Cam for multi-entertaining
Connect the memory camcorder to a PC via a USB 2.0 cable and instantly
communicate via live video with business associates, friends and family wherever you are.
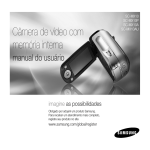
Versatile 16:9 Wide & 4:3 Display option
You can easily select the display option when recording or playback (16:9 Wide/4:3 ). Samsung’s 16:9 Wide display
option lets you monitor more widely on the 2.7" wide LCD screen when recording or playback with your memory
camcorder. Ensure your entire movies are recorded in 4:3 aspect ratio regardless of the display option (16:9 Wide/4:3
aspect ratio).
< 4:3 aspect ratio >
< 16:9 Wide aspect ratio >
English_iii
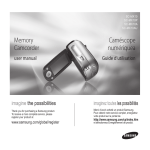
safety warnings
What the icons and signs in this user manual mean :
Means that death or serious personal injury is a risk.
WARNING
Means that there is a potential risk for personal injury or material damage.
CAUTION
CAUTION
To reduce the risk of fire, explosion, electric shock, or personal injury when using your memory
camcorder, follow these basic safety precautions:
Means hints or referential pages that may be helpful when operating the memory camcorder.
These warning signs are here to prevent injury to you and others.
Please follow them explicitly. After reading this section, keep it in a safe place for future reference.
important safety instructions
CAUTION
RISK OF ELECTRIC SHOCK
DO NOT OPEN
CAUTION: TO REDUCE THE RISK OF ELECTRIC SHOCK,
DO NOT REMOVE COVER (OR BACK).
NO USER-SERVICEABLE PARTS INSIDE
REFER SERVICING TO QUALIFIED SERVICE PERSONNEL.
This symbol indicates that dangerous voltage consisting a risk of
electric shock is present within this unit.
This symbol indicates that there are important operating and
maintenance instructions in the literature accompanying this unit.
Warning
To Reduce The Risk Of Fire Or Electric Shock, Do Not Expose This Apparatus To Rain Or Moisture.
Caution
Apparatus shall not be exposed to dripping or splashing and no objects filled with liquids, such as vases, shall be
placed on the apparatus.
To disconnect the apparatus from the mains, the plug must be pulled out from the mains socket, therefore the
mains plug shall be readily operable.
iv_English
1. Read these instructions.
2. Keep these instructions.
3. Heed all warnings.
4. Follow all instructions.
5. Do not use this apparatus near water.
6. Clean only with dry cloth.
7. Do not block any ventilation openings. Install in
accordance with the manufacturer’s instructions.
8. Do not install near any heat sources such as
radiators, heat registers, stoves, or other apparatus
(including amplifiers) that produce heat.
9. Do not defeat the safety purpose of the polarized
or grounding-type plug. A polarized plug has two
blades with one wider than the other. A grounding
type plug has two blades and a third grounding
prong. The wide blade or the third prong are
provided for your safety. If the provided plug does
not fit into your outlet, consult an electrician for
replacement of the obsolete outlet.
10. Protect the power cord from being walked on
or pinched particularly at plugs, convenience
receptacles, and the point where they exit from the
apparatus.
11. Only use attachment/accessories specified by the
manufacturer.
12. Use only with the cart, stand, tripod,
bracket, or table specified by the
manufacturer, or sold with the apparatus.
When a cart is used, use caution when
moving the cart/apparatus combination
to avoid injury from tip-over.
13. Unplug this apparatus during lightning
storms or when unused for long periods
of time.
14. Refer all servicing to qualified service personnel.
Servicing is required when the apparatus has been
damaged in any way, such as powersupply cord or
plug is damaged, liquid has been spilled or objects
have fallen into the apparatus, the apparatus has
been exposed to rain or moisture, does not operate
normally, or has been dropped.
15. Apparatus shall not be exposed to dripping or
splashing and no objects filled with liquids, such as
vases, shall be placed on the apparatus.
16. VENTILATION:
Slots and openings in the cabinet are provided
for ventilation to ensure reliable operation of the
CAMCORDER and to protect it from overheating.
These openings must not be blocked or covered.
Never place your CAMCORDER on a bed, sofa,
rug, or other similar surface: on or near a radiator
or heat register. This CAMCORDER should not be
placed in a built-in installation such as a bookcase
or rack unless proper ventilation is provided or the
manufacturer’s instructions have been adhered to.
English_
important safety instructions
17. POWER SOURCES:
The CAMCORDER should be operated only from the
type of power source indicated on the label. If you are
not sure of the type of power supply at your home,
consult your appliance dealer or local power company.
A CAMCORDER is intended to be operated from
battery power, or other sources, refer to the operating
instructions.
18. GROUNDING OR POLARIZATION:
This CAMCORDER may be equipped with either a
polarized 2-wire AC line plug (a plug having one blade
wider than the other) or a 3-wire grounding type plug,
a plug having a third (grounding) pin. If you are unable
to insert the plug fully into the outlet, try reversing the
plug. If the plug still fails to fit, contact your electrician
to replace your outlet. Do not defeat the safety purpose
of the polarized plug.
19. POWER-CORD PROTECTION:
Power-supply cords should be routed so that they are
not likely to be walked on or pinched by items placed
upon or against them, paying particular attention to
cords or plugs, convenient receptacles, and the point
where they exit from the unit.
70-1984, provides information with respect to proper
grounding of the mast and supporting structure,
grounding of the lead-in wire and supporting structure,
grounding of the mast and supporting structure,
grounding of the lead-in wire to an antenna discharge
unit, size of grounding to conductors, location of
antenna-discharge unit, connection to grounding
electrodes and requirements for the grounding
electrode.
See figure below.
ANTENNA
LEAD IN
WIRE
GROUND
CLAMP
ANTENNA
DISCHARGE UNIT
(NEC SECTION 810-20)
ELECTRIC
SERVICE
EQUIPMENT
GROUNDING CONDUCTORS
(NEC SECTION 810-21)
GROUND CLAMPS
POWER SERVICE GROUNDING
ELECTRODE SYSTEM
(NEC ART 250, PART H)
NEC NATIONAL ELECTRICAL CODE
21. LIGHTNING:
For added protection of this CAMCORDER during a
lightning storm or when it is left unattended and unused
20. OUTDOOR ANTENNA GROUNDING:
for long periods of time, unplug it from the wall outlet
CAMCORDER, be sure the antenna or cable system is
and disconnect the antenna or cable system. This will
grounded to provide some protection against voltage
prevent damage to the CAMCORDER due to lightning
surges and built-up static charges, Section 810 of the
and powerline surges.
National Electrical Code, ANSI/NFPA No.
vi_English
22. POWER LINES:
An outside antenna system should not be located in
the vicinity of overhead power lines or other electric
light or power circuits where it can fall into such
power lines or circuits. When installing an outside
antenna system, extreme care should be taken to
keep from touching such power lines or circuits as
contact with them might be fatal.
23. OVERLOADING:
Do not overload wall outlets and extension cords as
this can result in a risk of fire or electric shock.
24. OBJECTS AND LIQUIDS:
Never push objects of any kind into this
CAMCORDER through openings as they may touch
dangerous voltage points or short out a part that
could result in a fire or electric shock. Never spill
liquids of any kind onto the CAMCORDER. Should
spillage occur, unplug unit and have it checked by
a technician before use.
25. SERVICING:
Do not attempt to service this CAMCORDER
yourself. Opening or removing covers may expose
you to dangerous voltage or other hazards. Refer all
servicing to qualified service personnel.
26. DAMAGE REQUIRING SERVICE:
Unplug this CAMCORDER from the wall outlet and
refer servicing to qualified service personnel under
the following conditions:
a. When the power-supply cord or plug is
damaged.
b. If any liquid has been spilled onto, or objects
have fallen into the CAMCORDER.
c. If the CAMCORDER has been exposed to rain
or water.
d. If the CAMCORDER does not operate normally
by following the operating instructions, adjust
only those controls that are covered by the
operating instructions. Improper adjustment
of other controls may result in damage and
will often require extensive work by a qualified
technician to restore the CAMCORDER to its
normal operation.
e. If the CAMCORDER has been dropped or the
cabinet has been damaged.
f. When the CAMCORDER exhibits a distinct
change in performance, this indicates a need for
service.
27. REPLACEMENT PARTS:
When replacement parts are required, be sure the
service technician has used replacement parts
specified by the manufacturer and having the same
characteristics as the original part. Unauthorized
substitutions may result in fire, electric shock or
other hazards.
28. SAFETY CHECK:
Upon completion of any service or repairs to
this CAMCORDER, ask the service technician
to perform safety checks to determine that the
CAMCORDER is in safe operating order.
English_vii
important safety instructions
29. To prevent damage which may result in fire or shock
hazard, do not expose this appliance to rain or
moisture.
30. If this power supply is used at 240V ac, a suitable
plug adapter should be used.
31. This product is covered by one or more of the
following U.S. patents:
5,060,220 5,457,669 5,561,649 5,705,762 5,987,417
6,043,912 6,222,983 6,272,096 6,377,524 6,377,531
6,385,587 6,389,570 6,408,408 6,466,532 6,473,736
6,477,501 6,480,829 6,556,520 6,556,521 6,556,522
6,578,163 6,594,208 6,631,110 6,658,588 6,674,697
6,674,957 6,687,455 6,697,307 6,707,985 6,721,243
6,721,493 6,728,474 6,741,535 6,744,713 6,744,972
6,765,853 6,765,853 6,771,890 6,771,891 6,775,465
6,778,755 6,788,629 6,788,630 6,795,637 6,810,201
6,862,256 6,868,054 6,894,963 6,937,552
USER INSTALLER CAUTION:
Your authority to operate this FCC certified equipment could
be voided if you make changes or modifications not expressly
approved by this party responsible for compliance to part 15
FCC rules.
NOTE:
Hg LAMP(S) INSIDE THIS PRODUCT CONTAIN MERCURY AND
MUST BE RECYCLED OR DISPOSED OF ACCORDING
TO LOCAL, STATE OR FEDERAL LAWS. For details see
lamprecycle.org, eiae.org, or call 1-800-Samsung (7267864)
CALIFORNIA USA ONLY
This Perchlorate warning applies only to primary CR
(Manganese Dioxide) Lithium coin cells in the product sold
or distributed ONLY in California USA
“ Perchlorate Material - special handling may apply,
See www.dtsc.ca.gov/hazardouswaste/perchlorate.”
viii_English
NOTE: This equipment has been tested and found to comply
with the limits for a Class B digital device, pursuant to part 15
of the FCC Rules.
These limits are designed to provide reasonable protection
against harmful interference in a residential installation.
This equipment generates, uses and can radiate radio
frequency energy and, if not installed and used in accordance
with the instructions, may cause harmful interference to
radio communications. However, there is no guarantee that
interference will not occur in a particular installation.
If this equipment does cause harmful interference to radio or
television reception, which can be determined by turning the
equipment off and on, the user is encouraged to try to correct
the interference by one or more of the following measures:
- Reorient or relocate the receiving antenna.
- Increase the separation between the equipment and
receiver.
- Connect the equipment into an outlet on a circuit different
from that to which the receiver is connected.
- Consult the dealer or an experienced radio/TV technician
for help and for additional suggestions.
The user may find the following booklet prepared by the
Federal Communications Commission helpful : “How to
Identify and Resolve Radio-TV Interference Problems.”
This Booklet is available from the U.S. Government
Printing Office, Washington, D.C. 20402, Stock No.
004-000-00345-4.
FCC Warning
The user is cautioned that changes or modifications not
expressly approved by the manufacturer could void the user’s
authority to operate the equipment.
This device complies with Part 15 of FCC Rules.
Operation is subject to the following two conditions;
(1) This device may not cause harmful interference, and
(2) This device must accept any interference received,
including interference that may cause undesired operation.
precautions
Warning!
This camcorder should always be connected to an AC outlet with a protective grounding connection.
Caution
Danger of explosion if battery is incorrectly replaced.
Replace only with the same or equivalent type.
If this power supply is used at 240V ac, a suitable plug adaptor should be used.
CLASS 1 LASER PRODUCT
KLASSE 1 LASER PRODUKT
LUOKAN 1 LASER LAITE
KLASS 1 LASER APPARAT
PRODUCTO LASER CLASE 1
English_ix
important information on use
BEFORE USING THIS CAMCORDER
• This memory camcorder records video in MPEG4 format and at Standard Resolution (SD-VIDEO).
• Please note that this memory camcorder is not compatible with other digital video formats.
• Before recording important video, make a trial recording.
- Play back your trial recording to make sure the video and audio have been recorded properly.
- Samsung cannot compensate for any damage caused when a recording
cannot be played back because of a defect in the memory camcorder or memory card.
Samsung cannot be responsible for your recorded video and audio.
- Recorded contents may be lost due to a mistake when handling this memory camcorder or memory card,
etc. Samsung shall not be responsible for compensation for damages due to the loss of recorded
contents.
• Make a backup of important recorded data
- Protect your important recorded data by copying the files to a PC. We also recommend you copy it from
your PC to other recording media for storage. Refer to the software installation and USB connection guide.
• Copyright: Please note this memory camcorder is intended for individual use only.
- Data recorded on the card in this memory camcorder using other digital/analog media or devices is protected
by the copyright act and cannot be used without permission of the owner of copyright, except for personal
enjoyment. Even if you record an event such as a show, performance or exhibition for personal enjoyment,
it is strongly recommended that you obtain permission beforehand.
_English
precautions on use
IMPORTANT NOTE
• Handle the liquid crystal display (LCD) with care:
- The LCD is a very delicate display device: Do not press its surface with excessive force, hit it or prick it with a
sharp object.
- If you push the LCD surface, unevenness in display may occur. If unevenness does not disappear, turn the
camcorder off, wait for a few moments, and then turn it on again.
- Do not place the camcorder with the open LCD screen down.
- Close the LCD monitor when not using the camcorder
• Liquid crystal display:
- The LCD screen is a product of high precision technology. Out of the total pixels (approx. 112,000 pixels of an
LCD monitor ), 0.01% or less pixels may be out (black dots) or may remain lit as colored dots (red, blue, and
green). This shows the limitations of the current technology, and does not indicate a fault that will interfere with
recording.
- The LCD screen will be slightly dimmer than usual when the camcorder is at low temperature, as in cold
areas, or right after the power is turned on. Normal brightness will be restored when the temperature inside
the camcorder rises. This has no effect on the images in the storage media, so there is no cause for concern.
• Hold the memory camcorder correctly:
- Do not hold the memory camcorder by the LCD monitor when lifting it: the LCD monitor could detach and
the memory camcorder may fall.
• Do not subject the memory camcorder to impact:
- This memory camcorder is a precision machine. Take great care that you do not strike it against a hard
object or let it fall.
- Do not use the memory camcorder on a tripod in a place where it is subject to severe vibrations or impact.
• No sand or dust!
- Fine sand or dust entering the memory camcorder or AC power adaptor could cause malfunctions or
defects.
English_xi
precautions on use
• No water or oil!
- Water or oil entering the memory camcorder or AC power adaptor could cause electric shock, malfunctions
or defects.
• Heat on surface of product:
- The surface of the memory camcorder will be slightly warm when in use, but this does not indicate a fault.
• Be careful of unusual ambient temperature:
-U
sing the memory camcorder in a place where the temperature is over 140°F (40°C) or lower than 32°F (0°C)
may result in abnormal recording/playback.
- Do not leave the memory camcorder on a beach or in a closed vehicle where the temperature is very high
for a long time: This could cause a malfunction.
• Do not point directly at the sun:
- If direct sunlight strikes the lens, the memory camcorder could malfunction or a fire could occur.
- Do not leave the memory camcorder with the LCD screen exposed to direct sunlight:
This could cause a malfunction.
• Do not use the memory camcorder near TV or radio:
- This could cause noise to appear on the TV screen or in radio broadcasts.
• Do not use the memory camcorder near strong radio waves or magnetism:
- If the memory camcorder is used near strong radio waves or magnetism, such as near a radio transmitter
or electric appliances, noise could enter video and audio that are being recorded. During playback
of normally recorded video and audio, noise may also be present in picture and sound.
At worst the memory camcorder could malfunction.
xii_English
• Do not expose the memory camcorder to soot or steam:
- Thick soot or steam could damage the memory camcorder case or cause a malfunction.
• Do not use the memory camcorder near corrosive gas:
- If the memory camcorder is used in a place where there is dense exhaust gas generated by gasoline or diesel
engines, or corrosive gas such as hydrogen sulfide, the external or internal terminals could corrode, disabling
normal operation, or the battery connection terminals could corrode, so that power will not turn on.
• Do not use the memory camcorder near an ultrasonic humidifier:
- Calcium and other chemicals dissolved in water could scatter in the air, and white particles could adhere to
the optical head of the memory camcorder, which could cause it to operate abnormally.
• Do not clean the memory camcorder body with benzene or thinner:
- The coating of exterior could peel off or the case surface could deteriorate.
- When using a chemical cleaning cloth, follow the instructions.
• Keep the memory card out of reach of children to prevent swallowing.
English_xiii
precautions on use
ABOUT THIS USER MANUAL
• T
his User Manual covers models SC-MX10, SC-MX10P, SC-MX10A and SC-MX10AU.
The SC-MX10A and SC-MX10AU have a built-in 4 GB flash memory, but also use Memory cards. The SC-MX10,
SC-MX10P does not have built-in flash memory and uses Memory cards exclusively.
Although some features of SC-MX10, SC-MX10P, SC-MX10A and SC-MX10AU are different, they operate in the
same way.
• Illustrations of model SC-MX10A are used in this user manual.
• The displays in this user manual may not be exactly the same as those you see on the LCD screen.
• Designs and specifications of storage media and other accessories are subject to change without any notice.
NOTES REGARDING A TRADEMARK
• A
ll the trade names and registered trademarks mentioned in this manual or other documentation provided with
your Samsung product are trademarks or registered trademarks of their respective holders.
• Windows® is registered trademark or trademark of Microsoft Corporation, registered in the United States and
other countries.
• Macintosh is trademark of Apple Computer, Inc.
• All the other product names mentioned here in may be the trademark or registered trademarks of their respective
companies.
• Furthermore, “TM” and “R” are not mentioned in each case in this manual.
xiv_English
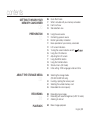
contents
GeTTING TO KNOW YOUR
memory camcorder
06
07
08
09
Quick Start Guide
What's included with your memory camcorder
Front & left view
Side & bottom view
PREPARATION
10
12
20
21
22
25
26
27
27
28
29
30
Using the accessories
Connecting a power source
Button type battery installation
Basic operation of your memory camcorder
LCD screen indicators
Turning the screen indicators on/off (
Using the LCD enhancer
Adjusting the LCD screen
Using the MENU button
Using the Control buttons
Shortcut menu (OK Guide)
Initial setting : OSD Language & date and time
06
10
about the storage media
32
)
32Selecting the storage media
(SC-MX10A/MX10AU only)
33 Inserting / ejecting the memory card
34 Selecting the suitable memory card
36 Recordable time and capacity
recording
38
38
40
41
Recording movie images
Recording with ease for beginners (EASY.Q mode)
Zooming In and out
playback
42
Movie Images playback
English_0
contents
recording options
45
47
48
48
49
50
51
52
53
54
55
55
56
56
Changing the menu settings
Menu items
Recording menu items
Scene Mode (AE)
White Balance
Exposure
Anti-shake(EIS)
Digital Effects
Focus
Back Light
16:9 Wide
Quality
Resolution
Digital Zoom
play back options
57
58
59
60
61
61
Setting the play option
Deleting movie images
Protecting movie images
Copying movie images (SC-MX10A/MX10AU only)
16:9 Wide
File Information
SETTING OPTIONS
62
63
64
64
64
64
65
65
65
66
Changing the menu settings in "Settings"
Setting menu items
Date/Time set
Date format
Time format
Date/Time
LCD Brightness
LCD color
Auto Power Off
Beep Sound
45
57
62
04_English
66
66
67
67
68
68
68
68
68
File no.
Memory type (SC-MX10A/MX10AU only)
Memory info
Format
Default set
Version
Language
USB Connect
Demo
usb interface
69
71
73
74
75
76
System requirements
Installing the software
Connecting the USB cable
Viewing the contents of storage media
Transferring files from the memory camcorder to your PC
Using the PC Cam function
connection
77
78
Viewing on TV Screen
Recording (Dubbing) Images on Other Video Devices
maintenance & additional
information
79
80
Maintenance
Additional information
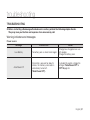
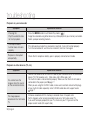
Troubleshooting
81
Troubleshooting
Specifications
93
warranty (sea users only)
94
69
English_0
quick start guide
• This chapter introduces you to the basic features of your memory camcorder.
• See the reference pages for more information.
Step1
Preparation
• Connecting a power source ➥page 12
• Check out the storage media ➥page 32
• Setting the Date/Time and OSD Language ➥page 30
Step2
Recording
• Recording the movie ➥page 38
Step3
Playing back
• Selecting an image to play back from the thumbnail index views ➥page 42
• Viewing playback from your camcorder on your PC or TV
➥page 73, 77
06_English
2
1
getting to know your memory camcorder
WHAT'S INCLUDED with YOUR Memory Camcorder
Your new memory camcorder comes with the following accessories. If any of these items is missing from your box,
call Samsung’s Customer Care Center.
✪ The exact shape of each item may vary by model.
Battery pack
(IA-BP85ST)
AD43-00180A
AC power adapter
(AA-E9 type)
AD44-00116A
Multi-AV cable
AD39-00119D
USB cable
AD39-00132A
Software CD
AD46-00093B,
AD46-00097A
User manual
AD68-01307A
Button type battery
(type: CR2025)
AD43-10130H
Lens cover
AD97-13002A
Lens cover strap
AD72-00049A
Quick start guide
AD68-01310A
Pouch
AD69-00932A
SD Card
1109-001375
• The contents may vary depending on the sales region.
• Parts and accessories are available at your local Samsung dealer.
Cradle*
AD97-13017A
* :The Cradle is not supplied with your camcorder. To buy this optional accessory, contact
your nearest Samsung dealer.
English_0
getting to know your memory camcorder
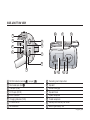
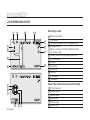
FRONT & LEFT VIEW
11
1
2
3
4
5
6
8
7
1
2
3
4
5
6
Lens
Internal microphone
MENU button
OK button
Control button (
Recording start/stop button
08_English
7
8
9
10
)
11
LCD screen
Built-in speaker
button
LCD ENHANCER (
Zoom lever (W/T)
9
10
) button
Side & Bottom View
10
1
2
9
3
8
4
11
12
7
6
5
1
2
3
4
5
6
7
8
MODE indicator (record(
Multi cable jack (AV/ S )
USB jack (USB)
DC IN jack (DC IN)
EASY.Q button
Charging indicator (CHG)
POWER switch
MODE button
16
) / player (
))
9
10
11
12
13
14
15
16
15
14 13
Recording start/stop button
Grip belt
Swivel Hand-grip
Grip belt hook
Tripod receptacle
Cradle receptacle
Memory card /Battery slot cover
Button type battery slot
English_0
preparation
This section provides information on using this memory camcorder : such as how to use the
provided accessories, how to charge the battery, how to setup the operation mode and initial setup.
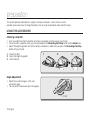
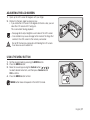
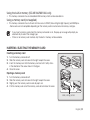
USING THE ACCESSORIES
Attaching a Grip Belt
• Insert your right hand from the bottom of memory camcorder up to the base of your thumb.
• Put your hand in a position where you can easily operate the Recording start/stop button and the Zoom lever.
• Adjust the length of grip belt so that the memory camcorder is stable when you press the Recording start/stop
button with your thumb.
1. Detach the belt.
2. Adjust the length of grip belt.
3. Attach the belt.
1
2
3
Angle Adjustment
• Rotate the swivel hand-grip at the most
convenient angle.
• You can rotate it downward upto 150 degrees.
0˚~150˚
10_English
Attaching a Lens Cap
Pass the provided string through the hole in the grip belt attachment part
and pass it through the hole in the lens cap.
1.
Attach the lens cap string to lens cap.
Shorter side is for the lens cap.
2. Attach the string to the attachment hole of memory camcorder.
Detaching the grip belt makes things easier.
3. Push both sides of cap inward and attach it over the lens.
Using the cradle (optional accessory)
The Cradle is a connection plate which can be used to make the camcorder
more stable when charging the battery,or connecting to a TV or a PC.
Cradle
receptacle
DC IN
jack
USB jack
Multi cable jack
English_11
preparation
CONNECTING A POWER SOURCE
• There are two types of power source that can be connected to your memory camcorder.
• Do not use provided power supply units with other equipment.
- The battery pack: used for outdoor recording.
- The AC power adapter : used for indoor recording. ➥page 19
Insert
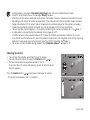
To Charge the Battery Pack
• Be sure to charge the battery pack before you start using your memory
camcorder.
Battery Pack installation / ejection
It is recommended you purchase one or more additional battery packs to allow
continuous use of your memory camcorder.
Inserting the battery pack
1. Slide and open the battery slot cover as shown in the figure.
2. Insert the battery pack into the battery slot until it softly clicks.
• Make sure that the SAMSUNG logo is facing up and the camcorder
is placed as shown in the figure.
3. Slide and close the battery slot cover
Ejecting the battery pack
1. Slide and open the battery slot cover and push the battery lock.
• Gently push the battery lock in the direction as shown in the figure to eject
the battery out.
2. Pull the ejected battery out in the direction as shown in the figure.
3. Slide and close the battery slot cover.
12_English
Eject
About battery packs
• T
he battery pack should be recharged in an environment that is between 32°F (0°C) and 104°F (40°C).
However, when it is exposed to cold temperatures (below 32°F (0°C)), its usage time becomes reduced and it may
cease to function. If this happens, place the battery pack in your pocket or other warm, protected place for a short
time, then reattach it to the memory camcorder.
• The recording time shortens dramatically in a cold environment. The continuous recording times in the operating
instructions are measured using a fully charged battery pack at 77 °F (25 °C). As the environmental temperature
and conditions vary, the remaining battery time may differ from the approximate continuous recording times given
in the instructions.
On handling a battery pack
• To preserve battery power, keep your memory camcorder turned off when you are not operating it.
• For power saving purposes, the memory camcorder automatically turns off after 5 minutes in standby mode.
(Only if you set "Auto Power Off" from the menu to "On" (5 min).)
• Do not touch or let metallic objects come into contact with the terminals.
• Make sure that the battery pack fits firmly into place. Do not drop the battery pack as it may cause damage.
• Be careful to keep the battery pack out of the reach of children. There is danger that a child might swallow it.
• Frequent use of the LCD screen or using the fast forward or rewind buttons wears out the battery pack faster.
English_13
preparation
• The recording time is affected by temperature and environmental conditions.
• We recommend only using the original battery pack that is available from your Samsung retailer. When the battery
reaches the end of its life, please contact your local dealer. The batteries have to be dealt with as chemical waste.
• Clean the terminals to remove any foreign substances before inserting the battery.
• Do not put the battery pack near any heat source (i.e. fire or a heater).
• Do not disassemble, apply pressure to, or heat the battery pack.
• Do not allow the + and - terminals of the battery pack to be short-circuited.
It may cause leakage, heat generation, induce overheating or fire.
- Do not expose the battery pack to water. The battery pack is not water resistant.
• When fully discharged, a battery pack damages the internal cells.
The battery pack may be prone to leakage when fully discharged.
• Remove the battery from the camcorder when it is not in use. Even when the power is switched off, the battery
pack will still discharge if it is left attached to the memory camcorder.
• When not using the memory camcorder for an extended period:
It is recommended that you fully charge the battery pack once a year, attach it to memory camcorder and use it up
: then remove the battery pack and store it in a cool place again.
About the battery life
• Battery capacity decreases over time and through repeated use. If decreased usage time between charges
becomes significant, it is probably time to replace it with a new one.
• Each battery's life is affected by storage, operating and environmental conditions.
Use only Samsung-approved battery packs. Do not use batteries from other manufacturers.
Otherwise, there is a danger of overheating, fire or explosion.
Samsung is not responsible for problems occurring due to using unapproved batteries.
14_English
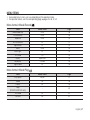
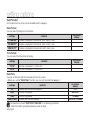
Charging, recording and playback times with fully charged battery pack
(with no zoom operation, etc.)
• For your reference, the approximate time with fully charged battery pack:
Battery type
IA-BP85ST
Charging time
approx. 2 hr.
Media
Built-in
memory
SDHC/
MMCplus
Mode
Super Fine
Fine
Normal
Continuous
recording time
approx. 115min.
approx. 120min.
approx. 125min.
Playback time
approx. 230min.
approx. 230min.
approx. 230min.
Continuous
recording time
approx. 120min.
approx. 125min.
approx. 130min.
Playback time
approx. 230min.
approx. 230min.
approx. 230min.
- The time is only for reference. Figures show above are measured under Samsung's test environment, and may differ from your actual use.
Continuous Recording (without zoom)
The continuous recording time of memory camcorder in the table shows the available recording time when the
memory camcorder is in the recording mode without using any other functions.
In actual recording, the battery pack may discharge 2-3 times faster than this reference since the record start/stop
and zoom are being operated, and playback is performed. Assume that the recordable time with a fully charged
battery pack is between 1/2 and 1/3 of the time in the table, and prepare type and number of battery packs to allow
for the time you are planning to record on the memory camcorder.
Note that the battery pack discharges faster in cold environment.
The charging time will vary depending on the remaining battery level.
English_15
preparation
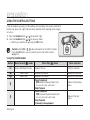
To check the remaining battery charge
• When the camcorder is turned off (battery is installed) press and release the
button to display the remaining capacity of the battery capacity.
• When the camcorder is turned on (battery is installed) press and hold the
button for more than 2-3 seconds to display the remaining
battery capacity. Press the
button again or any other button to
return to the initial OSD while the battery information is displayed.
•
•
When the battery is installed and the AC adapter is connected,
if you press
button, the remaining battery capacity
is displayed.
When the AC adapter alone is connected, pressing the
button will display "No Battery" message.
Battery
0%
50%
154 Min
Memory (Super Fine)
120 Min
60 Min
Recording capacity (approx.)
Remaining battery(approx.)
16_English
100%
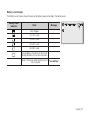
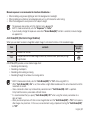
Battery Level Display
The Battery Level Display shows the amount of battery power remaining in the battery pack.
Battery Level
Indicator
State
Message
Fully charged
-
20~40% used
-
40~60% used
-
60~80% used
-
80~95% used
-
Exhausted(flickers): The device will soon turn off.
Change the Battery Pack as soon as possible.
-
(flickers): The device will be forced to turn off
after 5 seconds.
"Low battery"
STBY 00:00:00/00:58:00
120
MIN
English_17
preparation
Charging the Battery Pack
1
The IA-BP85ST battery pack provided with this memory camcorder may be
charged a little at purchase time: Charge it fully before using the memory camcorder.
• Use IA-BP85ST battery pack only.
1.
2.
3.
4.
Slide the POWER switch downward to turn off the power.
Insert the battery pack.
Open the LCD screen and jack cover.
Connect the AC power adapter to the DC IN jack of your
memory camcorder.
5. Connect the AC power adapter to a wall socket.
• The charging indicator will start to blink, showing that the battery pack is
charging.
6. When the battery pack is fully charged, disconnect the AC power adapter
from the memory camcorder.
Even if your camcorder is turned off, AC power (house current) is still
supplied to it while connected to the wall outlet via the AC power adaptor.
•
CAUTION
•
•
Do not use the AC adaptor placed in a narrow space, such as between a
wall and furniture.
Before detaching the power source, make sure that the camcorder’s
power is turned off. Failure to do so can result in camcorder malfunction.
Use a nearby wall outlet when using the AC power adaptor. Disconnect
the AC power adaptor from the wall outlet immediately if any malfunction
occurs while using your camcorder.
18_English
2
3
5
4
Charging indicator
Tips for battery identification
• The color of the LED indicates charging status.
- If the battery has been fully charged, the charge indicator is green.
If you are charging the battery, the color of the charge indicator is orange.
The charge indicator flickers if the battery is abnormal.
Color
Charging state
Orange
Charging
Green
Fully Charged
Using memory camcorder with AC power adaptor
It is recommended that you use the AC power adaptor to power the
memory camcorder from a household AC outlet when you perform settings on it,
play back, or use it indoors.
- Make the same connections as you do when charging the battery pack.
➥page 18
•
•
Be sure to use the provided AC power adaptor to power the memory camcorder.
Using other AC power adaptors could cause electric shock or result in fire.
The AC power adaptor can be used around the world. An AC plug adaptor is required in some foreign
countries. If you need one, purchase it from an electronics store.
English_19
preparation
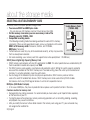
BUTTON TYPE BATTERY INSTALLATION
• The button type battery maintains the clock function and preset contents of the
memory : even if the battery pack or AC power adapter is removed.
1. Insert the button type battery in the battery slot on the bottom of the memory
camcorder.
2. Position the button type battery with the positive ( + ) terminal face down
in the button type battery slot.
Precautions regarding the button type battery
•
There is a danger of explosion if button type battery is incorrectly replaced.
Replace only with the same or equivalent type.
Battery installation for the internal clock
The button type battery for the memory camcorder lasts about 6 months under
normal operation from the time of installation.
When the button type battery becomes weak or dead, the date/time indicator will
display "2007/01/01 12:00AM " when you turn the date and time display on.
WARNING
Keep the button type battery out of reach of children.
Should a battery be swallowed, consult a doctor immediately.
20_English
BASIC OPERATION OF YOUR MEMORY CAMCORDER
This section explains the basic techniques of recording movies, and also basic settings on your memory camcorder.
Set the appropriate operation mode according to your preference using POWER switch and MODE button.
Turning memory camcorder on or off
You can turn the power on or off by sliding the POWER switch down.
• Slide the POWER switch repeatedly to toggle the power on or off.
•
•
Power saving function
- In the setting at the time of purchase, the power turns off
automatically if you leave your camcorder without any performing
any operation for approximately 5 minutes, to save the battery
power. ➥page 65
If warning messages appear on the screen, follow the instructions.
➥page 81
Setting the operating modes
• You can switch the operating mode in the following order each time you
press the MODE button.
• Movie Record mode (
) ➔ Movie Play mode (
) ➔ Movie Record mode (
)
• Each time the operational mode changes, the respective mode indicator lights up.
- Movie Record mode (
): To record movie images.
- Movie Play mode (
): To play movie images.
English_21
preparation
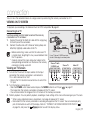
LCD SCREEN INDICATORS
1
2
3
Movie Record mode
4
1
2
120
MIN
STBY 00:00:00/00:58:00
5
17
6
16
7
15
8
3
4
9
14
10
EASY.Q
2007/01/01 12:00AM
11
5
6
7
8
13
15
12
9
12
10
11
•
•
•
•
The above screen is an example for explanation:
The displays in this user manual may not be exactly
the same as those you see on the LCD screen.
The OSD indicators are based on memory capacity
of 2GB(MMC plus).
Functions marked with * won’t be kept when the
memory camcorder is shut down.
For enhanced performance, the display indications and
the order are subject to change without prior notice.
22_English
12
13
14
15
16
17
Movie Record mode
Operating status
([STBY](standby) or [ ] (recording))
Time counter
(movie recording time: remaining recordable time)
Storage media
(Built-in memory (SC-MX10A/MX10AU only)
or memory card)
Battery info.(Remaining battery level/time)
LCD Enhancer *
Anti-Shake(EIS) (Electronic Image Stabilizer)
Focus *
Back Light *
Digital Effect
EASY.Q *
Zoom (Optical zoom / Digital zoom)
Date/Time
White balance
Scene Mode (AE) / Exposure (Manual) *
Video quality
Resolution
LCD SCREEN INDICATORS
Movie Record mode: Shortcut menu (OK Guide)
120
MIN
STBY 00:00:00/00:58:00
1
2
3
5
4
4
WB
5
3
2
1
1
2
Movie Play mode
3
4
5
6
1
2
Delete
3
120
MIN
100-0001
7
4
5
10
8
6
7
9
Move
Screen size (16:9 Wide/4:3)
Focus (Auto Focus/Manual Focus) *
Shortcut menu (OK Guide) / Return
White balance *
Exposure (Auto Exposure/Manual Exposure)
OK
Play
MENU
Exit
8
9
10
Movie Play mode
Menu name (Delete, Protect, Copy)
Protect
File Name
Storage media
(Built-in memory (SC-MX10A/MX10AU only)
or memory card)
Battery info. (Remaining battery level/time)
Copy Selected (SC-MX10A/MX10AU only)
Scroll bar
Button Guide
Delete Selected
English_23
preparation
LCD SCREEN INDICATORS
1
2
3
Movie Play mode
4
1
00:00:00/00:23:00
120
MIN
12
5
6
11
2
3
4
7
5
10
6
7
9
2007/01/01 12:00AM
100-0001
8
8
9
10
00:00:00/00:23:00
120
MIN
11
12
Movie Play mode
Play Status
Time code (Elapsed time / Recorded time)
Storage media
(Built-in memory (SC-MX10A/MX10AU only)
or memory card)
Battery info.(Remaining battery level/time)
LCD Enhancer *
Protect
File Name
Date/Time
Volume
Play Option
Resolution
Movie Play mode: Shortcut menu (OK Guide)
6
1
5
2
4
3
ZOOM
3
24_English
100-0001
List
2
1
4
5
6
FF(fast forward)
Volume Down
Button Guide
Play/Pause
REW(rewind)
Volume Up
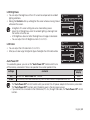
TURNING THE SCREEN INDICATORS ON/OFF (
)
Switching the information display mode
• You can switch the display mode of on-screen information:
Press the
button.
The full and minimum display modes will alternate.
• Full display mode: All types of information will appear.
• Minimum display mode: Only operating status indicator will appear.
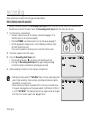
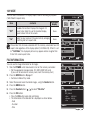
Checking the remained battery and memory capacity
• When the camcorder is turned off (battery is installed) press and release the
button to display the remaining capacity of the battery capacity.
• When the camcorder is turned on (battery is installed) press and hold the
button for more than 2-3 seconds to display the remaining
battery capacity.
• The approximate recordable time in the selected storage (Internal Memory or
Memory Card) and battery information appear for about 10 seconds.
Battery
0%
50%
100%
154 Min
Memory (Super Fine)
120 Min
60 Min
Recording capacity (approx.)
Remaining battery(approx.)
English_25
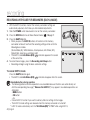
preparation
USING THE LCD ENHANCER
• Contrast is enhanced for a clear and bright image on the LCD screen.
This effect is also implemented outdoors in bright daylight.
1. Press the LCD ENHANCER (
) button.
The selected function icon is displayed.
2. To exit LCD ENHANCER, press the LCD ENHANCER (
) button again.
LCD ENHANCER function does not affect the quality of the image being
recorded.
STBY 00:00:00/00:58:00
LCD POWER SAVING FUNCTION
• The LCD screen is turned off after a certain period of time has passed (see below) in each mode
in order to prevent unnecessary battery power consumption.
• Press any button to go back and turn on the LCD screen.
Mode
Movie
Sub-mode
STBY
Mode
Time
10 min
26_English
Play
While
Play
(thumbnail
Recording (single view)
view)
None
None
10 min
Settings
USB
Demo
Mode
-
PC
Camera
Mass
Storage
None
60 sec
60 sec
60 sec
120
MIN
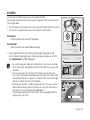
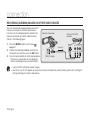
ADJUSTING THE LCD SCREEN
1. Open up the LCD screen 90 degrees with your finger.
2. Rotate it to the best angle to record or play.
• If you rotate the LCD screen 180 degrees to the lens side, you can
close the LCD screen with it facing out.
This is convenient during playback.
•
•
WARNING
See page 65 to adjust brightness and color of the LCD screen.
Over-rotation may cause damage to the inside of the hinge that
connects the LCD screen to the memory camcorder.
Do not lift the memory camcorder with holding the LCD screen.
It can be a cause of sudden fall.
USING THE MENU BUTTON
1. Set the desired mode by pressing the MODE button.
2. Press the MENU button.
3. Move the cursor by pressing the Control button ( / / / ).
to select desired menu item, and then press Control button
OK to confirm.
4. Press the MENU button to finish.
MENU button dose not operate in the EASY.Q mode.
English_27
preparation
USING THE CONTROL BUTTONS
Used for playback, pausing, fast forwarding, and rewinding. Also used as directional
buttons (up, down, left, right) and to make a selection when selecting movie images
or menus.
1. Press the Control button ( / ) to move left / right.
2. Press the Control button ( / ) to move up / down.
• Confirm your selection by pressing the OK button.
•
•
Control button (OK / ( / )) does not operate in the EASY.Q mode.
Using the OK button, you may directly access the shortcut menu.
➥page 29
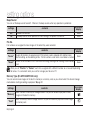
Using the Control button
Button
OK
Movie Record(
) mode
Access the Shortcut menu
Zoom (wide)
Zoom (tele)
-
-
28_English
Movie Play(
) mode
Menu selection
Playback /Pause
Confirms selection
Increases the volume
Decreases the volume
- Search playback
RPS (Reverse Playback Search) rate:
x2→x4→x8→x16→x32→x64
- Skip Playback
- Search playback
FPS (Forward Playback Search) rate:
x2→x4→x8→x16→x32→x64
- Skip Playback
- Frame-by-frame playback
Moves the cursor up
Moves the cursor down
Moves to the previous
menu
Moves to the next
menu
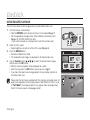
SHORTCUT MENU (OK GUIDE)
Shortcut menu (OK guide) represents the most frequently accessed functions
according to the selected mode.
1. Press the OK button.
• Shortcut menu (OK guide) is displayed.
2. Press the Control button ( / / / ) to control the setting.
3. Press the OK button to confirm your selection.
OK
• Press the OK button to exit the shortcut menu.
STBY 00:00:00/00:58:00
120
MIN
WB
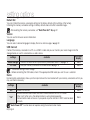
Shortcut function using the Control buttons
Button
OK
Movie Record(
)mode
- Access the shortcut menu
- Confirm selection
- Exit the shortcut menu
Exposure (Auto / Manual)
Focus (Auto / Manual)
White Balance
(Auto ~ Custom WB)
16 : 9 Wide
(Off / On)
Movie Play(
) mode
- Shortcut menu (OK guide) is displayed
- Playback /Pause
lncreases the volume
Decreases the volume
- Search playback
RPS (Reverse Playback Search) rate: x2→x4→x8→x16→x32→x64)
- Skip Playback
- Search playback
FPS (Forward Playback Search) rate: x2→x4→x8→x16→x32→x64)
- Skip Playback
- Frame-by-frame playback
OK button dose not operate in the EASY.Q mode.
English_29
preparation
INITIAL SETTING : OSD LANGUAGE & DATE AND TIME
• Initial setting is available in all operating modes.
• To read the menus or messages in your desired language, set the OSD language.
To store the date and time during recording, set the date/time.
How to set the settings mode
1.
2.
3.
4.
Slide the POWER switch downward to turn on the memory camcorder.
Press the MENU button.
Press the Control button ( / ) to select "Settings".
Press the OK button.
• The settings menu screen appears.
OK MENU
Control
POWER
Selecting the OSD language
You can select the desired language to display the menu screen and the messages.
1. Set the "Settings" mode.
• The settings menu screen appears.
• Refer to "How to set the settings mode" for accessing to " Settings " mode.
2. Press the Control button ( / ) to select "Language".
3. Press the Control button ( / ) to select the desired OSD language,
and then press the OK button.
• English / 한국어 / Français / Deutsch / Italiano / Español / Português /
Nederlands / Svenska / Suomi / Norsk / Dansk / Polski / Magyar /
Українська / Русский /
/
/ Türkçe / Iranian / Arabic
4. Press the MENU button to exit the menu.
• The OSD language is refreshed in the selected language.
Even if the battery pack or AC power are removed, the language
setting will be preserved.
• "Language" options may be changed without prior notice.
30_English
•
Video
120
MIN
Settings
OK
Move
OK
Select
MENU
Exit
Settings
120
MIN
Language
English
Français
Move
OK
Select
MENU
Exit
Setting Date and Time
Set the current date and time so that the date and time at which you make a
recording can be recorded correctly.
The following procedure can also be used to correct the date and time
you have already set.
1. Set the "Settings" mode.
• The settings menu screen appears.
• Refer to "How to set the settings mode" for accessing to " Settings " mode.
➥page 30.
2. Press the Control button ( / ) to select "Date/Time Set" and then
press the OK button.
3. Set the desired value by moving the Control button ( / ).
4. Move to the next item by moving the Control button ( / ), and then
set values by moving the Control button ( / ).
• Items are displayed in the order of the date format.
• By default, the Date/Time setting appears in the order of year, month, date,
hour, minute and AM/PM.
5. After setting the last item, press the OK button to finish the setting.
• Press the MENU button to exit the menu.
•
•
•
Video
120
MIN
Settings
OK
Move
OK
Select
MENU
Exit
Settings
120
MIN
Date/Time Set
2007
01
12 : 00
01
AM
OK Set
Move
You can set the year up to 2037.
After setting, the date and time are automatically recorded on a
special data area of the storage media.
The button type battery maintains the clock function and preset contents of
the memory : even if the battery pack or AC power adapter is removed.
The button type battery for the memory camcorder lasts about 6 months
under normal operation from the time of installation.
When the button type battery becomes weak or dead, the date/time indicator will
display "2007/01/01 12:00AM " when you turn the date and time display on. ➥page 20.
MENU
Exit
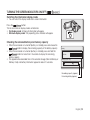
Turning the date and time display on/off
• To switch the date and time display on or off, access the menu and change the date/time
mode. ➥page 64
English_31
about the storage media
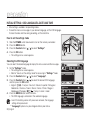
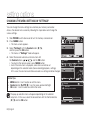
SELECTING THE STORAGE MEDIA (SC-MX10A/MX10AU ONLY)
You can record moving on the built-in memory or a memory card, so you should select the desired storage media
before starting recording or playback.
Selecting the storage media (SC-MX10A/MX10AU only)
• Selecting the recording medium is available in the Movie record / Movie Play modes.
Movie images can be stored and played back using the built-in memory or a memory card.
Set the memory type before recording and playing back images.
1. Press the MENU button.
• The menu list will appear.
2. Press the Control button ( / ) to select "Settings",
then press the OK button.
3. Press the Control button ( / ) to select "Memory Type",
then press the OK button.
4. Press the Control button ( / ) to select "Memory" or "Card"
then press the OK button.
5. Press the MENU button to exit.
32_English
Settings
120
MIN
Memory Type
Memory
Card
Move
OK
Select
MENU
Exit
Using the built-in memory (SC-MX10A/MX10AU only)
• This memory camcorder has an embedded 4GB memory which can be recorded on.
Using a memory card (not supplied)
• This memory camcorder has multi card slot for access to SDHC (Secure Digital High Capacity) and MMCplus.
- Some cards are not compatible depending on the memory card manufacturer and memory card type.
•
•
If you insert a memory card when the memory camcorder is on, the pop-up message will prompt you
automatically to select the storage type.
If there is no memory card inserted, only the built-in memory will be available.
INSERTING / EJECTING THE MEMORY CARD
Inserting a memory card
1. Turn the memory camcorder off.
2. Slide the memory card slot cover to the right to open the cover.
3. Insert the memory card into the memory card slot until it softly clicks
in the direction of the arrow shown in the figure.
4. Close the cover.
Ejecting a memory card
1.
2.
3.
4.
Turn the memory camcorder off.
Slide the memory card slot cover to the right to open the cover.
Slightly push the memory card inwards to pop it out.
Pull the memory card out of the memory card slot and close the cover.
label pasting portion
English_33
about the storage media
SELECTING A SUITABLE MEMORY CARD
A memory card is a compact portable storage media.
Usable Memory Cards
• You can use SDHC and MMC plus cards.
(128MB ~8GB)
- You can also use a SD memory card, but it must be less than 4GB.
• On this memory camcorder, you can use memory cards of the
following capacity: 128MB ~ 8GB
• Compatible recording media
<MMCplus>
Terminals
-The following recording media have been guaranteed to work with this memory
camcorder. Others are not guaranteed to work, so buy such products with caution.
SDHC or SD memory cards: Panasonic, SanDisk, and TOSHIBA,
MMC plus: Transcend
Protection
<SDHC memory card> tab
• If other media are used, they may fail to record data correctly, or they may lose data
that has already been recorded.
• For movie recording, use a memory card that support faster wirte speed(at least 1.25 MB/sec).
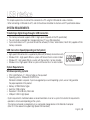
SDHC (Secure Digital High Capacity) Memory Card
• SDHC memory card complies with new SD specification Ver.2.00. This latest specification was established by SD
Card Association to realize data capacity over 2GB.
• The SDHC memory card supports a mechanical write protection switch. Setting the switch prevents accidental
erasure of files recorded on the SDHC memory card. To enable writing, move the switch up to the direction of
terminals. To set write protection, move the switch down.
• Due to change In File Allocation System and physical specifications, SDHC memory card can not be
used with current SD enabled host devices. SDHC memory card can be used with only SDHC enables
host devices which carry SDHC logo on devices its self or on its operation manual.
MMCplus (Multi Media Card plus)
• In the case of MMCplus, they have no protection tab so please use the protect function in the menu.
Common cautions for memory card
• Damaged data may not be recovered. It is recommended you make a back-up of important data separately
on the hard disk of your PC.
• Turning the power off or removing a memory card during operation such as formatting, deleting, recording,
and playback may cause the data loss.
• After you modify the name of a file or folder stored in the memory card using your PC, your camcorder may
not recognize the modified file.
34_English
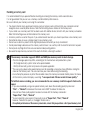
Handling a memory card
It is recommended that you power off before inserting or removing the memory card to avoid data loss.
It is not guaranteed that you can use a memory card formatted by other devices.
Be sure to format your memory card using this camcorder.
• You have to format newly-purchased memory cards or memory cards with data that your camcorder cannot
recognize or are saved by other devices. Note that formatting erases all data on the memory card.
• If you cannot use a memory card that has been used with another device, format it with your memory camcorder.
Note that formatting erases all information on the memory card.
• A memory card has a certain life span. If you cannot record new data, you have to purchase a new memory card.
• Do not bend, drop, or cause a strong impact to your memory card.
• Do not use or store in a place that has high temperature and humidity or dusty environment.
• Do not place foreign substances on the memory card terminals. Use a soft dry cloth to clean the terminals if required.
• Do not paste anything other than exclusive label on label pasting portion.
• Be careful to keep memory card out of the reach of children, who might swallow it.
The memory camcorder supports SDHC and MMCplus memory cards for data storage.
• The data storage speed may differ, according to the manufacturer and production system.
- SLC(single level cell) system: faster write speed enabled.
- MLC(multi level cell) system: only lower write speed supported.
• The user using a lower write speed memory card for recording a movie may have difficulties storing the
movie on the memory card. You can even lose your movie data during the recording.
• In an attempt to preserve any bit of the recorded movie, the memory camcorder forcibly stores the movie
on the memory card and displays a warning: "Low speed card. Please record at lower quality."
To facilitate movie recording, you are recommended to use a memory card that supports faster write
speed.
• If you are unavoidably using a low speed memory card, lower the recording quality by one level
"Fine" → "Normal" or decrease the movie size to 352P to reduce the data size.
• You can have three quality options to record a movie with the memory camcorder :
"Super Fine", "Fine", "Normal"
• You can record the same scene in three quality levels of "Super Fine", "Fine", "Normal".
However, the better the quality is, the bigger the data size is.
• For optimal performance of the memory camcorder, ensure that you purchase a fast speed memory card.
English_35
about the storage media
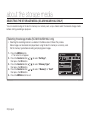
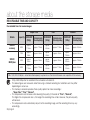
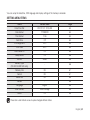
Recordable time and capacity
Recordable time for movie images
Super Fine
Media
built-in
memory
SDHC/
MMCplus
Fine
Capacity 352X240P 720X480i(480i)/ 352X240P
(240p) 720x480p(480p)
(240p)
720X480i(480i)/
720x480p(480p)
Normal
352X240P 720X480i(480i)/
720x480p(480p)
(240p)
4GB
approx.
170min.
approx. 112min.
approx.
256min.
approx. 170min.
approx.
512min.
approx. 256min.
1GB
approx.
43min.
approx. 28min.
approx.
64min.
approx. 43min.
approx.
128min.
approx. 64min.
2GB
approx.
85min.
approx. 56min.
approx.
128min.
approx. 85min.
approx.
256min.
approx. 128min.
4GB
approx.
170min.
approx. 112min.
approx.
256min.
approx. 170min.
approx.
512min.
approx. 256min.
1GB=1,000,000,000bytes : actual formatted capacity may be less as the internal firmware uses a portion of the memory.
240p, 480i/480p refer to resolutions the camcorder will record at.
The above figures are measured under Samsung’s standard recording test conditions and may differ
depending on actual use.
• The memory camcorder provides three quality options for movie recordings:
- " Super Fine", "Fine", "Normal".
• The compression rate increases while lowering the quality (in the order of "Fine", "Normal").
The higher the compression rate is, the longer the recording time will be. However, the picture quality
will be lower.
• The compression rate automatically adjusts to the recording image, and the recording time may vary accordingly.
36_English
•
•
To facilitate the movie recording, it is recommended to use a memory card that supports faster write speed. (Write speed: 1.25 MB / sec or higher) If you use a low write-speed memory card, recording may stop with
a message of "Low speed card. Please record at lower quality".
If you inevitably use a low speed card, select a lower quality ("Fine" → "Normal") or set the movie size to 352p.
• Memory cards of bigger than 8GB in capacity may not work properly.
• The memory card that is used to store a movie can cause unwritable area, which may result in reduced recording time and free memory space.
• The maximum size of a movie (MPEG4) file that can be recorded at one time is 2GB.
• You can store up to 5000 movie images on a memory card.
• Movie image files recorded on other equipment are not playable on this memory camcorder.
•
To check capacity that remains memory
• Press the
button. ➥page 16
English_37
recording
Basic procedures to record movie images described below.
RECORDING MOVIE IMAGES
• Memory camcorder provides two Recording start/stop buttons. One is on the rear side of the camcorder and
the other one is on the LCD panel. Select the Recording start/ stop button that works best for you.
1. Turn the memory camcorder on.
• Connect a power source to the memory camcorder. ➥pages 12,18
(A battery pack or an AC power adapter)
• Slide the POWER switch downward to turn on the power. ➥page 21
• Set the appropriate storage media : Internal Memory or Memory Card.
(SC-MX10A/MX10AU only)
(If you want to record on a memory card, insert the memory card.)
2. Check the subject on the LCD screen.
3. Press the Recording start/stop button.
00:00:00/00:58:00
• The recording indicator (
) will display and recording will start.
• Pressing the Recording start/stop button again during recording
Recording...
will set the memory camcorder to recording pause mode.
4. When recording is finished, turn the memory camcorder off.
•
•
Setting the display option of "16:9 Wide" does not imply wide angle (wide
aspect ratio) recording. Camera output, recording and playback signal is
formatted to 4:3 aspect ratio.
Please note that all movies recorded with this memory camcorder have
4:3 aspect ratio regardless of the display option (16:9 Wide/4:3). When it
is set to "16:9 Wide", the displayed picture may appear wider or rougher
than that of 4:3 screen aspect ratio. ➥pages 55,61
38_English
STBY 00:00:30/00:57:30
120
MIN
120
MIN
•
•
•
•
•
•
•
•
•
•
•
•
ject the battery pack when you have finished recording to prevent unnecessary battery power consumption.
E
For on-screen information display. ➥page 22
For approximate recording time. ➥page 36
For various functions available when you record movie images. ➥page 45~56
If focusing is difficult, use the manual focus function. ➥page 53
During recording, some button operations are unavailable. (MENU button, etc.)
Sound is recorded from the internal stereo microphone on the front of the memory camcorder.
Take care that this microphone is not blocked.
While recording, don't insert or eject the memory card as it may record noise. (SC-MX10A/MX10AU only)
Do not operate the power switch or remove the memory card while accessing the storage media.
Doing so may damage the storage media or the data on storage media.
Before recording an important movie, make sure to test on the recording function to check if there is any
problem with the audio and video recording.
You can not use a locked memory card for recording. You will see a message saying recording is disabled
due to the lock.
If you press the Recording start/stop button while a menu operation is in process, the product returns to
recording pause mode.
English_39
recording
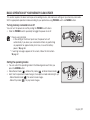
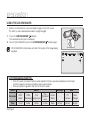
RECORDING WITH EASE FOR BEGINNERS (EASY.Q MODE)
•
1.
2.
3.
4.
With the EASY.Q function, most of the memory camcorder settings are
automatically adjusted, which frees you from detailed adjustments.
Slide the POWER switch downward to turn on the memory camcorder.
Press the MODE button to set Movie Record mode (
). ➥page 21
Press the EASY.Q button.
• When you press the EASY.Q button, all functions on the memory
camcorder will be set to off and the recording settings will be set to the
following basic modes.
(Scene Mode (AE), White Balance, Auto Exposure, Anti-Shake (EIS),
Digital Effect, Auto Focus and Back Light)
• The EASY.Q and Anti-Shake (EIS) (
) indicator appear on the screen
at the same time.
To record movie images, press the Recording start/stop button.
• Recording will begin using the basic automatic settings.
STBY 00:00:00/00:58:00
EASY.Q
To cancel EASY.Q mode
Press the EASY.Q button again.
• The EASY.Q and Anti-Shake (EIS) (
120
MIN
) indicators disappear from the screen.
Unavailable buttons during operation
• The following button and menu operations are unavailable because the items are automatically set.
And the corresponding message (" Release the EASY.Q ") may appear if unavailable operations are
attempted.
- MENU button
- OK button
- etc.
• Cancel EASY.Q function if you want to add any effect or settings to the images.
• The EASY.Q mode settings are released when the memory camcorder is turned off.
• EASY.Q mode automatically sets the "Anti-Shake(EIS)" to "On" while using EASY.Q.
40_English
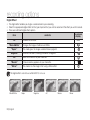
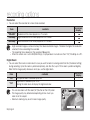
ZOOMING
Use the zoom function for close-up or wide-angle recording.
This memory camcorder allows you to record using optical 34x power zoom and
1200x digital zoom.
• You can zoom with the Zoom lever or the zoom(W/T) button on the LCD panel.
• The further you slide the Zoom lever, the quicker the zoom action.
To zoom in
• Slide the Zoom lever towards T (telephoto).
To zoom out
• Slide the Zoom lever towards W (wide-angle).
• Zoom magnification over 34x is done through digital image processing,
and is therefore called digital zoom. Digital zooming is possible up to 1200x.
Set "Digital Zoom" to "On". ➥page 56
•
•
•
•
•
Be sure to keep your finger on the Zoom lever. If you move your finger
off the zoom lever, the operation sound of the Zoom lever may be also
recorded.
You can also zoom with the Zoom (W/T) button on the LCD panel.
The minimum possible distance between camcorder and subject while
maintaining sharp focus is about 1 cm (about 0.39 inch) for wide angle
and 50 cm (about 19.68 inch) for telephoto.
Focusing may become unstable during zooming. In this case, set the
zoom before recording and lock the focus by using the manual focus,
then zoom in or out during recording. ➥page 53
Optical zoom preserves the movie quality, but during digital zoom the
image quality may suffer.
W:Recording wide area
(wide-angle)
T: Recording enlarged image
(telephoto)
W: Wide angle
STBY 00:00:00/00:58:00
T: Telephoto
120
MIN
English_41
playback
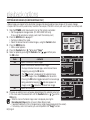
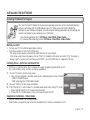
MOVIE IMAGES PLAYBACK
You can find a desired movie image quickly using thumbnail index view.
1. Turn the memory camcorder on.
• Slide the POWER switch downward to turn on the power.➥page 21
• Set the appropriate storage media :Internal Memory or Memory Card
➥page 32 (SC-MX10A/MX10AU only)
(If you want to record on a memory card, insert the memory card.)
2. Open the LCD screen.
• Adjust brightness or contrast of the LCD screen.➥page 65
3. Press the MODE button.
• Switches to Movie Play mode.
• The recorded movie images are displayed in thumbnail index view.
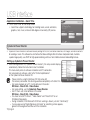
4. Use the Control button ( / / / ) to select the desired movie images,
and the press the OK button.
- Shortcut menu for playback will be displayed for a while.
• Each time you press the OK button, play or pause is toggled.
• If you move the zoom lever during playback, the camcorder switches to
thumbnail index view.
100-0001
Move
OK
120
MIN
Play
00:00:00/00:23:00
120
MIN
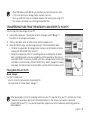
Please note that all movies recorded with this memory camcorder have 4:3
aspect ratio regardless of the display option (16:9 Wide/4:3). When it is set
to "16:9 Wide", the displayed picture may appear wider or rougher than
that of 4:3 screen aspect ratio. ➥pages 55,61
100-0001
42_English
•
•
•
•
•
•
•
•
•
During playback, pressing the Recording start/stop button will move to Movie Record mode.
If there is no file stored to view, the message "Empty" appears.
When the multi-AV cable is connected to the memory camcorder, the built-in speaker will automatically turn off.
Depending on the amount of data to be played back, it may take some time for the playback images to appear.
Image data edited on PC or certain types of image data may not be displayed on this memory camcorder.
Image data recorded on another camcorder may not be playable on this memory camcorder.
You can also play movie images on a TV screen by connecting the memory camcorder to a TV. ➥page 77
A video codec is required to play the recorded movie images on a PC.
Install the software in the provided software CD to have the CODEC automatically installed in the system.
If you do not have the software CD, search the product model name in the download center on the Samsung
Electronics home page (www.samsung.com) to get the CODEC installation file.➥page 71
For various functions available during playback, see “playback options”. ➥pages 57~61
Adjusting the volume
00:00:20/00:10:30
• You can hear the recorded sound from the built-in speaker.
• You can control the volume by using the Control button ( / ).
• The level can be adjusted anywhere between 0 and 10.
(If you close the LCD screen while playing, you will not hear the sound
from the speaker.)
Press the Control button ( / ) to increase or decrease the volume.
- The volume bar disappears after 1~2 seconds.
ZOOM
120
MIN
100-0001
List
00:00:00/00:23:00
120
MIN
100-0001
English_43
playback
Various Playback Operations
Still playback (pause)
• Press the OK button during playback.
- To resume normal playback, press the OK button again.
Search playback or movie
• During normal playback, press and hold the Control button ( )
for forward search, or to the left for reverse search.
• Moving the Control button to ( / ) repeatedly increases
the search speed for each direction.
- RPS(Reverse Playback Search) rate: x2→x4→x8→x16→x32→x64
- FPS(Forward Playback Search) rate: x2→x4→x8→x16→x32→x64
• To resume normal playback, press the OK button.
Skip playback of movie
• During playback, press the Control button ( ) to locate
the start point of next file. Pressing the Control button ( )
repeatedly skips files in forward direction.
• During playback, press the Control button ( ) to locate the
start point of the current file, pressing the Control button ( )
repeatedly skips files in reverse direction.
• Press the Control button ( ) within 3 seconds from the start point,
it skips to the first image of the previous file.
Frame-by-frame playback
• While playback is paused, press the Control button ( ).
- Pressing the Control button ( ) repeatedly advances the still picture
frame by frame.
- While playback is paused, press and hold the Control button to ( ),
it plays back frame by frame just like slow motion playback.
- To resume normal playback, press the OK button.
44_English
OK
00:00:20/00:10:30
ZOOM
120
MIN
100-0001
List
00:00:00/00:23:00
120
MIN
100-0001
recording options
CHANGING THE MENU SETTINGS
You can change the menu settings to customize your memory camcorder.
Access the desired menu screen by following the steps below, then change the various settings.
1. Slide POWER switch downward to turn the memory camcorder on.
2. Select the operation mode.
• For Movie Record Menus: Press MODE button to set Record (
).
• For Movie Play Menus: Press MODE button to set Play (
).
3. Press MENU button.
• The menu screen appears.
4. Select the desired sub menu and menu item with the Control buttons and
the OK button.
• To return to the normal screen, press MENU button.
• Even if the menu item is displayed, some items cannot be
set depending on the selected mode (movie recording/playback, settings).
In this case, sub menu cannot be accessed or setting cannot be changed.
➥page 85
•
•
OK MENU
Control
POWER
MODE
You can also access the shortcut menu using the OK button. ➥page 29
While the menu screen is displayed, pressing the Recording start/stop
button will move to Movie Record mode.
Button Tips
a. MENU button : Use it to enter or exit the menu.
b. Control button ( / / / ) : Use it to move up/down/left/right
c. OK button : Use it to select or confirm the menu.
English_45
recording options
✪
Follow the instructions below to use each of the menu items listed after this page.
For example: setting the White Balance in Movie Record mode.
1. Slide the POWER switch downward to turn the memory camcorder on.
2. Select the operation mode.
• For Movie Record Menus:
Press MODE button to set Record (
).
3. Press MENU button.
• The menu screen appears.
4. Press the Control button ( / ) to select "White Balance".
5. Select the desired sub menu item with the Control button ( / ),
and then press the OK button.
6. Press MENU button to exit the menu.
•
•
•
The selected item is applied and the indicator is displayed.
In "Auto" mode, the item indicator may not displayed on the screen.
While the menu screen is displayed, pressing the Recording start/stop
button will move to Movie Record mode.
You can also change the menu setting, using the shortcut menu
represents the most frequently accessed functions. ➥ page 29
46_English
Video
120
MIN
White Balance
Auto
Daylight
Cloudy
Move
OK
Select
STBY 00:00:00/00:58:00
MENU
Exit
120
MIN
MENU ITEMS
• Accessible items in menu can vary depending on the operation mode.
• For operation details, see the corresponding page. ➥pages 45~46, 57~61
Menu items in Movie Record(
)
Items
Scene Mode (AE)
White Balance
Exposure
Anti-Shake (EIS)
Digital Effect
Focus
Back Light
16:9 Wide
Quality
Resolution
Digital Zoom
Menu items in Movie Play(
Items
Play Option
Delete
Protect
Copy
(SC-MX10A/MX10AU only)
16:9 Wide
File Info
Default value
Auto
Auto
Auto
Off
Off
Auto
Off
On
Super Fine
720x480i
Off
Page
48
49
50
51
52
53
54
55
55
56
56
Default value
Play All
OK
On
Page
57
58
59
-
60
On
OK
61
61
)
English_47
recording options
RECORDING MENU ITEMS
You can setup the menu items for movie images recording.
Scene Mode (AE)
This memory camcorder automatically sets the shutter speed and aperture according to the subject brightness for optimum
recording: You can also specify one of five modes depending on subject conditions, recording environment or purpose of filming.
item
"Auto"
contents
- Auto balance between the subject and the background.
- To be used in normal conditions.
- The shutter speed is automatically adjusted from 1/60 to 1/250 per second,
depending on the scene.
"Sports"
- Reduces blurring when recording rapidly moving subjects such as in golf or tennis.
If the Sports mode is used under a fluorescent light, the image may flicker.
In this case, use the Auto mode for recording.
"Portrait"
-C
reates a shallow depth of field so that the person or subject appears against a
softened background.
- The portrait mode is most effective when used outdoors.
- The shutter speed is automatically adjusted from 1/60 to 1/1000 per second.
"Spotlight"
- Prevents overexposure of subject's face, etc. when strong light strikes the subject,
as in a wedding or on stage.
"Beach/Snow"
- Prevents under exposure of subject's face, etc. in a place where reflection of light is
intense, such as at the seaside in midsummer or on a ski slope.
"High Speed"
-F
or recording fast-moving subjects such as players in golf or tennis games.
If you set the Exposure to manual, "Scene Mode (AE)" will be disabled. ➥page 50
his function will not operate in the EASY.Q mode.
T
You can check the selected "Scene Mode (AE)" on the on-screen information display.
However, nothing will appear in "Auto" mode.
48_English
•
•
•
on-screen
display
None
White Balance
This memory camcorder automatically adjusts the color of subject. Change the
white balance setting depending on the recording conditions.
item
"Auto"
"Daylight"
"Cloudy"
"Fluorescent "
"Tungsten"
"Custom WB"
on-screen
display
contents
This option is generally used to control the white balance automatically.
None
This controls the white balance according to the outdoor ambience, especially for
close up and when the subject is of one dominant color.
This option is used when you make a recording in cloudy weather.
This option is used when you make a recording under white fluorescent lights.
This option is used when the surroundings are less than 3200K of tungsten light.
You can manually adjust white balance to match the light source or situation.
Setting the white balance manually:
1. Select "Custom WB".
• The indicator (
) and the message "Set White Balance" are displayed.
2. Frame a white object such as a piece of paper so that it fills the screen.
Use an object that is not transparent.
• If the object that fills the screen is not focused, correct the focus using
"Manual Focus" ➥page 53
3. Press the OK button.
• The white balance setting will be applied and indicator (
) is displayed.
120
MIN
STBY 00:00:00/00:58:00
Set White Balance
OK Set
MENU Cancel
White thick paper
English_49
recording options
•
•
•
•
•
•
•
A subject can be recorded under various types of lighting conditions indoors (natural, fluorescent,
candlelight, etc.). Because the color temperature is different depending on the light source,
the subject tint will differ depending on the white balance settings. Use this function for a more natural result.
The white balance also can be set in the shortcut menu. ➥page 29.
The white balance can not be set use while EASY.Q is in use.
It is recommended that you specify "Digital Zoom" to "Off" before setting white balance. ➥page 56
Reset the white balance if lighting conditions change.
During normal outdoor recording, setting to auto may provide better results.
Do not use a colored object when setting white balance: The appropriate tint cannot be set.
Exposure
The memory camcorder usually adjusts the exposure automatically. You can also manually adjust the exposure
depending on the recording conditions.
item
"Auto"
"Manual"
This option automatically adjusts image brightness according to the environmental light
conditions.
- You can adjust the brightness of an image manually.
- Adjust the brightness when the subject is too bright or too dark.
Setting the exposure manually:
• Press the Control button ( / ) to adjust the exposure while viewing the
image on the LCD screen.
- Confirm your selection by pressing the OK button.
- Exposure value can be set between "0" and "29".
- If you set exposure to manual, the higher the exposure, the brighter the
recorded picture will be.
50_English
on-screen
display
contents
STBY 00:00:00/00:58:00
Manual Exposure
22
None
120
MIN
Manual exposure is recommended in situations listed below :
• When shooting using reverse lighting or when the background is too bright.
• When shooting on a reflective natural background such as at the beach or when skiing.
• When the background is overly dark or the subject is bright.
•
•
•
The exposure also can be set in the shortcut menu. ➥page 29
EASY.Q mode automatically sets the "Exposure" to "Auto".
If you manually change the exposure value when "Scene Mode(AE)" function is selected, manual changes
are applied first.
Anti-Shake(EIS) (Electronic Image Stabilizer)
When you use zoom to record a magnified subject image, it will correct fuzziness in the recorded image.
item
contents
"Off"
Disables the function.
"On"
Compensates for unstable images caused by camera-shake, particularly at high
magnification.
on-screen
display
None
Anti-Shake(EIS) provides a more stable image when:
•
•
•
•
Recording while zooming
Recording small objects
Recording while walking or moving
Recording through the window of a moving vehicle
EASY.Q mode automatically sets the "Anti-Shake(EIS)" to "On" while using EASY.Q.
hen "Anti-Shake(EIS) : On" is set, there will be a slight difference between the actual movement and the
W
movement on screen.
• Gross camcorder shake may not be entirely corrected even if "Anti-Shake(EIS) : On" is specified.
Firmly hold the memory camcorder with both hands.
• It is recommended that you specify "Anti-Shake(EIS): Off " when using the memory camcorder on a
desk or tripod.
• When you record pictures with 34x or more magnification and the "Anti-Shake(EIS)" is "On" in dim places,
after-images may stand out. In this case, we recommend using a tripod and turning the "Anti-Shake(EIS)"
to "Off".
English_51
•
•
recording options
Digital Effect
• T
he digital effect enables you to give a creative look to your recording.
• Select the appropriate digital effect for the type of picture that you wish to record and the effect you wish to create.
• There are 6 different digital effect options.
item
"Off"
"Black&White"
"Sepia "
"Negative"
"Art"
on-screen
display
contents
Disables the function.
None
Changes the images into Black and White.
This mode gives the images a reddish brown pigment.
Reverses the colors, creating the look of a negative.
Adds artistic effects to your movie file.
"Mosaic"
A mosaic overlay appears on your movie file.
"Mirror"
This mode cuts the image in half using a Mirror effect.
The digital effects can not use while EASY.Q is in use.
Black&White
52_English
Sepia
Negative
Art
Mosaic
Mirror
Focus
• The memory camcorder usually focuses on a subject automatically (auto-focus).
• You can also manually focus a subject depending on the recording conditions.
item
"Auto"
"Manual"
on-screen
display
contents
This memory camcorder automatically focuses a subject at the center of screen (autofocus). When the memory camcorder is turned on, auto-focus will always be set.
Manual focusing may be necessary under certain conditions that make automatic
focusing difficult or unreliable.
Focusing manually during recording
This memory camcorder automatically focuses a subject from close-up to infinity.
However, the correct focus may not be obtained depending on the recording
condition. In this case, use the manual focus mode.
1. Set "Focus" to "Manual".
• The manual focus adjustment indicator appears.
2. Use the zoom lever to zoom in on subject.
3. Press the Control button ( / ) to adjust the focus,
while viewing the subject on the LCD screen.
Focusing on a further subject
To focus on a further subject, press the Control button ( ) .
Focusing in a nearer subject
To focus on a nearer subject, press the Control button ( ).
STBY 00:00:00/00:58:00
None
120
MIN
Manual Focus
Manual focus is recommended in the following situations :
a. A picture containing several objects, some close to the
<Nearer subject >
<Further subject >
memory camcorder, others further away.
b. A person enveloped in fog or surrounded by snow.
c. Very shiny or glossy surfaces like a car.
d. People or objects moving constantly or quickly like an athlete or a crowd.
• The focus also can be set in the shortcut menu. ➥page 29
• EASY.Q mode automatically sets the "Focus" to "Auto".
• Be sure to zoom in on your subject before manually focusing on it.
If you bring the subject into focus at the "W" control side, focus will be faulty when you turn
the zoom lever to the "T" control side to zoom in on the subject.
English_53
recording options
Back Light
When subject is lit from behind, this function will compensate for lighting so that the subject is not too dark.
item
on-screen
display
contents
"Off
Disables the function.
"On"
- Backlight compensation is executed.
- Backlight compensation brightens the subject quickly.
None
Back lighting influences recording when the subject is darker than the background:
• The subject is in front of a window.
• The subject is against a snowy background.
• The subject is outdoors and the background is overcast.
• The light sources are too bright.
• The person to be recorded is wearing white or shiny
clothes and is placed against a bright background:
The person’s face is too dark to distinguish his/her features.
<BLC off>
The "Back Light" function can not use while EASY.Q is in use.
54_English
<BLC on>
Digital Zoom is not available in the 16:9 Wide mode.
16:9 Wide
You can select the desired LCD display aspect ratio for recording or playback (16:9 Wide/4:3 aspect ratio).
item
contents
on-screen
display
"Off"
Disables the function. Displays the image in 4:3 aspect ratio.
Select to use the standard display aspect ratio of 4:3 on the screen.
None
"On"
Select to view movies of 4:3 aspect ratio by enlarging and fitting into 16:9 aspect ratio.
None
•
•
16:9 wide setting also can be set in the shortcut menu. ➥page 29.
lease note that all movies recorded with this memory camcorder have 4:3 aspect ratio regardless of the
P
display option (16:9 Wide/4:3). When it is set to "16:9 Wide", the displayed picture may appear wider or
rougher than that of 4:3 screen aspect ratio.
Quality
You can select the quality of a movie to be recorded. This memory camcorder can record in the SF (super fine), F (fine)
and N (normal) modes.
item
"Super Fine"
"Fine"
"Normal"
contents
on-screen
display
Records at the best quality.
Records at high quality.
Records at normal quality.
ou can record a scene at three quality levels: "Super Fine, Fine, or Normal".
Y
However, the better the quality is, the more memory is used.
English_55
recording options
Resolution
• You can select the resolution of a movie to be recorded.
item
contents
"720x480i"
Resolution of the movie played on a TV screen.
"720x480p"
Higher resolution of the movie played on a PC screen.
"352x240p"
Lower resolution of the movie played on a PC screen.
•
•
•
on-screen
display
High resolution images use more memory than lower resolution images. Therefore the higher the resolution
selected, the less recording time available.
The recording times depend on the resolution. ➥page 36
When the screen size is set to 352(352x240p), it is played back in smaller size than 720(720x480p) on a PC.
Digital Zoom
• You can select the maximum zoom level in case you want to zoom to a level greater than 34x (the default setting)
during recording. Up to 34x zoom is performed optically, and after that, up to 1200x zoom is performed digitally.
Note that the image quality decreases when you use the digital zoom.
item
"Off"
"On"
•
•
•
contents
Only optical zoom is available up to 34x.
Digital zoom is available up to 1200x.
Moving the zoom lever will display the digital zoom bar.
You can also zoom with the zoom (W/T) button on the LCD panel.
The image quality may deteriorate depending on how much you
zoom in on the subject.
Maximum zooming may result in lower image quality.
56_English
on-screen
display
00:00:00/00:58:00
120
MIN
playback options
• You can manage recorded movie images in various ways.
• Each thumbnail image shown in the display represents the first frame of a separately recorded movie.
SETTING THE PLAY OPTION
• You can play all movies continuously or play the selected movie only.
• You can also set the repeat option for all movies.
1. Slide the POWER switch downward to turn on the memory camcorder.
• Set the appropriate storage media. (SC-MX10A/MX10AU only)
(If you want to record on a memory card, insert the memory card.)
2. Press the MODE button.➥page 21
• Switches to Movie Play mode.
The recorded movie thumbnail images, are displayed in a thumbnail index view.
3. Press the MENU button.
• Press the Control button ( / ) to select "Play Option".
4. Press the Control button ( / ) to select an option, and then press the
OK button.
item
contents
"Play All"
Plays back from the selected movie to the last movie.
"Play One"
The selected movie will be played.
"Repeat All"
All movies will be played repeatedly.
"Repeat One" The selected movie will be played repeatedly.
5.
Press the MENU button to exit the menu.
• During playback, the selected item is applied
•
•
120
MIN
100-0002
Move
OK
Play
100-0002
120
MIN
Play Option
Play All
Play One
Repeat All
Move
OK
Select
MENU
Exit
100-0002
120
MIN
Play Option
Play All
Play One
Repeat All
Move
While the menu or thumbnail image screen is displayed, pressing the
Recording start/stop button will move to the Movie Record mode.
It operates identically in the full image display (single image displayed on the screen).
OK
Select
MENU
Exit
English_57
playback options
DELETING MOVIE IMAGES
• You can delete saved movie images.
1. Slide the POWER switch downward to turn on the memory camcorder.
• Set the appropriate storage media. (SC-MX10A/MX10AU only)
(If you want to record on a memory card, insert the memory card.)
2. Press the MODE button. ➥page 21
• Switches to Movie Play mode.
• Select the desired movie thumbnail images, using the Control button.
3. Press the MENU button.
4. Press the Control button ( / ) to select "Delete".
5. Select an option by pressing the Control button ( / ) and then press
the OK button.
100-0006
Move
OK
120
MIN
Play
100-0006
120
MIN
item
"OK"
contents
Delete
Deletes the selected movie.
OK
Multi Select
Deletes the individual selected movies.
All
- To delete individual movie images, select the desired thumbnail
movie images for deletion by pressing the OK button.
OK Select
MENU Exit
Move
Then press the MENU button to delete.
"Multi Select"
- The (
) indicator is displayed on the selected movie images.
100-0005
- Pressing the OK button toggles between the movie image
being selected for deletion (( ) indicator appears on image) or
not ( ) indicator is removed from image).
"All"
Deletes all movie images.
6. The pop-up selection menu will appear depending on the selected menu item.
In this case, select the desired item with the Control buttons ( / ) and the
OK Play
Move
OK button.
• The deleted images also disappear in thumbnail image display.
• While the menu or thumbnail image screen is displayed, pressing the
Recording start/stop button will move to Movie Record mode.
• It operates identically in the full image display (single image displayed on the screen).
• Once deleted, a movie can not be restored.
• Protected files (movies) will not be deleted.
58_English
120
MIN
PROTECTING MOVIE IMAGES
• You can protect saved important movies from accidental deletion.
• Protected movies will not be deleted unless you release the protection or format the memory.
1. Slide the POWER switch downward to turn on the memory camcorder.
• Set the appropriate storage media. (SC-MX10A/MX10AU only)
(If you want to record on a memory card, insert the memory card.)
2. Press the MODE button. ➥page 21
• Switches to Movie Play mode.
• Select the desired movie thumbnail images, using the Control button.
3. Press the MENU button.
• Menu screen appears.
Move
4. Press the Control button ( / ) to select "Protect".
5. Select an option by pressing the Control button ( / ) and then press
the OK button.
item
"On"
contents
Protects the selected movie from deletion.
Protects individual selected movie from deletion.
- To protect individual movies, select desired movie thumbnail
images by pressing the OK button.Then press the MENU
button to confirm.
"Multi Select"
- The ( ) indicator is displayed on the selected movie thumbnail images.
- Pressing the OK button toggles between the movie image
being selected for protection ((
) indicator appears on image)
or not (
) indicator is removed from image).
Protects all movie images from deletion.
"All On"
Cancels the protection for all movie images.
"All Off"
6. The pop-up selection menu will appear depending on the selected menu item.
In this case, select the desired item with the Control buttons ( / ) and the
OK button.
•
•
•
•
120
MIN
100-0006
OK
Play
100-0006
120
MIN
Protect
On
Multi Select
All On
Move
OK
Select
MENU
100-0006
Move
OK
Exit
120
MIN
Play
While the menu or thumbnail image screen is displayed, pressing the
Recording start/stop button will move to Movie Record mode.
It operates identically in the full image display (single image displayed on the screen).
Protected movie images will show the protection indicator ( ) when they are displayed.
If the write protection tab on the memory card is set to lock, you cannot set image protection.
English_59
playback options
COPYING MOVIE IMAGES (SC-MX10A/MX10AU ONLY)
• Movie images are copied to the destination storage while leaving original movie images in the source storage.
• It copies from the currently-used memory to another. For example, if the built-in memory was used, it copies to a memory card.
1. Slide the POWER switch downward to turn on the memory camcorder.
• Set the appropriate storage media. (SC-MX10A/MX10AU only)
100-0003
(If you want to record on a memory card, insert the memory card.)
➥page
2. Press the MODE button.
21
• Switches to Movie Play mode.
• Select the desired movie thumbnail images, using the Control button.
3. Press the MENU button.
• Menu screen appears.
4. Press the Control button ( / ) to select "Copy".
OK Play
Move
5. Select an option by pressing the Control button ( / ) and then press
the OK button.
120
MIN
item
"OK"
contents
Copies the selected movie images.
Copies the individual selected movie images.
- To copy individual movie images, select desired movie
images by pressing the OK button.
- The ( ) indicator is displayed on the selected movie
"Multi Select"
thumbnail images. Press the MENU button to confirm.
- Pressing the OK button toggles between the movie image
being selected for copying ((
) indicator appears on
image) or not (
) indicator is removed from image).
Copies all the movies.
"All "
100-0003
120
MIN
Copy
OK
Multi Select
All
Move
OK
Select
MENU
Exit
100-0003
120
MIN
Copy
OK
Multi Select
All
6. The pop-up selection menu will appear depending on the selected menu item.
In this case, select the desired item with the Control buttons ( / ) and the
OK button.
Move
• While the menu or thumbnail image screen is displayed, pressing the
Recording start/stop button will move to Movie Record mode.
• It operates identically in the full image display (single image displayed on the screen).
• If a memory card is not inserted, you can not perform the "Copy" function.
60_English
OK
Select
MENU
Exit
16:9 WIDE
You can select the desired LCD display aspect ratio for recording or playback
(16:9 Wide/4:3 aspect ratio).
item
"Off"
"On"
contents
120
MIN
100-0004
on-screen
display
Disables the function. Displays the image in 4:3
aspect ratio. Select to use the standard display
aspect ratio of 4:3 on the screen.
None
Select to view movies of 4:3 aspect ratio by enlarging
and fitting into 16:9 aspect ratio.
None
Move
Play
100-0004
Please note that all movies recorded with this memory camcorder have 4:3
aspect ratio regardless of the display option (16:9 Wide/4:3). When it is set
to "16:9 Wide", the displayed picture may appear wider or rougher than
that of 4:3 screen aspect ratio.
120
MIN
16:9 Wide
Off
On
Move
FILE INFORMATION
You can see the image information for all images.
1. Slide the POWER switch downward to turn on the memory camcorder.
• Set the appropriate storage media. (SC-MX10A/MX10AU only)
(If you want to record on a memory card, insert the memory card.)
2. Press the MODE button. ➥page 21
• Switches to Movie Play mode.
3. Select the desired movie thumbnail images, using the Control button.
4. Press the MENU button.
5. Press the Control button ( / ) to select "File Info".
6. Press the OK button.
• Press the OK button again after confirming.
• The information of the selected file is displayed as shown below.
- Date
- Duration
- Size
OK
OK
Select
MENU
Exit
100-0004
120
MIN
File Info
OK
Move
OK
Select
MENU
100-0004
Exit
120
MIN
100VIDEO
SDV_0004.AVI
■
■
■
OK
Date
Duration
Size
2007/01/01
00:00:01
3,876 KB
Back
English_61
setting options
CHANGING THE MENU SETTINGS IN "SETTINGS"
You can change the menu settings to customize your memory camcorder.
Access the desired menu screen by following the steps below and change the
various settings.
1. Slide POWER switch downward to turn the memory camcorder on.
2. Press MENU button.
• The menu screen appears.
3. Select "Settings" with the Control button ( / ),
and then press the OK button.
• The menus in "Settings" mode will appear.
4. Select the desired sub menu and menu item with
the Control buttons ( / / / ) and the OK button.
• To return to the normal screen, press MENU button.
• Even if the menu item is displayed, some items cannot be set
depending on the selected mode (movie recording/playback, settings).
In this case, the sub menu cannot be accessed or a setting cannot be changed.
Button Tips
a. MENU button : Use it to enter or exit the menu.
b. Control button ( / / / ) : Use it to move up/down/left/right
c. OK button : Use it to select or confirm the menu.
The pop-up selection menu will appear depending on the selected
menu item. In this case, select the desired item with the Control buttons
( / ) and the OK button.
62_English
Video
120
MIN
Settings
OK
Move
OK
Select
MENU
Exit
Settings
120
MIN
Default Set
OK
Move
OK
Select
MENU
Settings
120
MIN
Default Set ?
All settings return to default.
Yes
Move
Exit
No
OK
Select
You can setup the date/time, OSD language and display settings of the memory camcorder.
Setting menu items
Items
Default value
Page
Date/Time Set
2007/01/01 12:00 AM
64
Date Format
YY/MM/DD
64
Time Format
12 Hr
64
Date/Time
Off
64
LCD Brightness
40%
65
LCD Color
50%
65
Auto Power Off
Off
65
Beep Sound
On
66
File No.
Series
66
Memory Type
(SC-MX10A/MX10AU only)
-
66
Memory Info
OK
67
Format
OK
67
Default Set
OK
68
Version
-
68
Language
English
68
USB Connect
Mass Storage
68
Demo
Off
68
These Items and Default values may be changed without notice.
English_63
setting options
Date/Time Set
Set the date and time so they can be recorded correctly. ➥page 31
Date Format
You can select the date format to display.
settings
contents
"YY/MM/DD" T
he date is displayed in the order of year / month / date.
"DD/MM/YY" The date is displayed in the order of date / month / year.
"MM/DD/YY" The date is displayed in the order of month / date / year.
on-screen
display
-
Time Format
You can select the time format to display.
settings
"12 Hr"
"24 Hr"
contents
he time is displayed in 12 hour units.
T
The time is displayed in 24 hour units.
on-screen
display
-
Date/Time
You can set the date and time to display on the LCD screen.
• Before you use the "Date/Time" function, you must set the date/time. ➥page 31
settings
"Off"
"Date"
"Time"
"Date & Time"
contents
he date and time are not displayed.
T
The date is displayed.
The time is displayed.
The date and time are displayed.
The date/time will read "2007/01/01 12:00 AM" in the following conditions.
- When the button type battery becomes weak or dead.
64_English
on-screen
display
None
2007/01/01
12:00AM
2007/01/01 12:00AM
LCD Brightness
• You can adjust the brightness of the LCD screen to compensate for ambient
lighting conditions.
• Moving the Control button up will brighten the screen whereas moving it down
will darken the screen.
•
•
•
•
A brighter LCD screen setting consumes more battery power.
Adjust the LCD brightness when the ambient lighting is too bright and
the monitor is hard to see.
LCD Brightness does not affect the brightness of images to be stored.
You can adjust the LCD Brightness from 0% to 100%.
Settings
120
MIN
LCD Brightness
40%
Move
LCD Color
Settings
• You can adjust the LCD color from 0% to 100%.
• When you set color range, the higher the figures the brighter the LCD monitor will be.
LCD Color
Adjust
MENU
Exit
120
MIN
50%
Auto Power Off
Move
Adjust
MENU
Exit
To save battery power, you can set the "Auto Power Off" function which turns
off the memory camcorder if there is no operation for a certain period of time.
settings
"Off"
"5 Min"
•
•
contents
Cancels the "Auto Power Off" function.
The memory camcorder automatically turns off when there is no operation for 5 min.
on-screen
display
None
None
The "Auto Power Off" will not function when you connect the AC power adapter to the memory camcorder.
The "Auto Power Off" functions when the battery pack is the only power source.
If you connect the camcorder to the USB device (PC, etc.) through USB cable, the "Auto Power Off" will not
function.
English_65
setting options
Beep Sound
You can set the beep sound to on/off. When on, the beep sounds when any operation is performed.
settings
"Off"
"On"
contents
Disables the function
The beep sounds when operate the menu settings, the power is turned on.
on-screen
display
None
None
File No.
File numbers are assigned to movie images in the order they were recorded.
settings
"Series"
"Reset"
contents
Assigns file numbers in sequence even if the memory card is replaced with another one or
after formatting, or after deleting all files. The file number is reset when a new folder is created.
Resets the file number to 0001 even after formatting, deleting all or inserting a new memory
card.
on-screen
display
None
None
hen you set "File No." to "Series", each file is assigned with a different number so as to avoid duplicating
W
file names. It is convenient when you want to manage your files on a PC.
Memory Type (SC-MX10A/MX10AU only)
You can record movie images on the built-in memory or a memory card, so you should select the desired storage
media before starting recording or playback. ➥page 32
settings
"Memory"
"Card"
66_English
contents
Select the built-in memory for storage medium. So you can record or play back movie
images on the built-in memory.
Select a memory card for storage medium. So you can record or play back movie images
on memory card.
on-screen
display
Memory Info
It shows you the storage information. You can view the storage media, used memory space and available memory
space, and the recordable time according to the quality.
settings
on-screen
display
contents
It shows you the memory information of built-in
"Memory"
storage media. (SC-MX10A/MX10AU only )
It shows you the memory information of the inserted
"Card"
memory card.
Memory Info
●
Used:
-
Card
OK
4MB
●
Free:
SF :
F :
N :
117MB
026Min
005Min
059Min
Back
If there is no storage media inserted, it can not be selected and will be dimmed on the menu.
In case of model SC-MX10/MX10P, the information of the memory card appears by selecting "OK".
Format
The format function completely delete all files and options on the storage media, including protected files.
You can format (initialize) recording data in the storage media. You have to format the pre-used storage media or
newly purchased memory cards with this memory camcorder before using them. This enables stable speeds and
operation when accessing the recording medium.
Be aware that all files and data including protected files will be erased.
settings
contents
"Memory" Formats the built-in storage media. (SC-MX10A/MX10AU only)
"Card"
Formats the memory card.
on-screen
display
None
None
Make sure to format the recording medium on the memory camcorder.
Do not remove the recording medium or perform any other operation (such as turning off the power)
during format. Also, be sure to use the provided AC power adapter, as the recording medium may
be corrupted if the battery becomes exhausted during formatting. If the recording medium becomes
corrupted, format it again.
• A memory card with the protection tab set to lock will not be formatted. ➥page 59
• In case of model SC-MX10/MX10P, the format is executed by selecting "OK".
Do not format the recording medium on the PC or a different device.
WARNING Make sure to format the recording medium on the memory camcorder.
English_67
•
•
■
■
setting options
Default Set
You can initialize the memory camcorder settings to the factory defaults (initial settings at the factory).
Initializing the memory camcorder settings to factory defaults does not affect recorded images.
After resetting the memory camcorder, set "Date/Time Set". ➥page 31
Version
You can see the firmware version information.
Language
You can select a desired language to display the menu and messages. ➥page 30
USB Connect
Connect the memory camcorder to a PC via a USB 2.0 cable and you can transfer your movie images from the
storage media, or use this camcorder as a web camera.
settings
contents
on-screen
display
None
None
"Mass Storage" Transfers the data files with your memory camcorder and a PC. ➥page 75
Uses your memory camcorder as a web camera. ➥page 76
"PC Cam"
• The default setting is mass storage.
• Before connecting the USB cable, check if the appropriate USB mode you want to use is selected.
Demo
Demonstration automatically shows you the major features that are included with your memory camcorder so that you
may use them more easily.
settings
contents
"Off"
Disables the function
Activates demonstration mode and shows various features on the LCD screen.
- After it exit to the menu, the demonstration is automatically operated.
- Demonstration mode will resume if you operate any other function in STBY mode for about
6minute.
"On"
"Auto Power Off " function does not operate during the demonstration mode.
68_English
on-screen
display
None
None
USB interface
This chapter explains how to connect the camcorder to a PC using the USB cable for various functions.
-When connecting a USB cable to a PC, refer to the software installation instructions and PC specifications below.
System Requirements
Transferring a Digital Image through a USB Connection
• The memory camcorder supports USB 2.0 High speed. (Depends on the PC specification)
• You can transfer a recorded file in storage media to a PC via a USB connection.
• If you transfer data to a PC, you need to install the software (DV Driver, Video Codec, DirectX 9.0) supplied with the
memory camcorder.
USB Connection Speed (depending on the System)
•
•
•
•
High speed USB connection is supported by Microsoft (Windows) device drivers only.
Windows 2000 - High speed USB on a system with Service Pack 4 or later installed.
Windows XP - High speed USB on a system with Service Pack 1 or later installed.
Windows Vista - High speed USB on a system with Service Pack 1 or later installed.
System Requirements
Windows operating systems
• CPU: Intel® Pentium 4™, 2GHz or higher, or the equivalent
• Operating systems: Windows® 2000/XP/Vista
Standard installation is required. If you have upgraded your current operating system, we can not guarantee
the proper operation of the product.
• Memory: 512MB RAM or higher
• Hard Disk: 2GB or higher
• Resolution: 1024x768 dots, 24bit color
• USB port: USB2.0 High Speed
- System requirements mentioned above are recommendations. Even on a system that satisfies the requirements
operation is not ensured depending on the system.
- This memory camcorder is recognized just as a removable storage device on the Macintosh computer.
(Mac OS 10.3 or above that support High Speed USB standards)
English _69
USB interface
• O
n a slower PC than recommended, movie playback may not be smooth or video editing may take a
long time.
• On a slower PC than recommended, movie playback may skip frames or operate unexpectedly.
• If your OS is Windows 2000/XP/Vista, log in as the Administrator(administrator of the PC)
(or a user with the equivalent privileges) to install the software.
• Check out the storage media of the memory camcorder before connecting USB cable. If no memory
card or an unformatted memory card is inserted, the PC will not recognize your memory camcorder as a
removable disk.
• If you disconnect the USB cable from the PC or the memory camcorder during the data transfer, the data
transfer will stop and the data may be damaged.
• If you connect the USB cable to a PC using a USB HUB or with other devices at the same time, it may
cause conflict and may not work properly. If this occurs, remove all other USB devices and try the
connection again.
• Intel® Pentium III™ or Pentium 4™ is a trademark of the Intel Corporation.
• Windows® is a registered trademark of the Microsoft® Corporation.
• All other brands and names are property of their respective owners.
70_English
INSTALLING THE SOFTWARE
Installing DV Media Pro Program
You need to install DV Media Pro to play back recorded movie files or the transferred data from
memory camcorder with the USB cable on your PC. When you install the DV Media Pro
software on your Windows computer, you can enjoy the following operations by connecting your
memory camcorder to your computer via a USB cable.
- View movie recordings on PC: DV Driver - DirectX9.0 - Video Codec
- PC camera/USB streaming function: DV Driver - DirectX9.0 - Video Codec
Before you start!
• Turn on your PC. Exit all other applications running.
• Insert the provided CD into the CD-ROM drive.
- The setup screen appears automatically soon after the CD was inserted.
If the setup screen does not appear, click on "Start" on the bottom left corner and select "Run" to display a
dialog. Type "D:\autorun.exe" and then press ENTER, if your CD-ROM drive is mapped to "D:Drive".
Installing Driver - DV Driver and DirectX 9.0
• DV Driver is a software driver that is required to support establishing connection to a PC.
(If it is not installed, some functions will not be supported.)
1. Click on "DV Driver" on the setup screen.
• Driver software required is installed automatically. Following drivers will be installed:
- USB PC-CAMERA driver
- USB streaming driver (USB video transfer)
2. Click on "Confirm" to finish driver installation.
3. If the "DirectX 9.0" is not installed, it is installed automatically after setting "DV Driver"..
• After installing DirectX 9.0, PC needs to be restarted.
• If DirectX 9.0 is installed already, there is no need to restart the PC.
Application Installation - Video Codec
• Click on "Video Codec" on the setup screen.
Video Codec is required to play movie files recorded by this memory camcorder on a PC.
English _71
USB interface
Application Installation – Quick Time
1. Click "Quick Time" on the setup screen.
• QuickTime is Apple's technology for handling movie, sound, animation,
graphics, text, music, and even 360-degree virtual reality (VR) scenes.
CyberLink Power Director
• CyberLink Power Director is software for easily editing MPEG, AVI, and other video files, still images, and other contents
for creating a movie. This software has an interface that allows editing in either time line or storyboard mode, maintains
superior image quality, uses SVRT for high-speed rendering, and has a host of other advanced video editing features.
Setting up CyberLink Power Director
• After inserting another CD("Cyberlink Power Director"), the setup screen displays
automatically. Follow the instruction to start installation.
This manual only refers to software installation and PC connection.
For more details on software, refer to the "Online help/Readme"
on the CyberLink Power Director CD.
• Please install by using the Software CD that came with
this memory camcorder. We do not guarantee compatibility with other CDs.
• For movie playback on a PC, install software in this order :
DV Driver - DirectX 9.0 - Video Codec
• For movie editing, use the CyberLink Power Director.
• For PC Cam use, install software in this order:
DV Driver - DirectX 9.0 - Video Codec
• You have to install "DV Driver", "Video Codec" and "DirectX 9.0" to run
DV Media Pro properly.
• During installation, if the Microsoft LOGO test warning is shown, just click ‘Continue(C).’
• If a message saying "Digital Signature not found" or something similar appears,
ignore the message and continue with the installation.
72_English
CONNECTING THE USB CABLE
Connect the USB cable to copy movie images from the camcorder
to the PC and vice versa.
You can use various other functions with USB connection.
(as a PC-camera, data storage, etc.)
1. Set the "USB Connect" to "Mass Storage." ➥page 68
2. Connect the memory camcorder to the PC with a USB cable.
PC
Memory camcorder
USB cable
•
•
•
Don’t apply excessive force when inserting or extracting a USB cable into/from a USB jack.
We recommended using the camcorder's AC adapter as the power supply instead of the battery pack.
When the USB cable is connected, turning the camcorder on or off the camcorder may cause the PC to
malfunction.
Disconnecting the USB cable
Before loading or unloading recording mediums or turning off the PC, first disconnect the USB cable and turn off the
memory camcorder.
After completing the data transmission, you must disconnect the cable in the following way:
1. Click the "Unplug or eject hardware" icon on the task tray.
2. Select "USB Mass Storage Device" or "USB Disk," and then click "Stop."
3. Click "OK."
4. Disconnect the USB cable from the memory camcorder and PC.
•
•
If you disconnect the USB cable from the PC or the memory camcorder while transferring,
the data transmission will stop and the data may be damaged.
If you connect the USB cable to a PC via a USB HUB or simultaneously connect the USB cable
along with other USB devices, the memory camcorder may not work properly. If this occurs, remove all USB
devices from the PC and reconnect the memory camcorder.
English _73
USB interface
VIEWING THE CONTENTS OF STORAGE MEDIA
1. Slide the POWER switch downward to turn on the memory camcorder.
- Select the desired recording medium. ➥page 32 (SC-MX10A/MX10AU only)
- Make sure that there is a memory card in the memory camcorder
(SC-MX10/MX10P only).
2. Connect the memory camcorder to the PC with a USB cable. ➥page 73
- Check out the USB connection on the LCD monitor.
3. When using Windows® XP,Vista version :
- The "Removable Disk" window appears on the PC’s screen after a moment.
- Select "Open folders to view files using Windows Explorer" and click "OK."
When using Windows® 2000:
a. Doubleclick the "My Computer" icon on the desktop.
The "Removable Disk" icon which represents the storage media in the
memory camcorder appears in the "My Computer" window.
b. Doubleclick the "Removable Disk" icon.
4. The folders in the storage media appear.
- Different file types are stored in different folders.
If the "Removable Disk" window does not appear, confirm the connection
or perform the steps 1 and 2.
VIDEO
Structure of folders and files on the storage media
• The folder and file structure for built-in memory or memory card is as follows.
• Don’t arbitrarily change or remove the folder or file name. It may not be playable.
Movie images file (1)
The SD-quality movie images have SDV_####.AVI format. The file number
automatically increases when a new movie image file is created. When the
number exceeds 9,999, a new folder is created and it is stored in SDV_0001.AVI.
General data file (2)
It is the place where the user can save general document files as a storage device.
74_English
Movie image
Setting data
VIDEO
100VIDEO
SDV_0001.AVI
SDV_0002.AVI
MISC
1
2
• When
•
999 folders and 9,999 files are recorded, you cannot record any more.
In this case, format your storage media. (memory card, etc.)
You may modify the name of a file/folder stored in the memory card using a PC.
This memory camcorder may not recognize modified files.
TRANSFERRING FILES FROM THE MEMORY CAMCORDER TO YOUR PC
You can copy the movie images to your PC.
1.
2.
3.
Execute the procedure in "Viewing the contents of storage media." ➥page 74
The folders in the storage media appear.
Create a new folder, enter the folder name, and then double-click it.
Select the folder to copy, and then drag and drop it into the destination folder.
• The folder is copied from the storage media (memory card (all models) or internal
memory (SC-MX10A/MX10AU) to the PC.
• Saving the wrong kinds of files in a recording medium or deleting files or folders
from a recording medium can cause problems with the operation of the memory
camcorder. When it is necessary to delete a file from a storage media (memory card
(all models) or internal memory (SC-MX10A/MX10AU), delete it through the memory
camcorder. Also, do not move or rename folders and files within the medium on PC.
Playing Back Files on the PC
Movie Images
Use the "DV Media Pro".
- You can install this software from the provided CD.
For more details of "Video Codec". ➥page 71
hen playing back a file in the recording medium on your PC, copy the file to your PC, and then play it back.
W
If video file is played back directly from recording medium (i.e. the memory camcorder is connected
through USB to your PC), it may be not played back properly due to the inadequate processing speeds or
other problems.
English _75
USB interface
USING THE PC CAM FUNCTION
You can use your memory camcorder as a PC camera for video chatting, video conference and other PC camera applications.
Before you start!
For PC Cam use, you must install the DV Driver. ➥page 71
1. Slide the POWER switch downward to turn on the memory camcorder.
• The Movie Record mode screen appears.
2. Press the MENU button and select the " Settings". ➥page 62
• The Settings screen appears.
3. Press the Control button ( / ) to select "USB Connect".
4. Press the Control button ( / ) to select "PC Cam" and then
press the OK button.
5. Turn on your PC.
6. Connect the memory camcorder to your PC with the USB cable.
7. The memory camcorder can be used as a PC Cam for programs such as
Windows Messenger.
- Various applications take advantage of the "PC Cam" function.
Refer to respective product documentation for further details.
- When finished, disconnect the USB cable.
•
•
•
•
•
Settings
120
MIN
USB Connect
Mass Storage
PC Cam
Move
PC
OK
Select
MENU
Exit
Memory camcorder
USB cable
We recommended using the AC Power Adapter during data transfer to avoid unintended power outages.
When the USB port connection is changed, it may require DV Driver re-installation. ➥page 71
If you connect more than two USB devices to a single PC or use a hub for USB connection,
the PC camera function may not work properly.
You may see a popup message for compatibility confirmation, depending on the PC specification.
Press "Continue" and follow the on-screen instructions to complete the installation.
If the DV Media Pro is not properly installed on your PC, during connection, you may see the Found
New Hardware Wizard on the screen during connection. Follow the on-screen instructions to complete
the installation.
76_English
connection
You can view the recorded movies on a large screen by connecting the memory camcorder to a TV.
VIEWING ON TV SCREEN
To playback your recordings, the television must be NTSC compatible. ➥ page 80
Connecting to a TV
Use the provided multi-AV cable to connect the memory
camcorder to a TV as follows:
1. Connect the end of the Multi AV cable with the single plug
to the AV jack of the camcorder.
2. Connect the other end with S-Video or Video (yellow) and
left(white)/ right(red) audio cables to the TV.
•
•
Before connecting, make sure that the volume on TV
is turned down: forgetting this may cause feedback from
the TV speakers.
Carefully connect the input and output cables to the
corresponding connections on the device the memory
camcorder is being used with.
Viewing on TV Screen
Normal TV
Memory Camcorder
INPUT
S-VIDEO
Signal flow
VIDEO
L-AUDIO-R
Multi-AV cable
If your TV has an S-VIDEO input jack,
use the S-Video plug for a clearer picture.
Stereo TV with
S-VIDEO Jack
S-VIDE O
AUDIO
R
Stereo TV
AUDIO
VIDEO
R
L
Mono TV
VIDEO
AUDIO
VIDEO
L
1. Turn on the TV and set the input selector to the Input
Yellow
White
connection the memory camcorder is connected to.
Yellow
Red
This is often referred to as "line".
White
- Refer to the TV instruction manual for how to switch the
White
Red
TV input.
2. Turn the memory camcorder on.
- Slide the POWER switch downward and press the MODE button to set Player (
). ➥ page 21
- The image from the memory camcorder will appear on the TV screen.
- You can also monitor the image on the LCD screen of the memory camcorder.
3. Perform playback. You can perform playback, recording or make settings in the menu while viewing on your TV screen.
• When a copy-protected movie is played back, no image will appear on TV screen.
• Information that the memory camcorder is recording will appear on the TV screen: You can also display only
part of information or switch off the display. Refer to “ TURNING THE SCREEN INDICATORS ON/OFF (
)”
on page 25, and press the
button to switch the display status.
English_77
R
W
R
W
Y
R
Y
Y
R
W
B
G
W
Y
connection
RECORDING (DUBBING) IMAGES ON OTHER VIDEO DEVICES
You can record (dub) images played back on this
memory camcorder, onto other video devices.
Use the multi-AV cable(provided) to connect the
memory camcorder to another video device as
shown in the following figure:
1. Press the MODE button to set Player(
).
➥page 21
2. Choose the recorded (dubbed) movie on the
thumbnail view and then press the OK button.
3. Press the record button on the connected device.
- The memory camcorder will start playback
and the recording device will record (dub) it.
•
•
Memory Camcorder
VCRs or DVD/HDD
recorders
INPUT
S-VIDEO
Signal flow
VIDEO
L-AUDIO-R
Multi-AV cable
Using S-VIDEO will deliver clearer images.
Be sure to use the AC adaptor to power the memory camcorder to prevent battery power from shutting off
during recording on another video device.
78_English
maintenance & additional information
MAINTENANCE
Your memory camcorder is a product of superior design and craftsmanship and should be treated with care.
The suggestions below will help you fulfill any warranty obligations and allow you to enjoy this product for many years.
✪ For safekeeping of the memory camcorder, turn off the memory camcorder.
- Remove the battery pack and AC power adaptor. ➥page 13
- Remove the memory card. ➥page 32
Cautions on Storing
• D
o not leave the memory camcorder in a place where the temperature is very high for a long period
of time:
The temperature inside a closed vehicle or trunk can become very high in a hot season. If you leave the memory
camcorder in such a place, it could malfunction or the case could be damaged. Do not expose the memory
camcorder to direct sunlight or place it near a heater.
• Do not store the memory camcorder in a place where the humidity is high or in a dusty place:
Dust entering the memory camcorder could cause malfunctions. If humidity is high, the lens could become moldy,
and the memory camcorder could become inoperative. It is recommended that you put the memory camcorder in
a box together with a desiccant when storing it in a closet, etc.
• Do not store the memory camcorder in a place subject to strong magnetism or intense vibrations:
This could cause malfunctions.
• Detach the battery pack from the memory camcorder and store it in a cool place:
Leaving the battery pack attached or storing it at high temperature could shorten its life.
Cleaning the memory camcorder
✪ Before cleaning, turn off the memory camcorder and remove the battery pack and AC power adapter.
• To clean the exterior
Wipe gently with a soft dry cloth. Do not apply excessive force when cleaning, gently rub the surface.
- Do not use benzene or thinner to clean the camcorder. The coating of exterior could peel off or the case could
deteriorate.
English_79
➥
maintenance & additional information
• To clean the LCD monitor
Wipe gently with a soft dry cloth. Be careful not to damage the monitor.
• To clean the lens
Use an optional air blower to blow out dirt and other small object. Do not wipe the lens with cloth or your fingers.
If necessary, wipe gently with lens cleaning paper.
- Mold may form if the lens is left dirty.
- If the lens looks dimmer, turn off the memory camcorder and leave it for about 1 hour.
ADDITIONAL INFORMATION
Using your memory camcorder abroad
• Each country or region has its own electric and color systems.
• Before using your memory camcorder abroad, check the following items.
• Power sources
The provided AC adapter features automatic voltage selection in the AC range from 100 V to 240 V.
You can use your camcorder in any countries/regions using the AC power adaptor supplied with your camcorder
within the AC 100 V to 240 V, 50/60 Hz range.
Use a commercially available AC plug adaptor, if necessary, depending on the design of the wall outlet.
• About TV color systems
Your camcorder is an NTSC-system-based camcorder.
If you want to view your recordings on a TV or to copy it to an external device, it must be an NTSC-system-based
TV or an external device having the appropriate Audio/Video jacks. Otherwise, you may need to use a separate
video format transcoder (NTSC-PAL format converter).
•
•
NTSC-Compatible Countries / Regions
Bahamas, Canada, Central America, Japan, Mexico, Philippines, Korea, Taiwan, United States of America, etc.
PAL-Compatible Countries / Regions
Australia, Austria, Belgium, Bulgaria, China, CIS, Czech Republic, Denmark, Egypt, Finland, France, Germany, Greece, Great Britain, Holland, Hong Kong, Hungary, India, Iran, Iraq, Kuwait, Libya, Malaysia, Mauritius, Norway, Romania, Saudi Arabia, Singapore, Slovak Republic, Spain, Sweden, Switzerland, Syria, Thailand, Tunisia, etc.
80_English
troubleshooting
TROUBLESHOOTING
✪ Before contacting a Samsung authorized service center, perform the following simple checks.
They may save you the time and expense of an unnecessary call.
Warning indicators and messages
Power source
Message
Low Battery
Auto Power Off
Informs that...
The battery pack is almost discharged.
If no button is pressed for about 5
minutes, the memory camcorder is
automatically turned off .
("Auto Power Off").
Action
Change to a charged one or use
AC adaptor.
Charge the battery pack.
To disable this option, change the
setting of "Auto Power Off" to
"Off" ➥page 65
English_81
troubleshooting
Storage media
Message
Informs that...
Action
Memory Full
There is not enough space to record
on built-in memory.
Delete unnecessary files on the
built-in memory. (SC-MX10A/MX10AU)
Use a memory card.
Insert Card
There is no memory card inserted in
the card slot.
Insert a memory card.
Use the built-in memory.
(SC-MX10A/MX10AU)
Card Full
There is not enough space to record
on memory card.
Delete unnecessary files on the
memory card.
Use the built-in memory.
(SC-MX10A/MX10AU)
The memory card is corrupted.
Format the memory card or replace
it with a new one.
The memory card is not supported in
this camcorder.
Change the memory card that we
recommended.
Card Error
Not Supported Card
Editing files
Message
Not Formatted
Informs that...
The memory card is not formatted.
Action
Format the memory card.
Recording
Message
Not Supported Format
82_English
Informs that...
The format is not supported.
Action
The file format is not supported.
Check the supported file.
CAUTION
When there is dew condensation, do not use the camcorder for a while
• What is dew condensation?
Dew condensation happens when a memory camcorder is moved to a place where there is a significant
temperature difference from the previous place. In other words, the water vapor in the air turns into dew
because of the temperature difference, and it condensates like dew on the external or internal lenses of
the memory camcorder and on the reflection lens.
When this happens, you temporarily may not use the record or play functions of the memory camcorder.
Also, it may cause a malfunction or damage to the memory camcorder when using the device with the
power on while there is dew condensation.
• What can I do?
Turn the power off and detach the battery pack, and leave it in a dry area for 1~2 hours before using it.
• When does the dew condensation occur?
When the device is relocated to a place with a higher temperature than the previous location, or when
using it in a hot area suddenly, it will cause condensation.
- When recording outside in cold weather during the winter and then using it in indoors.
- When recording outside in hot weather after being indoors or inside a car where the AC was running.
Note before sending your camcorder for repair.
• If these instructions do not solve your problem, contact your nearest Samsung authorized service center.
• Depending on the problem, current hard disk may need to be initialized or replaced and the data will be
deleted. Be sure to back up the data on the hard disk on the other storage media before sending your
camcorder to repair. Samsung cannot guarantee any loss of your data.
English_83
troubleshooting
✪ If you encounter any problem using your camcorder, check the following before requesting service.
If these instructions do not solve your problem, contact the nearest Samsung authorized service
center.
Symptoms and solutions
Power
Symptom
The power does not turn on.
Explanation/Solution
• The battery pack may not be installed on your memory camcorder. Insert a
battery pack to the memory camcorder.
• The inserted battery pack may be discharged. Charge the battery pack or
replace it with a charged one.
•If you use an AC power adaptor, make sure it is properly connected to the
wall outlet.
• Your memory camcorder has been left for more than 5 minutes without any
button operation. To turn on your memory camcorder, press the Record
start/stop button.
• Is "Auto Power Off" set to "On"?
The power automatically turns off.
If no button is pressed for about 5 minutes, the memory camcorder is
automatically turned off ( "Auto Power Off"). To disable this option,
change the setting of "Auto Power Off" to "Off" ➥page 65
• The battery pack is almost discharged. Charge the battery pack or replace
it with a charged one.
Power cannot be turned off.
The battery pack is quickly
discharged.
84_English
• Remove the battery pack or unplug the AC power adaptor, and connect
the power supply to the camcorder again before turning it on.
• The temperature is too low.
• The battery pack is not fully charged. Charge the battery pack again.
• The battery pack reached its lifespan and cannot be recharged.
Use another battery pack.
Displays
Symptom
Explanation/Solution
•All movies recorded with this memory camcorder have 4:3 aspect ratio.
- It can occur when recording or viewing a 16:9-ratio image on the LCD
The screen of TV or LCD screen
screen. For more details, see the display specifications. ➥page 55, 61
displays distorted images.
- If you want to display properly on your TV, check out your TV type and set
the proper screen mode (4:3 aspect ratio).
Unknown image appears on the
LCD screen.
• T
he memory camcorder is in "Demo" mode.
Change the setting "Demo" to "Off". ➥page 68
• A warning indicator or message appears on the screen. ➥page 81
The afterimage remains on the
LCD screen.
• This occurs if you disconnect the AC power adaptor or remove the battery
pack before turning the power off.
The image on the LCD screen
looks dark.
• Ambient light is too bright. Adjust the brightness and angle of LCD.
Menu
Symptom
Explanation/Solution
• You cannot select grayed items in the current recording/playback mode.
• There are some functions you cannot activate simultaneously. The following list
shows examples of unworkable combinations of functions and menu items.
If you want to set the desired functions, do not set the following items first.
<Cannot Use>
<Because of the following setting>
Menu items are grayed out.
Scene Mode(AE)
Exposure (Manual)
• Most of menu items cannot be selected when you set the EASY.Q function.
• If there is no storage media inserted, it can not be selected and will be dimmed
on the menu : " Memory Info", "Format", etc.
English_85
troubleshooting
Recording Media (Memory card, etc)
Symptom
Explanation/Solution
Memory card functions are not
operable.
• Insert a memory card into your camcorder properly. ➥page 33
• If you use a memory card formatted on a computer, format it again directly
on your camcorder. ➥page 67
Image cannot be deleted.
• The recorded images are protected. Remove protection from the files and
delete them. ➥page 59
• You cannot delete images protected by another device.
Release the protection of the image on the device.
• Release the lock on the write-protect tab of the memory card
(SDHC, standard SD memory card etc), if any. ➥page 34
You cannot format the memory
card.
• Release the lock on the write-protect tab of the memory card
(SDHC, standard SD memory card, etc), if any. ➥page 34
• Copy any important recorded files to your PC before formatting.
Samsung shall not be responsible for any loss of data. (It is recommended
that you copy the data to your PC or other storage media.)
• The file may be corrupted.
The data file name is not indicated • The file format is not supported by your camcorder.
correctly.
• Only the file name is displayed, if the directory structure does not comply
with the international standard.
86_English
Recording
Symptom
Pressing the Recording
start/stop button does not
start recording.
Explanation/Solution
• Press the MODE button to set Movie Record mode (
).
• There is not enough free space to record on the built-in memory or memory
card.
• Check if the memory card is write-protected or if SDHC memory card is
inserted.
• The internal temperature of your camcorder is unusually high. Turn off your
camcorder and leave it for a while in a cool place.
• Your camcorder is damp and moist inside (condensation). Turn off your
camcorder and leave it for about 1 hour in a cool place. ➥page 79
• T
he recording time is measured under Samsung’s standard recording test
The actual recording time is less
conditions and may differ depending on actual use.
than the estimated time.
• When you record an object that moves fast, the actual recording time may
be shorten.
The recording stops
automatically.
• If you make a frequent recording or deletion of files, the performance of the
built-in flash memory will deteriorate. In this case, format the built-in memory
again.
When recording a subject
illuminated by bright light,
vertical lines appear.
• This is not a malfunction.
English_87
troubleshooting
Symptom
Explanation/Solution
When the screen is exposed to
direct sunlight during recording,
the screen becomes red or black
for an instant.
• This is not a malfunction.
During recording, the date/time
does not display.
• "Date/Time" is set to "Off". Set the "Date/Time" to "On". ➥page 64
There is a time difference
between the point where you
press Recording start/stop
button and the point where the
recorded movie starts/stops.
• On your camcorder, there may be a slight time delay between the point
when you press Recording start/stop button and the actual point where
the recorded movie starts/stops. This is not an error.
The recording stops.
• The internal temperature of your camcorder is unusually high. Turn off your
camcorder and leave it for a while in a cool place.
• Your camcorder is damp and moist inside (condensation). Turn off your
camcorder and leave it for about 1 hour in a cool place. ➥page 79
88_English
Adjusting the image during recording
Symptom
Explanation/Solution
Focus does not adjust
automatically.
• Set "Focus" to "Auto". ➥page 53
• The recording conditions are not suitable for auto focus. Adjust the focus
manually. ➥page 53
• The lens is dusty on the surface. Clear the lens and check the focus.
• Recording is being made in a dark place. Light up to brighten the place.
The image appears too bright or
flickering, or changes in color.
• This occurs when recording images under a fluorescent lamp, sodium lamp,
or mercury lamp. Cancel "Scene Mode (AE)" to minimize this phenomena.
➥page 48
Color balance of image is not
natural.
• White balance adjustment is required. Set proper "White Balance".
➥page 49
Unknown indicator appears on
the screen.
• A warning indicator or message appears on the screen.
The backlight function does not
function.
• While recording in EASY.Q mode, the backlight function does not work.
English_89
troubleshooting
Playback on your camcorder
Symptom
Explanation/Solution
Pressing the
Play/Pause button does
not start playback.
• Press the MODE button to set Movie Play mode. (
)
• Image files recorded using other device may not be played on your memory camcorder.
• Select a proper recording medium.
The Skip or Search
function does not work
properly.
• If the temperature inside the camcorder is too high, it can not function properly.
Turn the camcorder off, wait for a few moments, and turn it on again.
Playback is interrupted
unexpectedly.
• Check the AC adaptor or battery pack is properly connected and stable.
Playback on other devices (TV, etc.)
Symptom
Explanation/Solution
You cannot view the
image or hear the sound
on the connected device.
• Connect the audio line of the multi-AV cable to your camcorder or to the connected
device (TV, DVD recorder, etc). (Red color- right, White color- left)
• The multi-AV cable is not connected properly. Make sure that the multi-AV cable is
connected to the proper jack. ➥page 77
• When you are using the S-VIDEO cable, make sure to connect red and white plugs
of your multi-AV cable separately since S-VIDEO cable does not support audio.
➥page 77
• All movies recorded with this memory camcorder have 4:3 aspect ratio.
The image appears
So this happens when viewing recorded movies on a 16:9 wide screen TV.
distorted on the 16:9 wide
• If you want to display properly on your TV, check out your TV type and set the
TV.
proper screen mode (4:3 aspect ratio).
90_English
Connecting/Dubbing with other devices (TV, DVD player, etc)
Symptom
Explanation/Solution
You cannot dub correctly
using the multi-AV cable.
• The multi-AV cable is not connected properly. Make sure that the multi-AV cable is
connected to the proper jack, i.e. to the input jack of the device used for dubbing
an image from your camcorder. ➥page 78
Connecting to a computer
Symptom
The computer does not
recognize your camcorder.
Cannot play a movie file
properly on a PC.
Cannot use the provided
software, "DV Media Pro",
on a Macintosh computer.
Explanation/Solution
• Install the provided software program. ➥page 71
• Disconnect the USB devices other than the keyboard, the mouse and the
camcorder from the computer.
• Disconnect the USB cable from the computer and camcorder, restart the
computer, then connect it again correctly.
• A video codec is needed to play the file recorded on your memory camcorder.
Install the software provided with your camcorder ➥page 71.
Please install by using the software CD that came with this camcorder.
We do not guarantee compatibility for different CD versions.
• Make sure you insert the connector in the correct direction, and connect the USB
cable to the USB jack on your camcorder firmly.
• Disconnect the cable from the computer and camcorder, restart the computer.
And connect it again properly.
• You cannot use "DV Media Pro" for a Macintosh computer.
• This camcorder is recognized just as a removable storage device on the Macintosh
computer. (Mac OS 10.3 or above supported.)
English_91
troubleshooting
Symptom
Explanation/Solution
"DV Media Pro" does not
function properly.
• Exit the "DV Media Pro" program, and restart the Windows computer.
The image or sound on
your camcorder is not
played on your computer
properly.
• Movie playback or sound may stop temporarily depending on your computer.
The movie or sound copied to your computer is not affected.
• If your camcorder is connected to a computer that does not support Hi-speed
USB(USB2.0), the images or sound may not be played back correctly.
The images and sound is copied to your computer is not affected.
The playback screen is
paused or distorted.
• Check the system requirements to play a movie. ➥page 69
• Exit other all applications running on the current computer.
Overall operations
Symptom
The date and time are
incorrect.
92_English
Explanation/Solution
• Has the camcorder been left unused for a long period of time? The backup memory
battery (button-type battery) may be discharged: replace it with a new one.
➥page 20
specifications
Model Name: SC-MX10/SC-MX10p/SC-MX10a/SC-MX10AU
Video signal
Picture compression format
Audio compression format
Recording quality
Image device
Lens
Focal Length
Minimum Illumination
Filter diameter
Size/dot number
LCD screen method
S-Video output
Composite video out
Audio output
USB output
System
NTSC
MPEG4 ASP Format
ADPCM
Super Fine (about 12Mbps), Fine (about 10Mbps), Normal (about 8Mbps)
CCD (Charge Coupled Device) (Max/Effective : 680K/350K pixels)
F1.6 to 4.3, 34x (Optical), 1200x (Digital) Electronic zoom lens
2.3~78.2mm
3.0 Lux
Ø30
LCD screen
2.7 inches wide, 112k
1.6" interlaced scan, LCD panel/TFT active matrix system
Connectors
Y:1V (p_p), 75Ω, analog
C:0.286Vp_p, 75Ω, analog
1.0V (p_p), 75Ω, analog
(-7.5dBm 47KΩ, analog, stereo)
mini USB-B type (USB2.0 High Speed)
General
8.4V (Using AC adapter), 7.4V (Using Lithium Ion battery pack)
Power supply (100V~240V) 50/60Hz, Lithium Ion battery pack
Power source
Power source type
Power consumption
2.96W, 0.4A / 2.4W ( 0.3A)
(LCD on/LCD off)
Operating temperature
0˚~40˚C (32˚F~104˚F)
Operating humidity
30% ~80%
Storage temperature
-20˚C ~ 60˚C (-4˚F ~ 140˚F)
Dimensions (W x H x D)
Approx. 2.36" x 2.46" x 4.76" (60mm x 62.5mm x 121mm)
Weight
Approx. 0.61Ibs (280g) (expect for battery pack or memory card)
Internal MIC
Omni-directional stereo microphone
These technical specifications and design may be changed without notice.
English_93
Warranty
SAMSUNG
LIMITED WARRANTY
SAMSUNG Electronics America Inc. (SEA), warrants that this product is free from defective material and
workmanship.
SEA further warrants that if product fails to operate properly within the specified warranty period and the failure is due
to improper workmanship or defective material, SEA will repair or replace the product at it’s option.
All warranty repairs must be performed by a SEA authorized service center. The name and address of the location
nearest you can be obtained by calling toll free: 1-800 SAMSUNG (1-800-726-7864).
Labor
90 days carry-in
Parts
1 year
On carry-in models, transportation to and from the service center is the customer’s responsibility.
The original dated sales receipt must be retained by the customer and is the only acceptable proof of purchase.
It must be presented to the authorized service center.
EXCLUSIONS (WHAT IS NOT COVERED)
This warranty does not cover damage due to accident, fire, flood and/or other acts of God; misuse, incorrect line
voltage, improper installation, improper or unauthorized repairs, commercial use, or damage that occurs in shipping.
Exterior and interior finish, lamps, and glass are not covered under this warranty.
Customer adjustments which are explained in the instruction manual are not covered under the terms of this warranty. This warranty will automatically be voided for any unit found with a missing or altered serial number. This warranty
is valid only on products purchased in the United States and Puerto Rico.
Some States do not allow the exclusions or limitations of incidental or consequential damages, or allow limitations on
how long an implied warranty lasts, so the above limitations or exclusions may not apply to you. This warranty gives you specific legal rights, and you may also have other rights which vary from State to State.
94_English
contact SAMSUNG world wide
If you have any questions or comments relating to Samsung products, please contact the samsung customer care center.
Region
North America
Latin America
Country
CANADA
MEXICO
U.S.A
ARGENTINE
BRAZIL
CHILE
COSTA RICA
ECUADOR
EL SALVADOR
GUATEMALA
JAMAICA
PANAMA
PUERTO RICO
REP. DOMINICA
TRINIDAD & TOBAGO
VENEZUELA
COLOMBIA
BELGIUM
CZECH REPUBLIC
Europe
CIS
Asia Pacific
Middle East & Africa
DENMARK
FINLAND
FRANCE
GERMANY
HUNGARY
ITALIA
LUXEMBURG
NETHERLANDS
NORWAY
POLAND
PORTUGAL
SLOVAKIA
SPAIN
SWEDEN
U.K
Republic of Ireland
AUSTRIA
Switzerland
RUSSIA
KAZAHSTAN
UZBEKISTAN
KYRGYZSTAN
UKRAINE
LITHUANIA
LATVIA
ESTONIA
AUSTRALIA
New zealand
CHINA
HONG KONG
INDIA
INDONESIA
JAPAN
MALAYSIA
PHILIPPINES
SINGAPORE
THAILAND
TAIWAN
VIETNAM
Turkey
SOUTH AFRICA
U.A.E
Customer Care Center
1-800-SAMSUNG (726-7864)
01-800-SAMSUNG (726-7864)
1-800-SAMSUNG (726-7864)
0800-333-3733
0800-124-421, 4004-0000
800-SAMSUNG (726-7864)
0-800-507-7267
1-800-10-7267
800-6225
1-800-299-0013
1-800-234-7267
800-7267
1-800-682-3180
1-800-751-2676
1-800-SAMSUNG(726-7864)
0-800-100-5303
01-8000112112
0032 (0)2 201 24 18
844 000 844
Distributor pro Českou republiku :Samsung Zrt., česka organizační složka Vyskočilova 4, 14000 Praha 4
70 70 19 70
030-6227 515
3260 SAMSUNG(726-7864) or 08 25 08 65 65 (€ 0,15/Min)
01805 - 121213 (€ 0,14/Min)
06-80-SAMSUNG (726-7864)
800-SAMSUNG (726-7864)
0035 (0)2 261 03 710
0900 20 200 88 (€ 0,10/Min)
815-56 480
0 801 801 881,022-607-93-33
80 8 200 128
0800-SAMSUNG (726-7864)
902 10 11 30
0771-400 200
0870 SAMSUNG (726-7864)
0818 717 100
0800-SAMSUNG(726-7864)
0800-SAMSUNG(726-7864)
8-800-555-55-55
8-10-800-500-55-500
8-800-120-0-400
00-800-500-55-500
8-800-502-0000
8-800-77777
800-7267
800-7267
1300 362 603
0800SAMSUNG (726-7864)
800-810-5858, 010-6475 1880
3698 - 4698
3030 8282, 1800 110011
0800-112-8888
0120-327-527
1800-88-9999
1800-10-SAMSUNG (726-7864)
1800-SAMSUNG (726-7864)
1800-29-3232, 02-689-3232
0800-329-999
1 800 588 889
444 77 11
0860-SAMSUNG (726-7864)
800-SAMSUNG (726-7864), 8000-4726
Web Site
www.samsung.com/ca
www.samsung.com/mx
www.samsung.com/us
www.samsung.com/ar
www.samsung.com/br
www.samsung.com/cl
www.samsung.com/latin
www.samsung.com/latin
www.samsung.com/latin
www.samsung.com/latin
www.samsung.com/latin
www.samsung.com/latin
www.samsung.com/latin
www.samsung.com/latin
www.samsung.com/latin
www.samsung.com/latin
www.samsung.com.co
www.samsung.com/be
www.samsung.com/cz
www.samsung.com/dk
www.samsung.com/fi
www.samsung.com/fr
www.samsung.de
www.samsung.com/hu
www.samsung.com/it
www.samsung.be
www.samsung.com/nl
www.samsung.com/no
www.samsung.com/pl
www.samsung.com/pt
www.samsung.com/sk
www.samsung.com/es
www.samsung.com/se
www.samsung.com/uk
www.samsung.com/ie
www.samsung.com/at
www.samsung.com/ch
www.samsung.ru
www.samsung.kz
www.samsung.uz
www.samsung.ua
www.samsung.lt
www.samsung.com/lv
www.samsung.ee
www.samsung.com/au
www.samsung.com/nz
www.samsung.com.cn
www.samsung.com/hk
www.samsung.com/in
www.samsung.com/id
www.samsung.com/jp
www.samsung.com/my
www.samsung.com/ph
www.samsung.com/sg
www.samsung.com/th
www.samsung.com/tw
www.samsung.com/vn
www.samsung.com.tr
www.samsung.com/za
www.samsung.com/mea
If you have any questions or comments relating to Samsung
products, please contact the SAMSUNG customer care
center Samsung Electronics America, inc.
1-800-SAMSUNG (726-7864)
www.samsung.com/us
RoHS compliant
Our product complies with “The Restriction Of the use of certain
Hazardous Substances in electrical and electronic equipment”,
and we do not use the 6 hazardous materials- Cadmium(Cd), Lead
(Pb), Mercury (Hg), Hexavalent Chromium (Cr +6), Poly Brominated
Biphenyls (PBBs), Poly Brominated Diphenyl Ethers(PBDEs)- in
our products.
Code No. AD68-01307A - 00