1
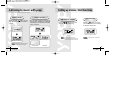
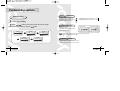
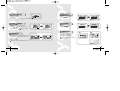
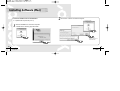
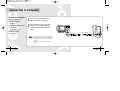
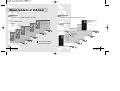
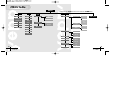
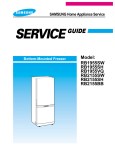
Miniature Design
D.I.Y. Support
Backlight Support
Real time Clock
Voice Recording
High Speed USB
64MB of Built-in Memory
http://www.samsungyepp.com
AH68-00945A
Contents
Preparations
Explorer Usage
Features ......................................................................................................3
Components ................................................................................................4
The name of parts ........................................................................................5
Inserting a battery ........................................................................................6
How to use yepp Explorer ..........................................................................31
Setting up Options......................................................................................33
Copying files to yepp (PC) ........................................................................35
Copying files to yepp (Mac) ......................................................................37
Deleting files (PC) ......................................................................................39
Deleting files (Mac) ....................................................................................40
Formatting (PC)..........................................................................................41
Formatting (Mac) ........................................................................................42
Uploading files (PC) ..................................................................................43
Uploading files (Mac)..................................................................................44
Moving files ................................................................................................45
Installing CD Ripper ..................................................................................46
Basic Usage
Listening to music with yepp ........................................................................7
Setting up Volume/Hold functions ..............................................................8
Changing modes ..........................................................................................9
Recording Voice ........................................................................................10
Searching for music/voice files ..................................................................11
Additional Usage
Loop repeating ..........................................................................................13
Setting up Menu ........................................................................................14
Repeating tracks ......................................................................................15
Setting up EQ ............................................................................................16
Setting up Files (Deleting/Formatting) ......................................................17
Customizing Options (Setting)....................................................................19
Connection to PC
1
Installing Software (PC)..............................................................................23
Installing Software (Mac) ..........................................................................25
Connecting to Computer ............................................................................27
Manual Installation of USB Driver ............................................................29
Appendix
Description of Buttons ................................................................................47
MENU table ..............................................................................................49
Customer Support
Precautions ................................................................................................51
Something wrong with yepp ? ..................................................................52
Security ....................................................................................................53
Specifications ............................................................................................54
Safety Information ......................................................................................55
Warranty ....................................................................................................57
2
Features
Components
yepp has the sound quality as good
as that of music CD.
Earphones
Miniature Design
Real time Clock
Smallest and lightest in the world
Automatic Clock Setting
D.I.Y. Support
Voice Recording
Logo embellish ment
Changing LCD fonts
Adjusting Scroll Speed
Voice Recording for 4 hours and 28
minutes in max
USB cable
Installation Pull the sponge on the
bottom in the direction of
CD
arrow, and there is an
installation CD.
Player body
Adjusting Contrast
High Speed USB
Backlight Support
Fast Downloading Speed
MAX. 7Mbps(the fastest speed in the
world)
Digital Audio Player
Neck strap
One battery
(1.5V AAA type)
User's Guide
Arm band
Cradle
N o t i c e : To put yepp in the cradle or to take it out from the cradle, use a coin to
3
turm open the screw to remove the hook on the back of cradle.
4
The name of parts
Front
Microphone
Earphones Jack
Back
Inserting a battery
Play/Stop/Pause/
Forward/Backward
Button
Volume
Display Window
Hold
After sliding the cover in the direction
the arrow is indicating, open the cover
pressing "PUSH OPEN".
Recording/Mode/Function
Setting Buttons
USB Cable
connection port
5
Inserting the battery to the right
poles (⊕, ⊖) and push-close
the cover in the direction the
arrow is indicating
N o t i c e : It will be the cause of damage if too much weight is
pressed on the cover.
6
Listening to music with yepp
Setting up Volume / Hold functions
First, insert a battery and connect the earphones to the player.
Playing music
Stopping music
Adjusting the volume
When you press
button, the yepp
logo appears and a music/voice file is
played.
When you press
button while playing,
the music stops. If any key is not entered it
automatically turns into Power off or Sleep
mode in 5 seconds
Press the / button on the side to
adjust the volume while playing.
N o t e : Volume ranges from 00 to 30.
HOLD function
Slide the
switch on the side
in the direction the arrow is indicating
to change to HOLD mode.
N o t i c e : Under Hold mode, no key works.
● Press short to adjust step by step.
● Press long to adjust continuously.
N o t e : Both Power Off and Sleep modes
can be set in the menu mode.
7
Power Off mode
Sleep mode
8
Changing Modes
Recording voice
To record voice
Changing to voice mode
09:41
Nor
002
●Stop playing music and press the
button short to change to voice mode.
Press the
button to play.
1
2
Press
button to begin
recording voice.
Nor
VI002. SC4
Press the
button to pause
while recording. Press the button
again to resume recording.
002
09:41
00:00:35
Nor
Record Pause
Changing to music mode
●Stop playing voice and press the
button short one more time to change
to music mode.
Press the
button to play.
09:41
00:00:00
002
3
Press the
button to stop
recording. A new Voice File is
created.
09:41
00:00:35
Nor
VI002. SC4
002
STOP
N o t i c e : Recording is done in the order of VI001,VI002..…
9
● When memory is full, recording stops automatically.
(The remained time is displayed on the right from the center when recording begins.)
● Music mode is switched to voice mode after voice recording stop.
● When recording voice, make sure to record it for longer than 5 seconds.
10
Searching for Music/Voice files
Searching for specific parts in a
track (music/voice files)
Searching for music/voice files
in PLAY
Searching for music/voice files
in STOP
●Press
/
button for longer than 1 second
while playing to find and listen to the part you choose.
Release the button to resume playing.
●Press
button short while playing to play the
next track.
●Press
button within 5 seconds from the start to play
the previous track. Press
button short after 5 seconds
from the start to play the beginning of the current track.
●Press the
/
button in STOP mode, to
skip to the previous or next track. Press
button to play.
N o t i c e : There’s no sound while searching for specific parts in a track of
voice files unlike music files.
11
N o t e : ● With VBR files, pressing
button within 5 seconds from the start may not result in
playing the previous track.
● With VBR files, the actual running time may differ from that of the player body display.
● VBR(Variable Bit Rate) Files: mp3 files whose compression rate changes when played.
12
Loop repeating
Setting up MENU
Play mode switch to MENU mode when pressing the
than 1 second.
Loop function
Use the
button to select and the
/
button longer
button to move.
Press the MENU button one more time to cancel the MENU mode.
Starting point
While playing music/voice files,
press the
button short at the
first part that you want to set up
the loop.
●
Ending point
Press the
button short at the
last point of the loop.
●
1. Play mode
2. Equalizer
2. Equalizer
3. File
1. Play mode
2. Equalizer
appears in the display screen.
● The loop is repeatedly played.
flickers in the display.
N o t e : Press the
button short to cancel the loop.
3. File
4. Setting
4. Setting
5. Exit menu
●Play mode : To select track repeating mode.
●Equalizer : To use equalizer function
●File : To delete or format music/voice files.
●Setting : To change the basic setup options of the display.
●Exit menu : To exit MENU
N o t e : ●In MENU, Go up can be used to exit the current setting.
13
●In MENU mode, no input for 10 seconds will cancel the mode.
14
Repeating tracks
Setting up EQ
EQ function
Track Repeating function
1
2
In MENU, select 1.Play mode.
In PLAY MODE, use the
/
button to move to the mode you
want and press the
button to select.
Normal
2. Repeat one
Normal
2. Repeat one
3. Repeat all
4. Shuffle
15
In MENU, select 2.Equalizer.
In EQ, use the
/
button to move to the tone you want (out
of the 8 tones) and press the
button to select.
2. Repeat one
3. Repeat all
Normal
Classic
Jazz
Rock
Normal-DBB
Classic-DBB
Jazz-DBB
Rock-DBB
4. Shuffle
5. lntro
●Normal: To play all the tracks in order one time. ●Shuffle: To play tracks at random.
●Intro: To play the first 10 seconds of tracks.
●Repeat one: To repeat one track. One
●Repeat all: To repeat all tracks.
1
2
All
Intro
N o t e : ●DBB is for Dynamic Bass Booster, which refers to the technology
intensifying the bass sound.
16
Setting up Files
Deleting
1
2
3
17
Formatting
In MENU, select 3.File.
In FILE, select Delete and the mode the target file is in.
Select Cancel to exit the mode.
Move to the file to delete and press the
The file is deleted.
1
2
In MENU, select 3.File.
In FILE, select Format Confirm.
Select Cancel to exit the mode.
button to select.
N o t i c e : ●You can format also in yepp Explorer.
●All files will be deleted when formatting the built-in memory.
18
Customizing options
Display
Setting function
1
2
1. Information
●Play time: displaying current play time
●Compression: displaying compression rate
128 Kbps
●Remain time: displaying remained play time
●Free memory: displaying remained memory
32 MB FREE
●Total time: displaying total play time
In MENU, select 4.Setting.
Use the
/
button to move to the function you want to change
and select the function by using the
button.
Display
2. Logo
Default Setting
ex) User define Setting
●Default: "yepp" logo
●User define: displaying user-defined logo
●None: displaying no logo.
SETTING
SETTING
SETTING
2. Time
3. Backlight
1. Display
2. Time
3. Backlight
4. Scroll speed
N o t e : yepp homepage (http://www.samsungyepp.com) offers a program to edit
the logo. You can download from support.
SETTING
4. Scroll speed
5. Contrast
SETTING
5. Contrast
6. Sleep mode
Display
3. Time
●12Hours: displaying the time in the scale of 12 hours
●24Hours: displaying the time in the scale of 24 hours
19
20
Time
1. Auto
Scroll speed
●Automatic time setting
Press the
●How to set up:
Set yepp as Auto
up the scroll speed.
Time
Connect to PC
button to set
Go to yepp Explorer
Contrast
2. Manual
●Manual time setting
Press the
/
button to change Year, Date
and Time and the press
/
Press the
/
button to
set up the contrast.
the button to select.
Sleep mode
Backlight
●Button: Backlight is "ON" when button is pressed
●Auto: Backlight is "ON" according to the current
time (pm.06 ~ am.06)
●Never: No backlight.
Button Setting
On
Off
●On: Setting up Sleep mode
●Off: Setting up Power Off mode
※Select Power Off mode to save electrical
power of a battery.
※ Select Never to save electrical power of a battery.
21
22
Installing Software (PC)
Insert the installation CD into CD-ROM drive.
Then the picture appears as shown below.
1
23
2
Click [Next] for the series of windows that appear.
Select "yepp explorer install".
24
Installing Software (Mac)
Insert the installation CD into CD-ROM drive.
● It operates with only MAC OS (8.6~9.1).
1
2
Click next for a series of windows that appear.
▼ yepp Explorer folder
Select the installation icon as shown in the picture
Double-Click on Samsung yepp 30S Installer
yepp Explorer is
executed
When installation is
completed, yepp Explorer is
created in Mac HDD.
25
26
Connecting to Computer
System requirements.
●Pentium 133MHz or over
●Windows 98/ME/2000
Mac (8.6~9.1)
●20MB of available hard disk space
●CD-ROM drive
(double speed or over)
1
2
Plug one end of the USB cable into the
USB port at the back of a computer.
Take off the bottom cover of yepp player
to plug the other end of the USB cable
into the USB port on the right side at the
bottom.
●USB port supported
USB connect cable
●VGA graphic
N o t e : ● Before connecting to the computer, make sure to
install yepp Explorer. If ' Add New Hardware Wizard’
appears, press the ‘Cancel’ button and install yepp
Explorer.
● If USB driver is not installed automatically, refer to
page 29.
27
28
Manual installation of USB driver
1
2
In Windows 98
Click [Next] button for a series of windows that appear.
Insert installation CD and
select drive.
In Windows 2000
Click [next] button for a series of windows that appear.
Insert installation CD and
select drive.
To complete the installation
process, reboot the system.
29
30
How to use yepp Explorer
File Menu
Copy to
To copy the files between the computer and yepp
Format
To format the built-in memory of yepp
Delete
To delete the files in the built-in memory
Stop
To stop the command for moving files from the computer to yepp
Refresh
To display the current files saved in yepp
To end yepp Explorer
Exit
Environment Menu
Font
Large Icon/Small Icon
Llist Icon/Detail
Registera
SecuMAX Key
Options
To change the font for displaying information on the list of files in yepp Explorer.
To change display type of the list of files in Explorer.
Refer to registering* SecuMAX Key ".
You can change voice file transfer type and USB setting.
N o t i c e : After connecting yepp to computer, click the [Refresh] icon in yepp Explorer
31
32
Setting up Options
PC (yepp Explorer)
When selecting Options, select Environment Options from yepp
Explorer. Click [OK] to save the change.
Note :
USB driver installation order
"Selecting USB(Options)" → "Turing on the
power of yepp" → "Connecting yepp to PC"
N o t e : The difference between SC4 and WAV
SC4: You can play it after downloading it to yepp but you cannot play it in the computer. (For backup in PC)
WAV: You can play it in the computer but you cannot play it after downloading to yepp (mp3 unconvertible)
If sc4 to WAV is checked, voice file is saved as WAV when uploaded to PC.
-USB driver is installed with the message
saying that it is searching for a new device.
If USB driver is not installed, try one more
time after rebooting the PC.
(If USB driver is not installed at the second
attempt, contact your PC manufacturer.)
When USB driver is installed, "SAMSUNG
YP-30S" will appear in [System Properties]
→ [Device Manager] as shown in the picture
on the right.
If is not, it is savedas sc4.
33
34
Copying files to yepp (PC)
Before copying files, connect yepp to PC.
When in Sleep mode, press the
button to make sure the power is on and then proceed.
1
Run yepp Explorer.
●Double- click yepp Explorer icon on
your desktop .
2
Select File → Copy to → Flash Memory.
3
Note :
35
After selecting the file to copy to
yepp, click [Open].
4
You can select the font you
want before copying, and copy
to yepp.
128Kbps file use about 1MB of memory per minute.
Directories are divided according to file extensions(.mp3,.sc4...).
Open the directory to check the saved file.
36
Copying files to yepp (Mac)
Before copying files, connect yepp to Mac.
When in Sleep mode, press the
button to make sure the power is on and then proceed.
1
2
Run yepp Explorer.
Click File
Memory .
Copy to
Flash
N o t e : You can select the font you want before copying, and copy to yepp.
Select Environment
37
Font
3
Select the file to transfer.
Note :
4
The file is saved. Now you can unplug
the USB cable from Mac and listen to
the music using yepp.
128Kbps file use about 1MB of memory per minute.
Directories are divided according to file extensions(.mp3,.sc4...).
Open the directory to check the saved file.
38
Deleting files (Mac)
Deleting files (PC)
Before deleting files, connect yepp to PC.
When in Sleep mode, press the
button to make sure the power is on and then proceed.
1
2
Run yepp Explorer.
3
Click File
Delete.
Select the files to delete.
Before deleting files, connect yepp to Mac.
When in Sleep mode, press the
button to make sure the power is on and then proceed.
1
2
Run yepp Explorer.
3
Click File
Delete.
Select the files to delete.
Note :
You can select [Delete]
after right-clicking the
mouse to delete files.
39
40
Formatting (PC)
Formatting (Mac)
Before formatting, connect yepp to PC.
When in Sleep mode, press the
button to make sure the power is on and then proceed.
Before formatting, connect yepp to Mac.
When in Sleep mode, press the
button to make sure the power is on and then proceed.
1
1
Run yepp Explorer.
2
Click File
Format .
N o t e : Before formatting, connect yepp to PC. Then click
Refresh and execute Format.
41
Run yepp Explorer.
2
Click File
Format .
N o t i c e : All files will be deleted when formatting bulit-in memory.
42
Uploading files (PC)
Uploading files (Mac)
Before uploading files, connect yepp to PC.
When in Sleep mode, press the
button to make sure the power is on and then proceed.
1
2
Run yepp Explorer.
Select file to upload and click File
Copy to PC.
3
Select the folder in the computer to
save the files in.
Before uploading files, connect yepp to Mac.
When in Sleep mode, press the
button to make sure the power is on and then proceed.
1
2
Run yepp Explorer.
Select File Refresh.
3
Select the file to save in Mac and click
File Copy to Mac.
※ Uploading voice files to PC may change the type the files are saved according to options.
N o t i c e : Due to the copyright law, mp3 files cannot be transferred to PC.
Notice :
Uploading voice files are saved as SC4 files.
You cannot play SC4 files saved in Mac. (For backup)
43
44
Installing CD Ripper
Moving files
You can change the order that the files are played.
1
2
3
Before moving files, connect yepp to PC.
When in Sleep mode, press the
button to make sure the power is on and then proceed.
Insert the installation CD in the CD-ROM driver.
Run yepp Explorer.
Click [Next] button for a series
of windows that appear.
Select the file to move.
4
Drag and drop the selected file to
where you wish it to be.
N o t i c e : In Mac, you have to drag and drop while
pressing the Control key to move files.
For more information on how to use it, refer
to HELP [?] after running CD Ripper.
N o t e : In Windows 2000, if ASPI (provided by adaptec) has not been installed, you
should install it. Windows displays "for Windows 98/NT",but you can use it in
45
Windows 2000 as well.
46
Description of buttons
Button
Before
Pressing length
Short
Within 5 seconds at the start:
Play the previous track
After 5 seconds from the start:
Play the beginning of the current track.
Play
Longer than 1
second
Fast rewind in the currrent
track.
Action
Power Off
Power On, and play
Stop
Skip to the previous track
Stop(When no button input for 5
seconds, yepp turns into Power off
mode or Sleep mode)
MENU mode
Move downward
Play
(MENU) clock setting
Increase
Play or Stop mode
Volume increase
Play or Stop mode
Volume decrease
MENU mode
Selection
Voice recording
Pause
Play
Short
resume recording
During loop setting
Short
Loop mode
Loop mode
Short
Cancel loop mode
Voice recording Pause
Intro Play
After cancelling intro, play generally
Play
Short
Play
Longer than 1
seconds
Stop
47
Play
Play the next track
Set the starting point for loop function
Stop
Short
Changing modes (music voice)
Fast forward in the current track
Play or Stop mode
Longer than 2
seconds
Enter MENU
Skip to the next track
MENU mode
MENU mode
Move upward
(MENU) Clock setting
Decrease
Stop mode
voice recording
Exiting MENU
Voice recording
Stop voice recording
48
MENU table
MENU
Play mode
Select with the
button and move with the
/
EQ
File
Normal
Normal
Delete
Repeat one
Classic
Voice
Total time
Repeat all
Jazz
Cancel
Compression
Free memory
Shuffle
Rock
Intro
Normal-DBB
Go up
Classic-DBB
Format
button.
Setting
Music
Display
Information
Play time
Remain time
Exit menu
Go up
Confirm
Logo
Default
User define
Cancel
None
Go up
Time
12 Hours
24 Hours
Jazz-DBB
Rock-DBB
Go up
Time
Auto
Manual
Go up
Go up
Backlight
Button
Scroll speed
Auto
Contrast
Never
Go up
Sleep mode
On
Off
49
Go up
Go up
50
Precautions
1. Do not drop or press on it.
2. Make sure not to let water in it
● If it got wet, dry it with towel and contact the service center.
3.Keep out of humid, hot or magnetic places.
4.Do not clean it with thinner, alcohol or benzene. It can be
damaged.
Something wrong with yepp?
Software does not work.
Backlight does not work.
●Refer to 27page.(computer environment)
●Check the backlight setup.
yepp does not work and the LCD displays nothing.
●When the remained voltage is low, the backlight would not
be on longer.
●Check the battery capacity
●Check to see if the battery is inserted rightly (⊕, ⊖)
yepp keeps being turned off.
The buttons do not work.
●In Stop mode, the power is automatically turned off after
five seconds.
●Check to see if HOLD button is set for HOLD.
●Check to see if there are files saved in it.
In PLAY mode, music is not played after
Something’s wrong with play time displayed
pressing the PLAY button
during Play mode.
●Check to see if MP3 file is saved in the built-in memory.
MP3 files cannot be downloaded.
●Check to see if it is playing VBR(Variable Bit Rate) files.
VBR files are supported partly.
●Check to see if the driver is installed rightly in the computer.
LCD window is dark
●Check the connection between the computer and USB.
●Check Contrast
Strange letters are displayed
●Check the font set up.
51
52
Security
Specifications
You can get legal MP3 files from a growing number of internet sites.
Model
Processor
What is SecuMax?
Internet Site
With the increasing amount of digital multimedia
content, the content providers became concerned with
the ease in which the content could be copied and
distributed in violation of their copyrights. This matter
required the system called SecuMAX for protecting
copyrighted music and for using legal content
conveniently.
It is the reason SecuMAX has been developed.
SecuMAX protects the copyrighted music against
infringement.
SecuMAX can be adapted to various types of digital
contents.
Note :
For further details on SecuMAX, please visit
www. samsungyepp.com
To listen to MP3 files encoded with
SecuMAX, you must download the
key file form the internet and register
it on the yepp TM Explorer.
www.cddb.com
Music CD-related data is
provided through the internet
TM
from the CDDB Music CD
Database.
Copyright 1998 CDDB Inc.
All rights reserved.
Memory capacity
18MHz, 20bit RISC
64MB of Built-in memory
Voltage
1.5V
Battery
One AAA / Lasting 5 hours (Alkaline battery)
×H×
×D)mm/Weight
Size (W×
44×65×14.5/34g
Case
Aluminum/Plastics
File Transfer Speed
Maximum 7Mbps
Noise Ratio
90dB with 20kHz LPF
Earphones Output Power
6mW
Output Frequency Range
20Hz~20kHz
Temperature Characteristics
53
YP-30S
-5~ +35℃
54
Safety Information
FCC Part 15: This equipment has been tested and found to
comply with the limits for a Class B digital device, pursuant
to Part 15 of the FCC Rules.
These limits are designed to provide reasonable protection
against harmful interference in a residential installation. This
equipment generates, uses, and can radiate radio
frequency energy and, if not installed and used in
accordance with the instructions, may cause harmful
interference to radio communications. However, this notice
is not a guarantee that interference will not occur in a
particular installaion. if this equipment does cause harmful
interference to radio or television reception, which can be
detemined by turning the equipment off and on, the user is
encouraged to try one or more of the following measures:
Reorient or relocate the receiving antenna.
Increase the distance between the equipment and
receiver.
Connect the equipment to an outlet on a circuit different
from that to which the receiver is connected.
Modifications
Any changes or modifications not expressly approved by
the grantee of this device could void the user s authority to
operate the device.
Compliance
This product conforms to the following Council Directive:
Directive 89/336/EEC,92/31/EEC(EMC)
EMI/EMC : AnSI C63.4 1992, FCC Part 15 Subpart B
This device complies with part 15 of the FCC Rules.
operation is subject to the following two conditions:
1. This device may not cause harmful interference, and
2. This device must accept any interference received, including interference that may cause undesirable
operation.
Declaration of Conformity
Name: Samsung Electronics Co., Ltd
Address:416,Maetan-3Dong, Paldal-Gu, Suwon City,
Kyungki-Do, Korea 442-742
declares under its sole responsibility that the product
Trade Name: Samsung Electronics Co., Ltd
Model Number: YP-30S
has been tested acoording to the FCC/CISPR22/95
requirements for Class B devices and found compliant with
the following standards
Party Responsible for Product Compliance
Samsung Electronics America
QA Lab.
85 West Tasman Dr.
San Jose, CA 95134
Tel : 408-544-5124
Consult the dealer or an experienced radio/TV
technician.
55
56
Warranty(Except U.S.)
Samsung warrants this product as free of
defects in material, design and workmanship
for the period of twelve(12) months from the
original date of purchase.
If during the period of warranty this product
proves defective under normal use and service
you should return the product to the retailer
from whom it was originally Purchased The
liability of Samsung and its appointed
maintenance company is limited to the cost of
repair and/or replacement of the unit under
warranty.
Return of the product for defective reasons
should be to the original purchaser, however
Samsung Authorised Dealers and Autorised
Service Centres will comply with the warranty
on the terms issued to purchasers in the
country concerned, for further information
relating to the Authorised Service Centres
contact.
57
WARRANTY CONDITIONS:
1. The warranty is only valid when the warranty card is
properly completed, and upon presentation of the proof
of purchase consisting of original invoice or sales slip
confirmation, indicating the date of purchase, dealers
name, model, serial No. and product number.
Samsung reserve the right to refuse
warranty service if this imformation has been removed
or changed after the original purchase of the product
from the dealer.
2. Samsung’s obligations are to the repair of the defective
part, and at its discretion replacement of the
product(service exchange unit)
3. Warranty repairs must be carried out by an Authorised
Samsung Dealer/Service Centre. No reimbursement will
be made for repairs carried out by non Samsung
Center s, and warranty cover will not be valid for repairs
or damage caused by such repairs.
4. Repair or replacement under the terms of this warranty
does not give right to extension to or a new starting of
the period of warranty. Repair or direct replacement under
the terms of this warranty may be fulfilled with functionally
equivalent service exchange units.
5. The warranty is not applicable in cases other than
defects in material, design and workmanship. The
warranty does not cover the following:
◆ Periodic checks, maintenance, repair and replacement
of parts due to normal wear and tear.
◆ Abuse or misuse, including but not solely limited to the
failure to use this product for its normal purposed or in
accordance with Samsung s instructions usage and
maintenance.
◆ The product has been used in conjunction with
accessories not approved by Samsung for use with this
product.
◆ Failure of the product arising from incorrect installation
or use not consistent with technical or safety standards
in current force, or failure to comply with product
manual instructions.
◆ Accidents, Acts of God or any cause beyond the
control of Samsung caused by lightning, water, fire,
public disturbances and improper ventilation.
◆ Un-authorised modifications carried out for the product
to comply with local or national technical standards in
countries for which the Samsung product was not
originally designed.
◆ Repairs performed By non-authorized service centres
such as opening of the product by a non-authorized
person.
◆ The nodel, serial No. and product number on the
product has been altered, deleted, removed or made
illegible.
6. This warranty does not affect the consumers statutory
rights nor the consumers rights against the dealer from
theirpurchase/sales agreement.
58


![hank yo_fo buyil_gaSamsung (}a_Te_a ]hs](http://vs1.manualzilla.com/store/data/005691502_1-2e8e29ffb67d0c8f7d0d701e3cb644b7-150x150.png)