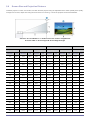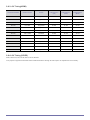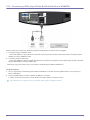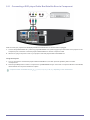
1
SP-A8000
DLP Projector
Owner’s Instructions
The color and the appearance of the product may differ
from the illustrations in this manual. The specifications are
subject to change without prior notice to improve
performance.
Table Of Contents
MAJOR SAFETY PRECAUTIONS
Before You Start . . . . . . . . . . . . . . . . . . . . . . . . . . . . . . . . . . . . . . . . . . . 1-1
Care and Maintenance . . . . . . . . . . . . . . . . . . . . . . . . . . . . . . . . . . . . . . 1-2
Safety Precautions . . . . . . . . . . . . . . . . . . . . . . . . . . . . . . . . . . . . . . . . . 1-3
INSTALLATION AND CONNECTION
Package Contents . . . . . . . . . . . . . . . . . . . . . . . . . . . . . . . . . . . . . . . . . 2-1
Installing the Projector . . . . . . . . . . . . . . . . . . . . . . . . . . . . . . . . . . . . . . 2-2
Leveling with Adjustable Feet . . . . . . . . . . . . . . . . . . . . . . . . . . . . . . . 2-3
Zoom and Focus Adjustment . . . . . . . . . . . . . . . . . . . . . . . . . . . . . . . . 2-4
Adjusting the Lens Position Moving Dial . . . . . . . . . . . . . . . . . . . . . . . 2-5
Screen Size and Projection Distance
. . . . . . . . . . . . . . . . . . . . . . . . . 2-6
Lamp Replacement . . . . . . . . . . . . . . . . . . . . . . . . . . . . . . . . . . . . . . . . . 2-7
Supported Display Modes . . . . . . . . . . . . . . . . . . . . . . . . . . . . . . . . . . . 2-8
Connecting the Power . . . . . . . . . . . . . . . . . . . . . . . . . . . . . . . . . . . . . . 2-9
Connecting a DVD player/Cable Box/Satellite Box to HDMI/DVI . . . 2-10
Connecting a DVD player/Cable Box/Satellite Box via Component
2-11
Connecting to VCR/Camcorder . . . . . . . . . . . . . . . . . . . . . . . . . . . . . . 2-12
Connecting with a PC and Setting up the PC . . . . . . . . . . . . . . . . . . 2-13
The 3D IR Emitters . . . . . . . . . . . . . . . . . . . . . . . . . . . . . . . . . . . . . . . . 2-14
USING
Product Features . . . . . . . . . . . . . . . . . . . . . . . . . . . . . . . . . . . . . . . . . . 3-1
Front, Upper . . . . . . . . . . . . . . . . . . . . . . . . . . . . . . . . . . . . . . . . . . . . . . 3-2
Rear Side . . . . . . . . . . . . . . . . . . . . . . . . . . . . . . . . . . . . . . . . . . . . . . . . . 3-3
Remote Control . . . . . . . . . . . . . . . . . . . . . . . . . . . . . . . . . . . . . . . . . . . 3-4
LED Indications . . . . . . . . . . . . . . . . . . . . . . . . . . . . . . . . . . . . . . . . . . . 3-5
Using the Screen Adjustment Menu (OSD: On Screen Display) . . . . 3-6
Read Before Watching 3D Picture . . . . . . . . . . . . . . . . . . . . . . . . . . . . 3-7
TROUBLESHOOTING
Before Requesting Service . . . . . . . . . . . . . . . . . . . . . . . . . . . . . . . . . . 4-1
MORE INFORMATION
Specifications . . . . . . . . . . . . . . . . . . . . . . . . . . . . . . . . . . . . . . . . . . . . . 5-1
RS232C Command Table . . . . . . . . . . . . . . . . . . . . . . . . . . . . . . . . . . . . 5-2
Contact SAMSUNG WORLDWIDE . . . . . . . . . . . . . . . . . . . . . . . . . . . . . 5-3
Correct Disposal - Europe only . . . . . . . . . . . . . . . . . . . . . . . . . . . . . . . 5-4
1
Major Safety Precautions
1-1
Before You Start
Icons used in this manual
ICON
NAME
MEANING
Caution
Indicates cases where the function may not work or the setting may be canceled.
Note
Indicates a hint or tip to operate a function.
Using this Manual
•
The contents of this manual are subject to change without prior notice for performance improvement.
•
Make yourself fully aware of the safety precautions before using this product.
•
If a problem occurs, refer to the 'Troubleshooting' section.
Copyright Notice
Copyright © 2010 Samsung Electronics Co., Ltd. All rights reserved.
The copyright of this manual is reserved by Samsung Electronics, Co., Ltd.
The contents of this manual may not be partially or in whole reproduced, distributed or used in any form without the written
permission of Samsung Electronics, Co., Ltd.
An administration fee may be charged if either.
(a) An engineer is called out at your request and there is no defect in the product.
(i.e. where you have failed to read this user manual).
(b) You bring the unit to a repair centre and there is no defect in the product.
(i.e. where you have failed to read this user manual).
The amount of such administration charge will be advised to you before any work or home visit is carried out.
1-2
Care and Maintenance
Cleaning the Surface and the Lens
Clean the projector using a soft dry cloth.
•
Do not clean the product with a flammable substance such as
benzene or thinner.
•
Avoid scratching the lens with your fingernails or a sharp object.
This may result in scratches or damage to the product.
•
Avoid cleaning the product with a wet cloth or by directly
spraying water onto the product.
If water enters the product, it may result in fire, electric shock, or
a problem with the product.
•
A white stain may appear on the surface of the projector if water
gets on it.
The appearance and the color may differ depending on the
model.
Cleaning Inside the Projector
For cleaning the interior of the projector, contact an authorized
Samsung Service Center.
•
Contact a Service Center if dust or other substances are inside
the projector.
1-3
Safety Precautions
Icons used for safety precautions
ICON
NAME
MEANING
Warning
Failing to follow the precautions marked with this sign may result in a serious injury or
death.
Caution
Failing to follow the precautions marked with this sign may result in a personal injury or
property damage.
Meaning of Signs
Do not perform.
Must be followed.
Power Related
The following images are for your reference and may differ depending on models and countries.
The appearance and the color may differ depending on models.
Warning
Plug the power plug in firmly.
•
Doing otherwise may result in fire.
Avoid connecting multiple electric appliances to a single wall outlet.
•
Avoid using a damaged power cord or plug
or a loose power outlet.
•
Doing otherwise may result in electric
shock or fire.
Avoid plugging in or unplugging the power
supply with wet hands.
•
Doing otherwise may result in electric
shock.
Doing otherwise may result in fire due
to overheating of the wall outlet.
Avoid bending or twisting the power cord
excessively and avoid placing heavy
objects on the cord.
•
Doing otherwise may result in electric
shock or fire due to a damaged power
cord.
To move the product, turn the power off
and unplug the power cord and any other
wires connected to the product.
•
Doing otherwise may result in electric
shock or fire due to the damaged
power cord.
Make sure to connect the power cord to a
grounded wall outlet (for insulation class 1
equipment only).
•
Doing otherwise may result in electric
shock or injury.
Major Safety Precautions
1-3
Caution
When unplugging the power plug from the
wall outlet, make sure to hold the power
plug by the plug and not by the cord.
•
Failing to do so may result in electric
shock or fire.
Unplug the power plug before cleaning the
product.
•
Do not turn the product on or off by plugging or unplugging the power plug. (Do not
use the power plug as a power switch.)
Keep the power cord away from sources of
heat.
There is a danger of electric shock or
fire.
Connect the power plug to a wall outlet
that can be easily reached.
•
When a problem occurs with the
product, you must unplug the power
plug to cut the power off completely.
You cannot cut the power off
completely using only the power button
on the product.
Installation Related
Warning
Avoid installing the product in a location
exposed to direct sunlight and installing
the product near a heat source such as a
fire or heater.
•
Avoid installing the product in a badly ventilated location such as inside a bookshelf
or closet.
•
This may shorten the product life cycle
or cause fire.
Doing otherwise may result in fire due
to internal overheating.
When installing the product in a cabinet or
shelf, take care so that the front end of the
product is completely supported by the
cabinet or shelf.
When installing the product on a console
or shelf, make sure that the front of the
product does not protrude out of the console or shelf.
•
Failing to do so may result in the
product falling and resulting in damage
to the product or injury.
•
•
Make sure to use a cabinet or shelf
suitable to the size of the product.
Doing otherwise may cause the
product to fall off and result in a
malfunction or injury.
Keep the power cord away from heaters.
When thunder or lighting occurs, unplug
•
the power cord.
The coating of the power cord may
melt and cause electric shock or fire.
Do not install the product in a location
exposed to dust, moisture (sauna), oil,
•
Failing to do so may result in electric
shock or fire.
Do not install the product in areas with
large amounts of dust.
smoke or water (rain drops) and do not
install it in a vehicle.
•
1-3
This may result in electric shock or fire.
Major Safety Precautions
Caution
Take care not to block the vent with a table
cloth or curtain.
•
Do not let the product drop while moving it.
•
Doing otherwise may result in fire due
to internal overheating.
This may result in a problem with the
product or injury.
When putting the product down, place it
gently.
Do not install the product at a height where
children may reach it.
•
•
Failing to do so may result in a problem
with the product or injury.
If a child touches the product, the
product may fall and this may result in
injury.
Usage Related
Avoid inserting metal objects such as
chopsticks, coins, or hairpins, or inflammable objects into the product (through the
vents, ports, etc).
•
If water or an alien substance enters
the product, turn the power off, unplug
the power cord and contact a service
center.
•
Doing otherwise may result in a
problem with the product, electric
shock or fire.
Do not disassemble, or attempt to fix or
modify the product.
•
When the product requires repairs,
contact a Service Center.
Avoid using or placing inflammable spray
or objects near the product.
•
This may result in an explosion or fire.
Do not let children place objects such as
toys or cookies on the product.
•
If a child tries to reach for any of these
objects, the product may fall and cause
harm.
Do not look directly at the light of the lamp
nor project the picture into someone's
eyes.
•
This is dangerous, especially for
children.
When you remove batteries from the
remote, be careful that they are not swallowed by children. Keep batteries out of
the reach of children.
•
If swallowed, see a doctor immediately.
Avoid placing a container with liquid such
as a vase, flowerpot, beverage can, cosmetics bottle or drug vail, or a metal object
on or above the product.
•
If water or an alien substance enters
the product, turn the power off, unplug
the power cord and contact a service
center.
•
Doing otherwise may result in a
problem with the product, electric
shock or fire.
Major Safety Precautions
1-3
Caution
If the product generates a strange noise, a
burning smell, or smoke, unplug the power
plug immediately and contact a service
center.
•
Failing to do so may result in electric
shock or fire.
If the power plug pin or jack is exposed to
dust, water or alien substances, clean it
thoroughly.
Do not use the product while it indicates a
malfunction, such as no sound or no picture.
•
•
There is a danger of electric shock or
fire.
When cleaning the product, disconnect the
power cord and clean the product with a
soft dry cloth.dlrm
•
Avoid using chemicals such as wax,
benzene, alcohol, thinner, mosquitorepellent, fragrance, lubrication or
cleansing agent when cleaning the
product.
This may result in the exterior being
deformed or the print being removed.
When not using the product for a long
time, such as leaving your home, unplug
the power cord from the wall outlet.
•
•
•
A spark may result in an explosion or
fire.
•
During a thunder or lighting storm, do
not touch the power cord or antenna
cable
Do not touch the lens on the product.
•
This may cause damage to the lens.
Do not touch any outer part of the product
with tools such as a knife or a hammer.
To clean dirt or fingerprints off the front
projection lens, use a cloth dampened with
neutral detergent and water.
Failing to do so may result in fire or
electric shock.
Make sure to place your remote control on
a table or desk.
•
If a gas leak occurs, do not touch the product or the power plug and ventilate the
room immediately.
Places exposed to microscopic dust,
chemicals, too high or low
temperatures, high humidity, such as
airports or stations where the product
is continuously used for a long time
etc..
If you drop the product or the case is damaged, turn the power off and unplug the
power cord. Contact a service center.
•
Turn the product off immediately,
unplug the power cord from a wall
outlet, and contact a Service Center.
Doing otherwise may cause dust
accumulation and result in fire caused
by overheating or a short circuit or
result in an electric shock.
If the product is installed in a location
where the operating conditions vary considerably, a serious quality problem may
occur due to the surrounding environment.
In this case, install the product only after
consulting our Call Center.
1-3
If water or a foreign substance enters the
product, turn the product off, unplug the
power cord from a wall outlet, and contact
a Service Center.
Ask a Service Center to clean the interior
of the projector at least once per year.
If you step on the remote control, you
may fall and hurt yourself or damage
the remote.
Major Safety Precautions
To avoid burning yourself, do not touch the
vents or lamp cover while operating or
right after turning off the product.
Do not clean the body of this product using
water spray or a wet cloth. Avoid using any
chemicals such as detergents, industrial or
automotive polish, abrasive, wax, benzene, alcohol on any plastic part of the
product such as projector case, since this
may cause damage.
Do not open any cover on the product.
Do not use any undesignated battery.
•
This would prove hazardous because
of high-voltage current inside the
product.
Be careful not to touch the ventilation hole
while the projector is on as hot air comes
out.
The ventilation hole is hot for some time
though the projector is turned off. Keep
you hands or body off the ventilation hole.
Do not place objects vulnerable to heat
near the projector.
Be careful to keep your body away from
the projector lamp. The lamp is hot.
(Children and those who have sensitive
skin should be more careful.)
Take care not to lose the lens cover of the
product.
•
The lens could get damaged
Major Safety Precautions
The lens cover protects the lens and
should be used when the projector is
turned off.
1-3
2
Installation and Connection
2-1
Package Contents
•
Unpack the product and check if all of the contents listed below have been included.
•
Store the packaging box in case you need to move the product at a later date.
•
If any items are missing, contact your dealer.
•
Contact a local dealer to purchase optional items.
Projector
CONTENTS
Quick Setup Guide
Warranty Card (Not available
in all locations)
User Manual
Cleaning Cloth
Remote control, Battery type
: 1.5V AA size, 2EA
3D Active Glasses(SSG2100AB), Battery type : 3V
Lithium/Maganese CR2025,
1EA
EXTERNAL 3D IR EMITTER
PACKAGE
Lens Cover
(Not available in all locations)
Power Cord
(SSG-2100ME)
4 Screws
(For ceiling mount bracket.)
2-1
Installation and Connection
SOLD SEPARATELY
HDMI to DVI Cable
HDMI Cable
D-Sub Cable
VIDEO Cable
Component Cable
A ceiling mount is not included and must be purchased separately. Use the included screws to attach the projector to the
ceiling mount bracket.
Installation and Connection
2-1
2-2
Installing the Projector
Install the projector so that the beam from the projector is perpendicular to the screen.
•
Place the projector so that the lens aims at the center of the screen. If the screen is not vertical, the picture on the
screen may not appear rectangular.
•
Do not install the screen in bright surroundings. If the surroundings are too bright, the picture on the screen will be
washed out and not display clearly.
•
When using the projector in bright surroundings, use curtains to block the light.
•
You can install the projector in the following locations relative to the screen : <Front-Floor> / <Front-Ceiling> / <RearFloor> / <Rear-Ceiling>. To view the installation position settings, see below.
To adjust the picture when you install the projector behind the screen
Installing behind a semi-transparent screen.
When you install the projector behind a semi-transparent screen,
you can use the menu to adjust the picture so that it displays correctly, depending on where you've located the projector, rearfloor (or low) or rear-ceiling.
1. For rear-floor, press :
Menu > Setup > Install > Rear-Floor
2. For rear-ceiling, press :
Menu > Setup > Install > Rear-Ceiling
To adjust the picture when you install the projector in the front of the screen
Installing the projector in front of the screen.
When you install the projector in front of a screen, you can use
the menu to adjust the picture so that it displays correctly,
depending on where you’ve located the projector, front-floor (or
low) or front-ceiling.
1. For front-floor, press :
Menu > Setup > Install > Front-Floor
2. For front-ceiling, press :
Menu > Setup > Install > Front-Ceiling
2-2
Installation and Connection
2-3
Leveling with Adjustable Feet
To level the projector, turn the projector's adjustable feet.
•
You may adjust the level of the projector up to 3 degrees.
•
Depending on the position of the projector, Keystone distortion of the image may occur.
Installation and Connection
2-3
2-4
Zoom and Focus Adjustment
Zoom Knob
You can adjust the size of the image within the zoom range
by manipulating the Zoom Knob.
Focus Ring
Focus the picture on the screen using the Focus Ring.
If you install your projector at a location beyond the projection distances specified for the projector, you will not be able to
adjust the focus correctly. For specified projection distances, refer to Screen Size and Projection Distance in this manual.
2-4
Installation and Connection
2-5
Adjusting the Lens Position Moving Dial
Move the picture projected on the screen up and down within the lens range by turning the Lens Shift Dial on the bottom side of
the projector with your fingers.
Installation and Connection
2-5
2-6
Screen Size and Projection Distance
Install the projector on a flat, even surface, and then level the projector using the adjustable feet to obtain optimal picture quality.
If images are not clear, adjust them using the Zoom Knob or Focus Ring, or move the projector forward and backward.
A. Screen / Z. Throw Distance / Y’. Distance from Lens Center to Image Bottom
X. Screen width / Y. Screen height / M. Screen Diagonal length
SCREEN SIZE
M (DIAGONAL)
X (HORIZONTAL)
THROW DISTANCE
Y (VERTICAL)
Z (TELE)
OFFSET
Z (WIDE)
Y'
INCHES
CM
INCHES
CM
INCHES
CM
INCHES
CM
INCHES
CM
INCHES
CM
40
101.6
34.9
88.6
19.6
49.8
78.1
198.4
60.0
152.3
2.0
5.0
50
127.0
43.6
110.7
24.5
62.3
97.6
248.0
75.0
190.4
2.4
6.2
60
152.4
52.3
132.8
29.4
74.7
117.1
297.5
89.9
228.5
3.0
7.5
70
177.8
61.0
155.0
34.3
87.2
136.7
347.1
104.9
266.5
3.4
8.7
80
203.2
69.7
177.1
39.2
99.6
156.2
396.7
119.9
304.6
3.9
10.0
90
228.6
78.4
199.2
44.1
112.1
175.7
446.6
134.9
342.7
4.4
11.2
100
254.0
87.2
221.4
49.0
124.5
195.2
495.9
149.9
380.8
4.9
12.5
110
279.4
95.9
243.5
53.9
137.0
214.8
545.5
164.9
418.9
5.4
13.7
120
304.8
104.6
265.7
58.8
149.4
234.3
595.1
179.9
456.9
5.9
14.9
130
330.2
113.3
287.8
63.7
161.9
253.8
644.7
194.9
495.0
6.4
16.2
140
355.6
122.0
309.9
68.6
174.3
273.3
694.3
209.9
533.1
6.9
17.4
150
381.0
130.7
332.1
73.5
186.8
292.9
743.8
224.9
571.2
7.4
18.7
160
406.4
139.4
354.2
78.4
199.2
312.4
793.4
239.9
609.2
7.8
19.9
170
431.8
148.1
376.3
83.3
211.7
331.9
843.0
254.9
647.3
8.3
21.2
180
457.2
156.9
398.5
88.2
224.1
351.4
892.6
269.8
685.4
8.8
22.4
190
482.6
165.6
420.6
93.1
236.6
370.9
942.2
284.8
723.5
9.3
23.7
200
508.0
174.3
442.8
98.1
249.1
390.5
991.8
299.8
761.6
9.8
24.9
210
533.4
183.0
464.9
103.0
261.5
410.0
1041.4
314.8
799.6
10.3
26.2
220
558.8
191.7
487.0
107.9
274.0
429.5
1091.0
329.8
837.7
10.8
27.4
230
584.2
200.5
509.2
112.8
286.4
449.0
1140.6
344.8
875.8
11.3
28.6
240
609.6
209.2
531.3
117.7
298.9
468.6
1190.1
359.8
913.9
11.8
29.9
2-6
Installation and Connection
SCREEN SIZE
M (DIAGONAL)
X (HORIZONTAL)
THROW DISTANCE
Y (VERTICAL)
Z (TELE)
OFFSET
Z (WIDE)
Y'
INCHES
CM
INCHES
CM
INCHES
CM
INCHES
CM
INCHES
CM
INCHES
CM
250
635.0
217.9
553.5
122.6
311.3
488.1
1239.7
374.8
951.9
12.2
31.1
300
762.0
261.5
664.1
147.1
373.6
585.7
1487.7
449.7
1142.3
14.7
37.4
This projector is designed to show images optimally on a 100 ~ 120 inch sized screen.
Installation and Connection
2-6
2-7
Lamp Replacement
Cautions on Lamp Replacement
•
The projector lamp is an expendable item. For best operating performance, replace the lamp according to the usage time.
You can view the lamp usage time in the Information Display (INFO button).
•
Use the recommended lamp when replacing. Replace with the same model provided with the projector.
- Lamp Model Name : LAMP-MERCURY-Philips
•
Make sure the power cord is unplugged before replacing the lamp.
•
Because the lamp is a high temperature and high voltage product, wait at least one hour from the time you disconnect the
power cord before replacing the lamp.
•
The projector lamp is on the bottom-left side when looking at the projector from behind.
•
Do not leave the old lamp near flammable items or in reach of children. There is a danger of fire, burns, or injury.
•
Remove dirt or foreign material around or inside the lamp unit using a proper vacuum device.
•
When handling the lamp, avoid touching any part of it except for the handles. If you handle the lamp incorrectly, you can
shorten the lamp’s lifetime and affect picture quality.
•
The projector has been designed so that the projector does not work if the lamp cover is not completely assembled after a
lamp replacement. If the projector does not work properly, please check the operating status of the indicator LED.
The lamp contains Mercury. Dispose According to Local, State or Federal Laws.
Lamp Replacement Procedure
•
Because the lamp is a high temperature and high voltage product, wait at least one hour from the time that the power
cord is disconnected before replacing it.
•
The projector lamp is on the left side of the projector when you look at the projector from the rear.
1. Turn the projector so the rear of the projector is facing you. The lamp and lamp cover are on
the left side.
- Be careful your projector does not fall.
2. Locate and remove the screws on the lamp cover.
2-7
Installation and Connection
3. Open the cover by holding
4. Remove the screws
down and pulling
, and then hold and open
.
to remove the lamp door.
5. Remove the screws from the lamp assembly as shown in the figure.
6. As shown in the figure, lift up the lamp handles by holding them and pull the lamp.
7. Install the new lamp, and then reverse the procedure to fix the lamp to the projector,
and re-install the lamp door and cover.
Installation and Connection
2-7
2-8
Supported Display Modes
2-8-1. PC Timing (D-Sub/HDMI)
2-8
FORMAT
RESOLUTION
DISPLAY
FORMAT
HORIZONTAL
FREQUENCY
(KHZ)
VERTICAL
FREQUENCY
(HZ)
PIXEL
FREQUENCY
(MHZ)
SYNC
POLARITY
IBM
640 x 350
70Hz
31.469
70.086
25.175
+/-
IBM
720 x 400
70Hz
31.469
70.087
28.322
-/+
VESA DMT
640 x 480
60Hz
31.469
59.94
25.175
-/-
MAC
640 x 480
67Hz
35.000
66.667
30.240
-/-
VESA GTF
640 x 480
70Hz
35.000
70.000
28.560
VESA DMT
640 x 480
72Hz
37.861
72.809
31.500
-/-
VESA DMT
640 x 480
75Hz
37.500
75.000
31.500
-/-
VESA CVT
720 x 576
60Hz
35.910
59.950
32.750
-/+
VESA DMT
800 x 600
56Hz
35.156
56.250
36.000
+/+
VESA DMT
800 x 600
60Hz
37.879
60.317
40.000
+/+
VESA GTF
800 x 600
70Hz
43.750
70.000
45.500
VESA DMT
800 x 600
72Hz
48.077
72.188
50.000
+/+
VESA DMT
800 x 600
75Hz
46.875
75.000
49.500
+/+
MAC
832 x 624
75Hz
49.726
74.551
57.284
-/-
VESA DMT
1024 x 768
60Hz
48.363
60.004
65.000
-/-
VESA DMT
1024 x 768
70Hz
56.476
70.069
75.000
-/-
VESA GTF
1024 x 768
72Hz
57.672
72.000
78.434
VESA DMT
1024 x 768
75Hz
60.023
75.029
78.750
+/+
VESA CVT
1152 x 864
60Hz
53.783
59.959
81.750
-/+
VESA GTF
1152 x 864
70Hz
63.000
70.000
96.768
VESA GTF
1152 x 864
72Hz
64.872
72.000
99.643
VESA DMT
1152 x 864
75Hz
67.500
75.000
108.000
+/+
MAC
1152 x 870
75Hz
68.681
75.062
100.000
-/-
VESA CVT
1280 x 720
60Hz
44.772
59.855
74.500
-/+
VESA GTF
1280 x 720
70Hz
52.500
70.000
89.040
VESA GTF
1280 x 720
72Hz
54.072
72.000
91.706
VESA CVT
1280 x 720
75Hz
56.456
74.777
95.750
-/+
VESA DMT
1280 x 768
60Hz
47.776
59.870
79.500
-/+
VESA DMT
1280 x 768
75Hz
60.289
74.893
102.250
-/+
VESA DMT
1280 x 800
60Hz
49.702
59.810
83.500
-/+
VESA DMT
1280 x 800
75Hz
62.795
74.934
106.500
-/+
VESA DMT
1280 x 960
60Hz
60.000
60.000
108.000
+/+
VESA GTF
1280 x 960
70Hz
69.930
70.000
120.839
Installation and Connection
HORIZONTAL
FREQUENCY
(KHZ)
VERTICAL
FREQUENCY
(HZ)
PIXEL
FREQUENCY
(MHZ)
FORMAT
RESOLUTION
DISPLAY
FORMAT
SYNC
POLARITY
VESA GTF
1280 x 960
72Hz
72.072
72.000
124.540
VESA CVT
1280 x 960
75Hz
75.231
74.857
130.000
-/+
VESA DMT
1280 x 1024
60Hz
63.981
60.020
108.000
+/+
VESA GTF
1280 x 1024
70Hz
74.620
70.000
128.943
VESA GTF
1280 x 1024
72Hz
76.824
72.000
132.752
VESA DMT
1280 x 1024
75Hz
79.976
75.025
135.000
+/+
VESA DMT
1440 x 900
60Hz
55.935
59.887
106.500
-/+
VESA DMT
1440 x 900
75Hz
70.635
74.984
136.750
-/+
VESA DMT
1600 x 1200
60Hz
75.000
60.000
162.000
+/+
VESA DMT
1680 x 1050
60Hz
65.290
59.954
146.250
-/+
VESA CVT
1920 x 1080
60Hz
67.500
60.000
148.500
+/-
VESA DMT
1920 x 1200 RB
60Hz
74.038
59.950
154.000
+/-
All resolutions higher or lower than 1920x1080 are converted to 1920x1080 by the Scaler chip inside the projector. If the
resolution of the signal output by the PC matches the real resolution (1920x1080) of the projector, the screen quality is
optimal.
2-8-2. AV Timing(Component)
FORMAT
VERTICAL FREQUENCY
(HZ)
SCAN
480i
59.94Hz
Interlaced
480p
59.94Hz
Progressive
BT.601
576i
50Hz
Interlaced
BT.1358
576p
50Hz
Progressive
720p
59.94Hz/60Hz
Progressive
720p
50Hz
Progressive
BT.709
1080i
59.94Hz/60Hz
Interlaced
SMPTE 274M
1080i
50Hz
Interlaced
1080p
59.94Hz/60Hz
Progressive
1080p
50Hz
Progressive
SPECIFICATIONS
BT.601
SMPTE 267M
BT.1358
SMPTE 293M
SMPTE 296M
SMPTE 274M
Installation and Connection
2-8
2-8-3. AV Timing(HDMI)
SPECIFICATIONS
RESOLUTION
SCAN
VERTICAL
FREQUENCY
(HZ)
HORIZONTAL
FREQUENCY
(KHZ)
PIXEL
FREQUENCY
(MHZ)
EIA-861
640 x 480
Progressive
59.940
31.469
25.175
EIA-861
640 x 480
Progressive
60.000
31.500
25.200
EIA-861
720 x 480
Progressive
59.940
31.469
27.000
EIA-861
720 x 480
Progressive
60.000
31.500
27.027
EIA-861
1280 x 720
Progressive
59.939
44.955
74.175
EIA-861
1280 x 720
Progressive
60.000
45.000
74.250
EIA-861
1920 x 1080
Interlaced
59.939
33.716
74.175
EIA-861
1920 x 1080
Interlaced
60.000
33.750
74.250
EIA-861
720 x 576
Progressive
50.000
31.250
27.000
EIA-861
1280 x 720
Progressive
50.000
37.500
74.250
EIA-861
1920 x 1080
Interlaced
50.000
28.125
74.250
EIA-861
1920 x 1080
Interlaced
50.000
28.125
74.250
EIA-861
1920 x 1080
Progressive
60.000
67.500
148.500
2-8-4. AV Timing (VIDEO)
NTSC, NTSC 4.43, PAL, PAL60, PAL-N, PAL-M, SECAM
Your projector supports the standard video formats listed above through its video inputs. No adjustments are necessary.
2-8
Installation and Connection
2-9
Connecting the Power
- Plug the power cord into the power terminal on the rear side of the projector.
Installation and Connection
2-9
2-10 Connecting a DVD player/Cable Box/Satellite Box to HDMI/DVI
Make sure that your projector and DVD player/Cable box/Satellite box are turned off and unplugged.
1. Connecting using an HDMI/DVI cable
- Connect the [HDMI IN 1 (DVI)] terminal on the back of the projector and the DVI output terminal of the DVD player/Cable/
Satellite box using a HDMI/DVI cable.
2. Connecting using an HDMI cable
- Connect the [HDMI IN 1 (DVI)] or [HDMI IN 2] terminal on the back of the projector and the HDMI output terminal of the DVD
player/Cable/Satellite box using a HDMI cable.
- When done, plug in the power cords of your projector and DVD player/Cable box/Satellite box.
Using the Projector
1. Turn on the projector and the DVD player/Cable box/Satellite box, and then press the [HDMI1] button on the projector to
select <HDMI1/DVI>.
2. Press the [HDMI2] button to select <HDMI2> if [HDMI2] is connected.
If <HDMI> mode cannot be selected, check whether the HDMI cable is connected correctly.
This projector does not support sound. (A separate audio system is needed for sound.)
2-10
Installation and Connection
2-11 Connecting a DVD player/Cable Box/Satellite Box via Component
Make sure that your projector and DVD player/Cable box/Satellite box are turned off and unplugged.
1. Connect the [COMPONENT IN 1 (Y/PB/ PR)] or [COMPONENT IN 2 (Y/PB/ PR)] input port at the back of the projector to the
Component port at the back of the DVD player/Cable/Satellite box with the Component cable.
2. When done, plug in the power cords of your projector and DVD player/Cable box/Satellite box.
Using the Projector
1. Turn on the projector and the DVD player/Cable box/Satellite box, and then press the [COMP1] button to select
<Component1>.
2. Press the [COMP2] button to select <Component2> if [COMPONENT IN 2] is connected. If Component Mode is not available,
check whether the component cables are in place.
Component Ports are marked as (Y/PB/PR), (Y, B-Y, R-Y) or (Y, Cb, Cr), depending on the manufacturer.
Installation and Connection
2-11
2-12 Connecting to VCR/Camcorder
Make sure that your projector and VCR or camcorder are turned off and unplugged.
1. Connect [VIDEO IN] input port of the projector to the VIDEO (yellow) OUT port of the video equipment using the video cable.
2. When finished connecting the devices, plug in the power cords of your projector and the VCR or camcorder.
Using the Projector
1. Turn on the projector and the VCR or camcorder, and then press the [VIDEO] button on the projector to select <Video>.
This projector does not support sound. (A separate audio system is needed for sound.)
2-12
Installation and Connection
2-13 Connecting with a PC and Setting up the PC
2-13-1. Setting up the PC Environment
Check the following items before connecting your PC to your projector.
1. Click the right mouse button on the Windows desktop, and then click [Properties].
The <Display Properties> dialog appears.
2. Click the [Settings] tab, and then set the <Screen resolution>. The optimal resolution for the projector is 1920 x 1080. For
other resolutions supported by the projector, see the PC Timing Display Mode table in section 2-8.
You do not have to change the <Color quality> setup.
3. Press the [Advanced] button. Another property window appears.
4. Click the [Monitor] tab and set the <Screen refresh rate>. For the refresh rate that matches the resolution you’ve chosen, see
the refresh rate (60 Hz, 70 Hz, etc.) next to your selected resolution in the PC Timing Display Mode table in section 2-8.
Setting the refresh rate sets both the vertical and horizontal frequencies.
Installation and Connection
2-13
5. Click the [OK] button to close the window, and then click the [OK] button on the <Display Properties> window to close that
window.
6. Shut down the PC and connect it to the projector.
•
The setup process might vary depending on your type of computer or version of Windows.
(For example, [Properties] appears instead of [Properties (R)] as shown in 1.)
•
This projector supports 32 bit color quality (per pixel) when it is used as a PC monitor.
•
Projected images may differ from the images on your monitor depending on the monitor manufacturer or Windows
version.
•
When connecting the projector to a PC, make sure that the PC setup complies with the display settings supported by
this projector. If it does not, you may have signal problems.
2-13-2. Connecting with a PC
Make sure that your projector and PC are turned off and unplugged.
1. Connect the [PC IN] port on the rear side of the projector to the PC video out (D-sub) port of the PC using a PC video cable.
2. Plug in the power cords of the projector and the PC.
This product supports plug and play. If you use Windows XP, you do not need to set up the driver on your PC.
Using the Projector
1. Turn on the PC, and then set the PC Environment (screen resolution, etc.) if necessary.
2. Turn on the projector, and then press the [PC] button to select <PC>.
If the <PC> Mode is not available, make sure the PC video cable is properly connected.
3. Adjust the screen.
2-13
•
Sound comes from the PC’s speakers.
•
To avoid experiencing a blank screen when connecting a PC, set <PC> in the <Edit Name> menu. See section 3-6-3 for
more detail.
Installation and Connection
2-14 The 3D IR Emitters
Your projector comes with a built-in 3D emitter, which is located on the front of the projector, and an external 3D emitter, which
you can connect to the back of the projector. Both 3D emitters emit a 3D synchronization signal that synchronizes the refresh rate
of the image displayed by the projector with the shutter rate of the required 3D glasses, creating the 3D effect. If the internal
emitter does not provide a sufficient 3D picture, you can connect the external emitter. You cannot use the internal and external
emitters at the same time.
•
<3D Emitter> does not switch automatically to <External> even if an external emitter is connected. Manually change the
setting to <External>. Refer to “3-6-1. Picture” for details.
•
The 3D effect may not work properly if there is any obstacle between the 3D emitter and 3D glasses.
•
The 3D emitter may not work normally if there is any other 3D product or electronic device working nearby.
2-14-1. Ranges in which the External and Internal 3D IR Emitter Can Operate
External 3D IR Emitter Range
A : Suggested Range of Use
Internal 3D IR Emitter Range
A : Suggested Range of Use
Installation and Connection
2-14
View Angles
VIEW ANGLE
MAX. SIGNAL RECEIVING DISTANCE
2m/6 ft. : 140 °
4m/13 ft. : 100 °
External emitter : 15m/48.75 ft. (base on 0°)
Internal emitter : 8m/25.3 ft. (base on 0°)
6m/19.5 ft. : 80 °
•
The range of the 3D function may differ slightly depending on the projector size, projection distance, and viewing
angle.
•
Make sure to use only 3D glasses authorized and supplied by Samsung Electronics.
2-14-2. Connecting the External 3D IR Emitter to the Projector
Make sure that your projector is turned off.
1. Connect the external 3D IR emitter to [3D SYNC OUT] on the back of the projector.
2. Power on the projector.
Using the Projector
1. To enjoy a 3D picture, power on the projector and press [3D] on the remote control.
•
<3D Emitter> does not switch automatically to <External> even if an external emitter is connected. Manually change the
setting to <External>.
•
Be sure to install the external IR emitter with the transmitters facing the viewers.
•
You cannot use the internal and external emitters at the same time.
•
This projector does not support sound. (A separate audio system is needed for sound.)
2-14-3. Installing an External 3D IR Emitter on a Ceiling
1. Contents
Unpack the external 3D IR emitter package and confirm that none of the following components are missing:
If any items are missing, contact your dealer.
2-14
Installation and Connection
EXTERNAL 3D IR EMITTER : 1 EA
Emitter Holder: 1EA
Wire Holders : 3EA
Anchor : 5EA (M4 x L25 Screws)
Screws : 5 EA (M4 x L25)
2. Installation Procedure
To install the external 3D IR emitter on the ceiling, follow these steps:
1. Make holes in the ceiling, matched
to the screw holes in the emitter
holder
.
4. Insert the external emitter
the emitter holder
into
. Insert at point
2. Insert the anchors
into the holes
in the ceiling. Tap with a hammer
until the anchors are flush with the
ceiling.
3. Fasten the screws
5. Fix the wire to the ceiling using the
6. The external emitter has been installed.
wire holders
holder
to fix the emitter
to the holes in the ceiling.
.
first (circled above).
•
Disassembly is in the reverse order of assembly.
•
If you make holes in the ceiling and drill into an underlying beam or stud, you do not need the anchors.
Installation and Connection
2-14
3
Using
3-1
Product Features
1. Optical engine with advanced DLP technology
•
Full 1920x1080 HD panel.
•
6 segment color wheel to implement optimal colors.
•
300W Lamp designed to improve luminance
2. Vivid colors
•
Quality picture tuning focused on improving color. Your projector provides near broadcast quality color for vivid, life-like
displays.
3. Minimized fan noise and light leakage
•
The airflow and fan installation structure are optimized to minimize fan noise and beam leakage.
4. Various Input Ports
•
Abundant input terminals are available, such as two HDMI (supporting HDCP) terminals and two Component terminals,
enhancing connectivity with peripheral devices.
5. User adjustments
•
This unit allows adjustment of each input port.
•
The unit has a reference pattern you can use for positioning and adjustment.
•
For your convenience, a backlight for the remote control is provided for use in dark surroundings.
6. 3D Display
3-1
•
The world's first full HD, 3D AV projector for home use
•
You can enjoy 3D pictures converted from a 2D video source.
Using
3-2
Front, Upper
ICON
NAME
DESCRIPTION
- STAND BY (Blue LED)
Indicators
- LAMP (Blue LED)
- TEMP (Red LED)
Refer to the LED Indications.
Focus Ring
Use for Focus Adjustment.
3D signal emitter
Emits a 3D synchronization signal, allowing you to view 3D images through
3D glasses.
Lens Position Moving Dial
You can adjust screen images up and down within the lens range.
- Refer to Adjusting the Lens Position Moving Dial.
Lens
-
Remote Control Signal Receiver
-
Adjustable Feet
You can adjust the screen position by moving the adjustable feet up and
down.
Zoom Knob
Use to enlarge or reduce image size.
POWER button
Use to turn the projector on or off.
SOURCE button
Use to select the external device signal.
MENU button
Use to display the Menu Screen.
Move
/ Select
/
: Use to move or to select an item within a menu.
The buttons on the top of the projector are touch buttons.
Touch them lightly with your fingers to use them.
Using
3-2
3-3
Rear Side
ICON
NAME
PC IN Input port
COMPONENT IN 1 / COMPONENT IN 2 ports
Remote Control Signal Receiver
3D SYNC OUT (connects to an external emitter)
Power Input port
RS232C port
SERVICE port
AUDIO OUT port
VIDEO IN port
AUDIO IN (L-AUDIO-R) port
HDMI IN 1 (DVI) / HDMI IN 2 port
3-3
Using
3-4
Remote Control
Using your projector with another remote control device nearby may result in improper functioning due to remote control
code (frequency) interference.
ON ( ) Button
Used to turn on the projector.
OFF ( ) Button
Used to turn off the projector.
COMP1 Button
Used to switch to COMPONENT1
Mode.
LIGHT ( ) Button
Use to check source signals, picture
setup, PC screen adjustment, and
lamp lifespan.
VIDEO Button
Used to switch to Video Mode.
HDMI1 Button
Used to switch to HDMI1/DVI Mode.
3D Button
Used to switch 2D-3D.
HDMI2 Button
Used to switch to HDMI2 Mode.
PC Button
Used to switch to PC Mode.
COMP2 Button
Used to switch to COMPONENT2
Mode.
MENU Button
Used to display the Menu Screen.
RETURN Button
Returns to the previous menu.
Move(
) / ENTER Buttons
Used to move to or select each menu
item.
INFO Button
Used to view information about the
current input mode (external input signal).
EXIT Button
Used to make Menu Screen disappear.
D.BLACK button
Used to adjust the screen brightness
and contrast by adjusting the iris in
the optical system.
P.SIZE Button
Used to adjust the size of picture
screen.
P.INFO Button
Use to check source signals, picture
setup, PC screen adjustment, and
lamp lifespan.
STILL Button
Used to see still images.
INSTALL Button
Used to flip or reverse the image so that
it is appropriate for the projector's
installation location (In front of the screen
and hanging from the ceiling, behind the
screen and hanging from the ceiling,
etc.)
P.MODE Button
Used to select Picture Mode.
Using
•
Make sure to place your remote control on a table or desk.
- If you step on the remote control, you may fall and hurt yourself or damage the remote.
•
We recommend you use your remote control:
- No more than10m (32.8 ft) from the remote control signal receiver
- At an angle of no more than 30° to the left or right of the remote control signal receiver
3-4
Installing Batteries in the Remote Control
1. Lift the cover at the back of the remote control upward as shown in the figure.
2. Insert two AA size batteries.
3. Close the cover.
3-4
Using
3-5
LED Indications
LED Indications
:Light is On
STAND BY
:Light is Blinking
LAMP
:Light is Off
TEMP
INFORMATION
If you press the POWER button on the remote control or projector, the screen
appears within 30 seconds.
The projector is in normal operating condition.
This state appears when the projector is preparing an operation after the
POWER button on the projector or the remote control has been pressed.
The POWER button is pressed to turn off the projector, and the cooling system
is in operation to cool off the inside of the projector. (Lasts for about 1 minute)
The cooling fan inside the projector is not operating normally.
Refer to Action 1 on the next page.
The lamp cover protecting the lamp unit is not closed properly.
Refer to Action 2 on the next page.
The temperature inside the projector has risen beyond the control limit.
Power is turned off automatically. Refer to Action 3 on the next page.
A problem has occurred when operating the IC in the product. Refer to Action 4.
A problem has occurred with the operation of the lamp. Refer to Action 5.
The lifetime of the lamp has expired. Refer to Action 6 on the next page.
The memory in the product is not operating normally. Contact a Service Center.
The power for the product is not operating normally. Contact a Service Center.
A problem has occurred with the operaton of the color wheel in the product.
Refer to Action 4 on the next page.
Using
3-5
Clearing Indicator Problems
CLASSIFICA
TION
STATE
MEASURES
Action 1
When the cooling fan system is
not in normal operating condition.
If the symptom remains even after you disconnect and then reconnect the
power cord and turn the projector on again, contact a Samsung service
center.
Action 2
When the lamp cover protecting
the lamp unit is not properly
closed or the sensor system is
not in normal operating condition.
Confirm that the screws in the projector lamp cover are tightly fastened. If
they are, contact your dealer or service center.
Action 3
When temperature inside of the
projector becomes too high.
Refer to the Installation Related Warnings in the front of this manual and
adjust the installation of your projector accordingly. Cool down your projector sufficiently and then operate it again. If the same problem occurs continually, contact a Samsung service center.
Action 4
The DDP IC or color wheel has
failed to operate.
Disconnect and reconnect the power cord and start the projector again. If
the same symptom still occurs, contact a Samsung service center.
Action 5
The lamp malfunctions after
power turns off abnormally or
after powering on right after
turning off the projector.
Turn the power off, wait for a sufficient amount of cooling time and then
turn the power on to operate. If the same problem occurs continually, contact a Samsung service center.
Action 6
When the screen becomes
darker
Check the lamp usage time on the Information Display screen. If you need
to replace the lamp, contact a Samsung service center.
This Projector uses a cooling fan system to keep the unit from overheating. Operation of the cooling fan may cause noise.
This noise does not affect product performance and is part of normal operation.
3-5
Using
3-6
Using the Screen Adjustment Menu (OSD: On Screen Display)
The Screen Adjustment Menu (OSD: On Screen Display) Structure
To access the Menu, press the MENU button on the product or on the remote. To move in the menu, press the arrow buttons.
Menu selections with an arrow on the far right have sub-menus. Press the right arrow button to access the sub-menu. Directions
for navigating and selecting items in a menu are at the bottom of each menu screen.
MENU
Picture
SUB-MENU
3D
Mode
Contrast
Brightness
Sharpness
Color
Tint (G/R)
Gamma
Dynamic
Black™
Color Temperature
Save
Auto Adjustment
Screen
Advanced Setting
Picture Options
Menu Language
No Signal Power
Off
Install
Lamp Mode
Background
Test Pattern
Color Standard
General
Information
Factory Default
Input
Source List
Edit Name
Support
Software
Upgrade
Open Source
License
Picture Reset
Setup
3-6-1. Picture
Using
3-6
MENU
DESCRIPTION
3D
Enjoy dynamic 3D images by using Samsung 3D glasses. Be sure to read "3-7 Read Before Watching 3D Picture" thoroughly before you watch 3D picture.
•
•
If there is any obstacle between the emitter and 3D Active Glasses, the proper 3D effect
may not be obtained.
•
To switch to <3D> picture mode, press the 3D button on the remote control.
<3D Mode> : Select a 3D picture input mode. The available modes differ depending on the video
input signal. You can preview a selected mode before it is confirmed. Select the mode that
provides you with the most vivid and comfortable picture.
•
<Off> : Turns the 3D function off.
•
2D → 3D : Changes a 2D image to 3D.
•
Side by Side : Displays two images next to each other.
•
Top & Bottom : Displays one image above another.
•
Vertical Stripe : Displays the images for the left and right eye alternately in rows.
•
Line by Line : Displays the images for the left and right eye alternately in columns.
•
Checker Board : Displays the images for the left and right eye alternately in pixels.
•
Frame Sequential : Displays the images for the left and right eye alternately in frames.
Compatible 3D modes for each input source and resolution
•
•
: Compatible with all conditions
•
A : Compatible with a resolution of 720p, 1080i, or 1080p
•
PC : Compatible with PC resolutions (refer to PC Timing)
•
If watching a 3D channel received via the HDMI port from a set-top box (that is
compatible with 3D channels), changing to a 2D channel (on the set-top box) may
temporarily distort or corrupt the picture. To resolve this, disable 3D mode, which will
restore normal picture.
•
The 3D input can be viewed as 3D picture only in HDMI mode.
<3D → 2D> : Displays the image for the left eye only.
•
<Off> - <On>
This function is deactivated when <3D Mode> is set to
Using
(2D → 3D) or <Off>.
3-6
MENU
3D
DESCRIPTION
•
<3D View Point> : The overall adjustment of 3D perspective.
This function is deactivated when <3D Mode> is set to
•
(2D → 3D) or <Off>.
<Depth> : Specify the level of 3D effect for converting a 2D video to 3D. Range: 1–10 levels
This function is only activated when the <3D Mode> is set to
(2D → 3D).
•
<Picture Correction> : Adjusts the images for the left and right eye.
•
<3D Auto View> : Set 3D picture mode to be automatically activated for HDMI1.3 3D video input.
•
<Off> - <On>
If a 3D failure occurs due to a 3D information error, set <3D Auto View> to <Off> and
manually select a <3D Mode> using the 3D button or corresponding menu.
<3D Auto View> Support resolution
•
3D video input with one of the following resolutions will automatically switch the HDMI signal to
3D in
•
(Side by Side) mode. (16:9 only)
•
Resolution supported for HDMI PC mode
The resolution for HDMI PC mode is optimized to 1920 x 1080 input. An input resolution other
than 1920 x 1080 may not be displayed properly in 3D display or full screen mode.
•
Standard HDMI 3D Formats
The 3D formats listed below are recommended by the HDMI association and must be
supported.
•
The projector automatically switches to 3D mode if it inputs one of the source signal
formats above.
•
For the Standard HDMI 3D format with 24Hz, the Projector is optimized as follows:
Judder Reduction Display Mode: When <Motion Judder Canceller> is set to
<Smooth>, you can watch a smooth picture without judder.
<3D Emitter>
The <3D Emitter> setting does not change automatically.
Select the signal for the emitter you want to use.
•
Internal emitter: <3D Emitter> - <Internal>
•
External emitter: <3D Emitter> - <External>
You cannot use the internal and external emitters at the same time.
•
<DLP Link™>
You can use the 3D glasses which the DLP Link function was applied to.
•
3-6
<Off> - <On>
Using
MENU
Mode
DESCRIPTION
Select a screen mode to match the environment, the kind of images you are projecting, or select a
customized mode you have created based on your requirements.
•
•
•
•
•
Contrast / Brightness /
Sharpness / Color /
Tint (G/R)
<Vivid> : Select this mode for a more vivid picture.
<Dynamic> : Select if you want the screen quality to be clearer than standard screen quality.
<Standard> : You can comfortably view the projection screen if the surrounding is somewhat
bright.
<Movie1, Movie2> : Select if your surroundings are dark. This saves energy and reduces eye
fatigue.
<User1, User2, User3> : Select if you want to view the screen in your customized screen Mode.
You can set this in <Picture> - <Save>.
<Contrast> : Used to adjust the contrast between the object and the background.
<Brightness> : Used to adjust the brightness of the entire picture.
<Sharpness> : Used to adjust the sharpness of the picture.
<Color> : Used to adjust color lighter or darker.
<Tint (G/R)> : Used to obtain more natural color of objects using Green or Red enhancement.
In the <PC> mode, the <Sharpness>, <Color> and <Tint (G/R)> modes are not supported.
Gamma
An image compensation function that adjusts the settings according the media you have selected.
• <Film> : The best setting for watching a film.
• <Video> : The best setting for watching a Projector program.
•
Dynamic Black™
Adjusts the brightness and contrast of the screen by adjusting the tightening thread in the optical system.
• <Off> : You can view the screen where the brightness is emphasized by opening the tightening
thread fully.
• <Auto> : You can view a more dynamic screen as the input screens are adjusted automatically.
•
Color Temperature
Save
Using
<Manual> : You can view the screen while manually controlling the iris value from minimum to
maximum
You can change tint of the entire screen to suit your needs.
• <9300K> : The color temperature appropriate to very bright places such as a shop.
• <8000K> : This color temperature is appropriate for very bright places and is the defaut setting for
Dynamic Picture Mode. The sharpness and brightness are emphasized.
• <6500K> : This temperature is used for most video productions. It is the default setting for
Movie1, and may deliver the most precise tint.
•
<5500K> : Used to deliver optimal image quality for black-and-white films.
•
<R-Gain> - <G-Gain> - <B-Gain> - <R-Offset> - <G-Offset> - <B-Offset>
Used to save custom picture settings.
•
Auto Adjustment
<Graphic> : The best setting when you have a PC connected.
<User1> - <User2> - <User3>
Adjust frequency values/positions and fine tune the settings automatically.
•
Not available when connecting with an HDMI/DVI cable.
•
Available in <PC> Mode Only
3-6
MENU
Screen
DESCRIPTION
•
<Coarse> / <Fine> : Removes or reduces picture noise. If the noise is not removed by Fine-tuning
alone, then adjust the frequency as best as possible (<Coarse>) and Finetune again. After the
noise has been reduced, readjust the picture so that it is aligned to the Center of screen.
Available in <PC> Mode Only
•
•
<Position> : Adjust the PC screen position with direction button (▲ / ▼ / ◄ / ►).
<Zoom> : You can enlarge any area on the screen by using the numeric buttons (1 - 9) on the
remote.
Available in <PC> Mode Only
Advanced Setting
•
<Image Reset> : Return the display settings to the factory defaults.
•
<Black Tone>
Select the black level to adjust the screen depth.
<Off> - <Dark> - <Darker> - <Darkest>
You can not set in <PC> mode.
•
<Dynamic Contrast>
Adjust the screen contrast.
<Off> - <Low> - <Darker> - <High>
•
<Color Pattern>
You can filter the color of the entire screen according to your taste. Make optimal display settings
for movies.
•
<Off> : Shows the picture in the original color.
•
<Monochrome> : Shows the picture in black and white by filtering out all color signals.
•
<Red> : Shows the picture in red by filtering out the green and blue color signals.
•
<Green> : Shows the picture in green by filtering out the red and blue color signals.
•
<Blue> : Shows the picture in blue by filtering out the red and green color signals.
You can not set in <PC> mode.
•
<Flesh Tone>
Emphasize pink “Flesh Tone.”
You can not set in <PC> mode.
•
<Edge Enhancement>
Emphasize object boundaries.
<Off> - <On>
You can not set in <PC> mode.
•
3-6
<xvYCC>
Setting the <xvYCC> mode on increases detail and the color space when you display movies from
an external device (e.g. BD/DVD player) connected to the [HDMI IN] or [COMPONENT IN] jacks.
<Off> - <On>
•
Available when the picture mode is set to <Movie> and when the external input is set to
<HDMI> or <Component>.
•
Some external devices may not support this function.
Using
MENU
Picture Options
DESCRIPTION
•
•
<Size>
You can select a screen size according to the type of scene.
<16:9> - <Zoom1> - <Zoom2> - <Wide Fit> - <Anamorphic> - <4:3>
•
In the <PC> mode, only the <16:9> and <4:3> modes are supported.
•
In <HDMI1,2> (576p,480p,576i,480i resolutions) and <Component>
(576p,480p,576i,480i resolutions) modes, the <Wide Fit> mode is not
supported.
•
In the <Video> mode, the <Wide Fit> and <Anamorphic> modes are not
supported.
<Digital Noise Filter>
If a dotted line is displayed or the screen shakes, you can view the picture with better visual quality
by enabling Noise Reduction.
<Off> - <Low> - <Medium> - <High> - <Auto>
<Digital Noise Filter> is not available in <PC> mode.
•
<MPEG Noise Filter>
Reduces MPEG noise to provide improved picture quality.
<Off> - <Low> - <Medium> - <High> - <Auto>
<MPEG Noise Filter> is not available in <PC> mode.
•
<Film Mode>
Using this function, you can set the display mode so that it is optimized for playing movies.
<Off> - <Auto1> - <Auto2>
<Film Mode> is only supported for <Video>, <Component>(480i,576i).
•
<Motion Judder Canceller>
Removes drag from fast scenes with a lot of movement to provide a clearer picture.
<Off> - <Standard> - <Smooth> - <Demo>
If <Motion Judder Canceller> is Demo, you can compare the difference between on and off
modes.
•
<Black Level>
If the picture seems too dark, you can set a brighter black level.
The <Black Level> function can only be selected in <Video>, <HDMI1/DVI> and <HDMI2>
modes.
For <Video> Modes
•
<0 IRE> : Default black level.
•
<7.5 IRE> : Set the black level so it is darker.
For <HDMI1/DVI>, <HDMI2> Modes
•
<Low> : Set the brightness for dark signals to a low setting.
If the input signal is an [HDMI-Video] type, unclear screens are displayed normally.
•
•
Picture Reset
Using
<Normal> : Set the brightness for dark signals to a high setting. If the input signal is an [HDMIPC] type, dark screens are brighter.
<Overscan>
Using this function, you can cut off the edge of the picture when unnecessary information or
images appear on the edge of the picture.
<Off> - <On>
•
<Overscan> is not available in <PC> mode.
•
Cannot be enabled if the input signal is [HDMI-PC].
Resets your current picture mode to its default settings.
3-6
3-6-2. Setup
MENU
Menu Language
No Signal Power Off
DESCRIPTION
Set the menu language.
To avoid unnecessary energy consumption, set how long you want the Projector to remain on if it’s
not receiving a signal.
•
<Off> - <15min.> - <30min.> - <60min.>
Disabled when a connected PC is in power saving mode.
Install
Lamp Mode
Background
To adjust the picture to the installation location, (for example, behind a semi-transparent screen,
hanging from the ceiling), you can invert the projected images vertically / horizontally.
•
<Front-Floor> : Normal Image
•
<Front-Ceiling> : Horizontal/Vertical Reversed Image
•
<Rear-Floor> : Horizontally Reversed Image
•
<Rear-Ceiling> : Vertically Reversed Image
Using this function, you can set the image brightness by adjusting the amount of light generated by
the lamp.
•
<Theater> : This mode is optimized for screens smaller than 100 inches.
This mode decreases the lamp brightness and power consumption to extend the lamp lifetime
and reduce noise and power consumption.
•
<Bright> : This mode maximizes the lamp brightness when the ambient illumination is bright. As
the brightness of the lamp increases, the lamp lifetime may be reduced and the noise and power
consumption may increase.
You can select an image or screen which will appear when there is no signal from the external device
connected to the projector.
•
3-6
<Logo> - <Black>
Using
MENU
Test Pattern
Color Standard
General
Information
Factory Default
Using
DESCRIPTION
Generated by the projector itself. Utilize as standards to optimize the installation of the projector.
•
<Crosshatch> : Helps you to determine whether the picture is distorted or not.
•
<Screen Size> : Displays picture format sizes such as 1.33 : 1 or 1.78 : 1.
•
<Red> : Red Screen, only for color adjustment.
•
<Green> : Green Screen, only for color adjustment.
•
<Blue> : Blue Screen, only for color adjustment.
•
<White> : White Screen, only for color adjustment.
•
<6500K_White> : White Screen, brings out the white tones for a more real white.
•
The Crosshatch and Screen Size patterns of this projector are provided by JKP (JK
Production).
•
The Red/Green/Blue colors of the test patterns are only for the color adjustment procedures,
and may not comply with the actual colors displayed during video playback.
Lets you select the color standard to match the color standard of the input signal.
•
<HD> : High Definition, 1125 scan lines, standard definition Projector submitted to the ITU-R by
U.S., Japan and Canada, in 1986.
•
<SMPTE_C> : Standardized for Video Equipment by the Society of Motion Picture and Television
Engineers
•
<EBU> : Regulations and standards for European Broadcasting Production and Technology,
standardized by the European Broadcasting Union
•
<Menu Transparency>
You can set the transparency of the menu.
<Bright> - <Dark>
•
<Menu Display Time>
You can set the display time of the menu.
<5 sec> - <10 sec> - <30 sec> - <60 sec> - <90 sec> - <120 sec> - <Stay On>
•
<Auto Power On>
If power is supplied to the projector, it is turned on automatically. You do not need to press the
Power button.
<Off> - <On>
•
<LED Indicator>
You can turn the LED indicators on your projector on or off according to your requirements.
<Off> : This mode disables the operating LED. However, LEDs will come on regardless of the LED
setting when the power is turned on or off or when the projector is in an abnormal state.
<On> : This mode enables the operating LEDs so they can display the current operating state of
the projector.
You can check external source signals, picture setup, PC picture adjustment.
Using this function, you can reset various settings to the factory default settings.
3-6
3-6-3. Input
MENU
Source List
DESCRIPTION
You can select a device connected to the projector to display.
•
Edit Name
<PC> - <Video> - <Component1> - <Component2> - <HDMI1/DVI> - <HDMI2>
You can edit the names of devices connected to the projector.
•
<VCR> - <DVD> - <Cable STB> - <Satellite STB> - <PVR STB> - <AV Receiver> - <Game> <Camcorder> - <PC> - <DVI PC> - <DVI Devices> - <TV> - <IPTV> - <Blu-ray> - <HD DVD> <DMA>
3-6-4. Support
MENU
DESCRIPTION
Software Upgrade
Samsung may offer upgrades for your Projector’s firmware in the future. Please visit http://www.samsung.com or contact the Samsung call center at 1-800-SAMSUNG (726-7864) to receive information
about downloading upgrades. To upgrade, you download the upgrade to your PC, copy the upgrade
to a USB flash drive, and then attach the USB flash drive to the USB port on the projector.
Open Source License
•
When software is upgraded, video and audio settings you have made will return to their
default (factory) settings.
•
We recommend you write down your settings so that you can easily reset them after the
upgrade.
Open Source License Notice
In the case of using open source software, Open Source Licenses are available on the product menu.
3-6
Using
3-7
Read Before Watching 3D Picture
IMPORTANT HEALTH AND SAFETY INFORMATION FOR 3D PICTURES.
Be sure to read and understand fully the following safety precautions before you use the 3D function on the projector.
Precautions
•
Children should be monitored by a responsible adult when they use the 3D function.
If a child indicates he has tired eyes, a headache, dizziness, or nausea, have the child stop watching 3D pictures and rest.
•
Do not use the 3D glasses for other purposes: as general eye glasses, sunglasses, protective goggles, etc.
•
3D pictures may cause discomfort such as dizziness, nausea, or a headache.
If you experience any of these symptoms, stop watching 3D pictures, remove the 3D glasses, and rest.
•
Watching 3D images for an extended period of time may strain your eyes.
If your eyes are strained, stop watching the 3D pictures, remove the 3D glasses, and rest.
•
Do not use the 3D function or wear the 3D glasses while walking or moving around.
3D images can be distracting. You may run into an object and trip or fall.
Precautions for Using the 3D Function
•
The 3D glasses may not function normally if there is any other 3D products or electronic devices operating nearby.
- If the 3D function operates abnormally due to interference, move all other electronic devices and wireless telecommunication
devices as far away as possible from the glasses.
•
The screen may seem to flicker slightly if you watch 3D pictures under three-wave-length light, poor light conditions (e.g. a
flickering, fluorescent light), or a fluorescent light with a frequency of 50 - 60 Hz.
- If this occurs, dim or turn off the light.
•
The 3D effect may not look good if you are outside the effective distance or viewing angle.
•
If you leave the 3D glasses powered on, the battery's life will decrease.
- Power off the 3D glasses when not using them.
•
If you lie on your side with the 3D glasses on, the picture on the Projector may look dark or not be visible.
•
Changing the input source will automatically disable 3D picture mode.
•
3D glasses from other manufacturers are not compatible.
•
Be sure you keep other electronic devices or wireless telecommunication devices as far away as possible from the glasses.
•
Some options are disabled when you change the picture mode of the 3D projector screen.
•
Your 3D experience may differ from others. You may not notice the effect at all if your vision in one eye is much different from
the other.
Using
3-7
4
Troubleshooting
4-1
Before Requesting Service
Please check the following before requesting After-Sales service. If the problem continues, please contact your nearest
Samsung Electronics Service Center.
Symptoms
Installation and
Connection
Menu and
Remote
Control
Troubleshooting
No Power.
Check the power cable connections.
I want to install my projector on the ceiling.
The ceiling installation bracket is sold separately. Contact your
local product distributor.
External Source can not be selected.
Be sure that the video cable or cables are properly connected
to the correct jack or jacks on both ends. If the device is not
connected properly, it can not be selected.
Remote control does not work.
Be sure that the proper external source is selected.
Check whether your remote control is aimed at the correct
angle and is within its effective operating range. Remove any
obstacles between your remote control and the product.
The remote control may work abnormally or degrade in sensitivity if a lamp (three-wavelength fluorescent lamp, etc.) interfers with the sensor on the projector.
The batteries may have been discharged. Replace the batteries. (Be sure the batteries' positive and negative poles are correctly oriented.)
Check whether the LED indicator on the top of the projector is
turned on.
I cannot select a menu.
4-1
Check if the menu is displayed in gray. Gray-colored menu
items are unavailable.
Troubleshooting
Symptoms
Screen and
External
Source
Cannot see picture images.
Troubleshooting
Be sure that the power cord of the projector is connected.
Confirm that the projector's power button is turned on.
Be sure that the proper input source is selected.
Confirm that the connectors are properly connected to the
ports at the back of the projector.
Be sure that the <Color> and<Brightness> settings are not at
their lower limit.
Poor color.
Adjust the <Tint> and <Contrast>.
Images are not clear.
Adjust the focus.
Check if the projector is too far from or too near to the screen.
Strange noise.
If a strange sound continues, contact your Service Center.
An operating LED is lit.
Refer to the LED Indications section.
Lines appear on screen.
On-screen noise may occur when using your PC. Adjust the
frequency (refresh rate) of the screen.
No external device screen is displayed.
Check the operating status for the external device and check
whether the adjustable menu items, such as <Brightness> and
<Contrast> have been changed correctly in the <Mode> command screen of the Projector menu.
Only a blue screen appears.
Be sure to properly connect the external devices. Check the
connection cables again.
Screen appears in black and white or in an
odd color, or the screen is too dark or bright.
As mentioned above, check the adjustable items such as
<Brightness>, <Contrast>, or <Color> in the menu.
If you want to restore various settings to their factory defaults,
run <Factory Default> from the menu.
Troubleshooting
4-1
5
More Information
5-1
Specifications
MODEL
Panel
Size
0.95 inches DLP
Resolution
1920×1080p
Projection lens
Power
Lamp
SP-A8000
16:9
Power Consumption
Max 410W (Standby : under 1W)
Voltage
110/220V ac +/-10%, 50/60 Hz +/-3Hz
Power Consumption
300 W UHP
Life Time
2,000 Hours (Eco)
Dimension (W x D x H)
431.3 x 468.5 x 198.8 mm / 17.0 x 18.4 x 7.8 inches
Weight
9.8 Kg / 21.6 lbs
Key Features
Input signal
User Environment
Brightness
1,000 ANSI lumen
Contrast
10000 : 1
Projection Range
1 m ~ 14 m / 39.37 inches ~ 551.18 inches
Zoom Adjustment
Manual
Focus Adjustment
Manual
Screen Size (Diagonal)
Diagonal 40 inches ~ 300 inches
Throw Ratio
1.7 / 2.2
Focus
< 3 pixel
VIDEO IN
CVBS (Composite video)
PC IN
D-Sub 15p (Analog RGB)
COMPONENT IN 1, 2
Component on RCA type
HDMI IN 1(DVI)
HDMI, DVI
HDMI IN 2
HDMI
Temperature and Humidity
Operating : Temperature 32 °F ~ 95 °F ( 0 °C ~ 40 °C )
Humidity : 10% ~ 80% (Non-condensing)
Storage : Temperature -4°F ~ 140 °F ( -20 °C ~ 60 °C )
Humidity : 5% ~ 95% (Non-condensing)
Noise
Eco : 24 dB, Bright : 30 dB
This Class B equipment is designed for home and office use. The equipment has been registered regarding EMI for
residential use. It may be used in all areas. Class A is for office use. Class A is for business while class B emits less
electromagnetic waves than class A.
The DMD panel used for Samsung projectors is made of hundreds of tiny mirrors. As with other visual display elements, the
DMD Panel may include a few bad pixels. Samsung and the DMD Panel manufacturer have a rigid, bad pixel identification
and limitation procedure in place and products will not exceed the maximum number of bad pixels set by our standards.
Rarely, non-displayable pixels may exist, however it does not affect the picture quality nor the lifespan of the product.
5-1
More Information
5-2
RS232C Command Table
Communication Format (Complies with the RS232C Standard)
•
Baud rate : 9,600 bps
•
parity : None
•
Data bits : 8, stop bit : 1
•
Flow Control : None
Serial Communication Protocol
1. Command Packet Structure [7bytes]
0x08
0x22
cmd1
cmd2
•
A command packet consists of 7 bytes in total.
cmd3
value
•
The two bytes 0x08 and 0x22 signify that the packet is for serial communication.
•
The following 4 bytes represent a pre-defined command that can be defined by the user.
•
The last byte is the checksum which checks the validity of the current packet.
•
Header [2 Byte]: Pre-defined values fixed to 0x08 and 0x22.
•
Cmd1 [1 Byte]: The first value of the code defined in the command list (Hexadecimal)
•
Cmd2 [1 Byte]: The second value of the code defined in the command list (Hexadecimal)
•
Cmd3 [1 Byte]: The third value of the code defined in the command list (Hexadecimal)
•
Value [1 Byte]: Input parameter for the command (Default: 0) (Hexadecimal)
•
CS [1 Byte]: Checksum (the 2’s complement of the sum of all the values except for the CS value.)
CS
2. Response Packet Structure [3 Bytes]
1. Success
0x03
0x0C
0xF1
0x0C
0xFF
2. Fail
0x03
•
When the received packet from an external device has a valid value, a Success packet is sent. Otherwise, a Fail
packet is sent.
•
A Fail packet is sent if:
•
•
The received packet length is not equal to 7 bytes.
•
The 2 byte packet header value is not equal to 0x08, 0x22.
•
The check sum is incorrect.
Failure detection by an external device
•
An external device classifies the packet as Fail if it does not receive a Success packet within 100ms.
More Information
5-2
Command Table
CONTROL ITEM
General
Input
Power
Source List
Power
HDMI
CMD1
Display OSD
/ Power On
0x00
CMD2
0x00
CMD3
0x00
1
Cancel
2
HDMI1/DVI
0x0A
0x00
0x01
Mode
Size
Dynamic
Black™
Component1
0x02
Install
Lamp Mode
1
Video
0x04
0
PC
PC
0x05
0
0x00
0
Vivid
0x0B
0X00
Dynamic
1
Standard
2
Movie1
3
Movie2
4
User1
5
User2
6
User3
7
16:9
0x0B
0x00
0
Zoom1
1
Zoom2
2
Wide Fit
3
Anamorphic
4
4:3
5
Off
0x14
0
Auto
Front-Floor
1
RIGHT
2
LEFT
3
0x0C
0x00
0x00
0
Front-Ceiling
1
Rear-Floor
2
Rear-Ceiling
3
Theater
Bright
5-2
0
Video
Manual
Setup
0
1
Component2
Picture
0
OK
HDMI2
Component
VALUE
0x01
0x00
0
1
More Information
5-3
Contact SAMSUNG WORLDWIDE
If you have any questions or comments relating to Samsung products, please contact the SAMSUNG customer care center.
NORTH AMERICA
U.S.A
1-800-SAMSUNG (726-7864)
http://www.samsung.com
CANADA
1-800-SAMSUNG (726-7864)
http://www.samsung.com
MEXICO
01-800-SAMSUNG (726-7864)
http://www.samsung.com
LATIN AMERICA
ARGENTINA
0800-333-3733
http://www.samsung.com
BRAZIL
0800-124-421
http://www.samsung.com
4004-0000
CHILE
800-SAMSUNG (726-7864)
http://www.samsung.com
COLOMBIA
01-8000112112
http://www.samsung.com
COSTA RICA
0-800-507-7267
http://www.samsung.com
ECUADOR
1-800-10-7267
http://www.samsung.com
EL SALVADOR
800-6225
http://www.samsung.com
GUATEMALA
1-800-299-0013
http://www.samsung.com
HONDURAS
800-7919267
http://www.samsung.com
JAMAICA
1-800-234-7267
http://www.samsung.com
NICARAGUA
00-1800-5077267
http://www.samsung.com
PANAMA
800-7267
http://www.samsung.com
PERU
0-800-777-08
http://www.samsung.com
PUERTO RICO
1-800-682-3180
http://www.samsung.com
REP. DOMINICA
1-800-751-2676
http://www.samsung.com
TRINIDAD & TOBAGO
1-800-SAMSUNG (726-7864)
http://www.samsung.com
VENEZUELA
0-800-100-5303
http://www.samsung.com
EUROPE
ALBANIA
42 27 5755
-
AUSTRIA
0810 - SAMSUNG (7267864,€ 0.07/
min)
http://www.samsung.com
BELGIUM
02-201-24-18
http://www.samsung.com/be (Dutch)
http://www.samsung.com/be_fr
(French)
BOSNIA
05 133 1999
-
BULGARIA
07001 33 11
http://www.samsung.com
CROATIA
062 SAMSUNG (062 726 7864)
http://www.samsung.com
More Information
5-3
EUROPE
CZECH
800 - SAMSUNG (800-726786)
http://www.samsung.com
DENMARK
70 70 19 70
http://www.samsung.com
EIRE
0818 717100
http://www.samsung.com
ESTONIA
800-7267
http://www.samsung.com
FINLAND
030 - 6227 515
http://www.samsung.com
FRANCE
01 48 63 00 00
http://www.samsung.com
GERMANY
01805 - SAMSUNG (726-7864,€ 0,14/
Min)
http://www.samsung.com
HUNGARY
06-80-SAMSUNG (726-7864)
http://www.samsung.com
ITALIA
800-SAMSUNG (726-7864)
http://www.samsung.com
KOSOVO
+381 0113216899
-
LATVIA
8000-7267
http://www.samsung.com
LITHUANIA
8-800-77777
http://www.samsung.com
LUXEMBURG
261 03 710
http://www.samsung.com
MACEDONIA
023 207 777
-
MONTENEGRO
020 405 888
-
NETHERLANDS
0900 - SAMSUNG (0900-7267864) (€
0,10/Min)
http://www.samsung.com
NORWAY
815-56 480
http://www.samsung.com
POLAND
0 801 1SAMSUNG (172678)
http://www.samsung.com
022 - 607 - 93 - 33
PORTUGAL
80820 - SAMSUNG (726-7864)
http://www.samsung.com
RUMANIA
1. 08010 SAMSUNG (72678) – doar din
reţeaua Romtelecom, tarif local;
http://www.samsung.com
2. 021.206.01.10 – din orice reţea, tarif
normal
SERBIA
0700 Samsung (0700 726 7864)
http://www.samsung.com
SLOVAKIA
0800-SAMSUNG (726-7864)
http://www.samsung.com
SPAIN
902 - 1 - SAMSUNG (902 172 678)
http://www.samsung.com
SWEDEN
0771 726 7864 (SAMSUNG)
http://www.samsung.com
SWITZERLAND
0848-SAMSUNG (7267864, CHF 0.08/
min)
http://www.samsung.com/ch
0330 SAMSUNG (7267864)
http://www.samsung.com
U.K
http://www.samsung.com/ch_fr (French)
CIS
ARMENIA
0-800-05-555
-
AZERBAIJAN
088-55-55-555
-
BELARUS
810-800-500-55-500
-
GEORGIA
8-800-555-555
-
5-3
More Information
CIS
KAZAKHSTAN
8-10-800-500-55-500 (GSM: 7799)
http://www.samsung.com
KYRGYZSTAN
00-800-500-55-500
http://www.samsung.com
MOLDOVA
00-800-500-55-500
-
RUSSIA
8-800-555-55-55
http://www.samsung.com
TADJIKISTAN
8-10-800-500-55-500
http://www.samsung.com
UKRAINE
0-800-502-000
http://www.samsung.com/ua
http://www.samsung.com/ua_ru
UZBEKISTAN
8-10-800-500-55-500
http://www.samsung.com
ASIA PACIFIC
AUSTRALIA
1300 362 603
http://www.samsung.com
NEW ZEALAND
0800 SAMSUNG (0800 726 786)
http://www.samsung.com
CHINA
400-810-5858
http://www.samsung.com
010-6475 1880
HONG KONG
(852) 3698 - 4698
http://www.samsung.com/hk
http://www.samsung.com/hk_en/
INDIA
3030 8282
http://www.samsung.com
1800 110011
1800 3000 8282
1800 266 8282
INDONESIA
0800-112-8888
http://www.samsung.com
021-5699-7777
JAPAN
0120-327-527
http://www.samsung.com
MALAYSIA
1800-88-9999
http://www.samsung.com
PHILIPPINES
1-800-10-SAMSUNG (726-7864)
http://www.samsung.com
1-800-3-SAMSUNG (726-7864)
1-800-8-SAMSUNG (726-7864)
02-5805777
SINGAPORE
1800-SAMSUNG (726-7864)
http://www.samsung.com
TAIWAN
0800-329-999
http://www.samsung.com
THAILAND
1800-29-3232
http://www.samsung.com
02-689-3232
VIETNAM
1 800 588 889
http://www.samsung.com
MIDDLE EAST
BAHRAIN
8000-4726
http://www.samsung.com
Egypt
08000-726786
http://www.samsung.com
JORDAN
800-22273
http://www.samsung.com
Morocco
080 100 2255
http://www.samsung.com
Oman
800-SAMSUNG (726-7864)
http://www.samsung.com
Saudi Arabia
9200-21230
http://www.samsung.com
More Information
5-3
MIDDLE EAST
TURKEY
444 77 11
http://www.samsung.com
U.A.E
800-SAMSUNG (726-7864)
http://www.samsung.com
AFRICA
NIGERIA
0800 - SAMSUNG (726-7864)
http://www.samsung.com
SOUTH AFRICA
0860-SAMSUNG (726-7864)
http://www.samsung.com
More Information
5-3
5-4
Correct Disposal - Europe only
Correct Disposal of This Product (Waste Electrical & Electronic Equipment) - Europe only
(Applicable in the European Union and other European countries with separate collection systems)
This marking on the product, accessories or literature indicates that the product and its electronic accessories
(e.g. charger, headset, USB cable) should not be disposed of with other household waste at the end of their
working life. To prevent possible harm to the environment or human health from uncontrolled waste disposal,
please separate these items from other types of waste and recycle them responsibly to promote the sustainable
reuse of material resources.
Household users should contact either the retailer where they purchased this product, or their local government
office, for details of where and how they can take these items for environmentally safe recycling.
Business users should contact their supplier and check the terms and conditions of the purchase contract. This
product and its electronic accessories should not be mixed with other commercial wastes for disposal.
Correct disposal of batteries in this product - Europe only
(Applicable in the European Union and other European countries with separate battery return systems.)
This marking on the battery, manual or packaging indicates that the batteries in this product should not be disposed of with other household waste at the end of their working life. Where marked, the chemical symbols Hg,
Cd or Pb indicate that the battery contains mercury, cadmium or lead above the reference levels in EC Directive
2006/66. If batteries are not properly disposed of, these substances can cause harm to human health or the
environment.
To protect natural resources and to promote material reuse, please separate batteries from other types of waste
and recycle them through your local, free battery return system.
5-4
More Information