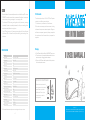
1
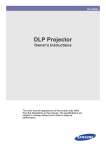
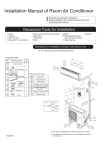
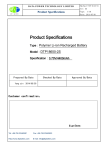
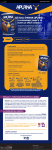
Note:
* Recorded videos will be automatically saved as an individual file every 20 minutes.
* DIVEMATE is unable to record video or operate as a flashlight at the same time
when its battery is being recharged or it is outputting video.
* The indicator LED illuminating red signifies critically low battery, recharge
immediately. If power is completely exhausted, the file you are recording will be
saved automatically before shutting down.
* If your SD card memory is full, pressing the recording on/off button will cause
the Indicator LED to illuminate blue only without flashing, and recording will not
take place.
Warnings
SPECIFICATIONS
Model No.
DIVEMATE Flashlight DVR
FCC Information
This device complies with part 15 of the FCC Rules. Operation
is subject to the following two conditions:
(1) this device may not cause harmful interference;
(2) this device must accept any interference received, including
interference that may cause undesired operation. Changes or
modifications not expressly approved by the party responsible
for compliance could void the user’s authority to operate the
equipment.
Imaging Sensor
1/5-inch Color CMOS
Video Resolution
640 x 480
Viewing Angle
52o
Video Format
.AVI
Video File Size
>30M Byte/ minute
Viewing Resolution
656 x 488
Storage Medium
2~32GB of Built-in Memory
Power Supply
5V
Charge Time
3 hours (Max.)
Work Time
8 hours (Max.)
LED Light Power
1W
LED Light Color Temperature
5500~6000K
Waterproof Capacity
IP68
Consumption Current (Max.)
440mA
Charge Current
1A (Max.)
Dimensions (W x D x H)
119 x 38 x 46 (mm)
Approx. Weight
133g
Operating Temperature
0OC~50OC
Operating Humidity
15~85%RH
* All the specifications are subject to minor change without prior notice.
-4-
● Turn off Power Lock/Unlock Switch if the DIVEMATE is not in use.
● This product can only be completely disconnected for from its
power source by unplugging the power adapter.
● Do not cut the DC power cable of provided with this product to
fit with another power source.
EU Environmental Protection
Waste electrical products should
not be disposed of with household
waste. Please recycle where
facilities exist. Check with your
local authority or retailer for
recycling advice.
Version 1.1
Please read this user manual carefully before using this product.
Failure to understand operation procedures may result in injury.
WELCOME
Congratulations on your purchase of our waterproof video camera with flashlight
LED, the DIVEMATE. This product is designed for use when diving, snorkeling,
caving, camping, hiking, biking, or nearly any other outdoor activity. Please read
the user manual carefully before using this product.
PACKING LIST
① DIVEMATE x 1
② Buckle Bracket x 1
If the date/time of your video does not match the local date/time, please follow
these steps:
1. Set the date/time on your computer to match the local date/time;
2. Connect DIVEMATE to your computer via the USB cable provided;
3. Double-click the My Computer icon on your desktop, then navigate into the
Mobile Disk directory. This is the directory DIVEMATE’s SD card uses;
4. Insert the CD provided into your computer’s CD drive;
5. Search your CD drive for a filed named ‘GETTIME.exe’, copy and paste this
file into the Mobile Disk folder;
6. Double-click the file and wait for your system to automatically produce a
‘GETTIME.txt’ file;
7. You may now close all folders and disconnect the USB cable, set up has been
successfully completed.
③ Bicycle Bracket x 1
recording);
5. Press the recording on/off button once to start recording. The indicator LED
will illuminate blue for seven seconds and then begin to flash to indicate that
recording is in progress;
Very Important:
6. If working underwater, please ensure that all waterproof parts are ready with following A.B.
C steps and then you protect DIVEMATE’s internal components by:
A: Screw the waterproof plug at the back of DAVEMITE.
B: Stuffing up the microphone with the waterproof plug located near the LEDs.
C: Sliding the lock/unlock switch to the ‘lock’ position if underwater more than10m.
7. Press the recording on/off button again to stop recording.
Lock
④ Power Adapter x 1
①
②
③
④
Unlock/on
Turn off power
INSTALLATION
⑤ USB Cable x 1
Lock
Switch
⑥ Safety Strap x 1
⑤
⑦ Software CD x 1
⑥
⑦
⑧
Flashlight
on/off
Indicator
LED
Recording
on/off
⑧ Lock/unlock pick x 1
The pictures are for reference only, please refer to actual product.
For your bicycle
For your helmet
For your wrist
Installation brackets allow for convenient video recording in a variety of outdoor
settings and provide multiple potential installation configurations. Whether recording
at night or underwater, installation is quick and convenient, simply place DIVEMATE
into your desired mount and you are ready to go!
STRUCTURE
Indicator LED
Flashlight on/off
BASIC OPERATION
Recording on/off
Power Lock/unlock Switch
LED Lighting
USB Socket
Microphone
Camera Lens
Waterproof Plug
Waterproof Plug
-1-
Operating Instruction:
1. Unscrew waterproof plug located at the back of DIVEMATE;
2. Using the provided pick, slide the Power Lock/unlock Switch to the ‘ON’ position
and replace the waterproof plug (refer to Fig-1);
3. Unplug the microphone waterproof plug located near the LEDs for voice recording;
4. Press the flashlight on/off button to turn on the LED (refer to Fig-2) (Pressing
the flashlight on/off button again turns the LED off. If natural lighting is strong
enough, you can conserve batter y power by keeping the flashlight off during
-2-
Fig-1
Fig-2
Fig-3
Charging Battery/Video Output:
1. Connect DIVEMATE to any computer with a USB port via the USB cable
provided (refer to Fig-3). When correctly connected, the indicator LED will
illuminate red indicating that DIVEMATE is charging (users may also use the
power adapter provided to recharge DIVEMATE’s built-in battery) and is also
ready to output video files;
2. Your computer should automatically recognize the new hardware, which you
may browse by double-clicking on the My Computer icon on your desktop, and
then navigating into the Mobile Disk directory;
3. Select your desired video file(s) and play them back using a variety of software.
* If your computer is unable to playback desired video files, please first install
the video player software from the included CD.
-3-