1
UML Modeling with Enterprise
Architect - UML Modeling Tool
Enterprise Architect is an intuitive, flexible and powerful UML
analysis and design tool for building robust and maintainable
software.
This booklet explains how to use the modeling facilities of
Enterprise Architect.
Copyright © 1998-2010 Sparx Systems Pty Ltd
UML Modeling with Enterprise Architect - UML Modeling Tool
© 1998-2010 Sparx Systems Pty Ltd
All rights reserved. No parts of this work may be reproduced in any form or by any means - graphic, electronic, or
mechanical, including photocopying, recording, taping, or information storage and retrieval systems - without the
written permission of the publisher.
Products that are referred to in this document may be either trademarks and/or registered trademarks of the
respective owners. The publisher and the author make no claim to these trademarks.
While every precaution has been taken in the preparation of this document, the publisher and the author assume no
responsibility for errors or omissions, or for damages resulting from the use of information contained in this document
or from the use of programs and source code that may accompany it. In no event shall the publisher and the author be
liable for any loss of profit or any other commercial damage caused or alleged to have been caused directly or
indirectly by this document.
Printed: May 2010
Publisher
Sparx Systems
Managing Editor
Geoffrey Sparks
Technical Editors
Brad Maxwell
Simon McNeilly
Neil Capey
Special thanks to:
All the people who have contributed suggestions, examples, bug
reports and assistance in the development of Enterprise Architect.
The task of developing and maintaining this tool has been greatly
enhanced by their contribution.
Contents
I
Table of Contents
Foreword
1
Modeling
2
Work With...................................................................................................................................
Packages
3
Open Package
..........................................................................................................................................................
in the Project Browser
Add a Package
..........................................................................................................................................................
Rename a ..........................................................................................................................................................
Package
Copy a Package
..........................................................................................................................................................
Drag a Package
..........................................................................................................................................................
Onto a Diagram
Show or Hide
..........................................................................................................................................................
Package Contents
Delete a Package
..........................................................................................................................................................
3
3
4
4
5
6
6
Work With...................................................................................................................................
Diagrams
7
Diagram ..........................................................................................................................................................
Context Menu
10
Diagram Tasks
.......................................................................................................................................................... 12
Add New
.........................................................................................................................................................
Diagrams
13
Layout
.........................................................................................................................................................
Diagrams
14
Circular/Elliptical
.........................................................................................................................................
Layout
15
Box Layout ......................................................................................................................................... 18
Per Page Layout
......................................................................................................................................... 19
Digraph Layout
......................................................................................................................................... 20
Spring Layout
......................................................................................................................................... 21
Neaten Layout
......................................................................................................................................... 21
Converge/Diverge
.........................................................................................................................................
Layout
22
Fan Relations
.........................................................................................................................................
Layout
24
Auto Route .........................................................................................................................................
Layout
25
Lay Out a Diagram
.........................................................................................................................................
Automatically
26
Delete
.........................................................................................................................................................
Diagram
29
Rename
.........................................................................................................................................................
Diagram
30
Copy.........................................................................................................................................................
And Paste Diagram Element
30
Diagram
.........................................................................................................................................................
Navigation Hotkeys
30
Copy.........................................................................................................................................................
Image to Disk
31
Copy.........................................................................................................................................................
Image to Clipboard
31
Change
.........................................................................................................................................................
Diagram Type
31
Z Order
.........................................................................................................................................................
Elements
32
Copy.........................................................................................................................................................
(Duplicate) Diagram
32
Open.........................................................................................................................................................
Package From Diagram
33
Feature
.........................................................................................................................................................
Visibility
33
Insert.........................................................................................................................................................
Diagram Properties Note
36
Autosize
.........................................................................................................................................................
Elements
36
Paste.........................................................................................................................................................
from Project Browser
37
Paste Multiple
.........................................................................................................................................
Items
38
Paste Composite
.........................................................................................................................................
Elements
39
Paste Activities
......................................................................................................................................... 39
Place.........................................................................................................................................................
Related Elements on Diagram
40
Swimlanes
.........................................................................................................................................................
Matrix
41
Using.........................................................................................................................................................
the Image Manager
44
Create Custom
.........................................................................................................................................
Diagram Background
45
Import Image
.........................................................................................................................................
Library
46
Swimlanes ......................................................................................................................................... 47
Show.........................................................................................................................................................
Realized Interfaces of Class
49
Label.........................................................................................................................................................
Menu Section
49
Lock .........................................................................................................................................................
Diagram
50
Undo.........................................................................................................................................................
Last Action
51
© 1998-2010 Sparx Systems Pty Ltd
II
Contents
Redo.........................................................................................................................................................
Last Action
View .........................................................................................................................................................
Last and Next Diagram
Diagram
.........................................................................................................................................................
Properties
General Tab.........................................................................................................................................
Diagram Tab
.........................................................................................................................................
Elements Tab
.........................................................................................................................................
Features Tab
.........................................................................................................................................
Connectors.........................................................................................................................................
Tab
Visible Class
.........................................................................................................................................
Members
Set the
.........................................................................................................................................................
Default Diagram
Create
.........................................................................................................................................................
Legends
Scale.........................................................................................................................................................
Image to Page Size
Set Diagram
.........................................................................................................................................................
Page Size
Pan and
.........................................................................................................................................................
Zoom a Diagram
Move.........................................................................................................................................................
Elements In Diagram Sections
51
51
52
53
54
55
57
58
59
59
60
62
63
64
65
Work With
Elements
...................................................................................................................................
67
Element Context
..........................................................................................................................................................
Menu
Properties
.........................................................................................................................................................
Menu Section
Advanced Submenu
.........................................................................................................................................
Custom Properties
.........................................................................................................................................
Dialog
Add Submenu
.........................................................................................................................................................
Insert Related
.........................................................................................................................................
Elements
Find Submenu
.........................................................................................................................................................
Embedded
.........................................................................................................................................................
Elements Submenu
Embedded .........................................................................................................................................
Elements Window
Features
.........................................................................................................................................................
Menu Section
Code.........................................................................................................................................................
Engineering Menu Section
Appearance
.........................................................................................................................................................
Menu Section
Set Element.........................................................................................................................................
Font
Element
.........................................................................................................................................................
Multiple Selection Menu
Element Tasks
..........................................................................................................................................................
Create
.........................................................................................................................................................
Elements
Add Elements
.........................................................................................................................................................
Directly To Packages
Use Auto
.........................................................................................................................................................
Naming and Auto Counters
Set Element
.........................................................................................................................................................
Parent
Show.........................................................................................................................................................
Element Use
Set Up
.........................................................................................................................................................
Cross References
Move.........................................................................................................................................................
Elements Within Diagrams
Move.........................................................................................................................................................
Elements Between Packages
Copy.........................................................................................................................................................
Elements Between Packages
Change
.........................................................................................................................................................
Element Type
Align .........................................................................................................................................................
Elements
Resize
.........................................................................................................................................................
Elements
Delete
.........................................................................................................................................................
Elements
Customize
.........................................................................................................................................................
Visibility of Elements
Create
.........................................................................................................................................................
Notes and Text
Set an
.........................................................................................................................................................
Element's Default Appearance
Get/Set
.........................................................................................................................................................
Project Custom Colors
Set .........................................................................................................................................................
Element Templates Package
Highlight
.........................................................................................................................................................
Context Element
Make
.........................................................................................................................................................
Linked Element a Local Copy
Copy
.........................................................................................................................................................
Features Between Elements
Move
.........................................................................................................................................................
Features Between Elements
Attributes
..........................................................................................................................................................
Attributes
.........................................................................................................................................................
Dialog - General Tab
Attributes
.........................................................................................................................................................
Dialog - Detail
Attributes
.........................................................................................................................................................
Dialog - Constraints
Attribute
.........................................................................................................................................................
Tagged Values
UML Modeling with Enterprise Architect - UML Modeling Tool
69
70
71
72
73
74
74
75
75
77
77
77
79
79
81
81
83
83
84
85
86
88
89
90
91
91
92
93
94
95
96
98
100
101
102
103
104
105
108
110
111
112
Contents
III
Create
.........................................................................................................................................................
Properties
Display
.........................................................................................................................................................
Inherited Attributes
Create
.........................................................................................................................................................
Object From Attribute
Properties
..........................................................................................................................................................
General
.........................................................................................................................................................
Settings
Advanced .........................................................................................................................................
Settings
Details
.........................................................................................................................................................
Requirements
.........................................................................................................................................................
External Requirements
.........................................................................................................................................
Constraints
.........................................................................................................................................................
Links
.........................................................................................................................................................
Scenarios
.........................................................................................................................................................
Structured.........................................................................................................................................
Specification Tab
Generate Diagrams
.........................................................................................................................................
Generate Test
.........................................................................................................................................
Cases
Generate Scenario
.........................................................................................................................................
From Activity Diagram
Context References
.........................................................................................................................................
Tab
Associated
.........................................................................................................................................................
Files
Tagged
.........................................................................................................................................................
Values Tab
Tagged
.........................................................................................................................................................
Values
Advanced .........................................................................................................................................
Tag Management
Quick Add.........................................................................................................................................
of Tagged Values
Object
.........................................................................................................................................................
Classifiers
Using Classifiers
.........................................................................................................................................
Select
.........................................................................................................................................................
<Item> Dialog
Select Property
.........................................................................................................................................
Dialog
Behavioral
..........................................................................................................................................................
Modeling
Operations
.........................................................................................................................................................
Operations.........................................................................................................................................
Dialog - General
Operations
...................................................................................................................................
Dialog - Behavior
Initial Code
...................................................................................................................................
Operations
...................................................................................................................................
Dialog - Constraints
Operation .........................................................................................................................................
Tagged Values
Override Parent
.........................................................................................................................................
Operations
Display Inherited
.........................................................................................................................................
Operations
Interactions
.........................................................................................................................................................
and Activities
Behavior
.........................................................................................................................................................
Calls
Associate .........................................................................................................................................
with Different Behaviors
Synchronize
.........................................................................................................................................
Arguments
Behavior
.........................................................................................................................................................
Parameters
Link Note to
.........................................................................................................................................
Internal Documentation
Parameters
.........................................................................................................................................
Dialog
Parameter.........................................................................................................................................
Tagged Values
Operation .........................................................................................................................................
Parameters by Reference
Behavior
.........................................................................................................................................................
Call Arguments
Element..........................................................................................................................................................
In-place Editing Options
In-place
.........................................................................................................................................................
Editing Tasks
Edit.........................................................................................................................................................
Element Item Name
Edit.........................................................................................................................................................
Feature Stereotype
Edit.........................................................................................................................................................
Feature Scope
Edit.........................................................................................................................................................
Attribute Keyword
Edit.........................................................................................................................................................
Operation Parameter Keyword
Edit.........................................................................................................................................................
Parameter Kind
Insert
.........................................................................................................................................................
New Feature
Insert
.........................................................................................................................................................
Operation Parameter
Insert
.........................................................................................................................................................
Maintenance Feature
Insert
.........................................................................................................................................................
Testing Features
Element..........................................................................................................................................................
Icons
114
115
117
118
119
120
121
122
124
125
126
127
129
135
142
143
143
144
145
145
146
147
148
149
149
151
153
154
155
158
161
162
163
164
165
167
167
168
168
168
168
170
172
173
174
175
175
176
177
178
179
179
180
181
182
182
184
186
© 1998-2010 Sparx Systems Pty Ltd
IV
Contents
Compartments
..........................................................................................................................................................
Linked Documents
..........................................................................................................................................................
Create
.........................................................................................................................................................
Document Artifact
Link.........................................................................................................................................................
Document to UML Element
Edit.........................................................................................................................................................
Linked Documents
Hyperlink
.........................................................................................................................................................
From Linked Document
Create
.........................................................................................................................................................
Element From Document
Replace
.........................................................................................................................................................
or Delete Documents
Create
.........................................................................................................................................................
Linked Document Templates
Edit.........................................................................................................................................................
Linked Document Templates
187
188
190
191
191
193
193
194
194
195
Work With
Connectors
...................................................................................................................................
197
Connector
..........................................................................................................................................................
Context Menu
Properties
.........................................................................................................................................................
Menu Section
Type-Specific
.........................................................................................................................................................
Menu Section
Advanced
.........................................................................................................................................................
Menu Section
Style.........................................................................................................................................................
Menu Section
Appearance
.........................................................................................................................................................
Menu Section
Connector
..........................................................................................................................................................
Tasks
Connect
.........................................................................................................................................................
Elements
Connect
.........................................................................................................................................................
to Element Feature
Add.........................................................................................................................................................
a Note to a Connector
Arrange
.........................................................................................................................................................
Connectors
Change
.........................................................................................................................................................
Connector Type
Change
.........................................................................................................................................................
the Source or Target Element
Connector
.........................................................................................................................................................
Styles
Create
.........................................................................................................................................................
Connector in Project Browser
Relationship
.........................................................................................................................................................
Visibility
Delete
.........................................................................................................................................................
Connectors
Generalization
.........................................................................................................................................................
Sets
Hide/Show
.........................................................................................................................................................
Connectors
Hide/Show
.........................................................................................................................................................
Labels
Connector
.........................................................................................................................................................
In-place Editing Options
Reverse
.........................................................................................................................................................
Connector
Set .........................................................................................................................................................
Association Specializations
Show
.........................................................................................................................................................
Uses Arrow Head
Tree.........................................................................................................................................................
Style Hierarchy
Connector
..........................................................................................................................................................
Properties
Connector
.........................................................................................................................................................
Constraints
Source
.........................................................................................................................................................
Role
Target
.........................................................................................................................................................
Role
Connector
.........................................................................................................................................................
Tagged Values
Message
..........................................................................................................................................................
Scope
197
198
199
199
199
200
201
201
202
203
205
205
206
206
209
210
210
212
212
214
214
214
214
215
216
217
218
219
221
222
222
Relationship
Matrix
...................................................................................................................................
224
Open the
..........................................................................................................................................................
Relationship Matrix
Set Element
..........................................................................................................................................................
Type
Set Connector
..........................................................................................................................................................
Type and Direction
Set Source
..........................................................................................................................................................
and Target Package
Relationship
..........................................................................................................................................................
Matrix Options
Modify Relationships
..........................................................................................................................................................
in Matrix
Export to
..........................................................................................................................................................
CSV
Matrix Profiles
..........................................................................................................................................................
Review ..........................................................................................................................................................
Source and Target Elements
225
225
226
227
228
229
230
230
231
Business
Modeling
...................................................................................................................................
232
Process..........................................................................................................................................................
Modeling Notation
Inputs, Resources
..........................................................................................................................................................
and Information
Events ..........................................................................................................................................................
Outputs..........................................................................................................................................................
UML Modeling with Enterprise Architect - UML Modeling Tool
233
234
235
235
Contents
V
Goals ..........................................................................................................................................................
A Complete
..........................................................................................................................................................
Business Process
235
236
Business
Rule Modeling
...................................................................................................................................
237
Model Business
..........................................................................................................................................................
Rules For RuleTasks
Create a..........................................................................................................................................................
Business Domain Model
Create a..........................................................................................................................................................
Rule Flow Model
Pass.........................................................................................................................................................
Parameters to Rule Flow Activity
Model
.........................................................................................................................................................
Rules In an Operation
Compose
..........................................................................................................................................................
Business Rules
Validate..........................................................................................................................................................
Business Rules
Code Generation
..........................................................................................................................................................
For Business Rules
240
241
242
245
246
248
253
254
Systems...................................................................................................................................
Engineering Modeling
256
Create a..........................................................................................................................................................
Requirements Model
Create an
..........................................................................................................................................................
Operational Domain Model
SysML Parametric
..........................................................................................................................................................
Models
Simulate
.........................................................................................................................................................
a SysML Model
Compose
..........................................................................................................................................................
System Design
Create Reusable
..........................................................................................................................................................
Subsystems
Index
259
260
262
265
267
268
270
© 1998-2010 Sparx Systems Pty Ltd
1
Foreword
Foreword
This user guide describes how to use the
modeling facilities of Enterprise Architect.
UML Modeling with Enterprise Architect - UML Modeling Tool
|
2
Modeling
In relation to using Enterprise Architect, UML modeling can be described as graphically representing a
business process or software system. The resulting model can be used to emphasize a certain aspect of the
system being represented and to record, document and communicate its detail. A study of such a model can
enable insight or understanding of the system.
The Enterprise Architect Modeling Platform
Enterprise Architect's modeling platform is based on the Unified Modeling Language (UML), a standard that
defines rules and notations for specifying business and software systems.
For information on UML, see the UML Dictionary.
For examples of the UML models that Enterprise Architect can help you build, see the Model Templates topic
in Using Enterprise Architect - UML Modeling Tool.
Building a Model
Using Enterprise Architect, you can quickly build a model using a hierarchy of packages to represent the
structure and organization of the model. Each package can contain:
· Other packages
· Diagrams that represent various aspects of the equipment, environment and business processes of the
system
· Elements that represent the objects and actions within the system or process, arranged in an organization
defined by relationships represented by UML connectors.
The Create a Project - Quick Start topic briefly shows you how to create a diagram within a package,
containing elements and connectors. See Getting Started with Enterprise Architect. Sparx Systems also
provide a demonstration of quickly developing a Use Case model.
For specific details of configuring and combining the components of a model, see:
·
·
·
·
Work
Work
Work
Work
With
With
With
With
Packages 3
Diagrams 7
Elements 67
Connectors 197 .
Relationship Matrix
The Relationship Matrix enables you to display and manage the relationships between the elements within
selected packages. You can refine the display to show specific types of relationship between specific types of
element. The Relationship Matrix 224 is an effective and convenient method of visualizing relationships quickly
and definitively.
© 1998-2010 Sparx Systems Pty Ltd
3
Work With Packages |
1 Work With Packages
A package is a container of model elements, and is displayed in the Project Browser using the 'folder' icon
familiar to Windows users. This topic explores the tasks you can perform with packages, including:
·
·
·
·
·
·
·
Open a package 33
Add a package 3
Rename a package 4
Copy a package 4
Drag a package onto a diagram
Show or hide a package 6
Delete a package 6 .
5
Note:
In the Corporate, Business and Software Engineering, Systems Engineering and Ultimate editions of
Enterprise Architect, if security is enabled you must have Update Element permission to update or delete a
package. See User Security in UML Models.
1.1 Open Package in the Project Browser
To open a package from the Project Browser, follow the steps below:
1. Double-click on a package; the contents display in the Project Browser.
2. Click on the + and - symbols next to the folder icon to open or close the package respectively.
Tip:
Package contents are arranged alphabetically and elements can be dragged from one package to another
using the mouse.
1.2 Add a Package
To add a new package:
1. In the Project Browser, select the package or view under which to add a new package.
2. Right-click on the folder icon within the Project Browser. The context menu displays.
3. Select the Add | Add Package menu option. The New Model Package dialog displays.
4. In the Package Name field type the name of the new package.
UML Modeling with Enterprise Architect - UML Modeling Tool
Work With Packages | Add a Package
4
5. To immediately create a diagram for the package, leave the Automatically add new diagram
checkbox selected. To avoid creating a diagram, deselect the checkbox.
6. If you are adding a package to a parent package that is under version control, the Add to Version
Control option displays, with the checkbox selected. Deselect the checkbox to exclude the new
package from version control, otherwise leave it selected. (See Version Control Within UML Models
Using Enterprise Architect.)
7. Click on the OK button. The new package is inserted into the tree at the current location and, if you left
the Automatically add new diagram checkbox selected, the New Diagram dialog 13 displays.
8. If you have selected to put the package under version control, the Package Control Options dialog
displays. Complete this dialog as required. See the Controlled Packages topic in UML Model
Management.
Tip:
You can also add a package using the Enterprise Architect UML Toolbox and pasting a new package element
into a diagram. In this case the package is created under the diagram's owning package, and is created with
a default diagram of the same type as that in which the package is created.
Note:
In a multi-user environment, other users do not see the change until they reload their project. (See Version
Control Within UML Models Using Enterprise Architect.)
1.3 Rename a Package
To rename a package, follow the steps below:
1. Select the package to rename in the Project Browser.
2. Right-click to display the context menu.
3. Click on the Package Properties option.
4. In the Name field, type the new name.
5. Click on the OK button.
Alternatively, highlight the package to rename, and press [F2].
Note:
In a multi-user environment, other users do not see the change until they reload their project. (See Version
Control Within UML Models Using Enterprise Architect.)
1.4 Copy a Package
Enterprise Architect enables you to quickly and easily duplicate a complete package, including its child
packages, elements and diagrams. You can insert a copy of a package under the same parent or under one
or more other packages, in the same model or project or any other model or project.
This procedure is effectively the same as exporting and importing the package XMI file, with the Strip GUIDs
checkbox selected (see the Copy Packages Between Projects topic in UML Model Management. You would
tend to use this procedure for copying sections of a model within the project rather than reproducing an entire
model or project, although copying these larger structures is equally feasible.
© 1998-2010 Sparx Systems Pty Ltd
5
Work With Packages | Copy a Package
Notes:
· A copy of a package does not have the external cross references of the source package; that is, the
following connectors are discarded:
· Connectors coming from packages and elements outside the package being copied, into the
package being copied
· Connectors going to packages and elements outside the package being copied, from the
package being copied.
· You cannot paste a package into a parent package that is locked by another user (see User Security in
UML Models) or that is checked in (see Version Control Within UML Models Using Enterprise Architect).
The Paste... option is grayed out in the context menu.
To copy a package, follow the step below:
1. In the Project Browser, right-click on the required package and select the Copy Package to Clipboard
context menu option (or click on the package and press [Ctrl]+[C]). The Copy Package to Clipboard
dialog briefly displays until the copy operation completes.
To paste a package, follow the step below:
1. In the Project Browser, right-click on the package into which to paste the copied package, and select
the Paste Package from Clipboard context menu option (or click on the package and press [Ctrl]+[V]
). The Paste Package from Clipboard dialog briefly displays until the paste operation completes.
The target package is expanded to expose the pasted package in the Project Browser. If you are pasting the
package within the same model as the copied source, the source parent package is also collapsed.
If the target package already contains:
· a package with the same name as the pasted package, the pasted package name has the suffix - Copy
· a package with the same name as the pasted package including the - Copy suffix, the suffix becomes Copy1 (or - Copy2, - Copy3 and so on, as copies of the package accumulate in the target parent package).
You can keep the same package name as the source, or you can rename the package either by clicking twice
on it and editing the name in the Project Browser, or by double-clicking on it and editing the name in the
Properties dialog.
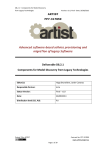
1.5 Drag a Package Onto a Diagram
You can drag a package element from the Project Browser onto the current diagram. This displays the
package and any contents within. This is a useful feature to help organize the display and documentation of
models.
The following illustration shows how a package is displayed in a diagram; note the child Actor and Use Case
icons.
UML Modeling with Enterprise Architect - UML Modeling Tool
Work With Packages | Drag a Package Onto a Diagram
6
1.6 Show or Hide Package Contents
To show or hide the contents of packages in a diagram, follow the steps below:
1. Load a diagram.
2. Double-click in the background area to open the Diagram Properties dialog.
3. Click on the Elements tab.
4. Select or clear the Package Contents checkbox as required.
5. Click on the OK button.
1.7 Delete a Package
To delete a package, follow the steps below:
1. Highlight the package in the Project Browser.
2. Right-click to open the context menu.
3. Click on the Delete option. A confirmation prompt displays.
4. Click on the OK button.
Warning:
Deleting a package also deletes all contents of the package, including sub-packages and elements. Make
very sure that you really want to do this before proceeding.
Note:
In a multi-user environment, other users do not see the change until they reload their project. (See Version
Control Within UML Models Using Enterprise Architect.)
© 1998-2010 Sparx Systems Pty Ltd
7
Work With Diagrams |
2 Work With Diagrams
Diagrams are collections of project elements laid out and inter-connected as required.
Enterprise Architect supports all of the UML diagrams, as well as some custom extensions. Together with the
Enterprise Architect elements and connectors, these form the basis of the model. Diagrams are stored in
packages and can have a parent object (optional). Diagrams can be moved from package to package.
The basic elements used in each type of diagram are shown below. After you have looked at these
illustrations, go to the following topics:
· Diagram Context Menu
· Diagram Tasks 31
10
Tip:
If the diagram display is too small to read comfortably, click on the diagram, press and hold [Ctrl] and use the
mouse wheel to temporarily expand or reduce the display magnification.
UML Modeling with Enterprise Architect - UML Modeling Tool
Work With Diagrams |
8
© 1998-2010 Sparx Systems Pty Ltd
9
Work With Diagrams |
UML Modeling with Enterprise Architect - UML Modeling Tool
Work With Diagrams | Diagram Context Menu
10
2.1 Diagram Context Menu
Open the required diagram and right-click on the diagram background to open the diagram context menu. Not
all menu options shown below appear on all diagram context menus.
The diagram context menu enables you to:
· View the Diagram Properties 52 dialog
· Add Swimlanes 47 or a Swimlanes Matrix 41 to the diagram
· Protect a diagram from inadvertent changes (Lock Diagram 50 )
Note:
This does not apply in the Corporate, Business and Software Engineering, Systems Engineering and
Ultimate editions if security is enabled. In that case, see the Lock Model Elements topic in User Security in
UML Models.
· Display the diagram contents as an Element List instead of as a diagram (see Using Enterprise Architect UML Modeling Tool)
· Insert various elements into a diagram (see below)
· Paste copied element 30 (s) as a link or as new elements
· Paste an image held on the clipboard into the diagram (see the Paste Elements Submenu topic in Using
Enterprise Architect - UML Modeling Tool.)
· Make all the elements on the diagram selectable. If an element is selectable, you can move it around the
diagram and perform right-click context-menu operations. If an element is unselectable, you cannot move it
around the diagram and the only right-click operation available is to make the element selectable. This
option has no effect on double-click operations on the element, such as displaying child diagrams.
· Save the current diagram as a Profile (see the Export a UML Profile topic in SDK for Enterprise Architect)
· Import, or reverse engineer, source code (not available in the Desktop edition) (see the Import Source
Code topic in Code Engineering Using UML Models)
· Import database tables from an ODBC data source (not available in the Desktop edition) (see the Import
Database Schema from ODBC topic in Code Engineering Using UML Models)
© 1998-2010 Sparx Systems Pty Ltd
11
Work With Diagrams | Diagram Context Menu
· Save any changes to the current diagram
· View the Enterprise Architect Help on the type of diagram currently displayed.
Insert Items
When you click on the New Element or Connector context menu option, a list of elements and connectors
displays, as shown below for a Class diagram:
The structure of this list is as follows:
· Other - expands to offer options to select elements and connectors from diagram types other than either
the current diagram type or pinned Enterprise Architect Toolbox pages
· The expanded list of elements and connectors for the current diagram type
· Collapsed lists of elements and connectors for pages that have been pinned in the Toolbox; if an MDG
Technology:
· is active
· automatically pins Toolbox pages, and
· has pages that redefine UML or Extended pages
the MDG Technology pages override the UML or Extended pages, which are not shown
· (At the end) Common - expands to display a list of the common elements and connectors.
UML Modeling with Enterprise Architect - UML Modeling Tool
Work With Diagrams | Diagram Tasks
12
2.2 Diagram Tasks
This topic details many of the common tasks associated with managing diagrams.
Note:
In the Corporate, Business and Software Engineering, Systems Engineering and Ultimate editions of
Enterprise Architect, if security is enabled you must have Update Element permission to update or delete
items on a diagram, and Manage Diagram permission to create, copy or delete diagrams. See User Security
in UML Models.
·
·
·
·
·
·
·
·
·
·
·
·
·
·
·
·
·
·
·
·
·
·
·
·
·
·
·
·
·
·
·
·
·
·
Add New Diagrams 13
Delete a Diagram 29
Rename a Diagram 30
Copy And Paste Diagram Element 30
Diagram Navigation Hotkeys 30
Z Order Elements 32
Copy Image to Disk 31
Copy Image to Clipboard 31
Present Diagrams in a Model Views Slideshow (See Using Enterprise Architect - UML Modeling Tool)
Set Default Diagram 59
Change Diagram Type 31
Open a Package 33
Duplicate a Diagram 32
Feature Visibility 33
Insert Diagram Properties Note 36
Autosize Elements 36
Paste from the Project Browser 37
Place Related Elements on Current Diagram 40
Swimlanes 47
Swimlanes Matrix 41
Using the Image Manager 44
Show Realized Interfaces for a Class 49
Label Menu Section 49
Pan and Zoom a Diagram 64
Move Diagram Sections 65
View Last and Next Diagram 51
Set Diagram Page Size 63
Scale Image to Page Size 62
Lock Diagram 50
Manage Legend Elements 60
Lay Out a Diagram 26
Set Diagram Properties 52
Undo Last Action 51
Redo Last Action 51
© 1998-2010 Sparx Systems Pty Ltd
13
Work With Diagrams | Diagram Tasks
2.2.1 Add New Diagrams
This topic explains how to add a UML diagram, Extended diagram or MDG Technology diagram to a model in
Enterprise Architect.
Note:
In the Corporate, Business and Software Engineering, Systems Engineering and Ultimate editions of
Enterprise Architect, if security is enabled you must have Manage Diagram permission to create new
diagrams. See User Security in UML Models.
To add a new diagram to an existing package or element, follow the steps below:
1. In the Project Browser, select the appropriate package or element under which to place the diagram.
2. Do one of the following:
· In the Project Browser toolbar click on the New Diagram icon
· Right-click to open the context menu and select the Add | Add Diagram or Add | Add <type>
Diagram menu option
· Press [Insert] and select the Add | Add Diagram or Add | Add <type> Diagram menu option, or
· Select the Project | Add Diagram menu option.
The New Diagram dialog displays.
3. The Name field defaults to the name of the selected package or element; if necessary, type a different
name for the new diagram.
4. In the Select From panel, click on the appropriate diagram category for the diagram. The Diagram
Types panel displays a list of the diagram types within the selected category. (See the UML Diagrams
topic in the UML Dictionary.)
5. In the Diagram Types panel, click on the type of diagram to create.
6. Click on the OK button to create your new diagram.
Note:
The diagram type determines the default toolbar associated with the diagram and whether it can be set as a
child of another element in the Project Browser (for example, a Sequence diagram under a Use Case).
UML Modeling with Enterprise Architect - UML Modeling Tool
Work With Diagrams | Diagram Tasks
14
2.2.2 Layout Diagrams
Enterprise Architect provides a Layout Tools window to enable you to lay out the elements in a diagram.
Unless the diagram is very simple, this facility does not lay out the entire diagram; it consists of a set of tools
to set out different areas or sets of elements in the diagram.
To start to lay out a diagram, follow the steps below:
1. Open the Layout Tools window; either:
· Select the View | Layout Tools menu option, or
· Right-click on the main toolbar and select the Layout Tools context menu option.
2. Select the elements to lay out on the currently-active diagram - hold [Shift] or [Control] while you click
on each required element, or hold the mouse button down while you sweep over the area containing the
required elements.
Note:
If no elements are selected on the active diagram, then all elements on the diagram are laid out
(except where otherwise documented).
3. Click on the drop-down arrow on the top left field of the Layout Tools window, and select the required
layout type.
4. The layout type determines the fields presented in the window, therefore the appropriate fields are
described in the topic for each layout type.
· Circle/Ellipse 15
· Box 18
· Per Page 19
· Digraph 20
· Spring 21
· Neaten 21
· Converge/Diverge 22
· Fan Relations 24
· Auto Route 25
5. When you have completed the fields, click on the
button.
Enterprise Architect sets out the selected elements according to the options you have selected.
6. If you do not want to work with the new layout, click on the Undo button in the toolbar (
Enterprise Architect also provides a facility for automatically laying out a diagram
manually adjust the final result of this automatic process.
26
).
. If necessary, you can
© 1998-2010 Sparx Systems Pty Ltd
15
Work With Diagrams | Diagram Tasks
2.2.2.1 Circular/Elliptical Layout
The Circle and Ellipse layouts arrange the selected elements in a circle or elliptical pattern, using the largest
horizontal and vertical element edge in the set of elements when calculating the radius of the layout arc.
To invoke these layouts, follow the steps below:
1. Follow the general Layout Diagrams
required.
14
procedure, and at step 3 select either Circle or Ellipse as
2. Click on the drop-down arrow in the Sort By: field and select the required sort parameter. The options
UML Modeling with Enterprise Architect - UML Modeling Tool
Work With Diagrams | Diagram Tasks
16
are:
· None - Elements are passed to the specified layout in the order in which they appear on the original
diagram (left to right, top to bottom)
· Area (Ascending) - Elements are passed to the specified layout in order of the screen space they
occupy, smallest to largest
· Area (Descending) - Elements are passed to the specified layout in order of the screen space they
occupy, largest to smallest
· Name (Ascending) - Elements are passed to the specified layout in alphanumeric order, based on
the element name
· Name (Descending) - Elements are passed to the specified layout in reverse alphanumeric order,
based on the element name
· Element Type - Elements are grouped by type (for example, Class, Use Case) and in alphanumeric
order within the group by name.
3. Under the Placement option, select either:
· Top to Bottom (the elements are positioned in the required order, zig-zagged across the perimeter
of the circle or ellipse - see Diagram A)
· Circular (the elements are placed in the required order, clockwise around the perimeter of the circle
or ellipse - see Diagram B)
4. Select the Center focused element checkbox to put the last-selected element (the one with the hashed
border) in the center of the circle or ellipse - see Diagram C.
Diagram A - Top To Bottom Layout
© 1998-2010 Sparx Systems Pty Ltd
17
Work With Diagrams | Diagram Tasks
Diagram B - Circular Layout
UML Modeling with Enterprise Architect - UML Modeling Tool
Work With Diagrams | Diagram Tasks
18
Diagram C - Center Focused Element
2.2.2.2 Box Layout
The Box layout arranges the set of selected elements into a square grid.
The dimensions of the box are determined by the square root of the number of selected elements (for
© 1998-2010 Sparx Systems Pty Ltd
19
Work With Diagrams | Diagram Tasks
example, 16 elements create a 4x4 box).
To invoke this layout, follow the steps below:
1. Follow the general Layout Diagrams
14
procedure, and at step 3 select Box.
2. Click on the drop-down arrow in the Sort By: field and select the required sort parameter. The options
are:
· None - Elements are passed to the specified layout in the order in which they appear on the original
diagram (left to right, top to bottom)
· Area (Ascending) - Elements are passed to the specified layout in order of the screen space they
occupy, smallest to largest
· Area (Descending) - Elements are passed to the specified layout in order of the screen space they
occupy, largest to smallest
· Name (Ascending) - Elements are passed to the specified layout in alphanumeric order, based on
the element name
· Name (Descending) - Elements are passed to the specified layout in reverse alphanumeric order,
based on the element name
· Element Type - Elements are grouped by type (for example, Class, Use Case) and in alphanumeric
order within the group by name.
3. In the Padding (px) field, type the vertical and horizontal distance between elements, in pixels.
4. Select the appropriate element distribution option:
· Automatically distribute: Automatically calculate the dimensions of the box (the square root of the
number of selected elements; for example,16 elements create a 4x4 box)
· Specify distribution: Manually define the width of the box, in columns.
5. If you selected Specify Distribution, in the Columns field type the required number of columns.
2.2.2.3 Per Page Layout
The Per Page layout divides each diagram page into a number of cells, which house the selected elements.
The number of cells per page is determined by the page distribution parameter, as explained below.
To invoke this layout, follow the steps below:
1. Follow the general Layout Diagrams
14
procedure, and at step 3 select Per Page.
UML Modeling with Enterprise Architect - UML Modeling Tool
Work With Diagrams | Diagram Tasks
20
2. Click on the drop-down arrow in the Sort By: field and select the required sort parameter. The options
are:
· None - Elements are passed to the specified layout in the order in which they appear on the original
diagram (left to right, top to bottom)
· Area (Ascending) - Elements are passed to the specified layout in order of the screen space they
occupy, smallest to largest
· Area (Descending) - Elements are passed to the specified layout in order of the screen space they
occupy, largest to smallest
· Name (Ascending) - Elements are passed to the specified layout in alphanumeric order, based on
the element name
· Name (Descending) - Elements are passed to the specified layout in reverse alphanumeric order,
based on the element name
· Element Type - Elements are grouped by type (for example, Class, Use Case) and in alphanumeric
order within the group by name.
3. In the Padding (px) field, type the vertical and horizontal distance between cells, in pixels.
4. Select the appropriate page distribution option:
· Automatically distribute: Automatically calculate the optimum number of cells, taking into
consideration the largest horizontal and vertical element edges
· Specify distribution: Manually enter the per page grid dimensions.
5. If you selected Specify Distribution, in the Rows and Columns fields type the required number of
rows and columns.
6. Select the Center Elements checkbox to place each element in the center of its cell. Otherwise the
element placement defaults to the top left corner of the cell.
7. In the Start Page field, type the number from which to start page numbering. Pages begin at the top left
and continue horizontally to the right.
2.2.2.4 Digraph Layout
The Digraph layout arranges the selected elements into a directed graph (digraph for short). The Digraph
attempts to highlight the hierarchy of the elements while keeping the direction of all connectors pointing to the
same edge of the diagram.
The Digraph layout provides the same behaviour as the Automatic Diagram layout. For information on how to
apply this layout, see the Layout Diagrams 14 topic and, for details of the layout parameters, the Lay out a
Diagram Automatically 26 topic.
© 1998-2010 Sparx Systems Pty Ltd
21
Work With Diagrams | Diagram Tasks
2.2.2.5 Spring Layout
The Spring layout uses a force-directed approach to arrange the selected elements organically.
The Spring layout employs a physical analogy to lay out elements. Each element is treated as a particle with a
like electrical charge that repels other elements. Connectors act as springs (hence the term Spring layout) that
draw connected elements back together. The layout is good for highlighting clusters of related objects and
identifying symmetry in the graph.
To invoke this layout, follow the steps below:
1. Follow the general Layout Diagrams
14
procedure, and at step 3 select Spring.
2. In the Iterations field, type the number of iterations, or rounds, to perform to reach the final layout.
The layout is developed over several iterations. Depending on the complexity of the graph, increasing
the number of iterations produces a better result but takes longer to calculate.
3. If the diagram contains elements that significantly vary in size, and that might overlap in the final layout,
select the Scale to prevent overlap checkbox to scale up the positions of the selected elements
(preserving size) until no elements overlap.
2.2.2.6 Neaten Layout
The Neaten layout attempts to arrange the selected elements into a grid based on their horizontal and vertical
proximity to each other. Elements that share the same row or column are aligned based on the Column and
Row Snap parameters.
UML Modeling with Enterprise Architect - UML Modeling Tool
Work With Diagrams | Diagram Tasks
22
To invoke this layout, follow the steps below:
1. Follow the general Layout Diagrams
14
procedure, and at step 3 select Neaten.
2. In the Threshold (px) field, type the height or width distance, in pixels, at which elements should be
considered to be in the same row or column. A lower threshold value produces a tighter result, with only
elements that are extremely similar - vertically or horizontally - considered to be in the same row or
column.
3. In the Column Snap field, click on the drop-down arrow and select the appropriate alignment for
elements in the same column.
· Left - elements are aligned with the left edge of the left-most element in the column
· Center - elements are aligned with the vertical center of the center-most element in the column
· Right - elements are aligned with the right edge of the right-most element in the column.
4. In the Row Snap field, click on the drop-down arrow and select the appropriate alignment for elements
in the same row.
· Top - elements are aligned with the top edge of the highest element in the row
· Center - elements are aligned with the horizontal center of the center-most element in the row
· Bottom - elements are aligned with the bottom edge of the lowest element in the column.
2.2.2.7 Converge/Diverge Layout
The Converge layout attracts the set of selected elements towards the center of their bounding rectangle.
Conversely, the Diverge layout repels the set of selected elements away from the center of their bounding
rectangle. The Converge/Diverge layout also tries to maintain connector angles if an element in the set
contains a connector with waypoints.
© 1998-2010 Sparx Systems Pty Ltd
23
Work With Diagrams | Diagram Tasks
To invoke this layout, follow the steps below:
1. Follow the general Layout Diagrams
14
procedure, and at step 3 select Converge/Diverge.
2. For Direction, select the required layout:
· Converge - attracts the set of selected elements to the center point
· Diverge - repels the set of selected elements from the center point
3. The Amount (%) slider determines how far the elements are moved towards or away from the center
point. The movement is the element's current distance from the center point multiplied by the
percentage value set on the slider. In the Converge layout, the element moves towards the center point;
in the Diverge layout the element moves further away from the center point.
Set the slider to the required percentage.
UML Modeling with Enterprise Architect - UML Modeling Tool
Work With Diagrams | Diagram Tasks
24
2.2.2.8 Fan Relations Layout
The Fan Relations layout arranges the immediate relations of an element around a specified edge. This layout
requires a single element to be selected on the diagram, to be used as the context for the layout.
To invoke this layout, follow the steps below:
1. Open the Layout Tools window; either:
· Select the View | Layout Tools menu option, or
· Right-click on the main toolbar and select the Layout Tools context menu option.
2. Select the single element around which to lay out related elements on the currently-active diagram.
3. Click on the drop-down arrow on the top left button of the Layout Tools window, and select Fan
Relations.
4. Click on the drop-down arrow in the Sort By: field and select the required sort parameter. The options
are:
· None - Elements are passed to the specified layout in the order in which they appear on the original
© 1998-2010 Sparx Systems Pty Ltd
25
Work With Diagrams | Diagram Tasks
diagram (left to right, top to bottom)
· Area (Ascending) - Elements are passed to the specified layout in order of the screen space they
occupy, smallest to largest
· Area (Descending) - Elements are passed to the specified layout in order of the screen space they
occupy, largest to smallest
· Name (Ascending) - Elements are passed to the specified layout in alphanumeric order, based on
the element name
· Name (Descending) - Elements are passed to the specified layout in reverse alphanumeric order,
based on the element name
· Element Type - Elements are grouped by type (for example, Class, Use Case) and in alphanumeric
order within the group by name.
5. In the Padding (px) field, type the separation required between the selected element and its related
elements, in pixels.
6. Select the connector direction to use in determining the related elements to lay out. Either:
· Incoming Nodes - to lay out related elements that have the selected element as the target
· Outgoing Nodes - to lay out related elements that have the selected element as the source.
7. In the Fan Edge field, click on the drop-down arrow and specify the edge of the selected element from
which to lay out the related elements.
· Left - to arrange related elements to the left of the selected element
· Right - to arrange related elements to the right of the selected element
· Top - to arrange related elements from the top of the selected element
· Bottom - to arrange related elements from the bottom of the selected element.
2.2.2.9 Auto Route Layout
The Auto Route layout orthogonally routes connectors between the selected elements. The layout attempts to
find the shortest path between the two connected elements while minimizing crossings. In the following layout,
the original connectors are shown in red.
To invoke this layout, follow the steps below:
UML Modeling with Enterprise Architect - UML Modeling Tool
Work With Diagrams | Diagram Tasks
1. Follow the general Layout Diagrams
14
26
procedure, and at step 3 select Auto Route.
2. When calculating connector routes, the algorithm divides the diagram into cells of a size determined by
the Cell Size value. A smaller cell size results in connectors being placed closer together.
In this Cell Size (px) field, type the value in pixels.
3. In the Element Margin field, type the preferred separation between connector segments and element
borders, in pixels.
2.2.2.10 Lay Out a Diagram Automatically
Enterprise Architect provides the facility to layout diagrams automatically. This creates a tree-based structure
from the diagram elements and relationships in a diagram. Owing to the complexity of many diagrams, you
might then have to do some manual 'tweaking'.
Notes:
· This facility is available for Structural diagrams and Extended diagrams, but not for Behavioral diagrams
(see the UML Diagrams topic in the UML Dictionary for a description of the diagram types). However, the
facility is also available for Sequence diagrams generated by the Enterprise Architect Debugger.
· Dynamic and Analysis diagrams are NOT suited to this form of layout - please ensure first that the diagram
type you are laying out benefits from the action.
· If you dislike the autolayout, you can reverse it before saving the diagram. Click [Ctrl]+[Z].
Layout a Diagram
To layout a diagram, follow the steps below:
1. Select a diagram.
2. Click on either:
· The Diagram | Layout Diagram option, or
· The Auto Layout button on the diagram toolbar.
Access the Diagram Layout Options Dialog
For a fine degree of control of the elements in your diagram, you can use the Diagram Layout Options dialog.
Generally the default layout parameters provide adequate layouts for a wide range of diagrams, but there are
times when more specific settings are required. To access the Diagram Layout Options dialog, follow the steps
below:
1. Double-click on the background of the diagram to display the Diagram Properties dialog.
2. Click on the Diagram tab, then click on the Set Layout Style button. The Diagram Layout Options
dialog displays.
3. When you have made the required changes, click on the OK button to save the changes.
© 1998-2010 Sparx Systems Pty Ltd
27
Work With Diagrams | Diagram Tasks
You can alter any of the following settings on the Diagram Layout Options dialog to refine your layout:
· Cycle Remove Options panel - these settings remove cycles in the element organization (where element X
is the source of a path but also becomes the target of a branch of the path), by reversing the connectors
that impose the cycling and then reorganizing the diagram and reinstating the reversed relationships. This
identifies the primary source element in the diagram.
· Greedy - Select to use the Greedy Cycle Removal algorithm, which minimizes the number of
connectors reversed.
· Depth First Search - Select to use the Depth First Search Cycle Removal algorithm, which establishes
the longest linear sequence possible, before establishing parallel sequences and branches. This
algorithm is less effective in large and/or complex diagrams, but produces a more natural layout than
the Greedy algorithm.
· Crossing Reduction Options panel - these options determine how long the routine should look for ways of
reorganizing the layout to avoid crossed relationships:
· Iterations - Type the number of iterations to be used during cycle removal (more than 8 does not
usually provide any improvement).
· Aggressive - Select to use an aggressive (detailed and time-consuming) crossing reduction step.
· Layering Options panel - these settings determine how elements are organized in layers during layout:
· Longest Path Sink - Select to use the Longest Path Sink Layering algorithm, where the final target
elements (sinks, which have no relationships issuing from them) are arranged in a layer at the top of the
diagram, and the relationship paths built downwards from there in as many layers as there are nodes in
the longest path.
· Longest Path Source - Select to use the Longest Path Source Layering algorithm, where the original
source elements (those with no relationships entering them) are arranged in a layer at the bottom of the
diagram and the relationship paths built up from there in as many layers as there are nodes in the
longest path.
· Optimal Link Length - Select to use the Optimal Link Length Layering algorithm, which organizes the
elements into whichever layers minimize the total source-to-sink relationship chain; in this layout you
can have both source elements and sink elements at various levels of the diagram.
· Layout Options panel
· Layer Spacing - Type the default number of logical units between layers of elements (vertical spacing).
· Column Spacing - Type the default number of logical units between elements within a layer (horizontal
spacing).
· Up, Down, Left, Right - Select the direction in which directed connectors should point, to set the
position of the primary source element and the overall flow of the diagram.
UML Modeling with Enterprise Architect - UML Modeling Tool
Work With Diagrams | Diagram Tasks
28
· Initialize Options panel - the autolayout routine inserts line waypoints and connectors into relationship
paths to help plot the direction of relationships. The routine then assigns an index number to every node,
such that nodes in the same layer are numbered left to right. The settings in this panel determine how
those index numbers are assigned.
· Naive - Select to use the Naive Initialize Indices algorithm, which assigns index numbers to nodes as
they are encountered in a sweep and tends to place all waypoints to the right of real nodes (and
therefore long relationships between a small number of elements to the right of chains of short
relationships between several elements).
· Depth First Search Outward - Select to use the Depth First Out Initialize Indices algorithm, which
assigns index numbers to nodes as they are encountered in a depth first search from source nodes
outwards (and would therefore place longer relationship chains to the left of shorter chains, with the
primary source node at the start of the diagram flow).
· Depth First Search Inward - Select to use the Depth First In Initialize Indices algorithm, which also
assigns index numbers to nodes as they are encountered in a depth first search, but from sink nodes
inwards (and would therefore place longer relationship chains to the left of shorter chains, with the
ultimate target node at the end of the diagram flow).
· Set as Project Default checkbox
· Select this checkbox to apply the diagram layout settings to all diagrams in the project. If you later
check this box and click on the OK button for a different diagram, the new settings override the settings
saved earlier.
The following is an example of an automatically laid out diagram, with the following options set:
·
·
·
·
Depth First Search
Optimal Link Length
Depth First Search Outward
Direction - Up.
© 1998-2010 Sparx Systems Pty Ltd
29
Work With Diagrams | Diagram Tasks
2.2.3 Delete Diagram
Warning:
In Enterprise Architect there is no Undo feature for deleting diagrams, so be certain that you want to delete a
diagram before you do so.
Note:
When you delete a diagram, you do not delete the elements in the diagram from the model.
To delete a diagram from your model, follow the steps below:
1. In the Project Browser, right-click on the diagram to delete. The context menu displays.
2. Select the Delete '<diagram name>' menu option. A confirmation prompt displays.
UML Modeling with Enterprise Architect - UML Modeling Tool
Work With Diagrams | Diagram Tasks
30
3. Click on the OK button to confirm the delete.
You can also delete multiple diagrams from the Project Browser, by holding [Ctrl] or [Shift] while you select
them, then right-clicking on one of them and selecting the Delete selected items context menu option.
2.2.4 Rename Diagram
To rename a diagram, follow the steps below:
1. Open the Diagram Properties dialog by double-clicking on the diagram background, or by selecting the
Diagram | Properties menu option.
2. In the Name field on the General tab, type the new name for your diagram.
3. Click on the OK button to save changes.
2.2.5 Copy And Paste Diagram Element
To copy a diagram element, follow the steps below:
1. Select the element(s) to copy.
2. For multiple elements, right-click to open the context menu and select the Copy menu option.
Alternatively, press [Ctrl]+[C].
3. For single elements, select the Edit | Copy menu option or alternatively press [Ctrl]+[C].
Paste Diagram Elements
To paste diagram elements, follow the steps below:
1. Open the diagram to paste into.
2. Right-click on the diagram background to open the diagram context menu.
3. Select either the Paste Object(s) as New menu option (completely new element) or the Paste Object
(s) as Link menu option (reference to the existing element).
Note:
The Date Created and Time Created parameters of a pasted-as-new element are set to the current date and
time; the parameters for a linked element remain the same as the copied element.
2.2.6 Diagram Navigation Hotkeys
The diagram hotkeys enable you to quickly navigate to and select elements within a diagram. The following
table details the key combinations and their functionality.
Hotkey Command
Use To
[Shift]+[Arrow], Element(s)
selected
Move the selected element(s) by increments.
[Arrow], No element selected
Scroll around the diagram.
[Esc]
Clear the current selection.
[Tab]
Select the first element in the diagram if none currently selected.
[Shift]+click
Add the clicked element to the current selection.
[Ctrl]+click
Add the clicked element to the current selection.
[Ctrl]+[Shift]+drag
Pan the diagram.
[Alt]+[G]
Select the item in the Project Browser and give it focus.
© 1998-2010 Sparx Systems Pty Ltd
31
Work With Diagrams | Diagram Tasks
2.2.7 Copy Image to Disk
You can copy a diagram image to a disk file in the following formats:
·
·
·
·
·
·
·
Windows bitmap (256 color bitmap)
GIF image
Windows Enhanced Metafile (standard metafile)
Windows Placeable Metafile (older style metafile)
PNG format
JPG
TGA.
To copy a diagram image to file, follow the steps below:
1. Open the diagram to save.
2. Select the Diagram | Save Image menu option, or press [Ctrl]+[T].
3. When prompted, enter a name for the file and select an image format.
4. Click on the OK button.
Note:
Enterprise Architect clips the image size to the smallest bounding rectangle that encompasses all
diagram elements.
2.2.8 Copy Image to Clipboard
You can copy diagram images onto the MS Windows clipboard and paste them directly into MS Word or other
applications.
To copy an image to the clipboard, follow the steps below:
1. Open the diagram to copy.
2. Select the Diagram | Copy Image menu option, or press [Ctrl]+[B].
3. Click on the OK button.
The diagram has been copied to the clipboard and can now be pasted into compatible applications or into
another diagram. You can set the clipboard format on the Options dialog (Tools | Options menu option,
General page; see Using Enterprise Architect - UML Modeling Tool). Enterprise Architect supports bitmap or
metafile format.
2.2.9 Change Diagram Type
If necessary, you can change one type of diagram to another type. This is useful if you have either made a
mistake in selecting the diagram type to begin with, or if the purpose and nature of a diagram changes during
analysis.
Note:
Some diagram types do not transfer to others; for example you cannot change a Class diagram into a
Sequence diagram.
To change a diagram type, follow the steps below:
1. Open the diagram to change.
2. Select the Diagram | Change Type menu option. The Change Diagram Type dialog displays.
UML Modeling with Enterprise Architect - UML Modeling Tool
Work With Diagrams | Diagram Tasks
32
3. Select the required diagram type.
4. Click on the OK button to save changes.
2.2.10 Z Order Elements
Z Order refers to an element's depth in the diagram perspective, and thus influences which elements appear
in front of others and which appear behind.
To set the Z Order of an element, follow the steps below:
1. Right-click on the element in the Diagram View.
2. Select the Z order menu option. The following submenu displays:
3. Select the operation to perform. The element is moved to the new position in the diagram perspective.
2.2.11 Copy (Duplicate) Diagram
Enterprise Architect makes it easy to duplicate a complete diagram, either with links back to the original
diagram elements (shallow mode), or with complete copies of all elements in the diagram (deep mode).
When you copy a diagram in shallow mode, the elements in the new diagram are linked to the originals, so if
you change the properties of one, the other reflects those changes. If you copy the diagram in deep mode,
then all elements are duplicated completely, so that changing an element on one does not affect the other.
Element position and size should be independent in both copy modes.
You can also paste a copied diagram as a child of a composite element.
© 1998-2010 Sparx Systems Pty Ltd
33
Work With Diagrams | Diagram Tasks
Procedure
To duplicate a diagram, follow the steps below:
1. In the Project Browser, select the diagram to copy.
2. Right-click to display the context menu and select the Copy Diagram menu option.
3. Navigate to the package to host the new diagram, and right-click to open the context menu.
4. Select the Paste Diagram menu option. The Copy Diagram dialog displays.
5. In the Name field, type the name for the new diagram.
6. In the Type of copy panel, click on the radio button for the type of copy you require; either linked
elements (shallow copy) or complete copies of the originals (deep copy).
7. Click on the OK button.
Enterprise Architect automatically creates the new diagram, links or creates new elements and arranges them
as in the original diagram. All links are also copied between diagram elements where appropriate.
2.2.12 Open Package From Diagram
To open a package from within a diagram follow the steps below:
1. Open a diagram that shows the package to open.
2. Right-click on the package element to open the context menu.
3. Select the Open Package option. Alternatively, press [Ctrl]+[K].
Note:
Enterprise Architect finds the package default diagram and opens it for you. This is the first available diagram
in the package, selected in alphabetical order; for example, a diagram called Alpha in a child package or
element several levels down opens before a diagram called Beta immediately under the selected package.
2.2.13 Feature Visibility
Enterprise Architect enables you to set the visibility of attributes and operations - where shown - for selected
elements on a specific diagram only. You can hide or show attributes and operations by scope, or you can
hide attributes and operations individually. The visibility you set applies only to the current diagram, so a Class
can appear in one diagram with all features displayed, and in another with features hidden. For example, you
can hide all protected attributes, all private operations or any other combination of attributes and operations.
It is possible to show inherited attributes, operations, requirements, constraints and Tagged Values for
elements that support those features. When Enterprise Architect displays inherited features, it creates a
merged list from all generalized parents and from all realized interfaces. If a child Class redefines something
found in a parent, the parent feature is omitted from the Merge List.
UML Modeling with Enterprise Architect - UML Modeling Tool
Work With Diagrams | Diagram Tasks
34
Tip:
To show features for element types that do not have visible compartments, such as Use Cases and Actors,
right-click on the diagram object to display the context menu and select the Advanced Settings | Use
Rectangle Notation option.
Customize Feature Visibility
To customize feature visibility, follow the steps below:
1. Either:
· Click on the element in the diagram and either click on the Element | Feature Visibility menu option
or press [Ctrl]+[Shift]+[Y], or
· Right-click on the element in the diagram to display the context menu and click on the Feature
Visibility option.
The Feature Visibility dialog displays.
2. To filter display of attributes or operations by scope, select the checkbox against each scope that
should be visible and clear the checkbox against each scope that should not.
Note:
The Show checkbox, if selected, overrides these selections to display all attributes or operations in the
element, except those specifically deselected in the Show Features in Diagram 35 dialog.
3. In the Show Element Compartments panel, select the compartments to display for the element on the
diagram.
The Fully Qualified Tags checkbox enables you to display the full provenance of a Tagged Value,
where the same Tagged Value can be used several times in different contexts with different values. The
description in the Tagged Value compartment reads: <Profile>::<Stereotype>::<Tagged Value
name>=<Value>, for example: BPMN::Activity::Activity Type = Task. (Only for Tagged Values created in
Enterprise Architect release 7.1 or later.)
© 1998-2010 Sparx Systems Pty Ltd
35
Work With Diagrams | Diagram Tasks
If you select the Notes checkbox, the Notes compartment on the element in the diagram displays the
text that has been typed into the Notes field of the Element Properties dialog. This checkbox also
enables the maximum chars field, which defaults to 1000 as the number of characters of notes text
displayed. Overtype this value to display less text or more text.
The change only applies to the selected elements on the diagram, so you can display full notes for a
selected element whilst the other elements on the diagram have no notes text.
Note:
If you have selected the Notes checkbox, you can select the Render Formatted Notes checkbox to
display the text on the diagram, formatted using the Rich Text Notes toolbar. (See Using Enterprise
Architect - UML Modeling Tool.)
4. In the When Resizing Elements panel, select the appropriate option for resizing the Class, object or
table to prevent very wide diagram objects.
The selected option defaults to Resize to longest Feature, so that the minimum width for a diagram
object is determined by its longest displayed attribute, method or other compartment value. If
necessary, you can change the option to Wrap Features (so that any longer features are wrapped onto
multiple lines) or Truncate Features (so that longer features are not displayed in full).
5. If required, in the Inherited Features panel, select one or both checkboxes to set whether Enterprise
Architect should display inherited features as well as directly owned ones.
6. Click on the OK button to save changes. Enterprise Architect redraws the diagram with the appropriate
level of feature visibility.
Suppress or Show Specific Features
The Custom button in the Attribute Visibility and Operation Visibility panels enables you to show or hide
specific operations and attributes. If you select the Show checkbox, the Custom button displays the Show
Features in Diagram dialog; if you deselect the checkbox, the button displays the Suppress Features in
Diagram dialog.
The two dialogs are identical, but in the first you select the checkboxes of specific features to show, and in the
UML Modeling with Enterprise Architect - UML Modeling Tool
Work With Diagrams | Diagram Tasks
36
second you select the checkboxes of specific features to hide.
You can also use the Filter by Scope button in this dialog to, for example, list only operations that are
Protected and select, say, two of them to hide, so that on the diagram the element displays all but two of the
Protected operations and all operations of other scopes.
2.2.14 Insert Diagram Properties Note
Properties of a diagram can be displayed on screen within a custom text box. You can move this text box
around and change its appearance 96 . You cannot change what the text box says.
To create the note, drag the Diagram Notes element from the Common page of the Enterprise Architect UML
Toolbox onto the diagram.
Alternatively, select the Diagram | Property Note menu option, or click on the Diagram Properties Note
button on the UML Elements toolbar and click on the diagram.
Note:
This is not the same as the diagram details note, which displays in the top left corner of the diagram if the
Show Diagram Details checkbox is selected on the Diagram Properties 54 dialog. You cannot move the
diagram details, nor change the appearance. To hide the diagram details, deselect the checkbox.
2.2.15 Autosize Elements
You can autosize an element or group of elements in a diagram to the default size for the element type (for a
Class, 90 x 70 pixels at 100% zoom). However, if the element contains more information than the default size
can show (such as a long name, long attributes or additional compartments) the autosize option resizes the
element to the minimum size for revealing the information.
The size change effectively operates around the mid point of each element, so the layout and size of the
diagram do not change. To automatically change the layout of a diagram, see the Lay Out a Diagram 26
topic.
To autosize elements, follow the steps below:
1. Select the elements to resize (press [Ctrl]+[A] to select all).
2. Either:
· Right-click on any of the elements and, on the context menu, select the Autosize menu option, or
· Press [Alt]+[Z].
Note:
· Not all elements resize: elements such as Events remain the same; Timing and Sequence diagrams
(where position is crucial) are unchanged; and elements added from a profile or Shape Script maintain any
size definitions imposed by the profile.
· With an element image created with a Shape Script that contains a defSize command, Autosize returns
the element to the defSize value and not the element default size. (See SDK for Enterprise Architect).
© 1998-2010 Sparx Systems Pty Ltd
37
Work With Diagrams | Diagram Tasks
2.2.16 Paste from Project Browser
As well as creating new elements in a diagram, you can drag existing elements from the Project Browser into
the current diagram. When you do this, the Paste Element dialog displays to prompt you to select the type of
paste action to carry out. (If the dialog does not display, press and hold [Ctrl] while dragging the element onto
the diagram.)
Three paste options are available:
1. Paste the element as a simple link. In this case the original element exists both in the current diagram
and in the original source diagram. Changes to the element are reflected in all diagrams in which it is
shown.
2. Paste as an instance 148 of the element. If the element can have instances such as an Object,
Sequence instance or Node instance, you can drop the element in as an instance of the source
element, with the classifier pre-set to the original source. This is useful when creating multiple instances
of a Class in a Sequence diagram or Communication diagram.
If you select this option, the Copy connectors checkbox is enabled. If you select this checkbox, any
connectors between the original element and any other elements that have also been pasted to this
diagram are reproduced as connectors between the instances.
3. Create as a child of the source element. This automatically creates a new Class - which you are
prompted to name - with a Generalization connector back to the source. This is very useful when you
have a Class library or framework from which you inherit new forms; for example, you can paste a
Hashtable as "MyHashtable" which automatically becomes a child of the original Hashtable. Used with
the Override parent operations 164 and features, this is a quick way to create new structures based on
frameworks such as the Java SDK and the .NET SDK.
You can make your selection on this dialog the default for:
· all drag and drop operations, or
· only those where you display this Paste Element dialog.
If you select the This Dialog checkbox, you should then select the Only show this dialog when [Ctrl]
+Mouse drag is used checkbox and, on the Diagram Behavior page of the Options dialog, the Auto Instance
checkbox (see Using Enterprise Architect - UML Modeling Tool).
The effect of these selections is to give you two default paste options:
· Just drag the element onto the diagram and automatically create an instance
· Press [Ctrl] while you drag the element from the Project Browser, displaying the Paste Element dialog, and
click on the OK button to automatically paste the element according to whatever option you last selected
from the dialog.
If you select the All Drag and Drop checkbox on the Paste Element dialog, this deselects the Auto Instance
checkbox on the Options dialog and enables you to add existing elements to the diagram according to the
paste option you selected, without pressing [Ctrl] and without displaying a dialog. (If you want to change the
default paste option, press [Ctrl] as you drag to display the dialog again and make your changes.)
UML Modeling with Enterprise Architect - UML Modeling Tool
Work With Diagrams | Diagram Tasks
38
See Also
· Connect Requirements (see Requirements Management)
· Create Object From Attribute 117
· Make Linked Element A Local Copy 102
2.2.16.1 Paste Multiple Items
You can paste multiple elements from the Project Browser into the current diagram.
To select multiple elements, click on the selected items from the Project Browser while pressing and holding:
· [Ctrl] to add single items to the selection of multiple elements, or
· [Shift] to select all the elements between the first and last selected items in the Project Browser.
You can then drag the selected elements from the Project Browser onto the current diagram, pressing and
holding [Ctrl]; for each element you have selected, the Paste Element dialog displays, prompting you to select
the type of paste action 37 to carry out.
© 1998-2010 Sparx Systems Pty Ltd
39
Work With Diagrams | Diagram Tasks
2.2.16.2 Paste Composite Elements
When you drag a Composite element from the Project Browser onto the current diagram with [Ctrl] held down,
Enterprise Architect prompts you to select the type of paste action to carry out with the Composite element.
Two advanced options are available for pasting Composite elements; these require the include Embedded
Elements checkbox to be selected:
1. The All Embedded Elements option, which pastes all of the Composite element's embedded elements.
2. The Based on instance option, which pastes only the elements contained in a specific instance of the
Composite element, maintaining the layout of the embedded elements.
Click on the drop-down arrow and select the appropriate instance.
For details of the other options on this dialog, see the Paste from Project Browser
37
topic.
2.2.16.3 Paste Activities
You can paste an Activity from the Project Browser into the current diagram. (See UML Dictionary.)
When you hold [Ctrl] down and drag an Activity from the Project Browser onto the current diagram, The Paste
Element dialog displays, prompting you to select the type of paste action to carry out.
UML Modeling with Enterprise Architect - UML Modeling Tool
Work With Diagrams | Diagram Tasks
40
Two options are available:
· Paste the Activity as a link: in this case the Activity appears in the current diagram as a simple reference to
the original source Activity. Changes to the Activity in the diagram affect all other links to this Activity.
· Paste as an invocation of the Activity; if you select this option, the Copy connectors checkbox is enabled.
If you select this checkbox, any connectors between the original Activity and any other elements that have
also been pasted to this diagram are reproduced as connectors between the instances.
For details of the other options on this dialog, see the Paste from Project Browser
37
topic.
2.2.17 Place Related Elements on Diagram
To find and place related elements on the current diagram, use the Relationships window (View | Other
Element Tools | Relationships).
Right-click on any connector in the list to open the context menu.
© 1998-2010 Sparx Systems Pty Ltd
41
Work With Diagrams | Diagram Tasks
If an element is not present in the current diagram, the context menu contains the Place Target Element in
Diagram option. This is useful when you are building up a picture of what an element interacts with, especially
when reverse engineering an existing code base.
Select the Place Target Element in Diagram option. Move the cursor to the required position in the diagram
and click to place the element. Alternatively, press [Esc] to cancel the action.
2.2.18 Swimlanes Matrix
Enterprise Architect diagrams support a Swimlanes Matrix for all diagram types, based on the Zachman
Framework.
The Swimlanes Matrix divides the diagram into cells of vertical columns and horizontal rows. The cell in the top
left corner of the Swimlanes Matrix contains the heading of the matrix. The first cell at the top of each column
contains the column title text. The first cell at the left of each row contains the row title text.
Set up Swimlanes Matrix
To set up and manage the Swimlanes Matrix, select the Diagram | Swimlanes and Matrix menu option to
display the Swimlanes and Matrix dialog. Click on the Matrix tab.
UML Modeling with Enterprise Architect - UML Modeling Tool
Work With Diagrams | Diagram Tasks
42
Activate the Matrix
To activate the Swimlanes Matrix, select the Active check box.
At the same time, you can define the line width for all lines on the matrix; in the Line Widths field, click on the
drop-down arrow and select the appropriate width.
Create the Heading of the Swimlanes Matrix
To define the heading for the matrix, follow the steps below.
1. Click on the New button.
2. In the Type field in the Details of New Column panel, click on the drop-down arrow and select Heading.
3. In one or more of the Title fields, type the heading name. You can enter up to three text strings as
heading text.
4. If necessary, click on the Color, Font and Back options and select the heading text font, color and
background color.
5. Click on the Save button in the Operations panel. The Heading cell displays on the diagram.
Note:
The heading is the first item in the list; you create only one heading.
Create Columns and Rows:
To define the column and row headings for the matrix, follow the steps below.
1. Click on the New button.
2. In the Type field, in the Details of New Column panel, click on the drop-down arrow and select either
Column or Row as appropriate.
3. In one or more of the Title fields, type the column or row name. You can enter up to three text strings as
title text.
4. If necessary, click on the Color, Font and Back options and select the title text font, color and
background color.
© 1998-2010 Sparx Systems Pty Ltd
43
Work With Diagrams | Diagram Tasks
5. Click on the Save button in the Operations panel. The column or row heading cell and column or row
lines display on the diagram.
Note:
When you define columns and rows, you define the header or title cells. The properties of these cells
do not reflect on the matrix cells themselves. For example, the intersection cell of a column and row
has a transparent background and therefore takes the color and shading effect of the diagram
background.
Lock the Matrix
To lock the matrix so that it cannot be edited on the diagram, on the Swimlanes and Matrix dialog select the
Lock checkbox.
Edit items in the list:
As you create the heading, column and row title cells, they are added to the list in the bottom of the dialog. To
edit an item, follow the steps below.
1. Click on the required item in the list.
2. Make the relevant changes in the Edit Selected ... panel.
3. Click on the Save button in the Operations panel.
Delete items from the list:
To delete the heading or a column or row from the matrix, follow the steps below.
1. Click on an item in the list.
2. Click on the Delete button in the Operations panel.
Model Profiles:
After creating a Swimlane Matrix, you can save it into a Model Profile and apply it to other diagrams. Model
Profiles are available on any diagram in your model.
Save a Model Profile:
To save a Model Profile, follow the steps below.
1. In the Model Profiles panel, click on the Save button. The Save Model Profile dialog displays.
2. In the Name field, type the name of your profile.
3. Click on the OK button.
The profile is now visible in the profile name drop-down list here and on other diagrams.
Note:
You can also transport all the matrix profiles between models (as Diagram Matrix Profiles), using the Export
Reference Data and Import Reference Data options on the Tools menu. (See the Reference Data topic in
UML Model Management.)
Apply a Model Profile:
Note:
By applying a Model Profile, you replace the current profile. Save the current profile to avoid losing it.
To apply a Model Profile to a diagram, follow the steps below.
1. In the Model Profiles panel, click on the drop-down arrow of the profile name field, and select the
required profile from the list.
The list contains a predefined Zachman profile, as well as an empty profile should you want to replace
the current profile with one that you create on the spot.
2. A confirmatory prompt displays. Click on the OK button to display the profile details on the Swimlanes
and Matrix dialog.
3. Click on the OK button at the bottom of the Swimlanes and Matrix dialog to apply the profile to the
matrix on the diagram.
UML Modeling with Enterprise Architect - UML Modeling Tool
Work With Diagrams | Diagram Tasks
44
Size the Matrix
To size the rows and columns, drag the row and column borders on the diagram.
Elements placed inside each cell are shifted when sizing. To prevent the elements shifting, press and hold
[Ctrl] while sizing.
See Also
· Swimlanes
47
2.2.19 Using the Image Manager
The Image Manager dialog enables you to insert alternative images in diagrams, rather than inserting
standard UML elements. For example, you might want to place a custom background image 45 on a diagram,
or display a custom image such as a Router or PC on a UML element.
Notes:
· For elements with lifelines, such as those used on Sequence diagrams, the Lifeline must remain intact to
enable messages to be created between the elements. Therefore such elements cannot have alternative
images.
· In the Corporate, Business and Software Engineering, Systems Engineering and Ultimate editions of
Enterprise Architect, if security is enabled you must have Configure Images permission to configure
alternative element images. See User Security in UML Models.
To display the Image Manager dialog, either:
· Right-click on the element within the diagram and, from the context menu, select the Appearance | Select
Alternate Image option, or
· Select the element in the diagram and press [Ctrl]+[Shift]+[W].
To locate and display an image, click on individual image filenames, or press [#] and [$] to scroll through the
list of images. As you highlight each image filename, the Preview panel changes to reflect the image. Double-
© 1998-2010 Sparx Systems Pty Ltd
45
Work With Diagrams | Diagram Tasks
click on the required image filename to display the image in full size.
On the Image Manager dialog, the following buttons are available:
Option & Function
Keys
Use to
View [Alt]+[V]
Display the selected image in full size.
Add New [Alt]+[A]
Browse appropriate directories to search for and import new images.
You can import images in .BMP, .PNG, .EMF, .WMF, .TGA, .PCX or .JPG format.
Internally, Enterprise Architect stores the images in .PNG or metafile format to
conserve space.
Update Selected [Alt] Refresh the selected image; for example, after it has been modified.
+[U]
Delete [Alt]+[D]
Delete the selected image.
A message displays to indicate how many elements use the image. Click on the
Continue button to delete information about the image from those elements, which
then revert to their previous appearance.
Close
Close the Image Manager dialog.
OK [Alt]+[O]
Confirm selection of the alternative image for the element selected in the diagram.
Notes:
· If you are creating many elements of the same type that have a particular image, you should use a custom
stereotype with an associated metafile (see Extending UML in Enterprise Architect)
· You can transport image files between models, using the Export Reference Data and Import Reference
Data options on the Tools menu. (See the Reference Data topic in UML Model Management.)
2.2.19.1 Create Custom Diagram Background
Enterprise Architect diagrams have a single-color 'wash' background that you can set to a solid color or a fade
gradient down the screen. You set the color on the Standard Colors page of the Options dialog, and whether
to have a fade gradient on the Diagram Appearance page. (See Using Enterprise Architect - UML Modeling
Tool.)
Alternatively, using the Image Manager dialog, you can create a non-tiled background for diagrams. To
perform this operation follow the steps below:
1. Create a Boundary object (see the System Boundary topic in the UML Dictionary) from the Use Case
Elements page of the Enterprise Architect UML Toolbox. Do not use the Boundary element from any
other section of the Toolbox. (See Using Enterprise Architect - UML Modeling Tool.)
2. Stretch the Boundary to a size that can contain all of the elements you intend to place on the diagram,
and drag it to the edges of the diagram workspace.
3. Right-click on the Boundary element. The context menu displays.
4. Select the Z-Order | Send to Bottom menu option. This ensures that the Boundary is not displayed in
front of any other element in the diagram.
5. Either:
· Press [Ctrl]+[Shift]+[W], or
· Right-click on the Boundary to display the context menu, and select the Appearance | Alternate
Image menu option.
6. On the Image Manager 44 dialog, select an appropriate image as the diagram background and ensure
that the image size is large enough to span the required size of the diagram background.
7. When you have selected the required image, click on the OK button.
Alternatively, you can copy an image from another source onto the Windows clipboard, right-click on the
Boundary element in the Enterprise Architect diagram, and select the Appearance | Apply Image From
Clipboard context menu option.
UML Modeling with Enterprise Architect - UML Modeling Tool
Work With Diagrams | Diagram Tasks
46
2.2.19.2 Import Image Library
Using the Image Library enables you to create attractive diagrams with custom images. A bundled clip art
collection of UML-based images is available as an Imported Image Library, from www.sparxsystems.com/
resources/image_library.html. Image libraries enable you to import a collection of images into the Image
Manager in one process.
Note:
Images contained within the Image Library are copyright of Sparx Systems, are only available for use in
conjunction with Enterprise Architect, and are supplied on the understanding that they are not used under any
other circumstance.
Import an Image Library
To import an Image Library you must have a suitable Image Library file. To import the Image Library, follow the
steps below:
1. Download the Image Library from www.sparxsystems.com/resources/image_library.html.
2. Select the Tools | Import Reference Data menu option. The Import Reference Data dialog displays.
3. Locate the XML Image Library file to import using the Select File button. The file name is ImageLibrary.
xml in the directory in which you saved the file.
4. Select the data set containing the Image Library. Then click on the Import button.
Use the Image Library
To use the images contained within the Image Library, follow the steps below:
1. Create a diagram to associate with the images contained in the Image Library.
2. Select the element to change from the default appearance to one of the images contained within the
library.
3. Press [Ctrl]+[Shift]+[W], or right-click on the selected element to display its context menu and then
select the Appearance | Select Alternate Image option.
4. On the Image Manager dialog, in the Name field highlight the appropriate image name and then click on
the OK button.
© 1998-2010 Sparx Systems Pty Ltd
47
Work With Diagrams | Diagram Tasks
2.2.19.3 Swimlanes
Enterprise Architect diagrams support Swimlanes for all diagram types. Swimlanes are vertical or horizontal
bands in a diagram that divide the diagram into logical areas or partitions. In the example below the activities
relating to particular entities within the model (such as the User, or the back end Repository) are placed within
a containing swim lane to indicate their association.
UML Modeling with Enterprise Architect - UML Modeling Tool
Work With Diagrams | Diagram Tasks
48
To manage swimlanes, select the Diagram | Swimlanes and Matrix menu option to display the Swimlanes
and Matrix dialog. The dialog defaults to the Swimlanes tab.
© 1998-2010 Sparx Systems Pty Ltd
49
Work With Diagrams | Diagram Tasks
This dialog enables you to set the orientation (vertical or horizontal), line color and width of the swimlanes, and
lock the swimlanes to prevent further movement. You can also specify the font color and bold font, hide
names, hide the classifier and show the name in the title bar. Use the New, Modify and Delete buttons to
change aspects of the selected swimlane. Use the
of swimlanes within the diagram.
and
(up and down) buttons to change the order
If you set a background color for a swimlane, it takes on the same shading profile as the main diagram
background.
See Also
· Swimlanes Matrix
41
2.2.20 Show Realized Interfaces of Class
You can display each interface directly realized by a Class as a 'lollipop' style interface node, which protrudes
from the left-hand side of the Class. Connectors can be directly attached to the node, indicating usage of the
interface part of the Class or component. See the example below:
In this example, Class2 realizes Interface1 and Interface2 as represented by the interface nodes protruding
from the Class. Class1 is dependent on these two interfaces, which is shown by the Dependency connectors
linking to the nodes.
To show nodes for the interfaces a Class realizes, as in the above diagram, right-click on the Class and select
the Embedded Elements | Show Realized Interfaces context menu option. This setting only applies to the
selected Class, and can be changed at any time.
2.2.21 Label Menu Section
You can add labels to both connectors and elements, using the element or connector context menu as follows:
· Element:
· Select the Embedded Elements 75 menu option and either the Add <element> option or the
Embedded Elements option; the label is the embedded element name
· Apply an alternative image 44 to an element (that might also have a run state - see The UML
Dictionary); the run state, attributes and operations of the element are then displayed as a label of
the element.
· Connector - Select the Properties 217 option and define the connector name, stereotype, constraints and/
or source and target roles.
Once you have these labels, you can edit and format them using the Labels context menu.
To display the Labels context menu, right-click on a label.
UML Modeling with Enterprise Architect - UML Modeling Tool
Work With Diagrams | Diagram Tasks
50
Note:
As labels can be concentrated on and around the element or connector, make sure that you click on a
section of the required label that is clear of any other label or structure.
Element Labels
The Labels menu associated with embedded elements provides the following options:
Menu Option
Use to
Set Label Color
Specify a color for the label.
Hide Label
Hide the label; to unhide the label, right-click on the element and select the
Appearance | Show labels 77 context menu option.
Bold
Set the label font to bold.
Text Alignment
Align the text within the label text area. The options available from the submenu
enable you to specify left, center and right alignment.
Label Rotation
Orient the label in the horizontal or vertical planes, with the vertical plane offering the
option of clockwise or anti-clockwise position.
Default Position
Move the label to the initial default location.
Default Color
Set the label color to the default color.
Connector Labels
The Labels menu associated with connectors provides the following options:
Menu Option
Use to
Set Label Color
Specify a color for the label.
Hide Label
Hide the label; to unhide the label use the Visibility | Set Label Visibility
on the connector context menu.
Bold
Set the label font to bold.
Text Alignment
Align the text within the label text area. The options available from the submenu
enable you to specify left, center and right alignment.
Label Rotation
Orientate the label horizontally or vertically and, if vertically, in a clockwise or anticlockwise position.
Direction
Set a small arrow at the end of the label pointing to either the label source or the
destination dependent upon selection from the available options.
214
option
This is part of the label, so if there is no label there is no direction indicator.
Default Position
Move the label to the default location.
Default Color
Set the label color to the initial default color.
2.2.22 Lock Diagram
You can lock a diagram against inadvertent changes, such as moving or sizing elements.
To lock a diagram, follow the steps below:
© 1998-2010 Sparx Systems Pty Ltd
51
Work With Diagrams | Diagram Tasks
1. Open the diagram to lock.
2. Right-click on the background to open the diagram context menu.
3. Click on the Lock Diagram option to prevent further changes.
4. Click on the OK button.
If a user selects an item on a locked diagram, the object border or outline displays in red.
Note:
This does not apply in the Corporate, Business and Software Engineering, Systems Engineering and Ultimate
editions if security is enabled. In that case, see the Lock Model Elements topic in User Security in UML
Models.
2.2.23 Undo Last Action
When editing diagrams, Enterprise Architect supports multiple undo levels for moving, re-sizing and deleting
elements, and for deleting connectors.
There are three ways to undo the last action:
· Press [Ctrl]+[Z]
· Select the Edit | Undo menu option
· Click on the Undo button in the Default Tools toolbar.
Warning:
Currently you cannot undo element additions or connector moves.
2.2.24 Redo Last Action
When editing diagrams, Enterprise Architect supports multiple undo levels for moving, re-sizing and deleting
elements, and for deleting connectors. If an Undo action is in error, you can redo the action to reverse the
Undo.
There are three ways to redo the last action:
· Press [Ctrl]+[Y]
· Select the Edit | Redo menu option
· Click on the Redo button in the Default Tools toolbar.
2.2.25 View Last and Next Diagram
Enterprise Architect enables you to step backwards and forwards through the currently-open diagrams,
including the Start Page.
To view the previous or next diagram use the Previous or Next buttons on the Diagram toolbar.
Use the Home button to display the default project diagram
59
UML Modeling with Enterprise Architect - UML Modeling Tool
(if one has been specified).
Work With Diagrams | Diagram Tasks
52
2.2.26 Diagram Properties
You can set several properties of a diagram using the diagram Properties dialog. Some properties influence
the display and some are logical attributes that appear in the documentation.
Note:
You can also set the default diagram background color and the element fill color on the Standard Colors page
of the Options dialog. You can set color gradients for both diagram background and element fill color on the
Diagram Appearance page of the dialog. (See Using Enterprise Architect - UML Modeling Tool.)
There are several options for opening the diagram Properties dialog for a given diagram:
·
·
·
·
Select the Diagram | Properties menu option to open the Properties dialog for the currently active diagram
Right-click on the required diagram in the Project Browser and select the Properties context menu option
Right-click on the background of the open diagram and select the Properties context menu option
Double-click in the background of the open diagram.
In the Diagram Properties dialog you can set properties including name, author and version information, zoom
factor, paper size and layout, diagram notes and various appearance attributes. Once you have made any
necessary changes, click on the OK button to save and exit.
See the following topics:
·
·
·
·
·
General Tab 53
Diagram Tab 54
Elements Tab 55
Features Tab 57
Connectors Tab 58
© 1998-2010 Sparx Systems Pty Ltd
53
Work With Diagrams | Diagram Tasks
2.2.26.1 General Tab
The General tab of the diagram Properties dialog enables you to define characteristics of the overall diagram,
such as its title, version and modification date.
Note:
In the Corporate, Business and Software Engineering, Systems Engineering and Ultimate editions of
Enterprise Architect, if security is enabled you must have Update Diagrams permission to update diagram
properties. See User Security in UML Models.
Field
Use to
Name
Type the name of the diagram (defaults to the name of the parent package).
Author
Type or select the name of the person who created the diagram.
Version
Type the version number of the diagram (defaults to 1.0).
Stereotype
Type or select the name of the stereotype for the diagram. You can define
stereotypes to select here using the Settings | UML menu option, selecting the
Stereotypes tab and creating stereotypes with a Base Class of Diagram (see SDK
For Enterprise Architect).
Created
Automatically display the date the diagram was created.
Modified
Type the date and time on which the diagram was last modified (defaults to the
current date and time).
Notes
Type any additional notes about the diagram. You can format the notes using the
Rich Text Notes toolbar at the top of the field. (See Using Enterprise Architect UML Modeling Tool.)
UML Modeling with Enterprise Architect - UML Modeling Tool
Work With Diagrams | Diagram Tasks
54
2.2.26.2 Diagram Tab
The Diagram tab of the diagram Properties dialog enables you to define the structure of the diagram.
Field
Use to
Use Alias if Available
Display the element alias as the name if the alias is specified.
Show Additional Parents
Show the name of all parents not in the current diagram for all Classes
and interfaces.
Show Page Border
Show a page border to align elements with.
Show Diagram Details
Show diagram details in a note in the top left corner of the diagram.
(Deselect to hide the diagram details.)
Show Sequence Notes
Show the Sequence Notes on the current diagram.
Show Namespace
Show the namespace of each element on the diagram, under the
element; that is, PackageName::ElementName.
Always Open as Element List
Always display the diagram contents as an Element List rather than as a
diagram. See Using Enterprise Architect - UML Modeling Tool.
Page Setup
See Scale Image to Page Size
Print Page Header and Page
Footer
Add page headers and footers to a print-out of the diagram. The headers
and footers are generated from the diagram characteristics, such as the
name of the creator and the date of modification.
RTF Document Options
Options for generating RTF reports for a particular diagram. See Report
Creation in UML Models.
Exclude image from RTF
documents
Exclude this diagram image from any RTF document generated on the
parent package or element.
62
.
© 1998-2010 Sparx Systems Pty Ltd
55
Work With Diagrams | Diagram Tasks
Field
Use to
Document each contained
element in RTF
Include documentation on each element in the diagram, in any RTF
document generated on the parent package or element.
(Applies only in the Legacy RTF Report Generator; for the extended RTF
Report Generator, use the Generate RTF Documentation dialog. See
Report Creation in UML Models.)
Divide Diagram into Multiple
Pages
Divide each large diagram into separate pages in the RTF document.
Note:
This option is only effective when the Scaled Printing option
None on the Print Advanced dialog.
Rotate Images
62
is set to
Rotate each diagram image by 90 degrees in the RTF document.
Note:
Only valid for bitmap (.bmp) images.
2.2.26.3 Elements Tab
The Elements tab of the diagram Properties dialog enables you to define what components of the elements
should be displayed on the diagram.
Field
Use to
Use Stereotype Icons
For elements that have whole shapes drawn by Enterprise Architect (such
as Analysis stereotypes - see the UML Dictionary), draw the alternative
shape (if defined).
UML Modeling with Enterprise Architect - UML Modeling Tool
Work With Diagrams | Diagram Tasks
Field
56
Use to
For elements that have an icon displayed in the top right corner, (such as
an Artifact element - see the UML Dictionary) if Show Element
Stereotypes is selected, display the stereotype icon instead of the
stereotype text.
Show Element Stereotypes
For elements that have whole shapes drawn by Enterprise Architect, if Use
Stereotype Icons is deselected, display any stereotype on the element.
For elements that have an icon displayed in the top right corner, indicate
that a stereotype is present (icon if Use Stereotype Icons is selected, text
if not).
Show Table Owner
Display the Table Owner. For more information, see the Set Table Owner
topic in Code Engineering Using UML Models.
Show Element Property
String
Show the advanced property string for all elements; for example, {leaf}.
Show Compartments
Enable the following compartments to be shown or hidden for any element
using rectangle notation:
Attributes
Operations
Tags (Tagged Values)
Requirements
Constraints
Testing (Testing Scripts) - see the Testing topic in Project
Management with Enterprise Architect
· Maintenance (Maintenance Scripts) - see the Maintenance topic in
Project Management with Enterprise Architect
· Package Contents
· Notes.
·
·
·
·
·
·
© 1998-2010 Sparx Systems Pty Ltd
57
Work With Diagrams | Diagram Tasks
2.2.26.4 Features Tab
The Features tab of the diagram Properties dialog enables you to define the features of the diagram.
Field
Use to
Show Qualifiers and Visibility
Indicators
Show or hide the qualifiers and visibility indicators on the diagram.
Qualifiers include such things as the 'derived' symbol (/) and the public
key symbol (PK).
Visibility indicators include such things as +, -, # and ~, which indicate
the scope of access of the item (such as an attribute, operation or role) see the Modeling Conventions topic in Code Engineering Using UML
Models.
Show Stereotypes
Show the stereotypes on all features.
Show Property String
Show the advanced property string for all element features, for example,
{readOnly}.
Show Operation Return Type
Display the return data type of operations.
Suppress Brackets for
Suppress brackets on operations that have no parameters; that is, Opn;
Operations Without Parameters rather than Opn();.
Visible Class Members
Hide Class members according to their scope and methods that specify
properties. See the Visible Class Members 59 topic.
Show Attribute Detail
Select whether to show both the attribute name and type or the attribute
name only.
Show Parameter Detail
Control the display of method parameters. See the Visible Class
Members 59 topic.
UML Modeling with Enterprise Architect - UML Modeling Tool
Work With Diagrams | Diagram Tasks
58
2.2.26.5 Connectors Tab
The Connectors tab of the diagram Properties dialog enables you to define the appearance of the connectors
on the diagram.
Field
Use to
Show Relationships
Show relationships in the current diagram.
Show Collaboration Numbers
Show numbering in Communication diagrams.
Show Non-Navigable Ends
Indicate when an Association end is not navigable; a cross is presented
at the Association connector.
Show Connector Property
String
Show the property string for connectors.
Suppress All Connector
Labels
Hide all connector labels.
Connector Notation
Display the required connector notation:
· UML 2.1 - use the standard UML 2.1 notation for connectors
· Information Engineering - use the Information Engineering (IE)
connection style; for more information see the http://www.agiledata.
org/essays/dataModeling101 page
· IDEFX1 - use the Integrated Definition Methods IDEFX1 connection
style; for more information see the http://www.idef.com/IDEF1X.html
page.
© 1998-2010 Sparx Systems Pty Ltd
59
Work With Diagrams | Diagram Tasks
2.2.26.6 Visible Class Members
On the Features tab of the diagram Properties dialog, the Visible Class Members panel enables you to hide
Class members by their scope and methods that specify properties. Use the checkboxes to define the visibility
of Class members.
Show Parameter Detail
The Show Parameter Detail field enables you to control the display of method parameters with the following
options:
Option
Effect
None
No details shown.
Type Only
Shows the type of parameter only.
Full Details
Shows all of the details for parameters.
Name Only
Shows the name of the parameter only.
2.2.27 Set the Default Diagram
A project might have a default diagram. If set, this diagram loads when Enterprise Architect first opens the
model. It is often convenient to place hyperlinks to other diagrams and resources on the default diagram, thus
creating a Home Page for your model.
To set the currently active diagram as the model default, select the Diagram | Make Model Default menu
option - see the Diagram Menu topic in Using Enterprise Architect - UML Modeling Tool. (Also use this option
to cancel the default setting.)
Tip:
Once you have specified a default diagram, the Home icon on the Diagram toolbar takes you back to that
diagram from your current location in the model.
UML Modeling with Enterprise Architect - UML Modeling Tool
Work With Diagrams | Diagram Tasks
60
2.2.28 Create Legends
A Legend shape identifies colors and styles you have used to group other elements on the diagram. You can
use the Legend to assist in distinguishing different elements, connectors or systems on the diagram. For
example, the Legend could show that all elements concerned with the management system are shaded in
blue, and all outcomes connectors are shown in red. The Legend displays as a key to the diagram, with the
filled shape styles first and the lines and connector styles underneath.
You add a Legend to the diagram, then edit it to add Legend elements, which define the colors and styles
used in the diagram.
Add a Legend
To add a Legend to a diagram, drag the Diagram Legend element from the Common page of the Enterprise
Architect UML Toolbox onto the diagram (or click on the New Diagram Legend icon (
Elements toolbar, and click on the diagram).
) on the UML
The Legend dialog displays.
Click on the OK button. The Legend displays on the diagram as a simple rectangle.
© 1998-2010 Sparx Systems Pty Ltd
61
Work With Diagrams | Diagram Tasks
Edit a Legend
To edit the Legend follow the steps below:
1. Either:
· Double-click on the Legend, or
· Right-click on the Legend and select the Properties context menu option.
The Legend dialog displays.
Note:
The Legend dialog enables you to add, delete, modify or re-sequence Legend elements. Use the Fill
tab to define the Legend elements for shapes, then click on the Line tab to define Legend elements for
lines and connectors.
2. In the Name field, type the name of the Legend element; for example, Management System or Help.
3. Use the drop-down arrows to select the fill color, line color and line thickness for the Legend element.
4. Click on the Save button to save the Legend element. The element displays in the Fill or Line tab, as
appropriate.
5. Click on the New button to add another Legend element.
Style Options
Click on the Style Options button [ ... ] to display the Style Options dialog, on which you can modify a Legend
title, font size, background color and border color. If you choose default options for the colors, the Legend
automatically assumes colors based on the diagram background color.
UML Modeling with Enterprise Architect - UML Modeling Tool
Work With Diagrams | Diagram Tasks
62
Click on the OK button on the Style Options dialog and again on the Legend dialog. The Legend displays on
the diagram.
2.2.29 Scale Image to Page Size
When you print a diagram (see Using Enterprise Architect - UML Modeling Tool), the default setting is to scale
the image to fit the size of the printer paper you have defined in the page set-up. The image is not scaled up to
fill the page, but it is scaled down if it exceeds the current page boundary. The image retains its current
proportions; that is, it is scaled down equally in the X and Y dimensions. For a large diagram, this can mean
that the components of the diagram are small and hard to read.
Alternatively, you can print a multi-page image; that is:
· allow the diagram image to print on as many printer pages as it naturally occupies, (no scaling), or
· scale the diagram image to exactly fit a specified number of pages.
In all three cases you also define the paper size and orientation.
Scale Images
To turn off or customize image scaling options, follow the steps below:
1. Select the diagram to scale.
2. Double-click on the diagram background to display the <type> Diagram: <name> dialog, or right-click
on the background and select the Properties context menu option.
3. Click on the Diagram tab and, in the Page Setup panel click on the Advanced button.
The Print Advanced dialog displays.
© 1998-2010 Sparx Systems Pty Ltd
63
Work With Diagrams | Diagram Tasks
From the Print Advanced dialog the following options are available:
·
·
·
·
None: select to print on as many pages as the diagram image covers
Scale to 1 page: select to scale the diagram image to fit on the currently selected page
Custom: select to specify the width and height of the diagram images across a specified number of pages
Page Setup: click to select the page size and alignment 63 .
Note:
Before printing, make sure you have selected the required page layout using the Page Setup button.
2.2.30 Set Diagram Page Size
You can change the size of the diagram area (or scrollable/printable area) using the Diagram Properties
dialog.
Note:
In the Corporate, Business and Software Engineering, Systems Engineering and Ultimate editions of
Enterprise Architect, if security is enabled you must have Update Diagrams permission to change diagram
page setup. See User Security in UML Models.
To set the page size, follow the steps below:
1. Load a diagram.
2. Double-click on the background to open the Diagram Properties dialog.
3. Click on the Diagram tab and, in the Appearance panel ensure that the Show Page Border checkbox is
selected.
4. On the Page Setup panel, click on the Advanced button. The Print Advanced dialog displays.
5. Click on the Page Setup button. The Page Setup dialog displays.
UML Modeling with Enterprise Architect - UML Modeling Tool
Work With Diagrams | Diagram Tasks
64
Note:
As you adjust the settings on this dialog, the page icon at the top illustrates the effects of your
changes.
6. In the Size field, click on the drop-down arrow and select an appropriate page size.
7. In the Orientation panel click on the radio button for the orientation of the page to print.
8. In the Margins panel, type the required left, right, top and bottom page margins for the diagram, in
inches.
9. Click on the OK button on the Page Setup dialog, the Print Advanced dialog, and the Diagram
Properties dialog.
The area within the page boundary lines on your diagram is expanded or reduced accordingly. When you print
or print preview, the output is cropped to these boundary lines and the diagram divided between the necessary
number of pages.
Setting the Default Paper Size for New Diagrams
You can set the default paper size for new diagrams on the Diagram page of the Options dialog (select the
Tools | Options | Diagram menu option). Once the paper size is set there, all new diagrams have that as the
default size.
See the Configure Local Options - Diagram topic in Using Enterprise Architect - UML Modeling Tool.
2.2.31 Pan and Zoom a Diagram
Pan
Pan the Diagram View in the following ways:
·
·
·
·
Use [!], ["], [#], [$], [Page Up], [Page Down], [Home] and [End] when the Diagram View is selected
Use the scrollbars
Use the middle mouse button
Use the Pan & Zoom window - see the Pan & Zoom Window topic in Using Enterprise Architect - UML
© 1998-2010 Sparx Systems Pty Ltd
65
Work With Diagrams | Diagram Tasks
Modeling Tool.
Zoom
You can zoom into and out from a diagram using the zoom buttons on the diagram toolbar, or by using the
Diagram | Zoom submenu.
Change the zoom level by 10% by clicking on either the Zoom In (+) or Zoom Out (-) buttons. Alternatively,
select the Zoom In or Zoom Out options from the Diagram | Zoom submenu.
There are three ways to return the diagram to 100%:
· Click on the
button
· Select Zoom to 100% from the Diagram | Zoom submenu
· [Ctrl]+middle-click the mouse.
Tip:
You can zoom in and out of the main window dynamically by holding [Ctrl] and rolling the mouse wheel.
Note:
· Changes in diagram magnification through the zoom options can be saved as permanent changes to the
diagram.
· At high levels of zoom, element features cease to display. This is because of the difficulty the Windows
font mapper has in choosing a font for extreme conditions, and the result can look odd.
2.2.32 Move Elements In Diagram Sections
As you build up a diagram, you might find that you need to move part of the diagram up, down or to one side.
You can do this in one of two ways:
· Hold the left mouse button down and drag over a group of elements to move (creating an outline around
the elements), then click on an element in the outline and move the group as required
· Press [Alt] and click on the diagram, then drag the cursor to move everything beyond the cursor in the
direction of the movement.
The first method enables you to reposition groups of elements within the larger diagram. The second method
enables you to create space within the diagram without pushing some elements into others, as might happen
if you cannot see the whole diagram on one screen.
When you press [Alt] and click on the diagram, as you move the cursor a line displays on the diagram just
behind the cursor. If you are moving the cursor left, everything to the left of the line moves with the cursor. If
you move the cursor up, everything above the line moves up.
However, if you move the cursor diagonally, two lines display to create a quadrant, and everything within the
quadrant moves. For example, if you move the cursor left and down, everything below and left of the cursor
moves.
Fine Movement
To adjust (or 'nudge') the position of a single element or a selected group of elements, press [Shift]+["], [!],
UML Modeling with Enterprise Architect - UML Modeling Tool
Work With Diagrams | Diagram Tasks
66
[#] or [$].
© 1998-2010 Sparx Systems Pty Ltd
67
Work With Elements |
3 Work With Elements
UML Models are constructed from elements, each of which has its own meaning, rules and notation. Elements
can be used at different stages of the design process for different purposes. The basic elements for UML 2.1.1
are depicted in the following diagrams:
UML Modeling with Enterprise Architect - UML Modeling Tool
Work With Elements |
68
© 1998-2010 Sparx Systems Pty Ltd
69
Work With Elements |
3.1 Element Context Menu
Right-click on a single element in a diagram to open the element context menu. If two or more elements are
selected, a different, multiple selection context menu 79 is displayed.
The element context menu is split into a number of sections and submenus:
·
·
·
·
Properties 70
Add 73
Find 74
Transform [Ctrl]+[H] - Transform the selected element from one domain to another (see the Transform
UML Modeling with Enterprise Architect - UML Modeling Tool
Work With Elements | Element Context Menu
70
Elements topic in the MDA Transformations User Guide)
· Embedded Elements 75
· Features 77
· Generate DDL - Generate DDL for a table, procedure or view Class (see the Generate DDL topic in Code
Engineering Using UML Models)
· Code Engineering 77
· Appearance 77
· UML Help - display the Enterprise Architect Help topic for the UML element type
· Delete [Ctrl]+[D] - delete the element.
Note:
Context menus vary between element types. The Code Engineering options won't display for a Use Case
element, for example.
Example Context Menu for a Class:
Example Context Menu for an Activity:
3.1.1 Properties Menu Section
The Properties section of the element context menu can contain the following options:
Menu Option & Function Keys
Use to
Properties [Ctrl]+[Enter]
Open the Properties dialog
118
for the selected element.
© 1998-2010 Sparx Systems Pty Ltd
71
Work With Elements | Element Context Menu
Menu Option & Function Keys
Use to
For State Lifeline and Value Lifeline elements, display
the Configure Timeline dialog. See the UML Dictionary.
Advanced
Open the Advanced
sub-menu.
Rule Composer
For a Rule Task element, invoke the Rule Composer 248
tab in Business Rule Modeling. (See Extending UML in
Enterprise Architect.)
Other Properties
For State Lifeline and Value Lifeline elements, display
the Properties dialog 118 for the selected element.
Create (or Edit) Linked
Document [Ctrl]+[Alt]+[D]
(Corporate, Business and Software Engineering,
Systems Engineering and Ultimate editions) Create
an RTF document linked to the element.
Delete Linked Document
Delete an existing linked document for the element.
71
191
3.1.1.1 Advanced Submenu
The Advanced submenu on an element context menu can contain the options listed in the table below.
Notes:
· Context menus vary between element types. Not all menu options shown here are present on all element
context menus; for example, the Partition Activity option only displays for an Activity element.
· If an element appearance is overridden by a Shape Script (see UML Model Management), several of the
appearance options are disabled; for example, Use Rectangle (Circle) Notation.
Menu Option & Function
Keys
Use to
Custom Properties
[Ctrl]+[Shift]+[Enter]
Open the Custom Properties
Parent [Ctrl]+[I]
Set the element parent
84
Instance Classifier [Ctrl]+[L] Set the instance classifier
72
dialog.
.
149
for the element, on the Select <Item> dialog.
Classifier Properties
[Ctrl]+[Alt]+[Enter]
Open the Properties
Make Composite
Set the element as a Composite element. See The UML Dictionary.
Change to State (Value)
Lifeline
Switch one type of Lifeline element to the other.
Show Composite Diagram
Display a mini-picture of the contents of a composite element within that
element.
Multiplicity
Define the multiplicity for the element, using the format defined on the
Cardinality tab. (See UML Model Management.)
118
dialog for the classifier of the selected element.
This is the number of instances of the element that can exist in a set. The
value displays on the element in a diagram, in the Name compartment.
Edit Extension Points
For an extended Use Case, display the Use Case Extension Points dialog,
which you use to insert the point at which the behavior should be inserted.
See The UML Dictionary.
UML Modeling with Enterprise Architect - UML Modeling Tool
Work With Elements | Element Context Menu
72
Menu Option & Function
Keys
Use to
Association Class
Connect the Class to a new Association (if the element is a Class). See The
UML Dictionary.
Use Rectangle (Circle)
Notation
Use rectangle notation for the element. See The UML Dictionary.
Partition Activity
Define an Activity Partition. See The UML Dictionary.
Set Run State
Add a new instance variable to the element using the Define Run State
dialog. See The UML Dictionary.
Set Property Value
(Part elements) Set the property value for the Part, using the Set Property
Values dialog.
Override Attribute
Initializers
[Ctrl]+[Shift]+[R]
Pre-define initial values for attributes that can be used to override existing
defaults.
Convert to Instance
(Property)
Convert this classifier to an instance or a property, depending on the type of
classifier selected (for example, SysML classifiers are always converted to
properties).
Convert Linked Element To
Local Copy
Convert the occurrence of the element on this diagram from a link to the
original element to a local copy of the element.
Make Sender/Receiver
Toggle the element from a sender to a receiver and vice versa.
Accept Time Event
Change the notation for an Accept Event action to an Accept Time Event
action.
Set Object State [Ctrl]
+[Shift]+[S]
Set the state of an object/instance based on the child states of its classifier.
See The UML Dictionary.
Define Concurrent
Substates
Define a set of substates that can be held simultaneously within that
composite state. See The UML Dictionary.
Use State Label Notation
Display State Label Notation for a State object (the element name is
displayed on a box on top of the element rather than inside it).
Deep History
Change the type of pseudo-state to a Deep History. Applies only when
right-clicking on a History pseudo-state.
Set Attached Links
Attach the selected Note element
Link to Diagram Note
Display the diagram notes as the Note element text. The option simply
deletes any current text and blocks the Note from being edited other than
through the Notes field in the diagram Properties dialog.
203
to a connector, or several connectors.
3.1.1.2 Custom Properties Dialog
Certain elements and connectors feature the Custom Properties option in their context menu. The following
example shows the Custom Properties dialog for an Activity element. Properties differ between the various
types of element or connector.
© 1998-2010 Sparx Systems Pty Ltd
73
Work With Elements | Element Context Menu
As shown above, you can change the values of properties either by selecting the value from the property's
drop-down list or by typing the value in the field to the right of the property.
3.1.2 Add Submenu
The Add submenu enables you to add supporting elements and diagrams to the selected element.
Menu Option
Use to
Tagged Value
Add a Tagged Value
Related Elements
Open the Insert Related Elements
Note
Create and attach a blank Note
Constraint
Create and attach a blank Constraint element to the current element. See
The UML Dictionary.
Activity
Add an Activity element as a child of the current Classifier 148 element, with
either an Activity diagram or an Interaction Overview diagram. See The UML
Dictionary.
Interaction
Add an Interaction element as a child of the current Classifier element, with
either a Sequence diagram, a Communication diagram or a Timing diagram.
See The UML Dictionary.
State Machine
Add a State Machine element as a child of the current Classifier element,
with a State Machine diagram. See The UML Dictionary.
RuleFlow activity
For a Class element, create a Rule Flow Activity 242 element with a child
Rule Flow diagram, as a behavior for the Class. See Extending UML in
Enterprise Architect.
Add Diagram
Add a child diagram to the Classifier element, using the New Diagram
dialog.
147 .
95
74
dialog.
element to the current element.
13
Note:
Not all menu options shown here are present on all element context menus. Context menus vary between
element types. The options relating to Classifiers, for example, are not available for Object elements.
UML Modeling with Enterprise Architect - UML Modeling Tool
Work With Elements | Element Context Menu
74
3.1.2.1 Insert Related Elements
The Insert Related Elements dialog can be accessed from the Add | Related Elements option on most
element context menus. This dialog enables you to insert connected elements from elsewhere in the model
into the current diagram.
You can specify the following details:
Option
Use to
Insert elements to: «x»
levels
Select the level down to which to insert connected elements, between levels
1 and 5.
You can select levels 4 or 5 to see how far the element/relationship
hierarchy extends, but as this can produce a complicated and tangled
diagram, it is better to use level 1 or 2 on selected elements in turn.
For Link Type
Select a type of connector to limit the inserted elements to those connected
by that relationship type.
With Link Direction
Select whether the connectors are to be a single direction or bi-directional.
Limit to Element Type
Select a type of element to limit the inserted elements to those of that
element type.
Layout Diagram When
Complete
Select whether Enterprise Architect should layout the diagram after the
elements have been inserted. The layout applied is the Digraph 20 layout.
Note:
If no elements have been added, this option has no effect. Elements have
to be added for Enterprise Architect to adjust the layout.
Limit to this Namespace
Select a specific namespace from which the inserted elements are to come.
3.1.3 Find Submenu
The Find submenu on the element context menu can contain the following options:
Menu Option & Function Keys
Use to
In Project Browser [Alt]+[G]
Highlight the currently selected element in the Project Browser.
© 1998-2010 Sparx Systems Pty Ltd
75
Work With Elements | Element Context Menu
Menu Option & Function Keys
Use to
Locate Classifier In Project
Browser [Ctrl]+[Alt]+[G]
Highlight the classifier for the currently-selected object, in the Project
Browser.
Locate Operation in Project
Browser [Ctrl]+[Alt]+[G]
Highlight the call operation for the currently-selected Activity, in the
Project Browser. See the UML Dictionary.
In Diagrams [Ctrl]+[U]
Open the Element Usage
85
Custom References [Ctrl]+[J]
Set up Cross References
86
Add to Favorites
Add the element to the Favorites folder in the Resources window. See
the Favorites topic in Using Enterprise Architect - UML Modeling Tool.
dialog.
.
3.1.4 Embedded Elements Submenu
The Embedded Elements submenu on the element context menu can contain the following options:
Menu Option
Use to
Add Port
Add an embedded Port to the element.
Add Required Interface
Add an embedded Required Interface to the element.
Add Provided Interface
Add an embedded Provided Interface to the element.
Add Action Pin
Add an embedded Action Pin to the element.
Add Expansion Node
Add an embedded Expansion Node to the element.
Add Object Node
Add an embedded Object Node to the element.
Add Activity Parameter
Add an embedded Activity Parameter to the element.
Add Entry Point
Add an embedded Entry Point to the element.
Add Exit Point
Add an embedded Exit Point to the element.
Embedded Elements
Open the Embedded Elements
Show Realized Interfaces
Display each interface directly realized
Show Dependent Interfaces
Display each dependency relationship for that model element as a
lollipop style node attached to its left-hand side.
75
window.
49
by a Class.
Note:
Not all menu options shown here are present on all element context menus. Context menus vary slightly
between element types. Of the Add options, only Add Port displays for a Class element, for example.
3.1.4.1 Embedded Elements Window
The Embedded Elements dialog enables you to embed particular elements into other elements. For example,
a Port can be embedded into a Class. The Embedded Elements option is available on the context menu of
some elements.
UML Modeling with Enterprise Architect - UML Modeling Tool
Work With Elements | Element Context Menu
76
In the Embedded Elements dialog, click on the New button to create a new embedded element. Enter details
such as type, name and stereotype, and click on the OK button. The embedded element now shows on the
primary element as shown below.
You can add as many embedded elements as necessary. Modify or delete embedded elements using the
Embedded Elements dialog.
To incorporate inherited or owner properties, select the Show Owned/Inherited checkbox.
The name of the embedded element is a label, which you can edit using the Labels
49
context menu.
© 1998-2010 Sparx Systems Pty Ltd
77
Work With Elements | Element Context Menu
3.1.5 Features Menu Section
The Features section of the element context menu can contain the following options:
Menu Option & Function Keys Use to
Attributes
Open the Attributes
Operations
Open the Operations
Feature Visibility
[Ctrl]+[Shift]+[Y]
Open the Feature Visibility
dialog.
105
dialog.
155
dialog.
33
Note:
Not all menu options shown here are present on all element context menus. Context menus vary slightly
between element types. The Attributes and Operations options won't display for an Action element, for
example.
3.1.6 Code Engineering Menu Section
The Code Engineering submenu on the element context menu can contain the following options:
Menu Option & Function Keys Use to
Generate Code [F11]
Generate source code for the selected element (forward engineer).
See Code Engineering Using UML Models.
Synchronize With Code [F7]
Reverse engineer source code for the selected element. See Code
Engineering Using UML Models.
View Source Code [F12]
Open the source editor if a file exists for that selected element. See
Using Enterprise Architect - UML Modeling Tool.
Create Workbench Instance
[Ctrl]+[Shift]+[J]
Create a workbench instance for the Debug Workbench (if a debug
command has been configured for the parent package). See Visual
Execution Analyzer in Enterprise Architect.
Note:
Not all menu options shown here are present on all element context menus. Context menus vary slightly
between element types. These Code Engineering options won't appear for a Use Case element, for example.
3.1.7 Appearance Menu Section
The Appearance section of the element context menu can contain the following options:
Menu Option
Use to
Lock Element
Lock the element so it can't be edited. To unlock the element, select Lock
Element again.
Note:
This does not apply in the Corporate, Business and Software Engineering,
Systems Engineering and Ultimate editions when security is enabled; in that
situation, see the Lock model elements topic in User Security in UML Models.
Selectable
Toggle whether the element is selectable or not. If an element is selectable, you
UML Modeling with Enterprise Architect - UML Modeling Tool
Work With Elements | Element Context Menu
Menu Option
78
Use to
can move it around the diagram and perform right-click context menu
operations.
If an element is unselectable, you cannot move it around the diagram and the
only right-click operation available is to make the element selectable.
This option has no effect on double-click operations on the element, such as
displaying child diagrams or Properties dialogs.
Note that an element on a locked diagram is also unselectable - if you click on
it, the element outline displays in red.
Dockable
Align and join two elements either vertically or horizontally, on the current
diagram only.
Both elements must have the Dockable option selected, and must have the
joining edges parallel. As the distance between the elements narrows, the
moving element snaps to the edge of the other element. For Activity Partitions,
the option is selected by default. See The UML Dictionary.
Deselecting the Dockable option does not separate the elements; if necessary,
you can simply move the elements apart again.
Appearance
Display the Appearance submenu; see the table below.
Z-Order
Set the Z-Order
32
of the element.
Note:
You can also change the appearance (and other aspects) of several selected elements at once
79
.
Appearance Sub-Menu
Menu Option &
Function Keys
Use to
Default Appearance
[F4]
Override the global default appearance of all elements (which you set on the
Options dialog, Standard Colors page and Diagram Appearance page) with a
different default for just the selected element 96 on all diagrams in which it is
found.
To change the appearance of the selected element on the current diagram only,
use the Format toolbar. See Using Enterprise Architect - UML Modeling Tool.
Apply Image From
Clipboard
Paste the image held on the clipboard onto the selected element.
Select Alternate Image
[Ctrl]+[Shift]+[W]
Select an alternative image using the image manager
44
.
Hide/Show Name Under Hides or redisplays the name label under an element with an alternative image.
Image
Set Font
Change the font
Show Labels
Reveal any hidden labels on the element.
Copy Appearance to
Painter
Copy the default element appearance (set using the Default Appearance option,
above) to the painter. You then paste the default appearance using the Paste
Appearance option on the Diagram toolbar. See Using Enterprise Architect UML Modeling Tool.
Copy Image to
Clipboard
Copy the element image to the clipboard.
79
type, size, color and effects for the text in an element.
© 1998-2010 Sparx Systems Pty Ltd
79
Work With Elements | Element Context Menu
Note:
Not all menu options shown here are present on all element context menus. Context menus vary slightly
between element types. The Alternate Image option won't display for a Lifeline element, for example.
3.1.7.1 Set Element Font
You can change the appearance of the text within an element, for one or more selected elements, by either:
· Selecting the Appearance | Set Font context menu option, or
· Selecting the Font icon on the Format toolbar. See Using Enterprise Architect - UML Modeling Tool.
The Font dialog displays.
Select the font, style, size, color and effects, and (if necessary) the script type. Click on the OK button to save
your changes.
3.1.8 Element Multiple Selection Menu
You can perform operations on two or more elements on a diagram at once. To select the required elements,
either click and drag the cursor over the group to highlight them, or press [Shift] and click on each element.
Right-click on an element to display the following context menu:
UML Modeling with Enterprise Architect - UML Modeling Tool
Work With Elements | Element Context Menu
80
This menu enables you to do the following:
Note:
Where elements are made the same, they are matched to the element you right-clicked on.
·
·
·
·
·
·
·
·
·
·
·
·
·
Align elements (by left edge, right edge, top, bottom, center in a column or center in a row)
Space elements evenly (across or down)
Standardize the dimensions of the selected elements
Specify the visibility of features 33 for all selected elements
Add the same Tagged Value to all selected elements - see the Assign a Defined Tagged Value to an Item
topic in Using Enterprise Architect - UML Modeling Tool
Automatically resize elements to match (element content permitting)
Turn the Dockable 78 option on or off for all selected elements on a diagram
Set the default appearance 96 and font 79 for multiple elements at once
Make the selected elements on the diagram non-selectable 77 ; to make them selectable again, right-click
on the diagram and select the Make All Elements Selectable context menu option
Generate code for all selected elements at once, or synchronize the code against the selected elements
Transform the selected elements - see the MDA Transformations User Guide
Copy all selected elements to the clipboard
Automatically adjust the layout of the selected elements on the diagram
© 1998-2010 Sparx Systems Pty Ltd
81
Work With Elements | Element Context Menu
· Delete all selected elements.
Tip:
It is much faster to assign an appearance or characteristic to a group of elements than to one element at a
time.
3.2 Element Tasks
This topic describes the following common UML tasks that you can perform on elements in Enterprise
Architect:
·
·
·
·
·
·
·
·
·
·
·
·
·
·
·
·
·
·
·
·
·
·
Create Elements 81
Add Elements Directly to Packages 83
Use Auto Naming and Auto Counters 83
Set Element Parent 84
Show Element Use 85
Set Up Cross References 86
Move Elements Between Packages 89
Move Elements Within Diagrams 88
Copy Elements Between Packages 90
Change Element Type 91
Align Elements 91
Resize Elements 92
Delete Elements 93
Customize Visible Elements 94
Create Notes and Text 95
Set an Element's Default Appearance 96
Get/Set Project Custom Colors 98
Use Element Templates 100
Highlight Context Element 101
Make Linked Element a Local Copy 102
Copy Features (Attributes and Operations) Between Elements
Move Features Between Elements 104
103
Note:
In the Corporate, Business and Software Engineering, Systems Engineering and Ultimate editions of
Enterprise Architect, if security is enabled you must have Update Element permission to update element
properties or delete an element. See User Security in UML Models.
3.2.1 Create Elements
Elements within a model are typically arranged on diagrams to visually communicate the relationships
between a given set of elements. Enterprise Architect provides simple mechanisms for creating elements in
the model, using diagrams or the Project Browser.
Create Elements on a Diagram
The fastest and simplest way to create elements directly on a diagram is to press [Spacebar] or [Insert] on
the diagram. This displays a list of elements and connectors that mirrors the current Toolbox pages; usually
these are the most appropriate elements and connectors for the diagram.
UML Modeling with Enterprise Architect - UML Modeling Tool
Work With Elements | Element Tasks
82
You can display and select from a longer list of elements by clicking on the Other option.
The following topics describe other approaches for creating elements on a diagram:
· Create Elements In Place Using the Quick Linker - see Using Enterprise Architect - UML Modeling Tool
· Create Elements Using the Enterprise Architect UML Toolbox - see Using Enterprise Architect - UML
Modeling Tool
· Create Elements Using the Diagram Context Menu 10
· Create a Group of Elements Using UML Patterns - see Extending UML in Enterprise Architect
· Create Domain Specific Elements from UML Profiles - see Extending UML in Enterprise Architect.
Tip:
If you are creating several elements of one type, after creating the first just press [Shift]+[F3] or [Ctrl]+click
to create the next element of that type.
Re-Use Existing Elements
Be aware that once you have created elements, you can re-use them by dragging them
Browser and dropping them onto your diagrams.
37
from the Project
Add Elements Directly to a Package
Sometimes it is useful to add elements to a package, without a diagrammatic representation. This can be
accomplished via the Project Browser window and is explained in the following topic:
· Add Elements Directly to a Package
83
.
See Also - in the UML Dictionary:
· Behavioral Diagram Elements - summary of all elements used in Behavioral diagrams
· Structural Diagram Elements - summary of all elements used in Structural diagrams
© 1998-2010 Sparx Systems Pty Ltd
83
Work With Elements | Element Tasks
3.2.2 Add Elements Directly To Packages
You can quickly add new elements to a package without the necessity of adding a diagram element at the
same time. This is particularly useful in defining a group of Requirements, Changes, Issues, base Classes or
other element types that might not require diagrammatic representation in the model.
To add a new element to a package, follow the steps below:
1. In the Project Browser, right-click on the appropriate package. The context menu displays.
2. Select the Add | Add Element menu option. The New Element dialog displays.
3. In the Name field, type the name of the element.
4. In the Type field, click on the drop-down arrow and select the element type.
Note:
The drop-down list is populated from one of the Toolbox page groups (including profile, Add-In and
MDG Technology groups). If the list does not represent the group containing the element you require,
click on the Select Group button and, from the list, select the appropriate Toolbox page group. The
drop-down list then shows the elements from that group.
The <default> group in the list contains a basic set of elements drawn from across the UML Behavioral
and Structural groups, and the Enterprise Architect Extended groups.
5. If required, in the Stereotype field either type the stereotype name or click on the drop-down arrow and
select the stereotype.
6. Select the Open Properties Dialog on Creation checkbox if the Properties dialog is to open
immediately after the element is created.
7. Deselect the Close Dialog on OK checkbox to add multiple elements in one session.
8. Click on the OK button to create the element.
Note:
If you have a diagram open, the Add to Current Diagram checkbox is available and defaulted to selected to
add the new element to the diagram. If you do not want the element in that diagram, deselect the checkbox.
3.2.3 Use Auto Naming and Auto Counters
The Auto Element Naming dialog enables you to configure automatic naming for any element type. Each
element can have separately configured automatic names and aliases.
To set up auto naming, follow the steps below:
1. Select the Settings | Auto Name Counters option from the main menu. The Auto Name Counters
dialog displays.
UML Modeling with Enterprise Architect - UML Modeling Tool
Work With Elements | Element Tasks
84
2. In the Type field, click on the drop-down arrow and select the element type (for example, Activity).
3. In the Name panel:
· In the Prefix field, type a prefix for the new name (optional).
· In Counter field, type the counter value; use as many 0's as required to pad the name.
· In the Suffix field, type a suffix for the new name (optional).
· If required, click on the Active checkbox to turn auto naming on for this element type.
4. In the Alias panel:
· In the Prefix field, type a prefix for the new alias (optional).
· In Counter field, type the counter value; use as many 0's as required to pad the alias.
· In the Suffix field, type a suffix for the new alias (optional).
· If required, click on the Active checkbox to turn alias auto naming on for this element type.
5. Click on the Save button.
New elements of this type now have an automatically-generated name and/or alias with an incrementing
counter value.
Note:
If an Alias is active then auto naming applies; however, to view the Alias in a diagram requires that the option
Use Alias if Available is selected in Diagram Properties 52 .
3.2.4 Set Element Parent
You can manually set an element's parent or an interface it realizes, using the Type Hierarchy dialog.
To set the element parent, follow the steps below:
1. Select a generalizable element in a diagram.
2. Select the Element | Advanced | Set Parents and Interfaces menu option. Alternatively:
· Press [Ctrl]+[I] or
· Right-click and select the Advanced | Parent context menu option.
The Set Parents and Interfaces dialog displays.
© 1998-2010 Sparx Systems Pty Ltd
85
Work With Elements | Element Tasks
3. You can elect to enter a parent or interface name by either manually typing it in, or clicking on the
Choose button to locate the element within the current model.
4. Set the Type of relationship (Implements or Generalizes) from the drop-down list.
5. Click on the Add button to add the relationship.
6. Click on the Delete Selected button to remove the current selected relationship.
Note:
If Parents are not in the same diagram as their corresponding related element, the parentage is shown
in the top right corner of the child element, as shown below:
3.2.5 Show Element Use
You can display the use of an element using the Element Usage dialog. This lists all occurrences of the
element throughout the model, and enables you to easily navigate to any occurrence.
To show element usage, follow the steps below:
1. Select an element in a diagram.
2. Select the Element | Find in Diagrams menu option. Alternatively, press [Ctrl]+[U]. If the element
exists in other diagrams, the Element Usage dialog displays, listing all occurrences of the current
element in diagrams in the model.
UML Modeling with Enterprise Architect - UML Modeling Tool
Work With Elements | Element Tasks
86
3. Double-click on a line item to open the relevant diagram and display the selected element. If you want
to display the usage information in a more readable layout, you can resize the dialog and its columns.
Note:
You can also access this feature from the Project Browser; select an element in the tree and select the
Element | Find in Diagrams menu option. If there is only one instance of the element in any diagram, that
diagram displays instead.
3.2.6 Set Up Cross References
It is possible to set up a cross reference (or Custom Reference) from one element in Enterprise Architect to
another. You can also view existing cross references on an element, using the Context References 143 tab on
the element's Properties dialog, or the Traceability window (see Using Enterprise Architect - UML Modeling
Tool).
To set up a cross reference, follow the steps below:
1. In the Project Browser, locate the target element or diagram (that is, the object of the cross reference).
2. Open a diagram that contains the elements that are to have the currently selected element as a
reference.
3. Right-click on the element in the Project Browser. The context menu displays.
4. Select the Add custom reference menu option.
5. In the Set up references dialog, select the checkbox against each element to that is to have the target
element as a reference.
6. Optionally, in the Comment field, type some text to describe the purpose of the reference.
© 1998-2010 Sparx Systems Pty Ltd
87
Work With Elements | Element Tasks
7. Click on the OK button.
Use the Cross Reference
To use the cross reference, follow the steps below:
1. Select an element in a diagram.
2. Select the Element | Custom References menu option. Alternatively, either press [Ctrl]+[J], or rightclick on the element and select the Find | Custom References context menu option.
3. The Custom References dialog displays, showing a list of elements that have been set as cross
references for the selected element.
4. You can open the Properties dialog for an element by highlighting it and clicking on the Open button.
5. If you have a diagram cross reference, you can open that diagram.
6. If you have a string of diagram links, click on the Home button to return to the original diagram.
Note:
You can delete a cross reference by selecting it on the Custom References dialog and clicking on the Delete
button. Cross references are also automatically deleted if the source or target element in the reference is
deleted.
UML Modeling with Enterprise Architect - UML Modeling Tool
Work With Elements | Element Tasks
88
3.2.7 Move Elements Within Diagrams
Any one of the following options enables you to move an element within a diagram. Select an element or
group of elements in the diagram view, then:
· Use the mouse to drag the element to the required position (the cursor switches to the four-arrow icon as
shown below)
· Hold down [Shift] and use the arrow keys to move the element by increments to the required position
· Use the Left, Right, Up and Down options in the Element | Move submenu
· Align multiple elements using the Element | Alignment submenu, the Alignment options in the right-click
context menu, or the Alignment buttons on the Diagram toolbar.
Confirm Possible Parent Elements
As you organize the elements within a diagram, you can drag any element over another and, provided the
dragged element is within and on top of the possible parent, it is always encapsulated by the lower element
and moved within the lower element. However, the lower element might not be a valid parent.
You can confirm that a possible parent element is able to accept a selected child element. When you drag the
child element over the potential parent, the target element border changes to a dashed line if it can accept the
selected element as a child. If the border does not change, the selected element cannot be a child to the
target element.
© 1998-2010 Sparx Systems Pty Ltd
89
Work With Elements | Element Tasks
Notes:
· The Support for Composite Objects checkbox must be selected on the Objects page of the Options
dialog (select the Tools | Options | Objects option). If this option is not selected, the dashed border does
not show and the child element cannot be embedded on the parent in the diagram.
· Both elements must already exist on the diagram; an element border does not change if you drag a
potential child element over it from the Toolbox or Project Browser.
· The child element must have equal or higher z-order placement than the parent; that is, the parent element
must be level with or behind the child.
· The child element borders must be completely within the parent element borders.
For example, if you drag a Signal over a Class, the Class border changes; a Class element can be a parent to
a Signal. If you drag a Class element over a Signal element, the Signal border does not change. A Signal
cannot be a parent to a Class.
When you embed a child element on its parent, the child element becomes part of the parent element
hierarchy in the Project Browser. Similarly, if you drag the child element out of the parent, the child element
becomes independent and is no longer embedded in the parent element hierarchy.
3.2.8 Move Elements Between Packages
Elements and packages can be moved from one package to another by dragging and dropping the element to
the target destination in the Project Browser. Note that if you move a package, ALL the child packages and
their contents are moved to the new location also.
To move an element between packages, follow the steps below:
1. Click on the element in the Project Browser. (See Customer in the diagram below.)
2. Drag the element so that the cursor is over the target package icon. The element symbol (and, in some
operating systems, the element name) displays at the moving cursor position.)
3. Release the mouse button. The element is moved into the target package.
Tip:
You can also drag the element under a host element in the new package; for example, drag an element
under a Class.
UML Modeling with Enterprise Architect - UML Modeling Tool
Work With Elements | Element Tasks
90
Notes:
· Moving an element has no effect on any relationships that the element might have.
· Moving an element in the Project Browser has no effect on the use of that element in any diagram.
· Moving a diagram generally does not affect the location of elements in packages. If you move a diagram
out of one package into another, all the elements in the diagram remain in the original package. However,
certain elements (such as Decision, Initial and Final elements) are used only within one diagram, have no
meaning outside that diagram, and are never re-used in any other diagram. Therefore, if you move a
diagram containing these elements, they are moved to the new parent package with the diagram.
Warning:
In a multi-user environment, if one person moves or updates the Project Browser structure, other users must
reload their project to see the latest changes in the Project Browser (see Version Control Within UML Models
Using Enterprise Architect). Although this is true of any addition or modification to the tree, it is most
important when big changes are made, such as dragging a package to a different location.
3.2.9 Copy Elements Between Packages
Enterprise Architect enables you to quickly and easily duplicate one or more elements, including their child
elements and diagrams. You can insert a copy of an element under one or more other packages, in the same
.eap file or any other .eap file.
Notes:
· A copy of an element does not have the external cross references of the source element; that is:
· if one element is copied it has no connectors
· if more than one element is copied, only the connectors between the copied elements are retained
· however, if those elements come from a Sequence or Communication diagram and the diagram
itself is not copied, the message connectors between the copied elements are not retained.
· You cannot paste an element into a package that is locked by another user (see User Security in UML
Models) or that is checked in (see Version Control Within UML Models Using Enterprise Architect). The
Paste... option is grayed out in the context menu.
To copy elements, follow the step below :
1. In the Project Browser, select each required element, right-click on one of them and select the Copy
Element(s) to Clipboard context menu option (or click on a selected element and press [Ctrl]+[C]).
The Copy Element(s) to Clipboard dialog briefly displays until the copy operation completes.
To paste the copied elements, follow the step below:
1. In the Project Browser, right-click on the package into which to paste the copied elements, and select
the Paste Element(s) from Clipboard context menu option (or click on the package and press
[Ctrl]+[V]). The Paste Element(s) from Clipboard dialog briefly displays until the paste operation
completes.
The target package is expanded and the pasted elements are exposed in the Project Browser. If you are
pasting the elements within the same model as the copied source, the source parent package is also
collapsed.
If the target package already contains:
· an element of the same type with the same name as a pasted element, the pasted element name has the
suffix - Copy
· an element with the same name as the pasted element including the - Copy suffix, the suffix becomes Copy1 (or - Copy 2, - Copy3 and so on, as copies of the element accumulate in the target package)
You can keep the same element names as the source, or you can rename each element either by clicking
twice on it and editing the name in the Project Browser, or by double-clicking on it and editing the name in the
Properties dialog.
© 1998-2010 Sparx Systems Pty Ltd
91
Work With Elements | Element Tasks
3.2.10 Change Element Type
To change an element type, follow the steps below:
1. In the Diagram View, click on the element to change.
2. Select the Element | Advanced | Change Type menu option. The Select Element Type dialog displays.
3. In the Element Type field, click on the drop-down arrow and select the required element type.
4. Click on the OK button.
The target is transformed into the required type.
3.2.11 Align Elements
To align multiple elements, follow the steps below:
1. Select a group of elements by drawing a selection box around them all. (Or select them one by one by
holding down [Ctrl] and clicking on each element).
2. Right-click on the element in the group to align others to. The context menu displays.
3. Select the alignment function you require.
All selected elements are aligned to the one beneath the cursor.
UML Modeling with Enterprise Architect - UML Modeling Tool
Work With Elements | Element Tasks
92
Tip:
You can also use the Diagram toolbar.
The first four buttons are used to align elements, and are made available when more than one element is
selected in a diagram.
You can also select the Element | Alignment menu option.
3.2.12 Resize Elements
Any one of the following options enables you to resize an element. Select an element or group of elements in
the diagram view, then:
· Use the resize handles that appear at each corner and side to resize the element(s) by dragging with the
mouse (the cursor switches to the double-ended arrow as shown below)
· Press and hold [Ctrl] and use the arrow keys to resize by increments as required
· Use the Wider, Narrower, Taller and Shorter options in the Element | Move submenu
· Autosize selected element(s) using the option in the Element | Appearance submenu, or by pressing [Alt]
+[Z]. (With multiple elements selected, Autosize also appears in the right-click context menu)
· Set multiple elements to the same height, width or both, using these options in the Element | Make Same
submenu, or the options in the right-click context menu.
Resize a Set of Objects to a Specific Size
If you right-click a selected set of objects, you can resize them to the same dimensions (height, width or both)
using the context menu. When you select multiple elements using [Ctrl]+click, then resize the dimensions, the
dimensions of the selected hatched object are used to set the dimensions of the other selected objects.
For example, in the diagram below, the Message Class height and width are used to set the height and width
of the Account and Message Folder Classes. The aim is to make the Account and Message Folder elements
the same height and width as the Message element.
© 1998-2010 Sparx Systems Pty Ltd
93
Work With Elements | Element Tasks
To do this follow the steps below:
1. Set one element to the required size (for example, Message as above).
2. Select all other elements (for example, Account and Message Folder as above).
3. Right-click on the pre-sized element (for example, Message).
4. Select your resizing option (such as same height, width) from the context menu.
See Also
· Highlight Context Element
101
3.2.13 Delete Elements
Delete an Element From a Diagram
Follow the steps below:
1. In the active diagram, click on the element to delete.
2. Either:
· Press [Delete], or
· Right-click to display the context menu and select the Delete <element name> option.
Note:
This does not delete the element from the model, only from the current diagram.
Delete an Element From the Model
Follow the steps below:
1. In the Project Browser, right-click on the element to delete. The context menu displays.
2. Select the Delete <element name> option. A confirmation prompt displays.
3. Click on the Yes button.
UML Modeling with Enterprise Architect - UML Modeling Tool
Work With Elements | Element Tasks
94
Alternatively:
1. Click on the element in the Project Browser and press [Ctrl]+[Delete].
The element is completely removed from the model.
Delete Multiple Elements From a Diagram
Follow the steps below:
1. In the active diagram, [Ctrl]+click on each element to delete.
2. Either:
· Press [Delete], or
· Right-click to display the context menu and select the Delete selected elements option.
Delete Multiple Elements From a Diagram and Model
Follow the steps below:
1. Open the diagram containing the elements to remove from the model.
2. Press [Ctrl]+[A] to select all of the elements in the diagram, or use [Ctrl]+click to select specific
elements.
3. Press [Ctrl]+[Delete] to completely remove the elements from the model.
Delete Multiple Elements from the Project Browser and Model
Follow the steps below:
1. In the Project Browser, press and hold either [Shift] or [Ctrl] and click on the required items.
2. To completely remove the elements from the model, either:
· Press [Ctrl]+[Delete], or
· Right-click on the selected items and select the Delete selected item(s) context menu option.
Note:
If you delete an element in this way, you delete all its properties and connectors as well.
3.2.14 Customize Visibility of Elements
Some elements are hidden from view in packages and in RTF documents by default. These include Events,
Decisions, Sequence elements and Associations. You have the option of turning these elements back on.
For example, some Events and Decisions contained in a package do not appear in the package view, as in the
example below.
To show additional elements, follow the steps below:
1. Select the Tools | Options | Objects menu option. The Objects page of the Options dialog displays.
2. Click on the Advanced button. The Advanced Settings dialog displays.
© 1998-2010 Sparx Systems Pty Ltd
95
Work With Elements | Element Tasks
3. Select the checkbox for each type of element to show in packages and in RTF documents.
4. Click on the Close button on each dialog.
5. Reload the current diagram if required (see Version Control Within UML Models Using Enterprise
Architect).
The package from the example above now shows the Event and Decision elements it contains:
3.2.15 Create Notes and Text
You can create both notes and text on a diagram; the two are slightly different.
Create a Note
To create a note, follow the steps below:
1. Drag the Note icon from the Common page of the Enterprise Architect UML Toolbox onto the diagram.
· If you have the Edit Object On New checkbox deselected on the Objects page of the Options dialog
(Tools | Options | Objects), the Note element displays on your diagram; type your note text directly
within the Note element
· If you have the checkbox selected, the Notes window displays; type your text in that window. If you
want to display the Notes information in a more readable layout, you can resize the dialog.
You can format the text if necessary, using the Rich Text Notes toolbar at the top of the window (see
Using Enterprise Architect - UML Modeling Tool). When you have completed the text, click on the
OK button to save it.
UML Modeling with Enterprise Architect - UML Modeling Tool
Work With Elements | Element Tasks
96
The Note text displays in the Note element.
Note:
You can also create a note by clicking on the New Note icon (the text page) on the UML Elements toolbar
and clicking on the diagram (see Using Enterprise Architect - UML Modeling Tool).
Create Text
To create text, follow the steps below:
1. Drag the Text Element icon from the Common page of the Enterprise Architect UML Toolbox onto the
diagram. The Notes window displays.
2. Type your text in the window. If you want to display the Notes information in more readable layout, you
can resize the dialog.
You can format the text if necessary, using the Rich Text Notes toolbar at the top of the window (see
Using Enterprise Architect - UML Modeling Tool). When you have completed the text, click on the OK
button to save it.
Your text displays on the diagram in the following format, with no border:
3.2.16 Set an Element's Default Appearance
You can set the global appearance of all elements throughout a model, using the Options dialog. Select the
Tools | Options menu option, then select Standard Colors and Diagram | Appearance from the options
tree. See the Standard Colors and Appearance topics in Using Enterprise Architect - UML Modeling Tool.
To override the global appearance and define a default appearance for a specific element on all diagrams on
which it is found, right-click on the element and select the Appearance | Default Appearance context menu
option. The Default Appearance dialog displays.
To change the appearance of an element on the current diagram only, use the Format toolbar. If the Format
toolbar is not displayed, select the View | Toolbars | Format Tool menu option (see Using Enterprise
Architect - UML Modeling Tool).
© 1998-2010 Sparx Systems Pty Ltd
97
Work With Elements | Element Tasks
Note:
You can adjust several elements at the same time. Select all of the required elements, right-click on one of
them and select the Default Appearance context menu option, or use the Format toolbar.
Change a Background, Font or Border Color
To reset the background color, font color or border color, follow the steps below:
1. On the Default Appearance dialog, select the Background Color, Font Color or Border Color radio
button as appropriate.
Note:
You have further options for changing the font of element text in the Set Font
79
menu option.
2. Deselect the Use Default Color checkbox, to enable the Select button.
3. Click on the Select button. The Color dialog displays.
4. Select the required color (click on the Define Custom Colors>> button and define a specific color if
necessary) and click on the OK button. You return to the Default Appearance dialog, on which the
Preview panel indicates the selected color for the element.
UML Modeling with Enterprise Architect - UML Modeling Tool
Work With Elements | Element Tasks
98
Note:
To change to a different color, click on the Select button again, or to return to the default color, select
the Use Default Color checkbox.
5. Click on the OK button. The new color is applied to the selected element or elements.
Change the Border Thickness
To change the border thickness, follow the steps below:
1. On the Default Appearance dialog, in the Border Thickness field, type the number of points to apply.
Alternatively, click on the scroll arrows to increase or decrease the number.
The Preview panel indicates the effect of the change in border thickness.
2. Click on the OK button. The new border thickness is applied to the selected element or elements.
3.2.17 Get/Set Project Custom Colors
If more than one person is working on a project, each person might want to use specific colors for elements
within the project. The Settings | Colors | Set Project Custom Colors and Get Project Custom Colors
options enable you to set specific colors and subsequently get the colors in a different session, without having
to remember RGB values.
Set a Project Custom Color
Follow the steps below to set your project's custom colors:
1. Select an element to be colored.
2. Select the Element | Appearance | Default Appearance... menu option. The Default Appearance
dialog displays.
© 1998-2010 Sparx Systems Pty Ltd
99
Work With Elements | Element Tasks
3. Deselect the Use Default Color checkbox to enable the Select button.
4. Click on the Select button. The Color dialog displays.
5. Click on the Define Custom Colors » button.
6. Create the color in the color mixer panel on the right of the dialog.
UML Modeling with Enterprise Architect - UML Modeling Tool
Work With Elements | Element Tasks
100
7. Click on the Add to Custom Colors button to add the color to the Custom colors blocks on the left
hand side of the dialog.
8. Click on the OK button to close the Color dialog, then click on the OK button to close the Default
Appearance dialog.
9. Select the Settings | Colors | Set Project Custom Colors menu option to save the custom color you
have created.
Get a Project Custom Color
To get your project's custom colors, follow the steps below.
1. Select the Settings | Colors | Get Project Custom Colors menu option. This applies any saved
custom colors to this project.
2. Click on an element to be colored and select the Element | Appearance | Default Appearance menu
option. The Default Appearance dialog displays.
3. Deselect the Use Default Color checkbox to enable the Select button.
4. Click on the Select button to view the applied custom colors (as listed at step 7, above).
5. Click on the required color and click on the OK button to close the Color dialog, then click on the OK
button to close the Appearance dialog. The element changes to the selected color.
3.2.18 Set Element Templates Package
In building up a model, you might want to represent or emphasize certain characteristics of elements in the
appearance of those elements, or select particular display options as standard. For example, you could make
new Interface elements a different default color to new Class elements, ensure all new Activity Partitions are
vertical rather than horizontal, or set a specific group of display options for new diagrams. You could also
define a set of characteristics to use for each development stage of a project.
To do all this, you create a diagram with all the characteristics you require, and store it in an element
Templates package. Enterprise Architect then checks this folder whenever you start to create an element in a
diagram and, if it finds a template for that diagram type, applies the settings in that template to the new
element or to the display options of the diagram. For example, you could save a diagram under the name
ClassTemplate, to apply a set of display characteristics to all new Class elements.
© 1998-2010 Sparx Systems Pty Ltd
101
Work With Elements | Element Tasks
You should create the Templates package in an administrative View of the project file, rather than in any work
area. This prevents the package from being changed or lost in any project development work.
There are two other ways in which you can modify the appearance of elements in diagrams:
· You can define the default appearance of elements (and other structures) grouped in a diagram by using
UML Profiles (see Extending UML in Enterprise Architect). These provide a means of extending the UML
Language, which enables you to build UML models in particular domains. They are based on additional
stereotypes and Tagged Values that are applied to elements, attributes, methods, connectors, connector
ends and so on.
· You can modify the appearance of elements (and connectors) of a specific type using stereotypes (see
Extending UML in Enterprise Architect). Stereotypes take precedence over templates; if you drop an
unstereotyped element - a Class, for example - onto a diagram, Enterprise Architect searches the
Templates package for a Class diagram that defines an unstereotyped Class, and applies that definition to
the new Class. If you drop a stereotyped Class onto a diagram, the stereotype defines the Class
appearance so the template is not accessed. Stereotypes are much more flexible for defining the
appearance of an element under different scenarios.
Procedure
To set up the element Templates package, follow the steps below:
1. Create a new package in the appropriate administration View. You can give this package any name;
Templates is an unambiguous option.
2. Within the Templates package create new diagrams, one for each type of diagram to template. Give
them easily recognized names; for example ClassTemplate for the template for Class diagrams.
3. Add new elements to the template diagrams from the Enterprise Architect UML Toolbox and configure
the size, appearance, notes, version and other properties.
4. Select the Settings | Template Package menu option to set the templates as the default element
templates. The Browse Project window displays.
5. Locate and click on the Templates package, and click on the OK button to set the package as the
default element template.
Now each new element you add to your project is created with the settings from the appropriate Template
diagram.
Note:
If you decide not to use the default element template, set the default element template to <none> in the
Browse Project window. The <none> package is at the bottom of the hierarchy shown in the Browse Project
window.
3.2.19 Highlight Context Element
You can show a hatched border around a selected element by selecting the Always Highlight Context
Element checkbox on the Diagram Behavior page of the Options dialog (select the Tools | Options |
Diagram | Behavior menu option). If you have selected this checkbox, the selected element displays similarly
to the following example:
UML Modeling with Enterprise Architect - UML Modeling Tool
Work With Elements | Element Tasks
102
If you have not selected the Always Highlight Context Element checkbox, the selected element does not
have a hatched border around it.
Multiple Selections
Whether you have selected the Always Highlight Context Element checkbox or not, if you select multiple
elements one of the elements you select always has a hatched border. If you align the elements, this element
is the one used to align the other elements against.
For example, if the elements in the diagram below are aligned, the top element aligns to the bottom element
(the element showing a hatched border).
Change the Element to Align Against
To change which element has a hatched border in a selected group (and thus the element that is aligned with)
click on the element that the other elements are to align with.
3.2.20 Make Linked Element a Local Copy
To convert a linked element to a local copy, follow the steps detailed below:
1. Open the diagram with the linked element.
2. Select the linked element and right-click on it to display its context menu.
3. Select the Convert Linked Element to Local Copy menu option.
The element changes to a local copy and is placed in the appropriate package.
© 1998-2010 Sparx Systems Pty Ltd
103
Work With Elements | Element Tasks
3.2.21 Copy Features Between Elements
Using drag and drop, you can copy attributes
on to another element in a diagram.
105
and/or operations
154
from an element in the Project Browser
To move attributes and operations, see Move Attributes and Operations Between Elements
104 .
Copy an Element Feature
To copy an element feature, follow the steps below:
1. Open a diagram that contains the target element (in the example below, the AccountItem Class is the
target and Customer element is the donor).
2. Click on the attribute or operation and drag to the target element.
3. Release the mouse button.
The image below shows AccountItem after the attribute Account has been dropped from the browser on to it.
Copy Multiple Element Features
To copy multiple element features, follow the steps below:
1. Open a diagram that contains the target element (in the example above, the AccountItem Class is the
target and Customer element is the donor).
2. Hold down [Ctrl] (separate features) or [Shift] (select a range) and click on the attributes and/or
operations to copy, then drag the selected features to the target element.
3. Release the mouse button.
UML Modeling with Enterprise Architect - UML Modeling Tool
Work With Elements | Element Tasks
104
3.2.22 Move Features Between Elements
Using drag and drop, you can move attributes 105 and/or operations
Browser on to another element within the Project Browser.
154
from an element in the Project
To copy attributes and operations, see Copy Attributes and Operations Between Elements
103 .
To move element features, follow the steps below:
1. In the Project Browser, locate the attributes and/or operations to move from the target element and
select them while holding down [Ctrl] (single item select) or [Shift] (multiple item select).
2. Holding down the mouse button, drag the attributes and/or operations to the target element. A single
feature symbol (and, under some operating systems, the feature name) displays during the move;
however all of the selected features are moved.
© 1998-2010 Sparx Systems Pty Ltd
105
Work With Elements | Element Tasks
3. Release the mouse button. The image below shows the final stage of the attribute and operations move
between the Class element and the Account element.
3.3 Attributes
Attributes are features of an element that represent the properties or internal data elements of that element.
Not all element types support attributes, and others have restrictions - for example, attributes of Interfaces
must have Public scope.
Elements with attributes (typically Classes) display their features in diagrams in the manner shown below.
UML Modeling with Enterprise Architect - UML Modeling Tool
Work With Elements | Attributes
106
Attributes display in the first compartment of properties in colored text - the default color is red (for example,
Age : int).
For a Customer Class, CustomerName and CustomerAddress can be attributes. Attributes have several
important characteristics, such as type, scope (visibility), static, derived and notes.
Create and Modify Element Attributes
Note:
This facility is only available if the element supports attributes.
In the Project Browser, Classes with attributes have their features collected beneath them, each preceded by
a blue box ( ).
1. In the Diagram view, either:
· Right-click on the element to be edited, and from the context menu select the Attributes menu
option
· Click on the element and press [F9], or
· Drag the attribute from the Project Browser onto the element.
2. The <Element name> Attributes dialog displays.
© 1998-2010 Sparx Systems Pty Ltd
107
Work With Elements | Attributes
Notes:
· If you make changes and do not save them, the Cancel button prompts you to save or cancel the changes,
whilst the Close button closes the dialog immediately and does not save the changes.
· If you are creating many attributes, go to the Attribute/Operations page of the Options dialog (Tools |
Options | Source Code Engineering | Attribute/Operations) and select the After save, re-select edited
item checkbox. Now, when you create an attribute and click on the Save button, the dialog fields clear
ready for you to enter the details of the next attribute. This helps you when you want to create attributes
quickly and might not necessarily want to fully define each one as you create it.
See the topics on the Attributes dialog General
108 ,
Detail
110
and Constraints
111
tabs.
Note:
If the parent element provides source or target roles for a connector, the connector can be attached to a
specific attribute. See the Connect to Element Feature 202 topic.
See Also
· Attribute Tagged Values 112
· Create Properties 114
· Display Inherited Attributes 115
· Create Object From Attribute 117
UML Modeling with Enterprise Architect - UML Modeling Tool
Work With Elements | Attributes
108
3.3.1 Attributes Dialog - General Tab
The General tab of the Attributes dialog is shown below:
To review an existing attribute, click on the attribute name in the Attributes panel.
To delete an existing attribute, click on the attribute name in the Attributes panel and click on the Delete
button.
To create a new attribute, either:
· Click on the New button, or
· Click on an existing attribute name in the Attributes panel, and click on the Copy button.
Review, edit or complete the fields as indicated in the following table.
Field
Use to
Name
Display the name of the attribute. For a new attribute, type the name (with no spaces).
Alias
Display an optional alias for the attribute. If necessary, type in a new alias.
Type
Display the attribute's type. If necessary, click on the drop-down arrow and select a
different type.
The type can be defined by the code language (data type) or by a classifier element.
When you click on the drop-down arrow, the first set of values in the list provides the
data types, and the second (longer) set provides the possible classifiers.
To add new code language data types that can be displayed in this list, see the Data
© 1998-2010 Sparx Systems Pty Ltd
109
Work With Elements | Attributes
Field
Use to
Types topic (see UML Model Management).
[ ... ] (Select)
button
Open the Select <Item> 149 dialog, which you use to select or define a different attribute
classifier type that might not be in the Type drop-down list.
Scope
Define the attribute as Public, Protected, Private or Package. If necessary, click on the
drop-down arrow and select a different scope.
Stereotype
Define the optional stereotype of the attribute. If necessary, either type a different
stereotype name or click on the drop-down arrow and select a stereotype.
Containment
Define the containment type (by reference, by value or not specified). If necessary, click
on the drop-down arrow and select a different containment type.
Derived
Indicate that the attribute is a calculated value. If you select this checkbox, the attribute
name in the element attributes compartment has the derived symbol (/) as a prefix.
Static
Indicate that the attribute is a static member.
Property
Indicate that the attribute has automatic property creation
Const
Indicate that the attribute is a constant.
Is Literal
(For Enumeration elements.) Defaults to selected, to define the attribute as an
enumeration literal. Deselect to define the attribute as a normal element attribute.
114 .
In the Attributes compartment on the diagram, the enumeration literals are listed
separately, above the normal attributes. (Ensure that the Stereotype field for the normal
attribute is not set to enum.)
Initial
Display an optional initial value. If necessary, type in a new initial value.
Notes
Enter any free text notes associated with the attribute. You can format the notes text
using the Rich Text Notes toolbar at the top of the field (see Using Enterprise Architect UML Modeling Tool).
To change the position of an attribute in the list in the Attributes panel, click on the Scroll Up or Scroll Down
(hand) buttons.
Note:
By default, the attributes are listed in alphabetical order. Before changing this sequence, you must deselect
the Sort Features Alphabetically checkbox on the Objects page of the Options dialog (Tools | Options |
Objects).
If you have changed the attribute details, click on the Save button to save the changes.
UML Modeling with Enterprise Architect - UML Modeling Tool
Work With Elements | Attributes
110
3.3.2 Attributes Dialog - Detail
To define additional details relating to collections, click on the Detail tab of the Attributes dialog.
Field
Use to
Multiplicity
Lower bound
Define a lower limit to the number of elements allowed in the
collection.
Upper bound
Define an upper limit to the number of elements allowed in the
collection.
Allow Duplicates
Indicate that duplicates are allowed.
Maps to the UML property isUnique, value FALSE).
Ordered Multiplicity
Indicate that the collection is ordered.
Redefined Property
Review the redefined properties for the attribute.
Add redefined properties by clicking on the Add button to
display the Select Property 151 dialog.
Subsetted Property
Review the subsetted properties for the attribute.
Add subsetted properties by clicking on the Add button to
display the Select Property 151 dialog.
© 1998-2010 Sparx Systems Pty Ltd
111
Work With Elements | Attributes
Field
Use to
Collection
Code the attribute as an array, so that it can contain multiple
concurrent values rather than a single value.
Attribute is a Collection
Indicate that the attribute is a collection (array).
Container Type
Enter the name of the container type.
Other
Transient
(For Java code) indicate that the attribute can change
regardless of what the code is performing.
Qualifiers
Click on this button to add Qualifiers to the attribute, The
Qualifiers dialog displays (see The UML Dictionary).
When you have completed these fields, click on the Save button.
3.3.3 Attributes Dialog - Constraints
Attributes can also have constraints associated with them. Typically these indicate such things as maximum
value, minimum value and length of field.
Select the Constraints tab of the Attributes dialog to define these constraints.
To review an existing constraint, click on the constraint name in the panel at the bottom of the dialog.
UML Modeling with Enterprise Architect - UML Modeling Tool
Work With Elements | Attributes
112
To delete an existing constraint, click on the constraint name in the panel and click on the Delete button.
To create a new constraint, click on the New button.
Review, edit or complete the fields as indicated in the following table.
Field
Use to
Constraint
Type the constraint name.
Type
Click on the drop-down arrow and select the constraint type.
(Notes)
Type any comments or notes concerning the constraint.
If you have created or edited the data, click on the Save button to save the changes.
3.3.4 Attribute Tagged Values
You can define Tagged Values for an attribute. Tagged Values are a convenient means of extending the
properties a model element supports. This in turn can be used by code generators and other utilities to
transform UML models into other forms.
Note:
Tagged Values are supported for attributes, operations, objects and connectors.
Add a Tagged Value
To add a Tagged Value to an attribute, follow the steps below:
1. Click on the Tagged Values tab of the Attribute Properties dialog.
© 1998-2010 Sparx Systems Pty Ltd
113
Work With Elements | Attributes
2. Click on the New tag button (
). The Tagged Value dialog displays.
3. In the Tag field, type the tag name or click on the drop-down arrow and select a defined tag.
4. If appropriate, in the Value field type a specific value for the tag.
5. Click on the OK button to confirm the operation. The tag name and value are displayed under the
attribute in the Tagged Values tab.
Note:
You can define custom tags by creating a Custom Tagged Value. For more information see SDK for
Enterprise Architect.
UML Modeling with Enterprise Architect - UML Modeling Tool
Work With Elements | Attributes
114
3.3.5 Create Properties
Enterprise Architect has capabilities for automatically creating properties in various languages. Property
creation is controlled from the General tab of the Attribute dialog.
Select the Property checkbox. The Create Property Implementation dialog immediately displays.
The Language panel defaults to the Class language; however, you can change this and generate the
properties for any language. Each language has slightly different syntax and generates slightly different
results. For example:
· Java and C++ generate get and set functions
· C# and VB.Net create property functions
· Delphi creates get and set functions as well as a specialized Delphi property Tagged Value.
Type in the required details and click on the OK button. Enterprise Architect generates the required operations
and properties to comply with the selected language.
Note that get and set functions are stereotypes with «property get» «property set» making it easy to recognize
property functions. You can also hide these specialized functions by deselecting the Property Methods
checkbox in the Features tab of the Diagram Properties dialog for a specific diagram (select the Diagram |
Properties menu option). This makes it easier to view a Class, uncluttered by many get and set methods.
© 1998-2010 Sparx Systems Pty Ltd
115
Work With Elements | Attributes
Note that for Delphi you must enable the Tagged Values compartment to see the generated properties. See
Compartments 187 for the steps for doing this.
3.3.6 Display Inherited Attributes
When displaying a Class with attributes in a diagram, you can also show the inherited attributes from all
parents in the elements type hierarchy (ancestors).
To show inherited attributes, use the Specify Feature Visibility
33
UML Modeling with Enterprise Architect - UML Modeling Tool
dialog.
Work With Elements | Attributes
116
Note that for elements that have attributes, you can also override an inherited attribute's initial value, using the
element context menu option Advanced | Override Attribute Initializers. This displays the Override Attribute
Initializers dialog.
© 1998-2010 Sparx Systems Pty Ltd
117
Work With Elements | Attributes
In the Override Attribute Initializers dialog, select the variable name and enter a new initial value. If required,
you can type a note in the Note field. When you display inherited attributes, Enterprise Architect merges the
list of attributes from all ancestors and merges the attribute initializers, so that the final child Class displays the
correct attribute set and initial values.
3.3.7 Create Object From Attribute
If you drag an attribute from the Project Browser onto an Activity diagram, the attribute generates an Object
element of the same name. This is very useful for creating connectors between elements and specific
attributes. For example, a Class element of stereotype table defines its fields as attributes; Requirement
elements that define requirements for those fields can then be linked to the appropriate table fields via the
attribute Object elements.
Note:
From Enterprise Architect release 7.5, you can create this relationship more directly by linking an attribute in
an element to another element, or linking two attributes in different elements. See the Connect to Element
Feature 202 topic.
In the following diagram, the billingAddress Object was generated by dragging the billingAddress attribute from
the Account Class in the Project Browser onto the diagram. The user then created Realize relationships
between the Account element and the billingAddress element, and between the billingAddress element and
the REQ028 Requirement element.
UML Modeling with Enterprise Architect - UML Modeling Tool
Work With Elements | Properties
118
3.4 Properties
This topic area covers element properties and their settings, responsibilities, constraints, connectors,
scenarios, Tagged Values, associated files, object files and classifiers, and boundary element settings.
To display the element Properties dialog, use any of the following methods:
·
·
·
·
·
Select an element in the Diagram View and select the Element | Properties menu option
Right-click on an element in the Diagram View, and select the Properties context menu option
Select an element in the Diagram View, and press [Alt]+[Enter]
Double-click on an element in the Diagram View
Right-click on an element in the Project Browser, and select the Properties context menu option.
To suppress display of the Properties dialogue when placing a new element, uncheck the Edit Object on New
option on the Objects page of the Options dialog (Tools | Options | Objects).
Note:
There are several variations of the Properties dialog:
· The dialog for a Table or Stored Procedure element has slight differences on the General tab, and a Table
(Stored Procedure) Details tab instead of a Details tab; see the Set Table Properties topic in Code
Engineering Using UML Models.
· The dialog for a Class element of a stereotype other than Table is as shown in General Settings
119 .
· The dialog for an element of any other type does not have a Details tab.
· Port and Part elements have a Property tab (see the element descriptions in The UML Dictionary).
· Activity elements have a Behaviors 167 tab, and Action and Invocation elements (depending on their type)
have other tabs such as Effect, Trigger and Call 167 tabs (see the element descriptions in The UML
Dictionary).
· Action Pins have a Pin tab (see the element description in The UML Dictionary).
In all cases, the Properties dialog is an expandable window, which you can stretch to enable longer entry and
clearer inspection of the text field values.
The following topics describe each of the tabs in the Class Properties dialog in detail.
·
·
·
·
·
·
·
·
General 119
Details 121
Requirements 122
Constraints 125
Links 126
Scenarios 127
Files 144
Tagged Values 145
Follow the links for information on Tagged Values 145 , Object files and Classifiers
element appearance (see the element description in The UML Dictionary).
148 ,
and the Boundary
© 1998-2010 Sparx Systems Pty Ltd
119
Work With Elements | Properties
3.4.1 General Settings
The General tab of the element Properties dialog is shown below:
Complete the following fields:
Field
Use to
Name
Change the element's name.
Stereotype
(Optional) Type the name of a stereotype for the element, or click on the drop-down arrow
and select one.
Abstract
Indicate that the element is abstract.
Author
Enter or select the name of the original author.
Status
Indicate the current status of the element (such as Approved, Proposed).
Scope
Indicate the element's scope (public, private, protected, package).
UML Modeling with Enterprise Architect - UML Modeling Tool
Work With Elements | Properties
120
Field
Use to
Complexity
Indicate the complexity of the element (used for project estimation). Assign Easy, Medium
or Hard.
Alias
Enter an alias (alternative display name) for the object.
Language
Select the programming language for the object.
Keywords
Enter free-text items such as keywords or context information. This can be filtered in Use
Case Metrics and Search dialogs.
Phase
Indicate the phase this element is to be implemented in (for example, 1, 1.1, 2.0 ...).
Version
Enter the version of the current element.
Notes
Enter any notes text associated with the element, as described for the Notes window. You
can format the notes text using the Rich Text Notes toolbar at the top of the field (see Using
Enterprise Architect - UML Modeling Tool).
Further facilities are made available by pressing the Advanced button. See Advanced Settings
120
for details.
3.4.1.1 Advanced Settings
Some elements support additional attributes. These are Generalizable elements, and by clicking on the
Advanced button on the element Properties dialog you can set the following:
·
·
·
·
·
IsRoot - the element is a root element and cannot be descended from another
IsLeaf - the element is final and cannot be a parent for other elements
IsSpecification - the element is a specification
IsActive - the element is active; for example, an Active Class (see the UML Dictionary)
Multiplicity - the number of instances of the element that can exist. The value displays on the element in a
diagram, in the Name compartment. Use the format defined in the Cardinality tab (see UML Model
Management).
© 1998-2010 Sparx Systems Pty Ltd
121
Work With Elements | Properties
3.4.2 Details
The Details tab of the element Properties dialog is shown below. It enables you to define the structural and
processing details for the selected Class element.
Note:
When launched from MDG Integration, the Attributes and Operations buttons are not available.
Field/Button
Use to
Cardinality
Note:
Cardinality and Multiplicity are effectively the same. It is recommended that you
define the value in the Multiplicity field of the Advanced dialog 120 ; this ensures
that the value displays on the element in a diagram.
Select the number of elements in a set for the Class.
Visibility
Select the visibility of the Class.
UML Modeling with Enterprise Architect - UML Modeling Tool
Work With Elements | Properties
122
Field/Button
Use to
Attributes
Define attributes for the Class. The Attributes Properties
Operations
Define operations for the Class. The Operations Properties
Concurrency
Specify how concurrent activities should be processed.
Collection Classes
Define Collection Classes (for generating code from Association connectors) that
apply to this Class. The Collection Classes for Association Roles dialog displays
(see the Set Collection Classes topic in Code Engineering Using UML Models..
Type
Select the type of Class template parameter to add or list. You can also edit or
delete parameters. See the Parameterised Classes topic in the UML Dictionary.
Arguments
Select a parameter and type any required argument for that parameter.
105
dialog displays.
155
dialog displays.
3.4.3 Requirements
The Requirements tab of the element Properties dialog is shown below. Use this page to create requirements
that this element is designed to meet. Requirements are of two types: internal requirements (responsibilities see Requirements Management) and external requirements 124 (system requirements, elements connected to
this element by a Realize connector). Enterprise Architect shows both types, but you can only edit the internal
type from this tab.
© 1998-2010 Sparx Systems Pty Ltd
123
Work With Elements | Properties
You can show the requirements for an element on the diagram directly, using the Specify Feature Visibility
function. (It is also possible to show inherited requirements in this way).
Field/Button
Use to
Requirement
Enter the name and high level detail of the requirement.
Type
Specify the type; for example, Functional or Non-functional. Functional
requirements are things that the system must do, such as identify franked,
unfranked and total credit for a dividend; non-functional requirements are things
that the system must be, such as reliable, cost effective.
Last update
Specify the date of the last requirement update.
Status
Specify the current status of the requirement.
Difficulty
Identify the complexity of implementing the current requirement.
Priority
Specify how urgent the requirement is.
UML Modeling with Enterprise Architect - UML Modeling Tool
33
Work With Elements | Properties
Field/Button
Use to
Stability
Specify the estimated stability of the requirement.
124
This is an indication of the probability of the requirement - or understanding of the
requirement - changing. High stability indicates a low probability of the
requirement changing.
Notes
Record details of the requirement. As for the Notes window, you can format the
notes text using the Rich Text Notes toolbar at the top of the field. (See Using
Enterprise Architect - UML Modeling Tool.)
Move External
Make an internal responsibility into an external requirement. (See Requirements
Management.)
New
Create a new requirement.
Save
Save changes to requirements.
Delete
Delete a selected requirement.
Defined
List the defined requirements associated with this element.
3.4.3.1 External Requirements
External requirements are those Requirement elements that have been connected to the current element
using a Realization connector. By creating the connector from the element to the requirement, you create an
expectation that the element must implement the requirement as part of the system solution.
In Enterprise Architect, linked requirements are shown in the Requirements tab of the element Properties
dialog, but they are marked external and cannot be directly edited (on selection, the tab fields are grayed out).
Double-click an external requirement in the list to activate the Properties dialog for the associated
requirement, where you can view and modify the requirement details and check the requirement hierarchy
details.
© 1998-2010 Sparx Systems Pty Ltd
125
Work With Elements | Properties
See Also (in Requirements Management)
· Create Requirements
· Make Internal Requirement External
3.4.4 Constraints
The Constraints tab of the element Properties dialog is shown below.
Elements can have associated constraints placed on them. These are conditions under which the element
must exist and function. Typical constraints are pre- and post- conditions, which indicate things that must be
true before the element is created or accessed and things that must be true after the element is destroyed or
its action complete.
Use the Specify Feature Visibility 33 function to show constraints for an element on the diagram directly (it is
also possible to show inherited constraints in this way).
Add Constraints to a Model Element
To add constraints to a model element, follow the steps below:
1. Open the element Properties dialog.
2. Select the Constraints tab.
UML Modeling with Enterprise Architect - UML Modeling Tool
Work With Elements | Properties
126
3. In the Constraint field, type the name of the constraint.
4. In the Type and Status fields, click on the drop-down arrow and select the constraint type (Precondition, Post-condition or Invariant) and status.
5. In the larger text field, type any additional notes required.
6. Click on the Save button.
Constraints are used in conjunction with responsibilities
element operates and exists.
122
to define the conditions and rules under which an
3.4.5 Links
The Links tab of the element Properties dialog displays a list of all relationships active for the current element.
The Relationships panel lists the relationships this element has. The:
·
·
·
·
·
Element column identifies the elements this element is related to
Element Stereotype column identifies the stereotype (if any) of the element
Type column identifies the element type of the related element
Connection column identifies the type of relationship
Stereotype column identifies the stereotype (if any) of the relationship.
From the Links tab you can perform operations on a relationship, by right-clicking on the relationship to display
the context menu.
© 1998-2010 Sparx Systems Pty Ltd
127
Work With Elements | Properties
To:
· Hide the relationship on the diagram, click on the Hide Relation menu option; the option then changes to
Show Relation, which you select to redisplay the relationship on the diagram
· Display the relationship Properties 217 dialog, click on the Relationship Properties menu option
· Highlight the related element in the Project Browser, click on the Locate Related Object menu option
· Delete the relationship from the model and all diagrams, click on the Delete Relationship menu option; the
system prompts you to confirm the deletion.
3.4.6 Scenarios
A scenario is a real-world sequence of operations that describes how an element works in real-time. It can be
applied to any element - generally Use Cases - and can describe functional behavior, business work flows and
end-to-end business processes.
The Scenario tab of the element Properties dialog has two internal tabs, as described below.
· The Description tab enables you to create scenarios and provide a simple text description of each
scenario, or of the structure of each scenario.
· The Structured Specification 129 tab enables you to create scenarios or select those you have created
elsewhere and, for each scenario:
· Create a series of steps for each part of the scenario
· Structure the scenario to show how the basic path diverges into the alternate paths and exception paths
· Generate a number of types of diagram 135 from the structure
· Generate a structured scenario from an Activity diagram 143
· Generate a structured scenario from text on the clipboard 133 ; this option has a variation in the
Description tab that enables you to translate scenario descriptions 129 created prior to release 8.0 of
Enterprise Architect, into structured scenarios in the latest release.
Notes:
· The Scenarios tab does not prevent you from creating more than one basic path, but it would be unusual to
define more than one.
· All the functions available on the Scenarios tabs are also available through the Scenarios & Requirements
window/view (see Using Enterprise Architect - UML Modeling Tool). Use the Browse Element icon in the
window toolbar to list and select the scenarios for the element.
Description Tab
When you first select the Scenarios tab, it defaults to the Description tab and sets both the Scenario (name)
field and the Type field to Basic Path, to enable you to define the basic path first. You can overtype the
scenario name with more appropriate text if required. As you go on to create other scenarios, you set the type
to Alternate or Exception as appropriate.
UML Modeling with Enterprise Architect - UML Modeling Tool
Work With Elements | Properties
128
Complete the fields as described below.
Field
Use to
Scenario
Type in the name of the scenario (or, for existing scenarios, click on the drop-down arrow
and select one from the list).
Type
Specify the type of scenario; the options are:
· Basic Path - the direct set of steps for the scenario
· Alternate - an alternative set of steps, in parallel with part of the basic path
· Exception - the path the scenario follows if a step of the basic path does not
produce an appropriate result.
Description
Record a textual description of how the user uses the current element.
As for the Notes window, you can format the notes text using the Rich Text Notes toolbar
at the top of the field. (See Using Enterprise Architect - UML Modeling Tool.)
As well as the Notes window facilities, you can also generate a structured specification
from the text in this field. Highlight the text, right-click on it and select the Create
© 1998-2010 Sparx Systems Pty Ltd
129
Work With Elements | Properties
Field
Use to
Structure from Notes context menu option.
The text is copied to the Structured Specification 129 tab for the current scenario, either as
a new specification or as the continuation of an existing specification, with a new step
created at each carriage return. Subsequent changes to the text on the Structured
Specification tab are not reflected on the Description tab.
New
Clear the data fields so that you can enter data in them to create a new scenario.
Save
Save a new scenario, or changes to an existing scenario.
Delete
Delete a scenario selected from the Scenarios panel, below.
Scenarios
Display a list of defined scenarios for this element.
You can change the order in which the scenarios are listed, using the
buttons.
and
3.4.6.1 Structured Specification Tab
The Structured Specification tab enables you to define the structure, actions and interactions of the scenarios
defined for an element such as a Use Case. These scenarios can be the main or basic path, alternate paths,
or exception paths.
UML Modeling with Enterprise Architect - UML Modeling Tool
Work With Elements | Properties
130
When you open the Structured Specification tab it defaults to the basic path (as shown above) so that if it does
not already exist, you can create it. You can create alternate paths and exception paths as part of the process
of adding them to steps of the basic path.
You can also create all three types of scenario paths on the Description 127 tab, or in the Scenarios &
Requirements window (see Using Enterprise Architect - UML Modeling Tool).
Set Up Scenario Specification
You can create a specification for a scenario in one of several ways:
·
·
·
·
Enter the specification yourself, as described below
Generate a specification from an Activity diagram 143 created under a Use Case element
Generate a specification from the notes text 127 of the scenario in the Description tab
Generate a specification from text held on the clipboard 133 .
To enter the specification yourself, starting with the basic path, follow the steps below:
1. In the Scenario field, click on the drop-down arrow and select the Basic Path scenario.
2. In the new step field in the Action column, type the text of the first step or action.
© 1998-2010 Sparx Systems Pty Ltd
131
Work With Elements | Properties
Note:
An entry for the basic path displays in the Entry Points tab, as Step 0 with no value in the Join column
(the basic path does not rejoin itself).
3. Tab to the Uses column and, if necessary, type the name of each element used in this step.
Note:
The values in the Uses, Results and State columns, whilst optional, are significant if you want to
generate a diagram 135 from the specification. If you type the name of an element linked to the current
element (and listed in the Context References 143 tab), the element name is highlighted and
underlined.
4. Tab to the Results column and, if necessary, type the outcome of completing this step.
5. Tab to the State column and, if necessary, type the name of the state into which the step moves the
action.
6. When you move out of the Action column, the next new step field displays underneath. Repeat steps 2
to 5 as many times as is necessary.
By default, the steps begin with a user step (indicated by an actor icon) and alternate between user and
system (indicated by a screen icon) steps. To change the entity responsible for a step, either double-click on
the icon, or right-click on the step and select the Set Step as 'System' or Set Step as 'User' context menu
option as required.
The Structured Specification tab should now resemble the following illustration:
Repeat the Scenario Steps procedure for each scenario you have created. You can now adapt, enhance and
interrelate the scenario specifications using the facilities of the Structured Specification tab.
Facilities Of the Structured Specification Tab
The Structured Specification tab offers a wide range of facilities for generating and modifying scenario
specifications. These are available through the tab toolbar and a number of context menus.
Toolbar
The icons on the Structured Specification toolbar offer the following facilities:
UML Modeling with Enterprise Architect - UML Modeling Tool
Work With Elements | Properties
Icon
132
Use to
Save changes to the scenario specification.
Display the basic path specification (only if another specification is currently displayed).
(Only enabled when the basic path is displayed - you cannot add an alternate path to another
alternate path or an exception path.)
Create a branch from the selected step to an alternate path scenario - select the path from the
displayed list. If the appropriate scenario does not yet exist, double-click on the new path line and
type the scenario name, then click off the line and back on to it. Click on the OK button.
Note:
An entry for this alternate path displays in the Entry Points tab, as Step a of the basic path step it
branches from; in the Join column, click on the drop-down arrow and select the number of the
step at which action flows back to the basic path, or select End if the path terminates separately
from the basic path.
(Only enabled when the basic path is displayed - you cannot add an exception path to another
exception path or an alternate path.)
Create a branch from the selected step to an exception path scenario - select the path from the
displayed list. If the appropriate scenario does not yet exist, double-click on the new path line and
type the scenario name, then click off the line and back on to it. Click on the OK button.
Note:
An entry for this exception path displays in the Entry Points tab, as Step a of the basic path step it
branches from; in the Join column, click on the drop-down arrow and select the number of the
step at which action flows back to the basic path, or select End if the path terminates separately
from the basic path.
Move the currently-selected step one place up.
Move the currently-selected step one place down.
Display a list of diagrams that you can generate from the scenario
that you want to generate.
135 ;
select the type of diagram
Generate Test Cases 142 based on this Use Case scenario; you can generate either internal Test
Cases or External Test Cases.
Delete the selected step from the scenario.
Display the Help topic for this tab.
© 1998-2010 Sparx Systems Pty Ltd
133
Work With Elements | Properties
Item/Blank Space Context Menu
To display this context menu, right-click on a step or blank line on the Structured Specification tab. The
following options are available:
Option
Use to
Create Structure From
Clipboard Text - New
Lines
Generate a set of steps from a text description or list captured on the clipboard.
A new step is generated:
Create Structure From
Clipboard Text Sentences
· after each carriage return in the captured text (New Lines), or
· for each sentence in the text; that is, after each full stop/space/capital letter
combination (Sentences).
If a set of steps is already displayed, it is overwritten by the generated steps.
Create Structure From
Generated Activity
Diagram
Generate a set of steps from an Activity Diagram
Add Alternate Path
Create a branch from the selected basic path step to an alternate path (see
previously).
Add Exception Path
Create a branch from the selected basic path step to an exception path (see
previously).
Set Step As 'User'
Set Step As 'System'
Switch the entity responsible for performing the action of the selected step
between user and system.
Link Step to Use Case
Either include the actions of an existing Use Case element, extend an existing
Use Case element, or invoke a Use Case as the action of the selected step.
Selecting the appropriate sub-option displays the Select Use Case 149 dialog,
which you use to browse for and select the required Use Case element.
143
created for a Use Case.
If a set of steps is already displayed, it is overwritten by the generated steps.
The appropriate includes, extends or invokes stereotyped connector is created
between the current element and the selected Use Case.
For the include and extend actions, any text in the Action field is overwritten by
the link to the Use Case. For the invoke action, the following link is added to the
end of the Action text:
[Invokes: <Use Case Name>]
Merge With Step
Merge the selected step with another. A list of the other steps in the scenario
displays; click on the step to merge with the selected step.
Move After Step
Move the selected step to another position in the scenario. A list of the other
steps in the scenario displays; click on the step after which to position the
selected step.
Delete
Delete the selected step. A prompt displays to confirm the deletion. Any
subsequent steps are moved up one place.
Text Selection Context Menu
To display this context menu, highlight the text in a user-editable field within a step on the Structured
Specification tab. The following options are available:
Option
Use to
Create
Create a glossary definition (see Using Enterprise Architect - UML Modeling
Tool) or a new element 83 based on the highlighted text.
Link Step to Use Case
Either incorporate the actions of an existing Use Case element, or extend an
existing Use Case element, as the action of the selected step. Selecting the
appropriate sub-option displays the Select Use Case 149 dialog, which you use
UML Modeling with Enterprise Architect - UML Modeling Tool
Work With Elements | Properties
Option
134
Use to
to browse for and select the required Use Case element.
Any text in the Action field is overwritten by the link to the Use Case.
Link to existing Element
(Uses and Results fields only.) Create a Realization or Dependency
relationship to a Requirement, Feature or other element elsewhere in the
model.
You select the element and connector types from submenu options, which then
display the Select Element 149 dialog, which you use to browse for and select
the required element.
Insert Context Reference
Add a reference to an element stored elsewhere in the model, and create an
entry for the element in the Context References 143 tab.
Selecting this option displays the Select Element 149 dialog, which you use to
browse for and select the required reference element.
See also the Floating Toolbar
Insert glossary definition
135
section, below.
Insert an existing glossary term at the cursor position. To select the term,
double-click on it in the displayed list.
When you select the term it is inserted into the field as highlighted and
underlined text, which displays the definition when you move the cursor over it.
If you highlighted part of the original text, the term overwrites that text.
Split Step
Splits the selected step into two consecutive steps.
The option is available only if you highlight a portion of the text in the selected
field. The new step takes the highlighted text as its Action text.
Search for <text>
Displays a sub-menu of options for locating the selected text in a number of
locations (see Using Enterprise Architect - UML Modeling Tool).
Undo
Undo any unsaved changes you have just made in the step.
Cut
Copy
Perform simple editing operations on the highlighted text.
Paste
Delete
Select All
Entry Points Context Menu
The Entry Points tab shows how the basic path, alternate path and exception path scenarios for the element
are organized and interrelated. If an alternate path or exception path has been defined but has not yet been
added to the basic path, it is not listed on this tab.
You can switch focus between the Entry Points tab and the Structured Specification tab by pressing [Alt]+[Q].
To display the context menu for this tab, highlight an entry and right-click on it. The following options are
available:
Option
Use to
Edit Path
Display the steps of the scenario in the Structured Specification tab, with the
first step highlighted.
Join with Step
(Available only if the basic path scenario is displayed in the Structured
Specification tab. Not available to edit the basic path scenario.)
© 1998-2010 Sparx Systems Pty Ltd
135
Work With Elements | Properties
Option
Use to
Highlight the Join field and its drop-down arrow. Click on the drop-down to
define or change the step number at which the alternate or exception path
rejoins the basic path. Select End if the path does not rejoin the basic path
steps.
Delete
(Available only if the basic path scenario is displayed in the Structured
Specification tab. Not available to delete the basic path.)
Delete the relationship between the selected path and the basic path, and
remove the entry from the Entry Points tab.
Floating Toolbar
Wherever a reference to another element exists on the Scenario tab (that is, where the text is highlighted and
underlined), if you hover the cursor over the element name a short floating toolbar displays, which you can use
to:
· display the element Properties dialog
· locate the element in its parent diagram
· locate the element in the Project Browser.
3.4.6.2 Generate Diagrams
If you have created a structured scenario, you can generate any of the following diagrams from that scenario:
· Activity 136
· With ActivityParameter
· With Action 137
· With Action Pin 137
· Rule Flow 137
· State Machine 137
· Sequence 139
· Robustness 141
137
To generate the required diagram, follow the steps below:
1. Create the scenario structure on the Structured Specification
2. Click on the Generate Diagram icon (
129
tab.
) in the toolbar on the tab.
3. Click on the type of diagram to generate.
Enterprise Architect generates the diagram and notifies you that generation is complete. Close the Properties
dialog to review the diagram.
If the diagram being generated already exists under the selected element, the following prompt displays:
Select the appropriate radio button to:
UML Modeling with Enterprise Architect - UML Modeling Tool
Work With Elements | Properties
136
· Overwrite the existing diagram (delete the existing diagram and elements, and create a new diagram and
elements) or
· Synchronize the elements in the existing diagram with the scenario steps (however, Sequence and
Robustness diagrams cannot be synchronized).
Note:
The Synchronize elements in existing diagram option enables the Preserve Diagram Layout checkbox,
which you can select to preserve the existing arrangement of elements and connectors on the diagram. Any
new elements are added to the diagram in the default position, and you manually position them in the
diagram as required. If you do not select the checkbox, the diagram is recast in the default layout.
It is recommended that you uncheck the Preserve Diagram Layout checkbox if you are synchronizing
elements with scenario steps:
· When new steps have been added or existing steps have been deleted or moved within the Use Case
· For the first time in a Use Case that has been imported from XMI with the Strip GUIDs option selected
· For the first time in a Use Case that that has been copied and pasted
90
in the Project Browser, or
· For the first time in a Use Case whose containing package has been copied and pasted
Browser.
4
in the Project
Activity Diagram
An Activity is generated as a child of the selected element, to act as a container for the diagram. The scenario
steps are modeled as Activities, and the values of the Uses, Results and State columns for each step are
added as Tagged Values of the corresponding Activity.
© 1998-2010 Sparx Systems Pty Ltd
137
Work With Elements | Properties
Activity with ActivityParameter
The values of the Uses and Results columns are modeled as ActivityParameters.
The value of the State column is added as a Tagged Value of the Activities.
Note:
ActivityParameters are added to the Project Browser and not to the diagram.
Activity with Action
The scenario steps are modeled as Actions, and the values of the Uses, Results and State columns are added
as Tagged Values of the Actions.
Activity with ActionPin
The scenario steps are modeled as Actions, and the values of the Uses and Results columns are modeled as
Input Pins and Output Pins respectively.
The value of the State column is added as a Tagged Value of the Actions.
Note:
ActionPins are added to the Project Browser and not to the diagram.
RuleFlow Diagram
A Rule Flow Activity is created as a child of the selected element, to act as a container for the diagram. The
scenario steps are modeled as RuleTasks, and the values of the Uses, Results and State columns are added
as Tagged Values of the RuleTasks.
State Machine Diagram
A StateMachine is created as a child of the selected element, to act as a container for the diagram. Each
value in the State column is modeled as a State.
The scenario steps become the Transition connectors between the States, and the values of the Uses and
Results columns are added as Tagged Values of the Transitions.
UML Modeling with Enterprise Architect - UML Modeling Tool
Work With Elements | Properties
138
© 1998-2010 Sparx Systems Pty Ltd
139
Work With Elements | Properties
Sequence Diagram
Note:
All the elements involved in the scenario should be identified in the Context Reference 143 tab. That is,
relationships must already exist between the scenario parent element and the other elements named in the
scenario.
An Interaction is created as a child of the selected element, to act as a container for the diagrams - the Basic,
Alternate and Exception paths are modeled as separate Sequence diagrams under the Interaction.
Each Context Reference element named in a scenario step is modeled as a Lifeline. The step itself becomes
the Message between an originator and its destination(s); the first Context Reference element in a step is
treated as the originator, and the subsequent Context Reference element(s) become the destination(s).
Note:
Because the diagram generator acts on element names in the step, you should take care to avoid using the
element names as normal text. For example, in step 1 in the dialog below, the term ATM-Card is interpreted
as a reference to the ATM element, and two Customer inserts ATM-Card into ATM Messages are generated
for the step. (To avoid confusion, in the diagram the first Message has been deleted.)
The values of the Uses, Results and State columns are added as Tagged Values of the Message.
UML Modeling with Enterprise Architect - UML Modeling Tool
Work With Elements | Properties
140
© 1998-2010 Sparx Systems Pty Ltd
141
Work With Elements | Properties
Robustness Diagram
A Collaboration is created as a child of the selected element, to act as a container for the Robustness
diagram. For further information on these objects, and on those mention in the following Notes, see The UML
Dictionary.
Notes:
· All the elements involved in the scenario should be identified in the Context Reference 143 tab. That is,
relationships must already exist between the scenario parent element and the other elements named in the
scenario.
· Any values in the Uses, Results and State columns are ignored and not represented in the diagram.
· Each UI element in a step becomes a Boundary element. A Dependency relationship is created from this
Boundary element to the UI element (this connector is not shown on the diagram).
· Each Actor referenced in a step is dropped into the Robustness diagram as a simple link.
· Each Class referenced in a step is dropped into the Robustness diagram as a simple link, and is given the
stereotype entity.
· Each step with a System trigger becomes a Controller. Alternate/exception path Controllers are displayed
with a red background color.
· Each step with a User trigger becomes the name of the Association between Controllers.
UML Modeling with Enterprise Architect - UML Modeling Tool
Work With Elements | Properties
142
3.4.6.3 Generate Test Cases
When you select a scenario and click on the Test Case Generation icon in the window toolbar, Enterprise
Architect prompts you to select to generate either an Internal Test Case or an External Test Case.
Internal Test Case
A test is generated for the basic path and each alternate and exception path in the scenario, and added to the
© 1998-2010 Sparx Systems Pty Ltd
143
Work With Elements | Properties
selected element. In addition, for each step in the basic, alternate and exception paths that has a value in the
Results column, a test is generated and added to the selected element.
To view these tests, click on the element and display the Testing window (View | Testing) (see Using
Enterprise Architect - UML Modeling Tool).
Note:
These generated tests are written to the Scenario test tab of the Testing window. You can move the tests to
another test-type tab if required (see the Testing section of Project Management With Enterprise Architect).
External Test Case
A Test Case element is created, linked to the selected element using the Trace connector. A test case is
generated and added to the Test Case element for the basic path, and for each alternate and exception path
(see The UML Dictionary).
In addition, for each step in the basic, alternate and exception paths that has a value in the Results column, a
test is generated and added to the Test Case element.
Notes:
· The Test Case element is added to the Project Browser and not to the diagram.
· You can review the tests within the Test Case element using the Testing window, as for Internal Test
Cases.
3.4.6.4 Generate Scenario From Activity Diagram
You can generate a range of diagrams 135 from a scenario in an element. Conversely, you can also generate
a structured scenario within an element from an Activity diagram, reverse engineering the steps from the
diagram elements (effectively either regenerating the scenario within the Use Case, or transferring a scenario
into another Use Case).
Notes:
· The source Activity diagram must be generated from another Use Case Scenario.
· Any existing scenario steps are deleted and replaced by the generated scenario.
· This facility does not operate on the enhanced Activity diagrams generated from a Use Case - those
generated with ActivityParameters, Actions and Action Pins.
To generate the scenario from the Activity diagram, follow the steps below:
1. Open the element Properties dialog, select the Scenarios tab, and select the Structured Specification
tab.
2. Right-click in the empty space within the tab, and select the Create Structure From Generated
Activity Diagram context menu option. The Select an Activity 149 (generated from a UseCase
Scenario) containing the Diagram dialog displays.
3. Search for and select the Activity containing the required diagram. Enterprise Architect validates the
diagram (displaying the results in the Output window - see Using Enterprise Architect - UML Modeling
Tool) and, if the diagram is valid, generates the scenario steps in the Structured Specification tab
(replacing any existing scenario steps).
3.4.6.5 Context References Tab
On the Scenarios tab of the element Properties dialog, the Context References tab displays a list of all
elements that are either:
· connected to the current element by any connector, on the current diagram or another, or
· defined as a cross reference (or custom reference 86 ) on the current element.
UML Modeling with Enterprise Architect - UML Modeling Tool
Work With Elements | Properties
144
This tab enables you to add custom references - right-click anywhere in the list and select the Add Reference
context menu option. The Select Element 149 dialog displays, in which you can locate and select the required
cross reference element or elements. For each cross reference you can also use context menu options to
delete the entry in the list, or to open the Comment field so that you can add or edit comment text.
For each element in the Context References list, wherever the name of that element appears in the structured
specification, the name is highlighted and underlined. You can press [Ctrl]+click on the highlighted name to
view the element Properties dialog.
3.4.7 Associated Files
An element can be linked to files held in the database, using the Files tab of the element's Properties dialog.
Note:
Linked files are a good way to link elements to additional documentation and/or source code.
You can also insert hyperlinks in diagrams to other files, and launch them directly from the diagram (see the
UML Dictionary). This is an alternative method to that described here.
© 1998-2010 Sparx Systems Pty Ltd
145
Work With Elements | Properties
Field/Button
Use to
File Path
Type in or browse for the directory path and name of the file.
Type
Display the local file or web address.
Last Write
Display the date and time the file was last updated.
Size
Display the size of the file.
Notes
Type in free text about the file.
Files
Display the list of linked files.
Launch
Open the selected file. Local files open with their default Windows
application and web files open in the default browser.
3.4.8 Tagged Values Tab
The Tagged Values tab of the element Properties dialog simply provides the Tagged Values window within the
frame of the Properties dialog (see Using Enterprise Architect - UML Modeling Tool).
3.4.9 Tagged Values
Tagged Values are a convenient way of adding additional information to an element, in addition to that directly
supported by UML. UML provides the Tagged Value element for just this purpose. Often Tagged Values are
used during code generation or by other tools to pass information or operate on elements in particular ways.
For more information relating to using Tagged Values see The Tagged Values Window topic in Using
Enterprise Architect - UML Modeling Tool.
Add a Tagged Value
To add a Tagged Value to an element, follow the steps below:
1. Open the element Properties dialog, and select the Tagged Values tab.
2. Click on the New Tag button in the Tagged Values toolbar or press [Ctrl]+[N]. The Tagged Value dialog
displays.
3. In the Tag field, type the tag name (or click on the drop-down arrow and select a defined tag), then in
the Value field type the appropriate value.
UML Modeling with Enterprise Architect - UML Modeling Tool
Work With Elements | Properties
146
4. Click on the OK button to save the Tagged Value.
Tip:
You can define custom tags using a predefined Tagged Value Type. For more information see SDK for
Enterprise Architect
Tagged Values are the preferred method of extending the code generation capabilities of the modeling tool per
element / per language.
3.4.9.1 Advanced Tag Management
Tagged Values can also be managed within a type hierarchy and with respect to element instances, using the
Tagged Values window (see Using Enterprise Architect - UML Modeling Tool).
Using the Tagged Values window it is possible to:
· View Tagged Values inherited from parent Classes or realized interfaces or applied stereotypes
· Override Tagged Values derived from parents or applied stereotypes with a unique value for the current
element
· Delete Tagged Values from the current element (if a parent version of the Tagged Value exists, it reappears in the list after the override is deleted).
The diagram below illustrates a complex tag hierarchy and the way Tagged Values can be either inherited or
overridden in specialized Classes to create the final tagged property set for an element.
Note also that a similar concept applies to instances, in which case the full tag set is created from the directly
owned tags, plus all of those merged in from the classifier's type hierarchy, additional stereotypes and realized
© 1998-2010 Sparx Systems Pty Ltd
147
Work With Elements | Properties
interfaces.
3.4.9.2 Quick Add of Tagged Values
It is possible to add a single Tagged Value to one or more elements with a special shortcut.
1. From an element context menu (or the context menu of a multi-selection) choose the Add | Tagged
Value menu option. (Alternatively, select one or more elements and press [Shift]+[Ctrl]+[T]). The
Tagged Values dialog displays, which enables you to enter a Name and Value for the tag.
2. Click on the OK button to add your new Tagged Value to all the currently selected elements.
UML Modeling with Enterprise Architect - UML Modeling Tool
Work With Elements | Properties
148
Note:
You can also use the Current Element toolbar. The last button is a shortcut to the Add Tagged Value
function.
To delete this property you must open the element Properties dialog, go to the Tagged Values tab and
manually delete the item. There is currently no shortcut to delete tags from multiple elements at one time.
To add notes to the Tagged Value, go to the Tagged Values tab, click on the Tagged Value name, and click
on the Edit Notes button in the tab toolbar. The Notes dialog displays.
Any Notes text you enter also displays in the Info section at the bottom of the Tagged Values window.
3.4.10 Object Classifiers
Many elements in UML model classifications (such as Classes and Actors), and then other elements model
instances of such classifications (such as Objects, Actors again, and Sequence diagram objects). These
instance elements represent real things in a run-time scenario; for example, a Person element named Joe
Smith. In UML this is written as Joe Smith: Person.
You can define a classifier first, and then instances of that classifier. Alternatively, as a model develops from a
rough sketch to a detailed design, many objects become examples of a defined Class, so in the early analysis
phase you might model a Joe Smith and a Jane Smith, and later a Person Class from which Joe and Jane are
instantiated.
Enterprise Architect enables you to associate an Object with its template element (its classifier), such as a
Class. Doing this greatly increases the descriptive power of the model in capturing the functionality and
responsibility of Objects at run-time and their associated state. For example, if you describe a Person Class
with attributes such as Age, Name, Address and Sex, and functions such as GetAge and GetName, then when
you associate your Object with the Person Class it is seen to have all the Person Class behavior and state (as
well as inherited state and behavior from Person's ancestors).
Tip:
This is a powerful means of moving your model from the analysis phase into detailed design.
Elements that are classifiers and support instances of themselves at runtime can be dropped from the Project
Browser as a link to the classifier itself, or a new instance of the classifier. The example below shows a linked
Node element on the left and an instance of the Node on the right. Note that the instance is drawn like a
simple element with the : <ElementName> displayed. If you name your instance it displays <InstanceName> :
<ElementName>.
© 1998-2010 Sparx Systems Pty Ltd
149
Work With Elements | Properties
3.4.10.1 Using Classifiers
If you right-click on an Object in a diagram, the element context menu displays the Advanced | Instance
Classifier menu option. Select this option to choose a single element (generally a Class) as the classifier or
template for this Object.
The Select <Item>
149
dialog displays. Use this to set the instance classifier.
The Object name is then displayed as Object: Classifier; for example a Person object named Joe Smith is
displayed as Joe Smith: Person.
Several Changes Occur if an Object has a Classifier
It is important to remember that an Object is only an instance of a classifier at runtime, so the appropriate
attributes and operations are those of the classifier, not the Object. Therefore, in the context menu for the
Object, if you select the Attributes or Operations menu options, the Attributes or Operations dialog displays
for the classifier, not the Object.
If you set the classifier for an Object in a Sequence diagram, when you add a message the drop-down list of
available messages derived from the target Object come from the classifier, not the Object selected. This
enables you to associate Sequence diagram objects with Classes and use the defined behavior of the Class
to model actual behavior at run time.
You can also select a message for a State Flow connector. The same rules apply as for Sequence diagram
objects.
Note that in the Message dialog you can also select to include messages defined in the target classifier's
inheritance hierarchy.
3.4.11 Select <Item> Dialog
The Select <Item> dialog is a multi-purpose browser and search tool for locating model items such as
Classifier elements, properties, attributes and behaviors. The <Item> in the dialog title changes to represent
the type of item the original operation is working on. The dialog is called in a range of operations; for example,
setting:
The base type or classifier 149 for an Object, Swimlane or Lifeline (see the UML Dictionary)
Classifiers for the return types 155 for operations
Classifiers for generalization sets 212
The associated behavior for a behavior call 168
The type and return type for operation parameters 182
Activities for State transitions (see the UML Dictionary)
Activities from which to generate Use Case Scenarios 143
Pattern element defaults (see Extending UML With Enterprise Architect)
Locating the target element for a connector created with the Quick Linker (see Using Enterprise Architect UML Modeling Tool)
· The values of Tagged Values (see Using Enterprise Architect - UML Modeling Tool).
·
·
·
·
·
·
·
·
·
To select a required item, follow the steps below:
1. During an operation, when it is necessary to locate an element or feature, you click on the [ ... ]
UML Modeling with Enterprise Architect - UML Modeling Tool
Work With Elements | Properties
150
(browse) button. The Select <Item> dialog displays.
2. If required, in the Go To Namespace field select a namespace to reduce the scope of the displayed
hierarchy. The dialog opens the section of the hierarchy associated with that namespace, and closes all
previously-open sections associated with other namespaces.
3. You can either:
· expand the selected area of the hierarchy on the Browse tab, or any other package, and locate the
required item (go to step 5) or
· click on the Search tab and, in the Find field, type a partial or complete text string to search for the
item.
4. On the Search tab, you can filter the search further by selecting the Whole Word and Match Case
checkboxes.
Each list entry shows the name of the item, the type, any stereotype the item has, the immediate
© 1998-2010 Sparx Systems Pty Ltd
151
Work With Elements | Properties
package in which the item is held, and any successive parent packages (the package path). You can
either:
· Select the item immediately on the Search tab or
· Right-click on one item or a group of items and select the Locate item(s) in tree context menu
option; this redisplays the Browse tab and highlights each selected item in the <namespace>
hierarchy.
5. Click on the required item.
6. Click on the OK button.
Note:
When you have selected an item, the Select <Item> dialog retains the context and item. Next time you
display the dialog, if the context is similar the dialog opens to the same Namespace and item. For example, if
you have selected an activity for a State transition and you start to do the same for another transition, the
dialog opens to the activity you previously selected.
If the context is totally dissimilar, the dialog opens with the Namespace <any> and a collapsed model
hierarchy.
If the available items do not meet your requirements, you can create a new item and define the appropriate
properties. Click on the Add New button. The appropriate Add <Item> dialog displays, on which you define the
required item.
Note:
The Add New button is not always available, depending on the context and the type of item being searched
for.
Multiple Selection
Where an operation permits the selection of multiple items, the Select <Item> dialog is automatically enabled
to support this. To select the items, press [Ctrl] as you click on each item. Having selected an item, you can
continue to expand and browse the hierarchy, and/or search for items; the dialog retains the existing
selections until you click on the OK button.
3.4.11.1 Select Property Dialog
The Select Property dialog is a specific instance of the Select <Item> 149 dialog; it is used to select Ports,
Parts, Attributes and Association Ends as redefined or subsetted properties, from a hierarchical list of Classes
and their contained properties in the model. For example, consider the section of the model below:
UML Modeling with Enterprise Architect - UML Modeling Tool
Work With Elements | Properties
152
This would be represented in the dialog as follows:
© 1998-2010 Sparx Systems Pty Ltd
153
Work With Elements | Properties
Note:
Association ends should be owned by the Class to be listed in the dialog.
Locate and click on the required object to select it, then click on the OK button. (To select several objects at
once, press and hold [Ctrl] while you click on each object.)
3.5 Behavioral Modeling
Enterprise Architect enables you to define an element's behavior through the element's operations and
parameters. You can also define the behavior of more specific behavioral elements such as Activities,
Interactions, Actions and Interaction Occurrences, through the Behavior and Call tabs of the element
Properties dialogs. For further details, see the following topics:
·
·
·
·
·
Operations 154
Interactions and Activities 167
Behavior Calls 167 (Actions and Interaction Occurrences)
Behavior Parameters 168
Behavior Call Arguments 174 .
UML Modeling with Enterprise Architect - UML Modeling Tool
Work With Elements | Behavioral Modeling
154
3.5.1 Operations
Operations are features of a Class or other element that represent the behavior or services an element
supports. For a Customer Class, UpdateCustomerName and GetCustomerAddress can be operations.
Operations have several important characteristics, such as type, scope (visibility), static, abstract and notes.
How to Access Operations
If an element supports operations (typically Classes and Interfaces), the right-click context menu contains the
Operations menu item. Select this to open the Operations dialog 155 . Alternatively, press [F10].
How Operations Appear in Diagrams
Elements with operations (typically Classes) display their features in diagrams in the manner shown below.
Operations display in the second compartment of properties in colored text - the default color is dark green (for
example, Finalize() : void). Some characteristics display in shorthand form; for example, static displays as $,
abstract as *.
Note:
If the parent element provides source or target roles for a connector, the connector can be attached to a
specific operation. See the Connect to Element Feature 202 topic.
Operations in the Project Browser
In the Project Browser, Classes with operations have their features collected beneath them, each preceded by
a pink box ( ). Right-click on an operation and select the Operation Properties context menu option to open
the Operations dialog and edit details for the feature.
From the Project Browser, you can drag operations onto new elements to give them the same operations.
© 1998-2010 Sparx Systems Pty Ltd
155
Work With Elements | Behavioral Modeling
See Also
· Parameters
168
3.5.1.1 Operations Dialog - General
The Operations dialog has five tabs:
·
·
·
·
General, from which you can also define operation parameters
Behavior 158
Pre-conditions and Post conditions (that is, Constraints 162 )
Tagged Values.
170
The General tab of the Operations dialog enables you to define new operations and set the most common
properties, including name, access type and return.
Note:
The General tab can vary according to the type of element you are adding an operation to. If defining
operations for a data modeling table, see the Indexes, Triggers and Check Constraints topic in Code
Engineering Using UML Models. The following illustrations are for the operations of an Object element and a
State element.
UML Modeling with Enterprise Architect - UML Modeling Tool
Work With Elements | Behavioral Modeling
Field/Button
Use to
Name
Display the selected operation name.
Parameters
Display the parameter list. See Operation Parameters
what this string can contain.
Edit Parameters
Open the Parameters dialog.
170
156
for information regarding
© 1998-2010 Sparx Systems Pty Ltd
157
Work With Elements | Behavioral Modeling
Field/Button
Use to
Return Type
(Not shown for State or State Machine elements.)
Display the data type returned by the operation.
The type can be defined by the code language (data type) or by a classifier element.
When you click on the drop-down arrow, the set of values in the list provides the
appropriate data types.
To select or define possible classifiers, either click on the Select Type option in the
list, or click on the [ ... ] (Select) button to display the Select <Item> 149 dialog.
To add new code language data types that can be displayed in this list, see the Data
Types topic in UML Model Management.
[ ... ] (Return Type
Browse button)
Open the Select <Item>
Action
Define the action of the operation: do, exit or entry.
149
dialog to select the operation return type.
(Not shown for State or State Machine elements.)
(For State or State Machine elements. See the UML Dictionary.)
Scope
Select Public/Protected/Private/Package.
Stereotype
Specify an optional stereotype for this operation.
Concurrency
Set the concurrency of the operation.
Alias
Define an optional alias for the operation.
Notes
Enter free text notes. You can format this text if necessary, using the Rich Text Notes
toolbar at the top of the field. See Using Enterprise Architect - UML Modeling Tool.
Virtual/Abstract
If the operation's language is set to C++, map to the C++ Virtual keyword. Otherwise
this option is Abstract, pertaining to an abstract function.
(Not shown for State or State Machine elements.)
Return Array
Indicate that the return value is an array.
(Not shown for State or State Machine elements.)
Synchronized
Specify a code engineering flag that relates to multi threading in Java.
(Not shown for State or State Machine elements.)
Static
Indicate that the operation is a static member.
(Not shown for State or State Machine elements.)
Const
Indicate that the return type of this method is constant.
(Not shown for State or State Machine elements.)
Pure
Indicate that C++ is pure virtual syntax - for example:
virtual void myFunction( ) = 0;
(Not shown for State or State Machine elements.)
IsQuery
Indicate that this method does not modify the object.
(Not shown for State or State Machine elements.)
Operations
List the defined operations.
Up/Down Buttons
Change the order of operations in the list.
New
Create a new operation.
UML Modeling with Enterprise Architect - UML Modeling Tool
Work With Elements | Behavioral Modeling
Field/Button
Use to
Copy
Copy the currently selected operation.
Save
Save a new operation, or save modified details for existing operation.
Delete
Delete the currently selected operation.
158
Note:
· If you make changes and do not save them, the Cancel button prompts you to confirm or cancel the
changes, whilst the Close button closes the dialog immediately and does not save the changes.
· If you are creating many operations, go to the Attribute/Operations page of the Options dialog (Tools |
Options | Source Code Engineering | Attribute/Operations) and select the After save, re-select edited
item checkbox. Now, when you create an operation and click on the Save button, the dialog fields clear
ready for you to enter the details of the next operation. This helps you when you want to create operations
quickly and might not necessarily want to fully define each one as you create it.
3.5.1.1.1 Operations Dialog - Behavior
This topic illustrates how to elaborate a method's function in a diagram.
The Behavior tab of the Operations dialog enables you to enter free text to describe the functionality of an
operation. Use pseudo-code, structured English or just a brief description.
You can also use the Behavior tab to formally describe a method or State action and have the text appear
under the method/action name in a diagram.
State Operations - Behavior
A State's do, entry and exit operations optionally refer to other behaviors such as Activities, Interactions or
Operations. Use the [ ... ] (browse) button to invoke the Select <Item> 149 dialog, and locate and select the
required behavior.
Show Behavior in a Diagram
To show behavior in a diagram, follow the steps below:
1. Create or locate the required operation.
2. Click on the Behavior tab of the Operations dialog.
© 1998-2010 Sparx Systems Pty Ltd
159
Work With Elements | Behavioral Modeling
3. Select the Show Behavior in Diagram checkbox.
4. Click on the Save button.
Associate With Behavior
A Class operation can be associated with a behavior elsewhere in the model. Display the operation's
Properties dialog, select the Behavior tab, click on the [ ... ] (browse) button and select the required behavior
from the Select Element 149 dialog. The behavior is set in the Behavior field, and the operation is then set as
the specification of the associated behavior. For example:
UML Modeling with Enterprise Architect - UML Modeling Tool
Work With Elements | Behavioral Modeling
160
In behavioral code generation, the behavior of the associated behavioral element is generated as the
operation's code. In the following illustration, Op1 is associated with the Activity Activity.
The generated code for Op1 is as follows:
package Package;
public class Container {
public Container(){
}
public void finalize() throws Throwable {
}
© 1998-2010 Sparx Systems Pty Ltd
161
Work With Elements | Behavioral Modeling
public void op1(){
/*Activity element(Activity1)'s behavior rendered as
//Action1;
if (cond1)
{
//Action2;
}
else
{
//Action3;
}
//Action4;
}
/*Activity element(Activity1)not rendered*/
public void Activity2()
{
// behavior is a Activity
}
operation(op1)'s code*/
public void Interaction()
{
// behavior is a Interaction
}
}//end Container
See Also
· Initial Code
161
On the Behavior tab of the Operations dialog, you can use the Initial Code field to enter code to be inserted
into an operation body when the operation is first generated to file. After this point, forward code generation
and synchronization do not replace the existing operation code with the Initial Code field.
By default, the Initial Code field also is not imported into the model during reverse engineering, but you can
select to import the field by selecting the Include method bodies in model when reverse engineering
checkbox on the Options dialog (see the Options - Attributes and Operations topic in Code Engineering Using
UML Models).
This field is most useful when combined with UML Patterns (see Extending UML in Enterprise Architect).
Elements within a pattern often require the same stub code. Notice that the language specific patterns
available from www.sparxsystems.com/resources/developers/uml_patterns.html include initial code for some
of the defined operations. This helps speed up the process of applying patterns from model to implementation.
The Initial Code section is also useful for ensuring that the generated code is directly compilable.
This example shows the contents of the Initial Code field for the Instance() operation of the Singleton element
in the C# Singleton pattern:
UML Modeling with Enterprise Architect - UML Modeling Tool
Work With Elements | Behavioral Modeling
162
3.5.1.1.2 Operations Dialog - Constraints
Operations can have pre- and post- conditions defined. For each type, give the condition a name, a type and
enter notes.
Constraints define the contractual behavior of an operation, what must be true before they are called and what
is true after. In this respect they are related to the state model of a Class and can also relate to the guard
conditions that apply to a transition.
© 1998-2010 Sparx Systems Pty Ltd
163
Work With Elements | Behavioral Modeling
3.5.1.2 Operation Tagged Values
Operations can have Tagged Values associated with them. Tagged Values offer a convenient extension
mechanism for UML elements, so you can define any tags you like and then assign values to them using this
form.
Tagged Values are written to the XMI output, and can be input to other third party tools for code generation or
other activities.
Tip:
Tagged Values are supported for attributes, operations, objects and connectors.
Add a Tagged Value
To add a Tagged Value for an operation, follow the steps below:
1. Click on the Tagged Values tab of the operation Properties dialog.
UML Modeling with Enterprise Architect - UML Modeling Tool
Work With Elements | Behavioral Modeling
164
2. Click on the New Tags button. The Tagged Value dialog displays.
3. In the Tag field, type the tag name (or select a defined tag from the drop-down list), then in the Value
field type the initial tag value.
4. Click on the OK button to confirm the operation.
Note:
You can define custom tags using a predefined Tagged Value Type. For more information see SDK for
Enterprise Architect.
3.5.1.3 Override Parent Operations
In Enterprise Architect, you can automatically override methods from parent Classes and from realized
Interfaces.
Select a Class that has a parent or realized interface and select the Element | Advanced | Overrides &
Implementations menu option.
In the Override Operations/Interfaces dialog, check the operations/interfaces to automatically override and
click on the OK button. Enterprise Architect generates the equivalent function definitions in your child Class.
© 1998-2010 Sparx Systems Pty Ltd
165
Work With Elements | Behavioral Modeling
You can configure Enterprise Architect to display this dialog each time you add a Generalization or Realization
connector between Classes, and review their possible operations/interfaces to override/implement. Do this
from the Links page of the Options dialog (select the Tools | Options | Links menu option).
3.5.1.4 Display Inherited Operations
You can configure an element in a diagram to display the complete operation set obtained from all ancestors
in the element's type hierarchy, as well as those directly owned. To do this, use the Element | Feature
Visibility 33 function from the main menu, or press [Ctrl]+[Shift]+[Y].
The following diagram illustrates this behavior when enabled for each element in a simple hierarchy.
UML Modeling with Enterprise Architect - UML Modeling Tool
Work With Elements | Behavioral Modeling
166
© 1998-2010 Sparx Systems Pty Ltd
167
Work With Elements | Behavioral Modeling
3.5.2 Interactions and Activities
The behavioral aspects of Interactions and Activities are modeled using the Behavior tab of the element
Properties dialog, which enables you to assign parameters and return types to the elements.
Use the Edit Parameters 170 button to edit an element's parameters. When you create a new parameter
using the dialog, it internally creates an Activity Parameter Node for an Activity or an Interaction Parameter for
an Interaction (see the UML Dictionary). In the Return field, click on the drop-down arrow and select the return
type of the element.
The specification field is populated automatically when an operation is associated with the activity as a
behavior 158 .
3.5.3 Behavior Calls
A behavior call is the invocation of a behavior. You can represent an invocation with a Call Operation Action
(Operation), Call Behavior Action (Activity) or Interaction Occurrence (Interaction) element (see the UML
Dictionary). You model the properties of the behavior call using the Call tab of the element Properties dialog,
on which you:
· Edit Arguments 174
· Re-associate the call with a different behavior 168
· Synchronize the arguments 168 with the parameters in the associated behavior.
UML Modeling with Enterprise Architect - UML Modeling Tool
Work With Elements | Behavioral Modeling
168
Click on the Edit button to create and delete arguments, and relate them to a corresponding parameter in the
associated behavior.
Click on the [ ... ] (Select Behavior) button to re-associate the invocation with a different behavior or to
remove any association with the current behavior.
The Interaction Occurrence panel is displayed only for Interaction Occurrence elements. It enables you to
enter the return value and attribute of the behavior call.
3.5.3.1 Associate with Different Behaviors
On the Call tab of the Behavior Call Properties dialog, when you click on the [ ... ] (Select Behavior) button
the Select <Item> 149 dialog displays, listing all available behaviors in the model.
Select <none> to remove any existing association between an invocation and a behavior, or select another
classifier to re-associate the invocation with a different behavior.
The Synchronize with Parameters button is enabled only if a valid behavior is identified in the Behavior
field.
3.5.3.2 Synchronize Arguments
On the Call tab of the element Properties dialog, click on the Synchronize with Parameters button to
synchronize the number of arguments in the invocation element with the number of parameters in the
associated behavior. This automatically creates or deletes arguments based on the number of parameters in
the behavior. If any arguments are to be deleted, Enterprise Architect prompts you to confirm the operation.
Click on the Yes button to confirm.
Note:
The Synchronize with Parameters button is enabled only if the invocation is associated with a valid
behavior, as identified in the Behavior field.
3.5.4 Behavior Parameters
This topic area describes the facilities for defining, editing and extending the parameters of behavioral
operations, Activities and Interactions.
· Parameter Dialog 170
· Parameter Tagged Values 172
· Operation Parameters By Reference
173
3.5.4.1 Link Note to Internal Documentation
It is possible to connect a Note element to another element's internal documentation. This enables you to
externalize model documentation to the diagram level, and as Enterprise Architect keeps the note and the
internal structure in synch, you do not have to worry about updating the note contents; this is done
automatically.
In the example below, two notes are connected into an element's internal structures. One is connected to an
attribute, and displays the attribute name and notes. The other is connected to a constraint, showing the
constraint name and documentation.
© 1998-2010 Sparx Systems Pty Ltd
169
Work With Elements | Behavioral Modeling
Procedure
To connect a Note element to a feature of another design element, follow the steps below:
1. Click on the element and then click on the feature to link the note to.
2. Select the Element | Inline Features | Create Linked Note context menu option. This creates a Note
element linked to the selected feature, reflecting the content of that feature.
Alternatively:
1. Insert the target element into a diagram.
2. Drag the Note icon from the Common page of the Toolbox onto the diagram, next to the target element.
The Notes dialog displays. Do not type any text, just click on the OK button.
3. Click on the Note Link icon from the Common page of the Toolbox, click on the Note, and drag across
to the target element to create the connector.
4. Right-click on the Note Link to display the context menu.
5. Select the Link this Note to an Element Feature menu option. The Link note to element feature dialog
displays.
UML Modeling with Enterprise Architect - UML Modeling Tool
Work With Elements | Behavioral Modeling
170
6. In the Feature Type field, click on the drop-down arrow and select the type of feature to link to.
7. In the Feature list, click on the specific feature to link to.
8. Click on the OK button.
The note now automatically derives its contents from the target element.
3.5.4.2 Parameters Dialog
The Parameters dialog enables you to define the parameters of an operation, Activity or Interaction. The
parameter list is reproduced in code in the order the parameters appear in the parameters list, so use the Up
and Down buttons to move parameters into their required positions. Additionally, you can select the Add new
to end checkbox to force new parameters to appear at the end of the list instead of the top.
Tip:
Set the amount of parameter detail to display in a specific diagram using the Show Parameter Detail 59
drop-down list on the Diagram Properties dialog. The setting applies only to the current diagram. The default
is to show the type only.
© 1998-2010 Sparx Systems Pty Ltd
171
Work With Elements | Behavioral Modeling
Option
Use to
Name
Type the parameter name.
Type
Select the data type of the parameter.
Alternatively, click on the [ ... ] button and select the element classifier to define
the type.
Default
Type an optional default value for the parameter.
Stereotype
Type a stereotype name, or click on the drop-down arrow and select a stereotype
for the parameter.
Kind
Indicate the way a parameter is passed to a function:
· In = By Value
· InOut = By Reference
· Out is passed by Reference, but only the return value is significant.
Fixed
Set the parameter to const, even if passed by reference.
Alias
Type an optional alias for the parameter.
Add new to end
Place new parameters at the end of the list instead of the start.
Multiplicity
Display the Multiplicity dialog, to specify the multiplicity of the parameters.
Notes
Type any additional notes on the parameter.
UML Modeling with Enterprise Architect - UML Modeling Tool
Work With Elements | Behavioral Modeling
172
Multiplicity Dialog
Field
Use to
Lower bound
Define a lower limit to the number of elements allowed in the collection.
Upper bound
Define an upper limit to the number of elements allowed in the collection.
Allow Duplicates
Indicate that duplicates are allowed.
Maps to the UML property isUnique, value FALSE).
Multiplicity is Ordered Indicate that the collection is ordered.
See Also
· Parameter Tagged Values 172
· Operation Parameters by Reference
173
3.5.4.3 Parameter Tagged Values
Behavioral parameters can have Tagged Values associated with them. Tagged Values offer a convenient
extension mechanism for UML elements; you can define any tags you like and then assign values to them
using this form.
Tagged Values are written to the XMI output, and can be input to other third party tools for code generation or
other activities.
Tip:
Tagged Values are supported for attributes, operations, objects and connectors.
Add a Tagged Value
To add a Tagged Value for a parameter, follow the steps below:
1. Double-click on the operation, Activity or Interaction containing the parameter in a diagram or in the
Project Browser. The Properties dialog displays.
2. Click on the Tagged Values tab, which shows the Tagged Values for the selected object and its
parameters.
3. Click on the required parameter in the Parameters compartment of the Tagged Values tab, and click on
the New Tags button. The Tagged Value dialog displays.
4. In the Tag field, type the tag name (or select a defined tag from the drop-down list), then in the Value
field type the initial tag value .
5. Click on the OK button to confirm the Tagged Value.
Tip:
Custom tags can be created using a predefined Tagged Value Type. For more information see SDK for
Enterprise Architect.
© 1998-2010 Sparx Systems Pty Ltd
173
Work With Elements | Behavioral Modeling
3.5.4.4 Operation Parameters by Reference
Note:
This facility currently applies to operations only.
You can select to highlight parameters declared as 'Kind: inout' or 'Kind: out' with an additional user-defined
prefix or suffix. On the Objects page of the Options dialog (select the Tools | Options | Objects menu option),
the Feature reference indicator panel enables you to set whether references are highlighted or not.
If you select the Highlight References checkbox, you can also indicate whether a prefix or suffix should be
used, and the actual reference character to use. In the example above, the & character has been set as a
prefix.
When you declare a parameter of type inout, it is assumed you are passing the parameter by reference rather
than by value. If you have elected to highlight references, then this is displayed in the Diagram View.
The example below shows that, in the getName operation, the parameter strName is a string reference, and is
highlighted using the chosen character and position.
UML Modeling with Enterprise Architect - UML Modeling Tool
Work With Elements | Behavioral Modeling
174
3.5.5 Behavior Call Arguments
You define the arguments of a Behavior Call 167 using the Arguments dialog, which you display by clicking on
the Edit button on the Call tab of the element Properties dialog.
1. In the Name field, type the name of an argument to map to the behavior.
2. In the Parameters field, click on the drop-down arrow and select a behaviors parameter from the list of
parameters associated with the behavior.
3. In the Value field, set any required value.
4. If a diagram is displayed, and if required, select the Show in current diagram checkbox to add an
Action Pin on the diagram (see The UML Dictionary).
5. Click on the Save button.
6. If appropriate, click on the New button and repeat steps 1 to 5 for another argument:parameter
mapping.
If you attempt to map a newly created argument to a parameter that is already associated with a different
argument, Enterprise Architect identifies the mapping and prompts you to confirm that you intend to change
the association.
© 1998-2010 Sparx Systems Pty Ltd
175
Work With Elements | Element In-place Editing Options
3.6 Element In-place Editing Options
This topic explores the tasks that can be performed using in-place editing of elements on a diagram in
Enterprise Architect. The tasks include:
·
·
·
·
·
·
·
·
·
·
·
·
View Properties 175
Edit Element Item Name 176
Edit Stereotype 177
Edit Scope 178
Edit Attribute Keyword 179
Edit Operation Parameter Keyword 179
Insert Operation Parameter 182
Edit Parameter Kind 180
Insert New Attribute or Operation 181
Add Maintenance Item 182
Add Test Item 184
Delete Selected from Model 176
3.6.1 In-place Editing Tasks
To use the options that are available through the in-place editing menu, follow the steps below:
1. Open the diagram containing the element.
2. Click on the element, and on the item to manipulate within the element. The item line is highlighted in a
lighter shade (the default is white), to indicate that it has been selected.
3. Edit and manipulate the items in the element, either by pressing the appropriate keyboard keys or by
right-clicking on the highlighted item and choosing a task from the Element Items context menu. The
following commands are available:
To...
Select menu option...
Or press...
Change the name, scope or stereotype of the
element or element item
Edit Selected
[F2]
Display the dialog containing details of the element
View Properties
[Enter]
Insert a new item in the element
Insert New After Selected [Insert]
Locate the item in the Project Browser
Find in Project Browser
Add an attribute to the element
Add Attribute
[Ctrl]+[Shift]+[F9]
Add an operation to the element
Add Operation
[Ctrl]+[Shift]+[F10]
UML Modeling with Enterprise Architect - UML Modeling Tool
Work With Elements | Element In-place Editing Options
To...
Select menu option...
Or press...
Insert a feature on the specific element item, such
as Maintenance features and Testing features
Add Other
[Ctrl]+[F11]
Delete the selected item from the model
Delete Selected from
Model
[Delete]
Display the source code for the element.
View Source code
[F12]
Set a breakpoint on a highlighted operation
(including a breakpoint, start recording marker, end
recording marker or stack auto-capture marker)
(see Visual Execution Analyzer in Enterprise
Architect).
Set Breakpoint
176
Navigate Diagram Selection, to navigate the
diagram between elements without having to use
the mouse
[Ctrl]+[Shift]+[arrow key
]
Toggle element highlight option on and off
[Shift]+[Enter]
Other options that are available while editing element attributes or operations in a diagram include:
To...
Press...
Accept current changes
[Enter]
Accept current changes and open a new slot to add a new
item
[Ctrl]+[Enter]
Abort the edit, without save
[Esc]
Display the context menu for in-place editing
[Shift]+[F10]
Invoke the Classifier dialog
[Ctrl]+[Space]
Note:
Most of the in-place editing menu commands have keyboard alternatives. For many of them, if the selected
item happens to be off-screen when you press the appropriate keys, the diagram automatically scrolls to
show the whole element, so that you can see what you are changing.
3.6.2 Edit Element Item Name
The in-place editing feature enables you to change the name of the element, or the name of an operation or
attribute, directly from the diagram. To use this feature follow the steps below:
1. Open the diagram containing the element.
2. Click on the element and on the name to change within the element. The item line is highlighted in a
lighter shade (the default is white), to indicate that it has been selected.
© 1998-2010 Sparx Systems Pty Ltd
177
Work With Elements | Element In-place Editing Options
3. Right-click on the item. The context menu displays.
4. Select the Edit Selected menu option (or press [F2]) to enable you to edit the item directly from the
diagram. The name of the attribute or operation is highlighted.
5. Delete or type over the name. Press [Enter] to accept the change, or [Esc] to cancel the change.
3.6.3 Edit Feature Stereotype
You can use the in-place editing feature to change the stereotype of an operation or attribute directly from the
diagram. To use this feature, follow the steps below:
1. Open the diagram containing the element.
2. Click on the element, and on the item to edit within the element. The item line is highlighted in a lighter
shade (the default is white), to indicate that it has been selected.
3. Right-click on the item. The context menu displays.
4. Select the Edit Selected menu option (or press [F2]) to enable you to edit the attribute or operation
directly from the diagram. The name of the item is highlighted.
5. Move the cursor to the position before the name or within the existing attribute or operation stereotype
UML Modeling with Enterprise Architect - UML Modeling Tool
Work With Elements | Element In-place Editing Options
178
(denoted by «stereotype name»).
6. Delete or type over the previous name to change the stereotype name of the attribute or operation.
Press [Enter] to accept the change or [Esc] to cancel the change. You can assign multiple stereotypes
by including a comma-separated list inside the stereotype markers.
3.6.4 Edit Feature Scope
The in-place editing feature enables you to rapidly change the scope of an attribute or operation directly from
the diagram. To use this feature follow the steps below:
1. Open the diagram containing the element.
2. Click on the element and on the item to edit within the element. The item line is highlighted in a lighter
shade (the default is white), to indicate that it has been selected.
3. Right-click on the item. The context menu displays.
4. Select the Edit Selected menu option (or press [F2]) to enable you to edit the attribute or operation
directly from the diagram. The name of the item is highlighted.
5. Move the cursor to the scope of the item and delete the previous entry.
© 1998-2010 Sparx Systems Pty Ltd
179
Work With Elements | Element In-place Editing Options
6. Reassign the entry by typing in one of the following symbols:
· + indicates that the scope is Public
· - indicates that the scope is Private
· ~ indicates that the scope is Package
· # indicates that the scope is Protected.
7. Press [Enter] to save the change, or [Esc] to cancel the change. The diagram is updated to reflect the
changes. (Also see the catalogNumber attribute in the above screen illustrations.)
3.6.5 Edit Attribute Keyword
You can add features such as attribute keywords and classifiers directly to an element, using the Element
Keywords and Classifiers menu. This enables you to rapidly assign details element item by element item,
directly from a diagram. To use this feature, follow the steps below:
1. In Enterprise Architect, open the diagram containing the element.
2. Click on the element, and on the attribute to edit within the element. The item line is highlighted in a
lighter shade (the default is white), to indicate that it has been selected.
3. Right-click on the item. The context menu displays.
4. Select the Edit Selected menu option (or press [F2]) to enable you to edit the attribute directly from the
diagram. The name of the attribute is highlighted.
5. Right-click on the attribute name to display the context menu.
6. From the context menu, you can:
· Change the attribute classifier to static or fixed - select the static or fixed menu options as
appropriate; the diagram is updated to reflect the changes.
· Display the Class properties - click on the Goto Definition menu option; Enterprise Architect locates
the Class in the Project Browser and opens its Properties 118 dialog.
If the data type is a raw data type, Enterprise Architect displays the message: The data type is a raw
data type.
3.6.6 Edit Operation Parameter Keyword
You can directly edit operation classifiers by element, using the in-place editing menu. This enables you to
rapidly assign parameter keywords. To use this feature, follow the steps below:
1. Open the diagram containing the element.
UML Modeling with Enterprise Architect - UML Modeling Tool
Work With Elements | Element In-place Editing Options
180
2. Click on the element, and on the operation to edit within the element. The item line is highlighted in a
lighter shade (the default is white), to indicate that it has been selected.
3. Right-click on the item. The context menu displays.
4. Select the Edit Selected menu option (or press [F2]) to enable you to edit the operation directly from
the diagram. The name of the operation is highlighted.
5. Right-click on the data type of a parameter to display the context menu.
6. From the context menu you can:
· Change the operation classifier by clicking on the appropriate menu option - static, isquery,
abstract or fixed. The diagram is updated to reflect the changes.
· Display the Class properties - click on the Goto Definition menu option.
If the data type is Class, Enterprise Architect locates the Class in the Project Browser and opens its
Properties 118 dialog.
If the data type is a raw data type, Enterprise Architect displays the message This data type is a raw
data type.
If the data type is not defined in the model, the message is: The data type is not defined in the
model.
3.6.7 Edit Parameter Kind
You can edit operation parameter kinds such as [in], [inout] and [out] directly from a diagram element by
element, using the Element Keywords and Classifiers menu. This enables you to rapidly assign the
parameter directly from a diagram. To use this feature follow the steps below:
1. In Enterprise Architect, open the diagram containing the element.
2. Click on the element, and on the operation to edit within the element. The item line is highlighted in a
lighter shade (the default is white), to indicate that it has been selected.
© 1998-2010 Sparx Systems Pty Ltd
181
Work With Elements | Element In-place Editing Options
3. Right-click on the item. The context menu displays.
4. Select the Edit Selected menu option (or press [F2]) to enable you to edit the item directly from the
diagram. The name of the item is highlighted.
5. Right-click on the item name to display the context menu.
6. Select the appropriate menu option for the parameter kind value: [in], [inout] and [out]. The diagram is
updated to reflect the change.
3.6.8 Insert New Feature
You can add attributes and operations to an element using the in-place editing options. To add attributes and
operations to a Class diagram element, follow the steps below:
1. Open the diagram containing the element to which you are adding an attribute or operation.
2. Click on the element, and within the element on the item after which to insert the operation or attribute.
The item line is highlighted in a lighter shade (the default is white), to indicate that it has been selected.
3. Press [Insert]. Alternatively, right-click on the selected element item to display the context menu and
select the Insert New After Selected menu option.
Enterprise Architect inserts a new data line in the diagram, underneath the selected item.
UML Modeling with Enterprise Architect - UML Modeling Tool
Work With Elements | Element In-place Editing Options
182
4. Type in the relevant information for the attribute or operation. Press [Enter] to accept the change or
[Esc] to cancel the change. The diagram is updated to reflect the changes.
3.6.9 Insert Operation Parameter
You can add operation parameters to an operation through the in-place editing options, using hotkey
commands or menu shortcuts. To add parameters to operations in a Class diagram element, follow the steps
below:
1. Open the diagram containing the element.
2. Click on the element, and on the operation to update within the element. The item line is highlighted in a
lighter shade (the default is white), to indicate that it has been selected.
3. Press [F2], or right-click on the selected item to display the context menu and select the Edit Selected
option.
4. Move the cursor inside the parameter brackets and click on the reference to the parameter (for
example, bks: for a vector containing books). Either:
· Type the name of the parameter or
· Place the cursor after the reference, right-click the mouse to display the inline editing options context
menu and select the Insert Classifier option.
The Select <Item>
149
dialog displays.
5. Locate and select the appropriate parameter, and click on the OK button. The parameter is displayed
on the diagram.
6. Press [Enter] to accept the change or [Esc] to cancel the change. The diagram is updated to reflect the
changes.
3.6.10 Insert Maintenance Feature
You can rapidly assign maintenance details such as Defects, Changes, Issues and Tasks directly to an
element from a diagram, using the Element Items menu. To use this feature follow the steps below:
1. Open the diagram containing the element.
2. Click on the element name. The name is highlighted in a lighter shade (the default is white), to indicate
that it has been selected.
© 1998-2010 Sparx Systems Pty Ltd
183
Work With Elements | Element In-place Editing Options
3. Either:
· Press [Ctrl]+[F11] or
· Right-click on the highlighted name to display the context menu, and select the Add Other option.
The Insert Feature dialog displays.
4. Click on the appropriate radio button option to associate the required maintenance feature with the
element item.
5. Click on the OK button. The <Maintenance Feature> details for <element> dialog displays.
UML Modeling with Enterprise Architect - UML Modeling Tool
Work With Elements | Element In-place Editing Options
184
6. Complete the fields to define the maintenance activity, and then click on the Apply button. To create a
subsequent maintenance activity of this type, click on the New button.
7. When you have defined all of the maintenance activities of this type, click on the OK button. The
maintenance details are added to the element.
To ensure that the maintenance items are visible in the diagram element, as shown in the example below,
select the Maintenance checkbox on the Elements tab of the Diagram Properties dialog. For more information
on diagram appearance options, see the Show Maintenance Scripts in Diagram topic in Project Management
with Enterprise Architect.
3.6.11 Insert Testing Features
You can rapidly add testing features such as Unit, Integration, System, Acceptance and Scenario tests to an
element directly from a diagram, using the Element Items menu. To use this feature follow the steps below:
1. Open the diagram containing the element.
2. Click on the element. The element name is highlighted in a lighter shade (the default is white), to
indicate that it has been selected.
© 1998-2010 Sparx Systems Pty Ltd
185
Work With Elements | Element In-place Editing Options
3. Either:
· Press [Ctrl]+[F11] or
· Right-click on the highlighted name to display the context menu and select the Add Other option.
The Insert Feature dialog displays.
4. Click on the appropriate radio button option to associate the required testing feature with the element.
5. Click on the OK button. The Testing window opens, showing the appropriate panel for the type of test
selected.
6. Complete the fields to define the test activity, and then click on the Save icon in the window toolbar (see
UML Modeling with Enterprise Architect - UML Modeling Tool
Work With Elements | Element In-place Editing Options
186
the Testing Workspace topic in Project Management with Enterprise Architect). The test is added to the
element.
7. To create a subsequent test activity of this type, click on the New icon, or to add items for other types of
test, click on the appropriate tab.
To ensure that the test items are visible in the diagram element, as shown in the example below, select the
Testing checkbox on the Elements tab of the Diagram Properties dialog. For more information on diagram
appearance options, see the Show Test Scripts in Compartments topic in Project Management with Enterprise
Architect.
3.7 Element Icons
When you add an element to a diagram, or select an existing element, a number of small icons display off the
right hand side of the element, underneath the Quicklinker arrow. For example:
or
These icons display small versions of the diagram toolbars or perform specific actions, to enable you to
quickly edit the element you have highlighted.
Icon
Description
Rotates a Fork/Join element from vertical to horizontal and vice-versa.
Displays the Format toolbar, for changing element appearance.
Displays the Current Element toolbar, to edit the element's properties and features.
When multiple elements are selected, displays the Diagram Toolbar for changing or aligning the
elements together.
Toggles an Activity Partition between vertical and horizontal.
For more information on the toolbars and their options, see Using Enterprise Architect - UML Modeling Tool.
For information on Activity Partitions, see the UML Dictionary.
© 1998-2010 Sparx Systems Pty Ltd
187
Work With Elements | Compartments
3.8 Compartments
In addition to the attributes and operations compartments shown in a Class element, Enterprise Architect also
supports other compartments that can optionally be displayed.
To set the visibility of the various compartments, see Feature Visibility
33
.
Tags Compartment
The tags compartment lists all Tagged Values for an element as entered in the Tagged Values
Or, in the fully qualified
33
145
window.
, expanded format:
Note:
The fully-qualified option operates only on those Tagged Values that were created in Enterprise Architect
release 7.1 or later. It does not expand Tagged Values created in earlier releases.
Responsibility Compartment
The responsibility compartment shows a list of responsibilities as entered on the Require
element Properties dialog.
122
tab of the
Constraint Compartment
The constraint compartment shows a list of element constraints as entered in the Constraint tab of the
element Properties dialog.
UML Modeling with Enterprise Architect - UML Modeling Tool
Work With Elements | Compartments
188
Testing Compartment
The testing compartment lists all of the tests associated with an element as listed in the Testing window
(select the View | Testing menu option). For more information on Testing, see Project Management with
Enterprise Architect.
Maintenance Compartment
The maintenance compartment lists all of the defects, changes, issues and tasks associated with an element,
as listed in the Maintenance window (select the View | Other Element Tools | Maintenance menu option).
For more information on Maintenance, see Project Management with Enterprise Architect.
3.9 Linked Documents
In the Corporate, Business and Software Engineering, Systems Engineering and Ultimate editions of
Enterprise Architect, you can link an RTF document to any UML element in the model.
All editions of Enterprise Architect provide an additional UML Artifact - Document Artifact (see the UML
Dictionary) - that can contain an RTF document internally.
You create linked documents from Linked Document Templates, which you define with the Document
Template Editor; see the Create Linked Document Templates 194 and Edit Linked Document Templates
topics.
195
The Document Artifact and the Document Editor are illustrated below:
© 1998-2010 Sparx Systems Pty Ltd
189
Work With Elements | Linked Documents
Note:
When you have saved the document, an A symbol displays in the bottom right corner of the element.
Documents created via the Document Artifact element are rendered into RTF Documentation by selecting the
Linked Document checkbox in the RTF Style Template Editor. See the Select Model Components For
Documentation topic in Report Creation in UML Models.
The Linked Document checkbox is within the Element hierarchy, towards the end. Remember that
checkboxes can be moved up and down the hierarchy (as has been done above) to position information in the
generated document as you require. In some templates, the Linked Document checkbox is only available as
a child of the External Requirements checkbox.
UML Modeling with Enterprise Architect - UML Modeling Tool
Work With Elements | Linked Documents
190
The linked document is rendered into the RTF documentation at:
linked document >
<linked document
See Also
· Create Document Artifact 190
· Link Document to UML Element 191
· Edit Linked Documents 191
· Hyperlink From Linked Document 193
· Create Element From Document 193
· Replace or Delete Linked Documents 194
· RTF Report Dialog Options in Report Creation in UML Models
3.9.1 Create Document Artifact
You create a Document Artifact element In a Component or Deployment diagram (see the UML Dictionary).
Drag and drop the Document Artifact element from the Enterprise Architect UML Toolbox into your diagram.
Double-click on the Document Artifact element. The Linked Document Editor
Document dialog.
191
opens, with the New Linked
In the Copy template field, click on the drop-down arrow and select a previously-created Linked Document
Template. Click on the OK button.
For more information on how to create and edit Linked Document Templates, see Create Linked Document
Templates 194 and Edit Linked Document Templates 195 .
© 1998-2010 Sparx Systems Pty Ltd
191
Work With Elements | Linked Documents
3.9.2 Link Document to UML Element
Note:
This operation is available in the Corporate, Business and Software Engineering, System Engineering and
Ultimate editions.
Click on an element in the Project Browser, Element List, Model Search or diagram, and:
· select the Element | Linked Document menu option
· press [Ctrl]+[Alt]+[D] or
· right-click and select the (Create) Linked Document option from the context menu.
The following dialog displays.
Select the previously-created template from which to create the document.
Click on the OK button.
The Linked Document editor
191
displays, in which you enter the text of the document.
Note:
When you have saved the document, an A symbol displays in the bottom right corner of the element.
For more information on how to create Linked Document Templates, see Create Linked Document Templates
194 and Edit Linked Document Templates 195 .
3.9.3 Edit Linked Documents
Enterprise Architect provides a Windows-like word processor to help you edit Linked Documents. This is a
simplified version of the RTF Style Template Editor, and it provides the same convenient features.
The main difference between the two editors is that you access the RTF Style Template Editor features
through a menu bar at the top of the screen, whilst you access the Linked Document Editor features through a
context menu. To access the context menu, just right-click anywhere on the document.
UML Modeling with Enterprise Architect - UML Modeling Tool
Work With Elements | Linked Documents
192
You can format and edit the document in a number of ways, and add links from and references to the content
of the document. For example, you can highlight a word or term in the linked document and select Create |
Glossary Definition to create a glossary definition for that term. Anyone reading the document can, if they
check for the term in the Project Glossary, read the definition (see Project Management With Enterprise
Architect).
The following topics (mostly in Report Creation in UML Models) provide assistance on using the Document
Editor.
·
·
·
·
·
·
·
·
·
·
·
·
·
·
·
·
·
·
Scroll Through Text
File and Print Options
Cut and Paste Options
Image and Object Imports
Character Formatting
Paragraph Formatting
Tab Support
Page Breaks and Repagination
Insert Headers and Footers
Insert Bookmarks
Table Commands
Sections and Columns
Stylesheets and Table of Contents
Text/Picture Frame and Drawing Objects
View Options
Search/Replace Commands
Hyperlink From Linked Document 193
Create Elements From Linked Documents
193
© 1998-2010 Sparx Systems Pty Ltd
193
Work With Elements | Linked Documents
3.9.4 Hyperlink From Linked Document
Within a linked document, you can add hyperlinks to other objects (elements, packages, diagrams, attributes
and operations) in the Enterprise Architect Project Browser.
To do this, click on the object in the Project Browser and drag it to the point at which to create the hyperlink.
The linked document editor automatically creates the hyperlink, using the object name as the hyperlink text.
You can edit this text if required.
Similarly, you can create a hyperlink to an element in the model by highlighting the link text in the linked
document, right-clicking on it and selecting the Create | Link to Existing Element context menu option. This
displays the Select Classifier 149 dialog, from which you select the element to link to.
In either case, when you next open the document, you can double-click on the hyperlink to locate and highlight
the object in the Project Browser. You can then perform all normal operations on the object, including opening
any linked document on the highlighted element.
You can also create a hyperlink to a wide range of additional objects, such as web pages, Help files, Model
Searches and Team Review Forums (see Using Enterprise Architect - UML Modeling Tool), by highlighting the
appropriate text and then selecting the Create | New | Hyperlink context menu option. This displays the
Hyperlink Details dialog (see The UML Dictionary).
For an alternative method of creating a hyperlink to an external document, Help file or web page, see the
Hyperlinks and Bookmarks topic in Report Creation in UML Models.
3.9.5 Create Element From Document
Using the Linked Document Editor, you can create document-specific elements and diagrams in the Project
Browser, with hyperlinks from the document to the created item. When you click on the hyperlink, the element
or diagram is highlighted in the Project Browser. The element or diagram is created in the same package as
the element for which the linked document was created.
You can create and link to any type of element or diagram, but the facility has specific options for the following
element types:
· Class (see the UML Dictionary)
· Requirement (see the UML Dictionary)
· Issue (see Project Management with Enterprise Architect).
You can create the same arrangement with existing elements, diagrams and packages by dragging them from
the Project Browser into the text of the document, creating a hyperlink 193 with the item name as the text.
Create Item
To create an element or diagram in the Project Browser, whilst in a linked document, follow the steps below:
1. Open the linked document, either from a Document Artifact 190 element or through the context menu
191 for an existing element (Corporate, Business and Software Engineering, System Engineering and
Ultimate editions).
2. Enter some text, including appropriate text to act as the link (such as the element or diagram name).
3. Highlight the appropriate text and right-click on it. The editor context menu displays.
4. Select the Create | New menu option, and the required submenu option. If you select the:
· Class, Requirement or Issue option, the corresponding element is immediately created in the
Project Browser.
· Other option, the New Element dialog 83 displays; specify the element type and - if appropriate stereotype, and click on the Create button.
· Diagram option, the New Diagram 13 dialog displays; specify the diagram type and click on the OK
button.
5. The highlighted text is now a hyperlink. Click on the link to highlight the new element or diagram in the
Project Browser.
You can now edit or expand the element or diagram as required.
UML Modeling with Enterprise Architect - UML Modeling Tool
Work With Elements | Linked Documents
194
3.9.6 Replace or Delete Documents
If a linked document is out of date, you can either edit
file. To replace the contents:
191
the text or replace the entire contents from another
1. Click in the body of the document and press [Ctrl]+[A] to select all the document text.
2. Press [Delete].
3. Right-click and select the File | Import context menu option. The Windows Open dialog displays, in
which you can browse for the file to import into the document.
4. Click on the Save icon in the Linked Document screen toolbar.
Alternatively, you can delete the linked document. To do this:
1. Click on an element in the Project Browser or diagram, and either:
· select the Element | Delete Linked Document menu option or
· right-click and select the Delete Linked Document context menu option.
2. Enterprise Architect prompts you to confirm the deletion; click on the Yes button.
If required, you can now create another linked document for the element.
3.9.7 Create Linked Document Templates
Linked Document templates can be created via the Resources window.
Under the Templates folder, right-click on the Linked Document Templates icon and click on the Create
Template context menu option. The following dialog displays.
© 1998-2010 Sparx Systems Pty Ltd
195
Work With Elements | Linked Documents
Enter a name for your template, or select a previously-created template. Click on the OK button.
You can group your templates into folders. Right-click on your newly created template and select the Assign
Template to Group context menu option. Enter a category name and click on the OK button.
You can also modify
195
and delete the templates using the context menu options.
Note:
You can transport these linked document templates between models, using the Export Reference Data and
Import Reference Data options on the Tools menu. See UML Model Management.
3.9.8 Edit Linked Document Templates
Double-click on a previously created template in the Resource View to invoke the Linked Document Template
Editor.
The Document Template Editor is built into Enterprise Architect.
UML Modeling with Enterprise Architect - UML Modeling Tool
Work With Elements | Linked Documents
196
The following topics in Report Creation in UML Models provide assistance on using the Document Editor.
·
·
·
·
·
·
·
·
·
·
·
·
·
·
·
Scroll Through Text
File and Print Options
Cut and Paste Options
Image and Object Imports
Character Formatting
Paragraph Formatting
Tab Support
Page Breaks and Repagination
Headers, Footers Hyperlinks and Bookmarks
Table Commands
Sections and Columns
Stylesheets and Table of Contents
Text/Picture Frame and Drawing Objects
View Options
Search/Replace Commands
© 1998-2010 Sparx Systems Pty Ltd
197
Work With Connectors |
4 Work With Connectors
UML connectors, along with elements, form the basis of a UML model. Connectors link elements together to
denote some kind of logical or functional relationship between them. Each connector has its own purpose,
meaning and notation and is used in specific kinds of UML diagrams. For more information on using
connectors, see:
· Connector Context Menu
· Connector Tasks 201
· Connector Properties 217
197
Off-Page Connector
UML, and therefore Enterprise Architect, does not have a connector that continues activity flow between two
diagrams. In creating a model diagram, if the need arises to continue flow to another diagram, you should
consider revising and simplifying the structure of the process so that groups of Actions are captured in
composite Activity elements, and each group of Actions is modeled within the child diagram of an Activity.
BPMN, however, does enable you to create off-page connectors (see Extending UML in Enterprise Architect).
You can also use the Suppress Line Segments 208 menu option to indicate continuation of flow in a large
diagram that, when printed, occupies several pages. Be aware that these options are purely diagrammatic and
do not indicate any diagram relationships in any of the relationship tools.
4.1 Connector Context Menu
If you right-click on a connector in a diagram, the connector context menu displays. This provides quick
access to some important functions. The menu is split into up to seven distinct sections:
·
·
·
·
·
·
·
Add-Ins - displays in the first section only if you have Add-Ins installed and registered, such as Eclipse
Properties 198
Type Specific 199
Style 199
Appearance 200
UML Help - Displays the Enterprise Architect Help topic for this connector type
Delete - delete the connector with this option.
Note:
Not all menu options are present on all connector context menus. Context menus vary slightly between
connector types. The type-specific menu options are not always included, for example.
Example Context Menu for a Generalization:
Example Context Menu for an Association:
UML Modeling with Enterprise Architect - UML Modeling Tool
Work With Connectors | Connector Context Menu
198
Connector Role Context Menu
For connectors with Roles, right-clicking a connector within up to 60 pixels of an end point displays a
role-specific context menu.
The Role context menu has three additional menu options:
· A Source/Target Role... menu option that opens the connector specification dialog with the respective
role page 219 selected.
· A Multiplicity submenu that enables the multiplicity for the role to be set.
· A Link to Element Feature menu option that displays a dialog through which you can attach the end of the
connector to a specific attribute or operation 202 .
4.1.1 Properties Menu Section
The Properties section of the connector context menu contains the following options:
Menu Option
Use to
<Connector type> Properties
Open the Properties
Advanced
Display the Advanced
Attach Note or Constraint
Attach a note or constraint
217
window for the selected connector.
199
menu.
203
to the connector.
Note:
Not all menu options are present on all connector context menus. Context menus vary slightly between
connector types. The type specific menu options are not always included, for example.
© 1998-2010 Sparx Systems Pty Ltd
199
Work With Connectors | Connector Context Menu
4.1.2 Type-Specific Menu Section
The Type-Specific section of the connector context menu is specific to the object, and only appears for a few
different connectors. Some examples are shown below:
Connector
Menu Option
Use to
Transition
Message
Set the value of the Message.
Aggregation
Set Aggregation to
Composite
Change the Aggregation to composite.
Aggregation
Set Aggregation to Shared
Set the Aggregation to shared. Appears after Set
Aggregation to Composite has been selected.
Note:
Not all menu options are present on all connector context menus. Context menus vary between connector
types. The type-specific menu options are not always included, for example.
4.1.3 Advanced Menu Section
The Advanced section of the connector context menu contains the following options:
Menu Option
Use to
Set Source and Target
Change the source and/or target
Change Type
Change the connector type
Reverse Direction
Reverse the direction of the connector. For example, if the connector is an
arrow, the arrowhead swaps to the other end.
Specialize Associations
Specify how the properties of this Association specialize the properties of
other Associations.
Information Flows
Realized
Realize any information items conveyed on an Information Flow connector
between these same two elements. See the UML Dictionary.
Dependency Properties
Select a stereotype for the Dependency (or Trace, Role Binding, Occurrence
or Represents connector).
Custom Properties
Display the Custom Properties 72 dialog, on which you can set the values for
predefined properties for a particular type of connector. For example, set
isDerived to True or False for an Association.
206
of the connector.
205 .
Note:
Not all menu options are present on all connector context menus. Context menus vary slightly between
connector types. The type specific menu options are not always included, for example.
4.1.4 Style Menu Section
The Style section of the connector context menu provides the following options:
Menu Option & Function
Keys
Use to
Line Style
Set the connector line style 206 - options are Direct, Auto Routing, Custom,
Bezier, Tree (Horizontal) or Tree (Vertical).
UML Modeling with Enterprise Architect - UML Modeling Tool
Work With Connectors | Connector Context Menu
200
Menu Option & Function
Keys
Use to
Pin End(s)
Pin the connector start and/or end to the current position on the target element.
A sub-menu displays to offer the options of pinning the start point only, the end
point only, or both.
Once one or both ends are pinned, a fourth option is available to unpin both
ends.
Bend Line at Cursor
[Ctrl]+[Q]
Insert an anchor point 206 on the line at the point of the cursor so you can
change the shape of the line.
Suppress Line Segment
Hide a segment of a connector so that you can view a part of the diagram that it
crosses.
To reverse the change, right-click on the connector and select the Show All
Line Segments context menu option.
Straighten Line at Cursor Remove an anchor point 206 on the line at the point of the cursor. (This is the
exact opposite of Bend Line at Cursor, and [Ctrl]+[Q] toggles the connector
[Ctrl]+[Q]
point between the options.)
Note:
Not all menu options are present on all connector context menus. Context menus vary slightly between
connector types. The type specific menu options are not always included, for example.
4.1.5 Appearance Menu Section
The Appearance section of the connector context menu provides the following options:
Menu Option
Use to
Appearance
Set the line color and line thickness of the connector.
Visibility
Set connector visibility; see table below for sub-menu options.
Tidy Line Angles
Tidy the line angles
206
of a custom connector.
Visibility Sub-Menu
Menu Option
Use to
Hide Connector
Hide the connector. To show the connector again, follow the steps in the
Hide/Show Connector 212 topic.
Hide Connector in Other
Diagrams
Hide or show the connector in other diagrams
Hide All Labels
Hide or show all labels attached to the connector.
Set Label Visibility
Hide or show labels
214
212 .
attached to the connector, individually.
Note:
Not all menu options are present on all connector context menus. Context menus vary slightly between
connector types. The type specific menu options are not always included, for example.
© 1998-2010 Sparx Systems Pty Ltd
201
Work With Connectors | Connector Tasks
4.2 Connector Tasks
This topic details some of the tasks associated with managing model connectors, such as:
·
·
·
·
·
·
·
·
·
·
·
·
·
·
·
·
·
·
Connect Elements 201
Connect to an Element Feature 202
Change Connector Styles 206
Arrange Connectors 205
Change Connector Type 205
Create Connector in Project Browser 209
Reverse Connector 214
Delete Connectors 210
Hide/Show Connectors 212
Hide/Show Labels 214
Create Generalization Set 212
Change the Source or Target Element 206
Set Relation Visibility 210
Add a Note to a Connector 203
Use Tree Style Hierarchy 216
Create Connector in Project Browser 209
Show Uses Arrow Head 215
Set Association Specializations 214 .
Note:
In the Corporate, Business and Software Engineering, System Engineering and Ultimate editions, if security
is enabled, you must have Update Element permission to update or delete a connector. See User Security in
UML Models.
4.2.1 Connect Elements
Connect Elements on a Diagram
The fastest and simplest ways to create connectors are using the Quick Linker and using the Enterprise
Architect UML Toolbox. The following topics describe these and other approaches for creating connectors on a
diagram:
· Create Connectors In Place Using the Quick Linker (see Using Enterprise Architect - UML Modeling Tool)
· Create Connectors Using the Enterprise Architect UML Toolbox (see Using Enterprise Architect - UML
Modeling Tool)
· Create a Group of Elements Using UML Patterns (see Extending UML With Enterprise Architect)
· Create Domain Specific Connectors From UML Profiles (see Extending UML With Enterprise Architect).
Tip:
To repeat the last connector you used, click on the appropriate source element and press [F3].
Select Connectors
To select a connector, simply click on it. Drag handles display, indicating that the connector is selected. This
gives the connector focus for keyboard commands such as [Delete], and displays connector properties in
docked windows such as the Tagged Values window. If there is more than one connector on a diagram, you
can cycle through them using the arrow keys.
Drag Connectors
You can drag a connector to position it. Click on the connector and drag the connector to where it is to appear.
UML Modeling with Enterprise Architect - UML Modeling Tool
Work With Connectors | Connector Tasks
202
Note that there are some limitations on how far or to where you can drag a connector.
Notes:
· You can reposition a connector by selecting and dragging the connectors as required.
· If a connector has source and target roles, you can attach either end of the connector to a specific attribute
or operation 202 in the source or target element.
Tip:
To reattach the end of a connector to a different source or target element, see the Change the Source or
Target Element 206 topic.
Connector Properties and Commands
You can double-click on a connector to change properties 217 , or right-click to display the context menu
containing commands to change connector type 205 and direction 214 .
You can also highlight the connectors on a specific element. Select the element and press [L]. All the
connectors issuing from or terminating at that element are highlighted.
Create Connectors Without a Diagram
Sometimes it is useful to create relationships between elements without a diagrammatic representation. You
can do this using the Project Browser and the Relationship Matrix, as explained in the following topics:
· Add Connectors With the Project Browser 209
· Add Connectors With the Relationship Matrix
224 .
4.2.2 Connect to Element Feature
If a connector has source and target roles, you can connect either end of the connector to a specific operation
or attribute in the source or target element. This is entirely a visual aid, to indicate which features are
significant in the relationship. In code generation or transformation, the link is interpreted as a normal sourceelement to target-element relationship.
To do this, follow the steps below:
1. Right-click on the end of the connector joined to the element containing the required feature.
2. Select the Link to Element Feature context menu option. The Link to Element Feature dialog displays.
© 1998-2010 Sparx Systems Pty Ltd
203
Work With Connectors | Connector Tasks
3. In the Feature Type field, click on the drop-down arrow and select the required feature type - Attribute
or Operation. The attributes or operations from the element are listed in the Feature field.
4. Click on the required attribute or operation, and click on the OK button.
The end of the connector changes to a bracket next to the selected feature.
You might create a number of feature-to-feature relationships between two elements (such as a Class and a
Table that represents the Class data) to produce a diagram similar to the following:
You can change the feature to which the connector is attached by following the above procedure and selecting
the new feature.
You can break the link to the selected feature in the following ways:
·
·
·
·
Follow the above procedure, setting the Feature Type to None.
Delete the attribute or operation from the element
Change the connector type to a type that does not have source and target roles
Change the connector to a different source or target element that does not contain the feature.
Note that reversing the direction of the connector does not break the connector's attachment to the feature.
4.2.3 Add a Note to a Connector
You can connect notes and constraints to graphical relationships. Notes enable you to provide explanations
and further detail for one or more connectors on a diagram, with a visible note element, as in the example
below.
UML Modeling with Enterprise Architect - UML Modeling Tool
Work With Connectors | Connector Tasks
204
Constraints let you specify a logical or informal constraint against a set of connectors; for example the {XOR}
constraint in the image above indicates that only one of the connectors in the specified set can be true at any
one time (exclusivity).
Attach a Note or Constraint to a Connector
To attach a note or constraint to one or more connectors, follow the steps below:
1. Right-click on one of the connectors to attach a note to. The context menu displays.
2. Select the Attach Note or Constraint menu option. The Link Relations dialog displays.
3. Check all the connectors that participate in the set. In the example below, two connectors have been
checked to participate in a logical constraint.
4. Click on the OK button to complete the note or constraint creation.
5. You can then use the normal Note dialog to enter the appropriate text for the note or constraint.
Note:
The constraint note is drawn slightly differently to a regular note, and has { and } automatically added
to visually indicate the constraint form.
© 1998-2010 Sparx Systems Pty Ltd
205
Work With Connectors | Connector Tasks
4.2.4 Arrange Connectors
Connectors between two elements can be moved around the element borders to create a good layout. There
is a limit to how much a connector can be moved around, but generally it is very easy to find an acceptable
layout. For the best layouts, use the custom line style; this enables you to add as many line points and bends
as you require to create a clean and readable diagram.
Move a Connector
To move a connector, follow the steps below:
1. Click once on the connector to select it.
2. Holding the mouse button down, move the connector in the required direction.
3. To refine the movement, click and hold very near to one end of the connector; this enables a slightly
different movement range.
4. To further refine the movement and range, select either a routed, direct or custom line style. Each
behaves slightly differently (see Connector Styles 206 ).
4.2.5 Change Connector Type
To change a connector type, follow the steps below:
1. In the Diagram view, right-click on the connector to change. The context menu displays.
2. Select the Connection Detail | Change Type menu option.
UML Modeling with Enterprise Architect - UML Modeling Tool
Work With Connectors | Connector Tasks
206
3. In the Connector Type field, click on the drop-down arrow and select the required connector type.
4. Click on the OK button to apply changes.
4.2.6 Change the Source or Target Element
After you have created a connector between two elements, you might later want to change either the source or
target. Instead of deleting and re-creating the connector, Enterprise Architect enables you to change the
source or target. There are two ways of doing this: using the Set Source and Target dialog or using the mouse.
Using the Set Source and Target dialog
To change the source or target element of a connector using the Set Source and Target dialog, follow the
steps below:
1. Right-click on the connector to open the context menu.
2. Select the Advanced | Set Source and Target menu option. The Set Source and Target dialog
displays.
3. Click on the drop-down arrows on the From Element and To Element fields, and select the source and
target elements.
4. Click on the OK button to apply changes.
Using the Mouse
To change the source or target element of a connector using the mouse, follow the steps below:
1. Click on the connector and position the cursor over the 'handle' at one end.
2. When the cursor changes, click the mouse and drag the handle to the new element.
Note:
The connector does not actually move until you release the mouse button over the new source or target
element. However:
· A dotted line shows where the connector would be during the move, and
· The solid outline of the nearest element or extension changes to a hatched outline as you move the cursor
onto it; this helps you identify where the connector will connect to, if there are many closely-arranged
elements, Parts, Ports and other extensions.
4.2.7 Connector Styles
Connectors come in five different routing styles:
Style
Description
Direct
A straight line from element A to element B. You can move the line (back and forward,
up and down) to a limited degree.
Auto Routing
A vertical and horizontal route from A to B with 90-degree bends. You can move the
line to improve the route, but the location and number of bends are not configurable.
Bezier
A smooth curved line from A to B. Bezier style is directly available for Data Flow
diagram connectors, Mind Mapping connectors, State Flows, State Transitions, Object
© 1998-2010 Sparx Systems Pty Ltd
207
Work With Connectors | Connector Tasks
Style
Description
Flows, and Control Flows.
Note:
You can convert other types of relationship to Bezier style by assigning the Tagged
Value _Bezier, with an integer value other than 0. However, some relationship types
(such as Aggregate) do not accommodate this style very well.
This Tagged Value over-rides the value of the Style field in the connector Properties
217 dialog.
Custom Line
The most flexible option. You can add one or more line points and bend and push the
line into virtually any shape, using the Toggle Line Point at Cursor option.
Tree Style Vertical
A line from element A to B with two right-angle bends, and the end points fixed to
selected locations on the elements (Vertical or Horizontal).
Tree Style Horizontal
Note:
You can convert relationships to Tree style by assigning the Tagged Value
_TreeStyle, with a value of H (Horizontal) or V (Vertical).
This Tagged Value over-rides the value of the Style field in the connector Properties
217 dialog.
Lateral - Vertical
Lateral - Horizontal
A line from element A to B with a single right-angle bend, and the end points fixed to
selected locations on the elements (Vertical or Horizontal).
Note:
You can convert relationships to Lateral style by assigning the Tagged Value
_TreeStyle, with a value of LH (lateral-horizontal) or LV (lateral vertical).
This Tagged Value over-rides the value of the Style field in the connector Properties
217 dialog.
Set the Connector Style
To set the connector style, follow the steps below:
1. Right-click on the connector to change; the context menu displays.
2. Select the Line Style option.
3. From the submenu, select the required style - Direct, Auto Routing, Custom, Tree or Lateral (or Bezier,
where appropriate).
Alternatively:
1. Select the connector to change.
2. Press the following keys to change the style:
· [Ctrl]+[Shift]+[D] for Direct
· [Ctrl]+[Shift]+[A] for Auto Routing
· [Ctrl]+[Shift]+[C] for Custom
· ([Ctrl]+[Shift]+[Z] for Bezier, where appropriate).
Bend Connectors
To bend a connector to quickly and easily route connectors in the required layout, follow the steps below:
1. Right-click on the connector; the context menu displays.
2. Set the line style to Custom Line ([Ctrl]+[Shift]+[C]); this enables the Bend Line at Cursor option in
the context menu.
3. Click on the Bend Line at Cursor option to add a line point.
UML Modeling with Enterprise Architect - UML Modeling Tool
Work With Connectors | Connector Tasks
208
Note:
Right-clicking a line point displays the Straighten Line at Cursor context menu option, which you can
use to remove the line point.
4. Using the mouse, drag the line point to the required position.
Alternatively:
1. Hold down [Ctrl] or [Shift] and click on a point on the connector to create a line point.
Note:
[Ctrl]+click also removes a line point.
2. Using the mouse, drag the line point to the required position.
Tidy Line Angles
To tidy line angles (custom connector), follow the steps below:
1. Right-click on the connector; the context menu displays.
2. Click on the Tidy Line Angles menu option; this nudges the custom line in horizontal and vertical
increments, saving you the time of trying to get a good layout manually.
Note:
You can set the Tidy Line Angles option to operate by default; click on the Tools | Options menu
option to display the Options dialog, and select the Diagram Behavior page.
Suppress Line Segments
To suppress individual line segments, follow the steps below:
1. Right-click on the connector; the context menu displays.
2. Set the line style to Custom Line ([Ctrl]+[Shift]+[C]), this enables the Suppress Line Segment option
in the context menu.
© 1998-2010 Sparx Systems Pty Ltd
209
Work With Connectors | Connector Tasks
3. Click on the Suppress Line Segment option to suppress a line between two bend points.
Note:
The segment you right-clicked on is suppressed.
4. To show the segment again, right-click on the line and click on the Show All Line Segments context
menu option.
One application for this is to represent the continuation of flow when your diagram crosses the page boundary
marker in the Diagram View. When you suppress the line segment that crosses the boundary, the link name
(connector properties) displays at both ends of the hidden segment. When you print the diagram on multiple
pages, the link name identifies the connection apparently broken by the page boundary.
4.2.8 Create Connector in Project Browser
You can create a connector from one element to another directly in the Project Browser.
Connect Elements from the Project Browser
To connect elements from the Project Browser, follow the steps below:
1. In the Project Browser, either:
· Right-click on the element to create a connector for, and select the Add | Create Link context menu
option, or
· Select the element, press [Insert] and select the Create Link context menu option.
The Create Link dialog displays.
2. In the Direction field, click on the drop-down arrow and select the direction of the new connector (
Outgoing means this element is the source).
3. In the Link Type field, click on the drop-down arrow and select the type of connector.
4. In the Choose target(s) list, click on the name of the target. (If necessary, in the Select Target Type
field click on the drop-down arrow and select a feature to list only elements having that feature.)
UML Modeling with Enterprise Architect - UML Modeling Tool
Work With Connectors | Connector Tasks
210
5. Click on the OK button to create the connector.
Note:
You can also reproduce an existing connector between two elements when you paste those elements from
the Project Browser into a diagram as instances. An option 37 enables you to copy the relationship as well,
or just the elements.
4.2.9 Relationship Visibility
You can change the visibility of individual connectors or relationships, diagram by diagram.
Set Relationship Visibility
To set relationship visibility, follow the steps below:
1. Open the diagram to change.
2. Select the Diagram | Visible Relations menu option. Alternatively, press [Ctrl]+[Shift]+[I]. The Set
Visible Relations dialog displays.
3. Select the checkbox against each list item to show, and clear the checkbox against each item to hide. If
you want to display the information in a more readable layout, you can resize the dialog.
4. Click on the OK button to apply the changes.
4.2.10 Delete Connectors
To delete a connector, follow the steps below:
1. Right-click on the connector. The context menu displays.
© 1998-2010 Sparx Systems Pty Ltd
211
Work With Connectors | Connector Tasks
2. Select the Delete Connector option. The Remove Connector dialog displays.
3. This dialog provides the options to hide the connector so that it remains functional, or remove the
connector completely. Click on the appropriate radio button and click on the OK button.
If you select the Hide option, it has the same effect as hiding the connector 212 on the Links tab of the
source element Properties dialog, or using the Visibility | Hide Connector context menu option. It also
hides the connector on the Relationships window (see Using Enterprise Architect - UML Modeling Tool).
Note:
The dialog does not display if:
· You have previously selected the Don't ask again checkbox or
· On the Links page of the Options dialog (Tools | Options | Links) the Prompt on connector deletes
checkbox is not selected.
Selecting the Don't ask again checkbox also deselects the Prompt on connector deletes checkbox.
Selecting the Prompt on connector deletes checkbox restores the dialog if you have used the Don't ask
again checkbox.
If you hide the dialog, the Delete Connector context menu option defaults to the setting you last used on the
dialog. Make sure that you have selected the right option to default to.
UML Modeling with Enterprise Architect - UML Modeling Tool
Work With Connectors | Connector Tasks
212
4.2.11 Generalization Sets
A generalization set enables you to specify the relationship of a group of subtypes.
To create a generalization set, follow the steps below:
1. Right-click on the connector. The context menu displays.
2. Select the Advanced | Generalization Set | New menu option. The following dialog displays.
3. In the Name field, type the name of the Generalization set; for example, Gender.
4. In the Power Type field, either type a new power type, or click on the drop-down arrow or browser
button 149 [ ... ] and select an existing one.
5. Check the IsMember column for the child subtypes that are part of this Generalization set.
The OMG UML specification (UML Superstructure Specification, v2.1.1, section 7.3.21, p. 77) states:
Each Generalization is a binary relationship that relates a specific Classifier to a more general Classifier (e.g.
from a class to its superclasses). Each GeneralizationSet defines a particular set of Generalization
relationships that describe the way in which a general Classifier (or superclass) may be divided using specific
subtypes.
4.2.12 Hide/Show Connectors
Connectors/relations that appear in multiple diagrams can be selectively shown or hidden. This makes it
easier to read diagrams where elements might have many connectors, but not all are relevant in the context of
the current diagram.
Hide or Show a Connector in the Current Diagram
To hide or show a connector in the current diagram, follow the steps below:
1. Double-click on the required diagram element in the Diagram view. The element Properties dialog
© 1998-2010 Sparx Systems Pty Ltd
213
Work With Connectors | Connector Tasks
displays.
2. Select the Links tab. This lists the connectors linked to the element, whether or not they are hidden on
the diagram.
3. Right-click on the connector to hide or show. The context menu displays.
4. Select the Show Relation menu option to show the hidden connector on the diagram, or the Hide
Relation menu option to hide the visible connector.
Tip:
Alternatively, hide a connector by right-clicking on it on the diagram and selecting the Visibility | Hide
Connector context menu option. However, you must use the Links tab of the element Properties dialog to
show the relationship again.
Note:
Certain elements, such as Requirements, do not have a Links tab in the Properties dialog. In these cases,
open the Relationships window (View | Other Element Tools | Relationships) for the element and right-click
on the relationship in the list to display the context menu. (See Using Enterprise Architect - UML Modeling
Tool.) This enables you to hide or show that relationship in the diagram. Be aware that, in the Corporate,
Business and Software Engineering, System Engineering and Ultimate editions with security on, locks on the
diagram and elements can make the required option unavailable.
Hide or Show a Connector in Other Diagrams
To hide or show a connector in other diagrams, follow the steps below:
1. Right-click on the connector in the diagram. The context menu displays.
2. Select the Visibility | Hide Connector in Other Diagrams menu option. The Set Connector Visibility
dialog displays.
3. If the two connected elements have been included in other diagrams, these diagrams are listed here. In
the list, all diagrams for which the checkbox is selected show the connector. Deselect the checkbox for
any diagrams in which to hide the connector. If you want to display the information in a more readable
layout, you can resize the dialog.
Tip:
To hide the connector in all of the diagrams listed, click on the Suppress All button.
4. Click on the OK button to save the changes.
UML Modeling with Enterprise Architect - UML Modeling Tool
Work With Connectors | Connector Tasks
214
4.2.13 Hide/Show Labels
You can hide or display one or more labels on a connector. To do this, follow the steps below:
1. Right-click on the connector. The context menu displays.
2. Select the Visibility | Set Label Visibility menu option. The Label Visibility dialog displays.
If you have several, long labels, you can resize this dialog for greater clarity.
3. Select the checkbox against each label to display, and clear the checkbox against each label to hide.
4. Click on the OK button.
4.2.14 Connector In-place Editing Options
You can edit many of the Enterprise Architect connector labels directly on the diagram. Each label can be
bound to a single connector field.
Procedure
To put a label into Edit mode, either:
· Select the Edit Label option from the context menu, or
· Select a label and press [F2].
To save the current text to the field, either press [Return] or deactivate the Edit window.
To cancel edit mode without saving any changes, press [Esc].
4.2.15 Reverse Connector
You can reverse the direction of a connector without having to delete and re-create it. This is helpful if your
design changes or you add the connector wrongly to begin with.
Procedure
To reverse a connector, follow the steps below:
1. Right-click on the incorrect connector to open the context menu.
2. Select the Connection Detail | Reverse Direction menu option.
4.2.16 Set Association Specializations
UML enables specialization of properties defined by Associations. Enterprise Architect enables this through
the Specialize Associations option in the advanced section of the context menu for an Association.
The following dialog displays, showing all Associations between the two Classes connected by the current
© 1998-2010 Sparx Systems Pty Ltd
215
Work With Connectors | Connector Tasks
Association and their parents.
The left two columns define the source role of the current Association, while the right two define the target
role. With this you are able to select the relationships of each end of the properties listed. When a relationship
is set then this is drawn at the corresponding end of the connector on any diagram it appears on.
The dialog above displays when you select the Advanced | Specialize Associations context menu option on
the lowest Association connector in the following diagram.
4.2.17 Show Uses Arrow Head
By default the Use connector in Use Cases has no arrow head. To generate arrow heads on the connectors,
follow the steps below.
1. Select the Tools | Options Links menu option. The Links page of the Options dialog displays.
2. In the General panel, select the Show Uses arrowheads checkbox.
3. Click on the Close button.
When you save the Use Case diagram, the Use connectors change to display arrowheads.
UML Modeling with Enterprise Architect - UML Modeling Tool
Work With Connectors | Connector Tasks
216
4.2.18 Tree Style Hierarchy
In Enterprise Architect you can create a tree style inheritance diagram using a special form of the
Generalization connector, as shown below.
Note:
The Son ->Parent connector has not yet been put in Tree Style - Vertical style.
This style of diagram provides a clearer layout for inheritance hierarchies and is easy to work with.
Create a Tree Style Connector
To create a tree style connector, follow the steps below:
1. Create a normal Generalization between two elements.
2. Right-click on the connector to open the context menu.
3. Select the Line Style | Tree Style - Vertical or the Line Style | Tree Style - Horizontal menu option.
4. Enterprise Architect automatically makes the Generalization layout conform to a specific shape. By
adding more Generalization connectors, and checking their Tree Style options, you can achieve the
appearance of the diagram above. You can slide the root and child Classes left and right to achieve the
required result; Enterprise Architect maintains the conformity of the branch connectors.
Set the Default Connector Style
To set this style of connector as default, follow the steps below:
1. Select the Tools | Options | Links menu option. The Links page of the Options dialog displays.
2. Select the Generalization link style Default = Tree checkbox to make this branching style the default
style for inheritance connectors.
© 1998-2010 Sparx Systems Pty Ltd
217
Work With Connectors | Connector Properties
4.3 Connector Properties
To access the connector Properties dialog, double-click on a connector in a diagram. You can change several
characteristics of connectors from this dialog.
Many of these characteristics generate text labels on or around the connector. You can change these labels
using the Label 49 context menu.
The connector Properties dialog has the following tabs:
·
·
·
·
·
General (see below)
Constraints 218
Source Role 219
Target Role 221
Tagged Values. 222
The General tab enables you to configure the name of the connector, the direction, the line style, the
stereotype (optional) and a comment.
Option
Use to
Source
Type in the name of the source element for the connector.
Target
Type in the name of the target element for the connector.
Name
(Optional) Type a name for the connector. If entered, the name displays on the diagram.
Alias
(Optional) Type an alternative name or alias for the connector.
Direction
Select the appropriate direction details: from source to destination, destination to
source, or bi-directional.
UML Modeling with Enterprise Architect - UML Modeling Tool
Work With Connectors | Connector Properties
Option
218
Use to
Some connectors have arrow heads that depend on this setting. Some connectors are
logically dependent on this (such as Inheritance).
Style
Select the appropriate connection style; choose from: Direct, Auto-Routing, Bezier,
Custom, Tree (Vertical) or Tree (Horizontal).
Stereotype
(Optional) Type the name of a stereotype for the connector, or click on the drop-down
arrow and select one. Alternatively, click on the [ ... ] button and select the stereotype
from the Stereotype Selector dialog (see Extending UML in Enterprise Architect).
If entered, the stereotype is displayed on the diagram and over-rides the connector type
in the RTF documentation.
Virtual
Inheritance
Indicate that inheritance is virtual. Available only for Generalization connectors.
Scope
Select the appropriate value for the scope (used for inheritance). Available only for
Generalization connectors where the child Class is C++.
Notes
(Optional) Type any notes on the connector. The notes are displayed in documentation,
if required.
As for the Notes window, you can format the text, using the Rich Notes Text toolbar at
the top of the field (see Using Enterprise Architect - UML Modeling Tool).
See Also
· Message Scope
222
4.3.1 Connector Constraints
A UML connector can also have associated constraints placed on it. Constraints tell us something about the
rules and conditions under which a relation operates. For example, it might be a pre-condition that a customer
is of a certain type before an Association connector to an Account is allowed.
Tip:
Constraints about an Association (connector) can be added to further refine the model. Constraints detail the
business and operational rules for the model.
Set Constraints on a Connector
To set constraints on a connector, follow the steps below:
1. Double-click on a connector to open the Connector Properties dialog.
2. Select the Constraints tab.
3. Fill in details of the constraint(s) that apply and click on the Save button.
© 1998-2010 Sparx Systems Pty Ltd
219
Work With Connectors | Connector Properties
Option
Use to
Constraint
Type in the name of the constraint.
Type
Specify the type of constraint (such as pre-condition).
Notes
Type in any notes about the connector.
Defined Constraints
Review the list of constraints for this connector.
4.3.2 Source Role
This description refers to the role of the Source element in a relationship, but applies equally to the role of the
Target element.
A connector can have certain properties assigned to one end, and be associated with the particular role that
element plays in the relationship. You can enter details about this role to further develop your model.
Set Source Role Details
To set the source role details, follow the steps below:
1. Double-click on a connector. The Connector Properties dialog displays.
2. Select the Source Role tab.
3. Enter the required details and click on the OK button.
UML Modeling with Enterprise Architect - UML Modeling Tool
Work With Connectors | Connector Properties
220
Option
Use to
<Type> Role
Type in or select the name of the role to be played.
Alias
Type an alias for the role, if required.
Role Notes
Type in any required notes about the role.
Derived
Indicate that the role value or values can be computed from other information.
Owned
Indicate that the role is owned by the opposite Class rather than the Association.
Selecting this checkbox adds a 'dot' to the appropriate end of the connector. (
)
Derived Union
Indicate that the role is derived from the properties that subset it.
Multiplicity
Specify the role multiplicity. (You can define the values of this field on the Cardinality tab
of the UML Types dialog - see UML Model Management.)
This is the range of instances of the role that can be active in the relationship; for
example, one employee can be assigned to tasks; for the target role you define the range
of instances (such as tasks) the employee could be assigned to.
The values have the following formats:
· *, or 0..* - zero, one or many instances
· 0..n - zero or up to n instances, but no more than n
· n - exactly n instances
· n..* - n, or more than n instances.
Note that you can also define source and target element multiplicity in the element
© 1998-2010 Sparx Systems Pty Ltd
221
Work With Connectors | Connector Properties
Option
Use to
Attribute properties
110 .
Ordered
Indicate that the role is a list and the list is ordered.
Allow
Duplicates
Indicate that the role can contain duplicate elements (relevant only if multiplicity is > 1).
Containment
Indicate the nature of the containment at the Destination (reference, value...).
Access
Select the access level for the role.
Aggregation
Select the type of aggregation that this role uses.
Target Scope
Select the level at which this role applies (instance or classifier).
Navigability
Select whether or not this role is navigable (non-navigable ends are shown depending on
diagram properties).
Changeable
Select whether this role is subject to change.
Constraint(s)
Type in any constraint on the role.
Qualifier(s)
Type any qualifiers or restrictions on the role. Separate multiple qualifiers with a semicolon.
Maps to the UML property isUnique (selecting the checkbox maps to the isUnique value of
FALSE).
Alternatively, click on the [ ... ] button at the end of the field, and define a new qualifier on
the Qualifiers dialog (see the UML Dictionary). (Qualifiers typed into the Qualifier(s) field
are also automatically added to this dialog.)
Stereotype
(Optional) Type the name of a stereotype that applies to this end of the Association, or
click on the [ ... ] button at the end of the field and select a stereotype from the Stereotype
Selector dialog (see Extending UML With Enterprise Architect).
Member Type
Type a role type that can be used when generating collection Classes for multiplicity > 1.
Note:
Source role details are displayed at the start end of a connector. If you have drawn the connector the wrong
way, you can always use the Reverse Direction menu option from the connector context menu.
4.3.3 Target Role
A connector can have certain properties assigned to one end, and be associated with the particular role that
element can play in the relationship.
You can enter details about this role to further develop your model.
Set Destination Role Details
To set the destination role details, follow the steps below:
1. Double-click on a connector to open the Connector Properties dialog.
2. Select the Target Role tab.
3. The details and appearance of this tab are identical to the Source Role tab. See Source Role
Note:
Destination role details are displayed at the terminating end of a connector on the diagram.
UML Modeling with Enterprise Architect - UML Modeling Tool
219 .
Work With Connectors | Connector Properties
222
4.3.4 Connector Tagged Values
The Tagged Values tab of the connector Properties dialog simply provides the Tagged Values window within
the frame of the Properties dialog. You can define Tagged Values for the connector and, on Association and
Aggregation connector types, you can set additional Tagged Values for the source and/or target role.
Set Tagged Values
To set Tagged Values for the connector, follow the steps below:
1. On the Properties dialog for the connector, click on the Tagged Values tab.
2. Select the connector type, Connector Source or Connector Target as required.
3. Either click on the New Tags button or press [Ctrl]+[N]. The Tagged Value dialog displays.
4. In the Tag field type the tag name and value, or click on the drop-down arrow and select a predefined
Tagged Value type.
5. Click on the OK button to save the changes.
4.4 Message Scope
A message in a Sequence diagram represents a dynamic interaction from one element to another. Sometimes
when you are designing your model you might have to change either the start or end point of a message as
the responsibilities of elements change during design. For this reason, Enterprise Architect enables you to
change the message scope by setting a new start or end element.
Change Message Scope
To change message scope, follow the steps below:
1. Select the message in the Sequence diagram.
2. Right-click on the message to open the context menu.
© 1998-2010 Sparx Systems Pty Ltd
223
Work With Connectors | Message Scope
3. Select Advanced | Set Source and Target.
4. In the pop up dialog, in the From Element and To Element fields, click on the drop-down arrows and
select the required elements.
5. Click on the OK button to save changes.
The message is re-routed to meet your changed requirements.
UML Modeling with Enterprise Architect - UML Modeling Tool
Relationship Matrix |
224
5 Relationship Matrix
The Relationship Matrix is a spreadsheet display of relationships between model elements within packages.
You select a source package and a target package, the relationship type and direction, and Enterprise
Architect identifies all the relationships between source and target elements by highlighting a grid square and
displaying an arrow indicating the direction of the relationship.
Note:
The direction is a reflection of which elements are the source elements and which are the target. It does not
indicate the Direction property of the connector, as defined in the connector Properties dialog.
The Relationship Matrix is a convenient method of visualizing relationships quickly and definitively. It also
enables you to create, modify and delete relationships between elements with a single mouse click - another
quick way to set up complex sets of element relationships with a minimum of effort.
If you click on a square in the matrix, the square, the row headers and the column headers are highlighted, as
shown in the example above. The example also illustrates the 'bent arrow' icon, indicating that connectors
exist in both directions between the source and target elements.
The relationship squares in the example are green. This indicates that the source element is not locked
(because the parent package has not been checked in under version control - see Version Control Within UML
Models Using Enterprise Architect). If the element is locked (the parent package has been checked in) the
highlight is pink, as follows:
For information on accessing the Relationship Matrix, see the Open the Relationship Matrix
225
topic.
© 1998-2010 Sparx Systems Pty Ltd
225
Relationship Matrix |
You can also:
Select options 228 for modifying the type of information the Relationship Matrix displays
Update, delete and create 229 relationships through the Relationship Matrix
Export the contents of the Relationship Matrix to a CSV file 230 or to a .png or .emf 228 file
Print the contents 228 of the Relationship Matrix, scaled down if required
Save a profile 230 of the Relationship Matrix settings to monitor development of the same source and target
packages
· Investigate the Source and Target elements 231 in the relationship.
·
·
·
·
·
5.1 Open the Relationship Matrix
To open the Relationship Matrix you can:
· Select the View | Relationship Matrix menu option
· Right-click on any package in the Project Browser, and select the Documentation | Open in Relationship
Matrix | As Source or As Target context menu option.
Once the Relationship Matrix opens you can:
· Set the source and target packages 227
· Select which element type to show 225
· Select connector type and direction to show
226
The Relationship Matrix refreshes after every change you make to the input parameters.
Tip:
The Relationship Matrix includes ALL child elements in a hierarchy. Sometimes in a large model this can be a
lot of elements, possibly too many to be useful. Take care in selecting the source and target package.
5.2 Set Element Type
The Relationship Matrix can show all element types, or you can specify which type to show.
To set the element type, follow the steps below:
1. Click on the Type drop-down arrow for the Source or Target package.
2. Find the required connector in the list and click on it. Enterprise Architect refreshes the Relationship
Matrix content.
UML Modeling with Enterprise Architect - UML Modeling Tool
Relationship Matrix | Set Element Type
226
5.3 Set Connector Type and Direction
The Relationship Matrix requires that you set the connector type to report on and the connector direction. To
do this, follow the steps below:
1. Click on the Link Type drop-down arrow to display a list of connector types.
2. Scroll through the list and click on the appropriate connector type.
3. Click on the Direction drop-down arrow to display a list of directions.
4. Scroll through the list and click on the appropriate direction.
Enterprise Architect refreshes the Relationship Matrix content.
Notes:
· If you set Direction to Both, each relationship is indicated by two arrows - a From-To arrow and a To-From
arrow. See the screen illustration in the Relationship Matrix 224 topic.
· The direction is a reflection of which elements are the source elements and which are the target. It does
not indicate the Direction property of the connector, as defined in the connector Properties dialog.
© 1998-2010 Sparx Systems Pty Ltd
227
Relationship Matrix | Set Source and Target Package
5.4 Set Source and Target Package
You must set both the source and target packages for the Relationship Matrix before relationships can be
displayed.
Tip:
You set the source and target packages AFTER setting the connector and element types/details; as
Enterprise Architect refreshes the content after each change, this is usually faster.
Set the Source or Target Package
To set the source or target package, follow the steps below:
1. In the Project Browser, click on the required source package, then press [Ctrl] and click on the required
target package, to select the two packages together.
2. Drag the selected packages over the Source and Target fields; the first-selected package name
displays in the Source field, and the second-selected package name displays in the Target field.
You can also select and drag a single package name over the required field, to change just the source or the
target package. If you drop the package name anywhere else on the Relationship Matrix, the system prompts
you to specify whether to add it to the Source or Target field.
Alternatively:
1. Click on the [ ... ] (Browse) button at the end of the Source or Target field.
2. The Browse Project dialog displays.
3. Select the required package and click on the OK button.
UML Modeling with Enterprise Architect - UML Modeling Tool
Relationship Matrix | Relationship Matrix Options
228
5.5 Relationship Matrix Options
The Relationship Matrix provides a menu of options that enable you to:
· Output 228 the information on the Relationship Matrix to the printer or to a metafile, .png file or .csv file
· Create and update profiles of the configurations of the matrix 230 that you have designed
· Define local settings 229 to control what the Relationship Matrix displays.
230
Output Relationship Matrix Information
Click on the Options button on the Relationship Matrix and click on the Matrix menu option. The following
submenu displays:
Print Relationship Matrix
To print a WYSIWYG representation of the Relationship Matrix contents, click on the Print option. The Print
dialog displays, on which you select the output printer and specify the printer properties, the range of pages to
print, and the number of copies.
If you want to check what the matrix might look like on the page before you print, click on the Print Preview
menu option. This displays the Print Preview screen (see Using Enterprise Architect - UML Modeling Tool).
Scale Printout
When you print the Relationship Matrix, by default it prints on as many pages wide and long as the matrix
requires. You can scale the printout into a fixed number of pages wide, and the row height is automatically
adjusted to maintain the proportions of the matrix. This reduces the overall size of the printout and improves
appearance, especially when used in conjunction with the Landscape option in the printer properties. For
example, a 16-page printout without scaling can, with a scaling of 2 pages wide, be reduced to 6 pages.
To set the page scaling, click on the Scale Setting menu option. The Scale Matrix dialog displays.
Select the Scale Matrix Width Into Pages checkbox, and type or select the number of pages in width to scale
to. Click on the OK button to apply the setting.
Save Relationship Matrix as Graphic File
To save the current Relationship Matrix output as a graphic, click on the Save as Metafile or Save as PNG
options. A Browser dialog displays that enables you to select the target file location and specify the filename of
the .emf or .png file in which to save the output.
You can incorporate these files in an RTF or HTML report, as a hyperlinked file or an included file.
© 1998-2010 Sparx Systems Pty Ltd
229
Relationship Matrix | Relationship Matrix Options
Manage Display Content
Click on the Options button on the Relationship Matrix and click on the Options menu option. The Matrix
Options dialog displays.
Select from the following options:
· Include Source Children - to recursively include child packages and contents under the Source
· Include Target Children - to recursively include child packages and contents under the Target
· Include All Extended Meta Types - to include elements that are extensions of a specified meta-type. For
example, if there are Block elements (extending Class) in the package, selecting this option and specifying
the type Class includes Class and Block elements, and any further derivatives of Block in the matrix.
· Sort Axes - to ensure package elements display in alphabetical order
· Show Package Names - to hide or show package names in the Relationship Matrix; this is useful for
shortening the displayed texts, especially in circumstances where packages have long names
· Use Element Alias If Available - to display an element's alias instead of the element name, if an alias has
been defined
· Show Level Numbering If Available - to reproduce level numbering in the Relationship Matrix, if it is
turned on in the Project Browser; see the screen illustration in the Relationship Matrix 224 topic.
5.6 Modify Relationships in Matrix
You can modify or delete relationships, or create new relationships, directly from the Relationship Matrix.
To Modify or Delete Relationships
Right-click on a highlighted relationship to open the context menu, and select from the following options:
·
·
·
·
View relationship - opens the Properties dialog for the selected relationship
Source element properties - opens the Properties dialog for the source element
Target element properties - opens the Properties dialog for the target element
Delete relationship.
If you have selected Delete relationship, Enterprise Architect prompts you to confirm this action.
Note:
The Delete relationship option does not work if:
· The source element (that is, the owner) is locked
· You have selected Both in the Direction field - you are effectively trying to delete half a relationship.
If you have selected one of the other options, modify any properties as required, and click on the OK button to
save the changes.
UML Modeling with Enterprise Architect - UML Modeling Tool
Relationship Matrix | Modify Relationships in Matrix
230
To Create a New Relationship
1. Select the required relationship type in the Link Type field.
2. Right-click on the empty intersection of the source row and target column to display the context menu.
3. Select the Create new relationship... option; a submenu displays, listing the types of relationship you
can create.
4. Click on the required type of relationship to create a new connector between the two elements.
Tip:
Use the matrix relationship management features to quickly create and manage relationships like Realization
and Aggregation between Requirements and implementation elements (such as Use Cases).
5.7 Export to CSV
The contents of the Relationship Matrix can be exported to a CSV file. This provides a convenient mechanism
for moving the matrix data to a spreadsheet environment such as Microsoft Excel. (This option is also active in
the 'Lite', read-only version of Enterprise Architect - see Getting Started With Enterprise Architect.)
To export to CSV, follow the steps below:
1. Click on the Options button on the Relationship Matrix to display the context menu.
2. Select the Matrix | Export to CSV menu option. The Windows Browser dialog displays.
3. Browse to the required file location and type in a .CSV filename to export to.
4. Click on the Save button to export the data.
5.8 Matrix Profiles
To save a certain Relationship Matrix configuration as a named profile for later recall, follow the steps below:
1. Set up the Relationship Matrix as required, with source and target, element types and relationship
types.
2. Click on the Options button on the Relationship Matrix to display the context menu, then select the
Profiles | Save as New Profile menu option.
3. In the Enter Value field, type a profile name of up to 12 characters. Click on the OK button.
Once you have created a profile, you can select it from the drop-down list in the Profile field at the top of the
Relationship Matrix screen.
You can also select an existing profile, modify it on the Relationship Matrix screen, then save it under the
same profile name by selecting the Profiles | Update Current Profiles menu option.
© 1998-2010 Sparx Systems Pty Ltd
231
Relationship Matrix | Matrix Profiles
To delete an existing profile, select it in the drop-down list and select the Profile | Delete Current Profile
menu option.
5.9 Review Source and Target Elements
As well as providing information on connectors and relationships, the Relationship Matrix enables you to
obtain information on the source and target elements in a relationship.
To help you quickly identify which source or target elements have relationships with a particular element, you
can highlight the entire row or column for the element by clicking on the element name in the row or column
titles. If the list of elements is long, you can scroll across or down the highlighted row or column and quickly
identify where the relationships are.
If you right-click on an element name in the row or column titles, the following context menu displays:
This enables you to:
· Display the Properties dialog for the selected element
· Display either the only diagram in which the element is used, with the element highlighted, or a list of the
diagrams in which the element is used; you then select and open a diagram from the list
· Locate and highlight the element name in the Project Browser
· Make the selected element the context or focus in any docked screens or windows that are open, such as
the Tagged Values window.
UML Modeling with Enterprise Architect - UML Modeling Tool
Business Modeling |
232
6 Business Modeling
Modeling the Business Process
Modeling the business process is an essential part of any software development process. It enables the
analyst to capture the broad outline and procedures that govern what it is a business does. This model
provides an overview of where the proposed software system being considered fits into the organizational
structure and daily activities. It can also provide the justification for building the system by capturing the
current manual and automated procedures that are to be rolled up into a new system, and the associated cost
benefit.
As an early model of business activity, it enables the analyst to capture the significant events, inputs,
resources and outputs associated with business process. By connecting later design elements (such as Use
Cases) back to the business process model through Implementation connectors, it is possible to build up a
fully traceable model from the broad process outlines to the functional requirements and eventually to the
software artefacts actually being constructed.
As the Business Process Model typically has a broader and more inclusive range than just the software
system being considered, it also enables the analyst to clearly map what is in the scope of the proposed
system and what is to be implemented in other ways (such as a manual process).
An Example
The example below demonstrates the kind of model that can be built up to represent a business process. In
this model, the goal of the business process is to take customer orders and to ship those orders out. A user
starts the process with an inquiry, which leads to the involvement of the Book Catalogue, Shopping Cart, online pages and warehouse inventory. The output of significance to the business is a customer order.
© 1998-2010 Sparx Systems Pty Ltd
233
Business Modeling |
The second half of the process model is to respond to a customer order and ship the required items. The
second process involves the warehouse inventory and shipping company, and completes when an order is
delivered to the customer.
See
· Process Modeling Notation 233
· Inputs, Resources and Information
· Events 235
· Outputs 235
· Goals 235
· A Complete Business Process 236
234
See Also
· Business Modeling and Business Interaction Diagrams
· Web Stereotypes
6.1 Process Modeling Notation
A business process model typically defines the following elements:
·
·
·
·
·
The goal or reason for the process
Specific inputs
Specific outputs
Resources consumed
Activities that are performed in some order, and
UML Modeling with Enterprise Architect - UML Modeling Tool
Business Modeling | Process Modeling Notation
234
· Events that drive the process.
The business process:
· Can affect more than one organizational unit
· Can have a horizontal organizational impact
· Creates value of some kind for the customer; customers can be internal or external.
A business process is a collection of activities designed to produce a specific output for a particular customer
or market. It implies a strong emphasis on how the work is done within an organization, in contrast to a
product's focus on what. A process is thus a specific ordering of work activities across time and place, with a
beginning, an end, and clearly defined inputs and outputs: a structure for action. The notation used to depict a
business process is illustrated below.
The process notation implies a flow of activities from left to right. Typically an Event 235 element is placed to
the left of the process and the output to the right. To specifically notate the internal activities, UML Activity
elements can be placed inside the process element.
The BPMN Profile
One popular notation and approach to business modeling is the Business Process Modeling Notation (BPMN).
This notation is specifically targeted at the business modeling community and has a relatively direct mapping
to UML through a BPMN Profile. Sparx Systems provides a built-in UML profile for BPMN modeling in
Enterprise Architect.
6.2 Inputs, Resources and Information
Business processes use information to tailor or complete their activities. Information, unlike resources, is not
consumed in the process; rather it is used as part of the transformation process. Information can come from
external sources, from customers, from internal organizational units and could even be the product of other
processes. A resource is an input to a business process and, unlike information, is typically consumed during
the processing. For example, as each daily train service is run and actuals recorded, the service resource is
'used up' as far as the process of recording actual train times is concerned.
The notation to illustrate information and resources is shown below.
A Supply connector indicates that the information or object linked to the process is not used up in the
processing phase. For example, order templates can be used over and over to provide new orders of a certain
style; the templates are not altered or exhausted as part of this activity.
© 1998-2010 Sparx Systems Pty Ltd
235
Business Modeling | Inputs, Resources and Information
An Input connector indicates that the attached object or resource is consumed in the processing procedure.
As an example, as customer orders are processed they are completed and signed off, and typically are used
only once per unique resource (order).
6.3 Events
An event is the receipt of some object, a time or date reached, a notification or some other trigger that initiates
the business process. The event might be consumed and transformed (for example a customer order) or
simply act as a catalyst (for example, nightly batch job).
6.4 Outputs
A business process typically produces one or more outputs of value to the business, either for internal use or
to satisfy external requirements. An output might be a physical object (such as a report or invoice), a
transformation of raw resources into a new arrangement (a daily schedule or roster) or an overall business
result such as completing a customer order.
An output of one business process might feed into another process, either as a requested item or a trigger to
initiate new activities.
An Output connector indicates that the business process produces some object (either physical or logical) that
is of value to the organization, either as an externally visible item or as an internal product (possibly feeding
another process).
6.5 Goals
A business process has some well defined goal. This is the reason the organization does this work, and
should be defined in terms of the benefits this process has for the organization as a whole and in satisfying the
business requirements.
UML Modeling with Enterprise Architect - UML Modeling Tool
Business Modeling | Goals
236
A Goal connector indicates that the attached object to the business process describes the goal of the process.
A goal is the business justification for performing the activity.
6.6 A Complete Business Process
The diagram below illustrates how the various model elements can be grouped together to produce a coherent
picture of a named business process. Included are the inputs, outputs, events, goals and other resources that
are of significance.
© 1998-2010 Sparx Systems Pty Ltd
237
Business Rule Modeling |
7 Business Rule Modeling
Note:
Business Rule Modeling is available in the Business and Software Engineering edition and Ultimate edition of
Enterprise Architect.
To model Business Rules in Enterprise Architect, you work through the following steps:
· Create a Rule model 238 to define business rules.
· Create a Business Domain model 241 , which provides the business vocabulary for defining business rules.
· Create a 242 Rule Flow 242 model 242 , which groups the rules for a specific task under a Rule Task, and
provides the order in which the business rules are executed.
· Model the rules in the Rule Composer 248 , which enables the rules to be transformed to a logical level of
detail.
· Validate 253 the rules in the Rule Composer.
· Generate code for the business rules 254 using Enterprise Architect's general code generation methods.
These steps are represented graphically in the following flow:
UML Modeling with Enterprise Architect - UML Modeling Tool
Business Rule Modeling |
238
Create a Business Rule Model
You can create a Business Rule Model from a template provided with Enterprise Architect. To do this, follow
the steps below:
1. In the Project Browser, either:
· Click on the New Model From Pattern icon in the toolbar
© 1998-2010 Sparx Systems Pty Ltd
239
Business Rule Modeling |
· Right-click on a model root node and select the Add a New Model using Wizard context menu
option, or
· Right-click on a package and select the Add | Add a New Model using Wizard context menu
option.
The Select Model(s) dialog displays.
2. In the Select From field, click on the drop-down arrow and select Business Rule Model. Alternatively,
if it is listed in the Technology panel, select the Business Rule Model item.
3. In the Name panel, select the checkbox next to the Business Rule Model icon.
4. Click on the OK button.
The following model structure is created in the Project Browser:
The Business Rules Model diagram, shown below, encapsulates the components of the Business Rules
model.
UML Modeling with Enterprise Architect - UML Modeling Tool
Business Rule Modeling |
240
7.1 Model Business Rules For RuleTasks
The Rule Model enables you to define Business Rule elements and associate them with a Rule Task. In the
example, you might define a set of rules to perform an eligibility check for a customer, to determine if the
customer is eligible to rent a car.
To do this, follow the steps below:
1. Create a diagram of type Rule Model. The Rule Model pages display in the Enterprise Architect UML
Toolbox.
2. Drag and drop a Rule Task element (Eligibility in the example) from the Rule Flow Activity diagram
package onto the Rule Model diagram.
3. Drag as many Business Rule elements as necessary from the Toolbox (or Project Browser if they exist
already) onto the diagram. You type the rule as the element name here, then define the parameters of
the rules using the Rule Composer 248 .
4. Create a Dependency relationship between each Business Rule element and the Rule Task element.
© 1998-2010 Sparx Systems Pty Ltd
241
Business Rule Modeling | Model Business Rules For RuleTasks
Note:
However, when you bring the rule into the Rule Composer, it automatically creates the Dependency
relationship anyway.
5. Repeat steps 2 - 4 for the next Rule Task element.
The resulting Rule Model resembles the following diagram:
After you have modeled rules for all the Rule Task elements in the Rule Flow diagram, the Business Domain
model is ready for code transformation 254 . The code templates for generating technology-specific rule code
work hand-in-hand with the EASL code templates to generate the code for the Rule Flow diagram.
7.2 Create a Business Domain Model
The Business Domain Model provides the business vocabulary - terms and facts - on which Business Rules
can be modeled. In Enterprise Architect a Business Domain model is created as a conceptual Class diagram.
Note:
When you create Classes in the Business Domain model, select the correct language for code generation to
ensure that the correct data type is set for attributes and operation parameters.
Business Rules code generation is supported for the following languages:
· C++
· C#
· Java
· VbNet.
The following diagram shows an example Business Domain model, for a Car Rental system.
UML Modeling with Enterprise Architect - UML Modeling Tool
Business Rule Modeling | Create a Business Domain Model
242
In the example Business Domain model, the Classes Rent, Customer, Car and Application, together with their
attributes and operations, provide the terms for the business vocabulary. The Class Rental System processes
the rules. To make Rental System process the rules, you add a Rule Flow Activity 242 as a behavior for this
Class.
When you create a Rule Flow behavior (Activity) under a Class you can model the rules as Rule Tasks
(Actions). When code is generated the rule flow behavior is rendered as a method inside the corresponding
Class.
Alternatively, if you have existing operations in the Class that already suit the purpose, you can model
business rules in those operations 246 . When code is generated for the Class the rules logic is generated as
the method body for the corresponding operation.
7.3 Create a Rule Flow Model
You create a Rule Flow Activity as a behavior for a Class, to enable that Class to process a set of rules.
To add a Rule Flow Activity to a Class, follow the steps below:
1. On the Business Domain model diagram, right-click on the Class that processes the rules (in the
example, Rental System).
2. From the context menu select the Add | RuleFlow Activity menu option.
A new Rule Flow Activity with a Rule Flow diagram is created as a behavior for the selected Class. The Rule
Flow diagram models the sequence in which a series of Rule Tasks are executed.
Code generation for a Rule Flow model renders each RuleFlow Activity as a set of operations or methods.
Depending on what you want these methods to do, you might want to pass in some parameters to be used
within the Rule Flow Activity. See the Pass Parameters to Rule Flow Activity 245 topic.
© 1998-2010 Sparx Systems Pty Ltd
243
Business Rule Modeling | Create a Rule Flow Model
Add a Rule Task
A Rule Task is a stereotyped Action that groups Business Rules for a specific task. You create Rule Task
elements in a Rule Flow diagram using the associated Rule Flow pages of the Enterprise Architect UML
Toolbox.
The following illustration is of a possible Rule Flow diagram for the car rental example.
UML Modeling with Enterprise Architect - UML Modeling Tool
Business Rule Modeling | Create a Rule Flow Model
244
The Rule Task elements Eligibility, Determine Rent Payable, Determine Penalty and Determine Total Amount
Payable group the business rules for the specific task indicated by the element name. You then identify the
business rules 240 for each group.
© 1998-2010 Sparx Systems Pty Ltd
245
Business Rule Modeling | Create a Rule Flow Model
Notes:
· In a Rule Flow diagram, every Decision Node has a matching Merge Node to ensure proper code
generation.
· For code generation, the Rule Task elements must be grouped inside the appropriate Rule Flow Activity in
the Project Browser. However, Rule elements can be defined anywhere in the model, as they can be used
in more than one Rule Task.
7.3.1 Pass Parameters to Rule Flow Activity
To pass in parameters to be used within a Rule Flow Activity, follow the steps below:
1. In the Project Browser, double-click on the Rule Flow Activity. The element Properties dialog displays.
2. Click on the Behavior tab.
3. Click on the Edit Parameters button. The Parameters dialog displays.
4. Create and define
170
each parameter, setting Type and Default values.
5. Save each parameter and, when you have finished setting the parameters, close both dialogs.
The Rule Flow Activity parameters can be accessed by the Rule Tasks within the parent Rule Flow Activity. In
UML Modeling with Enterprise Architect - UML Modeling Tool
Business Rule Modeling | Create a Rule Flow Model
246
the following hierarchy, the parameters m_rent and m_application can be used by any of the Rule Tasks under
the ProcessApplication Rule Flow Activity.
You can use the parameters as condition variables or action variables in the Business Rule Decision Table 248
, or as rule variables in the Computation Table 248 for any of the Rule Tasks. If the Activity parameter is not
accessible to a Rule Task, Enterprise Architect displays an error message.
7.3.2 Model Rules In an Operation
You can model business rules either in the Business Rule 240 elements attached to the Rule Task element in
a RuleFlow Activity 242 diagram, or in the operations of the rule Class in the Business Domain model 241 .
To model business rules for an operation:
1. Open the Properties dialog for the operation and, in the Stereotype field on the General tab, type the
value RuleTask.
2. In the Project Browser, right-click on the operation and select the Rule Composer option to open the
Rule Composer.
3. Model the rules for the operation
248 .
The operations appear in the Project Browser as shown below:
On code generation, the code for rules logic is generated in the method body.
When you drag and drop a RuleTask operation onto a Rule Flow diagram, an operation call behavior action
167 is created. To pass the parameters for this operation call, open the Properties dialog and select the Call
tab. Set the Behavior field to the operation to be called. Under the Arguments field, click on the Edit
Arguments button and edit the argument values 174 to be passed.
On the diagram, the call behavior actions for the RuleTask operations are indicated as shown below:
© 1998-2010 Sparx Systems Pty Ltd
247
Business Rule Modeling | Create a Rule Flow Model
UML Modeling with Enterprise Architect - UML Modeling Tool
Business Rule Modeling | Compose Business Rules
248
7.4 Compose Business Rules
You use the Rule Composer to define a business rule written in plain text within a Business Rule element or
Class operation. The Rule Composer enables you to model conceptual-level business rules at a logical level
in tabulated format, which assists in transforming the rules to technology-specific rules (code 254 ).
You can also download
Excel, via a CSV file.
253
the contents of the Rule Composer to a spreadsheet application such as Microsoft
Access The Rule Composer
To access the Rule Composer, right click on a Rule Task element and select the Rule Composer context
menu option. The Rule Composer displays in the central work area on its own tab.
The Rule Composer consists of:
· a Rule Statements list
· a Decision Table and
· a Computation Rule Table.
To assist with traceability, as the Rule Composer is completed, selections in one table automatically highlight
the corresponding rows and columns of the other tables. For example, If a Rule Statement is selected, the
related rule column in the Decision Table and row in the Computation Rule Table are highlighted. Similarly, if
a Computational Rule is selected, the corresponding column in the Decision Table and row in the Rule
Statements list are highlighted.
Rule Statements Table
The Rule Statements table lists the rules associated with the selected Rule Task. You add a rule to the table
by dragging an existing Business Rule element from the Project Browser onto an empty row in the Rule
Statements table. You cannot create new rules within the table.
To define a business rule associated with the selected Rule Task, follow the steps below:
1. For the first rule, select the text within the Business Rule element and drag it onto the empty row.
© 1998-2010 Sparx Systems Pty Ltd
249
Business Rule Modeling | Compose Business Rules
2. For a subsequent rule, click on the No column and select the Add Row context menu option. An empty
row is added to the Rule Statements table.
3. Drag the required Business Rule element from the Project Browser onto the new row. If the Business
Rule element is not already on the diagram, this adds the element to the diagram and creates a
Dependency relationship between the Business Rule and Rule Task elements.
To remove a rule that is no longer required in the Rule Composer, right-click on the appropriate No field and
select the Remove Rule context menu option.
Note:
This removes the rule from the Rule Composer and deletes the Dependency relationship with the Rule Task
element. However, it does not remove the Business Rule element from either the diagram or the Project
Browser (where, in either case, it might be in use with other Rule Task elements).
Decision Table
The Decision Table enables you to model conditional rules (for example: Cars must not be rented to
customers of age less than 18).
The table has three sections:
· Rule Conditions – to model condition variables
· Rule Actions – to model action variables
· Rule Bindings – to link the rule in the rule table.
Rule Conditions Section
To model Rule Conditions, follow the steps below:
1. The Business Domain model defines the business terms (such as Customer) and their associated
attributes. From the appropriate Class element in the Project Browser, drag and drop the required
condition attribute (such as age) or operation (such as IsValidLicense()) onto the Rule Conditions
column.
UML Modeling with Enterprise Architect - UML Modeling Tool
Business Rule Modeling | Compose Business Rules
250
Notes:
· The Rule Condition field enables you to use intellisense to display a list of possible entries for the
field. Press [Ctrl]+[Spacebar] in the field to display the list of entries.
· If the Rule Condition is of type enum, the Allowable Values fields are automatically set with the
enum literals. The procedure then ends here.
2. Define a range of accepted values for the Rule Condition.
3. Right-click on the Allowable Values column and select the Edit Allowable Values context menu
option. The Edit Allowable Values dialog displays.
Type each required value or range of values in the Value field, and click on the Save button to display
the value in the Allowable Values list box; for example:
age could have the values:
<18
>18 and <50
>50
IsValidLicense() could return:
True
False
4. Click on the OK button to save the values and close the dialog. A new constraint AllowableValues is
created for the attribute.
Notes:
· You can check this constraint by opening the Properties dialog for the attribute and selecting the
Constraints tab.
· If the Rule Condition references an enumeration, the enum literals are not editable in the Edit
Allowable Values dialog.
5. If the Rule Condition is an operation, you can pass parameters to it. Right click on the Allowable
Values field, and select the Edit Parameters context menu option. The Edit Parameters dialog
displays. Select the parameters and type their values into the Value text box. Click on the OK button to
cancel the dialog.
© 1998-2010 Sparx Systems Pty Ltd
251
Business Rule Modeling | Compose Business Rules
Note:
You can add an operation as a Rule Condition more than once, to allow calling the operation with
different sets of parameters.
To add another Rule Condition, right-click on the No column and select the Add Row context menu option. An
empty row is added to the table.
To remove a Rule Condition from the table, right-click on the appropriate No field and select the Delete Row
context menu option. This does not affect the original attribute or the new constraint in the model. You can
either re-use the attribute with its constraint, or use the attribute Properties dialog to remove the constraint.
Rule Actions Section
In the Rule Actions section, when a specific value of a Rule Condition calls an operation (such as post error)
or decision attribute (such as Eligible - Yes/No), you assign the operation or attribute as an action. To model
Rule Actions, follow the steps below:
1. From a business term Class element in the Project Browser, drag and drop the required attribute or
operation onto the Rule Actions field.
Note:
The Rule Actions field enables you to use intellisense to display a list of possible entries for the field.
Press [Ctrl]+[Spacebar] in the field to display the list of entries.
2. For an attribute, double-click on the Allowable Values/Parameters field. The Edit Allowable Values
dialog displays; type the range of values in the text box (such as Yes, No; or Accept, Reject), click on
the Save button and close the dialog. Select the appropriate response in the Result column fields.
Note:
If the dropped action variable is of type enum, the Allowable Values/Parameters fields are
automatically set with the enum literals.
3. For an operation, a checkbox displays in each of the Result column fields. To call the operation, select
the checkbox in the appropriate column.
To pass parameters to the operation, double-click on the Allowable Values/Parameters field. The Edit
Parameters dialog displays. Select the parameters and type the values into the Value text box. Click on
the Save button and close the dialog.
Note:
You can add an operation as a Rule Action more than once, to allow calling the operation with different
sets of parameters.
4. Click on the Save button in the Rule Composer toolbar to save the values.
UML Modeling with Enterprise Architect - UML Modeling Tool
Business Rule Modeling | Compose Business Rules
252
Note:
Alternatively, you can right-click on an Allowable Values/Parameters field to display a context menu with
two options:
· If the Rule Action is an attribute, the Edit Allowable Values option is enabled and this displays the Edit
Allowable Values dialog
· If the Rule Action is an operation, the Edit Parameters option is enabled and this displays the Edit
Parameters dialog.
To add another Rule Action, right-click on the No column and select the Add Row context menu option. An
empty row is added to the table.
To remove a Rule Action from the table, right-click on the appropriate No field and select the Delete Row
context menu option. This does not affect the original attribute or operation in the model.
Rule Bindings Section
The Rule Bindings section lies on top of the Rule Conditions section. It binds the Rule Condition and Rule
Action values to the appropriate rule in the Rule Table. To bind a rule, follow the steps below.
1. Select the rule number in the Rule Bindings field over one of the Value<n> or Result<n> columns.
2. Ensure that the values set in the Value<n> or Result<n> field for the Rule Condition or Rule Action,
underneath the rule number, all satisfy the rule.
3. Click on the Save icon in the Rule Composer toolbar.
For example, (referring to the screen diagram at the top of this Rule Composer topic) if rule 2 is Car must not
be rented to Customers of age less than 18:
·
·
·
·
Select 2 in the Rule field over the Value1 column
Select < 18 against Customer.age in the Value1 column in the Rule Conditions table
Select No against Customer.Eligible in the Result1 column in the Rule Action table
Select Reject against Application.Status in the Result1 column in the Rule Action table.
Computation Rule Table
The Computation Rule table enables you to model rules involving computations.
The table has the following columns:
·
·
·
·
Computation Rule Actions
Expression
Rule Bindings
Rule Dependency.
To define a computation rule, follow the steps below:
1. From the Project Browser, drag and drop the appropriate attribute from a Class in the Fact model into
the Computation Rule Actions field.
© 1998-2010 Sparx Systems Pty Ltd
253
Business Rule Modeling | Compose Business Rules
Note:
Both the Computation Rule Actions field and the Expression field enable you to use intellisense to
display a list of possible entries for the fields. Press [Ctrl]+[Spacebar] in the field to display the list of
entries.
2. In the Expression field, type the expression to be evaluated.
3. In the Rule Bindings field, type the rule number from the Rule table of the rule being modeled, to link
the table data to the rule.
4. If the rule depends on another rule being satisfied first, type the number of that rule in the Rule
Dependency field.
5. Click on the Save icon in the Rule Composer toolbar to save the computation rule.
If the computation rule is also a Rule Conditions rule, add the condition variable in the Decision table and bind
the appropriate rule in the Rule Bind section.
Export Rules To CSV File
To export the contents of the Rule Composer to a CSV file, follow the steps below:
1. Click on the Export to CSV icon (
displays.
) in the Rule Composer toolbar. The Windows Browser dialog
2. Browse to the required file location and type in a .CSV filename to export to.
3. Click on the Save button to export the data.
7.5 Validate Business Rules
It is recommended practice to validate the business rules in the Rule Composer before you generate code for
the Rule Task elements. To do this, click on the Validation (green tick) icon in the Rule Composer toolbar.
The business rules on the Rule Composer are parsed and any errors or warnings that might indicate
incomplete or unfavorable code generation are displayed on a Rule Composer Validation tab on the Output
screen. For example:
UML Modeling with Enterprise Architect - UML Modeling Tool
Business Rule Modeling | Validate Business Rules
254
To highlight and investigate the faulty data in the Rule Composer, double-click on the appropriate warning or
error message.
7.6 Code Generation For Business Rules
After you have modeled the business rules for all the Rule Task elements in the Rule Flow diagram, you can
generate code from the Rule Flow behavior.
To return a value from the Rule Flow behavior:
1. Double-click on the last Rule Task element before the end node of the Rule Flow diagram. The
element's Properties dialog displays.
2. Click on the Effect tab.
3. In the Effect field, type the return statement; for example, return true.
4. Click on the Save button, and on the OK button to close the dialog.
Generate code for the Class containing the rule flow behavior (in our initial example, Rental System 241 ). The
code for business rules logic is generated, with the rule statements expressed in natural language as
comments.
The following code snippet was generated from the Rental System Class element in our example:
///////////////////////////////////////////////////////////
// RentalSystem.cs
// Implementation of the Class RentalSystem
// Generated by Enterprise Architect
// Created on:
08-May-2009 2:39:23 PM
///////////////////////////////////////////////////////////
public class RentalSystem {
public Customer m_Customer;
public Car m_Car;
public Rent m_Rent;
public RentalSystem(){
}
~RentalSystem(){
}
public virtual void Dispose(){
}
/* Begin - EA generated code for Activities and Interactions */
public bool ProcessApplication(Rent m_rent,Application m_application)
{
// behavior is an Activity
/*CAR MUST NOT BE RENTED TO CUSTOMERS WITHOUT A VALID LICENCE NUMBER*/
if( m_Customer.ValidLicenceNumber == "FALSE" )
{
m_application.Status = "Reject";
m_Customer.Eligibile = false;
}
/*CAR MUST NOT BE RENTED TO CUSTOMERS OF AGE LESS THAN 18*/
if( m_Customer.age < 18 )
{
m_application.Status = "Reject";
m_Customer.Eligibile = false;
}
/*CAR MUST NOT BE RENTED TO CUSTOMERS WITH BAD HISTORY LEVEL 3*/
if( m_Customer.BadHistoryLevel == 3 )
{
m_application.Status = "Reject";
© 1998-2010 Sparx Systems Pty Ltd
255
Business Rule Modeling | Code Generation For Business Rules
m_Customer.Eligibile = false;
}
if (Customer.Eligible == true)
{
/*RENT FOR SMALL CARS IS 80 AUD PER DAY*/
if( m_Car.type == Small )
{
m_rent.RentPerDay = 80;
}
/*RENT FOR AWD CARS IS 100 AUD PER DAY*/
if( m_Car.type == AWD )
{
m_rent.RentPerDay = 100;
}
/*RENT FOR LUXURY CARS IS 150 AUD PER DAY*/
if( m_Car.type == Luxury )
{
m_rent.RentPerDay = 150;
}
/*RENT PAYABLE IS CALCULATED AS THE PRODUCT OF RENTPERDAY AND
RENTALPERIOD IN DAYS*/
m_rent.RentPayable = m_rent.RentPerDay * m_rent.No_of_rent_days;
if (CustomerBadHistoryLevel > 0)
{
/*PENALTY OF 20 % OF RENT MUST BE APPLIED FOR CUSTOMERS
WITH BAD HISTORY LEVEL 2*/
if( m_Customer.BadHistoryLevel == 2 )
{
m_rent.PenaltyFee = m_rent.RentPayable * 0.2;
}
/*PENALTY OF 10 % OF RENT MUST BE APPLIED FOR CUSTOMERS
WITH BAD HISTORY LEVEL 1*/
if( m_Customer.BadHistoryLevel == 1 )
{
m_rent.PenaltyFee = m_rent.RentPayable * 0.1;
}
}
else
{
}
/*TOTAL AMOUNT PAYABLE IS CALCULATED AS THE SUM OF RENT PAYABLE
AND PENALTY IF ANY.*/
m_rent.TotalAmountPayable = m_rent.RentPerDay + m_rent.PenaltyFee;
}
else
{
}
return m_application.Status;
}
/* End - EA generated code for Activities and Interactions */
}//end RentalSystem
UML Modeling with Enterprise Architect - UML Modeling Tool
Systems Engineering Modeling |
256
8 Systems Engineering Modeling
Note:
Systems Modeling Language (SysML) is available in the Systems Engineering edition and Ultimate edition of
Enterprise Architect.
To model Systems using SysML in Enterprise Architect, you work through the following steps:
· Create a Systems Engineering model 257 to develop your system.
· Create a Requirements model 259 to define the systems requirements and expectations.
· Create an Operational Domain model 260 , which describes the environment that the system operates
within, and the entities it interacts with.
· Create Constraint models 262 to describe the systems operating characteristics using parametric models.
· Simulate the parametric models 265 to verify their correctness and obtain the desired characteristic.
· Design the system's composition 267 using SysML Blocks and Parts.
· Implement the embedded software using UML Classes and behavioral models.
· Create a Library of reusable SysML blocks 268 , representing subsystems that can be reused on other
projects, and other common Type definitions.
These steps are represented graphically in the following flow:
© 1998-2010 Sparx Systems Pty Ltd
257
Systems Engineering Modeling |
Create a Systems Engineering Model
You can create a Systems Engineering Model from a template provided with Enterprise Architect. To do this,
follow the steps below:
1. In the Project Browser, either:
· Click on the New Model From Pattern icon in the toolbar
UML Modeling with Enterprise Architect - UML Modeling Tool
Systems Engineering Modeling |
258
· Right-click on a model root node and select the Add a New Model using Wizard context menu
option, or
· Right-click on a package and select the Add | Add a New Model using Wizard context menu
option.
The Select Model(s) dialog displays.
2. In the Select From field, click on the drop-down arrow and select Systems Engineering Model.
Alternatively, if it is listed in the Technology panel, select the Systems Engineering Model item.
3. In the Name panel, select the checkbox next to the Systems Engineering Model icon.
4. Click on the OK button.
The following model structure is created in the Project Browser:
The Systems Engineering Model diagram, shown below, encapsulates the key components of the Systems
Engineering model.
© 1998-2010 Sparx Systems Pty Ltd
259
Systems Engineering Modeling |
8.1 Create a Requirements Model
The SysML Requirements Model provides the system requirements, the expected abstract behavior and the
operating constraints that the designed system must conform to.
The following diagram shows an example requirements model for a Portable Audio Player.
UML Modeling with Enterprise Architect - UML Modeling Tool
Systems Engineering Modeling | Create a Requirements Model
260
In the example Requirements Model, each of the child packages contains child models that capture the
following aspects of the system's requirements:
· The Specifications package contains SysML Requirements describing the overall expectations of the
designed system.
· The Use Cases package contains SysML Use Cases that describe the general interaction between the
system and its users.
· The Interactions package contains SysML Interactions that describe a detailed sequence of interactions
between the system and its users.
· The State Machines package contains SysML State Machines that describe each of the operational states
the designed system has.
· The Constraint Blocks package contains SysML ConstraintBlocks that describe the expected performance
and operating boundaries of the system.
8.2 Create an Operational Domain Model
The SysML Operational Domain Model defines the system's operating environment, which describes the
operating conditions that the system is intended to operate within.
The following diagram shows an example Operational Domain model for a Portable Audio Player. The SysML
Block Definition Diagram describes the Operational Domain (in this example - the ListeningDomain) as a
system composition.
© 1998-2010 Sparx Systems Pty Ltd
261
Systems Engineering Modeling | Create an Operational Domain Model
In this example, the ListeningDomain is defined as a system containing other subsystems within it. The
domain contains subsystems that define the Listener (i.e. User), the Portable Audio Player, Clothing (which
the user wears), and the External Environment.
Details of the ListeningDomain system are further detailed in the ListeningDomain's Internal Block Diagram.
UML Modeling with Enterprise Architect - UML Modeling Tool
Systems Engineering Modeling | Create an Operational Domain Model
262
In this example, the ListeningDomain's system's detailed composition shows how the Portable Audio Player
and other sub-systems fit together to form the Listening Domain. It also describes the binding relationships
between the parts, which describe how they are functionally bound to one another.
8.3 SysML Parametric Models
Note:
Systems Modeling Language (SysML) is supported in the Systems Engineering and Ultimate editions of
Enterprise Architect.
SysML Parametric models support the engineering analysis of critical system parameters, including the
evaluation of key metrics such as performance, reliability and other physical characteristics. They unite
requirements models with system design models by capturing executable constraints based on complex
mathematical relationships.
The following text is derived from the SysML entry in the online Wikipedia.
The advantages of SysML over UML for systems engineering become obvious if you consider a
© 1998-2010 Sparx Systems Pty Ltd
263
Systems Engineering Modeling | SysML Parametric Models
concrete example, such as modeling an automotive system. With SysML you can use Parametric
diagrams to precisely define performance and mechanical constraints such as maximum acceleration,
curb weight, air conditioning capacity, and interior cabin noise management.
For further information on the concepts of SysML Parametric models, refer to the official OMG SysML website
and its linked sources.
Create a Parametric Model
Enterprise Architect enables you to develop SysML Parametric models quickly and simply; these models can
also be simulated 265 . To create a Parametric model, follow the steps below:
1. Create a collection of SysML Constraint Blocks that formally describe the function of a constraint in a
simulation model. Each Constraint Block contains properties that describe its input and output
parameters, as well as Element Script that describes the constraint's executable component.
2. Right-click on each of the constraintBlocks and select the SysML | Add Element Script context menu
option to add script to the constraint block. This is where you express the relationship / behavior of the
constraint block as an executable script.
3. Create a SysML Constraint Block to contain the Parametric model to simulate. The Parametric model
contains properties and occurrences of constraint blocks as Constraint Property elements, connected in
a Parametric Diagram.
UML Modeling with Enterprise Architect - UML Modeling Tool
Systems Engineering Modeling | SysML Parametric Models
264
4. Right-click within a Parametric Diagram and select the SysML | Simulate Diagram... context menu
option.
5. Depending on your configuration selections 265 , the simulation's results are either written to a
comma-separated CSV file or graphed in a 2-dimensional plot.
© 1998-2010 Sparx Systems Pty Ltd
265
Systems Engineering Modeling | SysML Parametric Models
8.3.1 Simulate a SysML Model
Note:
Systems Modeling Language (SysML) is supported in the Systems Engineering and Ultimate editions of
Enterprise Architect.
To simulate a SysML model, follow the steps below:
1. Right-click within a Parametric Diagram and select the SysML | Simulate Diagram... context menu
option. The Simulation Configuration dialog displays.
UML Modeling with Enterprise Architect - UML Modeling Tool
Systems Engineering Modeling | SysML Parametric Models
266
2. The Parameters panel lists all of the parameters that can be assigned input. Select each of the required
parameters and click on the right Arrow button to assign them as input. Parameters designated as
input parameters are listed in the Inputs panel on the right.
Note:
There must be at least one input parameter assigned for the simulation to execute.
3. Assign a set of values for each of the designated input parameters. For each input parameter, in the
Input Values panel select one of the two possible value kinds:
· Discrete - To enter a constant or a comma-separated range of discrete values
· Range - To enter a range of values beginning at the From value and ending at the To value. The
input values are incremented by the Step value.
4. Specify the classes of output value:
· Parameters - To output the parameters' data, select the checkbox
· Variables - To output the data generated within each internal variable, select the checkbox. Internal
variables are automatically generated by the simulator
5. Specify how the simulation results are to be reported. The Output Format panel enables you to choose
how the simulation outputs the simulation data.
· Plot To Graph: To plot the results on a 2-dimensional graph, select the checkbox; if you select this
option, you must specify an input parameter for the plot's X Axis
· Title - To enter a title for the graph, type in the title text
· Output to File - To output the results to a CSV text file, select the checkbox and type or browse ([...]
) for the file name.
6. Click on the OK button to execute the simulation.
© 1998-2010 Sparx Systems Pty Ltd
267
Systems Engineering Modeling | Compose System Design
8.4 Compose System Design
The SysML Design Model contains the blocks that define the system's composition. It describes the manner in
which reusable subsystems fit together to fulfill the design requirements.
The following diagram shows an example Design Model for a Portable Audio Player. The SysML Block
Definition Diagram describes the Portable Audio Player as a composition of various reusable off-the-shelf
subsystems in-house designed ones.
In the example above, the Portable Audio Player is defined as a SysML system containing subsystems that
perform specific tasks. The design contains subsystems for supplying power, performing playback and audio
processing, interfacing with other devices, and the user interface.
Details of the Portable Audio Player's composition are further described in detail within the Portable Audio
Player's Internal Block Diagram.
UML Modeling with Enterprise Architect - UML Modeling Tool
Systems Engineering Modeling | Compose System Design
268
In this example, the Portable Audio Player's composition is described, detailing how each of the sub-systems
is structured. It also describes the binding relationships between the parts, which describe how they are
functionally bound to one another - for example, the CPU, Memory and Codec are interfaced together in the P
rocessing Subsystem.
8.5 Create Reusable Subsystems
Model Based Systems Engineering provides the flexibility and expressiveness to define complex systems
quickly effectively by reusing common entities across design projects. A Library is a package containing many
reusable subsystems, parametric constraints, common data types and common value types, dimensions and
units.
The following diagram shows an example library model.
© 1998-2010 Sparx Systems Pty Ltd
269
Systems Engineering Modeling | Create Reusable Subsystems
In the example Library, each of the child packages contains child models that capture the following reusable
entities:
· Blocks defining systems such as those listed in the Components package, or those defined in the External
package.
· ConstraintBlocks defining parametric constraints for use in parametric models.
· Value Types describing quantities, expressed as measurable dimensions in specific units.
· Data Types and Flow Specifications describing data structures and Flows.
UML Modeling with Enterprise Architect - UML Modeling Tool
Index
Index
-AActivity
Behavioral Aspects 167
Edit Parameters 167
Parameters, Define 170
Paste As Action 39
Paste As Link 39
Paste From Project Browser 39
Activity Diagram
Create Object From Attribute 117
Generate From Scenario 135
Generate Scenario From 143
Add
Diagram Properties Note 36
Diagram to Project 13
Element Directly To Package 83
Element To Diagram From Project Browser
Line Points 206
Note To Connector 203
Note To Link 203
Package In Project Browser 3
Tagged Values 147
UML Diagram 13
Advanced
Settings, Generalizable Elements 120
Tag Management 146
Align
Multiple Elements 91
Alternate Path, Scenario 127
Alternative Image
For Element 44
In Diagram 44
Select 44
Appearance
Apply From Clipboard 77
Connectors Context Menu Section 200
Copy For Element 77
Default, Of Element 96
Element Context Menu 77
Argument
Call, Synchronize With Behavior Parameter
168
For Behavioral Parameter 174
Invocation, Synchronize With Behavior
Parameter 168
Arrange
Connectors 205
270
Associate
Calls With Behaviors 168
Invocations With Behaviors 168
Associated Files
Elements 144
Association
Details 217
Dot On Connector 219
Properties 217
Set Derived Property 199
Specialisation, Set Up 214
Attach
Note To Link 203
Attribute
Add To Element, In-place Editor 181
Collections 110
Connect To 202
Constraints 111
Copy Between Elements 103
Create 105
Create Object From 117
Definition 105
37
Delete 108
Derived 108
Dialog 105
Dialog, Constraints Tab 111
Dialog, Detail Tab 110
Dialog, General Tab 108
Disconnect From 202
Edit Keyword 179
Edit Name, In-Place Editor 176
Edit Scope 178
Edit Stereotype, In-place Editor 177
Fast Create 105
Inherited, Display 115
Inherited, Show 33
Introduction 105
Link To Element Via Object 117
Modify 105
Move Between Elements 104
Multiplicity 110
Properties, Create 114
Qualifiers 110
Redefine Property 110
Show On Diagram 33
Tagged Values 112
UML Property, isUnique 110
Auto Counter
Of Elements 83
Auto Naming
Of Element 83
Auto Numbering
© 1998-2010 Sparx Systems Pty Ltd
271
Index
Auto Numbering
Of Elements 83
Auto Route Diagram Layout 25
Autolayout
Diagram 26
Options 26
Autosize
Element, Single 36
Elements, As Group 36
-BBasic Path, Scenario 127
Behavior
Associate With Calls 168
Associate With Invocations 168
Of Operation, Display In Diagram 158
Operation, Associate With 158
Parameter, Tagged Values 172
Parameters, Define 170
Synchronize Call Arguments With Parameters
168
Synchronize Invocation Arguments With
Parameters 168
Behavior Call
Actions For RuleTask Operations 246
Interaction Occurrence 167
Modeling 167
Parameter Arguments 174
Behavioral Modeling 153
Behavioral Parameter
Edit 168
Extend 168
Reassign 168
Set 168
Behaviors
Of Activities 167
Of Interactions 167
Bend
Connector At Cursor 206
Bezier Lines 206
Bitmap Image
In Diagrams 44
Box Diagram Layout 18
Business Domain Model
Create 241
Business Modeling
Business Process Outline 236
Events 235
Example 232
Goals 235
Information 234
Inputs 234
Outputs 235
Process Element 233
Process Modeling Notation 233
Processes 232
Resources 234
Business Process
Outline 236
Business Rule
Add To Rule Task 248
Create 248
Element 240
Export To CSV File 248
Generate Code 254
Modeling 240
Parameters As Variables 245
Remove From Rule Task 248
Validate 253
Business Rule Modeling
Business Domain Model, Create 241
Business Rules 240
Compose Rules 248
Computation Rule Table 248
Decision Table 248
Export Rules To CSV File 248
Generate Code 254
In Class Operations 246
In RuleTask Actions 240
Overview 237
Rule Composer 248
Rule Flow Diagram 242
Rule Model 240
Vocabulary 241
-CCall
Associate With Behaviors 168
Re-associate With Behavior 168
Synchronize Arguments With Behavior
Parameters 168
Cancel
Default Diagram, Model 59
Change
Connector Source Or Target 206
Connector Type 205
Diagram Type 31
Element Type 91
Child
Confirm Element As Parent 88
Child Element
Paste Object As 37
UML Modeling with Enterprise Architect - UML Modeling Tool
Index
Circle Diagram Layout 15
Class
Members, Show/Hide On Diagram 59
Show Realised Interfaces On Diagram 49
Classifier
Drop As Link 37
Drop As New Instance 37
Of Objects 148
Set 149
Use 149
Code
Generate For Business Rule 254
Code Engineering
Element Context Menu 77
Code Language
Create Properties As Attributes 114
Compartment
Constraint 187
Element 187
Maintenance 187
Responsibility 187
Tag 187
Testing 187
Composite Element
Paste From Project Browser 39
Computation Rule Table
Business Rule Modeling 248
Confirm
Parent Element 88
Connect
Elements 201
Objects 201
To Element Feature 202
Connector
Add Note 203
Advanced, Menu Section 199
Appearance 200
Arrange 205
At Page Boundaries 206
Bend At Cursor 206
Break Connection To Feature 202
Change Source Or Target 206
Change Type 205
Characteristics, Edit 199
Connect To Element Feature 202
Constraints 218
Context Menu 197
Copy Between Instances Of Elements From
Project Browser 209
Create Between Elements 209
Create From Project Browser 209
Custom Properties 72
272
Custom Properties, Set Value 199
Delete 210
Destination Role 221
Details 217
Direction Indicator 49
Edge 206
Hide 210
Hide/Show 200
In-place Editor Options 214
Labels 49
Labels, Edit 214
List, On Context References Tab 143
Move 205
Multiplicity 219
Off Page 206
Off-Page 197
Page Boundary 206
Properties 217
Properties Menu 198
Reverse Direction 214
Role, Context Menu 197
Source Role Properties 219
Styles 199, 206
Tagged Values 222
Target Role Properties 221
Tasks 201
Type Specific Menu Section 199
Type, Change 205
Visibility 200, 210, 212
Working With 197
Connector Styles
Auto Routing 206
Bezier 206
Custom 206
Direct 206
Lateral 206
Line Style 206
Set 206
Tree Style 206
Constraint
Compartment, Element 187
Delete 111
Element 125
In Connector 218
Inherited, Show 33
Of Attributes, Create 111
Context Element
Highlight 101
In Multiple Selection 101
Context Menu
Connector 197
Connector Label 49
© 1998-2010 Sparx Systems Pty Ltd
273
Index
Context Menu
Connector Role 197
Diagram 10
Element 69
Element Label 49
Element, Add Supporting Diagrams and
Elements 73
Element, Multiple Selection 79
Linked Document Editor 191
New Element Or Connector 10
Structural Specification 129
Context Reference
Add Comments, On Context References Tab
143
Add, On Context References Tab 143
Delete, On Context References Tab 143
List, On Context References Tab 143
Tab 143
Converge Diagram Layout 22
Convert
Linked Element To Local Copy 102
Copy
Attributes Between Elements 103
Diagram Image To Clipboard 31
Diagram Image To Disk File 31
Diagram, Deep 32
Diagram, Shallow 32
Element Between Packages 90
Element On Diagram 30
Operations Between Elements 103
Package 4
UML Diagram, Deep 32
UML Diagram, Shallow 32
Create
Attribute Properties 114
Custom Diagram Background, Image Manager
45
Diagram 13
Diagram From Linked Document 193
Diagram, Automatically 3
Document Artifact 190
Element From Linked Document 193
Element In Diagram 81
Element On Diagram From Project Browser 37
Element Template 100
Elements 81
Link Between Elements 209
Linked Document Template 194
Notes 95
Relationship Using Matrix 229
Text 95
UML Diagram 13
Create Property Implementation Dialog 114
Cross Reference
Delete 86
Set For Element 86
Use In Element 86
CSV
Export From Relationship Matrix 230
Export From Rule Composer 248
Custom Background
Create For Diagram, Image Manager 45
Custom Properties
Dialog 72
For Connectors 72
For Elements 72
Custom Reference
Delete 86
Set For Element 86
Use In Element 86
Customize
Diagram Appearance 52
Visibility Of Elements 94
-DDashed Border
On Element 88
Decision Table
Business Rule Modeling 248
Rule Action Section 248
Rule Binding Section 248
Rule Condition Section 248
Deep Copy
Of Diagram 32
Default Appearance
Background Color 96
Border Color 96
Border Thickness 96
Font Color 96
Of An Element 77
Of Element 96
Default Diagram
Model, Cancel For 59
Model, Set For 59
Delete
Connectors 210
Diagrams From Project browser 29
Element From Diagram 93
Element from Model 93
Element From Project Browser 93
Line Points 206
Linked Document 194
UML Modeling with Enterprise Architect - UML Modeling Tool
Index
Delete
Linked Document Template 194
Package In Project Browser 6
Relationship 126
Relationship Using Matrix 229
Derived
Attribute 108
Symbol 108
Destination Role 221
Diagram
Add Elements Via Context Menu 10
Add To Project 13
Alias 54
Alternative Image For Element 44
Appearance Options, Connectors 58
Appearance Options, Diagram Tab 54
Appearance Options, Element 55
Appearance Options, Features 57
Appearance Options, General 53
Appearance Options, Set 52
Appearance Options, Visible Class Members
59
Attribute Details, Show 57
Auto Route Layout 25
Automatic Layout 26
Box Layout 18
Cancel Model Default 59
Center-Focussed Layout 15
Change Type 31
Circular Layout 15
Connector Appearance Options 58
Connector Notation, Show 58
Context Menu 10
Converge Layout 22
Copy, Deep 32
Copy, Shallow 32
Create 13
Create Automatically 3
Create Custom Background, Image Manager
45
Create From Linked Document 193
Create Using Image Library 46
Creator 53
Customize Appearance 52
Delete (Multiple) From Project Browser 29
Delete (Single) From Project Browser 29
Delete Element From 93
Delete Multiple Elements From 93
Details Note 36, 54
Digraph Layout 20
Diverge Layout 22
Divide Between Pages In RTF Reprt 54
274
Drag & Drop Elements From Project Browser
37
Drag Existing Package Onto 5
Duplicate 32
Element Appearance Options 55
Element Compartments, Show/Hide 55
Element Icons 186
Element Stereotypes, Show 55
Element, Copy 30
Element, Paste 30
Elliptical Layout 15
Fan Relations Layout 24
Feature Return Types, Show 57
Feature Stereotypes, Show 57
Features Appearance Options 57
Find Related Elements 40
Generate From Scenarios 135
Increase Display Size 7
Layout Options 26
Layout Tool 14
Layout, Move Sections 65
Legend 60
Lock, Security Off 50
Make All Elements Selectable 10
Make Model Default 59
Managing 12
Modeling With 7
Move Elements 88
Move Sections 65
Navigation And Selection Hotkeys 30
Neaten Layout 21
Note 36
Notes 53
Open Package In 33
Parametric, SysML 262
Paste 32
Per Page Layout 19
Place Related Elements On Current 40
Print Page Footer 54
Print Page Header 54
Properties Dialog - Connectors Tab 58
Properties Dialog - Diagram Tab 54
Properties Dialog - Elements Tab 55
Properties Dialog - Features Tab 57
Properties Dialog - General Tab 53
Properties Dialog, Visible Class Members, 59
Properties Note, Add 36
Properties, Set 52
Property Strings, Show 58
Qualifiers, Show 57
Redo Last Action 51
Relationships, Show 58
© 1998-2010 Sparx Systems Pty Ltd
275
Index
Diagram
Rename 30
Rotate Image In RTF Report 54
RTF Document Options 54
Rule Model 240
Save 10
Set Page Size 63
Show As Element List 10
Show Realised Interfaces For Class 49
Show/Hide Package Contents 6
Spring Layout 21
Stereotype 53
Swimlanes 47
Swimlanes Matrix 41
Synchronize With Scenario Steps 135
SysML, Parametric 262
Table Owner, Show 55
Tasks, General 12
Undo Last Action 51
Version 53
View Next 51
View Previous 51
Visibility Indicators 57
Working With 7
Z Order Elements 32
Diagram Image
Copy To Clipboard 31
Copy To Disk File 31
Save To Disk File 31
Dialog
Create Property Implementation 114
Paste Element 37
Select <Item> 149
Select Attribute Type 108
Select Property 151
Digraph Diagram Layout 20
Direction Indicator
Connector Label 49
Display
Attributes, Inherited 33
Constraints, Inherited 33
Inherited Attributes 115
Inherited Operation 165
Operations, Inherited 33
Requirements, Inherited 33
Tagged Values, Inherited 33
Diverge Diagram Layout 22
Dock
Two Elements 77
Dockable
Element Option 77
Document
Linking 188
Document Artifact
Element 188
Link Into RTF Report 188
Dot
On Association 219
Drag
Element From Project Browser Onto Diagram
37
Objects From Project Browser Onto Diagram
37
Drop
Classifiers As Links 37
Classifiers As New Instances 37
Elements From Project Browser Onto Diagram
37
Objects From Project Browser Onto Diagram
37
Duplicate
Diagram 32
Element 90
Package 4
UML Diagram 32
-EEdit
Attribute Name, In-Place Editor 176
Element Name, In-Place Editor 176
Linked Document Template 195
Linked Documents 191
Operation Name, In-Place Editor 176
Element
Active 120
Add Attribute, In-place Editor 181
Add Directly To Package 83
Add Operation, In-place Editor 181
Add Supporting Diagrams and Elements 73
Add To Diagram From Project Browser 37
Add To Diagram Via Context Menu 10
Add To Favorites 74
Align 79
Align Multiple 91
Alternative Image 44
Appearance, Context Menu Option 77
Associated Files 144
Attributes Option 77
Author 119
Auto Counters 83
Auto Naming 83
Auto Numbering 83
Autosize Group 36
UML Modeling with Enterprise Architect - UML Modeling Tool
Index
Element
Autosize Single 36
Business Rule 240
Cardinality (Multiplicity), Non-Displayable 121
Change Type 91
Code Engineering Menu 77
Compartments 187
Complexity 119
Concurrency 121
Confirm As Parent 88
Constraints 125
Context Menu 69
Context Menu, Add Submenu 73
Context Menu, Advanced 71
Context Menu, Features 77
Context Menu, Find Submenu 74
Copy Between Packages 90
Create Child Diagram 13
Create From Linked Document 193
Create In Diagram 81
Create Link From Project Browser 209
Custom Properties 72
Customize Visibility 94
Dashed Border On 88
Default Element Template 100
Delete 93
Details 121
Display Depth 32
Dockable 77
Drag From Project Browser 37
Duplicate 90
Edit Attribute Keyword 179
Edit Attribute Scope 178
Edit Attribute Stereotype, In-place Editor 177
Edit Item, Tasks 175
Edit Name, In-Place Editor 176
Edit Operation Parameter Keyword 179
Edit Operation Parameter Kind 180
Edit Operation Scope 178
Edit Operation Stereotype, In-place Editor 177
Embedded Submenu 75
Embedded, Add 75
External Requirements 124
Feature, Connect To 202
Feature, Disconnect From 202
Final (Leaf) 120
Find in Diagrams 74
Find In Project Browser 74
Find Related 40
Fine Movement 65
General Settings 119
Generalizable, Advanced Settings 120
276
Get Project Custom Colors 98
Highlight Context 101
Icons On Diagram 186
In-place Editor Options 175
In-Place Formatting 186
Insert Maintenance Feature 182
Insert Operation Parameter 182
Insert Related Elements 74
Insert Testing Features 184
Internal Requirements 122
Keywords 119
Labels 49
Layout 79
Legend 60
Link To Attribute Via Object 117
Linked, Convert To Local Copy 102
Lock, Security Off 77
Make All Selectable/Unselectable 10
Make Non-Selectable, Multiple Elements 79
Make Non-Selectable, Single Element 77
Make Selectable, Multiple Elements 79
Make Selectable, Single Element 77
Managing 81
Match Size 79
Modeling With 67
Move Between Packages 89
Move By Increments 65
Move In Diagrams 88
Multiple Selection 79
Multiplicity, Displayable 120
New 81
Non-Selectable, Multiple Elements 79
Non-Selectable, Single Element 77
Notes 95
Nudge 65
Operations Option 77
Paste Copy 90
Paste From Project Browser 37
Phase 119
Place Related On Current Diagram 40
Postconditions 125
Preconditions 125
Properties Dialog 118
Properties Dialog, General Settings 119
Properties Menu 70
Properties, As Attributes 114
Properties, Links 126
Properties, Tagged Values Tab 145
Relationship, Delete 126
Relationship, Hide 126
Relationship, Show 126
Requirements 122
© 1998-2010 Sparx Systems Pty Ltd
277
Index
Element
Resize 92
Responsibilities 122
Root 120
Rule Task 242
Scenario 127
Selectable, Multiple Elements 79
Selectable, Single Element 77
Set Cross References 86
Set Custom References 86
Set Default Appearance 96
Set Element Template Package 100
Set Feature Visibility 77
Set Font 79
Set Parent 84
Set Project Custom Colors 98
Show Usage 85
Size 92
Specification 120
Status 119
Stereotype 119
Superimposition 32
Tagged Values 145
Tasks 81
Template Package 100
Template Parameters 121
Template, Default Element 100
Templates And Profiles 100
Text 95
Type 71
Usage 85
Use Cross References 86
Use Custom References 86
Version 119
Visibility 121
Working With 67
Z Order 32
Element Feature
Attribute 105
Connect To 202
Disconnect From 202
Operation 154
Element List
Show Diagram As 10
Ellipse Diagram Layout 15
Embedded Elements
Dialog 75
Element Context Submenu 75
Include When Pasting Composite 39
Incorporate Inherited Properties 75
Maintain Layout In Pasting Composite 39
Window 75
Enterprise Architect
UML Modeling With 2
Entry Points
Tab Of Structural Specification
Exception Path, Scenario 127
External
Requirements 124
129
-FFan Relations Diagram Layout 24
Feature
As Attribute 105
As Operation 154
Feature Visibility
Attributes 33
Customize 33
Inherited 33
Operations 33
Set 33
Supress 33
Features
Connect To 202
Disconnect From 202
Find
Element In All Diagrams 74
Element In Project Browser 74
Submenu 74
Font
Set For Element Text 79
Forward Engineering
Initial Code In Operations 161
Forward Slash
Derived Symbol 108
Fully Qualified Tagged Value
Show In Element Compartment 33
-GGeneralizable Elements 120
Generalization
Sets 212
Generalization Link
Implement Parent Operations 164
Override Parent Operations 164
Generate Code
For Business Rule 254
Get Function
Create As Attribute Property 114
Get Project Custom Colors
For Element 98
UML Modeling with Enterprise Architect - UML Modeling Tool
Index
-HHide
Connectors 210
Connectors, All Diagrams 212
Connectors, Requirements Element 212
Connectors, Single Diagram 212
Labels 214
Package Contents On Diagram 6
Relationship 126
Hide/Show
Connector Labels 200
Connectors 200
Highlight
Context Element 101
Hotkeys
Diagram Navigation And Selection 30
Hyperlink
In Linked Document 193
To Element From Linked Document 193
-IIcons
For Element On Diagram 186
Image
Print Scaled 62
Refresh 44
Scale To Page Size 62
Select Alternative 44
Store In Enterprise Architect 44
Use From Image Library 46
Image Library
Import 46
Use 46
Image Manager
Create Custom Diagram Background
Select Alternative Image For Element
Use 44
Import
Image Library 46
Indicator
Visibility 57
Inherited Attributes
Display 115
Inherited Feature
Show 33
Inherited Operation
Display 165
Initial Code
45
44
278
Operations Properties 161
In-place Editor
Automatic Scroll Into View 175
Connector Options 214
Edit Attribute Keyword 179
Edit Attribute Name 176
Edit Attribute Scope 178
Edit Attribute Stereotype 177
Edit Connector Labels 214
Edit Element Name 176
Edit Operation Name 176
Edit Operation Parameter Keyword 179
Edit Operation Parameter Kind 180
Edit Operation Scope 178
Edit Operation Stereotype 177
Element Item, Tasks 175
Element Options 175
Insert Attribute To Element 181
Insert Maintenance Feature 182
Insert Operation Parameter 182
Insert Operation To Element 181
Insert Testing Feature 184
In-Place Formatting
Elements 186
Insert
Attribute To Element, In-place Editor 181
Diagram Properties Note 36
Linked Elements 74
Maintenance Feature In Element 182
Operation To Element, In-place Editor 181
Related Elements 74
Testing Features In Element 184
Instance
Paste Object As 37
Interaction
Behavioral Aspects 167
Edit Parameters 167
Parameter 167
Parameters, Define 170
Interaction Occurrence
Behavior Call 167
Interface
Set For Element 84
Invocation
Associate With Behaviors 168
Re-associate With Behaviors 168
Synchronize Arguments With Behavior
Parameters 168
Invocations
Modeling 167
isUnique
UML Property 219
© 1998-2010 Sparx Systems Pty Ltd
279
Index
-LLabel
Alignment 49
Bold 49
Connector 49
Connector, Hide/Show 200
Direction Indicator 49
Element 49
Hide 49, 214
Menu 49
Set Color 49
Show 214
Visibility 214
Language
Create Properties As Attributes
Layout
Diagram, Automatically 26
Diagram, Move Sections 65
Layout Diagram
Auto Route Layout 25
Box Layout 18
Center Focussed Layout 15
Circular Layout 15
Converge Layout 22
Digraph Layout 20
Diverge Layout 22
Elliptical Layout 15
Fan Relations Layout 24
Main Procedure 14
Neaten Layout 21
Options 14
Per Page Layout 19
Spring Layout 21
Tool 14
Top-To-Bottom Circle 15
Layout Tools Window 14
Legend
Add To Diagram 60
Edit 60
Element 60
Style 60
Letter A
Red 188, 191
Line
Angles, Tidy 206
Bend At Cursor 206
Bezier 206
Straighten At Cursor 206
Style 206
114
Supress Segments 206
Line Points
Add 206
Delete 206
Toggle 206
Link
Add Note 203
Copy Between Instances Of Elements From
Project Browser 209
Create Between Elements 209
Create From Project Browser 209
Paste Object As 37
Link Notes
To Element Feature 168
To Internal Documentation 168
Linked Document
Create 188
Create Diagram From 193
Create Document Artifact 190
Create Element From 193
Create For UML Element 191
Create Glossary Definition In 191
Delete 194
Edit 191
Editor Context Menu 191
Hyperlink 193
Introduction 188
Link Into RTF Report 188
Replace 194
To UML Element 191
Linked Document Template
Assign To Group 194
Create 194
Delete 194
Edit 195
Modify 194
Linked Element
Convert To Local Copy 102
Lock
Diagram, Security Off 50
Element, Security Off 77
-MMaintenance
Compartment, Element 187
Feature, Insert In Element 182
Manage
Diagrams 12
Elements 81
Matrix
Swimlanes 41
UML Modeling with Enterprise Architect - UML Modeling Tool
Index
Menu
Diagram Context 10
Element Context 69
Label 49
New Element Or Connector Context 10
Message
Scope 222
Source and Target 222
Method
From Rule Flow Activity 245
Show Parameters On Diagram 59
Model
Business Domain, Create 241
Business Rules 237
Default Diagram, Cancel 59
Default Diagram, Set 59
Delete Element From 93
Delete Multiple Elements From 93
Requirements, SysML, Create 259
Structure 2
SysML Operational Domain, Create 260
SysML Parametric, Create 262
SysML System Design 267
SysML, Simulate 265
Systems Engineering, Create 256
Model Profile
Apply 41
Save 41
Swimlanes Matrix 41
Zachman 41
Modeling
Behavior Calls 167
Behaviors (General) 153
Invocations 167
Systems Engineering 256
The Business Process 232
Modify
Linked Document Template 194
Relationship Using Matrix 229
Move
Attributes Between Elements 104
Connectors 205
Diagram Sections 65
Elements Between Packages 89
Elements By Increments 65
Elements In Diagrams 88
Objects Between Packages 89
Operations Between Elements 104
Multi-page Diagram
Print 62
Multiple Select
Items From Project Browser 38
280
Multiplicity
Connector, Source Role 219
Connector, Target Role 221
Of Element, Displayable 71, 120
Of Element, Non-Displayable 121
-NNavigation And Selection
Hotkeys, For Diagram 30
Neaten Diagram Layout 21
Non-Selectable
Element 77
Notation
Process Modeling 233
Note
Add To Link/Connector 203
Element, Create 95
Link To Element Feature 168
Link To Internal Documentation
Nudge
Elements 65
168
-OObject
Classifiers 148
Connector 126
Create From Attribute 117
Links 126
Move Between Packages 89
Multiplicity 219
Properties 118
Relationships 126
Scenario 127
Type, Change For Element 91
Open
Package From Project Browser 3
Package Within Diagram 33
Operation
Add To Element, In-place Editor 181
Appearance 154
Associate With Behavior 158
Behavior Description, Show In Diagram
Behavior, Initial Code 161
Business Rule 246
Connect To 202
Constraints 162
Copy Between Elements 103
Definition 154
Dialog, Behavior Tab 158
158
© 1998-2010 Sparx Systems Pty Ltd
281
Index
Operation
Dialog, General Tab 155
Dialog, Post Tab 162
Dialog, Pre Tab 162
Disconnect From 202
Display Inherited Operation 165
Edit Name, In-Place Editor 176
Edit Parameter Kind 180
Edit Scope 178
Edit Stereotype, In-place Editor 177
Element Feature 154
Fast Create 155
Implement Interface Operations 164
Implement Parent Operations 164
In Project Browser 154
Inherited, Show 33
Introduction 154
Move Between Elements 104
Of State Element, Behavior 158
Overide Interface Operations 164
Override Parent Operations 164
Parameter Keyword, Edit 179
Parameter, By Reference 173
Parameter, Insert In Element 182
Parameters, Define 170
Properties, Behavior 158
Properties, General 155
Properties, Initial Code 161
Properties, Postconditions 162
Properties, Preconditions 162
RuleTask, Behavior Call Action 246
Show On Diagram 33
Tagged Values, Add 163
Operational Domain Model
SysML, Create 260
Override
Attribute Initializer 115
Implement Parent Operations 164
Parent Operations 164
-PPackage
Add Element Directly 83
Add To Diagram From Toolbox 3
Add To Project Browser 3
Copy 4
Create Diagram 13
Delete In Project Browser 6
Duplicate 4
Existing, Drag Onto Diagram 5
Hide Contents On Diagram 6
Modeling With 3
Move Element Between 89
Move Objects Between 89
Open From Diagram 33
Open From Project Browser 3
Paste Copy 4
Rename 4
Show Contents On Diagram 6
Tasks 3
Working With 3
Page
Footer, Print On Diagram 54
Header, Print On Diagram 54
Size, Set For Diagram 63
Pan
Diagram View 64
Parameter
Activity 170
Behavior 170
Behavior Call Arguments 174
Behavior, Tagged Values 172
Behavioral, Edit 168
Behavioral, Extend 168
Behavioral, Reassign 168
Behavioral, Set 168
Behavioral, Synchronize Call Argument With
168
Behavioral, Synchronize Invocation Argument
With 168
Dialog 170
For Rule Flow Activity 245
Interaction 170
Kind Inout, By Reference 173
Operation 170
Operation, By Reference 173
Reference 173
Show Details On Diagram 59
Variables In Business Rules 245
Parameter Kind
Edit for Element Operation 180
Parametric
Diagram 262
Diagram, Simulate SysML Model 265
Model, SysML, Create 262
Parent
Confirm Element As Parent 88
Set For Element 84
Paste
Activity As Action 39
Activity As Link 39
Composite Element 39
UML Modeling with Enterprise Architect - UML Modeling Tool
Index
Paste
Connectors Between Pasted Activities 39
Connectors Between Pasted Instances 37
Copy Of Element 90
Copy Of Package 4
Diagram Into Package 32
Element From Project Browser 37
Element On Diagram 30
Multiple Items As Children 38
Multiple Items As Instances 38
Multiple Items As Links 38
Multiple Items From Project Browser 38
Object As Child 37
Object As Link 37
Object As New Instance 37
Paste Element Dialog 37
Per Page Diagram Layout 19
Print
Multi-page Diagrams 62
Page Footer On Diagram 54
Page Header On Diagram 54
Scaled Image 62
Process
Element 233
Process Modeling Notation 233
Profile
And Element Templates 100
Swimlanes Matrix 41
Zachman 41
Project
Structure 2
Project Browser
Open Package 3
Project Custom Colors
Get For Element 98
Set For Element 98
Properties
Behavior Tab 167
Call Tab 167
Connector, Menu Section 198
Dialog, Element 118
Element 118
Element Context Menu 70
Element, Associated Files 144
Element, Connectors 126
Element, Constraints 125
Element, Details 121
Element, External Requirements 124
Element, General 119
Element, Generalizable 120
Element, Internal Requirements 122
Element, Links 126
282
Element, Relationships 126
Element, Requirements 122
Element, Tagged Values Tab 145
Object 118
Properties Note
Diagram 36
Property
Redefined 151
Select, Dialog 151
Subsetted 151
-QQuick Add
Tagged Values
Quick Linker 201
147
-RRealization Link
Implement Parent Operations 164
Override Parent Operations 164
Realized Interfaces
For Class, Show On Diagram 49
Rectangle Notation
Element Menu Option 71
Red
Letter A 188, 191
Object Outline 50, 77
Redo
Last Action, Diagram Edits 51
Refresh
Image 44
Related Elements
Find 40
Insert With Context Menu 74
Place On Current Diagram 40
Relationship
Create Using Relationship Matrix 229
Delete 126
Delete Using Relationship Matrix 229
Hide 126
List, On Context References Tab 143
Modify Using Relationship Matrix 229
Show 126
Visibility 210
Relationship Matrix
Access 225
Create Relationship 229
Delete Relationship 229
Export To CSV 230
© 1998-2010 Sparx Systems Pty Ltd
283
Index
Relationship Matrix
Incorporate In HTML Report 228
Incorporate In RTF Report 228
Introduction 224
Link Direction 226
Link Type 226
Locate Elements 231
Manage Display Content 228
Modify Relationship 229
Open 225
Options 228
Print Matrix 228
Print Preview 228
Profile, Delete 230
Profile, Save 230
Profile, Update 230
Review Elements 231
Save As .EMF File 228
Save As .PNG File 228
Scale Printout Width 228
Set Element Type 225
Set Link Direction 226
Set Link Type 226
Set Source Package 227
Set Target Package 227
Relationships Window
Context Menu 40
Rename
Diagram 30
Package 4
Replace
Linked Document 194
Requirement
Create SysML Model 259
Element, Hide/Show Connectors 212
External 124
Functional 122
Inherited, Show 33
Internal 122
Non-Functional 122
Stability 122
Requirements Model
SysML, Create 259
Resize
Element 92
Element By Increments 92
Multiple Elements 92
Responsibility
Compartment, Element 187
Internal 122
Reusable Subsystems
Systems Engineering Modeling 268
Reverse Connector 214
Reverse Engineering
Initial Code In Operations 161
Robustness Diagram
Generate From Scenario 135
Role
Context Menu 197
Tagged Values 222
RTF Document Options
RTF Generator (Enhanced) 54
RTF Generator (Legacy) 54
RTF Generator
Document Options (Enhanced) 54
Document Options (Legacy) 54
Rule Composer
Business Rule Modeling 248
Computation Rule Table 248
Decision Table 248
Rule Table 248
Rule Flow
Activity 242
Activity Parameter 245
Behavior 242
Diagram 242
Generate Code From Behavior 254
Model 242
Rule Model
Diagram 240
Rule Task
Element 242
RuleFlow Diagram
Generate From Scenario 135
Run State
Define, Element Context Menu 71
-SSave
Diagram Image To Disk File 31
Diagram, Context Menu Option 10
Scale
Image To Page Size 62
Scenario
Alternate Path 127
Alternate Path, Add 129
Basic Path 127
Context Menus 129
Create 129
Delete 129
Description Tab 127
Element 127
UML Modeling with Enterprise Architect - UML Modeling Tool
Index
Scenario
Entry Points Tab 129
Exception Path 127
Exception Path, Add 129
External Test Cases 142
Facilities 129
Floating Toolbar 129
Generate Diagram From 135
Generate From Activity Diagram 143
Generate From Clipboard Text 129
Generate Structure From Notes 127
Internal Test Cases 142
Object 127
Structured Specification 129
Structured Specification Tab 127
Test Cases 142
Toolbar 129
Select
Alternative Image 44
Select <Item> Dialog 149
Select Attribute Type
Data Type 108
Dialog 108
Select Property Dialog 151
Selectable
Element 77
Sequence Diagram
Generate From Scenario 135
Set
Activities For Transitions 149
Association Specialization 214
Classifiers For REFGUID Tagged Values
Connector Visibility 210
Default Diagram, Model 59
Diagram Appearance Options 52
Diagram Page Size 63
Diagram Properties 52
Element Cross References 86
Element Custom References 86
Element Parent 84
Feature Visibility 33
Font For Element Text 79
Instance Classifier 149
Interface For Element 84
Message Source and Target 222
Operation Parameter Return Type 149
Operation Parameter Type 149
Operation Return Type 149
Parent For Element 84
Pattern Element Defaults 149
Relationship Visibility 210
Set Feature Visibility
149
Element Context Menu Option 77
Set Function
Create As Attribute Property 114
Set Project Custom Colors
For Element 98
Settings
Template Package 100
Shallow Copy
Of Diagram 32
Show
Connectors, All Diagrams 212
Connectors, Requirements Element
Connectors, Single Diagram 212
Labels 214
Package Contents On Diagram 6
Relationship 126
Usage Of Element 85
Use Case Arrowhead 215
Show/Hide
Connectors 200
Labels 200
Simulate
SysML Parametric Model 265
Source
Set for Message 222
Source Object
Multiplicity 219
Source Role
Details 219
Specialize Association 214
Spring Diagram Layout 21
State
Entry And Exit Actions 155
Operation Behavior 158
State Machine
Entry And Exit Actions 155
State Machine Diagram
Generate From Scenario 135
Store
Image In Enterprise Architect 44
Straighten
Line At Cursor 206
Structural Specification
Generate From Description 127
Structured Specification
Alternate Path, Add 129
Context Menus 129
Create 129
Delete 129
Entry Points Tab 129
Exception Path, Add 129
External Test Cases 142
284
212
© 1998-2010 Sparx Systems Pty Ltd
285
Index
Structured Specification
Facilities 129
Floating Toolbar 129
Generate From Activity Diagram 143
Generate From Clipboard Text 129
Internal Test Cases 142
Of Scenario Steps 129
Test Cases 142
Toolbar 129
Style
For Connectors 199
Submenu
Zoom 64
Subtype
Relationship 212
Supress
Line Segments 206
Swimlanes
Manage 47
On Diagram 47
Orientation 47
Swimlanes Matrix
Activate 41
And Matrix Dialog, Matrix Tab 41
Create Columns And Rows 41
Define Heading 41
Delete Items 41
Edit Items 41
Lock 41
Model Profile 41
Size 41
Synchronization
Diagrams With Scenario Steps 135
Intial Code In Operations 161
Synchronize
Call Argument With Behavior Parameter 168
Invocation Argument With Behavior Parameter
168
SysML
Create Operational Domain Model 260
Design Model 267
Internal Block Diagram 267
Parametric Model, Simulate 265
Parametric Models 262
Requirements Model, Create 259
Reusable Subsystems 268
System Design,
Compose, Systems Engineering Modeling 267
System Engineering Modeling
Create Reusable Subsystems 268
Systems Engineering Model
Create 256
Systems Engineering Modeling
Compose System Design 267
Create SysML Parametric Model 262
Create SysML Requirements Model 259
Overview 256
Process 256
Simulate SysML Parametric Model 265
SysLM Operational Domain Model, Create
-TTab
Context References 143
Tag
Compartment, Element 187
Management, Advanced 146
Tagged Value
Add 147
Add To Operations 163
Behavior Parameters 172
Element 145
Fully Qualified, Show 33
Inherited, Show 33
Of Attributes 112
Quick Add 147
Tab, Element Properties Dialog
Target
Role 221
Set For Message 222
Template
Package, Settings 100
Test
Generate From Scenario 142
Test Cases
Generate From Scenario 142
Testing
Compartment, Element 187
Testing Feature
Insert In Element 184
Text Element
Create 95
Tidy Line Angles 206
Toolbar
Structural Specification 129
Tree Style Hierarchy
Create 216
Set Default Link Style 216
Type
Element Context Menu 71
Type Hierarchy Dialog 84
Type Specific Menu Section
UML Modeling with Enterprise Architect - UML Modeling Tool
145
260
Index
Type Specific Menu Section
Connector 199
-UUML
Enterprise Architect Modeling Platform 2
UML Diagram
Add To Project 13
Copy, Deep 32
Copy, Shallow 32
Create 13
Duplicate 32
In Enterprise Architect 7
Paste 32
UML Modeling
And MDG Technologies 2
And Requirements Management In Enterprise
Architect 2
Build Models 2
Business Modeling In Enterprise Architect 2
What Is? 2
With Diagrams 7
With Elements 67
With Enterprise Architect 2
With Packages 3
With UML Patterns In Enterprise Architect 2
With UML Profiles In Enterprise Architect 2
With UML Stereotypes In Enterprise Architect
2
Undo
Last Action, Diagram Edits 51
Usage
Of Element 85
Use
Classifiers 149
Use Case
Arrowhead, Show 215
Set Diagram Appearance Options
286
59
-WWindow
Layout Tools 14
Working
With UML Connectors
197
-ZZ Order
Elements 32
Zachman
Profile 41
Zoom
Diagram View 64
Submenu 64
-VValidate
Business Rules 253
Rule Composer 253
View
Next Diagram 51
Previous Diagram 51
Visibility Indicators 57
Visibility Of Elements
Customize 94
Visible Class Members
© 1998-2010 Sparx Systems Pty Ltd
UML Modeling with Enterprise Architect - UML
Modeling Tool
www.sparxsystems.com