1
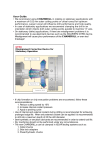
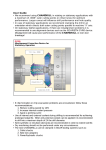
User Guide T-CLAMP ULTRA PLUS System This guide presents basic information that will enable you to obtain full benefit from T-CLAMP ULTRA PLUS System. T-CLAMP ULTRA PLUS enables multi-functional operations in one system: D eep Grooving P arting and Grooving S hallow Grooving T urning and Grooving P recision Grooving and Recessing F ace Grooving and Face Turning U ndercutting and Recessing Parting Inserts A ccuracy with good repeatability M olded chipbreaker T op and bottom prism hold the insert firmly and accurately in the correct position T DJ/C is a unique double-ended insert for grooving and parting T SJ/C is a unique single-ended insert for deep grooving and parting T DT double-ended insert for side turning and grooving T DA double-ended insert for aluminum wheel machining Blades Turning & Grooving S imple, accurate and rapid indexing T op and bottom seated insert alignment N o additional spare parts U ses standard tool blocks Integral Tool Shanks S imple, accurate and rapid indexing T op and bottom seated insert alignment S table support against side forces N o additional spare parts S tandard shank dimensions Face Grooving & Turning C 53 User Guide Advantages of T-CLAMP ULTRA PLUS System -CLAMP ULTRA PLUS is available as either double-ended or single ended insert for maximum economy. T Multifunction use - Right-hand and left-hand turning, grooving and parting with a single tool. T-CLAMP ULTRA PLUS replaces a multitude of ISO tools. - Reduces number of tools per operation. - Reduces inventory. Short cycle time - Short setup with less downtime - Reduces need for turret indexing. Improved Cycle Time - The excellent surface finish obtained from rough turning may eliminate finish turning. T-CLAMP ULTRA PLUS System vs Standard ISO System T-CLAMP ULTRA PLUS System Precision Grooving & Parting Grooving: Right and Left Hand Turning Standard ISO System Facing Grooving & Parting Right Hand Left Hand Turning Turning Facing Toolholder Screw Clamping Force ➧ C 54 Screw Recommended Torque (N·m) SH M5X0.8 5.5 SH M6X1 8.0 SH M8X1.25 12.0 User Guide Parting & Grooving Selecting Inserts Blade or Holder Size To match the correct insert to the cutting condition, the following variables must be considered: To minimize vibration and deflection choose: idth of cut (width of insert) W Chipbreaker style Lead angle Corner radii Carbide grade Blade or toolholder with the smallest possible overhang (Tmax) Toolholder with the maximum shank size (H). Blade height that is larger than Tmax Blade or toolholder with the maximum blade width (largest possible insert seat size) Width of Cut (WOC) and Depth of Cut (DOC) select the proper width and depth of cut, the application To must be considered. The ratio DOC = 8 x WOC can be used when cutting steel. For example, the maximum DOC for a 3mm wide insert is 24mm for parting a 48mm diameter bar. Neutral inserts with a 0 lead angle provide the maximum DOC. Lead Angle se inserts with a lead angle to minimize pips or burrs. U Inserts are available with either R or L hand, with the point of angle toward the finished surface. Increasing the lead angle reduces the pips or burrs, but will also produce a poor surface finish and short tool life. Neutral inserts are recommended when a pip/burr is acceptable. RH insert shown Insert Support Integral shank toolholders offer the best rigidity. self clamp holder is only recommended for radial A machining. A screw clamp holder is recommended for axial and radial machining. 90° Mounting he insert must be mounted 90° to the workpiece to T obtain perpendicular surfaces and minimize vibration. Setup he center height of the insert should be maintained T within ±0.1mm. The parting operation should be as close to the chuck as possible. (0.08mm + 0.025 WOC)max Center Height Selecting Preference Priority se insert with 0° lead angle U Use the largest blade size possible The smallest appropriate width of cut C 55 User Guide Machining Consistency of speed and feed improve performance. pply coolant abundantly (excluding Ceramic AB30). A Secure insert into clean pockets. Cutting forces on soft workpiece materials may be insufficient to push insert well into pocket. Tap insert into place using a plastic hammer. On a conventional lathe, lock the carriage to prevent axial motion during parting-off. Usage eplace worn inserts immediately. R The price of a new insert is much less than the risk of damage from continuing with a worn edge. Replace blade or damaged pockets. Never try to repair damaged pockets. Chipbreaker The chipbreaker’s function is to narrow the chip it occurs near the cutting edge at high temperature. Producing chips that are narrower than the groove gives the following advantages: - Eliminates friction with groove walls. - Prevents chip overload. - Permits higher feeds. - Produces unscratched surfaces, eliminating additional facing. Curling chips into compact spirals or breaking chips simplifies disposal. Curling is affected by the chipbreaker type and the machining conditions. Select an appropriate chipformer for the specific application. C 56 Parting & Grooving Extraction of Insert Insert Clamping Extractor (EDG-23B, EDG-33B) for Blades User Guide Parting & Grooving Selection of Chipbreakers C J or hard materials and tough applications F For general applications on steel, alloy steel and stainless steel Medium-to-high feeds For soft materials, parting of tubes, small diameters and thin-walled parts Low forces and smaller burrs Improved straightness Low-to-medium feeds 0.45 0.40 0.40 0.43 Feed (mm/rev) Feed (mm/rev) Recommended feed range as a function of insert width Material; SAE4140 (HB240) Recommendations are for neutral inserts - for R/L inserts reduce feeds by 20 - 40% 0.35 0.35 0.30 0.30 0.25 0.25 0.20 0.45 0.40 0.35 0.30 0.25 0.20 0.18 0.15 0.15 0.10 0.10 0.06 0.06 0.02 2 3 4 5 6 0.02 8 0.18 0.20 4 5 0.22 0.16 0.10 1.4 0.12 2 3 Width (mm) 6 Width (mm) “J” “C” Workpiece Materials Alloy Steel High Austenitic Stainless High - Temp Alloys Nonferrous Materials Cast Iron C C C C Brass C J J J Titanium J Aluminum Feed Low C 57 User Guide Parting & Grooving Practical Trouble shooting 1. To Reduce Burr Stub dia. n a CNC machine, reduce feed by 50% when O approaching center stub diameters WOC Check center height of cutting edge Use insert with lead angle If 0° lead angle must be used for whatever reason, apply narrow WOC Apply a supporting part-catcher (or adjust concentricity) 1 For hollow bars, it is better to machine chamfers using ID boring tool prior to parting operation. (See picture) 2 2. To Improve Surface Finish Increase cutting speed Use neutral inserts Select chipformer that provides optimum chip control Use coated carbide Improve coolant application Eliminate chatter 3. To Improve Flatness heck inserts and replace any that show wear C Use neutral inserts Use largest blade possible, i.e., TGB 32- instead of TGB 26Increase blade thickness and insert width Minimize blade overhang Check alignment and perpendicularity of tool to machine axis Optimize workpiece chucking Lock the carriage on manually operated lathes Apply coolant abundantly (excluding Ceramic AB30) Reduce feed 4. To Improve Chip Control eplace worn inserts R Choose a more appropriate chipbreaker Use a neutral insert Check alignment and perpendicularity of tool to machine axis Apply coolant abundantly Increase feed At initial groove depth, interrupt feed momentarily to let the chip enter slot C 58 User Guide Parting & Grooving 5. To Eliminate Chatter art-off as close to chuck as possible P Minimize blade overhang Improve chucking and monitor tool setup Change the RPM Increase the feed Lock the carriage on manually operated lathes 6. To Prevent Chipping of Cutting Edge se appropriate carbide grade and geometry U Use insert with larger corner radii Reduce feed at end of cut Eliminate chatter Increase speed Use strong grade Increase tool and setup rigidity Eliminate built-up edges 7. To Prevent or Reduce Built-up Edge se appropriate carbide grade and geometry U Increase speed Reduce feed Increase coolant flow/concentration 8. Parting on Eccentric Tubes Inserts with 4 degree lead angle are usually recommended for tubes; however, the combination of an eccentric bore and a robust machine may increase feed-snap on breakthrough and damage the cutting edge. Changing to an 8 degree lead angle insert will regulate the breakthrough. C 59 User Guide Parting & Grooving Machining Data for Parting Tensile Strength Rm(N/mm2) Hardness HB <0.25 %C Annealed 420 >=0.25 %C Annealed cast steel, free cutting steel ISO Material Non-alloy steel, P Condition TT8020 125 140-250 80-120 650 190 130-220 80-110 <0.55 %C Quenched and tempered 850 250 90-200 70-90 >=0.55%C Annealed 750 220 100-220 70-100 Quenched and tempered 1000 300 70-170 40-70 Annealed 600 200 90-120 70-100 930 275 80-170 50-70 1000 300 70-130 40-60 1200 350 50-120 30-50 Low alloy steel (less than 5% Quenched and tempered alloying elements) K Uncoated TT9080 / TT7220 and cast steel M Coated High alloy steel, cast steel and Annealed 680 200 60-140 50-80 tool steel. Quenched and tempered 1100 325 50-70 30-60 Stainless steel and cast steel Ferritic/martensitic 680 200 70-170 80-120 Martensitic 820 240 60-150 60-90 Austenitic 600 180 90-180 60-90 Gray cast iron Ferritic 160 100-230 60-80 (GG) Pearlitic 250 90-180 50-70 Cast iron nodular Ferritic 130 190-300 70-100 (GGG) Pearlitic 230 120-220 70-90 Ferritic 180 120-250 60-85 Pearlitic 260 100-210 45-75 Annealed 200 40-70 35-50 Cured 280 30-50 25-40 Annealed 250 30-40 20-30 Cured 350 15-25 15-20 Cast 320 15-30 15-20 Rm 400 90-190 150-200 Rm 1050 30-60 50-80 Malleable cast iron Fe based High temp. alloys S Ni or Co based Titanium, Ti alloys Alpha+beta alloys cured * For more information of material groups, see the TaeguTec concise catalogue “ Material Conversion Table” section. Steel C 60 K10 Stainless Steel Cast Iron Nonferrous High Temp. Alloys Hardened Steel User Guide Turning & Grooving Chipbreaker Style: “T” Chipbreaker he “T” chipbreaker is available for turning and T grooving of steel, alloy steel and stainless steel. Inserts with “T” style chipbreaker contain a central chipbreaking island for multi-direction chip control. Inserts are available with various corner radii for turning applications and profiling inserts are ground with a full radius. Workpiece: SAE 1045 (C45) Cutting Speed: Vc=100 - 180 m/min T Depth of Cut (mm) “T” Type 6.0 TDT 10.00E-0.80 5.0 TDT 8.00E-0.80 4.0 3.0 TDT 6.00E-0.80 2.0 TDT 5.00E-0.80 1.0 TDT 4.00E-0.80 0.5 0.1 0.2 0.3 0.4 0.5 0.6 0.7 0.8 TDT 3.00E-0.40 Feed (mm/rev) Reduce Cutting Speed 20 - 30% for Internal & Face Machining Toolholder or Blade Size Machining Definitions To minimize risk of vibration and deflection always choose: oolholder or blade with the smallest possible overhang T Toolholder with maximum shank dimension 90° Mounting It is very important that the insert is mounted at 90° to the center line of the workpiece in order to obtain a perpendicular surface and reduce the risk of vibration. Grooving Vc - Cutting Speed (m/min) - Maximum Depth (mm) T f1 - Feed in Radial Direction (mm/rev) Turning c - Cutting Speed (m/min) V apmax - Maximum Depth of Cut (mm) f2 - Feed in Lateral Direction (mm/rev) C 61 User Guide Turning & Grooving Selecting Inserts Insert Width Insert width strongly affects strength. For most efficient machining select the widest possible insert. Chipbreaking range depends on insert width. A narrow width improves chipbreaking at lower feed rates. Wide inserts and strong blades require high forces and feed rates to achieve a frontal clearance angle. Corner Radii - Lateral Turning Choose large corner radii for long tool life. Large radii - Small side forces hoose small corner radii to reduce cutting load C and lower feed with narrow inserts. Small radii - Strong side forces Turning Feed eed depends on chipbreaking range of the insert. F Maximum feed depends on insert width and is relative to the maximum load. High feed with small corner radii may reduce tool life. Maximum feed should not exceed the corner radii. For better chip formation when grooving, feed can be interrupted at small intervals. Maximum Feed: fmax = W ✕0.075 Depth of Cut inimum depth of cut equals the corner radii. M Maximum depth of cut depends on maximum possible load. Depth of cut depends on chipbreaking range. Large depth of cut causes large deflection and large frontal clearance. With a small depth of cut the deflection and frontal clearance may be too small. C 62 Maximum Depth of Cut: apmax = W ✕ 0.8 User Guide Turning & Grooving Principle of Turning with T-CLAMP ULTRA PLUS Tools he clearance angle α° is a function of the side T cutting forces and is not constant as is the case with ISO inserts. Clearance angle between the insert and workpiece The deflection is influenced by: F eed: f D epth of cut: ap O verhang: T C utting speed: Vc W orkpiece Material ✽ When these factors are properly applied, the insert (α°) creates a “Wiper” action providing excellent surface quality and tolerance. Finishing Operation: Diameter Compensation A compensation factor for the finish diameter must be used in the final machining operation. After grooving to the desired diameter, the machining direction changes to longitudinal turning. At this point deflection occurs. If machining continues without tool compensation, corner A will penetrate the workpiecs as a result of the deflection phenomenon (See picture). This will result in two different diameters ØD1 from the grooving operation and ØD2 from the turning operation. The difference between ØD1 and ØD2 is the change in diameter, designated at Delta . Tool compensation factor is calculated as shown: ØD1 - ØD2 = 2 Bad 2 sing the compensation factor will eliminate the difference in part diameter. U Follow this simple procedure during machining. 1. Groove to the final diameter 2. Pull the tool back, a distance equal to the value of /2 3. Continue the finish turning operation C 63 User Guide Turning & Grooving The diagrams show experimental results for specific machining conditions. These are sample values that will vary with different workpiece materials and different holder types. Recommendation: Measure the value for your finishing operation in a short test using your selected finishing conditions. Do not run your test using the final diameter. Feed (mm/rev) Feed (mm/rev) Feed (mm/rev) Multifunction Operations Not Recommended The multifunctional tools can operate in a sequence of grooving and turning modes. Moving from turning to grooving requires consideration of each basic principle. This will eliminate the possibility of insert breakage. In this situation, customers must release the side deflection necessary in turning but not recommended in grooving. Machining a Radius or Chamfer The machining of a corner with a radius or a chamfer larger than the radius of the insert always requires the combination of movement in two directions. Problems such as insert breakage result when this combined operation is used while the insert is plunged into the workpiece with material on all sides. Insert breakage is caused by forces acting simultaneously in two different directions as shown in F1 and F2. Not Recommended Recommended procedure to optimize machining and eliminate insert breakage Previous move Actual move 1 C 64 2 3 4 User Guide Turning & Grooving Machining Between Walls One of the most important advantages of the T-CLAMP ULTRA PLUS system is the ability to machine between walls. To achieve the best result - follow the recommended sequence: Leave steps near the wall. Do not arrive at the same Z value!!! Roughing 1 Roughing 2 Finishing 3 Finishing 5 Finishing 6 Z value=0.2 - 0.3mm Finishing 4 Eliminating a ‘Hanging Ring’ When turning at the end of a bar or toward a recess between two walls, a 'Hanging Ring' may be formed. To eliminate the ‘Hanging Ring’: Roughing (Incorrect) Roughing (Correct) Finishing (Correct) C 65 User Guide Turning & Grooving Optimizing Internal Machining 1. The first pass uses one corner for roughing. 2. The other corner is used on the return path for semi-finishing or finishing. 3. Tool position looks out of sequence with the amount of material that is removed. 4. Rapid position back to initial groove and then continue with face turning toward the center. L max ≤ 3D Toolholder Overhang Efficient use of Insert corners Improving Internal Turning in a Blind Hole Internal turning in a blind hole brings about the problem of chip evacuation. When the tool reaches the rear side wall, chips may be caught between the wall and the insert, causing breakage. Two solutions that can eliminate this problem: C 66 First Solution Second Solution 1. Start by grooving at the rear wall 2. Continue by turning from the inside toward the outside. 1. Start by grooving at the rear wall. 2. Pull the tool back to the outside. Turn the final diameter from outside toward the groove. User Guide Turning & Grooving Surface Quality Eliminating Grinding Operations Turning with T-CLAMP ULTRA PLUS Tools gives a surface quality superior to anything possible when using standard ISO tools. In fact, turning with T-CLAMP ULTRA PLUS Tools can produce a surface quality comparable to grinding. T-CLAMP ULTRA PLUS vs ISO Turning Inserts Calculation of Required Machine Power Turning P= Kc·ap·f·Vc η·45·103 Grooving/Parting [HP] Turning P= Kc·ap·f·Vc η·61·103 P= Kc·W·f·Vc η·45·103 Face Grooving [HP] Grooving/Parting [kw] P= Kc·W·f·Vc η·61·103 Where Kc appears - Specific Cutting Forces (N/mm2) could be used. η - Efficiency (η ≈ 0.8) P= Kc·W·f·Vc η·45·103 [HP] Face Grooving [kw] P= Kc·W·f·Vc η·61·103 [kw] C 67 User Guide Turning & Grooving TDXU Cutting Condition Table Grooving Turning D.O.C (mm) Feed Rate (mm/rev) 6.0 0.6 0.5 0.5 5.0 0.4 0.4 0.3 0.2 0.2 0.22 0.27 TDXU 2E TDXU 3E 4.0 0.3 TDXU 4E 3.0 TDXU 5E 2.0 0.1 0.03 0.05 2 3 0.06 4 0.07 0.1 0.12 5 6 8 TDXU 6E 1.0 0.1 Width (mm) 0.2 0.3 0.4 0.5 TDXU 8E Feed rate (mm/rev) TDT/TDXT Cutting Condition Table Feed Rate (mm/rev) 0.6 0.5 Turning 0.4 0.4 0.35 0.3 0.2 Grooving 0.5 0.5 0.25 0.2 0.18 0.15 0.1 0.1 0.05 3 0.2 0.2 0.2 0.2 0.2 0.15 0.05 0.05 0.05 4 5 0.05 6 8 Width (mm) C 68 User Guide Face Machining Tool Selection Follow these three recommendations for selecting the correct cutting tool: Choose the widest possible insert and tool, according to the cutting width and geometry to be machined. Choose the shortest tool holder overhang, according to the maximum depth required. Choose the tool range with the largest diameter depending on the initial grooving diameter required in the application. Tool Adjustment Prior to machining, check and adjust the following tool positions Check the cutting-edge height at center line, take a light cut toward the center, and check for a burr. Check parallelism of cutting edge and the machined surface. Correct position can guarantee good surface quality when face turning in both directions. Optimizing the Machining Procedure For Roughing Basic steps for roughing operations when face turning with T-CLAMP ULTRA PLUS tools: 2 1 Grooving into initial diameter range 3 Turning away from center Rapid position back to initial groove and continue with face turning toward center W hen face grooving, reduce the speed by 40% in relation to that used in face turning. For Finishing Basic steps for finishing operations when face turning with T-CLAMP ULTRA PLUS tools: 1 After initial groove move away from center 2 Finish major diameter and radius 3 Rapid position back to initial groove and continue with face turning toward center 4 Finish minor diameter W hen face grooving, reduce the speed by 40% in relation to that used in face turning. C 69 User Guide Recommended Cutting Condition ISO P Material Condition CT3000 TT9100 TT9080 TT7220 TT8020 TT9080 TT7220 TT8020 420 125 100-210 100-230 100-200 100-180 100-150 80-110 Non-alloy steel, >=0.25 %C Annealed 650 190 100-200 100-210 100-180 100-150 60-100 60-90 cast steel, free <0.55 %C Quenched and tempered 850 250 80-180 80-180 80-160 80-130 cutting steel >=0.55%C Annealed 750 220 80-180 80-180 80-160 80-130 60-110 50-90 Quenched and tempered 1000 300 70-150 70-150 70-130 70-120 Annealed 600 200 100-180 100-200 100-160 10-150 60-110 40-70 930 275 90-180 90-180 80-160 80-150 70-110 40-60 1000 300 80-170 80-170 80-150 80-130 1200 350 80-150 80-150 80-130 80-120 60-90 30-50 Low alloy steel Quenched and tempered alloying elements) High alloy steel, cast steel and Annealed 680 200 90-130 90-140 90-130 90-110 60-90 30-50 tool steel. Quenched and tempered 1100 325 50-80 50-80 50-80 50-70 50-80 30-40 ISO Material Stainless steel and cast steel ISO C 70 Internal Grooving, Face Grooving (m/min) Annealed (less than 5% K Groove-Turn, Profiling, Undercutting (m/min) <0.25 %C and cast steel M Tensile Hardness Strength HB 2 Rm(N/mm ) Condition Tensile Hardness Strength HB Rm(N/mm2) Groove-Turn, Profiling, Undercutting (m/min) Internal Grooving, Face Grooving (m/min) CT3000 TT9080 TT8020 TT9080 TT8020 50-130 40-80 40-130 30-80 Ferritic/martensitic 680 200 80-170 80-170 80-170 Martensitic 820 240 80-150 80-150 80-150 Austenitic 600 180 80-170 80-170 80-170 Material Condition Tensile Hardness Strength HB 2 Rm(N/mm ) Groove-Turn, Profiling, Undercutting (m/min) Internal Grooving, Face Grooving (m/min) TT6300 K10 T6080 TT6300 TT6080 K10 Gray cast iron Ferritic 160 150-270 70-100 110-250 90-140 70-120 40-60 (GG) Pearlitic 250 120-170 50-90 90-140 80-120 60-100 40-60 Cast iron nodular Ferritic 130 150-250 70-100 120-230 90-130 70-110 40-60 (GGG) Pearlitic 230 120-200 60-90 90-180 80-110 60-90 30-50 Malleable cast iron Ferritic/pearlitic 180 120-200 60-120 90-180 80-130 60-110 20-40 Pearlitic 260 100-180 50-80 80-150 60-100 50-90 20-40 User Guide ISO Material Condition KP300 K10 K10 60 150-2500 300-800 100-300 wrought alloy Cured 100 150-2500 230-310 100-300 Not cureable 75 150-2500 280-830 100-300 Cured 90 150-2500 200-510 100-300 High temp. 130 330-800 130-300 80-200 <=12% Si >12% Si >1% Pb Copper alloys ISO Free cutting 110 Brass 90 330-800 120-200 80-150 Electrolitic copper 100 190-400 90-150 60-100 Material Condition Fe based High temp. alloys Ni or Co based Internal Grooving, Face Grooving (m/min) TT9080 K10 TT8020 TT9080 TT8020 30-50 30-40 20-30 20-40 20-30 Cured 280 20-40 20-40 15-20 15-30 15-20 Annealed 250 20-30 20-30 15-20 15-20 15-20 Cured 350 15-20 15-20 15-20 15-20 15-20 Cast 320 15-20 15-20 15-20 15-20 15-20 130-170 100-130 80-100 90-120 60-80 40-70 20-50 15-30 20-50 15-30 Alpha+beta alloys cured Rm 1050 Material Condition Hardened steel Groove-Turn, Profiling, Undercutting (m/min) 200 Rm 400 Ti alloys ISO Tensile Hardness Strength HB 2 Rm(N/mm ) Annealed Titanium, H Internal Grooving, Face Grooving (m/min) Not curable cast, alloyed S Groove-Turn, Profiling, Undercutting (m/min) AluminumAluminum- N Tensile Hardness Strength HB 2 Rm(N/mm ) Tensile Hardness Strength HB 2 Rm(N/mm ) Groove-Turn, Profiling, Undercutting (m/min) Internal Grooving, Face Grooving (m/min) TT6300 TB650 K10 TT6300 K10 Hardened 55 HRc 30-50 90-110 20-40 15-25 15-20 Hardened 60 HRc 30-50 80-100 20-30 15-25 15-20 400 30-50 180-200 20-50 15-25 15-25 55 HRc 30-50 90-110 20-40 15-25 15-25 Chilled cast iron Cast Cast iron nodular Hardened 55 HRc * For more information of material groups, see the TaeguTec concise catalogue “ Material Conversion Table” section. Steel Stainless Steel Cast Iron Nonferrous High Temp. Alloys Hardened Steel Recommended Machining Conditions for Ceramic T-CLAMP ULTRA PLUS Insert Material Cast iron High hardened steel Grooving Turning Vc (m/min) 600 - 800 600 - 800 F (mm/rev) 0.1 - 0.2 0.1 - 0.24 Vc (m/min) F (mm/rev) Not recommended 250 - 350 0.08 - 0.20 • Above condition is adapted to TDT 4E-0.4T CE AB30. C 71 User Guide Grades Wear resistant CT3000 Toughness TT9100 TT5100 TT9080 TT9080 AS500 AS10 TT7220 TT8020 TT8020 TT6300 TT6080 KP300 K10 TT9080 TT8020 TB650 KB90 K10 TT6300(CVD) This grade has an extra thick CVD coating that guarantees excellent tool life especially when machining gray cast iron. Its surface has been treated after the coating process. TT6080(PVD) The latest PVD coating technology has been applied to substrate that has multi nano layers such as Multi Nano AlTiN/TiAlCrN/TiN. This ensures outstanding performance when machining ductile cast iron, as well as interrupted machining on gray cast iron. The surface has been treated after the coating process. TT9100(CVD) A CVD coating layer has now been added to enhance toughness and wear resistance, this grade is suitable to high speed steel machining. In addition, the grade shows 200% and 130% improved tool life when compared to the existing competitors. TT5100(CVD) A CVD coated grade for machining carbon steels, alloy steels and stainless steels with outstanding tool life TT9080(PVD) For general Turning, Grooving Profiling and Parting applications on Carbon Steel, Alloy Steel and Stainless Steel. TaeguTec has applied the latest coating technology to the existing sub micron substrate. TT7220(PVD) A PVD coated grade for machining carbon steel and alloy steel TT8020(PVD) TaeguTec’s toughest PVD grade for severely interrupted cutting, stainless steel and exotic alloy machining CT3000(Cermet) A tough new reinforced cermet grade with excellent wear resistance. Recommended for grooving, parting & turning alloy steels and stainless steels with good surface quality and long tool life C 72 User Guide Trouble Shooting Insert failure and tool life Problem 1. Rapid flank wear Short tool life 2. Cratering Short tool life 3. Cutting edge/ Insert fracture 4. Plastic deformation 5. Chip control Spaghetti-like chips coil under holder and interfere with operation 6. Poor surface finish 7. Vibration and poor surface quality Possible Cause Solution Excesively high cutting speed. Carbide with too low wear resistance · Decrease cutting speed ·Use a carbide with higher hardness or a coated carbide High cutting temperature on insert rake face at high feed and speed · Decrease feed and speed · Use coated grade High load on insert. Insert width too narrow. Grade too brittle. ·Use wider insert for maximum support · Decrease feed and speed · Choose a tougher grade High heat pressure decreasing carbide hardness. ·Use a bigger corner radius and decrease feed and speed · Choose carbide with higher hardness Small depth of cut. Feed too slow. Insert width too large. Insert radius too large. · Check chipbreaking range · Increase depth of cut · Increase feed rate ·Use narrower insert with a smaller radius Small depth of cut, i.e. less than corner radius. ·Increase depth of cut to minimum radius size Small front clearance angle between insert and workpiece leads to rubbing action. ·Increase feed to get suitable clearance ·Before starting, check that the front cutting edge is parallel to workpiece C 73 Sleeves for , Our new sleeves have been designed to accommodate the . and The sleeves have a stopper inside the hole, so customers can machine without the resetting process after indexing. It also allows users to replace tools without taking the sleeve from the tool post. for (Ø4mm & Ø7mm) Sleeve for The latest tools are designed for boring, grooving, back turning, profiling and face machining as internal operations. Including an internal coolant hole, a direct supply of cooling oil controls build-up and enables smooth chip evacuation. See page C77 - C83 C 75 Sleeves for L4 L3 h d2 D d1 L Designation MINSL 12-4-4 MINSL 14-4-4 MINSL 16-4-7 MINSL 20-4-7 MINSL 22-4-7 MINSL 25-4-7 D d1 d2 L L3 L4 h Set Screw Wrench 12.00 14.00 16.00 20.00 22.00 25.00 4.00 4.00 4.00 4.00 4.00 4.00 4.00 4.00 7.00 7.00 7.00 7.00 75.00 75.00 75.00 90.00 90.00 100.00 10.00 10.00 10.00 10.00 10.00 10.00 55.00 55.00 55.00 70.00 70.00 80.00 10.30 12.00 15.00 18.00 20.00 23.00 SS M5X0.8X4-MG SS M5X0.8X6-MG SS M5X0.8X6-MG SS M5X0.8X6-MG SS M5X0.8X6-MG SS M5X0.8X6-MG L-W 2.5 Recommended Cutting Conditions Cutting Speed (m/min) C 76 P 30~150 M 30~130 K 30~150 N 50~200 S 10~50 Turning / Back Turning 0.01 ~ 0.08 Feed Rate (mm/rev) Grooving Face Grooving 0.01 ~ 0.05 0.01 ~ 0.04 MINT Type Mini Carbide Bars for Internal Turning and Chamfering L d Tmax L1 8° L1 B a F 20° R Min. Bore Dmin Dia. Tmax Right hand shown Designation MINTR04-020004D006* MINTR04-030004D006* MINTR04-045005D010 MINTR04-065005D010 MINTR04-040005D020 MINTR04-090005D020 MINTR04-140005D020 MINTL04-090010D028 MINTR04-090010D028 MINTL04-150010D028 MINTR04-150010D028 MINTL04-190010D028 MINTR04-190010D028 MINTL04-090010D040 MINTR04-090010D040 MINTL04-150010D040 MINTR04-150010D040 MINTL04-190010D040 MINTR04-190010D040 MINTR04-230010D040 MINTR04-270010D040 d F a B L L1 R±0.05 Tmax Dmin R/L 4.00 0.60 0.60 0.60 0.60 0.60 0.60 1.50 1.50 1.50 1.50 1.50 1.50 1.50 1.50 0.50 0.50 0.90 0.90 1.70 1.70 1.70 2.60 2.60 2.60 2.60 2.60 2.60 3.50 3.50 3.50 3.50 3.50 3.50 3.50 3.50 0.35 0.35 0.70 0.70 1.45 1.45 1.45 2.20 2.20 2.20 2.20 2.20 2.20 2.90 2.90 2.90 2.90 2.90 2.90 2.90 2.90 18.50 19.50 21.00 23.00 20.50 25.50 30.50 25.50 25.50 31.50 31.50 35.50 35.50 25.50 25.50 31.50 31.50 35.50 35.50 35.50 43.50 3.50 4.50 6.00 8.00 5.50 10.50 15.50 10.50 10.50 16.50 16.50 20.50 20.50 10.50 10.50 16.50 16.50 20.50 20.50 24.50 28.50 0.04 0.04 0.05 0.05 0.05 0.05 0.05 0.10 0.10 0.10 0.10 0.10 0.10 0.10 0.10 0.10 0.10 0.10 0.10 0.10 0.10 0.08 0.08 0.10 0.10 0.10 0.10 0.10 0.20 0.20 0.20 0.20 0.20 0.20 0.30 0.30 0.30 0.30 0.30 0.30 0.30 0.30 0.60 0.60 1.00 1.00 2.00 2.00 2.00 2.80 2.80 2.80 2.80 2.80 2.80 4.00 4.00 4.00 4.00 4.00 4.00 4.00 4.00 R R R R R R R L R L R L R L R L R L R R R • Cutting condition: Page C76 • Holder: Page C76 • * Max D.O.C: 0.01 - 0.03, Max feed 0.01mm/rev Grade TT9030 : Standard Item Designation System MIN series R 04 - 040 005 D010 Hand of tool Shank dia. R Right hand 04 4.0mm L Left hand 05 5.0mm Max. Depth 050 5.0mm 140 14.0mm Corner Radius 010 0.10mm 020 0.20mm Min.bore.dia. D010 1.0mm For use T Turning and chamfering B Back turning P Turning and profiling UUndercutting and chamfering CTurning & 45°chamfering GGrooving and turning A Grooving along shaft F Face grooving RFull radius for internal boring and profiling NISO full profile internal threading SLSleeve for MINS C 77 MINT Type Mini Carbide Bars for Internal Turning and Chamfering L d Tmax L1 8° L1 B a F 20° Dmin Dia. Min. Bore Tmax R Right hand shown Designation d MINTL07-090015D050 MINTR07-090015D050 MINTL07-140015D050 MINTR07-140015D050 MINTL07-190015D050 MINTR07-190015D050 MINTL07-240015D050 MINTR07-240015D050 MINTL07-290015D050 MINTR07-290015D050 MINTR07-340015D050 MINTL07-140015D060 MINTR07-140015D060 MINTL07-210015D060 MINTR07-210015D060 7.00 MINTL07-240015D060 MINTR07-240015D060 MINTL07-290015D060 MINTR07-290015D060 MINTR07-340015D060 MINTR07-410015D060 MINTL07-190015D068 MINTR07-190015D068 MINTR07-240015D068 M