1
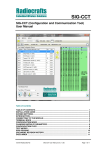
CANfigurator User Guide V1.18 CANfigurator - User Guide (13/10/2014) Table of Contents CANfigurator – User Guide .......................................................................................................................... 2 1. Installation ............................................................................................................................................ 2 1.1. Installation of CANfigurator Application .................................................................................... 2 1.2. Installation Steps ............................................................................................................................ 3 2. Using the CANfigurator Application .................................................................................................. 6 2.1. Registration Request ...................................................................................................................... 6 2.2. Using the Application..................................................................................................................... 7 2.2.1. Main Menu ........................................................................................................................... 7 2.2.2. Serial Port Settings .............................................................................................................. 8 2.2.3. Connecting to the FMS Interface ....................................................................................... 9 2.2.4. Serial Port Connection Error.............................................................................................. 9 2.2.5. FMS Interface Configuration ........................................................................................... 10 2.3. Capturing Messages on the CAN Bus ........................................................................................ 10 2.4. Viewing the RS232 Output .......................................................................................................... 13 2.5. Update Interface Firmware......................................................................................................... 14 2.5.1. Hard Reset .......................................................................................................................... 16 1 CANfigurator - User Guide (13/10/2014) CANfigurator – User Guide This guide will help you use the CANfigurator software. It will show you how to install the application and how to use it to configure, update the FMS interface, capture messages on the CAN network, as well as view the RS232 output of the FMS interface. 1. Installation To install be CANfigurator application, you need a computer with the following: Operative system: Windows XP, Windows 7, or Windows 8; Minimum 1GHz processor; Minimum 5MB HDD space; Minimum 512MB RAM memory; Local serial port serial or USB-RS232 adaptor; A serial cable. 1.1. Installation of CANfigurator Application To install the CANfigurator application, please ask for the latest version of the software from [email protected] or visit the website www.cango.ro/files/CANfigurator_setup_V1.18.exe. You will receive an executable file. Run the CANfigurator_setup_Vx.y.exe file and follow the installation instructions. Caution! If you already have installed another version of the software, it is preferable to first uninstall the old version (the installation program will ask this automatically). With the CANfigurator version V1.18 when the software will have a new update version, the software will warn you that there is a new version available and this window will pop up when you will open the software. 2 CANfigurator - User Guide (13/10/2014) 1.2. Installation Steps 1) Select the directory where you wish to install the application. 2) Select if you want to create a shortcut on the Desktop 3 CANfigurator - User Guide (13/10/2014) 3) Display of the installation information 4) Progress of the installation process 4 CANfigurator - User Guide (13/10/2014) 5) Successful installation of the CANfigurator application 5 CANfigurator - User Guide (13/10/2014) 2. Using the CANfigurator Application CANfigurator application must be run with Administrator rights. It will automatically ask for the permission of the administrator. 2.1. Registration Request CANfigurator application needs a ‘License KEY’. This key is obtained by sending ‘CODE for register’ in an email addressed to [email protected], specifying the company information. You will receive a ‘License KEY’ which you will input and then press the ‘Register’ button. If the next window appears, then the code is not correct and you have to input it again or repeat the previous step. If the next window appears then the code is correct. From now on you can use the CANfigurator application. 6 CANfigurator - User Guide (13/10/2014) 2.2. Using the Application The home page includes the following components: 1) Main menu: functionalities and settings of the application. 2) Tab set: functionalities of the application. 3) Status bar: information on the functionalities of the application. 2.2.1. Main Menu Menu Submenu File Settings CAN bus Update EXIT FMS interface Serial port Always on top Comments Existing the application Settings for the FMS interface Settings of the serial port for the connection of the PC to the interface Makes the FMS interface stay on top of other applications Switch’s to the “CAN bus input” tab, for the capture and play function of the FMS interface Switch’s to the “Update” tab, for updating of the FMS interface 7 CANfigurator - User Guide (13/10/2014) 2.2.2. Serial Port Settings 1) List of the COM ports of the computer. Here you select the serial port used to make the connection to the FMS interface; 2) Select the speed of the serial port; 3) ‘Refresh’ button: refreshes the COM list; 4) ‘CONNECT’ button: connect to/disconnect the serial port; 5) ‘Close’ button: closes the window; 6) ‘Handshake’ setting for the serial port; 7) ‘AUTO detect’ button: automatic detection of the FMS interface (connection to all available serial ports and to all the speeds of the serial ports. This operation will take longer, so please be patient). Caution! Please connect to the serial port connected to the FMS interface before performing any operation. The default settings of the interface are: 115200bps, no Handshake. 8 CANfigurator - User Guide (13/10/2014) 2.2.3. Connecting to the FMS Interface To connect to the FMS interface, you have to follow the steps below: 1) Power the FMS interface by connecting power of the interface; 2) Connect the interface to the RS232 port of the computer or to a USB-RS232 converter; 3) Start the CANfigurator application with administrator rights; 4) Select the ‘Settings’ menu and then the ‘Serial port’ submenu; 5) Select the serial port and the speed; 6) If necessary, also check ‘Handshake’; 7) Press the ‘CONNECT’ button, which will change to ‘DISCONNECT’; 8) If all is ok, then the status bar of the application will show a green indicator and the text ’CONNECTED on COMx’. Caution! The ‘AUTO detect’ button can be used to show the speed and the com port where the FMS interface is connected. This process takes a little longer, so please be patient. 2.2.4. Serial Port Connection Error To read or configure the FMS interface, it must be connected to the selected serial port through a regular serial cable. In case of error, the window below will appear: If the FMS interface does not answer to the commands, the following window will appear. Please reset the FMS interface, select another serial port or try the ‘AUTO detect’ button. 9 CANfigurator - User Guide (13/10/2014) 2.2.5. FMS Interface Configuration In this tab you can configure the FMS interface: The type of serial frames for the serial output; The repetition times and offset times of the serial frames; The CAN bus baud rate and select auto baud rate; The RS232 serial port baud rate and handshake; The type of information for ‘Readable table’ and ‘Spreadsheet’; Calibration coefficients of speed and fuel consumption; The separation character between the frame values; The prefix and suffix of the serial frames. You can see the interface configuration by pressing the ‘Get config from the device’ button. Caution: the previous values will be rewritten and the interface version will be updated. To save the configuration to the interface, press the ‘Set config to device’ button. Various configurations can be saved (‘Save configuration file’ button) and loaded (‘Load configuration file’ button), or you can go back to the initial values (‘Default configuration’ button). Please note, when you save configuration file it will also save the CAN baud rate so do not have only one CANfiguration file for all the vehicles or select the ‘AutoBaud’ option. There are some firmware’s (F4, F8, T0, C0) that are read-write firmware so do not select the ‘AutoBaud’ option on this cases. 10 CANfigurator - User Guide (13/10/2014) If the UART baud rate is changed when setting the device configuration, the software will warn you with the message bellow. Press ‘Yes’ to change the serial port connection baud rate to the selected baud rate or press ‘No’ to continue with the same baud rate. 2.3. Capturing Messages on the CAN Bus The messages on the CAN bus are captured on CAN1 cables or on the CANGOclick of the FMS interface. To start the capturing of CAN messages, press the ‘CONNECT’ button. The data captured can be saved in a file if you select the ‘capture in file’ option. 11 CANfigurator - User Guide (13/10/2014) If after pressing ‘CONNECT’ to make the connection with the interface the following window appears, please reset the interface and make the connection again The FMS interface will automatically check for the CAN bus network and will select the following options: Select between the CANgoclick or CAN1 wires; Select the CAN baud rate; Select if the FMS interface is in read-only or read-write mode; Selects if the Play feature is available or not. After making the automatic selection the FMS interface will make a report to show the correct configuration to connect to this CAN network. If after pressing ‘CONNECT’ to make the connection with the interface the following window appears please try to connect the CAN1 wires or the CANGOclick to other CAN network. If after pressing ‘CONNECT’ to make the connection with the interface the following window appears please contact [email protected] to get the last update of the firmware. 12 CANfigurator - User Guide (13/10/2014) 2.4. Viewing the RS232 Output To view the RS232 output of the FMS interface, press the ‘START’ button. This will show you how the data is being transmitted from the RS232 port. To save the data in a file, press the ‘Save log’ button and insert the name of the file. If you wish to delete the date, press the ‘CLEAR’ button. The ‘Clear stored data’ button resets all data stored on the FMS interface (odometer, operating hours, ..). By pressing the ‘Request #T2 frame’ you can see the T2 frame. When the odometer is not present on the CANbus network this parameter will be calculated by the FMS interface using speed. You can set this parameter using the window bellow. 13 CANfigurator - User Guide (13/10/2014) 2.5. Update Interface Firmware To update the FMS interface firmware: 1) Go to “Update” tab; 2) Press “Load Update File” Button to select the updating tab; 3) Press the “Update” button and wait for the updating to be complete. If the window below appears, then check the connection with the FMS interface or restart the interface If the update process was completed, the following window appears: 14 CANfigurator - User Guide (13/10/2014) The update process is assisted by a progress bar. NOTE: After the firmware update, the device will return to the default settings and configuration. This will reset the baud rate to 115200 b/s, if the UART baud rate was set different then the default settings you need to change the baud rate to be able to communicate again. 15 CANfigurator - User Guide (13/10/2014) 2.5.1. Hard Reset Sometimes the FMS interface will need to have a ‘Hard Reset’ of the system to be able to update a new firmware. Instruction to make a ‘Hard Reset’: 1) Go to the ‘Update’ tab 2) Choose a firmware with ‘Load update file’ and then press update button. 3) It will appear the following ‘Error’ window. 4) Follow de instruction written ‘Error’ window Disconnect the interface from the power supply; Press the ‘OK’ button; Connect the power supply to the FMS interface. NOTE: After the firmware update, the device will return to the default settings and configuration. This will reset the baud rate to 115200 b/s, if the UART baud rate was set different then the default settings you need to change the baud rate to be able to communicate again. 16