1
VDMP3 Setup Instructions
When installing the VDMP3 on an EVO96 control panel, it is necessary to
enable the accessory bus (section [4092] option [1]).
VDMP3
Plug-In Voice Module V1.02
Step
Instructions
EVO
Magellan/
Spectra
SP
Enter Programming Mode
1
Programming
Mode
EVO:
Press and hold [0] + [INSTALLER CODE]
MG/SP: Press Enter + [INSTALLER CODE]
Enable voice reporting and/or arm/disarm
function.
2
Enable
Functions
Printed in Canada 8/2007 paradox.com VDMP3-EI01
EVO:
[3090]
[703]
MG/SP:
Introduction
Sample message: “Area 1 in alarm. Zone 3. Press 1 to disarm the system...”
You can also call the VDMP3 from an outside line, enabling you to arm or disarm
the system as well as activate PGMs.
The VDMP3 essentially turns any outside telephone into a keypad.
3
Telephone
Numbers
[3091]
to
[3098]
VDMP3 Installation Instructions
Master
Quick
Menu
4
EVO:
[3091] Tel. # 1
[3092] Tel. # 2
[3093] Tel. # 3
[3094] Tel. # 4
[3095] Tel. # 5
[3096] Tel. # 6
[3097] Tel. # 7
[3098] Tel. # 8
MG/SP: Programmed through the Master Quick
Menu (see the MG/SP User Guide).
Step
3
[1] Arm/disarm (default 1 and 2 ON)
[2] Voice reporting
[8] Voice reporting
Program telephone numbers which will be called
in the event of an alarm. Telephone numbers
should be programmed in priority sequence as
the VDMP3 will start with telephone number 1.
For extra key functions, see “Special Telephone
Keys”.
The VDMP3 is a voice-assisted module that can be programmed to call one or
more telephone numbers in the event of an alarm.
1
2
English
Power down the control panel.
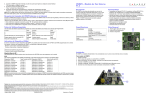
Install the VDMP3 directly onto the control panel’s DIALER and EBUS
connectors as shown in figure 1.
If using a 306USB / 307USB or CONV3USB / CONV4USB, connect to the
SERIAL connector as shown in figure 1.
Power up the control panel.
4
Enable
Numbers
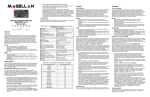
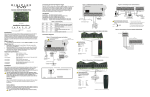
Figure/Figura 1 :
Attach support pin to EVO
panel and VDMP3
Choose which telephone numbers will be enabled
for each partition in your system.
(Default: Telephone number 1 is enabled for all
partitions.)
[3133]
to
[3833]
N/A
Connect VDMP3
to DIALER and
EBUS
5
[3052]
[902]
EVO:
[3087]
N/A
MG/SP:
Compatibility
Digiplex EVO
EVO48
EVO96 V1.5 or higher
EVO192
Magellan
Magellan control panels V2.10 or higher
Spectra SP
Spectra SP control panels V2.10 or higher
Power
Consumption
35mA
Audio
18,345Hz
Dimensions
2.5 x 2.5 in. (6.4 x 6.4 cm)
Warranty
For complete warranty information on this product please refer to the Limited Warranty Statement found
on the website www.paradox.com/terms. Your use of the Paradox product signifies your acceptance of
all warranty terms and conditions.
©2007 Paradox Security Systems Ltd. All rights reserved. Specifications may change without prior notice.
One or more of the following US patents may apply: 7046142, 6215399, 6111256, 6104319, 5920259,
5886632, 5721542, 5287111, 5119069, 5077549 and RE39406 and other pending patents may apply.
Canadian and international patents may also apply.
Digiplex EVO, Magellan and Spectra are trademarks or registered trademarks of Paradox Security
Systems Ltd. or its affiliates in Canada, the United States and/or other countries. For the latest
information on products approvals, such as UL and CE, please visit www.paradox.com.
[3088]
[836]
[3089]
[837]
Delay Before
Next Number [3054]
[832]
000 to 255 seconds (default 020)
Note: Changing these values will also affect
regular reporting to monitoring station.
Set the number of rings the VDMP3 will wait
before the call is answered.
10
[3051]
[901]
000 to 008 rings (default 008)
Note: Changing these values will also affect PC
communication via WinLoad software.
Set the number of times the VDMP3 will attempt
to dial each telephone number
9
Maximum
Dialing
Attempts
000 to 008 repetitions (default 008)
Set the delay before the VDMP3 attempts to dial
the next number on the list.
9
Ring Counter
000 to 127 seconds (default 003)
Set the number of times the VDMP3 will play the
voice message.
8
Message
Repetitions
Options [1] to [8] represent features
1 to 8 (default: OFF)
[1] to [8] always enabled
After the VDMP3 dials a phone number, it waits
the delay period programmed in this section
before playing the voice message.
7
Message
Delay
Technical Specifications
000 to 225 seconds (default 008)
Note:Changing these values will also affect PC
communication via WinLoad software.
Features in this section correspond to utility key
PGMs in the control panel. For more information,
see “Feature Activation (PGMs)”.
6
Connect 306USB / 307USB or
CONV3USB / CONV4USB
(WinLoad / NEware) to SERIAL
[3533] Part. 5 [1] to [8]
[3633] Part. 6 [1] to [8]
[3733] Part. 7 [1] to [8]
[3833] Part. 8 [1] to [8]
To override an answering machine or service, the
user must call the VDMP3, hang up, and then call
back within the time value programmed in this
section. The VDMP3 then overrides the
answering machine or service by answering the
line on the first ring.
Answering
Machine
Override
Enable
Features
(PGM)
[3133] Part. 1 [1] to [8]
[3233] Part. 2 [1] to [8]
[3333] Part. 3 [1] to [8]
[3433] Part. 4 [1] to [8]
[3056]
[831]
000 to 255 seconds (default 008)
Note: Changing these values will also affect
regular reporting to monitoring station.
Calling the VDMP3 (outside line)
Connected to an answering machine:
1. From an outside line, dial the telephone number to which the VDMP3 is
connected.
2. When the line rings, hang up the telephone.
3. Dial the telephone number again within the time limit set by your installer (see
“Answering Machine Override” in VDMP3 Setup Instructions).
4. See “Using VDMP3 Functions” below.
Not connected to an answering machine:
1. From an outside line, dial the telephone number to which the VDMP3 is
connected.
2. See “Using VDMP3 Functions” below.
Using VDMP3 Functions
1. When the VDMP3 answers the line, you are prompted to enter your usual
access code.
“Please enter your access code.”
2. Each area’s status is given.
“Area 1 armed, Area 2 disarmed...”
3. Options are given to arm/disarm and control PGM features.
“Press 1 to arm or disarm the system. Press 2 to control features.”
Receiving a Call From the VDMP3 (alarm in system)
When the VDMP3 calls because of an alarm in the system, the VDMP3 informs you
of the alarm and gives options to control the system.
For example: “Area 2 in alarm. Zone 3. Press 1 to disarm the system. Press pound
twice (##) to hang up.”
If you hang up without disarming or acknowledging (##), the VDMP3 calls the next
telephone number on its list.
Special Telephone Keys
Use special telephone keys when programming telephone numbers in Step 3 of the
Setup Instructions.
Function
Key
[STAY]
[FORCE]
*#
Function
Clear
Delete
Delete from cursor
to the end
Switch Tone /
[ARM]
Pulse Dialing (T)
Wait for second [DISARM] Insert space
dial tone (W)
4-second pause [BYP]
Dial 9 for outside
(P)
line
Key
[CLEAR]
[TRBL]
[ACC]
[MEM]
9+[STAY]
LED Feedback
Online
OFF
OFF
----ON
OFF
---
ERROR
ON
ON
--------Flashing
RX
OFF
OFF
Flashing
---------
TX
OFF
ON
--Flashing
-------
Message
No data / No EBus*
Invalid data
Receiving data
Sending data
Module online / activated
Stand-by mode
Firmware upgrade
*If a control panel is not detected, reset and power up.
If the LED display shows an error message, enter Installer Programming Mode to
re-scan for the VDMP3 module.
Feature Activation (PGMs)
By activating or deactivating the VDMP3’s 8 Features, it is possible to activate the
PGM utility keys or PGMs that are programmed in the control panel.
For example, when activating VDMP3 Features, the following message is played:
“Press 1 to activate / deactivate Feature 1”
“Press 2 to activate / deactivate Feature 2”
...
“Press star ( ) to exit”
“Press star (#) to hang up”
*
Magellan / Spectra SP
VDMP3 features can activate the first 8 PGMs as programmed in the control panel.
EVO
VDMP3 feature numbers correspond to EVO utility keys according to the following
table:
VDMP3 Feature
Feature 1 ON
Feature 1 OFF
Feature 2 ON
Feature 2 OFF
Feature 3 ON
Feature 3 OFF
Feature 4 ON
Feature 4 OFF
EVO Utility Key
Utility Key 1
Utility Key 2
Utility Key 3
Utility Key 4
Utility Key 5
Utility Key 6
Utility Key 7
Utility Key 8
VDMP3 Feature
Feature 5 ON
Feature 5 OFF
Feature 6 ON
Feature 6 OFF
Feature 7 ON
Feature 7 OFF
Feature 8 ON
Feature 8 OFF
EVO Utility Key
Utility Key 9
Utility Key 10
Utility Key 11
Utility Key 12
Utility Key 13
Utility Key 14
Utility Key 15
Utility Key 16
If a utility key in the EVO control panel is programmed with a timer, the
VDMP3 will not recognize PGM deactivation when the set timer elapses. As
a result, the VDMP3 may indicate that the PGM is ON when actually the
timer has elapsed and the PGM is in fact OFF.