1
BASIC FUNCTIONS
CHAPTER 3
3.1 POWER ON/OFF
3.2 THE CONTROL BAR
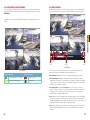
When a user is logged in, pressing the ESC button on the DVR or right-clicking on the screen
with the mouse will display the CONTROL BAR on the bottom of the screen.
Before turning on the DVR, ensure that all connections are good.
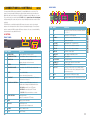
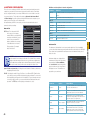
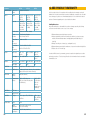
The functions of the Control Bar are listed below. Each will be covered in more detail in the
following chapters.
POWER ON
Menu: Opens the Main Menu.
Connect the power supply and the DVR will power up. The blue LED power indicator on the
front will illuminate and the DVR will display the live image from Channel 1.
Screen Display Mode: Choose the number of channels you wish to view at once. Channels
without attached cameras will display “Video Loss.” Clicking on the upward pointing arrows
to the right of each icon will allow you to select which channels to view in that mode.
Before you can proceed, you will need to log into the DVR.
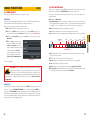
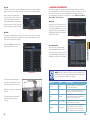
STEP 1. Right-click with the mouse anywhere on the screen
Dwell: Enable/disable the automatic cycling between channels.
STEP 2. Press the MENU button on the remote or press the STOP/ESC button on the
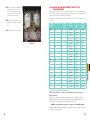
front of the DVR to open the Control Bar at the bottom of the screen (Picture 3-2).
Color: Adjust the brightness, hue, saturation and contrast for any channel.
Zoom: Available in single screen display mode, this digitally enlarges a section of the display.
Menu
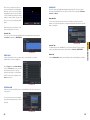
STEP 4. The Login screen will appear.
Enter the User Name and Password,
admin and 123456 respectively
using the Virtual Keyboard described
in the last chapter. Click ENTER
on the keyboard. You can change
the password later as described in
Section 4.7 User Management.
Screen Display
Mode
Dwell
Color
Zoom
Volume
PTZ
Move
Record
Control Bar
Snapshot
Playback
PICTURE 3-2
Volume: Adjust volume. This is only available if you have attached a microphone or audiocapable camera to the DVR.
PICTURE 3-1
You are now logged in.
PTZ: Opens the controls for optional Pan-Tilt-Zoom cameras.
Snapshot: Captures a still image from all channels and saves it to the hard drive.
Record: Begin manual recording on all channels.
Playback: Switches to Playback mode and brings up the Playback Control Bar.
IMPORTANT! If your are logging into the DVR for the first time, it is essential
that you set your DVR to the proper date and time at this point. Doing so
will allow you to search for events based on when they occurred as well as
Move Control Bar: Clicking this will allow you to reposition the Control Bar anywhere on the
screen. Right clicking on the screen will hide the Control Bar.
avoiding complications by having multiple recorded files with the same date and time if you
wait to make those settings. Complete instructions can be found in Section 4.1 Basic
Configuration.
POWER OFF
The DVR will power down to a standby mode when the POWER button on the remote control
is pressed, or when the SYSTEM SHUT DOWN icon is selected from within the MENU. In
both cases, the SHUT DOWN window will appear and users must select OK to confirm. The
hard drive will stop spinning and the system will shut down. For extended periods of inactivity,
it is recommended that the DVR be disconnected from power either by turning off the power
at the surge protector or unplugging the device.
24
25
CHAPTER 3 BASIC FUNCTIONS
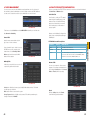
STEP 3. Once the Control Bar appears, click the Menu icon on the far left to open the
Main Menu.