1
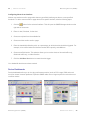
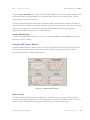
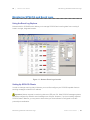
66 | Netmon User Guide Monitoring Disks and Partitions Alternatively, you can use the following command: killHUP <inetd PID> 4. Open the Disk Trackers panel, located in the Trackers console. 5. Click the Add New Disk button on the Disk Monitoring panel, and choose UNIX for disk type. 6. Fill in the following fields, then click the Add Disk button: IP Address This is the IP address of the UNIX host. Port Specify the port number to which NetMon must connect. This should be the same port number as entered in Step 1 above. Partition Enter the device name of the partition (i.e. /dev/sda1 or /dev/hda1). Timeout Specify how long, in minutes, NetMon should spend trying to connect to the remote host. The default timeout period is 5 minutes, but this can be set to any interval you choose. Interval Specify how frequently, in seconds, NetMon should check the remote partition. The default interval is 300 seconds (5 minutes) but this can be set to any interval you choose. Threshold When this amount of space is exceeded, NetMon will trigger an alert. The default threshold is 90%, but this can be set to any amount you choose. Adding a New UNIX Partition (xinetd Method) Use this method if your system uses xinetd. Monitoring a Unix partition requires a minor change to two configuration files on the remote system. These files are called /etc/services and /etc/inetd.conf. 1. Insert the following line into /etc/services: df 5001/tcp #DF (We have specified port 5001 here, but you can actually choose any port number you wish. However, you’ll have to remember to specify the same port number when adding this information to Netmon.) 2. Create the 'df' script in /etc/xinetd.d with the following content: Monitoring Disks and Partitions Netmon User Guide | 66