1
CodeWarrior ™
Development Tools
mwSourceSafe Plug-in
User Guide
Revised 2002/09/05
Metrowerks, the Metrowerks logo, and CodeWarrior are registered trademarks of Metrowerks
Corp. in the US and/or other countries. All other tradenames and trademarks are the property of
their respective owners.
Copyright © Metrowerks Corporation. 2002. ALL RIGHTS RESERVED.
The reproduction and use of this document and related materials are governed by a license
agreement media, it may be printed for non-commercial personal use only, in accordance
with the license agreement related to the product associated with the documentation. Consult
that license agreement before use or reproduction of any portion of this document. If you do
not have a copy of the license agreement, contact your Metrowerks representative or call 800377-5416 (if outside the US call +1 512-997-4700). Subject to the foregoing non-commercial
personal use, no portion of this documentation may be reproduced or transmitted in any
form or by any means, electronic or mechanical, without prior written permission from
Metrowerks.
Metrowerks reserves the right to make changes to any product described or referred to in this document without further notice. Metrowerks makes no warranty, representation or guarantee regarding the merchantability or fitness of its products for any particular purpose, nor does Metrowerks
assume any liability arising out of the application or use of any product described herein and specifically disclaims any and all liability. Metrowerks software is not authorized for and has not
been designed, tested, manufactured, or intended for use in developing applications where
the failure, malfunction, or any inaccuracy of the application carries a risk of death, serious
bodily injury, or damage to tangible property, including, but not limited to, use in factory
control systems, medical devices or facilities, nuclear facilities, aircraft or automobile navigation or communication, emergency systems, or other applications with a similar degree of
potential hazard.
USE OF ALL SOFTWARE, DOCUMENTATION AND RELATED MATERIALS ARE SUBJECT TO THE METROWERKS END USER LICENSE AGREEMENT FOR SUCH PRODUCT.
How to Contact Metrowerks
Corporate Headquarters
World Wide Web
Ordering & Technical Support
Metrowerks Corporation
9801 Metric Blvd.
Austin, TX 78758
U.S.A.
http://www.metrowerks.com
Voice: (800) 377-5416
Fax: (512) 997-4901
Table of Contents
1 Overview
5
About the mwSourceSafe Plug-in. . . . . . . . . . . . . . . . . . . . . 5
System Requirements . . . . . . . . . . . . . . . . . . . . . . . . . 5
Learning More About Visual SourceSafe . . . . . . . . . . . . . . . . . . 6
2 Setting Up the mwSourceSafe Plug-in
7
Obtaining the mwSourceSafe Plug-in . . . . . . . . . . . . . . . . . . . 7
Installing the mwSourceSafe Plug-in . . . . . . . . . . . . . . . . . . . 8
Activating the mwSourceSafe Plug-in . . . . . . . . . . . . . . . . . . 11
Deactivating the mwSourceSafe Plug-in . . . . . . . . . . . . . . . . . 22
3 Using the mwSourceSafe Plug-in
25
Preparation . . . . . . . . . . . . . . . . . . . . . . . . . . . . 25
The Project Window . . . . . . . . . . . . . . . . . . . . . . . . . 26
The Project Window and the Plug-in . . . . . . . . . . . . . . . . . 26
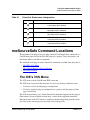
mwSourceSafe Command Locations . . . . . . . . . . . . . . . . . . 27
The IDE’s VCS Menu . . . . . . . . . . . . . . . . . . . . . . . 27
The Context Menu of a Project Window . . . . . . . . . . . . . . . . 28
The Editor Window . . . . . . . . . . . . . . . . . . . . . . . . 29
mwSourceSafe Command Reference . . . . . . . . . . . . . . . . . . 30
4 Tutorial
45
Creating a Default Plug-in Configuration. . . . . . . . . . . . . . . . . 45
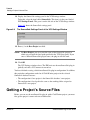
Getting a Project’s Source Files . . . . . . . . . . . . . . . . . . . . 52
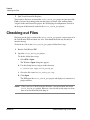
Checking out Files . . . . . . . . . . . . . . . . . . . . . . . . . 54
Checking in Files . . . . . . . . . . . . . . . . . . . . . . . . . . 56
Index
mwSourceSafe Plug-in User Guide
59
MWSS–3
Table of Contents
MWSS–4
mwSourceSafe Plug-in User Guide
1
Overview
This chapter provides an overview of the Metrowerks Visual SourceSafe plug-in for
the CodeWarrior™ integrated development environment (IDE). This tool is
commonly called the mwSourceSafe plug-in.
This chapter contains these topics:
• About the mwSourceSafe Plug-in
• System Requirements
• Learning More About Visual SourceSafe
About the mwSourceSafe Plug-in
The mwSourceSafe plug-in is a tool that makes working with CodeWarrior projects
that are under the control of the Microsoft Visual SourceSafe source code control
system more convenient. How?
The plug-in lets you:
• Execute common Visual SourceSafe commands on a CodeWarrior project from
within the CodeWarrior IDE.
• See the SourceSafe status of each file in a project (and of the project file itself)
from within the IDE.
In short, the plug-in is a time saver because its lets you use Visual SourceSafe without
leaving the CodeWarrior IDE. Without the plug-in, you must run a separate program
(typically, Visual SourceSafe Explorer) in order to use SourceSafe.
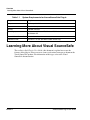
System Requirements
To use the mwSourceSafe plug-in, your computer, operating system, and software
must meet the requirements listed in Table 1.1.
mwSourceSafe Plug-in User Guide
MWSS–5
Overview
Learning More About Visual SourceSafe
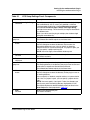
Table 1.1
System Requirements for the mwSourceSafe Plug-in
Component
Requirement
Computer
IBM-compatible PC
Processor
Pentium-class processor
Memory
128 MB, minimum
Operating system
Windows 98, Windows ME, Windows NT, Windows 2000,
or Windows XP
Microsoft Visual SourceSafe
Version 5.0 or later
CodeWarrior IDE
Version 4.x or later (Windows-hosted version only)
Learning More About Visual SourceSafe
The mwSourceSafe Plug-in User Guide (this document) explains how to use the
features of the plug-in. It does not cover source code control concepts or document the
Visual SourceSafe product. For information of this type, refer to the Visual
SourceSafe documentation.
MWSS–6
mwSourceSafe Plug-in User Guide
2
Setting Up the
mwSourceSafe Plug-in
This chapter explains how to obtain, install, activate, configure, and deactivate the
mwSourceSafe plug-in.
The chapter contains these topics:
• Obtaining the mwSourceSafe Plug-in
• Installing the mwSourceSafe Plug-in
• Activating the mwSourceSafe Plug-in
• Deactivating the mwSourceSafe Plug-in
Obtaining the mwSourceSafe Plug-in
The Metrowerks mwSourceSafe plug-in is free. This section explains how to obtain
the latest version of this software.
NOTE
Some CodeWarrior products ship with the mwSourceSafe plug-in. Others do
not. You already have the plug-in if the file mwSourceSafe.dll is in this
directory:
{CodeWarriorInstallDir}\Bin\Plugins\version control
where {CodeWarriorInstallDir} is a placeholder for the path to the
directory in which you installed your CodeWarrior product.
If you already have the plug-in, you do not need to perform the procedure in
this section. That said, if an updated version of the plug-in is posted on the
Metrowerks website, you can use this procedure to get the new version.
mwSourceSafe Plug-in User Guide
MWSS–7
Setting Up the mwSourceSafe Plug-in
Installing the mwSourceSafe Plug-in
To obtain the latest mwSourceSafe plug-in, follow these steps:
1
If the CodeWarrior IDE is running, exit the program.
2
Go to the Metrowerks version control tool download page by clicking this URL
(or by typing it into your Internet browser):
http://www.metrowerks.com/MW/Develop/Desktop/VersionControl.htm
Your Internet browser starts and displays the Metrowerks version control tool
download page.
3
In the Windows section of this page, click the name of the .zip file that contains
the mwSourceSafe plug-in.
4
Use the file download capabilities of your browser to obtain a local copy of the
mwSourceSafe plug-in’s .zip file.
5
Quit the Internet browser.
You now have the .zip file that contains the latest version of the mwSourceSafe
plug-in.
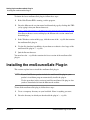
Installing the mwSourceSafe Plug-in
This section explains how to install the mwSourceSafe plug-in.
NOTE
If your CodeWarrior product includes the mwSourceSafe plug-in, your
product’s installation program automatically installs the plug-in.
Use the procedure in this section to install the mwSourceSafe plug-in after
you have downloaded it from the Metrowerks website.
To install the mwSourceSafe plug-in, follow these steps:
MWSS–8
1
Create a temporary directory on your hard disk. Name it anything you want.
2
Go to the directory in which you downloaded the plug-in’s .zip file.
mwSourceSafe Plug-in User Guide
Setting Up the mwSourceSafe Plug-in
Installing the mwSourceSafe Plug-in
3
Double-click the name of the .zip file.
WinZip (or another archive decompression program) runs and displays the
contents of the mwSourceSafe plug-in’s .zip file.
4
Extract the contents of the .zip file. Place them in the temporary directory.
The decompression program creates these subdirectories in the temporary
directory:
• Bin
• Release Notes
• Documentation
NOTE
At the time of this writing, the installation steps that follow were correct.
Before executing these steps, however, please check the release notes for
changes to the installation procedure.
The release notes file is named mwSourceSafe_Release_Notes.txt. It
is in this directory:
{YourTempDir}\Release Notes\VCS Notes\
5
Copy the file pmwSourceSafe.dll
from the directory:
{YourTempDir}\Bin\Plugins\PreferencePanel\
to the directory:
{CodeWarriorInstallDir}\Bin\Plugins\Preference Panel\
where {YourTempDir} is a placeholder for the directory to which you extracted
the mwSourceSafe plug-in distribution file and {CodeWarriorInstallDir} is
a placeholder for the directory in which you installed your CodeWarrior product.
6
Copy the file mwSourceSafe.dll
from the directory:
{YourTempDir}\Bin\Plugins\version control\
to the directory:
{CodeWarriorInstallDir}\Bin\Plugins\version control\
mwSourceSafe Plug-in User Guide
MWSS–9
Setting Up the mwSourceSafe Plug-in
Installing the mwSourceSafe Plug-in
7
Copy the file mwSourceSafe_Release_Notes.txt
from the directory:
{YourTempDir}\Release Notes\VCS Notes\
to the directory:
{CodeWarriorInstallDir}\Release Notes\
Version Control Notes\
8
Copy the file mwSourceSafe_UG.pdf
from the directory:
{YourTempDir}\Documentation\
to the directory:
{CodeWarriorInstallDir}\CodeWarrior Manuals\PDF
9
Copy the file mwSourceSafe_UG.chm
from the directory:
{YourTempDir}\Documentation\
to the directory:
{CodeWarriorInstallDir}\CodeWarrior Manuals\HTML
10 Create this directory:
{CodeWarriorInstallDir}\CodeWarrior Manuals\
Code Examples\mwSourceSafe Plug-in User Guide\
11 Copy the directory mwss_tutorial_db
from the directory:
{YourTempDir}\Documentation\
to the directory:
{CodeWarriorInstallDir}\CodeWarrior Manuals\
Code Examples\mwSourceSafe Plug-in User Guide\
12 Delete the temporary directory.
The mwSourceSafe plug-in is now installed.
MWSS–10
mwSourceSafe Plug-in User Guide
Setting Up the mwSourceSafe Plug-in
Activating the mwSourceSafe Plug-in
NOTE
Please read the release notes before using the mwSourceSafe plug-in. The
name of the release notes file is mwSourceSafe_Release_Notes.txt
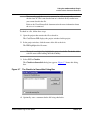
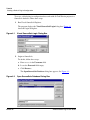
Activating the mwSourceSafe Plug-in
Before you can use the mwSourceSafe plug-in, you must first activate and configure
it. To do this, you must make entries in the VCS Setup settings panel and the
SourceSafe settings panel.
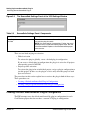
Figure 2.1 show the VCS Setup settings panel. Table 2.1 lists each component in this
panel and explains the purpose and effect of each.
Figure 2.2 show the SourceSafe settings panel. Table 2.2 lists each component in this
panel and explains the purpose and effect of each.
These procedures explain how to activate and configure the mwSourceSafe plug-in:
• Creating a Default mwSourceSafe Plug-in Configuration
• Creating a Project-specific mwSourceSafe Plug-in Configuration
Figure 2.1
The VCS Setup Settings Panel of the VCS Settings Window
mwSourceSafe Plug-in User Guide
MWSS–11
Setting Up the mwSourceSafe Plug-in
Activating the mwSourceSafe Plug-in
Table 2.1
VCS Setup Settings Panel: Components
Panel Component
Description
Use Version Control
check box
Check to instruct the IDE to use a version control system plug-in.
Clear to stop the IDE from using a version control system plug-in.
NOTE: If you are overriding the default plug-in configuration, this
item’s label is Use custom project, not Use Version Control.
Method
dropdown menu
Choose the version control system to use.
To use the mwSourceSafe plug-in, choose SourceSafe.
Use global settings as default
check box
Check to create the default mwSourceSafe plug-in configuration.
Clear to deactivate the default plug-in configuration.
NOTE: This check box is present only if there were no projects
open when you displayed the VCS Settings window.
Login Settings
group box
Groups items that pertain to logging into a SourceSafe database.
The bulleted items below explain each item in this group.
NOTE: All of the login settings are optional.
• Username
text field
Enter your SourceSafe user name for the selected SourceSafe
database (see Database Path below).
The SourceSafe administrator can give you your user name.
NOTE: You can leave this item blank. If you do, you must enter
your user name in the database login dialog box each time the
plug-in must connect to the selected SourceSafe database.
• Password
text field
Enter the password for the specified user name.
The SourceSafe administrator can give you your password.
NOTE: You can leave this item blank. If you do, you must enter
your password in the database login dialog box each time the
plug-in must connect to the selected SourceSafe database.
• Remember password
check box
Check if you do not want to enter your password each time the
plug-in displays the database login dialog box.
Clear if you want to enter your password each time the plug-in
displays the database login dialog box.
NOTE: If you do not check Remember password, the value
entered in the Password field (described above) is discarded.
• Connect on open
check box
Check if you want the plug-in to immediately connect to the
specified SourceSafe database when you open a project. In this
case, the plug-in does not display the database login dialog box.
Clear if you do not want the plug-in to immediately connect to the
specified SourceSafe database when you open a project.
NOTE: You must enter a valid user name/password combination
and check Remember password for the connect on open feature
to work.
MWSS–12
mwSourceSafe Plug-in User Guide
Setting Up the mwSourceSafe Plug-in
Activating the mwSourceSafe Plug-in
Table 2.1
VCS Setup Settings Panel: Components
Panel Component
• Always show login dialog
check box
Description
Check if you want the plug-in to display the database login dialog
box unconditionally, that is, even if you specified a valid user
name/password combination, checked Remember password,
and checked Connect on open. Always show login dialog
overrides these settings. This feature lets you login to SourceSafe
as a different user.
Clear if you do no want the plug-in to display the database login
dialog box unconditionally.
Database Path
group box
Groups items pertaining to the location of a SourceSafe database.
The bulleted items below explain each of these items.
• Choose...
button
Displays the Select an Access Path dialog box.
Use this dialog box to select the directory that contains the
SourceSafe database to use. You can specify an absolute,
compiler relative, or system relative path. If a project is open, you
can also specify a project relative path.
NOTE: You must supply a SourceSafe database path.
• Path
text field
Displays the selected SourceSafe database path.
This field is read-only.
• Try to mount shared volume
check box
Reserved for future use. Leave unchecked.
Local Path
group box
Groups items that pertain to the plug-in’s working directory.
The working directory is the directory the plug-in uses to store and
retrieve files in response to SourceSafe commands.
The bulleted items below explain each of these items.
• Choose...
button
Displays the Select an Access Path dialog box.
Use this dialog box to select the directory for the plug-in to use as
its working directory.
You can specify an absolute, compiler relative, or system relative
path. Also, if a project is open, you can specify a project relative
path.
NOTE: You must specify a local path. Further, the directory you
specify must match the working directory displayed by Visual
SourceSafe Explorer for the SourceSafe project you enter in the
Base Project text field (explained in Table 2.2).
• Path
text field
Displays the selected local path.
This field is read-only.
mwSourceSafe Plug-in User Guide
MWSS–13
Setting Up the mwSourceSafe Plug-in
Activating the mwSourceSafe Plug-in
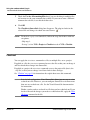
Figure 2.2
The SourceSafe Settings Panel of the VCS Settings Window
Table 2.2
SourceSafe Settings Panel: Components
Panel Component
Description
Base Project
text field
Enter the name of the base SourceSafe project with which
you want the plug-in to work.
NOTE: You must specify a base project. Further, the name
entered must be a valid SourceSafe project name. Run the
Visual SourceSafe Explorer to find the SourceSafe project
name to enter.
There are two kinds of plug-in activation:
• Global activation
To activate the plug-in globally, create a default plug-in configuration.
If you create a default plug-in configuration, the plug-in is active for all projects
subsequently opened in the IDE.
• Project-specific activation
To activate the plug-in for an individual project, assign a plug-in configuration to
just this project. In this case, the plug-in is active only when this project is both
open and selected.
The procedures in this section explain how to activate the plug-in both of these ways.
These procedures are:
• Creating a Default mwSourceSafe Plug-in Configuration
• Creating a Project-specific mwSourceSafe Plug-in Configuration
Creating a Default mwSourceSafe Plug-in Configuration
The IDE attempts to use the default mwSourceSafe plug-in configuration for each
CodeWarrior project that does not have a custom VCS plug-in configuration.
MWSS–14
mwSourceSafe Plug-in User Guide
Setting Up the mwSourceSafe Plug-in
Activating the mwSourceSafe Plug-in
NOTE
You do not have to create the default plug-in configuration. Instead, you can
create a custom configuration for each of your projects. The default plug-in
configuration is just a convenience.
To create the default plug-in configuration, follow these steps:
1
Run Visual SourceSafe Explorer.
Visual SourceSafe Explorer displays its main window.
2
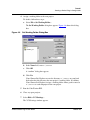
In the left pane of Visual SourceSafe Explorer, click the name of the SourceSafe
project that you want to make the Base Project (explained below) of the default
plug-in configuration.
Visual SourceSafe Explorer displays this project’s fully qualified name in its
“Contents of” field. See Figure 2.3.
TIP
Write down the selected project’s fully qualified name. You must use it for
the plug-in’s Base Project setting (explained below).
TIP
To create the most general plug-in configuration, select the root SourceSafe
project. This project is named $/. It is at the root level of the SourceSafe
project tree.
Figure 2.3
Visual SourceSafe Explorer with the Root Project Selected
“Contents of” field: full SourceSafe project name
(Enter this name for Base Project)
mwSourceSafe Plug-in User Guide
Working folder of selected project
(Enter this path for Local Path)
MWSS–15
Setting Up the mwSourceSafe Plug-in
Activating the mwSourceSafe Plug-in
3
Using Visual SourceSafe Explorer, assign a working folder to the SourceSafe
project just selected.
TIP
Write down the absolute path of the specified working folder. You must use
it for the plug-in’s Local Path setting (explained below).
TIP
To create the most general plug-in configuration, assign a working folder to
the root SourceSafe project ($/) and let all subprojects inherit this working
folder. Such a plug-in configuration works for all subprojects in a
SourceSafe database.
4
Quit Visual SourceSafe Explorer.
5
Run the CodeWarrior IDE.
6
Close any open projects.
7
Choose Edit > Version Control Settings...
The VCS Settings window appears.
8
Display the VCS Setup settings panel in the VCS Settings window.
To do this, select the item labeled VCS Setup. This item is in the pane labeled
VCS Settings Panels. This pane is on the left side of the VCS Settings window.
Figure 2.1 on page 11 shows the VCS Setup panel.
9
Check the Use Version Control check box.
10 Select the item labeled SourceSafe from the Method dropdown menu.
The IDE enables the rest of the items in the VCS Setup panel.
11 Check Use global settings as default check box.
This setting makes the current plug-in configuration the default configuration.
The IDE attempts to apply this configuration to all CodeWarrior projects that do
not have a custom plug-in configuration.
MWSS–16
mwSourceSafe Plug-in User Guide
Setting Up the mwSourceSafe Plug-in
Activating the mwSourceSafe Plug-in
NOTE
Because no project is open, the VCS Settings panel includes the Use global
settings as default check box. If a project is open, this check box is not
present.
12 Optionally, specify default Visual SourceSafe login settings.
NOTE
None of the login settings is required. Table 2.1 on page 12 explains the
purpose and effect of each login setting.
13 Specify the path to the SourceSafe database to make the default database.
To do this, follow these steps:
a. Click the Choose... button in the Database Path group box.
The Select an Access Path dialog box appears.
b. Use this dialog box to navigate to the directory that contains the SourceSafe
database you want to make the default database.
c. Click OK
The selected path appears in the read-only field to the left of the Choose...
button.
14 Specify the local path to make the default local path.
To do this, follow these steps:
a. Click the Choose... button in the Local Path group box.
The Select an Access Path dialog box displays.
b. Use this dialog box to navigate to the working folder defined in step 3.
NOTE
The directory you specify for local path must match the working folder
assigned to the SourceSafe project you intend to make the plug-in’s Base
Project. If you select a different local path, the plug-in will not work.
c. Click OK
The selected path appears in the read-only field to the left of the Choose...
button.
mwSourceSafe Plug-in User Guide
MWSS–17
Setting Up the mwSourceSafe Plug-in
Activating the mwSourceSafe Plug-in
15 Display the SourceSafe settings panel in the VCS Settings window.
To do this, select the item labeled SourceSafe. This item is in the pane labeled
VCS Settings Panels. This pane is on the left side of the VCS Settings window.
Figure 2.2 on page 14 shows the SourceSafe settings panel.
16 In the Base Project text field, enter the fully qualified SourceSafe project name
obtained in step 2.
NOTE
The name you enter for Base Project must match the fully qualified
SourceSafe project name obtained in step 2. If you enter a different name,
the plug-in will not work.
17 Click OK
The VCS Settings window closes. The IDE activates the mwSourceSafe plug-in
globally and adds the VCS menu to its menu bar.
Refer to “Using the mwSourceSafe Plug-in” on page 25 for instructions that explain
how to use each feature of the mwSourceSafe plug-in.
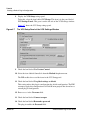
Creating a Project-specific mwSourceSafe Plug-in Configuration
A project-specific plug-in configuration is one that applies to just the CodeWarrior
project that is open and selected when you create the configuration.
To create a project-specific plug-in configuration, follow these steps:
1
Run Visual SourceSafe Explorer.
Visual SourceSafe Explorer displays its main window.
2
In the left pane of the Visual SourceSafe Explorer, select the SourceSafe project
that contains the source files of the CodeWarrior project for which you want to
create a project-specific plug-in configuration.
Visual SourceSafe Explorer displays the project’s fully qualified name in its
“Contents of” field and lists the files that belong to the project in its right pane.
See Figure 2.4.
MWSS–18
mwSourceSafe Plug-in User Guide
Setting Up the mwSourceSafe Plug-in
Activating the mwSourceSafe Plug-in
TIP
Figure 2.4
Write down the selected project’s fully qualified name. You must use it for
the plug-in’s Base Project setting (explained below).
Visual SourceSafe Explorer with a “Leaf” Project Selected
“Contents of” field: full SourceSafe project name
(Enter this name for Base Project)
3
TIP
4
Working folder of selected project
(Enter this path for Local Path)
Using Visual SourceSafe Explorer, assign a working folder to the selected
SourceSafe project.
Write down the absolute path of the specified working folder. You must use
it for the plug-in’s Local Path setting (explained below).
Using Visual SourceSafe Explorer, get the desired version of the selected project
out of SourceSafe.
Visual SourceSafe Explorer creates local copies of the selected project’s files in
the working folder assigned to the project.
5
Quit Visual SourceSafe Explorer.
6
Run the CodeWarrior IDE.
7
Close any open projects.
8
Open the CodeWarrior project just retrieved from SourceSafe.
mwSourceSafe Plug-in User Guide
MWSS–19
Setting Up the mwSourceSafe Plug-in
Activating the mwSourceSafe Plug-in
9
Choose Edit > Version Control Settings...
The VCS Settings window appears.
10 Display the VCS Setup settings panel in the VCS Settings window.
To do this, select the item labeled VCS Setup. This item is in the pane labeled
VCS Settings Panels. This pane is on the left side of the VCS Settings window.
NOTE
Because a project is open, the VCS Settings panel does not include the Use
global settings as default check box. This is because the IDE must assign a
plug-in configuration to an open project, if there is one.
11 Check the Use Version Control check box.
NOTE
If the default plug-in configuration has been defined, this check box is
labeled Use custom project instead of Use Version Control. In this case,
the new configuration overrides the default plug-in configuration for the
open project.
12 Select the SourceSafe item from the Method dropdown menu.
The IDE enables the rest of the items in the VCS Setup panel.
13 Optionally, specify SourceSafe database login settings for the open project.
NOTE
None of the login settings is required. Table 2.1 on page 12 explains the
purpose of each login setting.
14 Specify the path to the SourceSafe database that the open project uses.
To do this, follow these steps:
a. Click the Choose... button in the Database Path group box.
The Select an Access Path dialog box displays.
b. Use this dialog box to navigate to the directory that holds the SourceSafe
database that contains the open project.
MWSS–20
mwSourceSafe Plug-in User Guide
Setting Up the mwSourceSafe Plug-in
Activating the mwSourceSafe Plug-in
c. Click OK
The selected path appears in the read-only text field to the left of the
Choose... button.
15 Specify the local path to use for the open project.
To do this, follow these steps:
a. Click the Choose... button in the Local Path group box.
The Select an Access Path dialog box displays.
b. Use this dialog box to navigate to the working folder defined in step 3.
NOTE
The directory you specify for local path must match the working folder
assigned to the SourceSafe project you intend to make the plug-in’s Base
Project. If you select a different local path, the plug-in will not work.
c. Click OK
The selected path appears in the read-only text field to the left of the
Choose... button.
16 Display the SourceSafe settings panel in the VCS Settings window.
To do this, select the item labeled SourceSafe. This item is in the pane labeled
VCS Settings Panels. This pane is on the left side of the VCS Settings window.
Figure 2.2 on page 14 shows the SourceSafe settings panel.
17 In the Base Project text field, enter the fully qualified SourceSafe project name
obtained in step 2.
NOTE
The name you enter for Base Project must match the fully qualified
SourceSafe project name obtained in step 2. If you enter a different name,
the plug-in will not work.
18 Click OK
The VCS Settings window closes. The IDE activates the mwSourceSafe plug-in
for the open project.
mwSourceSafe Plug-in User Guide
MWSS–21
Setting Up the mwSourceSafe Plug-in
Deactivating the mwSourceSafe Plug-in
NOTE
The VCS menu appears in the IDE’s menu bar when you select a project for
which the plug-in has been activated. This menu disappears when you select
a project for which the plug-in has not been activated.
Refer to “Using the mwSourceSafe Plug-in” on page 25 for instructions that explain
how to use each feature of the mwSourceSafe plug-in.
Deactivating the mwSourceSafe Plug-in
To deactivate the mwSourceSafe plug-in, follow these steps:
1
Start the CodeWarrior IDE.
2
To deactivate the plug-in configuration for a specific CodeWarrior project, open
that project.
To deactivate the default plug-in configuration, close all projects.
3
Choose Edit > Version Control Settings...
The VCS Settings window appears.
4
Display the VCS Setup settings panel in the VCS Settings window.
To do this, select the item labeled VCS Setup. This item is in the pane labeled
VCS Settings Panels. This pane is on the left side of the VCS Settings window.
Figure 2.1 on page 11 shows the VCS Settings window with the VCS Setup panel
displayed.
5
Select the item labeled None from the Method dropdown menu.
6
To deactivate the default plug-in configuration, clear the box labeled Use global
settings as default.
NOTE
7
The VCS Setup panel includes the Use global settings as default check box
only if no projects are open. If the IDE has one or more projects open, this
check box is not present.
Clear the Use Version Control check box.
The IDE disables the other the items in the VCS Setup panel.
MWSS–22
mwSourceSafe Plug-in User Guide
Setting Up the mwSourceSafe Plug-in
Deactivating the mwSourceSafe Plug-in
NOTE
8
If a default plug-in configuration exists, this check box is labeled Use
custom project instead of Use Version Control.
Click OK
The VCS Settings window closes. The IDE deactivates the plug-in and removes
the VCS menu from its menu bar.
NOTE
If no projects were open when you clicked OK, the IDE deactivates the
default plug-in configuration. The IDE attempts to use this plug-in
configuration for all CodeWarrior projects that do not have a custom
configuration.
If a project was open, the IDE deactivates the plug-in for just this project.
mwSourceSafe Plug-in User Guide
MWSS–23
Setting Up the mwSourceSafe Plug-in
Deactivating the mwSourceSafe Plug-in
MWSS–24
mwSourceSafe Plug-in User Guide
3
Using the mwSourceSafe
Plug-in
This chapter explains how to use the mwSourceSafe plug-in.
The chapter contains these topics:
• Preparation
• The Project Window
• mwSourceSafe Command Locations
• mwSourceSafe Command Reference
Preparation
Before you can use the mwSourceSafe plug-in with a CodeWarrior™ project, you
must first get the project’s source files out of Visual SourceSafe. To do this, use the
Visual SourceSafe Explorer program. Refer to the Visual SourceSafe documentation
for instructions.
Once you have local copies of your project’s source files, open the project in the
CodeWarrior IDE. If you created the default plug-in configuration or assigned a
custom configuration to the project, you can now use the mwSourceSafe plug-in with
this project.
See “Creating a Default mwSourceSafe Plug-in Configuration” on page 14 and
“Creating a Project-specific mwSourceSafe Plug-in Configuration” on page 18 for
instructions that explain how to configure the mwSourceSafe plug-in.
mwSourceSafe Plug-in User Guide
MWSS–25
Using the mwSourceSafe Plug-in
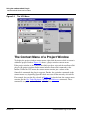
The Project Window
The Project Window
To use the mwSourceSafe plug-in, you must understand how the plug-in interacts with
the project window of a CodeWarrior project. This is because the project window:
• Shows you the SourceSafe status of each file in the project and of the project
itself.
• Lets you apply SourceSafe commands to files in the project and to the project
itself.
• Shows you the results of a SourceSafe command.
The Project Window and the Plug-in
Once you have activated the mwSourceSafe plug-in, a new column appears in the
project window of the project for which the plug-in was activated (or in all project
windows if you activated the plug-in globally). This column contains icons that signify
the check out status of each file in the project. In addition, an icon in the lower-left
corner of the project window indicates the check out status of the project file itself (the
.mcp file).
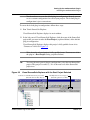
Figure 3.1 shows the project window of a project for which the mwSourceSafe plug-in
has been activated. Table 3.1 explains how to interpret each check out status icon.
Figure 3.1
A Project Window with the mwSourceSafe Plug-in Active
Check Out Status Column
Project Check Out Status Icon
MWSS–26
File Check Out Status Icons
mwSourceSafe Plug-in User Guide
Using the mwSourceSafe Plug-in
mwSourceSafe Command Locations
Table 3.1
Check Out Status Icons: Interpretation
Icon
Check Out Status
File is not in SourceSafe.
Local copy of file is writable
File is not in SourceSafe.
Local copy of file is read-only.
File is not checked out.
Local copy of file is read-only.
File is not checked out.
Local copy of file is writable.
File is checked out.
Local copy of file is writable.
mwSourceSafe Command Locations
The mwSourceSafe plug-in lets you apply common Visual SourceSafe commands to a
CodeWarrior project and to the files that belong to a project. To use the plug-in, you
must know where to find these commands.
The mwSourceSafe plug-in makes SourceSafe commands available from these places:
• The IDE’s VCS Menu
• The Context Menu of a Project Window
• The Editor Window
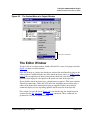
The IDE’s VCS Menu
The VCS menu is in the CodeWarrior IDE’s menu bar.
The VCS menu is present in the menu bar if at least one of these conditions is met:
• You have created a default plug-in configuration.
• You have assigned a plug-in configuration to a project, and that project is both
open and selected.
The VCS menu includes every Visual SourceSafe command supported by the plug-in.
Other menus (discussed below) include only a subset of the supported commands.
Individual items in the VCS menu are enabled or disabled depending upon the check
out status of the current project or currently selected project file.
mwSourceSafe Plug-in User Guide
MWSS–27
Using the mwSourceSafe Plug-in
mwSourceSafe Command Locations
Figure 3.2
The VCS Menu
The Context Menu of a Project Window
To display the project window context menu, right-click the mouse while its cursor is
within the project window. Figure 3.3 shows a project window context menu.
If the project window is for a project for which you have activated the mwSourceSafe
plug-in, the project window context menu includes SourceSafe commands at the
bottom. Unlike the VCS menu, the context menu contains just a subset of the
SourceSafe commands the plug-in supports. Further, the particular commands in the
context menu vary depending upon the check out status of the currently selected file.
For example, because the file selected in Figure 3.3 is checked out, the context menu
contains just the Get, Undo Checkout, Checkin, and Difference commands. These
commands are pertinent for a file that is checked out.
MWSS–28
mwSourceSafe Plug-in User Guide
Using the mwSourceSafe Plug-in
mwSourceSafe Command Locations
Figure 3.3
The Context Menu of a Project Window
SourceSafe Commands
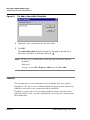
The Editor Window
To open a file in an editor window, double-click the file’s name in its project window.
Figure 3.4 shows an editor window.
If the file belongs to a project for which you activated the mwSourceSafe plug-in, the
editor window’s toolbar includes one of the check out status icons (see Table 3.1 on
page 27 for an explanation of how to interpret the check out status icons). The
particular icon displayed corresponds to the check out status of the open file.
If you click the check out status icon, a dropdown menu appears. This menu contains
SourceSafe commands. Unlike the VCS menu, the dropdown menu contains only a
subset of the SourceSafe commands the plug-in supports. Further, the particular
commands displayed vary depending upon the check out status of the open file.
For example, because the file in Figure 3.4 is not checked out, the dropdown menu
contains just the Get, Checkout, and Difference commands. These commands are
pertinent for a file that is not checked out.
mwSourceSafe Plug-in User Guide
MWSS–29
Using the mwSourceSafe Plug-in
mwSourceSafe Command Reference
Figure 3.4
The Editor Window’s SourceSafe Menu
mwSourceSafe Command Reference
This section explains each command supported by the mwSourceSafe plug-in.
Table 3.2 lists these commands.
Table 3.2
Commands Supported by the mwSourceSafe Plug-in
About
Add
Checkin
Checkout
Connect
Difference
Disconnect
Get
Status
Synchronize Selection
Synchronize Status
Undo Checkout
About
The About command displays the “About” box for the mwSourceSafe plug-in. The
About box displays the version number of the plug-in you are using along with
copyright information.
To issue the About command, select VCS > About. An About box like that shown in
Figure 3.5 appears.
NOTE
MWSS–30
The About command is present in just the VCS menu.
mwSourceSafe Plug-in User Guide
Using the mwSourceSafe Plug-in
mwSourceSafe Command Reference
Figure 3.5
About Box for the mwSourceSafe Plug-in
Add
You can apply the Add command to a file, to multiple files, or to a project.
If applied to a file, the Add command adds the selected file to SourceSafe.
If applied to a project, the Add command adds the project file (that is, the .mcp file) to
SourceSafe.
To add a file to SourceSafe, follow these steps:
1
Open the project that contains the file to be added.
The CodeWarrior IDE displays the project window for this project.
2
In the project window, click the name of the file to be added.
The IDE highlights this file name.
NOTE
3
To add multiple files, highlight the name of each file. To do this, click each
file name while holding down the Ctrl key.
Select VCS > Add
The Add to SourceSafe dialog box appears. Figure 3.6 shows this dialog box.
mwSourceSafe Plug-in User Guide
MWSS–31
Using the mwSourceSafe Plug-in
mwSourceSafe Command Reference
Figure 3.6
The Add to SourceSafe Dialog Box
4
Optionally, enter a comment for the file to be added.
5
Click OK
The Add to SourceSafe dialog box disappears. The plug-in adds the file to
SourceSafe and makes its check out status icon:
NOTE
To add a project to SourceSafe, follow the steps listed above with two
exceptions:
- Skip step 2.
- In step 3, select VCS > Project > Add instead of VCS > Add
Checkin
You can apply the Checkin command to a file, to multiple files, or to a project.
If applied to a file, the Checkin command adds the changes you made to the file to
SourceSafe and creates a new version of the file in SourceSafe.
If applied to a project, the Checkin command adds the changes you made to the
project file (that is, to the .mcp file) to SourceSafe and creates a new version of this
file in SourceSafe.
MWSS–32
mwSourceSafe Plug-in User Guide
Using the mwSourceSafe Plug-in
mwSourceSafe Command Reference
NOTE
You can only apply the Checkin command to a file or project that you have
checked out. If a file is not checked out or is checked out by another user,
you cannot check in the file.
Refer to the Visual SourceSafe documentation for more information about
the Checkin command.
To check in a file, follow these steps:
1
Open the project that contains the file to check in.
The CodeWarrior IDE displays the project window for this project.
2
In the project window, click the name of the file to check in.
The IDE highlights this file name.
NOTE
3
To check in multiple files, highlight the name of each file. To do this, click
each file name while holding down the Ctrl key.
Select VCS > Checkin
The Checkin to SourceSafe dialog box appears. Figure 3.7 shows this dialog
box.
Figure 3.7
The Checkin to SourceSafe Dialog Box
4
Optionally, enter a comment for the file being checked in.
mwSourceSafe Plug-in User Guide
MWSS–33
Using the mwSourceSafe Plug-in
mwSourceSafe Command Reference
5
Check the Use for All remaining Files box if you are checking in multiple files
and want to use the same comment for each file. If you want to enter a different
comment for each file, leave this check box clear.
6
Click OK
The Checkin to SourceSafe dialog box disappears. The plug-in checks in the
selected file and changes its check out status icon to:
NOTE
To check in a project to SourceSafe, follow the steps listed above with two
exceptions:
- Skip step 2.
- In step 3, select VCS > Project > Checkin instead of VCS > Checkin
Checkout
You can apply the Checkout command to a file, to multiple files, or to a project.
If applied to a file, the Checkout command reserves the file so that you can change it
and later check these changes into SourceSafe.
If applied to a project, the Checkout command reserves the project file (that is, the
.mcp file) so that you can change it and later check in these changes.
See “Checkin” on page 32 for instructions the explain how to use this command.
NOTE
In its default configuration, Visual SourceSafe allows just one user at a time
to check out a file. However, you can configure SourceSafe so it allows more
than one use to check out a file. See the Visual SourceSafe documentation
for instructions.
Further, you do not have to check in a file that you have checked out. If you
decide to discard the changes you made to a checked out file, apply the Undo
Checkout command to the file.
MWSS–34
mwSourceSafe Plug-in User Guide
Using the mwSourceSafe Plug-in
mwSourceSafe Command Reference
To check out a file, follow these steps:
1
Open the project that contains the file to check out.
The CodeWarrior IDE displays the project window for this project.
2
In the project window, click the name of the file to check out.
The IDE highlights this file name.
NOTE
3
To check out multiple files, highlight the name of each file. To do this, click
each file name while holding down the Ctrl key.
Select VCS > Checkout
The plug-in checks out the selected file and changes its check out status icon
to:
To check out a project, follow these steps:
1
Open the project that you want to check out.
The CodeWarrior IDE displays the project window for this project.
2
Select VCS > Project > Checkout
The plug-in checks out the project (that is, it checks out the project’s .mcp file)
and changes its check out status icon to:
. This icon appears in the lower-left
corner of the project window.
Connect
The Connect command connects the plug-in to the SourceSafe database specified in
the plug-in’s configuration.
NOTE
See “Activating the mwSourceSafe Plug-in” on page 11 for instructions that
explain how to configure the mwSourceSafe plug-in.
mwSourceSafe Plug-in User Guide
MWSS–35
Using the mwSourceSafe Plug-in
mwSourceSafe Command Reference
To connect to the SourceSafe database, follow these steps:
1
Open the project for which you want to connect to SourceSafe.
The CodeWarrior IDE displays the project window for this project.
2
Select VCS > Connect
If the plug-in configuration includes all information the plug-in needs to log into
the database, the plug-in does so. See Table 2.1 on page 12 for an explanation of
the plug-in’s database login configuration options.
If the configuration does not include all required information or if the Always
show login dialog option was chosen, the plug-in displays the Version Control
Login dialog box. Figure 3.8 shows this dialog box.
Figure 3.8
The Version Control Login Dialog Box
To use this dialog box, follow these steps:
a. Enter a user name.
This user name does not have to be the one specified in the plug-in’s
configuration.
b. Enter the password that corresponds with the user name entered.
c. Click OK
The plug-in logs into the database configured for the plug-in using the user
name and password supplied.
NOTE
MWSS–36
The Connect command is present in just the VCS menu. Further, if the
plug-in is already connected, the command Disconnect appears in place of
the Connect command.
mwSourceSafe Plug-in User Guide
Using the mwSourceSafe Plug-in
mwSourceSafe Command Reference
Difference
You can only apply the Difference command to an individual file. You cannot
apply it to multiple files or to a project.
The Difference command displays the differences between your local copy of the
selected file and the latest version of this file in SourceSafe.
To use the Difference command, follow these steps:
1
Open the project that contains the file to which to apply the Difference
command.
The CodeWarrior IDE displays the project window for this project.
2
In the project window, click the name of the file to which to apply the
Difference command.
The IDE highlights this file name.
3
Select VCS > Difference
The plug-in compares the local copy of the selected file to the latest version of
this file in SourceSafe. The plug-in displays the differences in the File Compare
Results window of the CodeWarrior IDE. This window displays the SourceSafe
version of the file in its left pane and the local copy of this file in its right pane.
Figure 3.9 show the File Compare Results window. Refer to the IDE User
Guide for instructions that explain how to use this window.
Figure 3.9
The File Compare Results Window of the CodeWarrior IDE
mwSourceSafe Plug-in User Guide
MWSS–37
Using the mwSourceSafe Plug-in
mwSourceSafe Command Reference
Disconnect
The Disconnect command disconnects the plug-in from the SourceSafe database
specified in the plug-in’s configuration.
To disconnect the plug-in from its SourceSafe database, choose VCS > Disconnect.
NOTE
The Disconnect command is present in just the IDE’s VCS menu. Further,
if the plug-in not yet connected, the command Connect appears in place of
the Disconnect command.
Get
You can apply the Get command to a file, to multiple files, or to a project.
If applied to a file, the Get command gets the latest version of the file from
SourceSafe and places it in your working directory.
If applied to a project, the Get command retrieves the latest version of the project file
(that is, the .mcp file) and places it in your working directory.
To get the latest version of a file, follow these steps:
1
Open the project that contains the file for which you want to get the latest version.
The CodeWarrior IDE displays the project window for this project.
2
In the project window, click the name of the file for which to get the latest
version.
The IDE highlights this file name.
NOTE
3
To get the latest version of multiple files, highlight the name of each file. To
do this, click each file name while holding down the Ctrl key.
Select VCS > Get
The plug-in gets the latest version of the selected file and changes its check out
status icon to:
MWSS–38
mwSourceSafe Plug-in User Guide
Using the mwSourceSafe Plug-in
mwSourceSafe Command Reference
To get the latest version of a project, follow these steps:
1
Open the project for which you want to get the latest version.
The CodeWarrior IDE displays the project window for this project.
2
Select VCS > Project > Get
The plug-in gets the project (that is, it gets the latest version of the project’s .mcp
file) and changes its check out status icon to:
. This icon appears in the lowerleft corner of the project window.
Status
You can apply the Status command to a file, to multiple files, or to a project.
If applied to a file, the Status command reports the SourceSafe status of the file.
If applied to a project, the Status command reports the SourceSafe status of the
project file (that is, the .mcp file).
To get the status of a file, follow these steps:
1
Open the project that contains the file for which you want to obtain status.
The CodeWarrior IDE displays the project window for this project.
2
In the project window, click the name of the file for which to obtain status.
The IDE highlights the file name.
NOTE
3
To obtain the status of multiple files at once, highlight the name of each file.
To do this, click each file name while holding down the Ctrl key.
Select VCS > Status
The plug-in displays the Status window. Figure 3.10 shows this window.
mwSourceSafe Plug-in User Guide
MWSS–39
Using the mwSourceSafe Plug-in
mwSourceSafe Command Reference
Figure 3.10 The Status Window
File’s SourceSafe
version number
Check out directory
User name of user who
checked out the file
SourceSafe item
To get the status of a project, follow these steps:
1
Open the project for which you want to obtain status.
The CodeWarrior IDE displays the project window for this project.
2
Select VCS > Project > Status
The plug-in displays the status of the project file (that is, the .mcp file) in the
Status window. Figure 3.10 shows this window.
NOTE
The Status command is present in just the IDE’s VCS menu.
Synchronize Selection
You can apply Synchronize Selection command to a file or files in a project.
You cannot apply the command to the project itself.
The command verifies that the check out status icon currently displayed for the
selected file matches the status of that file in SourceSafe. If there is a discrepancy, the
plug-in displays the correct check out status icon for the selected file.
The mwSourceSafe plug-in sometimes displays the wrong check out status icon if you
use the change the check out status of a file outside of the CodeWarrior IDE (for
example, by using the Visual SourceSafe Explorer program). You can use the
Synchronize Selection command to rectify this situation.
MWSS–40
mwSourceSafe Plug-in User Guide
Using the mwSourceSafe Plug-in
mwSourceSafe Command Reference
To issue the Synchronize Selection command, follow these steps:
1
Open the project that contains the file to synchronize.
The CodeWarrior IDE displays the project window for this project.
2
In the project window, click the name of the file to synchronize.
The IDE highlights this file name.
NOTE
3
To synchronize the status of multiple files at once, highlight the name of
each file. To do this, click each file name while holding down the Ctrl key.
Select VCS > Synchronize Selection
The plug-in verifies that the check out status icon currently displayed for the
selected file is correct. If not, the plug-in displays the correct check out status
icon.
NOTE
The Synchronize Selection command is present in just the IDE’s VCS
menu.
Synchronize Status
The Synchronize Status command is applied to all files in a project and to the
project itself.
The command updates the check out status icon of each file in the project and of the
project file itself (that is, of the .mcp file).
The mwSourceSafe plug-in can sometimes display the wrong check out status icon.
For example, if you change the check out status of a file or project outside of the
CodeWarrior IDE (by using the Visual SourceSafe Explorer program), the plug-in
might display the wrong check out status icon. Use the Synchronize Status
command to rectify this situation.
mwSourceSafe Plug-in User Guide
MWSS–41
Using the mwSourceSafe Plug-in
mwSourceSafe Command Reference
To issue the Synchronize Status command, follow these steps:
1
Open the project that you want to synchronize.
The CodeWarrior IDE displays the project window for this project.
2
Select VCS > Synchronize Status
The plug-in updates the check out status icon for each file for it finds a
discrepancy.
NOTE
The Synchronize Status command is present in just the IDE’s VCS
menu.
Undo Checkout
You can apply the Undo Checkout command to a file, to multiple files, or to a
project.
If applied to a file, the Undo Checkout command changes the SourceSafe status of
the file to “not checked out”. As a result, you cannot check in any changes you made
to the file while it was checked out.
If applied to a project, the Undo Checkout command changes the SourceSafe status
of the project file (the .mcp file) to “not checked out”. As a result, you cannot check in
any changes you made the project file while it was checked out.
NOTE
You can only apply the Undo Checkout command to a file or project that
you have checked out. If a file is not checked out or is checked out by
another user, you cannot undo the check out of this file.
Refer to the Visual SourceSafe documentation for more information about
the Undo Checkout command.
To undo the check out of a file, follow these steps:
1
Open the project that contains the file for which you want to undo the check out.
The CodeWarrior IDE displays the project window for this project.
MWSS–42
mwSourceSafe Plug-in User Guide
Using the mwSourceSafe Plug-in
mwSourceSafe Command Reference
2
In the project window, click the name of the file for which to undo the check out.
The IDE highlights this file name.
NOTE
3
To undo the check out for multiple files at once, highlight the name of each
file. To do this, click each file name while holding down the Ctrl key.
Select VCS > Undo Checkout
The plug-in undoes the check out of the selected file and changes its check out
status icon to:
NOTE
To undo the check out of a project, follow the steps listed above with two
exceptions:
- Skip step 2.
- In step 3, select VCS > Project > Undo Checkout instead of
VCS > Undo Checkout
mwSourceSafe Plug-in User Guide
MWSS–43
Using the mwSourceSafe Plug-in
mwSourceSafe Command Reference
MWSS–44
mwSourceSafe Plug-in User Guide
4
Tutorial
This chapter consists of a tutorial. The tutorial shows you how to:
• Create a default configuration for the mwSourceSafe plug-in.
• Use the plug-in to perform common Visual SourceSafe tasks from within the
CodeWarrior™ IDE.
The tutorial uses a demonstration Visual SourceSafe database. This database contains
two CodeWarrior projects. As you work through the tutorial, you apply
mwSourceSafe plug-in commands to the demonstration database.
The tutorial contains these lessons:
• Creating a Default Plug-in Configuration
• Getting a Project’s Source Files
• Checking out Files
• Checking in Files
Creating a Default Plug-in Configuration
Although you can create a custom plug-in configuration for each of your CodeWarrior
projects, it may be easier to create a default plug-in configuration. The IDE attempts to
use the default plug-in configuration for all projects that do not have a custom
configuration. This approach may be easier because you only have to create one
plug-in configuration.
Note the use of the word attempts in the paragraph above. The IDE cannot use the
default plug-in configuration with any CodeWarrior project for which the default
configuration conflicts with the setup of that project in SourceSafe. Fortunately, there
is a way to configure the plug-in such that it works with every SourceSafe project
setup. By the end of this lesson, you will know how to create such a plug-in
configuration.
mwSourceSafe Plug-in User Guide
MWSS–45
Tutorial
Creating a Default Plug-in Configuration
To create a default plug-in configuration that works with all CodeWarrior projects in a
SourceSafe database, follow these steps:
1
Run Visual SourceSafe Explorer.
The program displays the Visual SourceSafe Login dialog box. Figure 4.1
shows the login dialog box.
Figure 4.1
Visual SourceSafe Login Dialog Box
2
Login to SourceSafe.
To do this, follow these steps:
a. Enter Guest in the Username field.
b. Leave the Password field empty.
c. Click Browse...
The Open SourceSafe Database dialog box appears. See Figure 4.2.
Figure 4.2
MWSS–46
Open SourceSafe Database Dialog Box
mwSourceSafe Plug-in User Guide
Tutorial
Creating a Default Plug-in Configuration
d. Click Browse... again.
The Find Database dialog box appears. Figure 4.3 shows this dialog box.
Figure 4.3
Find Database Dialog Box
e. Use this dialog box to navigate to the directory that contains the tutorial’s
demonstration database. This directory is:
{CodeWarriorInstallDir}\CodeWarrior Manuals\
Code Examples\mwSourceSafe Plug-in User Guide\
mwss_tutorial_db
where {CodeWarriorInstallDir} is a placeholder for the path in which
you installed your CodeWarrior product.
f. Click Open
The Browse for Visual SourceSafe Database dialog box appears. Figure 4.4
shows this dialog box.
Figure 4.4
Browse for Visual SourceSafe Database Dialog Box
mwSourceSafe Plug-in User Guide
MWSS–47
Tutorial
Creating a Default Plug-in Configuration
g. Click OK
Visual SourceSafe Explorer adds the selected database to the Open
SourceSafe Database dialog box.
h. Check the box labeled Open this database the next time I run Visual
SourceSafe
i. Click Open
The Visual SourceSafe Login dialog box reappears.
j. Click OK
Visual SourceSafe Explorer opens the tutorial database and displays its
projects. Figure 4.5 shows Visual SourceSafe Explorer with the tutorial
database open.
Figure 4.5
Visual SourceSafe Explorer with the Tutorial Database Open
3
In the pane labeled All projects, click the project named $/
Visual SourceSafe Explorer highlights the name of this project and makes it the
current project.
NOTE
MWSS–48
In SourceSafe, the name of the root project is $/
mwSourceSafe Plug-in User Guide
Tutorial
Creating a Default Plug-in Configuration
4
Assign a working folder to the root project.
To do this, follow these steps:
a. Select File > Set Working Folder...
The Set Working Folder dialog box appears. Figure 4.6 shows this dialog
box.
Figure 4.6
Set Working Folder Dialog Box
b. In the Name field, enter C:\Source
c. Click OK
A “confirm” dialog box appears.
d. Click Yes
Visual SourceSafe Explorer creates the directory C:\Source on your hard
disk and makes this directory the root project’s working folder. In addition,
Visual SourceSafe Explorer assigns a working folder whose path is rooted at
C:\Source to each subproject of the root project.
5
Run the CodeWarrior IDE.
6
Close any open projects.
7
Select Edit > VCS Settings...
The VCS Settings window appears.
mwSourceSafe Plug-in User Guide
MWSS–49
Tutorial
Creating a Default Plug-in Configuration
8
Display the VCS Setup settings panel.
To do this, select the item labeled VCS Setup. This item is in the pane labeled
VCS Settings Panels. This pane is on the left side of the VCS Settings window.
Figure 4.7 shows the VCS Setup settings panel.
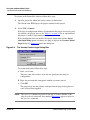
Figure 4.7
The VCS Setup Panel of the VCS Settings Window
9
Check the box labeled Use Version Control.
10 Select the item labeled SourceSafe from the Method dropdown menu.
The IDE enables the rest of the items in the VCS Setup panel.
11 Check the box labeled Use global settings as default.
This setting makes this plug-in configuration the default configuration. The IDE
attempts to apply this configuration to all CodeWarrior projects that do not have a
custom plug-in configuration.
12 Enter Guest in the Username field.
13 Check the box labeled Connect on open
14 Check the box labeled Remember password
The plug-in enables the Password field.
MWSS–50
mwSourceSafe Plug-in User Guide
Tutorial
Creating a Default Plug-in Configuration
15 Leave the Password field blank (because user Guest has no password).
16 Select the SourceSafe database to use in the default plug-in configuration.
For the purposes of this tutorial, select the database named mwss_tutorial_db.
To do this, follow these steps:
a. Click the Choose... button in the Database Path group box.
The Select an Access Path dialog box appears.
b. Use this dialog box to navigate to this directory:
{CodeWarriorInstallDir}\CodeWarrior Manuals\
Code Examples\mwSourceSafe Plug-in User Guide\
mwss_tutorial_db
where {CodeWarriorInstallDir} is a placeholder for the path to the
directory in which you installed your CodeWarrior product.
c. Leave the Try to mount shared volume check box unchecked.
d. Click OK
The full path to the tutorial database appears in the read-only field to the left
of the Choose... button.
17 Specify the local path to use in the default plug-in configuration.
To do this, follow these steps:
a. Click the Choose... button in the Local Path group box.
The Select an Access Path dialog box appears.
b. Use this dialog box to navigate to C:\Source, that is, to the working folder
you created and assigned to the SourceSafe root project ($/).
NOTE
The directory you specify for local path must match the working folder
assigned to the SourceSafe project you intend to make the plug-in’s Base
Project. If you select another path, the plug-in will not work.
c. Click OK
C:\Source appears in the read-only field to the left of the Choose... button.
mwSourceSafe Plug-in User Guide
MWSS–51
Tutorial
Getting a Project’s Source Files
18 Display the SourceSafe settings panel in the VCS Settings window.
To do this, select the item labeled SourceSafe. This item is in the pane labeled
VCS Settings Panels. This pane is on the left side of the VCS Settings window.
Figure 4.8 shows the SourceSafe settings panel.
Figure 4.8
The SourceSafe Settings Panel of the VCS Settings Window
19 Enter $/ in the Base Project text field.
NOTE
For Base Project, you must enter the name of the SourceSafe project to
which you assigned the local path specified in the VCS Setup panel. If you
enter a different SourceSafe project name, the plug-in will not work.
20 Click OK
The VCS Settings window closes. The IDE activates the mwSourceSafe plug-in
globally and adds a VCS menu to its menu bar.
You have finished creating a default mwSourceSafe plug-in configuration. In addition,
this particular configuration works for all CodeWarrior projects in the selected
SourceSafe database because:
• The configuration’s base project is the SourceSafe database’s root project.
• The configuration’s local path is the same as the working folder assigned to
SourceSafe’s root project.
Getting a Project’s Source Files
Before you can use the mwSourceSafe plug-in with a CodeWarrior project, you must
first get the project’s source code out of SourceSafe.
MWSS–52
mwSourceSafe Plug-in User Guide
Tutorial
Getting a Project’s Source Files
To get the hello_world_gui project out of SourceSafe, follow these steps:
1
Run Visual SourceSafe Explorer.
The program displays the Visual SourceSafe Login dialog box. Figure 4.1 on
page 46 shows this dialog box.
2
Enter Guest in the Username field.
3
Click OK
Visual SourceSafe Explorer opens the tutorial database and displays its projects.
4
Get the latest version of the hello_world_gui project out of the tutorial
database.
To do this, follow these steps:
a. In the All projects pane of Visual SourceSafe Explorer, click the subproject
named hello_world_gui.
Visual SourceSafe Explorer makes this project the current project.
b. Select SourceSafe > Get Latest Version
The Get dialog box appears. Figure 4.9 shows this dialog box.
Figure 4.9
The Get Dialog Box
c. Click OK
A “confirm” dialog box appears.
d. Click Yes
Visual SourceSafe Explorer gets the latest versions of the files in the
hello_world_gui project and puts them on your hard disk in the working
folder assigned to this project.
mwSourceSafe Plug-in User Guide
MWSS–53
Tutorial
Checking out Files
5
Quit Visual SourceSafe Explorer.
You now have the latest version of the hello_world_gui project on your local disk.
Further, because the working folder for this project is rooted at the working folder
assigned to the root SourceSafe project, the default plug-in configuration (created in
the first part of this tutorial) works for the hello_world_gui project.
Checking out Files
Now that you the latest version of the hello_world_gui project, you can open it in
the CodeWarrior IDE and check out a file. You should check out any file that you
intend to change.
To check out a file in the hello_world_gui project, follow these steps:
1
Run the CodeWarrior IDE.
2
Open the hello_world_gui project.
To do this, follow these steps:
a. Select File > Open
The Windows Open dialog box appears.
b. Use this dialog box to navigate to this directory:
C:\Source\GUI Apps\hello_world_gui
c. Select the file named hello_world_gui.mcp
d. Click Open
The IDE opens the hello_world_gui project and displays its contents in a
project window.
NOTE
MWSS–54
Unless you have CodeWarrior for Windows, you cannot build and run the
hello_world_gui project. However, you can still use the project to learn
how to use the mwSourceSafe plug-in.
mwSourceSafe Plug-in User Guide
Tutorial
Checking out Files
3
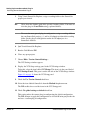
Select VCS > Synchronize Status
The project window displays the check out status icon for each file in the project
and for the project itself.
Figure 4.10 shows the project window for the hello_world_gui project. Table
3.1 on page 27 explains how to interpret each of the check out status icons.
NOTE
Any file in a CodeWarrior project that is not also in SourceSafe has no check
out status icon. For example, a CodeWarrior project may include a system
library, but this library may not be under source code control.
Figure 4.10 Project Window for the hello_world_gui Project
4
In the project window, click the file named hello_world_gui.cpp
The project window highlights this file name.
5
Select VCS > Checkout
The plug-in instructs SourceSafe to check out hello_world_gui.cpp.
SourceSafe copies the latest version of the file to its project’s working folder,
makes the file writable, and marks it “checked out.”
The plug-in then changes the file’s check out status icon to:
6
.
Change the file as necessary.
mwSourceSafe Plug-in User Guide
MWSS–55
Tutorial
Checking in Files
To check out the project file (that is, the .mcp file) of the hello_world_gui project,
follow these steps:
1
Select VCS > Project > Checkout
The plug-in instructs SourceSafe to check out the file hello_world_gui.mcp.
SourceSafe copies the latest version of the project file to its project’s working
folder, makes the file writable, and marks it “checked out.”
The plug-in then changes the project file’s check out status icon to:
appears in the lower-left corner of the project window.
2
. This icon
Change the project file as necessary.
You have now checked out two files using the mwSourceSafe plug-in. Note that to
accomplish the same thing without the plug-in, you have to:
• Run Visual SourceSafe Explorer.
• Navigate to the files you want to check out.
• Highlight the names of these files.
• Select SourceSafe > Check Out
The plug-in allows you to achieve the same result in fewer steps without leaving the
IDE. This saves time and lets you concentrate on programming.
Checking in Files
Once you finish changing a checked out file, you are ready to check it back in.
To check a file into the hello_world_gui project, follow these steps:
1
In the project window, click the file named hello_world_gui.cpp.
The project window highlights this file name.
2
Select VCS > Checkin
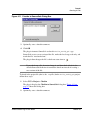
The plug-in displays the Checkin to SourceSafe dialog box. Figure 4.11 shows
this dialog box.
MWSS–56
mwSourceSafe Plug-in User Guide
Tutorial
Checking in Files
Figure 4.11 Checkin to SourceSafe Dialog Box
3
Optionally, enter a checkin comment.
4
Click OK
The plug-in instructs SourceSafe to check in hello_world_gui.cpp.
SourceSafe creates a new version of the file, makes the local copy read-only, and
marks the file “not checked out.”
The plug-in then changes the file’s check out status icon to:
NOTE
.
If you check out a file, do not to change it, and then check it back in, the
default SourceSafe behavior is to undo the check out instead of creating a
new version of the file.
To check in the project file (that is, the .mcp file) for the hello_world_gui project,
follow these steps:
1
Select VCS > Project > Checkin
The plug-in displays the Checkin to SourceSafe dialog box. Figure 4.11 on
page 57 shows this dialog box.
2
Optionally, enter a checkin comment.
mwSourceSafe Plug-in User Guide
MWSS–57
Tutorial
Checking in Files
3
Click OK
The plug-in instructs SourceSafe to check in hello_world_gui.mcp.
SourceSafe creates a new version of the project file, makes the local copy readonly, and marks the project file “not checked out.”
The plug-in then changes the project file’s check out status icon to:
appears in the lower-left corner of the project window.
MWSS–58
. This icon
mwSourceSafe Plug-in User Guide
Index
A
about
the mwSourceSafe plug-in 5
Visual SourceSafe 6
about command 30
activating the mwSourceSafe plug-in 11–22
add command 31
Always show login dialog configuration option 13
B
Method 12
Password 12
Remember password 12
Try to mount shared volume 13
Use global settings as default 12
Use Version Control 12
Username 12
connect command 35
Connect on open configuration option 12
creating a project-specific plug-in configuration 18–22
creating the default plug-in configuration 14–18
Base Project configuration option 14
C
check out status icons
in a project window 26
interpretation 27
checkin command 32
checkout command 34
command locations 27–30
editor window 29
project window context menu 28
VCS menu 27
commands
about 30
add 31
checkin 32
checkout 34
connect 35
difference 37
disconnect 38
get 38
project window context menu 28
status 39
synchronize selection 40
synchronize status 41
undo checkout 42
commands supported by the plug-in 30–43
configuration options
Always show login dialog 13
Base Project 14
Connect on open 12
Database Path 13
Local Path 13
Login Settings 12
mwSourceSafe Plug-in User Guide
D
Database Path configuration option 13
deactivating the mwSourceSafe plug-in 22–23
default plug-in configuration, creating 14–18
difference command 37
disconnect command 38
G
general Visual SourceSafe information 6
get command 38
H
how to
activate the mwSourceSafe plug-in 11–22
check in a file 56–58
check out a file 54–56
create a default plug-in configuration 14–18, 45–52
create a project-specific plug-in configuration 18–
22
deactivate the mwSourceSafe plug-in 22–23
get a project’s source files 52–54
install the mwSourceSafe plug-in 8–10
interpret the check out status icons 27
obtain the mwSourceSafe plug-in 7–8
I
information about Visual SourceSafe 6
installing the mwSourceSafe plug-in 8–10
L
learning about Visual SourceSafe 6
MWSS–59
Local Path configuration option 13
location of commands 27–30
Login Settings configuration option 12
O
M
P
meaning of check out status icons 27
menu, VCS 27
Method configuration option 12
more information about Visual SourceSafe 6
mwSourceSafe
overview 5
mwSourceSafe plug-in
about 5
activating 11–22
for a specific project 18–22
globally 14–18
command locations 27–30
editor window 29
project window context menu 28
VCS menu 27
command reference 30–43
commands
about 30
add 31
checkin 32
checkout 34
connect 35
difference 37
disconnect 38
get 38
status 39
synchronize selection 40
synchronize status 41
undo checkout 42
deactivating 22–23
installing 8–10
obtaining 7–8
project window
check out status icons 26
project window context menu commands 28
setting up 7–23
system requirements 5
tutorial 45–58
checking in files 56–58
checking out files 54–56
default plug-in configuration, creating 45–52
getting a project’s source files 52–54
using 25–43
MWSS–60
obtaining the mwSourceSafe plug-in 7–8
overview of mwSourceSafe 5
Password configuration option 12
plug-in tutorial 45–58
project specific plug-in configuration, creating 18–22
project window
check out status icons 26
context menu 28
context menu and SourceSafe commands 28
project window context menu 28
R
Remember password option 12
requirements for using the mwSourceSafe plug-in 5
S
setting up the mwSourceSafe plug-in 7–23
settings panels
SourceSafe 14
VCS Setup 11
SourceSafe settings panel
explanation of options 14
figure 14
options
Base Project 14
status command 39
synchronize selection command 40
synchronize status command 41
system requirements 5
T
tasks
activating the mwSourceSafe plug-in 11–22
creating a default plug-in configuration 14–18
creating a project-specific plug-in
configuration 18–22
deactivating the mwSourceSafe plug-in 22–23
installing the mwSourceSafe plug-in 8–10
obtaining the mwSourceSafe plug-in 7–8
Try to mount shared volume configuration option 13
tutorial
checking in files 56–58
checking out files 54–56
mwSourceSafe Plug-in User Guide
default plug-in configuration, creating 45–52
getting a project’s source files 52–54
U
undo checkout command 42
Use global settings as default configuration option 12
Use Version Control configuration option 12
Username configuration option 12
using the mwSourceSafe plug-in 25–43
V
VCS menu 27
VCS Setup settings panel
explanation of options 12–13
figure 11
options
Always show login dialog 13
Connect on open 12
Database Path 13
Local Path 13
Login Settings 12
Method 12
Password 12
Remember password 12
Try to mount shared volume 13
Use global settings as default 12
Use Version Control 12
Username 12
Visual SourceSafe
learning more about 6
mwSourceSafe Plug-in User Guide
MWSS–61
MWSS–62
mwSourceSafe Plug-in User Guide