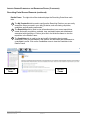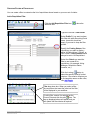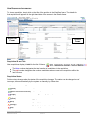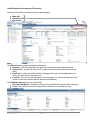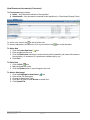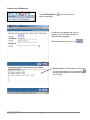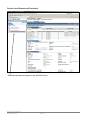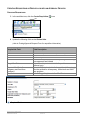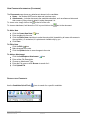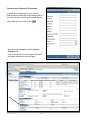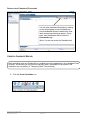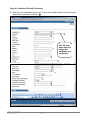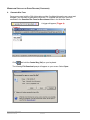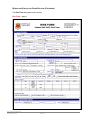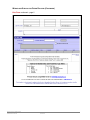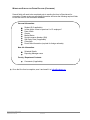
1
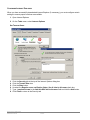
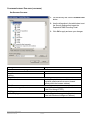
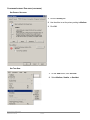
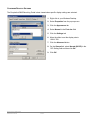
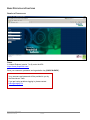
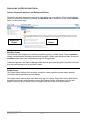
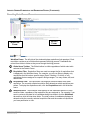
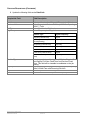
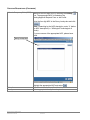
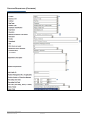
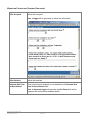
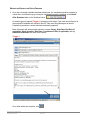
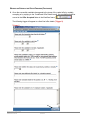
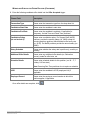
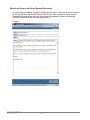
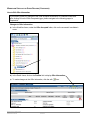
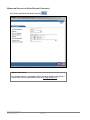
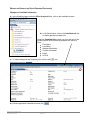
PEOPLECLICK
USER GUIDE
HR SERVICE TEAM
PEOPLECLICK USER GUIDE
HR SERVICE TEAM
PAGE 1
PEOPLECLICK USER GUIDE
HR SERVICE TEAM
ACCESSING PEOPLECLICK
TIPS FOR NON-INTERNET EXPLORER USERS ............................................................ 3
CONFIGURE INTERNET EXPLORER ........................................................................... 4
CONFIGURE DESKTOP SETTINGS ............................................................................ 7
BASIC PEOPLECLICK FUNCTIONS
SIGN IN TO PEOPLECLICK........................................................................................ 8
NAVIGATING THE RECRUITING PORTAL .................................................................... 9
IDENTIFY SCREEN ELEMENTS IN THE RECRUITING PORTAL ..................................... 9
CREATING FILTERS IN PEOPLECLICK ........................................................................ 12
VIEW REQUISITION INFORMATION ............................................................................ 13
SEARCH FOR A REQUISITION ................................................................................... 16
CREATING REQUISITIONS WITH AN APPROVAL PROCESS
CREATING REQUISITIONS ....................................................................................... 18
APPROVAL WORKFLOW REJECTIONS
REJECTED/DENIED REQUISITIONS IN PEOPLECLICK .................................................. 31
VIEW AND EDIT A DENIED REQUISITION .................................................................... 32
MANAGING CANDIDATES
VIEW CANDIDATE INFORMATION .............................................................................. 35
SEARCH FOR A CANDIDATE ..................................................................................... 36
HOW TO CREATE A CANDIDATE RECORD ................................................................. 38
PEOPLECLICK WORKFLOW
MANAGING THE W ORKFLOW ~ MOVING CANDIDATES THROUGH THE W ORKFLOW ........ 41
W ORKFLOW FOLDERS AND TRIGGERS ..................................................................... 45
W ORKFLOW STEPS IN THE OFFER PROCESS ............................................................ 49
APPENDIX
ICON GLOSSARY .................................................................................................... 60
PEOPLECLICK USER GUIDE
HR SERVICE TEAM
PAGE 2
ACCESSING PEOPLECLICK
The Peopleclick Recruiting Portal is the University of Calgary‟s recruitment management system.
This system enables us to manage our postings, applicants and approval processes. Peopleclick is a
web-based application. While you do not need to install any Peopleclick software on your computer
to use the Recruiting Portal, you do need to install an approved version of the Microsoft Internet
Explorer browser (version 7 or 8) and configure it correctly in order to use all of the functions of the
Recruiting Portal.
TIPS FOR USERS OF NON-INTERNET EXPLORER BROWSERS
If you are a PC user and have selected a different browser as your default (e.g., Firefox), you
can access Peopleclick by opening Internet Explorer from your desktop and going to
https://home.peopleclick.com. If Internet Explorer 7 or 8 is not installed on your PC, you can
download it from http://microsoft.com.
MAC users have the option of accessing the U of C Virtual Desktop which will allow you to
use Internet Explorer on your computer. For instructions, please visit the HR website.
Note: You must be on campus to access the Virtual Desktop
If you are a Linux or Sun Microsystems user, there are alternatives:
a. Contact the Recruitment Team ([email protected]) and request that applications be
emailed to you directly
b. Contact the Recruitment Team ([email protected]) and request to have a
colleague/administrator added as a hiring manager in Peopleclick so that they can
access applications and action candidates on your behalf
c. There are often labs and /or PCs available for use by students/staff. Inquire in your
department/unit as to where you may be able to access a PC
PEOPLECLICK USER GUIDE
HR SERVICE TEAM
PAGE 3
CONFIGURE INTERNET EXPLORER
When you have successfully downloaded Internet Explorer (if necessary), you must configure certain
settings to ensure proper functions are available.
1. Open Internet Explorer
2. On the Tools menu, select Internet Options
SET TRUSTED SITES:
3.
4.
5.
6.
7.
8.
Click the Security tab at the top of the Internet Options dialog box
Click the Trusted Sites icon
Click the Sites button
Unselect the Require server verification (https:) for all sites in this zone check box
Type *.peopleclick.com in the Add this Web site to the zone field and click the Add button
Click Close to return to the Security tab
PEOPLECLICK USER GUIDE
HR SERVICE TEAM
PAGE 4
CONFIGURE INTERNET EXPLORER (CONTINUED)
SET SECURITY SETTINGS:
1. On the Security tab, click the Custom Level
button
2. Use the information in the table below to set
the Security Settings that impact the
Peopleclick RMS Recruiting Portal
3. Click OK to apply and save your changes
4.
Setting Name
Active X controls and plug-ins
Run signed ActiveX controls
Script ActiveX controls marked safe for
scripting
Downloads
File Download
Required Value
Enable
Enable
Enable (Required to view candidate and
requisition attachments that are not viewed
natively within the browser window.)
Miscellaneous
Submit non-encrypted form data
Enable. (Required to support the Candidate
Portal if not using HTTPS.)
Scripting
Active Scripting
PEOPLECLICK USER GUIDE
HR SERVICE TEAM
Enable. (Required to support the Candidate
Portal and Business Intelligence Platform.)
PAGE 5
CONFIGURE INTERNET EXPLORER (CONTINUED)
SET PRIVACY SETTINGS:
1. Click the Privacy tab
2. Use the slider to set the privacy setting to Medium
3. Click OK.
SET TEXT SIZE:
1. On the View menu, click Text Size
2. Select Medium, Smaller, or Smallest
PEOPLECLICK USER GUIDE
HR SERVICE TEAM
PAGE 6
CONFIGURE DESKTOP SETTINGS
The Peopleclick RMS Recruiting Portal is best viewed when specific display settings are selected:
1. Right-click in your Windows Desktop
2. Select Properties from the pop-up menu
3. Click the Appearance tab
4. Select Normal in the Font size field
5. Click the Settings tab
6. Move the slider to set the display size to
1024 X 768
7. Click the Advanced button
8. On the General tab, select Normal (96 DPI) in the
DPI Setting field and then click OK
9. Click OK.
PEOPLECLICK USER GUIDE
HR SERVICE TEAM
PAGE 7
BASIC PEOPLECLICK FUNCTIONS
SIGN IN TO PEOPLECLICK
STEPS
In Internet Explorer (version 7 or 8), enter the URL:
https://home.peopleclick.com/
Enter your username, password and organization key (UNIVCALGARY).
Your username and password will be provided to you by
the Recruitment Team.
If you are having problems logging in, please contact
[email protected].
PEOPLECLICK USER GUIDE
HR SERVICE TEAM
PAGE 8
NAVIGATING THE RECRUITING PORTAL
IDENTIFY SCREEN ELEMENTS IN THE RECRUITING PORTAL
Peopleclick has been designed to make your work easier and more efficient. The Recruiting Portal
window is divided into two primary frames: the Workflow frame, located on the left, and the Details
frame, located on the right.
DETAILS
FRAME
WORKFLOW
FRAME
Workflow Frame
The Workflow frame displays your existing requisitions (jobs) in a folder format. These requisition
folders contain detailed information about each requisition. Within each requisition folder, a series of
workflow folders help move candidates through the hiring process.
Candidates appear in the Sent to Manager folder and can be moved through the workflow folders as
they are evaluated and a hiring decision is made.
Details Frame
The Details frame displays the information needed to create requisitions and maintain detailed
information about requisitions and candidates.
The Details frame displays three main tabs at the top of the frame. Page labels are located directly
beneath the main tabs, and information panels are displayed within these pages. Use the tabs,
pages, and panels of the Details frame to complete your day-to-day recruiting functions.
PEOPLECLICK USER GUIDE
HR SERVICE TEAM
PAGE 9
IDENTIFY SCREEN ELEMENTS IN THE RECRUITING PORTAL (CONTINUED)
Recruiting Portal Screen Elements
1
2
3
DETAILS
FRAME
WORKFLOW
FRAME
4
Workflow Frame. The left side of the window displays requisitions (job openings). Each
requisition contains a set of folders that represent the hiring process. Candidates are
moved from folder to folder as they move through the hiring process.
1
Global Icons Toolbar. The Global toolbar is visible regardless of which main tab is
selected in the Details Frame.
2
Requisition Filter. Requisition filters are used to manage the list of requisitions that
is displayed in the Workflow frame. For example, you can use filters to display only
requisitions that fall under a specific status (Open / Pending / On Hold), or only
requisitions that are assigned to a specific hiring manager. You may create, edit, and
delete filters.
3
Requisitions View. The requisitions view displays workflow folders within each
requisition. The currently selected requisition filter determines which requisitions are
shown. To display the requisitions view, click the Requisitions tab in the Workflow
frame.
4
Workflows View. The workflows view displays all the candidates who are in each
workflow folder, regardless of the requisition they are assigned to. For example, if you
want to review a complete list of candidates being interviewed, click the Workflows
tab and then click the Interviews folder. The total number of candidates displayed is
determined by the currently selected requisition filter and the number of requisitions
you have permission to view.
PEOPLECLICK USER GUIDE
HR SERVICE TEAM
PAGE 10
IDENTIFY SCREEN ELEMENTS IN THE RECRUITING PORTAL (CONTINUED)
Recruiting Portal Screen Elements (continued)
Details Frame. The right side of the window displays the Recruiting Portal three main
tabs:
1
2
3
The My Peopleclick tab is used to configure the Recruiting Portal so you can easily
access the items you need in your daily job duties, such as viewing requisition,
candidate, and job posting summaries.
The Requisitions tab is used to view information about your current requisitions,
create and modify requisitions, and add, view, and delete notes and attachments
associated with requisitions. Click on job a title in the Workflow frame to view the
requisition in the Details Frame.
The Candidates tab is used to view and modify information about current
candidates, enter new candidates in the system, and add notes and attachments to
a candidate‟s profile. Click on the Candidates name to view the Candidate in the
Details Frame.
1
2
3
WORKFLOW
FRAME
PEOPLECLICK USER GUIDE
HR SERVICE TEAM
DETAILS
FRAME
PAGE 11
CREATING FILTERS IN PEOPLECLICK
You can create a filter to customize the list of requisitions shown based on your own set of criteria.
Add a Requisition Filter
Click the Add Requisition Filter icon (
Workflow tree.
) above the
Type the new filter‟s Filter Name
Select Public? if you want to share
this filter with other Recruiting Portal
users. Leave this check box
empty if you want to keep the filter
private.
Specify the Posting Status of the
requisitions you want to display either „All Requisitions‟, „Posted‟, or
„Not Posted‟. Locked Status should
always be set to „All Requisitions‟.
Select the Criteria you want the
filter to use to search for
requisitions. (for example: Hiring
Manager, Requisition Status,
Location, etc.)
Click the Lookup ( ) button to
select the specific value(s) for that
criterion. If the criterion requires you
to find people‟s names as the value,
click
.
Saved filters can be selected in the Current
Filter drop-down box. When you select a filter,
the requisitions that meet the criteria of the filter
will be displayed in your workflow.
To edit a filter, ensure it is selected as the
Current Filter and click the edit ( ) icon. The
pop-up displayed above will appear and you
can update the filter/criteria as required.
PEOPLECLICK USER GUIDE
HR SERVICE TEAM
PAGE 12
VIEW REQUISITION INFORMATION
To view a requisition, simply click on the title of the position in the Workflow frame. The details for
that requisition will appear on the right hand side of the screen in the Details frame.
WORKFLOW
FRAME
DETAILS
FRAME
Requisition ID and Title
New requisitions display in bold for the first 24 hours.
The blue number designates the total number of candidates in the requisition.
The red number designates the number candidates who are new to the requisition within the
last 24 hours.
Requisition Status
Folder colours change when the status of the requisition changes. The status can be changed one of
two ways, either automatically by the system or manually by a Recruiter.
Requisition Status Categories
(green)
(green with blue thumb tack)
(purple)
(yellow)
(blue)
(orange)
(red)
PEOPLECLICK USER GUIDE
HR SERVICE TEAM
Open
Open and posted on the U of C Careers website
Pending (awaiting approval)
Closed
Filled
Cancelled
Denied (rejected / sent back for corrections)
PAGE 13
VIEW REQUISITION INFORMATION (CONTINUED)
Requisition information is divided into three separate pages:
Main Info
Additional Info
Documents
The Main Info page includes the following information:
Approval - Lists the individuals in the approval workflow and shows date/time stamp
General Info - Includes the position title, number of positions and expected start and end
dates
Detail Info - Includes all position details including position type, faculty/department, work
hours, job code, position description, etc.
Contacts - Lists the contacts connected to the requisitions (i.e. those individuals who have
access to view the requisition and the associated candidates)
The Additional Info page includes the following:
Earnings Distribution - Breakdown of accounting chartfields the position will be charged to
Costs - Any additional costs associated with the requisition (i.e. advertising costs)
The Documents page includes:
Notes - Any information relevant to the requisition.
Attachments – Any documents connected to this requisition (i.e. Recruitment Request Form)
PEOPLECLICK USER GUIDE
HR SERVICE TEAM
PAGE 14
VIEW REQUISITION INFORMATION (CONTINUED)
The Documents page includes:
Notes – Any information relevant to the requisition
Attachments – Any documents connected to this requisition (i.e. Recruitment Request Form)
To view a note, click on the
to the left of the note
To view an attachment, hold down the „Ctrl‟ key and click on the
next to the document.
To Add a Note
1. Click the Create New Note ( ) icon
2. Enter a subject for the note
3. Click the Public Note check box to make the note public (viewable by all users with access to
the requisition). If unchecked, it is private and viewable only by you
4. Click Save
To Edit a Note
1. Click the Edit ( ) icon
2. Make changes to the note
3. Click the Update button to save changes to the note
To Add an Attachment
1. Click the Add/Replace Attachment ( ) icon
2. Enter a New File Description
3. Choose an Attachment Type
4. Enter the File name or click Browse to search for it
5. Click Upload File
PEOPLECLICK USER GUIDE
HR SERVICE TEAM
PAGE 15
SEARCH FOR A REQUISITION
Use Find Requisition (
specific requisition.
) icon to search for a
A search box will appear and you can
search by Job Title, Requisition ID or
Recruiter/Hiring Manager.
After entering search criteria, click
.
Matches display in the box below. Select one
or more requisitions from the list and click
(more than one selection can be made using
the „Ctrl‟ key).
PEOPLECLICK USER GUIDE
HR SERVICE TEAM
PAGE 16
SEARCH FOR A REQUISITION (CONTINUED)
Selected requisitions will appear in the Workflow Frame.
PEOPLECLICK USER GUIDE
HR SERVICE TEAM
PAGE 17
CREATING REQUISITIONS IN PEOPLECLICK WITH AN APPROVAL PROCESS
CREATING REQUISITIONS
1. In the workflow tree, click the Create Requisition ( ) icon
2. Update the following fields under General Info:
(refer to Posting/Approval Request Form for requisition information)
Peopleclick Field
Field Description
Number to Create
Job Title
Positions to Fill
Status
Number of requisitions to create (default = 1)
Position title
Number of positions to fill
Defaulted to „Open‟, will automatically change to „Pending‟
once approvals are initiated
Enter the anticipated start date for the position
(dd/mon/yyyy)
Enter the expected end date for the position (dd/mon/yyyy)
Must be entered for all temporary, limited term and fixed
term positions
Select ‘Staged Implementation Workflow’
Target Start Date
Expected End Date (for
temporary and fixed term
positions)
Workflow
= Required Field
PEOPLECLICK USER GUIDE
HR SERVICE TEAM
PAGE 18
CREATING REQUISITIONS (CONTINUED)
3. Update the following fields under Detail Info:
Peopleclick Field
Field Description
Location
Business Unit
Select position location „Calgary‟, „Edmonton‟ or „Qatar‟
Select appropriate Business Unit i.e.) UCALG – Operating,
UCALT - Trust
Select „Part-time‟ or Full-time‟
Select „Temporary‟ or „Regular‟
Full/Part
Reg/Temp
Position Type
Employee Classification
Experience
Education
PEOPLECLICK USER GUIDE
HR SERVICE TEAM
Position Type
Regular/Temporary
Regular (Full/Part-time)
Regular
Recurring Part-time (Fixed
Term/Operating)
Temporary
Temporary (Full/Part-time)
Temporary
Limited Term (Full/Part-time)
Temporary
Sessional (Full/Part-time)
Regular
Fixed Term (Full/Part-time)
Regular
Fixed Short Term (Full/Parttime)
Temporary
Select appropriate position type i.e.) Full-time Regular, Parttime Regular, Full-time Fixed Term and Part-time Fixed
Term. This field will be viewable to candidates on the job
posting.
Select appropriate employee class i.e.) Regular, Temporary
Relief, Limited Term and Recurring Part-time
Select experience level – Entry, Intermediate or Senior level
Desired level of Education (minimum required)
PAGE 19
CREATING REQUISITIONS (CONTINUED)
National Occupancy Code (NOC)
Search for the four digit NOC by selecting the Lookup (
icon. The appropriate NOC is located on the
Posting/Approval Request Form or Job Profile.
)
Enter the four digit NOC in the Query Lookup box and click
.
Note: If searching by the NOC description, enter „%‟ before
the NOC description (i.e. %Biological Technologists &
Techs)
*If you are unsure of the appropriate NOC, please leave
blank.
Query Lookup box
Relocation
Faculty
PEOPLECLICK USER GUIDE
HR SERVICE TEAM
Highlight the appropriate NOC and select
Select if relocation will be offered for this position
Select appropriate faculty from drop down menu
PAGE 20
CREATING REQUISITIONS (CONTINUED)
Department
Search for the Department by selecting the Lookup ( )
icon.
Enter the Department number in the Query Lookup box and
click
.
Note: If searching by the department name, enter „%‟
before the department name (i.e. %Biological Science)
Query Lookup box
Highlight the appropriate Department and select
Unit (if applicable)
Work Hours per week
Background Check Required
Functional Area
Job Families
Department Description
PEOPLECLICK USER GUIDE
HR SERVICE TEAM
Enter Department or Unit. This field along with Faculty will
appear on the job posting
Total number of hours working per week
Select whether a background check is required for this role
Select appropriate functional area from the drop down menu
Select applicable job family
This section will be completed by the Recruiter based on
information from the job profile, however if you have any
information you would like included in the posting around
the work environment (i.e. overview of the department, lab
or project), include it here. If there is nothing specific you
would like to add, just enter „/‟
PAGE 21
CREATING REQUISITIONS (CONTINUED)
Position Requirements
Job Profile ID
Position Management No. (if
applicable)
Position # of Reporting Manager
Recruiting Start Date
Recruiting End Date
Job Code (Job Family, Phase, or
Rank)
Salary Range
Union Code
PEOPLECLICK USER GUIDE
HR SERVICE TEAM
This section will also be completed by the Recruiter based
on information from the job profile, however if you would like
to highlight the key responsibilities or qualifications, you can
do so here. If there is nothing specific you would like to add,
just enter „/‟
Enter UCPL #
If this position has employees reporting to it, ensure there is
a position management #
Enter the position # of the manager this position reports to
Recruiting start date will auto populate
Select closing date if known (May be adjusted by Recruiter
depending on timing of approvals)
Select applicable job family, phase, or rank
Select corresponding salary range
Select corresponding union code
PAGE 22
CREATING REQUISITIONS (CONTINUED)
PEOPLECLICK USER GUIDE
HR SERVICE TEAM
PAGE 23
CREATING REQUISITIONS (CONTINUED)
4. Update the Contacts – Recruiter and Hiring Managers
a) Select Add People
b) Select “Recruiters” or “Hiring Managers” in the Search For drop down menu. Enter
the last name of the person you are searching for and click
.
c) Add the desired names to the Recruiters or Hiring Managers box. To add a name to
the highlighted box, double-click the name in the Search Results list or highlight the
name and click the
arrow. To remove a name from a box, click the
icon next to
the name you want to remove.
d) Repeat these steps to select additional recruiters and hiring managers.
PEOPLECLICK USER GUIDE
HR SERVICE TEAM
PAGE 24
CREATING REQUISITIONS (CONTINUED)
e) When the names in the Recruiters and Hiring Managers boxes are correct, specify a
primary Recruiter and a primary Hiring Manager. Do so by clicking the radio
buttons ( ) next to the desired primary recruiter and the desired primary hiring
manager.
IMPORTANT NOTE:
Please ensure an HR Services Team member is selected as the Primary Recruiter and a
Central HR Recruiter as the secondary contact.
Please ensure the Hiring Lead/Budget Owner is selected as the Primary Hiring Manager
and any Admins, Resource Managers etc. as secondary contacts.
Primary Recruiter / Hiring Manager selection feeds email triggers in the workflow.
PEOPLECLICK USER GUIDE
HR SERVICE TEAM
PAGE 25
CREATING REQUISITIONS (CONTINUED)
5. Update Earnings Distribution
Enter the earnings distribution as approved by the Budget Officer or RFA.
NOTE: Earnings can be distributed between a maximum of four different chartfields. In addition,
benefits and salary can be charged to separate accounts.
Peopleclick Field
Field Description
Funding Source
Select appropriate funding source from the drop down menu i.e.)
N/A – Operating, Natural Sciences and Engineering (NSERC)
Note: Select N/A Operating for all Partnership Projects
Enter the percent to be charged to that accounting string (i.e. 50)
or enter „benefit‟ if only benefits are to be charged to that
accounting string
Enter the appropriate Fund ID
Percent 1
Fund 1
Department ID 1
Search for the Department ID by selecting the Lookup ( ) icon.
Enter the Department ID in the Query Lookup box and click
.
Account 1
Highlight the appropriate Department ID and select
Enter appropriate Account number
Program 1
Internal 1
Project 1
Activity 1
Enter if applicable
Enter if applicable
Enter if applicable
Enter if applicable
PEOPLECLICK USER GUIDE
HR SERVICE TEAM
PAGE 26
CREATING REQUISITIONS (CONTINUED)
6. Once you have completed the requisition, click
PEOPLECLICK USER GUIDE
HR SERVICE TEAM
PAGE 27
.
CREATING REQUISITIONS (CONTINUED)
7. An email trigger will appear to notify the Hiring Lead (Primary Hiring Manager) that the
requisition has been created and is currently in the approval/review process. Click
and
the HR Team and Hiring Lead will be notified by the Recruitment Team once all approvals
have been obtained and the position has been posted.
If you click Cancel, the email will not be sent.
PEOPLECLICK USER GUIDE
HR SERVICE TEAM
PAGE 28
CREATING REQUISITIONS (CONTINUED)
8. Your newly created requisition will appear in the workflow tree under filter Open / Pending /
On Hold Requisitions and will be in „Pending‟ status which is denoted by the purple folder.
Note:
Positions in „Open‟ status are green
Positions in „Pending‟ status are purple
9. Attach all required documents to the requisition (Provost approval, Recruitment Request form
and Posting Request form) in the Documents section
PEOPLECLICK USER GUIDE
HR SERVICE TEAM
PAGE 29
CREATING REQUISITIONS (CONTINUED)
Click the Add New Note (
) icon in the Requisitions toolbar.
Click the Add/Replace Attachment ( ) icon in the Requisitions toolbar
Use the UCPL# as New File Description for the Job Posting Request Form.
10. To monitor the approval/review process, view the Approval section of the pending requisition
(on the Main Info page).
PEOPLECLICK USER GUIDE
HR SERVICE TEAM
PAGE 30
APPROVAL WORKFLOW REJECTIONS
REJECTED / DENIED REQUISITIONS IN PEOPLECLICK
What happens if a requisition is denied?
If at any point in the approval process an approver rejects the requisition, the Primary HR
Contact will receive an email notification:
After receiving notification that a requisition has been rejected, you may need to review the
requisition information. In addition, you may need to edit requisition information. For example, you
might need to modify the earnings distribution and/or employee classification for a requisition.
Please contact your recruiter or [email protected] to gain access to edit the Peopleclick
requisition that was rejected.
PEOPLECLICK USER GUIDE
HR SERVICE TEAM
PAGE 31
VIEW AND EDIT A DENIED REQUISITION
Requisitions that have been rejected will appear in the workflow tree under filter Denied / Cancelled
Requisitions
Positions in ‘Denied’ status are red
Under the Approval section of the requisition, you can identify the approver and rejection reason.
The rejection reason is listed here, but to view notes with additional
details from the approver, see the Notes section under Documents.
Depending on the rejection reason, you may need to edit the requisition details under the Main Info
or Additional Info section.
Navigate to the Detail Info section under Main Info if you need to edit any of the following:
Business Unit
Position Type
Employee Classification
Job Code
Salary Range
Work Hours
Navigate to the Additional Info section if you need to edit the following:
Earnings Distribution
PEOPLECLICK USER GUIDE
HR SERVICE TEAM
PAGE 32
VIEW AND EDIT A REQUISITION (CONTINUED)
To edit the requisition, navigate to the Detail Info section under the Requisitions tab and select the
edit
icon on the right side of the screen
To edit the Earnings Distribution, navigate to the Additional Info section under the Requisitions tab
and select the edit
icon
PEOPLECLICK USER GUIDE
HR SERVICE TEAM
PAGE 33
VIEW AND EDIT A REQUISITION (CONTINUED)
Once you have made the appropriate edits to the requisition, select the Resubmit
Approvals section.
icon in the
The resubmitted requisition will be directed to the Workflow Coordinator to determine the next step.
Depending on the changes that were made, the Workflow Coordinator may edit the approvers.
Note: Though the old approval Workflow is replaced with the new one, the original approval notes
can be found under the „Documents‟ page.
PEOPLECLICK USER GUIDE
HR SERVICE TEAM
PAGE 34
MANAGING CANDIDATES
VIEW CANDIDATE INFORMATION
To view the candidates under a requisition, go to the Workflow frame.
1. Click the (+) to the left of the requisition title
. The numbers next to the folder name
indicate how many candidates are in each folder.
The blue number designates the total number of candidates in the folder
The red number designates the number candidates who are new to the folder within
the last 24 hours.
2. Click the (+) to the left of the workflow folder
3. Click the candidate‟s name to display their information in the Details frame.
You can view candidate information by clicking
on the various pages under the Candidates tab.
The Resume page shows the candidate‟s cover letter and resume.
The Candidate Info page shows the candidate‟s details; name, address, contact details etc.
The Profiles page shows the offer information entered via the “Offer Accepted” trigger (see pg. 49),
and thus would only show information for the person hired into the position.
PEOPLECLICK USER GUIDE
HR SERVICE TEAM
PAGE 35
VIEW CANDIDATE INFORMATION (CONTINUED)
The Documents page shows any attachment relevant to the candidate.
Notes – can include AUPE service date and interview notes
Attachments – includes documents the candidate submitted, such as reference letters and
their resume (if they chose to attach it rather than paste it in.
To view a note, simply click on the
to the left of the note
To view an attachment, hold down the „Ctrl‟ key and click on the
next to the document.
To Add a Note
Click the Create New Note ( ) icon
Enter a subject for the note
Click the Public Note check box to make the note public (viewable by all users with access to
the requisition). If unchecked, it is private and viewable only by you
Click Save
To Edit a Note
Click the Edit ( ) icon
Make changes to the note
Click the Update button to save changes to the note
To Add an Attachment
Click the Add/Replace Attachment ( ) icon
Enter a New File Description
Choose an Attachment Type
Enter the File name or click Browse to search for it
Click Upload File
SEARCH FOR A CANDIDATE
Use the Candidate Quick Find (
PEOPLECLICK USER GUIDE
HR SERVICE TEAM
) icon to search for a specific candidate.
PAGE 36
SEARCH FOR A CANDIDATE (CONTINUED)
A search box will appear giving you several
search options. Name and email searches will be
the most common (and will give the best results).
After entering search criteria, click
.
Search results will appear under the Search
Summary tab.
Click on a name and the candidate‟s information
will appear as shown in the next figure.
PEOPLECLICK USER GUIDE
HR SERVICE TEAM
PAGE 37
SEARCH FOR A CANDIDATE (CONTINUED)
You can view candidate information by clicking
on the various pages in the Candidates tab.
Some candidates choose to attach their cover
letter and resume rather than paste it. If they
have, their attachments will be under the
Documents page.
(Note: You are now under the Candidate tab)
CREATE A CANDIDATE RECORD
Most candidates enter into Peopleclick by completing an online application in the Candidate Portal.
However, occasionally you may need to manually enter a candidate into the system if the
requisition was not posted (i.e. Temporary Short Term positions)
1. Click the Create Candidate icon
PEOPLECLICK USER GUIDE
HR SERVICE TEAM
PAGE 38
CREATE A CANDIDATE RECORD (CONTINUED)
2. Referring to the candidate‟s resume or CV, enter the candidate‟s data. The fields that are
required are noted with an asterisk ( )
Use the drop
down menu to
assign the
candidate to a
requisition.
PEOPLECLICK USER GUIDE
HR SERVICE TEAM
PAGE 39
CREATE A CANDIDATE RECORD (CONTINUED)
3. Be sure to select the appropriate requisition that the candidate should appear in by selecting
a requisition from the Requisition field
4. After you have entered all applicable candidate information, click
candidate.
to save the
5. The new candidate will appear in the Recruiter‟s Inbox folder of the appropriate requisition.
Please notify your Recruiter ([email protected]) if you have created a candidate. Your
Recruiter will then move the candidate so that he/she appears in the Sent to Manager folder
of the requisition you selected.
PEOPLECLICK USER GUIDE
HR SERVICE TEAM
PAGE 40
PEOPLECLICK WORKFLOW
MANAGING THE WORKFLOW ~ MOVING CANDIDATES THROUGH THE WORKFLOW
Once all approvals have been obtained and the position has been posted and closed, the following
email will be sent to the Hiring Lead and HR Service Team to notify them of the total number of
candidates that have applied for the position and highlighting internal candidates with their service
date (as per Article 40.05 in the AUPE Collective Agreement).
PEOPLECLICK USER GUIDE
HR SERVICE TEAM
PAGE 41
MANAGING THE WORKFLOW ~ MOVING CANDIDATES THROUGH THE WORKFLOW (CONTINUED)
As candidates progress through the hiring process, you will move them through the corresponding
folders in the Workflow frame.
O
To display the workflow folders within a requisition, click the + sign next to the requisition name.
Each workflow folder represents a step in the hiring workflow.
PEOPLECLICK USER GUIDE
HR SERVICE TEAM
PAGE 42
MANAGING THE WORKFLOW ~ MOVING CANDIDATES THROUGH THE WORKFLOW (CONTINUED)
How to move candidates within the Workflow folders:
Option 1
Step Description
1
Click on the name of the candidate to view their resume and candidate information
2
Click on the name of the candidate and holding down the left mouse button, drag the
candidate down to the folder where you want to move the candidate
3
The candidate‟s name is displayed under the new folder name
PEOPLECLICK USER GUIDE
HR SERVICE TEAM
PAGE 43
MANAGING THE WORKFLOW ~ MOVING CANDIDATES THROUGH THE WORKFLOW (CONTINUED)
How to move candidates within the Workflow folders:
Option 2
Step Description
1
Click the Workflow folder title that you want to move candidates from and display the
candidate list
2
In the Candidate List, put a check mark next to the candidate(s) you want to move
3
Click the
or
icon next to the first candidate you selected, and drag the
candidates into the desired workflow folder
PEOPLECLICK USER GUIDE
HR SERVICE TEAM
PAGE 44
WORKFLOW FOLDERS AND TRIGGERS
Workflow Folder
Folder Description
Sent to Manager
Candidates who have met minimum requirements and have been sent to
the requisition contacts for review
Not Selected
Candidates who have not been shortlisted for the position
Note: An email trigger will be generated containing a generic and
editable decline email to the candidate(s). This email is sent from
[email protected]
Phone Screen
PEOPLECLICK USER GUIDE
HR SERVICE TEAM
Candidates who have been selected for a phone screen
PAGE 45
WORKFLOW FOLDERS AND TRIGGERS (CONTINUED)
Not Selected After
Phone Screen
Candidates who were not selected after phone screen
Note: An email trigger will be generated containing an editable decline
email to the candidate.
Shortlist
Candidates who have been shortlisted
Interview
Candidates who have been selected for an interview
PEOPLECLICK USER GUIDE
HR SERVICE TEAM
PAGE 46
WORKFLOW FOLDERS AND TRIGGERS (CONTINUED)
Not Selected After
Interview
Candidates who have not been selected after interview
Note: A message trigger will appear with a reminder that candidates
who have been brought in for an interview should be contacted via
telephone to decline.
Verbal Offer
Extended
Successful candidate who has been extended a verbal offer.
Note: An email trigger will be generated to outline conditional offer
details. This should be sent to the candidate and is meant to be a
confirmation of the verbal / conditional offer.
PEOPLECLICK USER GUIDE
HR SERVICE TEAM
PAGE 47
WORKFLOW FOLDERS AND TRIGGERS (CONTINUED)
Offer Accepted
Verbal offer accepted
Note: A trigger will be generated to collect final offer details.
Offer Declined
Verbal offer declined
Generate Hire Form
for Recruitment
Once offer has been accepted, move candidate to the Generate Hire
Form for Recruitment folder.
Note: A document trigger will generate the Hire Form which will be
populated with both job and candidate details.
PEOPLECLICK USER GUIDE
HR SERVICE TEAM
PAGE 48
WORKFLOW STEPS IN THE OFFER PROCESS
1. Once the successful candidate has been determined, the candidate should be extended a
verbal offer, and followed up by moving the candidate through the workflow to the Verbal
Offer Extended folder in the Workflow frame.
An email trigger will appear (Trigger 1) containing offer details. This email should be sent to
the successful candidate and copied to the HR Team and Hiring Managers as listed in
Peopleclick (requisition contacts should automatically populate).
Most information will automatically populate, however Salary, Start Date, End Date (if
applicable), Work Schedule / Start time, Conditions of Offer (if applicable) and any
Additional Comments will need to be entered.
Trigger 1:
Once offer details are complete, click
PEOPLECLICK USER GUIDE
HR SERVICE TEAM
.
PAGE 49
WORKFLOW STEPS IN THE OFFER PROCESS (CONTINUED)
2. Once the successful candidate has agreed to the terms of the verbal offer by verbally
accepting or by replying to the „Conditional Offer Details‟ email, the candidate should be
moved to the Offer Accepted folder in the Workflow frame.
The following trigger will appear to collect final offer details (Trigger 2).
Trigger 2
PEOPLECLICK USER GUIDE
HR SERVICE TEAM
PAGE 50
WORKFLOW STEPS IN THE OFFER PROCESS (CONTINUED)
3. Enter the following candidate offer details into the Offer Accepted trigger:
Trigger Field
Description
Transaction Type
Please enter the transaction type from the drop down list.
Candidate’s Start Date
Please enter the candidate‟s start date.
Candidate’s End Date
Please enter the candidate‟s end date, if applicable (ie.
Temporary, Limited Term and Fixed Term positions)
Candidate’s Salary
(do not include $)
Please enter candidate‟s salary. For Support Staff (AUPE)
positions, provide the monthly salary (ex. 2000) except for
recurring part-time positions which should be the hourly rate
(ex. 10.50). For MaPS positions provide the annual salary (ex.
50000).
Salary Schedule
Please enter whether the salary rate is paid hourly, monthly or
annually.
Additional Offer Details
Please enter any additional offer details (ex. Relocation
amount), notes for offer letter, etc.
Schedule Details
Please enter schedule details for this position. (ex. M – F; 7
hrs/day; 8:30 am start)
Note: Recurring Part Time positions do not require a schedule
UCID
Please enter the candidate‟s UCID (employee id #) if
applicable.
Employee Record
Please enter the employee record number to which this
position applies, if applicable.
Once offer details are complete, click
PEOPLECLICK USER GUIDE
HR SERVICE TEAM
.
PAGE 51
WORKFLOW STEPS IN THE OFFER PROCESS (CONTINUED)
An email trigger will appear (Trigger 3) containing offer details. This email is meant to be sent
by the Hiring Lead to the primary recruiter (HR Service Team member) to confirm that the
candidate has accepted the offer and inform them the candidate is ready for processing
(requisition contacts should automatically populate).
Trigger 3
PEOPLECLICK USER GUIDE
HR SERVICE TEAM
PAGE 52
WORKFLOW STEPS IN THE OFFER PROCESS (CONTINUED)
How to Edit Offer Information
If you need to make any changes to the Offer Accepted information or Candidate Information
after clicking OK on the Offer Accepted trigger, please navigate to the following pages in
Peopleclick.
Changes to Offer Information
a) In the Workflow frame, under the Offer Accepted folder, click on the successful candidate‟s
name
b) In the Detail frame, click on the Profiles link to display Offer Information
c) To make changes to the Offer Information, click the edit (
PEOPLECLICK USER GUIDE
HR SERVICE TEAM
PAGE 53
) icon
WORKFLOW STEPS IN THE OFFER PROCESS (CONTINUED)
d) Edit the applicable offer details and click
IMPORTANT NOTE:
Any change made to a candidate‟s offer information details requires that a
revised Hire form be generated and sent to [email protected].
PEOPLECLICK USER GUIDE
HR SERVICE TEAM
PAGE 54
WORKFLOW STEPS IN THE OFFER PROCESS (CONTINUED)
Changes to Candidate Information
a) In the Workflow frame under the Offer Accepted folder, click on the candidate‟s name
b) In the Detail frame, click on the Candidate Info link
to display general candidate info
Under the Candidate Info section you may edit any of the
following which will automatically populate into the Hire
Form:
First Name
Last Name
Address Information
Contact Information
Email
UCID #
c) To make changes to the Candidate Info, click the edit (
d) Edit the applicable Candidate Info and click
PEOPLECLICK USER GUIDE
HR SERVICE TEAM
PAGE 55
) icon
WORKFLOW STEPS IN THE OFFER PROCESS (CONTINUED)
4.
Generate Hire Form
Once you are sure both the Offer Information and the Candidate Information are correct and
complete, you are ready to generate the hire form. To complete the hire form, move the
candidate to the Generate Hire Form for Recruitment folder in the Workflow frame.
A trigger will appear (Trigger 4).
Trigger 4
Click
and hold the Control Key (Ctrl) on your keyboard
The following File Download prompt will appear on your screen. Select Open
PEOPLECLICK USER GUIDE
HR SERVICE TEAM
PAGE 56
WORKFLOW STEPS IN THE OFFER PROCESS (CONTINUED)
The Hire Form will appear on the screen
Hire Form – page 1
PEOPLECLICK USER GUIDE
HR SERVICE TEAM
PAGE 57
WORKFLOW STEPS IN THE OFFER PROCESS (CONTINUED)
Hire Form continued – page 2
PEOPLECLICK USER GUIDE
HR SERVICE TEAM
PAGE 58
WORKFLOW STEPS IN THE OFFER PROCESS (CONTINUED)
Several fields will need to be completed prior to sending the form to Recruitment for
processing. Please review pre-populated information and enter the following required fields
on the hire form for the successful candidate:
Personal Information:
Student ID (if applicable)
Is New Hire a current or previous U of C employee?
Date of Birth
Gender
Marital Status
Social Insurance Number (SIN)
SIN Expiry Date (if applicable)
Citizenship
Permit/Visa Information (required for foreign nationals)
New Job Information:
Schedule Details
Reporting Manager name
Faculty / Department Contacts:
Comments (if applicable)
a) Once the Hire form is complete, save it and email it to [email protected]
PEOPLECLICK USER GUIDE
HR SERVICE TEAM
PAGE 59
ICON GLOSSARY
Global Toolbar Icons
These icons appear in the top left corner of the screen
View the Recruiting Portal online help
Refresh the display of Requisitions and Candidates in the Workflow Tree
Requisition Quick Find
Candidate Quick Find
Log out of the Recruiting Portal
Requisition Icons
These icons appear next to the requisition in the Workflow Tree
(green)
(green with blue thumb tack)
(purple)
(yellow)
(blue)
(orange)
(red)
Open Requisition
Open Requisition that is posted on the U of C Careers website
Requisition pending approval
Closed Requisition
Requisition that has been filled
Requisition that has been cancelled
Requisition that has been rejected or sent back for corrections
Requisition Toolbar Icons
These icons appear in the top right corner of the Requisition tab
Refresh the information shown for the current requisition
Display all the candidates in the requisition in the Candidate List frame
Add a note to the current requisition
Attach a document to the current requisition
Print the current requisition
Right-Click Requisition Icons
These icons appear when you right click a requisition in the Workflow Tree
Display the number of candidates in each workflow folder
Display all the candidates in the requisitions in the Candidate List
Quickly find a requisition
Collapse the Workflow Tree
PEOPLECLICK USER GUIDE
HR SERVICE TEAM
PAGE 60
ICON GLOSSARY (CONTINUED)
Right-Click Workflow Folder Icons
These icons appear when you right click a Workflow folder in the Workflow Tree
Quickly find a requisition
Collapse the Workflow Tree
Candidate Indicators
These are the icons that appear next to a candidate‟s name in the Workflow Tree and the
Candidate List
External Candidate
Internal Candidate
Referred Candidate
Candidate Toolbar Icons
These icons appear in the top right corner of the Candidates tab
Refresh the information shown for the current candidate
Add a note to the current candidate
Attach a document to the current candidate
Send an email message to the current candidate
Undo the last candidate move
Print the current candidate‟s information
Forward the current candidate‟s resume
Right-Click Candidate Icons
These icons appear when you right click a candidate in the Workflow Tree
Collapse the Workflow Tree
Send an email message to the current candidate
Undo the last candidate move
PEOPLECLICK USER GUIDE
HR SERVICE TEAM
PAGE 61