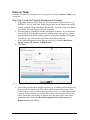
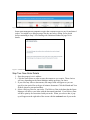
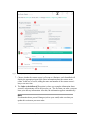
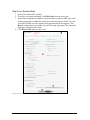
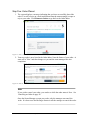
1
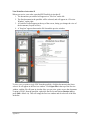
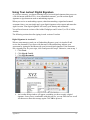
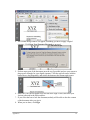
Access Point Information Canada
eStrataHub Customer
User’s Guide
Last Updated
April, 2015
Copyright
Copyright 2015 Access Point Information Canada Ltd.
This copyright document is intended for the use of eStrataHub Subscribers and their
employees only in the performance of functions related to and for the use of the
eStrataHub system, in accordance with the Terms and Conditions of Agreement entered
into between the Subscriber and eStrataHub.
Access Point Information Canada Ltd. grants consent to eStrataHub Subscribers and their
employees the right to photocopy, reproduce or store in electronic medium this user’s guide
provided that the copying is consistent with the intended use of the document. No part of
the user’s guide may be distributed either free of charge or for commercial purposes (e.g.,
sale, rent, trade, posting on Internet or on electronic bulletin boards) without the prior
consent of Access Point Information Canada Ltd.
Help Desk Telephone Numbers:
Toll-free in Canada: 1-800-663-6102
General Questions Telephone Numbers:
Phone: 1-877-953-8253
FAX: 250-953-8230
Email: [email protected]
Mailing Address
Access Point Information Canada Ltd.
Suite E400, 4000 Seymour Place
Victoria, B.C., Canada, V8X 5J8
Access Point Information Canada Web Site
www.apicanada.com
Table of Contents
Typographic Conventions ...................................................................................................1
eStrataHub Overview ..........................................................................................................2
Minimum Software Requirements .....................................................................................4
"My Orders" and "All Account Orders" .............................................................................5
Ordering Documents ...........................................................................................................6
Start eStrataHub..................................................................................................................7
The Order Index .................................................................................................................8
Place an Order ....................................................................................................................9
Step One: Locate the Property Management Company ...............................................9
Step Two: New Order Details.....................................................................................10
Step Three: Additional Details ...................................................................................14
Step Four: Review Order............................................................................................17
Step Five: Order Placed .............................................................................................18
When the Strata Manager Accepts/Rejects Your Order ...................................................19
Receive Messages .............................................................................................................20
Send Messages..................................................................................................................21
Provide an Undertaking ....................................................................................................22
Change an Order's Delivery Date .....................................................................................24
Cancelling an Order ..........................................................................................................26
Complete Payment............................................................................................................27
Receive Your Documents .................................................................................................29
Download Documents ................................................................................................30
Email Links to Documents ..........................................................................................31
View Order History ..........................................................................................................33
Dealing with Unclaimed Orders .......................................................................................34
Confirm Sale .......................................................................................................................35
Notification Email ............................................................................................................35
Confirming the Sale ..........................................................................................................35
Frequently Asked Questions .............................................................................................38
General Questions ............................................................................................................38
Fees and Payment .............................................................................................................39
Submitting an Order .........................................................................................................40
Order Index .......................................................................................................................41
Undertakings.....................................................................................................................42
Messages...........................................................................................................................42
Receiving the Order ..........................................................................................................43
Appendices ..........................................................................................................................47
View, Print, or Save Your Documents .............................................................................48
Using Your Juricert Digital Signature ..............................................................................57
Typographic Conventions
Typographic conventions are used with the following meanings:
Screen names and field names are capitalized. For example: In the Transaction screen,
move to the Search field.
Buttons and other “clickable” items appear in bold. For example: Click Submit.
Required input (that you enter exactly as shown) appears in Courier font. For example:
Type: ABCDE
Variable input (that you provide) appears in italic Courier font. For example: Type
your Password
System messages (and other screen output) appear in bold Courier font. For example:
PASSWORD CHANGE COMPLETED
Tips, Notes, Important Notes, Cautions, and Warnings appear as shown below:
Tip
A way to make your work easier.
Note
Further information about the current subject.
Important
An emphatic note about the current subject.
Caution
An important point that could prevent an inconvenience.
Warning
An important point that could prevent a financial loss, or loss of data.
eStrataHub Customer User Guide – April, 2015
1
eStrataHub Overview
eStrataHub provides a fast, reliable method to order documents from strata management
companies.
eStrataHub is available through two distribution channels – The Access Point web site at
www.apicanada.com and the BC OnLine web site at www.bconline.gov.bc.ca.
Registration and Payment Methods
Strata documents retrieved through the Access Point web site are paid for with a credit
card, and strata documents retrieved through BC OnLine are paid for with a BC OnLine
deposit account.
Both sites require customers to register in order to make use of the services. Registration
with Access Point just take a few minutes, and registration with BC OnLine can take 3 to 5
days.
Order Documents
You can use a property's Strata Plan Number to locate the strata management company. If
the company is registered with eStrataHub, you can order documents such as a Form B,
Form F, and Financial Statements from them. See Ordering Documents on page 6.
Tip
If you work with a strata management company that is not yet part of eStrataHub,
refer them to www.estratahub.com so they will be able to register their properties.
Provide an Undertaking
Undertakings are documents provided by legal practitioners such as Lawyers and Notaries.
For the conveyance of a property from one owner to another, the Undertaking binds the
practitioner to some action or payment relating to the conveyance. Homeowners and
Realtors are not required to provide Undertakings.
eStrataHub makes it easy to for practitioners to communicate with strata managers and
send an undertaking letter. See Provide an Undertaking on page 22.
Paying for Your Order
When you place your order through APIC, the credit card information you provide is
required to authenticate that the credit card is valid. There are no charges to your card
until you complete payment and the documents are released to you.
On the day you requested delivery, you will receive an email alerting you that your order
is ready to be paid for. This is your cue to log back into eStrataHub, open the details of
your order, and click the Complete Payment button.
Once payment is made, you will have an opportunity to download your documents to your
workstation, or send an email which has links to the documents imbedded in the email.
Orders placed through BC OnLine operate the same way. The BC OnLine deposit account
is not debited until you click the Complete Payment button.
eStrataHub Customer User Guide – April, 2015
2
Receive the Documents You Ordered
When the strata manager delivers your documents, eStrataHub sends you a summary of the
documents and an invoice. If everything is correct, you can pay for your order using your
BC OnLine account (see Complete Payment on page 27) and receive the documents in a
single "PDF Portfolio" file (see Receive Your Documents on page 29 and View, Print, or
Save Your Documents on page 48). Note that you can also pay by credit card if you
register with www.apicanada.com.
eStrataHub Customer User Guide – April, 2015
3
Minimum Software Requirements
The proper software is needed to place your order, and to view and print the strata
documents.
In order to use eStrataHub effectively, you should have:
• The latest version of Internet Explorer, Google Chrome, or Firefox.
• The latest version of Adobe Acrobat. If you are having problems opening
your files, you have two alternatives:
1. Download and install the latest version of the free Adobe Reader
and the associated Flashplayer:
https://get.adobe.com/reader
https://get.adobe.com/flashplayer
2. If you plan to use Adobe Acrobat Standard or Professional to sign
EFS documents and will not be using the Reader version of
Acrobat, then you need to download and install the free Flashplayer
plugin:
• Flashplayer: http://get.adobe.com/flashplayer
Note
Other PDF viewer software should work with the links to the individual files that
make up the documents in your order. However, these other viewers may have
difficulty viewing the Portfolio file that contains all of your documents in one
file.
eStrataHub Customer User Guide – April, 2015
4
"My Orders" and "All Account Orders"
When you log in and select eStrataHub, you will see the orders that you submitted.
If using BC OnLine, you can work with orders from other people in your account by
clicking the All Account Orders link in the lower left corner of the eStrataHub screen.
Figure 1: All eStrataHub orders in my BC OnLine account.
When you click All Account Orders, all orders initiated from everyone in your BC OnLine
account (including your own) will display. You can then work on orders that were placed
by others in your account.
Figure 2: My eStrataHub orders.
If you wish to switch back and just see your own orders, click the My Orders link in the
lower left corner of the eStrataHub screen.
eStrataHub Customer User Guide – April, 2015
5
Ordering Documents
You can use eStrataHub to find strata property management companies and order
documents from them. Before you begin, make sure that you know the property's Strata
Plan Number and Lot Number. See:
• Start eStrataHub on page 7.
• The Order Index on page 8.
• Place an Order on page 9.
• Receive Messages on page 20.
• Send Messages on page 21.
• Provide an Undertaking on page 22.
• Complete Payment on page 27.
• Receive Your Documents on page 29.
If you need to move an order's delivery date to an earlier (or later) date, see:
• Change an Order's Delivery Date on page 24.
eStrataHub Customer User Guide – April, 2015
6
Start eStrataHub
To access eStrataHub through BC OnLine, sign on as you normally do, then:
1. Select eStrataHub from the BC OnLine main menu.
2. Click Submit.
Figure 3: BC OnLine menu with eStrataHub selected.
To access eStrataHub through the APIC Portal, go to www.apicanada.com, then:
1. If you need to set up an APIC account, click the Register link.
2. Once you have registered and signed into APIC, you can click Go To eStrataHub.
Figure 4: APIC home page showing Registration link and eStrataHub .
eStrataHub Customer User Guide – April, 2015
7
The Order Index
The first time you use eStrataHub, your Order Index will be empty.
Figure 5: eStrataHub Order Index screen with no orders.
As you use eStrataHub, all your orders will appear in the Order Index. Orders remain in
the Order Index for 60 days.
There are a number of ways to locate an order:
1. Use the Order# field to find any order ever placed by you or your firm (including
orders more than 60 days old). Just enter the order number and click Find.
2. Use the From and To fields to list only orders that were made during a specific date
range (from a single day to a maximum of three months). Click the calendar icons
to select start and end dates, then click Search. To reset the Order Index to display
orders from the last 60 days, click Clear.
3. Click any heading to sort the index by Order #, Reference/Folio, Ordered On Date,
Due Date, and so on. Click the heading again to reverse the sort order.
4. If there are multiple pages of choices, click a page number to move ahead or back.
5. Click My Orders to list only orders that you made. Click All Account Orders to
list all orders made by everyone in your account.
Figure 6: eStrataHub Order Index screen with orders.
eStrataHub Customer User Guide – April, 2015
8
Place an Order
Placing a new order for documents is a five-step process. Click Create New Order to go
to step one.
Step One: Locate the Property Management Company
1. In the Order Reference/Folio field, you can enter your own client identifier (e.g.,
SMITH123) to "tag" each order. Whatever you enter here will appear on your BC
OnLine statement, along with charges for the order. If you pass such costs along to
your clients, this can help you with your accounting.
2. Enter the property's Strata Plan number and Strata Lot number. If you don't know
these numbers, click the link to search by building name. In the pop-up window,
start typing the name of the building, and a list of possible candidates will appear.
Click the one you want, and the Strata Plan will be filled in for you.
3. In the Acknowledgement section, indicate your role by selecting Real Estate
Agents, Lawyers & Notaries, or Homeowners.
4. Click Next.
Figure 7: Screen 1 of create new order process.
5. Some strata properties have multiple sections (e.g., a building with retail stores on
the ground floor, commercial offices above, and residential units on top). Each
section will have its own strata council, and may have its own Strata Management
company. In this situation, you will be able to choose from an index like the one
below. (Note that you may have to indicate your role again.) Select the correct
management firm, then select Real Estate Agents, Lawyers & Notaries, or
Homeowners and click Next.
eStrataHub Customer User Guide – April, 2015
9
Figure 8: Portion of Screen 1 showing multiple Sections for a strata building.
Some strata management companies require that customers agree to pay for unclaimed
orders. You might see a dialog message like the one below, asking you to decide
before continuing to Step 2. See Dealing with Unclaimed Orders on page 34 for
details.
Figure 9: Unclaimed order notice.
Step Two: New Order Details
1. Enter the property's civic address.
2. Click the check boxes to order as many documents as you require. These choices
will vary depending on the Strata Manager and the province you chose.
3. If you select any Minutes documents, date range fields will appear so you can
specify a time period for each type of minutes document. Click the Month and Year
fields to choose a start and end date.
4. Select a Delivery Date for your order. The Delivery Date is the date that the Strata
Manager will deliver your order with the documents attached. Your Delivery Date
will drive priority fees associated with your order. When you select a date, a popup will appear on the right side of the screen with the estimated cost of your order.
eStrataHub Customer User Guide – April, 2015
10
Figure 10: Cost estimate showing Priority fees, Document fees, and eStrataHub fee (note: no page fees).
You may alter the priority fee by selecting a new Delivery Date.
Note
The traffic-light indicates the strata management company's cut-off time. Orders
received before this time are considered to be received on the current day. Orders
received after this time are considered to be received on the following business
day (this becomes important when priority charges are involved).
A green light indicates that you have more than 10 minutes until cut-off. Yellow
indicates that cut-off is less than 10 minutes away. Red indicates that the day's
cut-off has passed. Enter the date by which you need the documents delivered.
The estimated delivery cost will appear below the Date Required field.
5. Select a Reason for Order from the drop down selection.
6. If you want to add any comments or special instructions for the strata manager,
enter them in the Comments box.
eStrataHub Customer User Guide – April, 2015
11
Figure 11: First part of screen 2 of create new order process.
7. Choose whether the current owner is a Person or a Business, and eStrataHub will
display the appropriate input fields. Enter information about the current strata
owner. In the case of a sale, adding the name and number of the current owner's
lawyer can save time.
8. The Order to be delivered To section is where you complete information about
yourself, as documents will be delivered to you. The first time you order, you must
enter your delivery information. After this, the information appears automatically.
Note
If information about yourself changes (such as your email) make sure that you
update this section on your next order.
eStrataHub Customer User Guide – April, 2015
12
9. Some Strata Managers offer additional delivery options such as mail, fax, or
document pickup (along with the cost of these additional options).
Note
Remember that Additional Delivery Options are optional. eStrataHub
provides files as downloadable PDF documents, which will likely
eliminate the need for you to receive the paper documents.
Figure 12: Second part of screen 2 of create new order process.
10. Once everything is correct, click Next. eStrataHub will ask you to confirm your
email address.
eStrataHub Customer User Guide – April, 2015
13
Figure 13: Confirmation screen for your email. All notifications will go to this email.
If it is correct, click Yes to go to Step 3. If it is incorrect, click No to stay on Step 2
and make the correction.
Step Three: Additional Details
Step three appears only if the reason for the order is "Sale/New Owner", "Registered
Lease", “Family Transfer” or if a Form F was requested. In these cases, the system asks
for further details.
1. In the top part of the screen:
• Enter the property's Legal Description, PID, Completion date and Possession
date. Click the calendar to choose a date using the mouse. Lawyers or notaries
who request a Form F may be asked to confirm the sale on the business day
following the completion date. See Confirm Sale on page 35.
• Optionally, enter the Adjustment date.
• If you want to know the name of the strata's insurance company or the Move In
and/or Move Out fees, select one or more of the check boxes. The information
will appear on your package's cover sheet.
2. Click Add Registered Owner and provide information in the pop-up box about all
who will be on Title at the Land Title and Survey Authority. (If there is more than
one Registered Owner, repeat this step until you add them all.) Please include
everyone who is currently on Title and who is being added to Title.
3. Once everything is correct, click Review Order.
eStrataHub Customer User Guide – April, 2015
14
Figure 14: Screen 3 of create new order process.
Note
Adding Registered Owners uses a pop-up window. Ensure that you turn your popup blocker off to display the Add Registered Owner pop-up.
1. Choose whether the Owner is a Person or a Business, and eStrataHub will display
the appropriate input fields.
2. "Primary Owner" indicates the person to contact in case there is a question (it does
not indicate primary ownership).
3. If you select No for Reside in Unit?, the pop-up window will expand so you can
complete the owner’s address.
4. If there is more than one owner, click Add Registered Owner and fill in another
pop-up window. Continue until you have filled in each owner’s information.
eStrataHub Customer User Guide – April, 2015
15
Figure 15: Add Registered Owner screen.
eStrataHub Customer User Guide – April, 2015
16
Step Four: Review Order
1. Review the order details carefully.
2. If you have to change something, click Edit Order to return to step two.
3. Some strata management companies require Realtors to upload a PDF copy of the
Listing Agreement to validate their request for strata documents. If this is so, and
your role is Realtor, an extra Attach Listing Agreement field will appear. Click
Browse, and navigate to your PDF copy of the Listing Agreement. The path to the
document will appear in the field.
4. Click Place Order when you are ready.
Figure 16: Review order screen showing a Listing Agreement attached by a realtor.
eStrataHub Customer User Guide – April, 2015
17
Step Five: Order Placed
1. The system displays a message indicating that you have successfully placed the
order. You will receive an e-mail notification when the strata manager accepts or
rejects your order. Click Return to Orders to go back to the Order Index.
Figure 17: Order confirmation screen. Order has been received by eStrataHub.
2. Your new order is now listed in the Order Index. Note the Status of your order—it
starts off as "New" and then changes as you and the strata manager take it to
completion.
Figure 18: Order Index screen with new order listed.
Note
If you wish to cancel your order, you can do so while the order status is New. See
Cancelling an Order on page 26.
Once the Strata Manager accepts your order, only the manager can cancel the
order. It is best to use the Messages feature to ask the manager to cancel the order.
eStrataHub Customer User Guide – April, 2015
18
When the Strata Manager Accepts/Rejects Your Order
When the Strata Manager accepts your order, you will receive an email acknowledging
acceptance. If you requested insurance and moving fee information and that information is
known to the manager when they accept your order, it will be included in the email.
Figure 19: Excerpt from Acceptance email which also shows moving fees and Insurance Company.
If the Strata Manager rejects your order, you will receive an email notification. The
examples below show orders rejected through an APIC session and a BC OnLine session.
Figure 20: Excerpt from rejection email through APIC.
Figure 21: Excerpt from rejection email through BC OnLine.
To view the reason for the rejection, open the order in eStrataHub.
Figure 22: Order Details screen showing reason for rejection.
The Order Status will show Rejected and the Rejected Reason will show why the Strata
Manager rejected your order.
Note
If your order is rejected, no fee will be charged to your account. Charges are applied
only when you complete payment.
eStrataHub Customer User Guide – April, 2015
19
Receive Messages
Important
Messages provide a way to communicate with a strata manager about an order, and
also provide a history of those communications. When using the Messages feature,
your communications become part of the order. This allows both you and the strata
manager to go to one place for all communications. Using fax or email dilutes the
value of the messages feature and can lead to confusion.
If you requested additional information or documents when you placed your order, the
strata manager will respond by sending you a message through eStrataHub. When this
happens, eStrataHub sends a Notification email to inform you that the information is
waiting. Make sure to note the order number in the email.
As an added feature, orders with unread messages will have an envelope icon
Msg column of the Order Index screen.
in the
Sign in and select the eStrataHub application. Your Order Index will list all of your current
orders. When you have a number of orders to choose from, you can click the column
headings to sort the list.
1. Find the order number that you want to view. Click the order to highlight it.
2. Click the View Order Details button (or just double-click the order).
Figure 23: Order Index with an unread Message.
3. Click the Messages tab.
4. You will see the message sent by the strata manager, with the date and time it was
sent. If a file is attached, you can either view or save it.
Figure 24: Messages tab showing the most recent message.
eStrataHub Customer User Guide – April, 2015
20
Send Messages
If you need to send a message or document to the strata manager, you can use the
Messages option.
1. Open the Messages tab
2. Click Send a Message.
Figure 25: Messages tab and the Send a Message button.
3. In the Send Message dialog box, you can enter text and attach any type of
document you wish to send.
4. Click Send, and eStrataHub instantly sends your Message to the strata manager.
Click Cancel if you want to close the comment box without sending.
Figure 26: Send message pop-up.
eStrataHub Customer User Guide – April, 2015
21
Provide an Undertaking
When a strata manager requests an undertaking, eStrataHub sends a Notification email to
inform you that the request is waiting. Make sure to note the order number in the email.
Sign in and select the eStrataHub application. Your Order Index will list all of your current
orders. You can click the + sign at the left to "expand" an order. When you have a number
of orders to choose from, you can click the column headings to sort the list.
1. Find the order number that you want to view. Note that the order's status will be
"Undertaking Required." Click the order to highlight it.
2. Click the View Order Details button (or just double-click the order).
Figure 27: Order Index with an Undertaking requested on an order.
3. Click the Undertaking tab.
4. Click the View Request link to open the strata manager's undertaking request.
(Like all documents in eStrataHub, it will be in PDF format.) If you agree to
provide the undertaking, there are two ways to prepare your response.
a) The traditional way is to create a response letter, sign it with a pen, scan it,
convert it to PDF, and send it to the strata manager.
b) The more efficient way is to apply your Juricert digital signature to the strata
manager's request, save it with a new name, and send back the signed request.
See Using Your Juricert Digital Signature on page 57 for details.
5. Click the Provide Undertaking button.
Figure 28: Undertaking tab showing a request for an Undertaking.
6. In the pop-up window, click the Browse button and navigate to the appropriate
undertaking PDF file on your network, then click Open.
7. Click Submit to send your undertaking letter to the strata manager.
eStrataHub Customer User Guide – April, 2015
22
Figure 29: Locate and attach Undertaking.
8. Note that you can click the links in the Undertaking section to view both the
original request and the document that you sent.
Figure 30: Response to Undertaking attached to Undertaking tab.
The strata manager will review your undertaking letter, then:
• Accept it and deliver your documents.
• Reject it and request changes to the undertaking.
eStrataHub Customer User Guide – April, 2015
23
Change an Order's Delivery Date
If you need to move an order's delivery date to an earlier (or later) date, use the Accelerate
Order button to contact the strata manager and request a changed delivery date.
Important
eStrataHub treats accelerated orders as brand-new orders. Priority fees are calculated
from when you change an order's delivery date, not from the date of your original
order. Because this can significantly change the cost of your order, we recommend
that you communicate with the strata manager before using this feature.
Sign in to the eStrataHub application. Your Order Index will list all of your current orders.
You can click the + sign at the left to "expand" an order. When you have a number of
orders to choose from, you can click the column headings to sort the list.
1. Find the order number that you want to accelerate. Click the order to highlight it.
The Accelerate Order button will appear below the index.
2. Click the Accelerate Order button to open a pop-up dialog box.
Figure 31: Selected order (highlighted in grey) and Accelerate Order button displays when order selected.
3. Click the calendar to select a new delivery date for the order. The new priority
delivery fee will appear beneath the date.
4. Click Send to send the acceleration request to the strata manager.
Figure 32: Accelerate Order pop-up with new delivery date and new priority fee.
5. The accelerated order will appear highlighted in red.
eStrataHub Customer User Guide – April, 2015
24
Figure 33: Order Index screen with an accelerated order.
When the strata manager accepts or rejects your request, a message like the one below will
appear on the Order Details page.
Figure 34: Acceleration recorded in Order Details.
Once the strata manager accepts your request to accelerate delivery, the Order Required
By date on the Order Details screen will change to the new accelerated delivery date.
You will also receive this information in an e-mail.
eStrataHub Customer User Guide – April, 2015
25
Cancelling an Order
You may cancel an order only if the strata manager has not yet accepted it. If the status of
the order is still New, you can open the order and click the Cancel Order button. When
you cancel an order, it will disappear from the Order Index.
Figure 35: Order Details screen on a New order showing Cancel button.
You cannot cancel your order after a strata manager accepts it. However, you can request
that the strata manager cancel an order for you. Follow these steps:
1. Use eStrataHub messages to communicate your request to the strata manager (see
Send Messages on page 21 and Receive Messages on page 20). This will create a
record of your request and your reasons for cancelling.
2. If the strata manager agrees to your request and cancels the order, the order's status
will change to Cancelled and eStrataHub will send you an email notification
regarding the cancellation.
3. If the strata manager does not agree, the order's status will remain unchanged and
the order will still stand. You will receive a message explaining that your request
was denied.
Note
There is no charge to place and then cancel an order.
eStrataHub Customer User Guide – April, 2015
26
Complete Payment
When the strata manager delivers the documents that you ordered, eStrataHub will send a
Notification email to inform you that your order is ready to download. Make sure to note
the order number in the email.
Sign in to the APIC web site or BC OnLine where you placed your order and select the
eStrataHub application. Your Order Index will list all of your current orders. You can click
the + sign at the left to "expand" an order. When you have a number of orders to choose
from, you can click the column headings to sort the list.
1. Find the order number that you want to view. Note that the order's status will be
"Waiting for Payment." Click the order to highlight it.
2. Click the View Order Details button (or just double-click the order).
Figure 36: Order on Order Index with a status of Waiting for Payment.
The Order Details screen displays information about the order.
3. To see a detailed breakdown of cost of your order, click the Statement/Receipt
button.
Figure 37: Order Details of an order waiting to complete payment.
Note that the summary of the cost of your order also displays on the Order Details.
4. An Order Summary window will open. Review this information carefully.
5. You can print the summary if you want to. Close the Order Summary window
when you have reviewed the information.
eStrataHub Customer User Guide – April, 2015
27
Figure 38: Payment Details before payment is complete.
6. At the top of the Order Details screen, click Complete Payment.
Figure 39: Complete Payment button on an order waiting for payment.
7. When you click Complete Payment, the Download Documents and Email Links
to Docs buttons will appear. Now you can take delivery of your order. See Receive
Your Documents on page 29 and Email Links to Documents on page 31.
Figure 40: Order Details screen with Download and Email buttons.
Important
When payment is verified, the order is complete.
eStrataHub Customer User Guide – April, 2015
28
Receive Your Documents
Shortly after you complete payment, eStrataHub delivers your order and sends a
Notification email to inform you that your documents are ready for download. Make sure
to note the order number in the email.
Important
Your order will remain on the Order Index for 60 days from the time it is delivered.
Please download the file and save it on your system. (You can find orders more than
60 days old by using the Order# field or searching by date range.)
Sign in and select the eStrataHub application. Your Order Index will list all of your current
orders. You can click the + sign at the left to "expand" an order. When you have a number
of orders to choose from, you can click the column headings to sort the list.
1. Find the order number that you want to view. Click the order to highlight it.
2. Click the View Order Details button (or just double-click the order).
Figure 41: Order Index selecting a completed order.
3. In the Order Details screen, click Download Documents or Email Links to Docs.
Each option is explained next.
Figure 42: Order Details screen showing Download and Email buttons.
eStrataHub Customer User Guide – April, 2015
29
Download Documents
The Download Documents button opens a window listing all of the documents in your
order. At the top of the screen, you can download your entire order as a single Adobe
Portfolio file. At the bottom of the screen, you can download individual documents from
within the order.
Figure 43: Download screen showing the link to the order as a single file, and links to individual files.
You can:
• Right-click the link, then choose Save target as... and save the PDF portfolio to
your network, where you can work on it later.
• Left-click the link to open the file in your Acrobat software, then print the PDF
documents or save them to your network.
To work with PDFs in the portfolio, you will need current versions of Adobe Flashplayer
and Adobe Acrobat Reader (or the latest version of Standard or Professional). See
Minimum Software Requirements on page 4 and View, Print, or Save Your Documents on
page 48 for details.
When you are finished with this screen, click the Order Details link at the top to return to
the order details screen for this order, or the Orders List link to return to the Order Index
screen.
eStrataHub Customer User Guide – April, 2015
30
Email Links to Documents
The Email Links to Docs button sends links by email to addresses that you provide. The
person who receives the email can use the links to download the documents from your
eStrataHub order. This is much easier than downloading the PDF files and then sending
them as email attachments.
Click Email Links to Docs to view the Email Document Links window.
If you do not want to send links to the email originally provided (usually yourself) just
clear the first box. If you want to send links to other email addresses, select the second box
and enter the addresses as shown. You can enter multiple addresses by separating each one
with a semicolon. You can add a comment to the email if you choose. When you are
finished, click Send Email.
Figure 44: Email Links popup with additional emails and Comments.
eStrataHub Customer User Guide – April, 2015
31
eStrataHub will send an email like this to the addresses you specified.
1. These links provide access to the free software needed to view the documents.
2. This link lets you download the entire order as a single Adobe Portfolio file.
3. These links let you download individual documents from within the order.
Figure 45: Email Links email showing links to free Adobe software, a link to documents as a single file, and links to each
file.
You can:
• Right-click the link, then choose Save target as... and save the PDF portfolio to
your network, where you can work on it later.
• Left-click the link to open the file in your Acrobat software, then print the PDF
documents or save them to your network.
To work with PDFs in the portfolio, you will need current versions of Adobe Flashplayer
and Adobe Acrobat Reader (or the latest version of Standard or Professional). See
Minimum Software Requirements on page 4 and View, Print, or Save Your Documents on
page 48 for details.
eStrataHub Customer User Guide – April, 2015
32
View Order History
The History link lets you view all of the events that an order has gone through.
1. Open the History tab.
2. The Order History screen shows who initiated each event, the nature of each event,
and when each event took place. In the example below, you can see when you
placed the order, when the strata manager accepted and delivered the order, and
when you completed payment.
Figure 46: History tab showing events recorded for this order.
eStrataHub Customer User Guide – April, 2015
33
Dealing with Unclaimed Orders
What happens if a strata manager assembles and delivers an order as per your request, but
you neglect to complete payment? The strata manager is placed in a difficult position—
they have done the work you requested, but they haven't been paid.
eStrataHub provides strata managers with an optional feature that lets them force payment
for unclaimed orders. If the strata management company uses this feature, you will go
through an extra step in the ordering process (between Step 1 and Step 2). You will have
to agree with the following notification before you can submit your order.
Figure 47: Unclaimed order notice.
Here are the steps in an unclaimed order situation. Note that as a customer, you have a
five-day grace period in which to pay for the order.
1. One day after your completed order's due date, eStrataHub sends you a message
that the order is ready. During the five-day grace period, the order's status is
Waiting for Payment.
2. Five days after your completed order's due date, the grace period elapses.
eStrataHub sends you and the strata manager a message that the strata manager
may bill your account even if you do not complete payment. The order's status
changes to Waiting for Payment - Chargeable. The strata manager now has 40 days
in which to bill for the unclaimed order.
3. During the 40-day Waiting for Payment - Chargeable period, you can continue to
negotiate with the strata manager through eStrataHub messages (see Send
Messages on page 21 and Receive Messages on page 20). These messages remain
on file as part of the order process, and include emails.
4. 45 days after your completed order's due date, if the strata manager has not billed
you, the order's status changes to Expired.
5. 60 days after your completed order's due date, if the order is unresolved for any
reason, the order's status changes to Expired. Nothing can happen to an expired
order. The strata manager won't be able to update it or bill for it, and you won't be
able to download it. At this point, it is a "dead" order.
eStrataHub Customer User Guide – April, 2015
34
Confirm Sale
When a property changes hands, strata managers need to update their files with the
purchaser's (your client's) names. When a sale falls through or is delayed, strata managers
may need to change their files back to the seller's names. If a strata manager activates
eStrataHub's optional Confirm Sale feature, an email request will go out to lawyers or
notaries who have ordered a Form F. Responding to the request is easy—you just log into
eStrataHub and answer a couple of questions. Note that realtors are not affected by this
feature, as they should not place Form F orders.
Notification Email
On the business day following the completion date, you will receive an email from
eStrataHub asking you to log on and confirm that the sale took place.
Figure 48: Confirm Sale email.
Confirming the Sale
After a sale completion date, when you sign on to eStrataHub a Confirm Sale dialog box
will pop up asking you to resolve the question: "Did the sale complete?" Click Resolve to
go to the Sale/Transaction Index screen.
eStrataHub Customer User Guide – April, 2015
35
Figure 49: Confirm Sale pop up.
Note that only you will see the Confirm Sale dialog box for your orders. If you are away
from the office, other people in your account can use the Confirm Sale button at the
bottom of the Order Index screen to get to the Sale/Transaction Index.
Figure 50: Confirm Sale button.
The Sale/Transaction Index screen will list one or more Confirm Sale requests. Click the
Resolve button next to the one you want to respond to.
Figure 51: Confirm Sale index listing of orders to be resolved.
In the Confirm Completion window:
1. Select the option that describes the situation. In most cases, the transaction will
have completed as scheduled. If the deal fell through, select the second option. If
the deal is delayed, choose the third option and provide a new completion date.
2. You can enter comments for the strata manager here.
3. Click Update. Your responses are saved to your Order Detail screen and the strata
manager will be notified to the resolution.
eStrataHub Customer User Guide – April, 2015
36
Figure 52: Confirmation screen showing a sale which was delayed.
4. When you have resolved all of your Confirm Sale requests, the Sale/Transaction
Index screen will be empty and you can click Return to Order List.
Figure 53: Sale/Transaction Index with all sales resolved.
eStrataHub Customer User Guide – April, 2015
37
Frequently Asked Questions
See the following topics for answers to frequently asked questions.
General Questions
1. Why would I want to use eStrataHub? eStrataHub was designed to help strata
managers avoid many of the problems with managing strata document orders
including:
• All the information in one spot. No frantic searching for telephone call notes,
faxes, and emails.
• Simple, fast payment. No cheques. No rush couriers.
• Easier and less stressful tracking the status of all your orders - especially around
closings.
• Save time and money. No more picking up paper orders at strata manager's
office.
2. How can I order forms and documents through eStrataHub?
You can use a BC OnLine account, or (if you want to pay by credit card) you can
register with APIC (www.apicanada.com).
3. I do not have a BC OnLine or APIC account? How do I get more information?
Getting a BC OnLine account takes from three to five days. Sign up here:
www.bconline.gov.bc.ca/account.html
Registering an account with APIC takes two to three minutes. Sign up here:
www.apicanada.com
4. How do I receive my order and what type of file is it?
You can download your order from a link on the Order Details page after you
complete payment. Your order is delivered as a single "PDF Portfolio" file, which
contains one or more PDF files. See View, Print, or Save Your Documents on page
48 for details.
5. Do I need Adobe Acrobat to read and print the order?
In order to work with PDFs in the portfolio, you will need current versions of
Adobe Flashplayer and Adobe Acrobat Reader (or the latest version of Adobe
Acrobat Standard or Professional). See Minimum Software Requirements on page
4 (under Minimum Software Requirements) and View, Print, or Save Your
Documents on page 48.
6. How long does it take to receive my order?
You can obtain your order within minutes of the strata manager submitting it for
delivery. After receiving an email from eStrataHub, you can review a summary of
the order fees. The documents will appear as soon as your payment is completed.
Frequently Asked Questions
38
Fees and Payment
1. What does it cost to use eStrataHub?
For each order, eStrataHub calculates the cost as follows:
Document Fees + Priority Fee (if any) + Delivery Charge
Document Fees: the Strata Property Act of BC specifies how much a property
management company may charge for forms and documents. Currently, a Form B
costs $35, and a Form F costs $15. If a per-page charge is applicable, it will be
$0.25.
Priority Fee: a property management company may charge a fee for a rush order.
This is in addition to the document fees set out in the Strata Property Act of BC.
Delivery Charge: eStrataHub adds a $13.50 Delivery Charge per order. This is in
addition to the document fees and priority fee (if any) charged by the property
management company.
2. How do I pay for an order?
The cost of the order is deducted from your BC OnLine deposit account when you
click the Complete Payment button. You can also register with APIC to use a credit
card (see www.apicanada.com)
3. What are the Priority Order Fees?
Priority Fees are the additional amount the Strata Manager may charge for rush
orders that are to be delivered earlier than the standard delivery times. Priority fees
are in addition to the applicable per page fees, form fees, and delivery fees. Priority
fees are established by the Strata Managers separately and therefore may vary from
one Strata to another.
4. What are Standard Delivery Times?
The Strata Property Act dictates the standard delivery time for documents. The
standard delivery time for the following documents is one week:
• Form B
• Form F
• Bylaws
• Rules
• Depreciation Report (if ordered along with a Form B)
The standard delivery time for all other documents is two weeks. Note that the
Strata Property Act requires certain documents be attached to the Form B
Information Certificate {59(4)}. When these documents are requested along with a
Form B, then the standard delivery time for Form B would apply (i.e., one week).
If the delivery of documents is requested earlier than the standard delivery times (as
a Rush Order) then Priority Order Fees may apply, as determined by the Strata
Manager.
Frequently Asked Questions
39
5. How does eStrataHub calculate Priority Order Fees (for a Rush Order)? If you
order a document and request the standard delivery time or later, no Priority Order
Fees will apply. If you request an earlier delivery time, Priority Order Fees may
apply.
Priority Order Fees are based on the number of business days from the receipt of
the order to the delivery date you select. Orders submitted on non-business days or
statutory holidays are considered received on the following business day.
Example A: If on Wednesday you order a Form B and a Form F to be delivered the
following Wednesday, no Priority fees will apply. Because the standard delivery
time for these documents is one week, only the statutory fees will apply ($35 for
Form B, $15 for Form F, $13.50 for eStrataHub delivery).
Example B: If on Wednesday you order a Form B and Form F to be delivered the
following Monday, the Strata Manager's Priority Order Fees will apply in addition
to the fees mentioned above. Priority Order Fees are based on business days
(Saturday and Sunday are not counted). In this example, your three-day rush order
would include Thursday, Friday, and Monday.
6. When is a “Same Day” order due?
The same business day that it is received.
7. When is a “+1 Business Day” due?
The business day after it is received.
8. Do you accept credit card payment?
Yes -- registration at www.apicanada.com is quick and easy. Once you have
registered, you can pay for strata documents with a credit card.
Submitting an Order
1. How do I submit a new order through eStrataHub? See Ordering Documents on
page 6.
2. How will I know when my order is accepted by the strata manager?
Two things happen when the strata manager accepts your order:
• eStrataHub will send you an email
• The status in the Order Index and on the Order Details page will change from
“New” to “In Progress”
3. I need to add another document or form to an order. What can I do?
Use the Messages feature to request that the strata manager add the missing
document.
Frequently Asked Questions
40
4. How do I contact the strata manager?
The best way to contact a strata manager is to use the Send Messages feature (see
page 21). This ensures that all communications become part of the eStrataHub
order. In addition to Messages, the name and the telephone number for the strata
manager is shown at the top of the Order Details page for each order. It is a good
idea to confirm any verbal communications with a Message so it becomes part of
the eStrataHub order.
5. My order was rejected. What do I do now?
You can do either of the following:
• Contact the strata manager by looking up their telephone number on the Order
Details page.
• Go to the Message section of the order and send a Message.
Order Index
1. How can I view all of the orders for our company?
Under the Order Index there are two links which filter the orders you see:
• My Orders shows only orders that you have placed.
• All Account Orders shows everything that has been ordered within your BC
OnLine account.
2. What are the different status types?
The possible status types are:
• New (You placed an order, but has not yet been accepted or rejected.)
• In Progress (Your order has been accepted and there is not an outstanding
request for undertaking.)
• Rejected (The strata manager has viewed and rejected your order.)
• Undertaking Required (The strata manager has requested that you provide an
undertaking letter.)
• Undertaking Provided (You have sent the undertaking letter using the
Undertaking section.)
• Waiting for Payment (Your order is ready to be delivered and you must
complete payment.)
• Waiting for Payment - Chargeable (The strata manager can force payment for
an unclaimed order.)
• Payment Authorized (eStrataHub is verifying your payment before delivering
the order.)
• Payment Declined (Your payment could not be processed.)
• Complete (Payment has been processed and the order has been delivered to
your Order Details page.)
Frequently Asked Questions
41
•
Expired (If a completed order is unresolved for any reason 60 days after the
order's due date, the status changes to Expired. Nothing can happen to an
expired order. A customer can't download it, and a strata manager can't bill for
it. At this point, it is a "dead" order.)
3. How do I sort the Order Index?
Click the header you wish to use for sorting. It will sort from smallest to largest or
A-Z. Click again to reverse the sort order.
4. How can I see what documents are being requested for each order?
On the Order Index, click on the “+” sign next to the order. The row will expand to
show the documents required.
Of course you can also double- click on the order which takes you to the Order
Details page where all information can be found.
Undertakings
1. How do I know when I need to provide an undertaking? See Provide an
Undertaking on page 22.
Please note that some strata managers may send you a Message request
2. How do I provide the undertaking letter? See Provide an Undertaking on page 22.
3. I sent an undertaking letter using Messages and the status is still “Undertaking
Required” What should I do?
It is best to attach your letter using eStrataHub's Provide an Undertaking feature
(see page 22). This way, you will be able to quickly find the Undertaking without
having to search the Messages.
4. What happens when the undertaking is accepted?
You receive an email that tells you the undertaking has been accepted and the status
of the order changes back to In Progress.
5. My undertaking was rejected. What can I do?
Usually the strata manager provides a reason for rejecting the undertaking and
requires a change to the undertaking letter. You can resubmit the undertaking letter
and the strata manager will receive it just as with your original letter. You can also
contact the strata manager directly to resolve the issue.
Messages
1. What are messages?
Messages allow you and the strata manager to send and receive information about
the order. This provides a record of all communication in one place. They can be
just text, a file or both.
2. How do I send a message to the strata manager? See Send Messages on page 21.
Frequently Asked Questions
42
3. How do I know if I receive a message from the strata manager?
You will receive an email notifying you that a message has arrived for an order. In
addition to the email, the Order Index screen shows an envelope icon
orders with unread messages.
beside
4. What types of files can I send with a message?
You can attach any type of file: Word documents, PDFs. spreadsheets, or images.
Receiving the Order
1. How do I receive my order?
See Receive Your Documents on page 29.
2. How long will the record last in the system after it is delivered?
An order will appear in your Order Index for 60 days after delivery, but it always
stays in the system. To find an order that no longer appears in the index, use the
Order# field or search by date range. See The Order Index on page 8.
3. I’m having trouble downloading my documents.
If you receive “Access denied” or “You are not authorized” messages, please try
the following solutions.
a) Disable Protected Mode (requires restarting Internet Explorer):
If you use the IE8 or IE9 browser, you may need to disable protected mode to
download ordered documents or to solve display issues.
• In the Tools menu, select Internet Options and open the Security tab.
• Find the Enable Protected Mode field and change its setting. If it is currently
selected, unselect it. You must re-start Internet Explorer for the changed setting
to take effect.
Frequently Asked Questions
43
•
Click Apply and then OK. Close, then restart the browser. If you used this tip
for a download problem, try downloading your eStrataHub documents again.
• If you used this tip to resolve a screen display problem, check your screen to
see if the problem is fixed.
4. I just get a blank or partial screen when I select eStrataHub.
If you see a blank or partial screen when you select eStrataHub from the main
menu, try changing the Enable Protected Mode setting as explained above, and see
the other solutions below.
a) Clear the Browser's Cache:
• In the browser's Tools menu, select Internet Options.
• In the General tab, under Browsing History, click Delete.
Frequently Asked Questions
44
•
A Delete Browsing History window will appear. Deselect all options except the
Temporary Internet File option, then click Delete.
Frequently Asked Questions
45
• Close, then restart the browser.
• Check your screen to see if the problem is fixed.
b) If you use Windows 7, try the 32-bit version of Internet Explorer: If you
use Windows 7, you may want to try using the 32-bit version of IE8 or IE9
instead of the 64-bit version.
Frequently Asked Questions
46
Appendices
The following sections describe in greater detail how to use software to make your
eStrataHub experience easier and more efficient.
Appendices
47
View, Print, or Save Your Documents
See Minimum Software Requirements on page 4 for details regarding Adobe Acrobat.
The forms and documents that you order through eStrataHub are delivered in a single
"PDF Portfolio" file. The portfolio acts as a container for one or more PDF files.
In order to work with PDFs in the portfolio, you will need current versions of: Adobe
Flashplayer and Adobe Acrobat Reader (or the latest version of Adobe Acrobat Standard
or Professional). Adobe Acrobat Standard and Professional are commercial products,
but the free software listed below might be enough for you:
Adobe Reader at: https://get.adobe.com/reader
Flashplayer at: https://get.adobe.com/flashplayer
The following sections describe each version.
Appendices
48
View/Print/Save in Acrobat X
When you receive your order, open the PDF Portfolio in Acrobat X.
1. The documents you ordered will appear in a "File List" on the left.
2. The first document in the portfolio will be selected, and will appear in a "Preview
Window" on the right.
3. A Portfolio Toolbar appears at the top of the screen, letting you change the view of
the documents (Layout or Files).
4. A "drag bar" appears between the file list and the preview window.
To view, save, or print a single PDF from the portfolio, click the document in the list to
select it. It will appear in the Preview window. Click Open File in the top of the Preview
window, and the file will open in Acrobat. Now you can view, print, or save the document.
To print all PDFs from the portfolio, right-click the file list and choose Deselect All (or
press Shift + Ctrl + A). This will empty the Preview window and de-select all of the files
in the list.
Appendices
49
In the File menu, click Print/Save to go to Acrobat's Print Dialog screen. The "All PDF
Files" option will appear selected. Click OK to print all of the files in the portfolio.
To print selected PDFs from the portfolio, you must first close the Preview window. Click
and hold the drag bar, and drag it all the way across the screen to close the Preview
window.
Appendices
50
Now hold down the Ctrl key and click the files that you want to print. To select a range of
files, you can also click the first file in the range, then hold down Shift and click the last
file in the range. In the picture below, the first and third file are selected. In the File menu,
click Print/Save to go to Acrobat's Print Dialog screen.
Now both the "All PDF Files" option and the "Selected PDF Files" options appear. Click
Selected PDF Files and click OK to print the files you selected.
Appendices
51
View/Print/Save in Acrobat XI
When you receive your order, open the PDF Portfolio in Acrobat XI.
1. The documents you ordered will appear in a "File List" on the left.
2. The first document in the portfolio will be selected, and will appear in a "Preview
Window" on the right.
3. A Portfolio Toolbar appears at the top of the screen, letting you change the view of
the documents (Layout or Files).
4. A "drag bar" appears between the file list and the preview window.
Appendices
52
To view, save, or print a single PDF from the portfolio, click the document in the list to
select it. It will appear in the Preview window. Click Open File in the top of the Preview
window, and the file will open in Acrobat. Now you can view, print, or save the document.
To print all PDFs from the portfolio, right-click the file list and choose Deselect All (or
press Shift + Ctrl + A). This will empty the Preview window and de-select all of the files
in the list.
Appendices
53
In the File menu, click Print/Save to go to Acrobat's Print Dialog screen. The "All PDF
Files" option will appear selected. Click Print to print all of the files in the portfolio.
To print selected PDFs from the portfolio, you must first close the Preview window. Click
and hold the drag bar, and drag it all the way across the screen to close the Preview
window.
Appendices
54
Now hold down the Ctrl key and click the files that you want to print. To select a range of
files, you can also click the first file in the range, then hold down Shift and click the last
file in the range. In the picture below, the first and third file are selected. In the File menu,
click Print/Save to go to Acrobat's Print Dialog screen.
Now both the "All PDF Files" option and the "Selected PDF Files" options appear. Click
Selected PDF Files and click Print to print the files you selected.
Appendices
55
Appendices
56
Using Your Juricert Digital Signature
As a lawyer or notary, you almost certainly have a Juricert digital signature that you use to
e-file documents with the LTSA. As an eStrataHub customer, you can use that digital
signature to sign documents such as undertaking requests.
When you receive an undertaking request, rather than attaching a signed and scanned
acceptance letter, you can simply apply your digital signature to the request and return the
signed version. Your digital signature will certify your identity and credentials.
You will need current versions of the Adobe Flashplayer and Version X, or XI of Adobe
Acrobat.
The following sections describe signing in each version of Acrobat.
Digital Signature in Acrobat X
When a strata manager sends you an Undertaking Request, open it in Acrobat X and
review the document. If you agree with the terms of the undertaking, indicate your
agreement by signing the document with your Juricert digital signature. If the document
has a signature box for you to sign, click it and proceed to step 6. Otherwise, start at step 1.
1. Click Tools.
2. Click Sign & Certify.
3. Click Sign Document.
4. An Acrobat dialog window will appear, reminding you how to apply a digital
signature. Once you are comfortable with this process, you can check the box to tell
Acrobat not to show this message again. Click OK to proceed.
Appendices
57
5. Pick an empty part of the document (near the top if possible) and use your mouse to
drag open a rectangle for your digital signature. Click the top-left corner, hold the
button down, drag diagonally, and release the button at the bottom-right corner.
6. Make sure your Juricert digital id is selected in the Sign As box, then enter your
Juricert password in the Password box.
7. If you select the box to lock the document, nobody will be able to alter the content
of the document after you sign it.
8. When you are done, click Sign.
Appendices
58
9. Save the signed document to a folder where you can easily find it (in the example
below, we have a folder called SignedUndertakings). We recommend saving the
document with a name that indicates that it has been signed (in the example below,
we added "JL_Signed" to the filename). When you are ready, click Save.
Appendices
59
10. Acrobat will display your saved document with your digital signature. Now you
can return the signed Undertaking Request to the strata manager to indicate your
acceptance. See Provide an Undertaking on page 22.
Digital Signature in Acrobat XI
When a strata manager sends you an Undertaking Request, open it in Acrobat XI and
review the document. If you agree with the terms of the undertaking, indicate your
agreement by signing the document with your Juricert digital signature. If the document
has a signature box for you to sign, click it and proceed to step 6. Otherwise, start at step 1.
1. Click Sign.
2. Click Work with Certificates.
3. Click Sign with Certificate.
Appendices
60
4. An Acrobat dialog window will appear, reminding you how to apply a digital
signature. Click Drag New Signature Rectangle to proceed.
5. Pick an empty part of the document (near the top if possible) and use your mouse to
drag open a rectangle for your digital signature. Click the top-left corner, hold the
button down, drag diagonally, and release the button at the bottom-right corner.
6. Make sure your Juricert digital id is selected in the Sign As box, then enter your
Juricert password in the Password box.
7. If you select the box to lock the document, nobody will be able to alter the content
of the document after you sign it.
8. When you are done, click Sign.
Appendices
61
9. Save the signed document to a folder where you can easily find it (in the example
below, we have a folder called SignedUndertakings). We recommend saving the
document with a name that indicates that it has been signed (in the example below,
we added "JL_Signed" to the filename). When you are ready, click Save.
Appendices
62
10. Acrobat will display your saved document with your digital signature. Now you
can return the signed Undertaking Request to the strata manager to indicate your
acceptance. See Provide an Undertaking on page 22.
Appendices
63