1
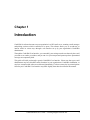
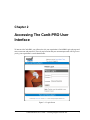
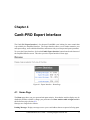
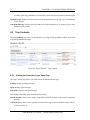
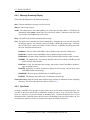
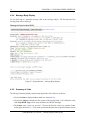
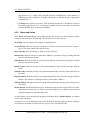
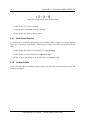
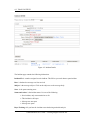
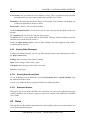
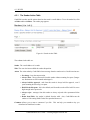
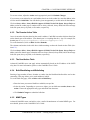
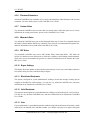
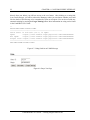
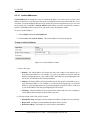
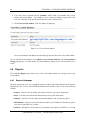
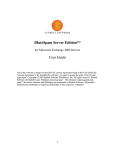
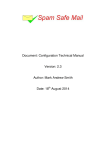
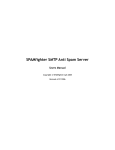
CanIt-PRO End-User’s Guide
Roaring Penguin Software Inc.
9 September 2005
2
CanIt-PROEnd-User’s Guide — Roaring Penguin Software Inc.
Contents
1
Introduction
5
2
Accessing The CanIt-PRO User Interface
7
3
CanIt-PRO Simplified Interface
9
4
CanIt-PRO Expert Interface
11
4.1
Home Page . . . . . . . . . . . . . . . . . . . . . . . . . . . . . . . . . . . . . . .
11
4.2
Trap Contents . . . . . . . . . . . . . . . . . . . . . . . . . . . . . . . . . . . . . .
12
4.2.1
Viewing the Contents of your Spam Trap . . . . . . . . . . . . . . . . . . .
12
4.2.2
Message Summary Display . . . . . . . . . . . . . . . . . . . . . . . . . . .
13
4.2.3
Sort Order . . . . . . . . . . . . . . . . . . . . . . . . . . . . . . . . . . . .
13
4.2.4
Message Body Display . . . . . . . . . . . . . . . . . . . . . . . . . . . . .
14
4.2.5
Summary of Links . . . . . . . . . . . . . . . . . . . . . . . . . . . . . . .
14
4.2.6
Status and Action . . . . . . . . . . . . . . . . . . . . . . . . . . . . . . . .
15
4.2.7
Quick Spam Disposal . . . . . . . . . . . . . . . . . . . . . . . . . . . . . .
16
4.2.8
Incident Details . . . . . . . . . . . . . . . . . . . . . . . . . . . . . . . . .
16
4.2.9
Viewing Other Messages . . . . . . . . . . . . . . . . . . . . . . . . . . . .
18
4.2.10 Viewing Specific Incidents . . . . . . . . . . . . . . . . . . . . . . . . . . .
18
4.2.11 Advanced Queries . . . . . . . . . . . . . . . . . . . . . . . . . . . . . . .
18
Rules . . . . . . . . . . . . . . . . . . . . . . . . . . . . . . . . . . . . . . . . . .
18
4.3.1
The Sender Action Table . . . . . . . . . . . . . . . . . . . . . . . . . . . .
19
4.3.2
The Domain Action Table . . . . . . . . . . . . . . . . . . . . . . . . . . .
20
4.3.3
The Host Action Table . . . . . . . . . . . . . . . . . . . . . . . . . . . . .
20
4.3.4
Bulk Blacklisting and Whitelisting . . . . . . . . . . . . . . . . . . . . . . .
20
4.3.5
MIME Types . . . . . . . . . . . . . . . . . . . . . . . . . . . . . . . . . .
20
4.3.6
Filename Extensions . . . . . . . . . . . . . . . . . . . . . . . . . . . . . .
21
4.3.7
Custom Rules . . . . . . . . . . . . . . . . . . . . . . . . . . . . . . . . . .
21
4.3
CanIt-PROEnd-User’s Guide — Roaring Penguin Software Inc.
3
4
CONTENTS
4.4
4.5
4.3.8
Mismatch Rules . . . . . . . . . . . . . . . . . . . . . . . . . . . . . . . .
21
4.3.9
SPF Rules . . . . . . . . . . . . . . . . . . . . . . . . . . . . . . . . . . . .
21
4.3.10 Bayes Settings . . . . . . . . . . . . . . . . . . . . . . . . . . . . . . . . .
21
4.3.11 Blacklisted Recipients . . . . . . . . . . . . . . . . . . . . . . . . . . . . .
21
4.3.12 Valid Recipients . . . . . . . . . . . . . . . . . . . . . . . . . . . . . . . .
21
4.3.13 Vote . . . . . . . . . . . . . . . . . . . . . . . . . . . . . . . . . . . . . . .
21
4.3.14 Locked Addresses . . . . . . . . . . . . . . . . . . . . . . . . . . . . . . .
23
Reports . . . . . . . . . . . . . . . . . . . . . . . . . . . . . . . . . . . . . . . . .
24
4.4.1
Reports Homepage . . . . . . . . . . . . . . . . . . . . . . . . . . . . . . .
24
Preferences . . . . . . . . . . . . . . . . . . . . . . . . . . . . . . . . . . . . . . .
25
CanIt-PROEnd-User’s Guide — Roaring Penguin Software Inc.
Chapter 1
Introduction
CanIt-PRO is software that runs on your organization’s or ISP’s mail server, scanning e-mail messages
and picking out those which it considers to be spam. The software allows you, as an end-user, to
interact with it in various ways through a web interface set up by your organization’s CanIt-PRO
administrator.
Through the CanIt-PRO User Interface, you can modify your settings to make sure that only the e-mail
you want to see reaches your inbox, and you can view your own personal spam trap where quarantined
messages are temporarily held.
This guide will walk you through a generic CanIt-PRO User Interface. Please note that your e-mail
administrator may have disabled certain functions in your organization’s CanIt-PRO installation, or
may have customized the software to add extra functionality. For these reasons, the layout and options
found in your CanIt-PRO User Interface may differ slightly from those described in this manual.
CanIt-PROEnd-User’s Guide — Roaring Penguin Software Inc.
5
6
CHAPTER 1. INTRODUCTION
CanIt-PROEnd-User’s Guide — Roaring Penguin Software Inc.
Chapter 2
Accessing The CanIt-PRO User
Interface
To interact with CanIt-PRO, you will need to visit your organization’s CanIt-PRO Login web page and
enter a username and password. The web page location and your username/password will be given to
you by your organization’s e-mail administrator.
Figure 2.1: Login Screen
CanIt-PROEnd-User’s Guide — Roaring Penguin Software Inc.
7
8
CHAPTER 2. ACCESSING THE CANIT-PRO USER INTERFACE
CanIt-PROEnd-User’s Guide — Roaring Penguin Software Inc.
Chapter 3
CanIt-PRO Simplified Interface
The first time you login to the CanIt-PRO User Interface, you will be taken to CanIt-PRO’s Simplified
Interface page. This interface lets you select your preferred level of spam-scanning intensity.
Under the heading Spam-Scanning Level, you should find a set of filtering options created by your
organization’s e-mail administrator. The choices available may look similar to the following screenshot:
Figure 3.1: Simplified Interface
Select your preferred option and click the Set Spam-Scanning Level button. Once you have made
your choice, your selection will be highlighted. The system will remember your choice and you will
not need to return to this screen unless you’d like to modify your selection.
After setting your spam-scanning level, the system will begin filtering e-mail sent to you according
to the details of your selection. No further interaction with CanIt-PRO is necessary unless you’d like
to access CanIt-PRO’s advanced features. These features are part of CanIt-PRO’s Expert Interface,
which permits you to allow or block particular senders, setup a personal spam quarantine, and further
customize your anti-spam settings. The Expert Interface is covered in Chapter 4 of this user guide.
CanIt-PROEnd-User’s Guide — Roaring Penguin Software Inc.
9
10
CHAPTER 3. CANIT-PRO SIMPLIFIED INTERFACE
CanIt-PROEnd-User’s Guide — Roaring Penguin Software Inc.
Chapter 4
CanIt-PRO Expert Interface
The CanIt-PRO Expert Interface is for advanced CanIt-PRO users looking for more control than
is provided by the Simplified Interface. The Expert Interface allows you to further customize your
anti-spam settings, create whitelists/blacklists, and interact with your own personal spam quarantine.
To access the Expert Interface, click on the Enable Expert Interface button located at the bottom of
the Simplified Interface screen. This takes you to the Expert Interface’s Home page.
Figure 4.1: Expert Interface – Home Page
4.1
Home Page
The Home page shows you your personal anti-spam statistics. Note that the statistics display may be
disabled by default; to enable it, change your preferences for Show statistics table on login screen in
the Preferences page (Section 4.5.)
Messages are categorized as follows:
Pending Messages Displays messages sent to your e-mail address that are suspected of being spam.
CanIt-PROEnd-User’s Guide — Roaring Penguin Software Inc.
11
12
CHAPTER 4. CANIT-PRO EXPERT INTERFACE
From this spam trap (quarantine) you can release valid e-mail and reject/delete spam messages.
Spam Messages Displays messages that have been determined to be spam (by you, or automatically
by the system).
Non-Spam Messages Displays messages that have been determined not to be spam (by you, or automatically by the system).
4.2
Trap Contents
The Trap Contents page shows you the contents of your Spam Trap (quarantine) and lets you release
or discard quarantined messages.
Figure 4.2: Expert Interface – Trap Contents
4.2.1
Viewing the Contents of your Spam Trap
The Trap Contents page allows you to take action on quarantined messages.
Pending Displays pending messages.
Spam Displays spam messages.
Non-Spam Displays non-spam messages.
All Displays all pending, spam and non-spam messages
Specific Incident Allows you to enter a CanIt-PRO incident ID to check on the status of a particular
message
Advanced Query Allows you to perform an advanced message search on attributes such as subject,
sender, recipient, etc.
CanIt-PROEnd-User’s Guide — Roaring Penguin Software Inc.
4.2. TRAP CONTENTS
4.2.2
13
Message Summary Display
The fields in the display have the following meanings:
Date The date and time the message was first received.
Subject The message subject.
Sender The sender, but be aware that spammers can easily fake the sender address. Technically, the
information in the Sender column is the Envelope Sender Address, which may not be the same
as the value in the From: header of the e-mail.
Relay The SMTP relay host that transmitted the message.
Score The spam score assigned by the spam-scanning rules. The higher the score, the more spam-like
the message appears. Any message scoring 5 or higher is held in the pending trap. A message
may be held even if it scores lower than 5. If this is the case, a Hold Reason will appear below
the score. Possible hold reasons are:
HoldRelay You have asked CanIt-PRO to always hold messages from the sending relay.
HoldSender You have asked CanIt-PRO to always hold messages from the sender.
HoldDomain You have asked CanIt-PRO to always hold messages from the sender’s domain.
HoldRBL The sending host is in a real-time blacklist, and you have asked CanIt-PRO to hold
mail from hosts in the blacklist.
HoldVirus A virus was detected in the message, and you have asked CanIt-PRO to hold messages containing viruses.
HoldEXE Potentially executable content was detected in the message, and you have asked
CanIt-PRO to hold such messages.
HoldMIME The message was held because of a MIME type rule.
HoldEXT The message was held because of a filename extension rule.
Status and Action shows the current status of the message, and lets you determine the fate of pending
messages. This will be described more fully in Section 4.2.6.
4.2.3
Sort Order
Normally, CanIt-PRO sorts messages in order of date received, with most recent messages first. You
can click on the arrow near the Score column (for example) to sort by score. Click on the little uparrow in a column to sort by that column in ascending order. Click on the down-arrow to sort in
descending order. CanIt-PRO colors the little arrow corresponding to the current sort order red. You
can change the default sort order on your preferences page, described in Section 4.5.
CanIt-PROEnd-User’s Guide — Roaring Penguin Software Inc.
14
CHAPTER 4. CANIT-PRO EXPERT INTERFACE
4.2.4
Message Body Display
To view the body of a particular message, click on the message subject. The first portion of the
message body will be displayed.
Figure 4.3: Expert Interface – Message Body Display
4.2.5
Summary of Links
The Message Summary Display contains many hyperlinks. These links are as follows:
• Click on the Date to display incident details (see Section 4.2.8).
• Click on the Subject to display the first portion of the message body. If it is difficult to read,
click Strip HTML Tags to more easily read the text of HTML messages.
• The Sender entry is split over two lines. Click on the first line (user@) to open the Sender
Action page (Section 4.3.1). Click on the second line (domain.com) to open the Domain Action
CanIt-PROEnd-User’s Guide — Roaring Penguin Software Inc.
4.2. TRAP CONTENTS
15
page (Section 4.3.2). Finally, click on the W to perform a WHOIS query on the domain. (A
WHOIS query takes a domain or IP address and attempts to find the person or organization
responsible for it.)
• The Relay entry is split over two lines. Click on the first line (the relay’s IP address) to open the
Host Action page (Section 4.3.3). Click on the second line (the relay’s host name, if resolvable)
to open a WHOIS query on the relay’s IP address.
4.2.6
Status and Action
In the Status and Action display, any pending message has an entry box that determines possible
actions for each message in the spam trap. The possible values for the action are:
Do Nothing Leave the status of the message as pending for now.
Accept Message Mark the message as not-spam so it will be accepted. You should receive the message in your inbox within a short period of time.
Reject Message Mark the message as spam so it will be rejected.
Blacklist host Mark the message as spam and in addition, reject future messages coming from that
host (use with extreme caution)
Whitelist host Mark the message as not-spam and in addition, accept any future messages from that
host (use with extreme caution)
Blacklist sender Mark the message as spam and automatically reject any future messages from the
sender.
Whitelist sender Mark the message as not-spam and automatically accept any future messages from
the sender.
Blacklist domain Mark the message as spam and automatically reject any future messages from the
domain. (The domain is everything after the @ in the sender’s address.)
Whitelist domain Mark the message as not-spam and automatically accept any future messages from
the domain.
Silently discard Silently discard the message. Neither the sender nor the recipient will receive notification that the message was lost. Do not use this option lightly; it is considered a serious breach
of Internet etiquette to silently discard e-mail.
To make changes, set the action boxes appropriately and then click on Submit Changes. A summary
of the actions will appear.
Note that if you or your administrator has set the Method for choosing spam-trap actions preference
to Checkbox, then instead of a drop-down list, you get a series of buttons like this:
CanIt-PROEnd-User’s Guide — Roaring Penguin Software Inc.
16
CHAPTER 4. CANIT-PRO EXPERT INTERFACE
Figure 4.4: Checkboxes for Message Disposition
• Select the red “X” to reject a message.
• Select the green check mark to accept a message.
• Select the question-mark to take no action.
4.2.7
Quick Spam Disposal
If your browser is JavaScript-enabled, then a line of buttons similar to Figure 4.2.6 appears after the
word “All”: near the top of the display. This lets you set all the action boxes on the page with one
click:
• Select the question-mark to set all action boxes to Do Nothing.
• Select the red X to set all action boxes to Reject message.
• Select the green check mark to set all action boxes to Accept message.
4.2.8
Incident Details
To view the details about a pending-message incident, click on the date of the particular message. The
incident page appears.
CanIt-PROEnd-User’s Guide — Roaring Penguin Software Inc.
4.2. TRAP CONTENTS
17
Figure 4.5: Incident Details
The Incident page contains the following information:
Incident ID is a number assigned to each incident. This ID lets you track down a spam incident.
Date is the date the message was first received.
Subject is the message subject. Click on the subject to see the message body.
Score is the spam-scanning score.
Status and Action is the incident status. It is one of the following:
• New incident; only one transmission so far.
• This incident is still open.
• Message was not spam.
• Message was spam.
Bayes Training tells you how the incident was trained using statistical analysis.
CanIt-PROEnd-User’s Guide — Roaring Penguin Software Inc.
18
CHAPTER 4. CANIT-PRO EXPERT INTERFACE
Freeze Status tells you whether or not the incident is frozen. This is an advanced feature and more
information on freeze status can be found in the CanIt-PRO User’s Guide.
Resolution is the action that was taken to dispose of the incident. If the incident is still pending, you
will have an opportunity to dispose of it here.
Resolved By is the user who resolved the incident.
The host information table is a table with a row for each relay host that attempted to deliver the
message.
The recipients table lists all of the recipients of the message.
The history table is a log of actions taken for this incident. This logs when the incident was opened,
and when it was closed (and who closed it.)
Finally, the spam analysis report is a list of spam-scanning rules which triggered, along with the
weight assigned to each rule.
4.2.9
Viewing Other Messages
In addition to pending messages, you can view other messages in the trap by following these links in
the Trap Contents menu:
Pending shows messages whose status is pending.
Spam shows messages whose status is spam.
Non-Spam shows messages whose status is not-spam.
All shows all messages.
4.2.10
Viewing Specific Incidents
To view an incident given its incident ID, click on Trap Contents and then Specific Incident. Type
the incident ID and press Enter.
You can view another incident by typing its ID in the box and pressing Enter.
4.2.11
Advanced Queries
This page is only for advanced CanIt-PRO users, and allows you to do a more sophisticated message
search by attributes such as subject, recipient, or spam score. Details can be found in the CanIt-PRO
User’s Guide.
4.3
Rules
This page lets you allow/disallow particular senders from sending e-mail to your account, and lets you
create custom spam filtering rules.
CanIt-PROEnd-User’s Guide — Roaring Penguin Software Inc.
4.3. RULES
4.3.1
19
The Sender Action Table
CanIt-PRO can take specific actions based on the sender’s e-mail address. To see the sender list, click
on Rules and then Senders. The sender page appears:
Figure 4.6: Sender Action Table
The columns in the table are:
Sender The e-mail address of a sender
Who The user who last modified the senders disposition.
Action The action taken by CanIt-PRO when a message from the sender arrives. Possible actions are:
• No change - keep the current action.
• Always allow - always allow mail from this sender without scanning for spam. (Dangerous attachments are still scanned and stripped.)
• Always hold for approval - mail from this sender is always held for approval, even if
spam-scanning does not flag it as spam.
• Hold if looks like spam - this is the default; mail from this sender will be held if it scores
high enough on the spam scale.
• Always reject - messages from this sender are always rejected with a permanent failure
code.
• Delete from Table - the sender is deleted from the table. Also, CanIt-PRO treats the
sender as if the setting Hold if looks like spam had been used.
Comment Allows you to enter a comment if you like. This can help you remember why you
whitelisted or blacklisted a sender.
CanIt-PROEnd-User’s Guide — Roaring Penguin Software Inc.
20
CHAPTER 4. CANIT-PRO EXPERT INTERFACE
To set new actions, adjust the Action entries appropriately and click Submit Changes.
If you want to set an action for an e-mail address that is not in the sender list, enter the address in the
text box and click Add Rule. You will then be given an opportunity to set the action for that address.
Click on Always Allow, Always Hold for Approval, Hold if Looks Like Spam, Always Reject or
All to restrict the sender page to senders who are always allowed, always held, held if the message
looks like spam, always rejected, or all senders, respectively.
4.3.2
The Domain Action Table
Just as it can make decisions based on the sender’s address, CanIt-PRO can make decisions based just
on the domain part of the address. (The domain part is everything after the @ sign. For example, the
domain part of [email protected] is roaringpenguin.com.)
To see the domain list, click on Rules and then Domains.
The columns and actions in the table have similar meanings to those the Sender Action Table (Section 4.3.1).
Click on Always Allow, Always Hold for Approval, Hold if Looks Like Spam, Always Reject or
All to restrict the domain page to domains who are always allowed, always held, held if the message
looks like spam, always rejected, or all domains, respectively.
4.3.3
The Host Action Table
Advanced CanIt-PRO users can apply actions automatically based on the IP address of the SMTP
relay host. For more information, please see the CanIt-PRO User’s Guide.
4.3.4
Bulk Blacklisting and Whitelisting
Entering a large number of hosts, domains or senders into the blacklist/whitelist tables can be time
consuming. This page allows you to ender addresses in bulk.
To see the bulk entry page, click on Rules and then Bulk Entry:
• Enter the items you want to blacklist or whitelist, one per line.
• Select the action. Depending on your access rights, you can bulk-enter senders, hosts or domains. Choose the appropriate entry type and action from the menu.
• Click Submit Changes to submit the bulk data.
4.3.5
MIME Types
Advanced CanIt-PRO users can hold or reject e-mail with attachments of certain MIME types. For
more details, please see the CanIt-PRO User’s Guide.
CanIt-PROEnd-User’s Guide — Roaring Penguin Software Inc.
4.3. RULES
4.3.6
21
Filename Extensions
Advanced CanIt-PRO users can hold or reject e-mail with attachments whose filenames end in certain
extensions. For more details, please see the CanIt-PRO User’s Guide.
4.3.7
Custom Rules
Very advanced CanIt-PRO users can create their own custom rules to affect the spam score. For more
information on creating custom rules, please see the CanIt-PRO User’s Guide.
4.3.8
Mismatch Rules
Very advanced CanIt-PRO users can use the Mismatch Rules page to check for a mismatch between
the sender’s domain and the SMTP relay’s domain. These rules are not recommended for general use,
and more information can be found in the CanIt-PRO User’s Guide.
4.3.9
SPF Rules
Very advanced CanIt-PRO users can use SPF (Sender Policy Framework) Rules. SPF allows the
owners of a domain to assert which hosts are allowed to originate e-mail claiming from that domain.
These rules are not recommended for general use, and more information can be found in the CanItPRO User’s Guide.
4.3.10
Bayes Settings
This display shows the number of spam and non-spam messages sent to your e-mail address that have
been used to train your filter’s statistical analysis engine.
4.3.11
Blacklisted Recipients
This option is designed for system administrators wishing to check that messages coming into the
company are destined for valid recipients. It is only for very advanced CanIt-PRO users, and more
information can be found in the CanIt-PRO User’s Guide.
4.3.12
Valid Recipients
This option is also designed for system administrators wishing to accept mail only for a set list of users.
It is only for very advanced CanIt-PRO users, and more information can be found in the CanIt-PRO
User’s Guide.
4.3.13
Vote
If your organization’s system administrator has enabled voting links at the bottom of incoming e-mails
(allowing you to manually tell CanIt-PRO whether you consider a message to be spam or non-spam
CanIt-PROEnd-User’s Guide — Roaring Penguin Software Inc.
22
CHAPTER 4. CANIT-PRO EXPERT INTERFACE
directly from your inbox) you will have access to the vote feature. After clicking on a voting link
in an e-mail message, you will be taken to the Vote page where you can choose whether you would
like the details of that message to be remembered as spam or non-spam. You can also override any
automatic training by pressing the Forget Training button. More information on voting can be found
in the CanIt-PRO User’s Guide.
-BEGIN-ANTISPAM-VOTING-LINKS
-----------------------------------------------------Teach CanIt if this mail (ID 7) is spam:
Spam:
https://canit.domain.org/b.php?c=s&i=7&m=76b43ba8900c
Not spam:
https://canit.domain.org/b.php?c=n&i=7&m=76b43ba8900c
Forget vote: https://canit.domain.org/b.php?c=f&i=7&m=76b43ba8900c
-----------------------------------------------------END-ANTISPAM-VOTING-LINKS
Figure 4.7: Voting Links in an E-Mail Message
Figure 4.8: Bayes Vote Page
CanIt-PROEnd-User’s Guide — Roaring Penguin Software Inc.
4.3. RULES
4.3.14
23
Locked Addresses
Locked Addresses are designed to solve the following problem: You want to give out your e-mail
address to someone, but you don’t trust that person or organization not to turn around and give or sell
it to others. You want an address that can only be used by the person or organization you give it to, and
not by anyone else. CanIt-PRO’s Locked Address feature allows you to do exactly that by creating a
specific e-mail address that can be given to, and used by, only one particular sender.
To create a Locked Address:
1. Click on Rules and then Locked Addresses.
2. Click Create a New Locked Address. The Locked Address Creation page appears:
Figure 4.9: Locked Address Creation
3. Select a lock type:
• Domain - the locked address will accept mail only from senders at the domain you’ve
given the locked address to. For example, if you give your address to someone from the
domain roaringpenguin.com, only senders with e-mail addresses @roaringpenguin.com
will be able to send mail to this new locked address.
• Address - the locked address will accept mail from only the specific e-mail address you’ve
given the locked address to. For example, if you choose this setting and give your locked
address to [email protected], [email protected] will be able to send mail
to your locked address, but [email protected] will not.
• Unlocked - the locked address will accept mail from anyone and will act as a temporary
e-mail address that can simply be deactivated at any time.
4. Select the action to take if the lock is violated:
• Hold mail in trap - messages from non-authorized senders will appear in your spam trap.
• Reject mail - messages from non-authorized senders will be rejected.
• Deactivate address - discontinue use of that locked e-mail address
CanIt-PROEnd-User’s Guide — Roaring Penguin Software Inc.
24
CHAPTER 4. CANIT-PRO EXPERT INTERFACE
5. If you like, enter a comment into the Comment: field to help you remember why you are
creating the locked address. For example, if you’re creating an address to paste into a Web
form, you could put a little note about the Web site in the Comment: field.
6. Click Create Locked Address. Your new address is displayed:
Figure 4.10: A New Locked Address
You can cut-and-paste the address from the Web page into the Web form or any other window.
To view and edit a locked address, click on Rules and then Locked Addresses. The Locked Address
Listing page appears. For more details on Locked Addresses, please refer to the CanIt-PRO User’s
Guide.
4.4
Reports
The CanIt-PRO Reports page allows you to view e-mail traffic statistics for messages sent to your
e-mail address.
4.4.1
Reports Homepage
The main report page gives you a graphical summary of daily and hourly inbound e-mail statistics
organization-wide. To view your individual inbound e-mail statistics, click on one of the following
sections:
• Senders - Lists the worst 50 senders (the senders who have sent you the most spam)
• Hosts - Lists the worst 50 hosts (the hosts that have sent you the most spam)
• Domains - Lists the worst 50 senders (the domains that have sent you the most spam)
• Hit-And-Run - Lists the worst 50 hit-and-run senders (for a definition of hit-and-run, please
refer to the CanIt-PRO User’s Guide.)
• Statistics - Will display a wide range of your inbound e-mail statistics in HTML or .csv format
CanIt-PROEnd-User’s Guide — Roaring Penguin Software Inc.
4.5. PREFERENCES
4.5
25
Preferences
Very advanced CanIt-PRO users can make further changes to their spam filtering settings in the Preferences section. This page allows you to set quarantine display preferences, change your password,
import or export rules, opt in our opt out of spam filtering, set spam thresholds and edit pending
message notification details. Further details can be found in the CanIt-PRO User’s Guide.
CanIt-PROEnd-User’s Guide — Roaring Penguin Software Inc.