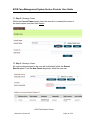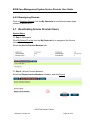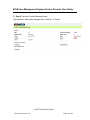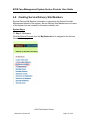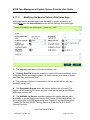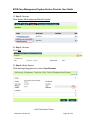
1
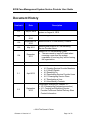
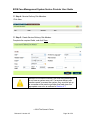
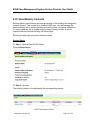
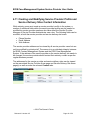
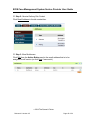
EOIS Case Management System Service Provider User Guide Chapter 4: Service Provider User Access and Profile Maintenance Version: 2.5 July 2014 EOIS Case Management System Service Provider User Guide Document History Version # Date Description 1.0 July 23, 2010 Initial version released prior to the launch of the system on August 4, 2010. 1.01 August 26, 2010 1.02 September 28, 2010 1.03 May 2011 Added system steps to 4.5 De-Activating Service Provider Users. 1.04 December 2011 Added to 4.6.2 De-activating a User: • The user needs to input a To date when removing a user from the system, regardless of how long they will be leaving the organization. 2.0 January 2012 2.1 2.2 April 2012 September 2012 Minor change to screenshots. Added section 4.8 View Ministry Contacts. Review and edits for Release 3.0. Updates to: • 4.2 Creating Service Provider Members • 4.4.1 Modify Details • 4.5 Resetting Pin • 4.6 Deactivating Service Provider Users • 4.6.1 Reassigning Service Plans • 4.7 Reactivating a User • 4.9 View Ministry Contacts Incorporates changes for Release 3.1: • 4.6.2 Reassigning Reviews(new section) • 4.11 Creating and Modifying Service Provider Profile and Service Delivery Sites Contact Information 2014 The Queen’s Printer Release 4.0 Version 2.5 Page 2 of 52 EOIS Case Management System Service Provider User Guide Incorporates changes for Release 3.2. 2.3 April 2013 New sections: • 4.12 Assigning a user as an Ontario SelfEmployment Benefit Case Reviewer • 4.11.1 Assigning a Self Service Email Address Updates to: • 4.6 Deactivating Service Provider Users • 4.11.2 Modifying the Service Delivery Site Home Page • 4.13 Field Values Table 2.4 August 2013 2.5 July 2014 Updates to: • 4.6 Deactivating Service Provider Users • 4.6.1 Reassigning Service Plans Updates to reflect new Release 4.0 user interface 2014 The Queen’s Printer Release 4.0 Version 2.5 Page 3 of 52 EOIS Case Management System Service Provider User Guide TABLE OF CONTENTS DOCUMENT HISTORY ........................................................................................ 2 4 SERVICE PROVIDER USER ACCESS AND PROFILE CONTACT INFORMATION MAINTENANCE ......................................................................... 5 4.1 Roles and Responsibilities 6 4.2 Creating Service Provider Members 8 4.3 Update Identity Verification 15 4.4 Modify Service Provider Members 17 4.4.1 Modify Details 20 4.4.2 Modify Phone Number 21 4.4.3 Modify User Role 23 4.5 Resetting User PIN 24 4.6 Deactivating Service Provider Users 27 4.6.1 Reassigning Service Plans 31 4.6.2 Reassigning Reviews 34 4.7 Reactivating Service Provider Users 34 4.8 Creating Service Delivery Site Members 37 4.9 Modifying Service Delivery Site Members 40 4.9.1 Modify Details 40 4.9.2 Modify Main Contact 41 4.10 View Ministry Contacts 42 4.11 Creating and Modifying Service Provider Profile and Service Delivery Sites Contact Information 43 4.11.1 Assigning a Self Service Email Address 44 4.11. 2 Modifying the Service Delivery Site Home Page 47 4.12 Assigning a user as an Ontario Self-Employment Benefit Case Reviewer 48 4.13 Field Values Table 51 2014 The Queen’s Printer Release 4.0 Version 2.5 Page 4 of 52 EOIS Case Management System Service Provider User Guide 4 Service Provider User Access and Profile Contact Information Maintenance The Case Management System (the system) is a component of the Employment Ontario Information System (EOIS) that supports the ministry and service providers in administering and delivering Employment Ontario programs and services. Both ministry and service provider staff are given access to the system to perform their identified roles. The set-up of service provider users is initiated by the ministry through the establishment of individual service provider profiles. These profiles include information on the service provider at the corporate level and the service delivery site level. The service provider profile includes information on the organization’s legal name, business number, contact staff (called members) and service delivery site details. These profiles are used across the EOIS for the purpose of contract management, case management and reporting. The management of the service provider profile is a shared responsibility between the ministry and the service provider. The ministry creates and maintains the core service provider and service delivery site data. The ministry must assign the system user role of Service Provider Manager to select service provider members. This system user role comes with the responsibility of the Service Provider Registration Authority (SPRA) business role. The member with the Service Provider Manager user role is the only person who can add, maintain and deactivate service provider members as system users, report users and contacts within their own service provider organization and associated service delivery sites. Only the ministry can add, maintain or deactivate the Service Provider Manager system user role. Each service provider is assigned a maximum number of users in the system. The system will not allow the Service Provider Manager to add users beyond this assigned number and will display an error message if this is attempted. If a change in the maximum number of users is required, the Service Provider Manager will have to contact his or her ministry representative. 2014 The Queen’s Printer Release 4.0 Version 2.5 Page 5 of 52 EOIS Case Management System Service Provider User Guide 4.1 Roles and Responsibilities There are four types of Service Provider Members in the system: Service Provider Member - System User – a service provider member who is given a system. There are three system user roles that can be assigned to service provider members: 1. Service Provider Manager (Ministry assigned only) o create, maintain and de-activate user accounts o maintain contact information in the service provider profile o create, view, update and close client profiles o create, view, update and close service plans o Create, view and update resource and information data. 2. Service Provider Case Worker o create, view, update and close client profiles o create, view, update and close service plans. 3. Service Provider Administrator o create, view, update and close client profiles o create, view, update and close service plans o create, view and update resource and information data o maintain contact information in the service provider profile. Service Provider Member - Non-System User – a key individual contact at a corporate service provider level such as an executive director or manager who does not require access to the system. These members are not counted in the maximum number of system users for each service provider. Service Delivery Site Member – a key individual contact at the service delivery site level who does not require access to the system. If service delivery site staff requires access to the system, he or she must become a service provider member to be assigned a system role. Service Provider Member – Reporting Role – a key individual contact at the corporate service provider level who does or does not require access to the system but requires access to the reporting tool for operational and performance reports. 2014 The Queen’s Printer Release 4.0 Version 2.5 Page 6 of 52 EOIS Case Management System Service Provider User Guide The system’s use of the term “member” is synonymous with the business term “contact.” A member who is referred to as a system user has system access responsibility; not all members are system users. The following table lists the actions that each system user role can perform in the Service Provider Management module of the system: Search/View Service Provider/Service Delivery Site Modify Specific Service Provider Profile Information Register/Modify Service Provider Members/Users Register/Modify Service Delivery Site Members Ministry Regional Administrator Service Provider Manager (SPRA) Service Provider Caseworker Service Provider Administrator 2014 The Queen’s Printer Release 4.0 Version 2.5 Page 7 of 52 EOIS Case Management System Service Provider User Guide 4.2 Creating Service Provider Members The service provider member who has been given the business role of the Service Provider Registration Authority (SPRA) is assigned the Service Provider Manager system user role by the ministry. This gives this member the authority to create, modify and deactivate members for their specific organization with both system, non-system and reporting user roles. The Service Provider Manager system user role can only assign members with the system roles of Service Provider Caseworker and Service Provider Administrator and with the reporting roles of SP Manager and SP Staff. Required Prerequisite Steps Before a service provider member can be set up as a system user, the member must complete the Service Provider Staff CaMS Registration form. The SPRA must validate the member’s identity and approve the Service Provider Staff CaMS Registration form. The service provider must not have exceeded the “License Allocation” that has been negotiated with their ministry representative. This number can be viewed on the Service Provider Home page in the Details information panel and compared to the system users displayed on the Service Provider Members page. Providers can have additional user accounts beyond their initial license allocation figure, if required. However, the provider needs to be aware that all users cannot be on the system at the same time. The maximum amount of users logged on to EOIS-CaMS at any one time is equal to their license allocation. 2014 The Queen’s Printer Release 4.0 Version 2.5 Page 8 of 52 EOIS Case Management System Service Provider User Guide System Steps Step 1: Workspace Click My Service Provider in the My Shortcuts list to navigate to the Service Provider Home page. Step 2: Service Provider Home Click the Service Provider Members tab. 2014 The Queen’s Printer Release 4.0 Version 2.5 Page 9 of 52 EOIS Case Management System Service Provider User Guide Step 3: Service Provider Members Click New. Step 4a: Create Service Provider Member-System user with or without a reporting role Complete the required fields. 2014 The Queen’s Printer Release 4.0 Version 2.5 Page 10 of 52 EOIS Case Management System Service Provider User Guide A unique email address must be entered for members assigned a User Role. If a member is assigned a user role, there must be a unique email address entered for that member. This is critical as the system will generate two emails to that member to complete the registration process. The first email contains the ONe-key enrollment number and the second email contains the PIN and link to the ONe-key login page. The system will validate the uniqueness and format of the email address. The system will not allow the screen to be saved if this validation fails and will provide an error message. If this member is the main contact for the service provider, select the Main Contact checkbox. The position field may also be completed, but it is optional. To access the system, the service provider member requires a user role. Select the appropriate CaMS Role: Service Provider Caseworker or Service Provider Administrator. To access reports, the service provider member also requires a reporting role. Select the appropriate Reporting Role: SP Manager or SP Caseworker. If a reporting role is not required, the field can be left blank. Once completed, click Save. 2014 The Queen’s Printer Release 4.0 Version 2.5 Page 11 of 52 EOIS Case Management System Service Provider User Guide Step 4b: Create Service Provider Member- Non-System user with or without a Reporting Role Complete the required fields. If this member is the main contact for the service provider, select the Main Contact checkbox. The position field may also be completed, but it is optional. Since the service provider member does not require a system role, do not select any CaMS Role and leave the field blank. If this member requires a reporting role, select either the Reporting Role of SP Manager or SP Caseworker. If a reporting role is not required, leave this field blank as well. Once completed, click Save. 2014 The Queen’s Printer Release 4.0 Version 2.5 Page 12 of 52 EOIS Case Management System Service Provider User Guide Step 5a: Service Provider Member - System user Click the appropriate Name for the service provider member on the Service Provider Member page to ensure that all information is correct. 2014 The Queen’s Printer Release 4.0 Version 2.5 Page 13 of 52 EOIS Case Management System Service Provider User Guide Step 5b: Service Provider Member - Non-System user Click the appropriate Name for the service provider member on the Service Provider Member page to ensure that all information is correct. 2014 The Queen’s Printer Release 4.0 Version 2.5 Page 14 of 52 EOIS Case Management System Service Provider User Guide 4.3 Update Identity Verification In order to verify the identity of SPRAs (aka Service Provider Managers), the system must capture a question and answer field on the Service Provider Member page. Service Provider Manager Users are able to update their own Challenge Question/Answer. System Steps Step 1: Service Provider Home Click the Service Provider Members tab. Step 2: Service Provider Members Click the Service Provider Manager user’s own name. 2014 The Queen’s Printer Release 4.0 Version 2.5 Page 15 of 52 EOIS Case Management System Service Provider User Guide Step 3: Service Provider Member Home Click Change next to Challenge Question/Answer The Challenge Question/Answer is mandatory for all Service Provider Managers. This extra security step will aid ministry staff when a Service Provider Manager requests a PIN reset. Step 4: Modify Service Provider Member Challenge Question Enter Challenge Question/Answer, and click Save. 2014 The Queen’s Printer Release 4.0 Version 2.5 Page 16 of 52 EOIS Case Management System Service Provider User Guide 4.4 Modify Service Provider Members The service provider member with the Service Provider Manager user role can modify other service provider member details and user roles (Service Provider Caseworker and Service Provider Administrator); however, if the Service Provider Manager user role has to be modified, the service provider member must contact the ministry. All user roles have the ability change their own Preferred Language and Challenge Question/Answer. To display the new selected language, the user must first log out, and then log back into the system. For the Service Provider Caseworker role, users must use the Find Service Provider action from the Shortcuts Panel and select their name from the Service Provider Members tab. 1. 2. 2014 The Queen’s Printer Release 4.0 Version 2.5 Page 17 of 52 EOIS Case Management System Service Provider User Guide 3. System Steps Step 1: Workspace Click My Service Provider from the My Shortcuts list to navigate to the Service Provider Home page. 2014 The Queen’s Printer Release 4.0 Version 2.5 Page 18 of 52 EOIS Case Management System Service Provider User Guide Step 2: Service Provider Home Select the Service Provider Members tab. Step 3: Service Provider Members Click Edit from the Action Button next to the member that needs to be modified to navigate to that member’s home page. 2014 The Queen’s Printer Release 4.0 Version 2.5 Page 19 of 52 EOIS Case Management System Service Provider User Guide 4.4.1 Modify Details Edit the fields in the Details information panel as required. The email address has to be unique to that member. 2014 The Queen’s Printer Release 4.0 Version 2.5 Page 20 of 52 EOIS Case Management System Service Provider User Guide 4.4.2 Modify Phone Number System Steps Step 1: Service Provider Members Navigate to the Service Provider Member home page by clicking their Name. Step 2: Phone Numbers To modify the phone number, click the Contact tab, and select Edit from the Action Button next to the phone number. 2014 The Queen’s Printer Release 4.0 Version 2.5 Page 21 of 52 EOIS Case Management System Service Provider User Guide Step 3: Modify Phone Number Modify the phone number, and click Save. 2014 The Queen’s Printer Release 4.0 Version 2.5 Page 22 of 52 EOIS Case Management System Service Provider User Guide 4.4.3 Modify User Role A Service Provider Manager can modify the user role of existing service provider members. Under the Service Provider User information panel, select the appropriate new CaMS Role: Service Provider Caseworker, Service Provider Administrator or leave the field blank for a non-system user. Click Save. When the system role of a service provider member is changed, the member will be notified with an email confirmation. There is no email confirmation to the service provider member if the reporting role is changed. If a member with a system role is changed to a non-system role, the system will disable the user ID in both the system and ONe-key. This means the user will no longer be able to access the system from the ONe-key home page. If a member with a non-system role is changed to a system role and/or to a reporting role, the system will commence the registration process to access the system which involves the two emails for ONe-key enrollment and PIN generation. 2014 The Queen’s Printer Release 4.0 Version 2.5 Page 23 of 52 EOIS Case Management System Service Provider User Guide 4.5 Resetting User PIN The system can only be accessed by a service provider user with a user PIN. If a service provider user forgets his or her PIN, it has to be reset by the member with the Service Provider Manager user role. If a Service Provider Manager forgets his or her PIN, the ministry has to be contacted to have the PIN reset. System Steps Step 1: Workspace Click My Service Provider from the My Shortcuts list to navigate to the Service Provider Home page. Select the Service Provider Members tab. Step 2: Service Provider Members Click the Name of the member that needs to be modified to navigate to that member’s home page. 2014 The Queen’s Printer Release 4.0 Version 2.5 Page 24 of 52 EOIS Case Management System Service Provider User Guide Step 3: Service Provider Member From the Action Button, click Reset PIN. Step 4: Reset Member PIN Complete the Reason, and click Reset. 2014 The Queen’s Printer Release 4.0 Version 2.5 Page 25 of 52 EOIS Case Management System Service Provider User Guide Step 5: Service Provider Home The system will display a “PIN has been reset successfully” message. The system will immediately send out an email to the user with their user ID. Forty eight hours after this email is sent, a second email will be sent to the user with their new PIN. 2014 The Queen’s Printer Release 4.0 Version 2.5 Page 26 of 52 EOIS Case Management System Service Provider User Guide 4.6 Deactivating Service Provider Users When a service provider member no longer requires access to the system, their user account must be deactivated. The proper maintenance of users in the system will support access requirements and help regulate the assigned maximum number of users for each service provider. A user cannot be deactivated if there are any active service plans, tasks or reviews associated with that user. These items have to be reassigned to other members of the service provider before proceeding with the de-activation. See Section 4.6.1 and Section 4.6.2 for instructions. If the user is assigned as an Ontario Self-Employment Benefit Case Reviewer, this role should be reassigned to another user. See Section 4.12 for instructions. System Steps Step 1: Workspace Click My Service Provider from the My Shortcuts list to navigate to the Service Provider Home page. Select the Service Provider Members tab. 2014 The Queen’s Printer Release 4.0 Version 2.5 Page 27 of 52 EOIS Case Management System Service Provider User Guide Step 2: Service Provider Members Click the Name next to the member that needs to be modified to navigate to that member’s home page. Step 3: Service Provider Member From the Action Button, click Edit. 2014 The Queen’s Printer Release 4.0 Version 2.5 Page 28 of 52 EOIS Case Management System Service Provider User Guide Step 4: Modify Service Provider Member Remove both the CaMS Role and Reporting Role from the user’s profile, and click Save. Step 5: Service Provider Member Home From the Action Button, click Deactivate. 2014 The Queen’s Printer Release 4.0 Version 2.5 Page 29 of 52 EOIS Case Management System Service Provider User Guide Step 6: Task Redirection Details If a user has any tasks, they will need to be reassigned to another user. Click on the drop-down menu to display a list of active users belonging to the same service provider. Step 7: Deactivate Service Provider Member. Click Save. A warning message will appear if there are service plans, tasks or reviews assigned to the user. These service plans, tasks and reviews must be closed or reassigned before the user can be deactivated. See Section 4.6.1 and Section 4.6.2 for instructions. Note that notifications are automatically deleted after 30 days, and there is no need to delete them prior to deactivating a user. 2014 The Queen’s Printer Release 4.0 Version 2.5 Page 30 of 52 EOIS Case Management System Service Provider User Guide Step 8: Service Provider Member Home The member’s status will change to “Inactive.” 4.6.1 Reassigning Service Plans Step 1: Workspace Click on Reassign Cases from the My Shortcuts list. 2014 The Queen’s Printer Release 4.0 Version 2.5 Page 31 of 52 EOIS Case Management System Service Provider User Guide Step 2: Reassign Cases Within the Current Owner panel, select the user who is currently the owner of the service plans, and then click Search. Step 3: Reassign Cases All service plans assigned to the user will be displayed within the Search Results panel. From the New Owner dropdown, select the new user. 2014 The Queen’s Printer Release 4.0 Version 2.5 Page 32 of 52 EOIS Case Management System Service Provider User Guide Step 4: Reassign Cases From the Search Results panel, click the check boxes beside the service plans to be reassigned or click the top checkbox to select all. Click Transfer. Step 5: Reassign Cases The system will display a confirmation message when the selected cases have been successfully reassigned. 2014 The Queen’s Printer Release 4.0 Version 2.5 Page 33 of 52 EOIS Case Management System Service Provider User Guide 4.6.2 Reassigning Reviews Click on Reassign Reviews from the My Shortcuts list and follow the same steps outlined in Section 4.6.1. 4.7 Reactivating Service Provider Users System Steps Step 1: Workspace Click My Service Provider from the My Shortcuts list to navigate to the Service Provider Home page. Select the Service Provider Members tab. Step 2: Service Provider Members Select the Display Inactive Members checkbox, and click Search. 2014 The Queen’s Printer Release 4.0 Version 2.5 Page 34 of 52 EOIS Case Management System Service Provider User Guide Step 3: Service Provider Members Click the Name next to the member that needs to be modified to navigate to that member’s home page. Step 4: Service Provider Member Home From the Action Button, click Reactivate. Step 5: Reactivate Service Provider Member Click Save. 2014 The Queen’s Printer Release 4.0 Version 2.5 Page 35 of 52 EOIS Case Management System Service Provider User Guide Step 6: Service Provider Member Home The member’s status has changed from “Inactive” to “Active.” 2014 The Queen’s Printer Release 4.0 Version 2.5 Page 36 of 52 EOIS Case Management System Service Provider User Guide 4.8 Creating Service Delivery Site Members Service Delivery Site Member information is captured in the Service Provider Management module of the system. Service Delivery Site Members are not users of the system, but are contacts for the service delivery site. System Steps Step 1: Workspace Click My Service Provider from the My Shortcuts list to navigate to the Service Provider Home page. 2014 The Queen’s Printer Release 4.0 Version 2.5 Page 37 of 52 EOIS Case Management System Service Provider User Guide Step 2: Service Provider Home Click the Reference Number next to the appropriate Service Delivery Site. Step 3: Service Delivery Site Home Select the Service Delivery Site Members tab. 2014 The Queen’s Printer Release 4.0 Version 2.5 Page 38 of 52 EOIS Case Management System Service Provider User Guide Step 4: Service Delivery Site Members Click New. Step 5: Create Service Delivery Site Member Complete the required fields, and click Save. Members at the service delivery site level are contacts and do not have a system user role. If a service delivery site member needs to access the system, they must be set up as a member at the service provider level and given the appropriate user role, as outlined in Section 4.1. 2014 The Queen’s Printer Release 4.0 Version 2.5 Page 39 of 52 EOIS Case Management System Service Provider User Guide 4.9 Modifying Service Delivery Site Members The Service Delivery Site Member information captured in the Service Provider Management module of the system can be modified. 4.9.1 Modify Details System Steps Step 1: Service Delivery Site Members Click Edit from the Action Button next to the appropriate service delivery site member. Step 2: Modify Service Delivery Site Member Make the required modifications, and click Save. 2014 The Queen’s Printer Release 4.0 Version 2.5 Page 40 of 52 EOIS Case Management System Service Provider User Guide 4.9.2 Modify Main Contact Only one main contact can exist for each service provider delivery site. In order to change the main contact, the original main contact has to be changed to a non-main contact. Navigate to the Service Delivery Site Members page, and edit the member who is currently recorded as the main contact, deselect the Main Contact checkbox, and click Save. Edit an existing member or create a new member to become the new Main Contact by selecting the Main Contact checkbox and clicking Save. It is important that each service delivery site has a Main Contact identified for ministry communication and administrative purposes. The initial Main Contact will be set up by the ministry when the service delivery site is registered in the system. 2014 The Queen’s Printer Release 4.0 Version 2.5 Page 41 of 52 EOIS Case Management System Service Provider User Guide 4.10 View Ministry Contacts Service delivery sites that are performing services for the ministry are assigned a ministry contact. This contact is an internal CaMS user, who will manage the service delivery site to ensure that they are meeting their contractual obligations. If a service delivery site is unsure of their primary ministry contact, it can be located within the Service Delivery Site Home page. Service providers can only view a ministry contact. System Steps Step 1: Service Delivery Site Home Click the Services tab. Step 2: Services The ministry contact is located beside the corresponding service. 2014 The Queen’s Printer Release 4.0 Version 2.5 Page 42 of 52 EOIS Case Management System Service Provider User Guide 4.11 Creating and Modifying Service Provider Profile and Service Delivery Sites Contact Information While ministry users must create a service provider’s profile in the system, a number of additional fields within the service provider profile may be created or modified by service provider members who have either the Service Provider Manager or Service Provider Administrator user roles. The following fields can be modified, at both the service provider and service delivery site levels: Phone Number Email Address Web Address The service provider address can be viewed by all service provider users but can only be modified by ministry staff. The reason is to provide data integrity between the EOIS Contract Management System and the EOIS Case Management System. If the address of the service provider or the service delivery site needs to be changed, the service provider should contact their ministry contact as per the regular business process. The addresses for the service provider and service delivery sites can be viewed on the associated Service Provider Home page and Service Delivery Site Home page(s) as well as under the relevant Contact tabs. 2014 The Queen’s Printer Release 4.0 Version 2.5 Page 43 of 52 EOIS Case Management System Service Provider User Guide 4.11.1 Assigning a Self Service Email Address A specific email address must be assigned as “self service” in order for the Self Service Notifications checkbox on the Service Delivery Site Home page to be checked, and thus for email notifications to be received when Employment Ontario Self Service applications are submitted to the service delivery site. Ensure that the email address is within the Contact folder of the service delivery site and not the service provider. System Steps Step 1: Service Delivery Site Home Select the Contact tab. 2014 The Queen’s Printer Release 4.0 Version 2.5 Page 44 of 52 EOIS Case Management System Service Provider User Guide Step 2: Service Delivery Site Contact Click Email Address in the tab content bar. Step 3: Email Addresses Click Edit from the Action Button next to the email address that is to be assigned to self service (or click New if none exist). 2014 The Queen’s Printer Release 4.0 Version 2.5 Page 45 of 52 EOIS Case Management System Service Provider User Guide Step 4: Modify Email Address Enter the required information and ensure that Self Service Notification is checked. Click Save. Once the email address is saved, the Self Service Notifications field on the Service Delivery Site Home page will be automatically checked, meaning both fields will have values of “yes” and email notifications will be received when EOSS applications are submitted to the service delivery site. It is, however, important to note that both the Self Service Notification field on the Email Address page and the Self Service Notifications field on the Service Delivery Site Home page must be checked in order to receive email notifications. There may be cases where one has been unchecked. 2014 The Queen’s Printer Release 4.0 Version 2.5 Page 46 of 52 EOIS Case Management System Service Provider User Guide 4.11. 2 Modifying the Service Delivery Site Home Page Authorized service provider users have the ability to modify information by clicking Edit from the Action Button on the Service Delivery Site Home page. 1 – The language preference of the service delivery site. 2 – Utilizing Data File allows the ministry to capture if the service delivery site is using data files for reporting purposes. If a service delivery site wants to receive data files, they must select “Yes.” 3 – The preferred method of communication for the service delivery site (e.g. hardcopy, email, etc.). 4 – The Geographic Region where the service delivery site is located. The region can be viewed by all service provider users but can only be modified by authorized ministry staff. 5 – The Available for Service checkbox indicates the service delivery site’s availability to accept Employment Ontario Self Service (EOSS) applications. For more information on EOSS Applications, see Chapter 11 and the Employment Ontario Self Service (EOSS) Training Resource Guide for ES, SJS & LBS Service Providers. 2014 The Queen’s Printer Release 4.0 Version 2.5 Page 47 of 52 EOIS Case Management System Service Provider User Guide 6 and 7– The Self-Service Notifications checkbox determines whether a service delivery site will receive email notifications when EOSS applications are submitted. An Email Address must be specifically assigned as “self service” in order for the Self-Service Notifications checkbox to be checked (see Section 4.11.1 ). 4.12 Assigning a user as an Ontario Self-Employment Benefit Case Reviewer For Ontario Self-Employment Benefit (OSEB) service providers, a Case Reviewer can be assigned at the service delivery site level. The Case Reviewer is assigned all reviews for OSEB product delivery cases assigned to the service delivery site, and these reviews will appear in their Pending Reviews list. All users within the service provider will still be able to complete any reviews within their organization regardless of to whom it is assigned and any review can still be forwarded to another user (for information on forwarding reviews, see Section 4.6.2). System Steps Step 1: Service Delivery Site Home Select the Services tab. 2014 The Queen’s Printer Release 4.0 Version 2.5 Page 48 of 52 EOIS Case Management System Service Provider User Guide Step 2: Services Click Ontario Self-Employment Benefit Program. Step 3: Services Click Edit. Step 4: Modify Service Click the magnifying glass icon next to Case Reviewer. 2014 The Queen’s Printer Release 4.0 Version 2.5 Page 49 of 52 EOIS Case Management System Service Provider User Guide Step 5: User Search Click Select next to the appropriate service provider user. Step 6: Modify Service Click Save. 2014 The Queen’s Printer Release 4.0 Version 2.5 Page 50 of 52 EOIS Case Management System Service Provider User Guide 4.13 Field Values Table Field Name Acceptable Values Description Email Address Type -Business -Personal Service provider or service delivery site’s email address type. Phone Number Type -Alternative -Fax -Primary Service provider or service delivery site’s phone number type. -English -French Preferred language of member, service provider, or service delivery site. Preferred Language -Data Transfer -Email Preferred Communication -Fax -Hard Copy -Phone The preferred communication method for the service delivery site Utilizing Data File -Yes -No Informs the ministry whether the service delivery site is using the data files provided on the EOIS Service Provider Reporting Website Title -Dr. -Miss -Mr. -Mrs. -Ms. -Prof. Designated title of member. User Role -Service Provider Caseworker -Service Provider Administrator User role of service provider member in the Case Management System. Available for Service -Yes (checked) -No (unchecked) Indicates the service delivery site’s availability 2014 The Queen’s Printer Release 4.0 Version 2.5 Page 51 of 52 EOIS Case Management System Service Provider User Guide Field Name Acceptable Values Description to accept Employment Ontario Self Service (EOSS) applications. Self Service Notifications Self Service Notification (within the service delivery site email address) -Yes (checked) -No (unchecked) Determines whether a service delivery site will receive email notifications when EOSS applications are submitted. -Yes (checked) -No (unchecked) Specifies the specific email address to be used for self service email notifications. The value of Self Service Notifications on the Service Delivery Site Home page must be “Yes” for notifications to be sent to the assigned email address. 2014 The Queen’s Printer Release 4.0 Version 2.5 Page 52 of 52