1
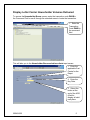
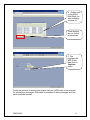
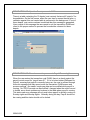
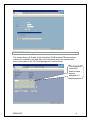
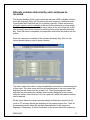
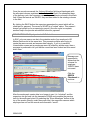
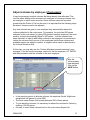
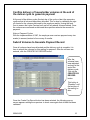
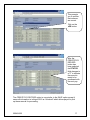
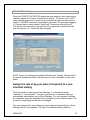
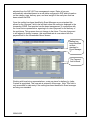
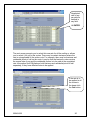
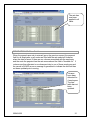
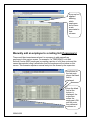
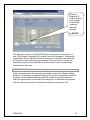
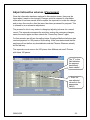
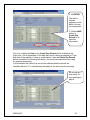
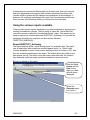
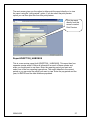
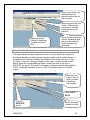
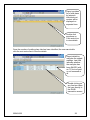
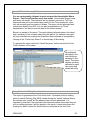
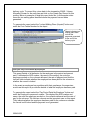
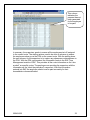
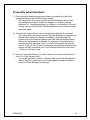
Business Transformation
User Guide for Householder
(HH) Bonus Payment Process
April 2004
2004/04/22
1
Table of Contents
Introduction ____________________________________________________ 3
Review – Householder Bonus Payment: Volume Allocation in Time
Management ____________________________________________________ 4
Display Letter Carrier Householder Volumes Delivered_________________ 5
ERROR MESSAGE: “Opted-in. Do not process in SAP” _______________ 7
ERROR MESSAGE: “Records cannot be processed…Payroll Processing”_ 7
ERROR MESSAGE: “Assign LC to uncovered route”__________________ 8
ERROR MESSAGE: “Employee is absent for the mailing duration” ______ 10
Allocate volumes delivered by each employee as recorded ____________ 11
ERROR MESSAGE: “Volume Allocated exceeds Maximum” ___________ 12
ERROR MESSAGE: “Employee Locked” “Failed…”__________________ 14
Adjust volumes by employee (if necessary) _________________________ 15
Confirm delivery of householder volumes at the end of the deliver cycle to
generate payment_______________________________________________ 16
Submit Volumes to Generate Payment Record_______________________ 16
ERROR MESSAGE: “Payment can not be created…” ________________ 18
Assign the rate of pay per piece (if required) to a non-standard mailing __ 18
ERROR MESSAGE: “Enter Rate”________________________________ 21
Manually add an employee to a mailing list (if necessary) _____________ 22
ERROR MESSAGE: “Select Route for employee” ___________________ 23
Adjust retroactive volumes (if necessary) ___________________________ 24
Using the various reports available ________________________________ 26
Report ZHRPT437_Activemp ____________________________________ 26
Report ZHRPT358_HHBONUS ___________________________________ 27
Query #1: Unpaid Mailings Report _______________________________ 28
Query #2: Period Summary (Paid) _______________________________ 30
Query #3: Locked Mailing Plans Unpaid ___________________________ 30
Query #4: Pay Period Detail By Employee _________________________ 31
Frequently asked Questions ______________________________________ 33
Troubleshooting employee concerns/issues related to incorrect payment 34
2004/04/22
2
Introduction
The intent of this user guide is to demonstrate and explain the business
procedures and system transactions associated with processing the householder
bonus payments for Group 2 employees represented by the Canadian Union of
Postal Workers (CUPW). This guide demonstrates the various steps involved to
allocate volumes for employees and to ensure they receive payment for the
delivery of these volumes.
The Event Manager (EM) Module of SAP tracks all mailings received for
delivery by Letter Carriers. These volumes are received into the Event Manager
module by one of two methods.
• The first method, the Electronic Shipping Tool (EST) receives all volumes
from large mailers. These are usually, but not restricted to, national
mailings.
• The second method to receive mailings is the Unaddressed Admail
Delivery System (UADS), which is where volumes received by individual
smaller mailers can be entered when they are received in the depots.
This guide focuses on the SAP/HR component of the overall process only.
The Time Management (TM) module of SAP captures relevant employee
information for CUPW Group 2 employees such as which hours are worked,
which absence or attendance code or which route the employee was assigned to
for a specific day. SAP Time Management uses this information, together with
the volumes associated to each Letter Carrier route, to determine who delivered
on a specific route and who should be paid for these volumes.
This user guide demonstrates the key components to complete this task of
allocating volumes to the correct Letter Carrier. These key components in the
Householder Bonus Payment process are:
Display Letter Carrier Householder Volumes Delivered
Allocate volumes delivered by each employee as recorded
Adjust volumes by employee if necessary
Confirm delivery of householder volumes at the end of the deliver cycle to
generate payment.
Submit volumes to Generate Payment Record
Assign the rate of pay per piece (if required) to a non-standard mailing
Manually add an employee to a mailing list if necessary
Adjust retroactive volumes if necessary
Using the various reports available
2004/04/22
3
Review – Householder Bonus Payment: Volume
Allocation in Time Management
Information recorded in Event Manager is also used in the Time Management
module in order to pay employees for the correct amount of Householder pieces
delivered.
The Delivery Control Slip (DCS) is printed from Event Manager on the “prep” day
for the Householder mailings. Remember that once you print your DCS you only
have until the end of that day to make changes in the volumes received and the
mailing characteristics in Event Manager. That night, the DCS information is sent
to a custom screen in Time Management, changes to the volume counts cannot
be adjusted. The next day, after the DCS has been printed, you are able to
allocate volumes among the Letter Carriers (LC) who delivered on each route.
There is a custom Time Management screen which uses information taken from
the other areas of Time Management to show who worked on a route on a
particular day. The custom screen shows the route owner, and any other
employees who are assigned through TM transactions to a route during the
delivery cycle of the mailing. These other TM transactions include, anyone who
has been substituted on a route for any day within the delivery cycle or anyone
who has worked overtime (either within the depot or from outside the depot). For
example, these include a Relief LC who is assigned to cover a scheduled
absence such as vacation for a LC or employees who have been offered portions
of uncovered routes.
At the end of the delivery cycle, the Supervisor reviews all the volumes delivered
as reported by the employees, ensures the correct information is entered, and
then submits the records for payment.
2004/04/22
4
Display Letter Carrier Householder Volumes Delivered
To access the Householder Bonus screen, enter the transaction code ZHHB in
the Command Field or scroll through the standard menu to locate the transaction.
1. Enter the
Transaction
Code ZHHB in
the command
field.
This will take you to the Householder Bonus selection criteria input screen.
1. Enter the
applicable Cost
Centre for the
Depot.
2. Enter the
Key Date.
3. Select the
button at the
end of the ADS
# field to
display all valid
mail plans.
2004/04/22
5
4. Double click
on the ADS#
(Mail Plan) you
want to display
volumes for.
These buttons
are not “active”
in this screen.
5. This
populates the
ADS # field,
then click on
Continue
button.
During the process of retrieving the proper mail plan (ADS) there is the potential
for several error messages. See below for samples of these messages and how
each should be handled.
2004/04/22
6
ERROR MESSAGE: “Opted-in. Do not process in SAP”
There is a table containing the 19 depots (cost centres) that are still “opted-in” for
householders. On the first screen, when the user tries to access the mail plan, a
validation against this cost centre table is performed in the background. If one of
these depots’ cost centre numbers is selected then this message is generated.
Upon receipt of this message the user needs to exit the transaction ZHHB and
revert to the proper method to process the householder volumes for these
depots.
ERROR MESSAGE: “Records cannot be processed…Payroll Processing”
When the user enters the transaction code ZHHB, there is a check against the
payroll control record for “payroll area 01”. If it is in locked status (Released for
Payroll), meaning that payroll is currently being run, the user is advised through
this error message that they cannot enter the transaction ZHHB screen and
process mailings. No master / employee data can be modified while payroll is
running. No IT0015 records can be modified / changed when the control record
is locked, as no direct updates can be done to the table when payroll is running.
This status and error message will only exist when payroll is actually running on
Sunday nights and Monday nights. Normally during the day, Payroll should not
be running and this status should not be locked.
2004/04/22
7
ERROR MESSAGE: “Assign LC to uncovered route”
This screen shows up as part of the transaction ZHHB anytime EM has received
volumes for a specific route and this route information cannot be matched with
correct information in the HR Time Management custom screen.
This shows that
route 0003
does not have
anyone
assigned to it.
2004/04/22
8
There are two possible reasons for this screen to show up. Firstly, the incorrect
or incomplete staffing actions can cause this screen to appear. This means there
are volumes associated with a route and the HR table does not have an
employee associated to that route.
If a route doesn’t have anyone assigned to it then it is displayed in the screen.
There are several scenarios that may cause this; for example, a vacant route
without anyone assigned through SAP Organization Management. Additionally,
the owner of the route could be absent (either long term or has an absence code
recorded in CAT2) during the entire length of the delivery cycle and no Relief
Letter Carrier has been assigned (via substitution) to cover the route. This
screen allows you to assign any employee to a route only which allows the
employee and route to be displayed on the Householder volumes screen. It does
not make the corresponding transactions in Time Management.
Secondly, if there is a difference between the route identification information from
Event Manager, which gets its information from the Postal Code Support System
(PCSS) or the Letter Carrier Route Measurement System (LCRMS), and the HR
Custom Time Management table then this prevents the system from associating
the correct employee to the route.
Each of these two scenarios have different corrective actions.
In the first scenario, an employee may have been assigned to a route, yet the
Staffing Officer may not have completed the employee movement action. To
correct this, the supervisor can enter the employee’s ID in this field and continue
to the next screen. They should note this and follow up with the Staffing Officer to
ensure this is completed immediately to prevent this scenario from happening the
next day. Also, there may be instances where an employee is absent and the
supervisor either has not cradled the Personal Data Assistant (PDA) or has not
done the staffing of the route (either through substitutions or incentive overtime
portions) in SAP. For these types of issues it is required that the supervisor
returns to SAP and either cradles the PDA or completes the staffing process in
SAP before moving on to the next screen.
The second scenario would mean there are different route numbers associated
between what PCSS / LCRMS indicates and what is showing in the HR Custom
table. The corrective action requires the supervisor to report this information to
the Route Measurement Officer (RMO) or to the Delivery Services Officer (DSO)
to report this to ensure the information is corrected in PCSS. It should be noted
that the process of advising the RMO/DSO has not changed. What has changed
is the importance of feeding the information from the supervisor to the RMO/DSO
immediately to have changes made in a timelier manner.
It is important the supervisor understands not to just click on the “Save and
Continue” button without entering an employee ID number. If no Employee ID
2004/04/22
9
number is entered at this screen then this route does not appear when the next
screen shows up. This prevents the supervisor from adding an employee or the
route later in the process.
In this scenario a RLC from another depot will cover this route.
Enter employee
ID# 7000059 in
the Empl ID
field.
Click the Save
and Continue
button
ERROR MESSAGE: “Employee is absent for the mailing duration”
During the process of completing the pop-up box above there is a validation
against the employee’s ID number. If the employee already has absences
recorded for the entire period of the mailing an error message is generated. You
won’t be able to continue until a valid ID number is selected. Once the supervisor
enters a valid employee ID number the system then moves to the next screen
which is where the volumes are entered.
2004/04/22
10
Allocate volumes delivered by each employee as
recorded
This screen displays all the routes where the mail plan (ADS) indicates volumes
are to be delivered. Daily, the Supervisor can print a report to identify all active
Householder Mail Plans that are out for delivery that day. Please see section
Using the various reports available at the end of this document for more details.
The Letter Carrier, upon return to the depot (either at the end of that day or the
next morning) records the volumes by mailing and by route they delivered that
day. Once the sheet is completed, the supervisor enters this information into the
screen.
Once the supervisor is advised of the volumes delivered, they then use the
screen shown below to enter in these volumes.
The Letter carrier who owns a route automatically receives the volumes assigned
to that route. The route owner and the volumes assigned to the route owner are
displayed on the screen and are ‘grayed’ out. Those employees who have
delivered any time during the delivery span are also displayed on the screen
under the owner of the route but it is in an open field (white field) where volumes
can be entered.
All the routes where the owner has been absent (substitutions created for the
route or OT portions offered) are displayed in this custom screen first. Then, all
the remaining routes where the volumes have defaulted to the owner are
displayed. If necessary, a field at the bottom of the screen allows the supervisor
2004/04/22
11
to add another employee to a route if for some reason the employee wasn’t
included in the displayed area under a route.
ERROR MESSAGE: “Volume Allocated exceeds Maximum”
While allocating the volumes the supervisor adds volumes to the employee as
per the listing provided to them. Adding volumes to any Letter Carrier on the
route automatically reduces volumes from the route owner. This screen does not
allow for assigning volumes greater than the total points of call for any route. If
you try to allocate volumes greater than the number of points of call you will
receive an error message.
In this case the
route has 440
pieces and the
supervisor has
attempted to
assign 445
pieces.
If you receive this message you need to reduce the volumes you have entered
for one or more employees. You can do this by clearing the field and hitting
enter. Additionally, if you have already entered volumes and are trying to adjust
them, you need to enter a negative amount for one of the employees before you
can increase another.
This custom screen to allocate volumes also automates the rate of pay (except in
the case of a non-standard mailing) per piece delivered and the number of pieces
to be delivered by route. No one can be paid for more pieces delivered than
Points of Call (PoC’s) on the route nor can anyone receive a rate of payment
other than the standard rate applicable for the size and weight of the mail piece.
On this screen the Payment field (rate per piece) is grayed out and cannot be
adjusted. The only way the rate can be adjusted is for the Supervisor to have
triggered this mailing as a “non-standard” back in Event Manager prior to the
DCS being printed.
2004/04/22
12
The screen shot below shows a typical (standard) mailing where the volumes
have been allocated according to employees identified delivering on the route.
1. Volumes are
entered based on
the information
provided to the
supervisor.
2. After the
Volumes have
been allocated,
Click on the
SAVE button.
NOTE:
There is an additional check on the mailing plan when being processed by a
specific date. Only one button, either the SAVE button or the CREATE PAY
RECORD button is accessible.
An “S” is
displayed in
the Status
Field. This
indicates the
record has
been SAVED.
2004/04/22
13
Once the records are saved, the Volume Allocation field turns blank again with
the allocated volumes registered in the Volume Paid field. On subsequent days
of the delivery cycle, the supervisor can continue to allocate volumes in this blank
field. When the records are SAVED, they are then added to the existing volumes
in the field.
By clicking the SAVE button the supervisor generates the record which will be
used later for payment. The record is SAVED in a “locked” status. This means it
doesn’t get picked up for processing by payroll. Once the cycle is complete,
another step in the process unlocks this record for payment.
ERROR MESSAGE: “Employee Locked” “Failed…”
In SAP, only one person can be in the maintain mode of an employee’s HR
Master Data record at the same time. This prevents multiple users trying to
create the same records and ensures data integrity. If you try to save the
Householder screen and an employee record is locked by another user, then a
message is produced to tell you that the record has been locked and this record
didn’t save.
Message was
generated to
advise that the
volumes for
employee
7000076 have
not saved.
Click the
GREEN
Checkmark to
continue.
After the employee’s master data is no longer in use, it is “unlocked” and the
supervisor can go back into the transaction ZHHB and complete the previous
task for the employee locked. By selecting the “Show Messages” button at the
top of the screen (directly under the screen title), the supervisor can see which
employee has not had the record and information “saved”.
2004/04/22
14
Adjust volumes by employee (if necessary)
It may be necessary to adjust volumes that have already been allocated. This
involves either adding more volumes to an employee or removing volumes from
an employee to add to some one else. Since volumes cannot be recorded
greater than the Points of Call on the route, it is important that the following steps
be taken if volumes need to be adjusted.
Any time volumes are given to one employee they automatically reduce the
volumes defaulted to the route owner. For example, if a route had 500 pieces
assigned to the route owner, by giving 200 pieces to another employee, the route
owner’s volumes automatically adjust to 300 pieces. If all the volumes have
been allocated, in order to add further volumes to an employee it is necessary to
reduce the volumes first from one of the employees before these volumes are
available again to be added to another. A negative value needs to be entered in
the Volume Allocation field.
At this step, you may also see the “Volume Allocated exceeds maximum” error
message. If you do see this message, reduce for the first employee, HIT ENTER,
and then proceed to add the volumes to the next employee.
After the
Volumes have
been adjusted,
Click on the
SAVE button
In the previous section to allocate volumes, the employee Carlos Wright was
assigned all 440 pieces for route 0008.
The route owner Wayne Hull actually delivered 200 of these pieces.
To give back the volumes, it is necessary to reduce the volumes for Carlos by
entering –200.00 pieces.
Hit enter to move these volumes back to the route owner Wayne Hull.
2004/04/22
15
Confirm delivery of householder volumes at the end of
the deliver cycle to generate payment
At the end of the delivery cycle (the last day of the cycle or later) the supervisor
confirms that all volumes have been allocated. This is done by validating the sign
off sheets for the volumes delivered by the employee and by touring the work
floor to ensure the Letter Carriers have not left any admail volumes behind. Once
the volumes are confirmed as delivered the supervisor submits the records for
payment.
Note on Payment Cycles:
With the implementation of SAP, the employee now receives payment every two
weeks (in arrears) instead of once every 6 months.
Submit Volumes to Generate Payment Record
Once all volumes have been allocated and the delivery cycle is complete, it is
time to submit the volumes for this mailing for payment. After the volumes are
entered, click the CREATE PAY RECORD button.
After the
volumes have
been adjusted,
and only at the
end of the
delivery cycle,
Click on the
CREATE PAY
RECORD
button.
This button is
“Disabled” until
the last day of
the mailing or
later.
Once the Create Pay Record button has been selected, the following pop-up
screen appears asking the supervisor to check once again that all data has been
validated.
2004/04/22
16
This prompts
you to confirm
that volumes
are correct.
Click on the
YES button
After the
CREATE PAY
RECORD
button has
been selected
the STATUS
field changes to
a “P” to indicate
the record is
ready to be
processed with
the next pay.
The CREATE PAY RECORD option is very similar to the SAVE option except it
saves all information in infotype 0015 as “unlocked” which allows payroll to pick
up these records for processing.
2004/04/22
17
ERROR MESSAGE: “Payment can not be created…”
When the CREATE PAY RECORD button has been selected, the system does a
validation against the “Payroll Control Record Status”. If Payroll is not in “EXIT”
status (meaning payroll is currently being processed) all these records are then
saved in “LOCKED” status and a message is generated. The message displayed
is “Payment has not been created. Saved only. Re-process after pay cut-off”.
This requires the supervisor to go back into the system and re-submit the mail
plan for payment (i.e., Create Pay Record again).
NOTE: Payroll is processed every second Monday and Tuesday. Please refer to
the payroll calendar provided to all field users for more information on the exact
dates.
Assign the rate of pay per piece (if required) to a nonstandard mailing
When the mailing is captured in Event Manager, it is identified as either
“standard” or “non-standard”. The rate of payment for a “standard” mailing is
automatically calculated as part of Event Manager. For “non-standard” mailings
the supervisor enters the negotiated rate of payment into this custom screen. The
process for negotiating the rate has not changed.
The rate of payment for any mailing can only be adjusted by identifying in Event
Manager that it is non-standard. The rate for a standard mailing cannot be
2004/04/22
18
adjusted from the SAP HR Time management screen. Rates of pay are
automatically calculated based on a rate table configured in SAP and information
on the category type, delivery span, and size/ weight of the mail piece that has
been entered into EM.
Once the mailing has been identified in Event Manager as non-standard this
allows for the “payment” field to be left blank when the mailing is displayed in the
transaction ZHHB. Past practice has the depot management, in conjunction with
the Local Union representative, agreeing to a rate of payment for the delivery of
the mail piece. This process does not change in the future. The rate of payment
is still agreed to locally; however, this negotiated rate is now entered into the
payment field in the Householder Bonus screen.
Mailing has
been identified
as Nonstandard in
Event Manager
“Y”.
The Payment
field is blank.
Working with local union representatives, a rate per piece for delivery by Letter
Carriers is negotiated. This new rate is entered in this screen. Note: This field is
only accessible for data entry if the mailing has been identified in Event manager
as being non-standard.
2004/04/22
19
Negotiated
rate of pay
per piece is
entered in
any field.
Hit ENTER.
The next screen prompts you to select this new rate for all the mailing or allows
you to select it for only a few routes. There may be certain instances where the
rate is not applicable to the entire route. For example, there may be business and
residential points of call on the route; it may be that the business routes receive
the normal rate of pay and the residential portion is to be paid at the negotiated
rate. Information from EM displays both business and residential points of call
separately, if they have different rates to be applied.
If the rate is to
be applied to all
the routes in
the depot click
the Yes button.
2004/04/22
20
The rate has
now been
applied to all
fields.
ERROR MESSAGE: “Enter Rate”
When the agreed upon rate is entered (as on the previous screen) the payment
field for all employees on all routes are filled with the rate selected. However,
when the data is saved, if there are no volumes associated with the employee
and the route the payment has the rate removed and the field is “blanked out”. If
volumes are then allocated on a subsequent day to one of these employees and
the record is SAVED an error message is generated to indicate the rate field has
not been updated prior to saving.
Volumes
have been
allocated for
4 employees.
The rate
table has not
been
updated.
2004/04/22
21
A pop-up box
appears
advising
which
employees
do not have
a rate
associated to
their
volumes.
Manually add an employee to a mailing list (if necessary)
There could be circumstances where it is necessary to add manually an
employee to this custom screen. For example, if a TEMPORARY or a Mail
Service Courier (MSC) employee is covering a portion of a full time route and this
cannot be captured using a substitution then the employee will not show on this
screen. This scenario requires a manual entry into the screen by the supervisor.
Scroll down to
the last route
where the blank
field is
displayed.
Once the blank
field at the
bottom is
displayed, the
supervisor
enters the
employee’s ID#
and the route
they delivered
volumes on.
2004/04/22
22
Enter the
employee ID
number and the
route number
for which the
employee
delivered
volumes.
Hit ENTER.
This field only allows for a valid CUPW Group 2 employee to be entered. If a
non-CUPW group 2 employee ID is entered, an error message of “Invalid entry”
is generated. Once a valid ID number is entered, the supervisor can then enter
the number of pieces the employee delivered. Once the record is saved, the
employee record is moved upwards on the list with the other corresponding
information for that route.
ERROR MESSAGE: “Select Route for employee”
If the route selected for the employee has multiple records for different mailing
attributes (for example, compressed delivery for a portion or separate records for
business versus residential delivery) then the supervisor will be prompted to
select the appropriate route record for the employee. A drop-down box appears
with the valid route records from which the supervisor can choose from.
2004/04/22
23
Adjust retroactive volumes (if necessary)
Once the information has been captured in this custom screen, there may be
times when it needs to be changed. Changes could be required to information
either after it has been saved, which requires the supervisor to make the change
and re-save the record or after the record has been processed for payment. This
is referred to as a retroactive adjustment.
The process for this is very similar to changing/ adjusting volumes for a saved
record. The supervisor accesses the mail plan, makes the necessary changes,
saves the record again and then selects the “Create Pay Record” again.
For this scenario we will use the mailing below. Employee Melissa Lafortune has
received payment for 100 pieces of this mailing. It has been determined that the
employee did not deliver any householders and that Thomas Wiseman actually
did the delivery.
The supervisor must remove the 100 pieces from Melissa and credit Thomas
with these 100 pieces.
The “P” in this
field indicates
the payment
has already
been created.
1. Enter the
new adjusted
volumes in the
appropriate
field(s).
2004/04/22
24
2. Hit ENTER.
The field to
indicate
payment is now
blank for these
two employees.
3. Hit the SAVE
button or
Create Pay
Record to resave the
information.
Only one of either the Save or the Create Pay Record will be enabled at any
given time. This is dependant on the date the record is being processed for. If the
end date of the mailing is “today or a date earlier”, then the Create Pay Record
button is enabled. By choosing this button, the records are saved and are ready
for payment processing.
In this scenario the Create Pay record was selected and the records are
identified with the “P” to indicate they are ready for the next payroll processing.
All records are
now ready for
reprocessing by
payroll.
2004/04/22
25
If these payment records for Melissa had not yet been paid, that is the records
had been generated but the payroll had not been generated then these new
records would be picked and the changes are transparent to the employee. If
however, the employee had already been paid, then the employee would have
these volumes (and therefore dollars) recovered from their next pay.
Using the various reports available
There are two custom reports developed to provide assistance for supervisors in
tracking Householder volumes. The first report is called the “Active Mail Plan”
report the second is called the “Householder Bonus” report. The reports can be
used to capture the volumes delivered (ZHRPT437_Activemp) or to provide the
necessary information to employee on the volumes delivered
(ZHRPT358_HHBONUS).
Report ZHRPT437_Activemp
This report displays all the “active Mailing plans” for a specific date. The report
lists all employees with exceptions recorded against them (i.e., Relief Letter
Carriers assigned to routes, Letter carrier working portions of routes on OT), and
then the remaining employees in the depot. The mailing plans are listed by end
date across the top. The intent is that the Letter carrier can enter the volumes
they delivered under the proper mail plan beside their name and route.
Below is a sample of this report.
Enter the Cost
Centre and the
Date for the
depot you want
the mail plans
displayed.
Select the
Generate report
icon (clock)
2004/04/22
26
The next screen gives you the option to either print the report directly or to view
the report using the “print preview” option. If you do select the print preview
option you can then print this from this print preview.
Print the report
directly from this
screen or select
Print Preview
Report ZHRPT358_HHBONUS
This is a new custom report built (ZHRPT358_ HHBONUS). This report has four
separate queries within it. Below is information on each of these queries and
when you would want to use them. Enter the reporting period you want and
select one of the four reporting type options. The report defaults to the current
period or you can enter the period you want to view. Enter the pay period and the
year, hit ENTER and the date fields are populated.
2004/04/22
27
Query to find a list of all
mailings where the
payment record has not
been created.
Report by period by Cost
Centre. Summary by
employee of volumes
processed by rate of
payment.
Report by period.
Details by employee
showing each mail
plan.
Report by period by Cost
Centre. Detailed by mail
plans not processed or
where payments not
generated.
Query #1: Unpaid Mailings Report
This report allows the depot supervisor to have a tool to identify a summary of
mail plans that have not had payment records created for their Letter Carriers. It
provides the information to display the different levels of late such as, 0-1 days,
2-3 days >7 days etc. Below is a sample of the report. From the initial screen
above, select the “Unpaid Mailings Report” button and click on the icon to
EXECUTE the report. This report is executed to determine all mail plans with no
IT0015 (additional payment) records or IT0015 records created in a “locked”
status.
Enter the Cost
Centre. Also an
option to select
subordinate
cost centres.
Enter a KEY
DATE
Click the
EXECUTE
button.
2004/04/22
Select the range
of dates for lates.
28
Report provides
list of mail plans
by lateness.
Individual cost
centres will be
displayed on
separate lines.
Double click
anywhere on
Cost centre line
to view details.
Once the number of mailing plans late has been identified, the user can double
click the cost centre line to view the details.
Report details by
mail plan the unpaid
mailings. Last field
indicates whether
the mail plan has
been SAVED (with
an “X”) but not paid
or not accessed at
all.
Double clicking on
any line item takes
the user directly to
the ZHHB
transaction screen.
2004/04/22
29
Query #2: Period Summary (Paid)
You are contractually obligated to print and post the Householder Bonus
Report – Pay Period Summary every two weeks. Householder Bonus is now
paid every two weeks. The payments are two weeks in arrears for Full Time
employees and are for the current pay period for Part Time employees, since
they are currently paid two weeks in arraers. The report can be generated and
printed from directly from SAP or it can also be exported into an “Excel”
spreadsheet if you want to post the data in this format instead.
Below is a sample of this report. The report displays all employees in the depot
and a summary of the volumes paid during the period. For example, the report
will only indicate those mailings the Supervisor has confirmed as completed by
clicking on the “Create Pay Record” on the last day of the mailing.
To generate the report select the “Period Summary” button and enter the Cost
Centre Number for the depot.
All employees
belonging to the
cost centre are
displayed in this
report. The report
displays volumes
delivered by each
rate of pay and
shows the totals.
Query #3: Locked Mailing Plans Unpaid
This report is generated at the Cost Centre level. It indicates all active mailing
plans by Admail Delivery Slip (ADS) number during the “period” selected where
the records were “saved” but the payment has not been generated. It is
important to note that if the supervisor has allocated volumes and saved them at
all in a mailing plan then it will not appear in this report. Locked records are the
mailings for which Create Pay Record was not submitted at the end of the
2004/04/22
30
delivery cycle. To correct this, return back to the transaction ZHHB - Volume
Allocation Screen for the mail plan and click on the Create Pay Record for this
mailing. Below is a sample of what this report looks like. In this sample notice
there are two mailing plans identified where the payment has not been
generated.
To generate the report select the “Locked Mailing Plans (Unpaid)” button and
enter the Cost Centre Number for the depot.
Report indicates two
mailing plans have
not had the
payments generated
at the end of the
delivery cycle.
Query #4: Pay Period Detail By Employee
This query Details of all deliveries for the employee in the period and amount
paid. It indicates the ADS number, the name of the mailing, the route the
employee worked on, the volumes delivered, the rate of payment and final the
last two fields indicate whether the employee has been paid for the volumes or
whether the record is locked.
In the event an employee has a problem with their paycheque, the supervisor
would use this report to provide the details of what the employee has been paid.
To generate the report select the “Pay Period Detail by Employee” button and
enter the Employee’s personnel number. This displays the ADS number and
name, the route the employee worked on, the volumes delivered and the rate of
pay for the volumes. The last two columns are the important ones on this report.
They indicate whether the employee has been paid for the volumes or whether
the record is still locked and the payment is not generated.
2004/04/22
31
This column
indicates the
payment has not
been generated
for the employee
to be paid.
In summary, the supervisor needs to ensure all the employee start off assigned
to the correct route. The staffing actions need to be done in advance to ensure
the employees show up on the PDA on the correct route. With the staffing done,
the next concern for the supervisor is to capture any absences or attendances on
the PDA. With the PDA synchronized, the information feeds to the SAP Time
Management module of SAP. This provides all the route information as the “who
worked” on specific routes. The employee now provides the supervisor with the
information as the “whet they delivered” component. With this information
entered into SAP the employee should now be paid accurately for their
householder volumes delivered.
2004/04/22
32
Frequently asked Questions
1) Can volumes be adjusted once the information is passed from the Event
manager module to the SAP/HR custom screen?
No. Once the DCS has been printed from Event Manager there is only
until midnight that night to make any changes to volumes or mailing
attributes (i.e., compressed delivery or setting to non-standard). Once the
mailing moves to the SAP/HR Time Management custom screen changes
cannot be made.
2) How does the system know to pay to compress the delivery for a mailing?
The system uses information provided by Event Manager to determine the
delivery dates. When the mailing is accepted in Event Manager the
system looks at the expected delivery start date and the received date to
determine if compression is required. For example, if the mailing has an
expected delivery start date of Feb 17 and the mailing was not received
until 14:30 pm on Feb 16 the Event Manager automatically determines this
delivery will be compressed since it was received after the cut-off time of
11:00 am for the days “prep”.
3) How can I compress delivery if a Letter Carrier has to deliver all volumes on
day 3 of a 3-day delivery cycle?
You cannot manually compress a delivery date in the Time Management
screen. Delivery compression can only be triggered through information
entered in Event Manager (late receipt).
2004/04/22
33
Troubleshooting employee concerns/issues related to incorrect payment
E m p lo yee
S u p e rvis o r
P a yro ll
E m p lo ye e ha s a
p rob le m w ith their
H H b o nu s p aym e n t
S ee S u p er v is o r
W a s th e
em p lo y ee ab s en t
d u r in g th e p er io d
o f p a ym en t?
Yes
D id th e y
rep o r t th e ir
vo lu m e s d e liv e re d
d a ily ?
Yes
C an th e
m iss in g vo lu m e s
b e id e n tif ied to
a m a il p la n
1
R u n rep o r t
ZH R PT 358_H H B O N U S
(S u m m ar y b y p er io d )
D o th e
V o lu m e s M atch
W ith th e V o lu m es
o n th e
C h eq u e?
Yes
Yes
R u n rep o r t
ZH R P T 358_H H B O N U S
(D eta iled b y e m p lo ye e)
R e v ie w M a il P lan (s)
In tr an sa ctio n Z H H B
C an p ro b le m
b e re so lv ed ?
No
No
C o n tac t P a yro ll to g et a lis tin g
o f a ll r eco r d s( w a g e typ e s) p ro ce ssed
fo r th e p a y ch eq u e
R e v ie w re co rd s fro m
P a yro ll.
Yes
M a ke ad ju stm e n ts
an d re- sa v e
tran sa ctio n Z H H B
2004/04/22
DRAFT
34
P ro v id e w a ge ty p e
L ist to s u p er v is o r