1
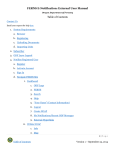
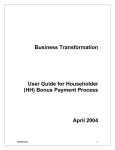
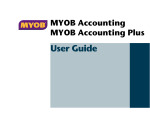
Quest - Student Information System
User Manual
By
Graham Bell
Jordan Leone
Xi Chen
Ali Niknafs
Submitted in partial fulfillment of the requirements of
CS 445/CS 645
University of Waterloo
December 2008
Professor: Daniel M. Berry
2 Table of Contents
Table of Contents
Preface ........................................................................................................................................
6
1 Introduction ............................................................................................................................
7
1.1 The Quest System ................................................................................................................
7
1.2 Audience ...............................................................................................................................
7
1.3 Quest Student Services ........................................................................................................
7
1.4 Current Quest System ...........................................................................................................
8
1.5 Proposed Quest System ........................................................................................................ 10
1.6 System Requirements............................................................................................................. 13
1.7 About this manual ................................................................................................................. 13
2 Conventions ............................................................................................................................. 14
2.1 Notational Conventions ......................................................................................................... 14
2.2 Glossary ................................................................................................................................ 14
2.3 Abbreviations ........................................................................................................................ 15
2.4 Getting Started ...................................................................................................................... 16
2.4.1 How to Retrieve/Reset Password ....................................................................................... 16
2.4.2 How to Enroll/Pre-enroll .................................................................................................... 17
2.4.3 How to Order Official Transcript ...................................................................................... 17
3 Use cases .................................................................................................................................. 19
3.1 Logging In ............................................................................................................................. 19
3.2 Profile .................................................................................................................................... 21
3.2.1 Viewing and Updating Current Profile .............................................................................. 21
3.2.2 Viewing Service Holds ...................................................................................................... 23
3.3 Admissions ............................................................................................................................ 23
3.3.1 Viewing Application Status and Accepting Offer ............................................................. 24
3.4 Finances ................................................................................................................................ 25
3 Table of Contents
3.4.1 View Term Finances .......................................................................................................... 26
3.4.2 Promissory Note and Payment Instructions ....................................................................... 27
3.4.3 Applying for Financial Aid ................................................................................................ 27
3.4.4: View Financial Aid Status ................................................................................................ 27
3.5: Academics ............................................................................................................................ 28
3.5.1: Diploma Requirements ..................................................................................................... 29
3.5.2: Transcript .......................................................................................................................... 30
3.5.3: Course Catalog .................................................................................................................. 31
3.5.4: Course Offerings ............................................................................................................... 32
3.5.5: Course Listing ................................................................................................................... 34
3.5.6: View Exam Schedule ........................................................................................................ 37
3.6: Advisors ............................................................................................................................... 38
3.7: Help and Searching .............................................................................................................. 38
3.8: Logging Out ......................................................................................................................... 39
4 Advanced Features ................................................................................................................. 40
4.1: Timeout ................................................................................................................................ 40
4.2: Settings ................................................................................................................................. 40
4.2.1: Customization ................................................................................................................... 41
4.2.2: Notification E-mail ............................................................................................................ 42
4.3: JobMine .............................................................................................................................. 42
4.4: myHR .................................................................................................................................. 43
Bibliography .............................................................................................................................. 44
4 Table of Figures
Table of Figures
Figure 1.1: Current Quest Student Welcome Screen ................................................................
8
Figure 1.2: Quest Banner Pane ..................................................................................................
9
Figure 1.3: Current Quest Finances Screen ..............................................................................
9
Figure 1.4: Tabs in Quest .........................................................................................................
10
Figure 1.5: Quest navigational Links .......................................................................................
10
Figure 1.6: Use case Diagram .....................................................................................................
11
Figure 1.7: Quest Domain Model .............................................................................................
12
Figure 2.1: Quest Login Screen ................................................................................................
16
19
Figure 3.1: Login screen ............................................................................................................ ……………………
Figure 3.2: Welcome screen ......................................................................................................
20
Figure 3.3: Failed Login error screen .........................................................................................
20
Figure 3.4: Main Profile screen ..................................................................................................
21
Figure 3.5: View and Update Profile .........................................................................................
22
Figure 3.6: Confirmation of Profile Update ...............................................................................
22
Figure 3.7: Service Holds screen ..............................................................................................
23
Figure 3.8: Main Admissions screen .........................................................................................
24
Figure 3.9: View Admission Application Status screen with acceptable offer .......................
25
Figure 3.10: Main Finances screen ...........................................................................................
25
Figure 3.11: Term selection for View Term Finances ......................................................
26
Figure 3.12: Breakdown of a specific term finance summary ....................................................
26
Figure 3.13: Apply for Financial Aid screen .............................................................................
27
Figure 3.14: View Financial Aid Status screen........................................................................
28
Figure 3.15: Main Academics screen ........................................................................................
29
Figure 3.16: Diploma Requirements checklist ........................................................................
29
Figure 3.17: Unofficial Transcript screen .................................................................................
30
5 Table of Contents
Figure 3.18: Request Official Transcript form ........................................................................
31
Figure 3.19: Course Catalog search screen ..............................................................................
32
Figure 3.20: Course Offerings for current term .......................................................................
33
Figure 3.21: Course Offerings for future term .........................................................................
33
Figure 3.22: Course listing of past term......................................................................................
34
Figure 3.23: Course listing of current term .................................................................................
35
Figure 3.24: Course listing of future term ..................................................................................
36
Figure 3.25: Enrollment Failure screen ....................................................................................
36
Figure 3.26: Exam Schedule .......................................................................................................
37
Figure 3.27: Main Advisors screen ............................................................................................
38
Figure 3.28: main Help screen....................................................................................................
39
Figure 3.27: Logout confirmation screen ...................................................................................
39
Figure 4.1: Timeout screen ........................................................................................................
40
Figure 4.2: Settings screen ........................................................................................................
41
Figure 4.3: Customization screen .............................................................................................
41
Figure 4.4: Notifications screen .................................................................................................
42
Figure 4.5: JobMine screen ........................................................................................................
42
Figure 4.6: myHR screen ............................................................................................................
43
6 Preface
Preface
What’s new in Quest?
The design of the Quest user interface (UI) outlined in this manual is intended to improve upon
that of its predecessor by increasing ease of use and making organization of services more
intuitive. Besides the design changes to the UI, services have been added to Quest in order to
better the system as a whole.
User has more control over the look and feel of Quest UI, with the newly added customizable
UI settings; now user can customize theme, fonts and colours. Four new services have been
added to those that were already available: “Accept Admissions Offer”, “Apply for Financial
Aid”, “Request Official Transcript”, and “Diploma Requirements”. The names of the services
effectively describe the functionality that they offer to students. For more details on how each of
these services are used view Section 3.
The following table lists some of the updates that have been made to Quest with the new design
along with the overall benefits of the update.
Table 1. Quest new features
Update to Quest
Quest services separated into tabs
Hierarchical links at top left corner of the screen.
Log in page appears immediately upon entering
Quest.
“Accept Admissions Offer” service added
“Apply For Financial Aid” service added
“Request Official Transcript” service added
“Diploma Requirements” service added
JobMine and myHR available within Quest
Customizable themes, fonts, and colours
Elimination of any special codes used in the
Quest UI
Event reminders in Home tab.
Notifications e-mail added to Quest
functionality.
Updated help section with search capability
Benefit of Update
User can jump from one service to a completely different
one relatively quickly and easily.
Navigation over a hierarchy of pages is simpler.
User does not have to search for the link to log into
Quest.
Applicants can accept an offer of admissions in Quest.
User can apply for financial aid in Quest
User can arrange for an official transcript to be sent to
some specified address through Quest.
User can view the diploma requirements for its program,
both fulfilled and unfulfilled. This is helpful for
choosing courses for enrollment.
User can now access all university related services from
one centralized location.
User has some control over what Quest looks like
making it more pleasant to use.
User does not have to memorize codes for certain entities
in Quest in order to refer to them.
Decreases the chance that user will forget about certain
upcoming deadlines and events
Users can handle status changes to their Quest account
in a more timely manner.
Users can find help on Quest topics more easily.
7 Introduction
Chapter 1: Introduction
1.1: The Quest System
Quest is a self-service application that provides a single point of access to a collection of
services offered by the University of Waterloo (UW) [QUEST, 08]. Essentially, Quest is an
online portal to services that will otherwise only be available offline through offices of UW. The
Quest system is intended to serve all types of user in the UW community: students, alumni,
faculty, and staff. The types of services available to each user relates to the type of user it is.
Quest is designed largely for use as a Student Information System (SIS) [WIKIPEDIA, 08a] as
well as a Human Resource Management System (HRMS) [WIKIPEDIA, 08b]. On the SIS side,
Quest maintains information about students from date of birth to course schedule. It also
provides the facilities for students to view and update their information. As a HRMS, Quest
offers access to all the basic HR related services to employees of UW. Through Quest users can
view or update payroll information, amount of time worked, benefits, and other employmentrelated details.
The Quest system gives the typical user the ability to quickly and easily access and modify its
UW related information in one centralized system. A major benefit of Quest is that
communication between members and administrative offices of the UW community is made
simpler and more efficient.
1.2: Audience
This manual describes the uses of the Quest system that are available to a student user.
Therefore, this manual deals exclusively with Quest system functionality that is visible to
student users.
1.3: Quest Student Services
Most of the services available to students through Quest can be divided into four main
categories: admissions, academics, finances, and profile. The profile category deals with the
viewing and updating of students’ personal information that is currently on record at UW. With
the profile services in Quest, students can change personal information including telephone
number and mailing address. Similarly, the finances category deals with all the financial
information related to students, namely fees accrued and financial aid. Finance services allow
8 Introduction
students to view paid and owing fees, as well as arrange fee payments. Services pertaining to
financial aid, such as applying for financial aid and viewing financial aid application details, are
also included in the finance category.
Academic services are those in Quest that are most heavily used by the students of UW. They
provide students with all the tools necessary to manage and assess their academic careers in
order to effectively plan for the future. Enrollment is a major part of academic services; students
have the ability to create and modify course enrollments for present and future terms. Tools to
help students enroll effectively, such as course catalogs and schedules, are also part of the
academic services available. Another important part of Quest academic services is academic
record. Academic record services allow a student to view his academic profile, including past
courses taken, transcripts and reports applicable.
Finally, the Admissions services are intended for use by prospective students, who are in the
process of applying to be a student at the University of Waterloo. All the necessary utilities
needed for an applicant are available within this set of services.
1.4: Current Quest System
The current Quest system is a Web-based application that can be logged onto from any
computer with Internet access. The user interface (UI) for the current Quest consists of Web
pages viewable through a browser client. The following figure depicts the Home screen for
student users of Quest.
Figure 1.1: Current Quest Student Welcome Screen
9 Introduction
The screen can be split up into two parts: the banner pane and the content pane. The content
pane is where all the content and services of Quest are displayed. The banner pane appears at
the top of every screen in Quest and provides links that are meant help to navigate through
Quest. The Home link returns the user to the welcome screen. The New Window link opens
a new browser window, which displays the welcome screen, and allows users to have multiple
Quest windows open simultaneously within the same user session. The Help link opens a user
assistance manual in a separate browser window. Lastly, the Sign Out allows the user to log out
of Quest and end its session.
Figure 1.2: Quest Banner Pane
The content pane of the Quest student welcome screen shows four icons reflecting the four main
student service categories described in Section 1.3. Each icon has a link beside it that allows
users to navigate to the content of the specific service category. Figure 1.3 shows the Finances
screen; services available in finances are displayed as hyperlinks the user will click to access.
The Return to Home link at the bottom right corner returns the user to the welcome screen.
Figure 1.3: Current Quest Finances Screen
10 Introduction
Depending on the context of the page that a user is currently viewing, the Return X link directs
the user to somewhere other than the welcome screen i.e. to the X screen. The screens for the
other main service categories, i.e. Academics, Admissions, Profile use the same format as the
Finances screen.
1.5: Proposed Quest System
The UI for Quest proposed in this manual takes an approach different from that of the current
UI. Most of the navigation in Quest in centered on a system of tabs. Figure 1.4 shows all the
tabs available to a student user of Quest. Home is the currently active tab pictured in Figure
1.4, meaning the user is currently viewing content related to Home.
Figure 1.4: Tabs in Quest
Tabs categorize services similar to how the icons on the welcome screen of the current Quest UI
do. Profile, Admissions, Finances, Academics, and Advisors each have their own tab; to
access services relating to a specific category open the desired tab. The Advisors tab lists
services pertaining to student advisor and was available through the Academics screen in the
previous UI. Help and Logout are accessible through tabs in this UI as well as other
functionality not included in the main uses of Quest.
Navigational links are provided at the top left corner of the active tab’s content pane as seen in
Figure 1.5. This makes moving through a tab’s hierarchy of content simpler.
Figure 1.5: Quest navigational Links
The following use case diagram depicts the requirements of the proposed Quest system.
11 Introduction
Figure 1.6: Use case Diagram
12 Introduction
Figure 1.7: Quest Domain Model
13 Introduction
1.6: System Requirements
Quest is designed to support the widest variety of client-side operating systems and client-side
browsers. The following browsers are formally supported and tested:
• With PCs running Windows OS: Internet Explorer, Firefox, Chrome
•
With Macs running OS X: Safari, Firefox
The web browser must also be configured to accept cookies. Quest is best viewed in a screen
resolution of 1024 x 768.
1.7: About this manual
The remainder of this manual is split into two main chapters: use cases and advanced features.
The use cases section takes an in-depth look at each of services Quest provides for students.
Each use case looks at a specific function and or service and provides detailed instruction
pertaining to how students can use Quest to accomplish their tasks. Lastly, the advanced
features sections covers customization and settings available in Quest as well as any other
functionality peripheral to the main uses of the system.
14 Conventions
Chapter 2: Conventions
2.1 Notational Conventions
The following text conventions are used in the manual:
•
•
•
•
•
•
•
Times New Roman is used for normal text
Times New Roman Italics is used for emphasis and new terms in normal text
Times New Bold is used for section names
Verdana is used for links and buttons
Arial is used for screens
Arial Italics is used for input fields
Arial Bold is used for tabs
2.2: Glossary
Current Quest glossary [QUEST, 08] was consulted for the creation of this glossary. The
following terms are used throughout the manual:
Term
Description
Quest
The name of the system
JobMine
An external system maintaining Co-op Students job postings.
myHR
An external system maintaining paycheque information.
User
The person who uses the system.
Class Enrollment
Students are asked to enroll for next semester at the 5th week of each term
and pre-enroll for future terms if students are planning on taking courses
during following term. The process of selecting and enrolling in courses
for a particular term via Quest prior to final date for fee arrangement,
having them approved, and recorded with the Registrar's Office. Some
programs or plans require mandatory core courses to be entered by the
Registrar's Office. Deadlines apply.
Drop
Drops the course from the user’s schedule. If the user drops a course after
lectures have begun, consequences will apply. Each term there are
15 Conventions
deadlines after which the user will not drop courses from his schedule
without penalties.
Pre-enrolment
Students will pre-enroll in courses using a list that is created from the UW
Pre-Enrollment Course Build page. Department representatives will have
access to build the list of courses. All students, faculty and staff will be
able to view the list of courses. The process of making course requests for
future terms using Quest. Faculties will make teaching plans using this
course demand data.
Section
The number that identifies a particular section of a course component.
Service Hold
A Hold is a notice that will affect the user’s use of Quest, or his
interaction with the University. For instance, if the user owe fees or other
goods, or have committed an academic offence, he will find a Hold
placed on his account. Holds will prevent the user from receiving
transcripts, or enrolling himself using Quest.
Student ID
A unique number assigned to every student when they apply to the
University.
Unofficial
Transcript
A record of the user’s courses, grades earned, units obtained towards his
degree, and more. Unofficial transcripts are for viewing purposes only
and can be obtained through UW's online student information system:
Quest. If graduate schools or employers require the user’s transcript,
they usually need an official transcript.
Waitlist
For handling enrolment requests for high demand courses when
course/sections become full or when the spaces allocated for those not
meet the specific requirement, waiting list is provided to student and it
will be processed though Quest system.
2.3: Abbreviations
FAQ
Frequently Asked Questions
HRMS
Human Resource Management System
SIS
Student Information System
UI
User Interface
16 Conventions
UW
University of Waterloo
2.4: Getting Started
This subsection is for the benefit of new Quest system users. As such, it tries to be short and
simple. Much more information is available through the next two sections.
2.4.1: How to Retrieve/Reset Password
The user will need to do this when:
•
User forgot his password
•
User fails to attempt to login more than 5 times
•
User wants to change his password
When the user fails to login more than 5 times the user’s account will be deactivated temporarily
and system will send a reactivate link to the user’s e-mail box.
To retrieve a new password:
1. Go to the main page of Quest
2. Click on the Retrieve Password
Figure 2.1: Quest Login Screen
17 Conventions
3. The Quest online password reset and account reactivation form is displayed and simple
instructions are provided as to how to fill out the form.
4. Upon submission of the form, a password reset/account reactivation link is sent to an email address specified in the form.
5. Alternatively, approach the Quest help desk for account reactivation.
2.4.2: How to Enroll/Pre-enroll
Students of UW can begin to enroll for the upcoming term at the 5th week of the current term and
pre-enroll for future terms. Those wishing to take courses in future terms can pre-enroll in order
to better the chances of getting into a course. Pre-enrollment deadlines can also be found in
Quest. Pre-enrollment allows UW to plan section sizes, minimize conflicts between courses,
and get students registered in the courses they want.
To enroll for following semester or pre-enroll for a future semester the user will:
1. Log into Quest and click the Academics tab. As a new feature, there will be an event
reminder with quick link, i.e. Enroll for Winter 2009 at the first day of enrollment
appointment.
2. On the right half of the page will be a listing of terms. The user will select the term for
which he wishes to enroll or pre-enroll.
3. Click either the Add Course or Add Future Course link. If neither link is present
then it is not possible to enroll or pre-enroll for the selected term.
4. Search for the desired course on the Course Offerings screen by selecting criteria and
clicking the Search Button.
5. Click either the Enroll, Pre-Enroll or Add to Waiting List link, which is beside the
desired course.
2.4.3: How to Order Official Transcript
Unlike the transcript order methods provided before, i.e. order by mail, order by fax, order in
person, Quest online order of transcript is more efficient and convenient. The transcript will be
available 5 days after successful ordering process. It will also be sent to the demander specified
mailing address directly.
To order an official transcript the user will:
18 Conventions
1. Select the Academics tab.
2. Select Request Official Transcripts.
3. Specify the number of transcripts needed and the mailing address for each one ordered.
4. On the new page fill in the form and choose Sign and Submit.
19 Use Cases
Chapter 3: Use Cases
Each use case is a sequence of actions taken by the user to perform one of the many functions
Quest offers. Each use case can only be performed while the system is running and the user has
already logged in with valid account credentials. Most use cases can be performed in multiple
ways which are referred to as scenarios, however only cases resulting in erroneous actions
referred to as exceptions and widely different operations resulting in the same general outcome
referred to as alternatives will be presented along with the most general and simplified scenario
to each use case.
3.1: Logging In
Logging in is the first function of Quest the user will be presented with and the only use case
that can be performed while the user is not already logged in. However, the system must be
running in order for the user to be able to log in.
Figure 3.1: Login screen
Upon successful login, the user will be presented with the Quest Home screen. The user can
select tabs in the main navigation bar at the top to access the different areas and functions of
Quest. Any important reminders or alerts will be displayed in the Welcome screen.
20 Use Cases
Figure 3.2: Welcome screen
If the user has attempted to login with invalid credentials, then the user will be informed by an
error message and re-presented with the Login screen.
Figure 3.3: Failed Login error screen
21 Use Cases
3.2: Profile
The Profile area is where the user will view and change public information about himself, and
view information about any Service Holds placed upon his account. The Profile area can be
access any time from anywhere in Quest by clicking the Profile link in the navigation bar.
Figure 3.4: Main Profile screen
3.2.1: Viewing and Updating Current Profile
The user will view the public information in his profile by clicking the View Profile link from
the main Profile screen.
While viewing his profile, the user will update his profile by changing different field values and
clicking the Update Profile. Afterwards, the user will be presented with a confirmation screen
that the update has been performed.
22 Use Cases
Figure 3.5: View and Update Profile
Figure 3.6: Confirmation of Profile Update
23 Use Cases
3.2.2: Viewing Service Holds
The user will view any service holds that have been placed on his account at any time by clicking
View Service Holds from the main Profile screen. Each service hold will include a brief
summary and possibly information to resolve the problem.
Figure 3.7: Service Holds screen
3.3: Admissions
The Admissions area is where prospective students can view or accept applications of
enrollment to the University of Waterloo. The user will access the Admissions area at any time
by clicking the Admissions tab in the navigation bar.
The Admissions tab is only visible and accessible by applicants with active applications to
UW. From the main Admissions screen, the user is able to see a list of active applications.
24 Use Cases
Figure 3.8: Main Admissions screen
3.3.1: Viewing Application Status and Accepting Offer
From the main Admission screen, the user will view the status of one of his applications by
selecting the application in question from the list and clicking View Application Status.
While viewing the status of an application, if the application has been processed and awaiting
offer acceptance by the user, then the Accept Offer link will be visible. By clicking the
Accept Offer link, the user will accept the offer of admission.
If the application has not been accepted by the acceptance due date, then the user will not see the
Accept Offer link, but will instead see an error message alerting him that the application has
passed the deadline.
25 Use Cases
Figure 3.9: View Admission Application Status screen with acceptable offer
3.4: Finances
The Finances area contains information regarding term fees and financial aid. The user will
access the Finances area at any time by clicking the Finances tab in the navigation bar.
Figure 3.10: Main Finances screen
26 Use Cases
3.4.1: View Term Finances
The user will view a breakdown of the current and past term’s finance summaries and remaining
balance owing by clicking the View Term Finances link from the Finances screen, then
clicking on the term in question. The user will also e-mail a copy of the detailed bill by clicking
the E-mail Bill link while viewing the breakdown of the term’s finance costs.
Figure 3.11: Term selection for View Term Finances
Figure 3.12: Breakdown of a specific term finance summary
27 Use Cases
3.4.2: Promissory Note and Payment Instructions
The user will arrange fees by following instructions to submit a Promissory Note or make fee
payments, by clicking the Submit Promissory Note link or Payment Instructions link,
respectively. Both links can be found on the main Finances screen.
3.4.3: Applying for Financial Aid
The user will see a list of links to sites where he will apply for financial aid, by clicking the
Apply for Financial Aid link on the main Finances screen. By clicking any of the links, the
user will be redirected to the corresponding website where he will find more information or
apply for financial aid.
Figure 3.13: Apply for Financial Aid screen
3.4.4: View Financial Aid Status
The user can view a list of active and past financial aid applications by clicking View
Financial Aid Status from the Finances Screen. The user will be presented with a list of
financial aid applications he has submitted and brief summary of information per application.
28 Use Cases
Figure 3.14: View Financial Aid Status screen
3.5: Academics
The user will access the Academics area by clicking the Academics tab in the navigation bar.
The Academics area allows the user to access information and perform services related to past,
present or future terms. The user can also view the University of Waterloo’s Course Catalog,
view the Diploma Requirements of the user’s program, and access a copy of the user’s transcript.
29 Use Cases
Figure 3.15: Main Academics screen
3.5.1: Diploma Requirements
The user will access a detailed listing of the user’s diploma requirements by clicking the
Diploma Requirements link on the main Academics screen.
Figure 3.16: Diploma Requirements checklist
30 Use Cases
3.5.2: Transcript
The user will view an unofficial copy of his transcript online by clicking the View Unofficial
Transcript link on the main Academics screen.
Figure 3.17: Unofficial Transcript screen
The user will request an official copy of his transcript be mailed or faxed by filling out an online
copy of a transcript request form, which can be accessed by clicking the Request Official
Transcript link on the main Academics screen.
31 Use Cases
Figure 3.18: Request Official Transcript form
3.5.3: Course Catalog
The user will access a listing of all courses and descriptions offered by the University of
Waterloo, by clicking the Course Catalog link on the main Academics screen. By selecting a
program from the Program drop-down box, the Course drop-down box will auto-populate with
all known courses belong to the selected program. By choosing a course from the Course dropdown box a link to the official descript in the UW Calendar and an unofficial description of the
selected course will be presented.
32 Use Cases
Figure 3.19: Course Catalog search screen
3.5.4: Course Offerings
The Course Offerings search page offers a common interface to search for course offerings in
present and future terms, and can accessed in a variety of ways as is shown in Section 3.5.5. The
Course Offerings page is typically related to enrolling, pre-enrolling and swapping courses. As
each field has a value selected from its drop-down box, the remaining fields below it will autopopulate with corresponding options. Only the Term field must have a value selected – if no
value is selected the Search button will not perform the search and the user will be presented
with an alert informing the user that he must select a term before searching. Once the user has
decided on the criteria the user will click the Search button to search for all course offerings
that meet the specified criteria. All results will be listed below with a link to an action beside
each result. If the user is searching the current or next term, then each result will have either an
Enroll, Swap or Add to Waiting List link beside it. If the user is searching a future term then
each result will have a Pre-Enroll or Swap link beside it.
33 Use Cases
Figure 3.20: Course Offerings for current term
Figure 3.21: Course Offerings for future term
34 Use Cases
3.5.5: Course Listing
From the main Academics page, the user will access a listing of courses and options relevant to
a specific term by selecting a link to the desired term.
Figure 3.22: Course listing of past term
Each term will present a listing of courses and instructors for the term. If the term is a past term,
then the grades of each course and term average will be shown.
If the term is a current or next term, then the user will see addition options including dropping or
swapping all enrolled courses, enrolling in a new course, viewing a weekly schedule of enrolled
courses and if available, viewing a monthly schedule of course exams.
35 Use Cases
Figure 3.23: Course listing of current term
If the term is a future term and not just the next term, then the user will see the options to drop or
swap any course he has pre-enrolled in thus far, and the option to pre-enroll in a future course.
If the user clicks a Drop link, then whichever course the link was belonged to will be dropped,
whether a future or current term course. If the user clicks a Swap, Add Future Course or
Add Course link, then the user will be presented with the Course Offerings page discussed in
Section 3.5.4. From the Course Offering page, the user will search for a course to substitute or
append to the term he/she was previously viewing.
The user will add, drop or swap only one course at a time, and if unsuccessful the user will be
presented with the Enrollment Failure page detailing why the action failed. The Enrollment
Failure page will include a Return link which will return the user to the previous screen usually the Course Offering screen.
36 Use Cases
Figure 3.24: Course listing of future term
Figure 3.25: Enrollment Failure screen
37 Use Cases
3.5.6: View Exam Schedule
While viewing the course listing for the current term the user may click the View Exam
Schedule link to see a calendar-style presentation of the exams of the courses the user is
enrolled in for the current term. If the user has multiple exams at the same date and time, then the
conflict will be automatically detected and the Registrar's Office will be notified. If the user has
two or more exams back-to-back and wishes to file a conflict, the user may click the Report
Exam Conflict link to submit an online Exam Conflict form. If the exam schedule for the term
has not been released yet, then the user will only see a notice that the exam schedule is not
available and to check back at the appropriate date.
Figure 3.26: Exam schedule
38 Use Cases
3.6: Advisors
The user will view a list of his advisors and each advisor’s contact information by clicking the
Advisors tab from the main Academics Screen. The Advisors tab is only visible and
accessible by graduate students who require academic advisors.
Figure 3.27: Main Advisors screen
3.7: Help and Searching
The user will view a list of Frequently Asked Questions, search help files or contact Quest
administrators by going to the Help screen, which can be accessed at any time by clicking the
Help tab in the navigation bar.
39 Use Cases
Figure 3.28: Main Help screen
3.8: Logging Out
The user can logout of Quest by clicking the Logout tab from the navigation bar. The user will
be presented with a confirmation screen. While at the confirmation screen, the user can return to
any area of Quest or continue logging out by clicking the Logout button.
Figure 3.29: Logout confirmation screen
40 Advanced Features
Chapter 4: Advanced Features
4.1: Timeout
The user’s Quest session will timeout after a prespecified period of inactivity regardless of
which page he is viewing, meaning that he will automatically be logged out. The user then will
be presented by the Login screen.
Figure 4.1: Timeout screen
4.2: Settings
The user has access to his settings such as theme selector, font selector and notification e-mail by
opening this area.
41 Advanced Features
Figure 4.2: Settings screen
4.2.1: Customization
The user can select his desired look and feel of the Quest. He can choose among different
predefined themes or simply select the desired type, size and color of font of the screens.
Figure 4.3: Customization screen
42 Advanced Features
4.2.2: Notification E-mail
The user can be notified of his status changes via e-mail. Status changes include the admission
application status, service holds status and pre-enrollment status. The user will enter a primary email address and appropriate check boxes to select his desired notifications.
Figure 4.4: Notifications screen
4.3: JobMine
The user is able to view and interact with the JobMine system through Quest.
Figure 4.5: JobMine screen
43 Advanced Features
4.4: myHR
The user can view his current and past paycheque information in the myHR area. He can change
his personal information which will be printed on his check and his bank account number to
which the monthly amount will be deposited. Normally students don’t have access to this section
unless they have some earnings on campus such as teaching assistantships.
Figure 4.6: myHR screen
44 Bibliography
Bibliography
[QUEST, 08]
Quest Help, http://www.quest.uwaterloo.ca/help/index.html, (Accessed:
November 2008).
[WIKIPEDIA, 08a]
“Student Information System”, available: http://en.wikipedia.org/wiki/
Student_information_system, (Accessed: November 2008).
[WIKIPEDIA, 08b]
“Human Resource Management System”, available: http://en.wikipedia.org/
wiki/Human_Resource_Management_Systems,(Accessed: November 2008).