1
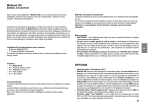
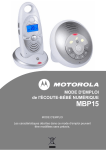
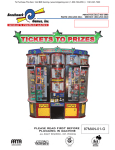
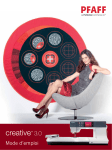
Guide de dépannage Troubleshooting Guidelines Auto-Dimming Compass Mirror User Guide Congratulations! Your new automobile is equipped with an Automatic Dimming Mirror, manufactured by Gentex Corporation. During nighttime driving, this safety feature senses distracting glare from vehicle headlights behind you and automatically dims the mirror to eliminate glare and preserve your vision. The mirror also displays your compass heading. LED SENSOR 1. Mirror, Compass Feature Will Not Function (with ignition “On”). Check to make sure that the ignition battery voltage and ground wires are properly connected. 2. “C” is Displayed in the Compass Window The compass needs to be calibrated. Drive the vehicle in a circle DW¿YHPSKRUOHVVXQWLOWKHGLVSOD\UHDGVDGLUHFWLRQ<RXFDQDOVR calibrate the compass by driving your vehicle on your everyday routine. The compass will be calibrated once it has tracked one complete circle. 1. Le compas ne fonctionne pas lorsque le contact est mis Guide d’ utilisation du miroir à compas à atténuation de lumière automatique Félicitations ! Votre nouvelle voiture est équipée d’un miroir à atténuation de lumière automatique fabriqué par Gentex Corporation. Lorsque vous conduisez la nuit, cette caractéristique de sécurité du miroir atténue automatiquement la lumière qui provient des phares du véhicule derrière vous pour éviter les éblouissements. Le miroir montre également le cap géographique au compas. DEL CAPTEUR NE SWITCH COMPASS DISPLAY To Operate the Auto-Dimming Feature 1. If the green LED indicator is illuminated, the Auto-Dimming feature is on. 2. If it is not on, push and hold the switch for 3 seconds, or until the green LED is illuminated. Upon release, Auto-Dimming is enabled. To Operate the Compass Feature 1. Push and release the switch in less than 3 seconds to toggle the directional heading display On/Off. 2. If the display reads “C”, calibrate the compass by driving the vehicle in a FRPSOHWHFLUFOHDWOHVVWKDQ¿YHPSK Cleaning the Mirror When cleaning the mirror, use a paper towel or similar material dampened with glass cleaner. Do not spray glass cleaner directly on the mirror as that may cause the liquid cleaner to enter the mirror housing and damage the mirror. 4. To Recalibrate the Compass 1. To put the compass in the calibration mode, push and hold the switch for 9 seconds until a “C” appears in the display window. 2. Calibrate the compass as in number 2 above. (1) Installing items such as a ski rack, antenna, or even some body reSDLUZRUNFDQFDXVHFKDQJHVWRWKHYHKLFOH¶VPDJQHWLF¿HOG In these situations, the compass will need to be recalibrated to the YHKLFOH¶VPDJQHWLF¿HOG (2) The compass may not indicate the correct compass point in tunnels or while driving up or down a steep hill. (The compass returns to the correct compass point when the vehicle moves to an area where the geomagnetism is stabilized.) Outside Auto-Dimming Mirror With Approach Lighting - If Equipped APPROACH LIGHT AUTO-DIMMING PORTION OF EXTERIOR MIRROR APPROACH LIGHT 1 2 15 2 3 4 5 3 6 7 8 9 12 10 11 14 13 /¶DI¿FKDJHpWDQWDOOXPpDSSX\H]VXUODWRXFKHSHQGDQWVHFRQGHV MXVTX¶jFHTXHODVpOHFWLRQ=RQHDSSDUDLVVHXQFKLIIUHDSSDUDvWUDj O¶DI¿FKHXUGXFRPSDV NE 14 INTERRUPTEUR AFFICHAGE DU COMPAS Fonctionnement de l’atténuation delumière automatique 1. Si la DEL verte est allumée l’atténuation automatique est en marche. 2. Si elle n’est pas en marche, appuyez sur l’interrupteur pendant 3 secondes, ou jusqu’à ce la DEL verte s’allume. Cessez d’appuyer sur l’interrupteur. L’atténuation de lumière automatique sera alors en marche. 1. Appuyez sur l’interrupteur et relâchez-le en moins de 3 secondes pour mettre en IRQFWLRQRXQRQO¶DI¿FKDJHGXFDSJpRJUDSKLTXH 6LO¶DI¿FKDJHLQGLTXH³&´FDOLEUH]OHFRPSDVSDUFRXUDQWXQFHUFOHFRPSOHWDX moyen du véhicule à moins de 5 mi/h. Nettoyage du miroir Lorsque vous nettoyez le miroir, utilisez une serviette en papier ou une matière semblable humectée d’un nettoyant pour vitres. Ne pulvérisez pas le nettoyant directePHQWVXUOHPLURLU/HOLTXLGHSRXUUDLWV¶LQ¿OWHUGDQVOHERvWLHUHWHQGRPPDJHUOHPLURLU Rétroviseur extérieur à antiéblouissement automatique avec éclairage d’approche (s’il y a lieu) ÉCLAIRAGE PORTION ANTIÉBLOUISSED’APPROCHE MENT DU RÉTROVISEUR EXTÉRIEUR ÉCLAIRAGE D’APPROCHE /¶DI¿FKDJHVHUHPHWWUDHQPRGHQRUPDOGDQVOHVVHFRQGHVVLYRXVQH touchez plus à l’interrupteur. 4. Si le véhicule change de zone, répétez les étapes 1 à 3 Voir la carte. 5. Si le réglage de la zone n’a pas corrigé l’erreur du cap du compas ou si la zone avait déjà été réglée convenablement pour votre secteur, recalibrez le compas selon les directives à la section 4. 4. Pour recalibrer le compas 1. Pour mettre le compas en mode de calibrage, appuyez sur l’interrupteur et gardez le doigt sur celui-ci pendant 9 secondes jusqu’à ce que la lettre &DSSDUDLVVHjO¶DI¿FKHXU 2. Calibrez le compas tel qu’indiqué à l’étape 2. 5. Remarques /¶LQVWDOODWLRQG¶DUWLFOHVWHOVTXHSRUWHVNLVDQWHQQHRXPrPHOHV UpSDUDWLRQVGHFDUURVVHULHSHXYHQWPRGL¿HUOHFKDPS magnétique du véhicule. Dans ces cas, le compas devra être recalibré par rapport au champ magnétique du véhicule. /HFRPSDVSHXWPDOIRQFWLRQQHUGDQVXQWXQQHORXGDQVXQHSHQWHHVFDU pée. (Le compas fonctionnera normalement lorsque le véhicule se trovera dans un secteur où le géomagnétisme est stable. 1 13 2 15 2 3 4 4 12 10 6 6 7 8 9 12 10 11 14 13 OBJECTS IN MIRROR ARE CLOSER THAN THEY APPEAR 14 13 4 12 9 7 8 NON-DIMMING OUTER CHROME RING The approach lighting feature illuminates the front and rear doors and also shines downward to illuminate the area in front of the doors when the doors are unlocked or opened. 5 3 11 5 OBJECTS IN MIRROR ARE CLOSER THAN THEY APPEAR The exterior auto-dimming feature is controlled by the interior auto-dimming mirror and will automatically dim the exterior mirror to eliminate glare and preserve your vision when the interior mirror adjusts. The auto-dimming feature of the exterior mirror can be turned on/off by setting the interior mirror’s auto-dimming feature to on or off. Refer to “To Operate the Auto-Dimming Feature” section for operation. 2. Alternez jusqu’à la zone voulue et relâchez l’interrupteur. Fonctionnement du compas 5. Note Le compas doit être calibré. Parcourez un cercle complet au moyen du véhicule à PLKRXPRLQVMXVTX¶jFHTXHO¶DI¿FKDJHLQGLTXHXQH direction. Vous pouvez aussi calibrer le compas en conduisant le véhicule selon votre routine quotidienne. Le compas sera calibré lorsqu’il aura parcouru un cercle complet. 3. Direction de compas incorrecte 3. Inaccurate Compass Direction 1. With the display turned on, push the button for 6 seconds, until the Zone selection comes up (a number will be displayed in the mirror compass window). 2. Toggle until correct zone is found and release switch. 3. The display will return to the normal compass mode within 10 seconds of no switch activity. 4. If the vehicle changes zone, repeat steps 1 thru 3. See map. 5. If adjusting the zone setting did not correct the compass heading error, or if the zone was already properly set for your area, then recalibrate the compass per section 4. 9pUL¿H]TXHODWHQVLRQGHODEDWWHULHG¶DOOXPDJHHWOHV¿OVGHPDVVHVRQW convenablement raccordés. /¶DI¿FKHXUGXFRPSDVLQGLTXHODOHWWUH& *550-0566-000* 550-0566AAA ANNEAU CHROMÉ EXTÉRIEUR SANS FONCTION ANTIÉBLOUISSEMENT La fonction antiéblouissement automatique du rétroviseur extérieur est commandée par le rétroviseur antiéblouissement intérieur et s’activera automatiquement au UpJODJHGXUpWURYLVHXULQWpULHXUSRXUpOLPLQHUOHVUHÀHWVHWSURWpJHUYRWUHYLVLELOLWp Vous pouvez activer ou désactiver la fonction antiéblouissement automatique du rétroviseur extérieur en réglant la fonction antiéblouissement du rétroviseur intérieur à la position ON ou OFF. Reportez-vous à la section « Pour utiliser la fonction DQWLpEORXLVVHPHQWDXWRPDWLTXHªSRXUFRQQDvWUHVRQIRQFWLRQQHPHQW /¶pFODLUDJHG¶DSSURFKHLOOXPLQHOHVSRUWHVDYDQWHWDUULqUHGHPrPHTXHOHVROD¿Q d’éclairer l’espace devant les portes lorsqu’on les déverrouille ou qu’on les ouvre. 11 5 10 6 9 7 8 *550-0568-000* $$$ Guide de dépannage Troubleshooting Guidelines Auto-Dimming Compass Mirror User Guide Congratulations! Your new automobile is equipped with an Automatic Dimming Mirror, manufactured by Gentex Corporation. During nighttime driving, this safety feature senses distracting glare from vehicle headlights behind you and automatically dims the mirror to eliminate glare and preserve your vision. The mirror also displays your compass heading. LED SENSOR 1. Mirror, Compass Feature Will Not Function (with ignition “On”). Check to make sure that the ignition battery voltage and ground wires are properly connected. 2. “C” is Displayed in the Compass Window The compass needs to be calibrated. Drive the vehicle in a circle DW¿YHPSKRUOHVVXQWLOWKHGLVSOD\UHDGVDGLUHFWLRQ<RXFDQDOVR calibrate the compass by driving your vehicle on your everyday routine. The compass will be calibrated once it has tracked one complete circle. 1. Le compas ne fonctionne pas lorsque le contact est mis Guide d’ utilisation du miroir à compas à atténuation de lumière automatique Félicitations ! Votre nouvelle voiture est équipée d’un miroir à atténuation de lumière automatique fabriqué par Gentex Corporation. Lorsque vous conduisez la nuit, cette caractéristique de sécurité du miroir atténue automatiquement la lumière qui provient des phares du véhicule derrière vous pour éviter les éblouissements. Le miroir montre également le cap géographique au compas. DEL CAPTEUR NE SWITCH COMPASS DISPLAY To Operate the Auto-Dimming Feature 1. If the green LED indicator is illuminated, the Auto-Dimming feature is on. 2. If it is not on, push and hold the switch for 3 seconds, or until the green LED is illuminated. Upon release, Auto-Dimming is enabled. To Operate the Compass Feature 1. Push and release the switch in less than 3 seconds to toggle the directional heading display On/Off. 2. If the display reads “C”, calibrate the compass by driving the vehicle in a FRPSOHWHFLUFOHDWOHVVWKDQ¿YHPSK Cleaning the Mirror When cleaning the mirror, use a paper towel or similar material dampened with glass cleaner. Do not spray glass cleaner directly on the mirror as that may cause the liquid cleaner to enter the mirror housing and damage the mirror. 4. To Recalibrate the Compass 1. To put the compass in the calibration mode, push and hold the switch for 9 seconds until a “C” appears in the display window. 2. Calibrate the compass as in number 2 above. (1) Installing items such as a ski rack, antenna, or even some body reSDLUZRUNFDQFDXVHFKDQJHVWRWKHYHKLFOH¶VPDJQHWLF¿HOG In these situations, the compass will need to be recalibrated to the YHKLFOH¶VPDJQHWLF¿HOG (2) The compass may not indicate the correct compass point in tunnels or while driving up or down a steep hill. (The compass returns to the correct compass point when the vehicle moves to an area where the geomagnetism is stabilized.) Outside Auto-Dimming Mirror With Approach Lighting - If Equipped APPROACH LIGHT AUTO-DIMMING PORTION OF EXTERIOR MIRROR APPROACH LIGHT 1 2 15 2 3 4 5 3 6 7 8 9 12 10 11 14 13 /¶DI¿FKDJHpWDQWDOOXPpDSSX\H]VXUODWRXFKHSHQGDQWVHFRQGHV MXVTX¶jFHTXHODVpOHFWLRQ=RQHDSSDUDLVVHXQFKLIIUHDSSDUDvWUDj O¶DI¿FKHXUGXFRPSDV NE 14 INTERRUPTEUR AFFICHAGE DU COMPAS Fonctionnement de l’atténuation delumière automatique 1. Si la DEL verte est allumée l’atténuation automatique est en marche. 2. Si elle n’est pas en marche, appuyez sur l’interrupteur pendant 3 secondes, ou jusqu’à ce la DEL verte s’allume. Cessez d’appuyer sur l’interrupteur. L’atténuation de lumière automatique sera alors en marche. 1. Appuyez sur l’interrupteur et relâchez-le en moins de 3 secondes pour mettre en IRQFWLRQRXQRQO¶DI¿FKDJHGXFDSJpRJUDSKLTXH 6LO¶DI¿FKDJHLQGLTXH³&´FDOLEUH]OHFRPSDVSDUFRXUDQWXQFHUFOHFRPSOHWDX moyen du véhicule à moins de 5 mi/h. Nettoyage du miroir Lorsque vous nettoyez le miroir, utilisez une serviette en papier ou une matière semblable humectée d’un nettoyant pour vitres. Ne pulvérisez pas le nettoyant directePHQWVXUOHPLURLU/HOLTXLGHSRXUUDLWV¶LQ¿OWHUGDQVOHERvWLHUHWHQGRPPDJHUOHPLURLU Rétroviseur extérieur à antiéblouissement automatique avec éclairage d’approche (s’il y a lieu) ÉCLAIRAGE PORTION ANTIÉBLOUISSED’APPROCHE MENT DU RÉTROVISEUR EXTÉRIEUR ÉCLAIRAGE D’APPROCHE /¶DI¿FKDJHVHUHPHWWUDHQPRGHQRUPDOGDQVOHVVHFRQGHVVLYRXVQH touchez plus à l’interrupteur. 4. Si le véhicule change de zone, répétez les étapes 1 à 3 Voir la carte. 5. Si le réglage de la zone n’a pas corrigé l’erreur du cap du compas ou si la zone avait déjà été réglée convenablement pour votre secteur, recalibrez le compas selon les directives à la section 4. 4. Pour recalibrer le compas 1. Pour mettre le compas en mode de calibrage, appuyez sur l’interrupteur et gardez le doigt sur celui-ci pendant 9 secondes jusqu’à ce que la lettre &DSSDUDLVVHjO¶DI¿FKHXU 2. Calibrez le compas tel qu’indiqué à l’étape 2. 5. Remarques /¶LQVWDOODWLRQG¶DUWLFOHVWHOVTXHSRUWHVNLVDQWHQQHRXPrPHOHV UpSDUDWLRQVGHFDUURVVHULHSHXYHQWPRGL¿HUOHFKDPS magnétique du véhicule. Dans ces cas, le compas devra être recalibré par rapport au champ magnétique du véhicule. /HFRPSDVSHXWPDOIRQFWLRQQHUGDQVXQWXQQHORXGDQVXQHSHQWHHVFDU pée. (Le compas fonctionnera normalement lorsque le véhicule se trovera dans un secteur où le géomagnétisme est stable. 1 13 2 15 2 3 4 4 12 10 6 6 7 8 9 12 10 11 14 13 OBJECTS IN MIRROR ARE CLOSER THAN THEY APPEAR 14 13 4 12 9 7 8 NON-DIMMING OUTER CHROME RING The approach lighting feature illuminates the front and rear doors and also shines downward to illuminate the area in front of the doors when the doors are unlocked or opened. 5 3 11 5 OBJECTS IN MIRROR ARE CLOSER THAN THEY APPEAR The exterior auto-dimming feature is controlled by the interior auto-dimming mirror and will automatically dim the exterior mirror to eliminate glare and preserve your vision when the interior mirror adjusts. The auto-dimming feature of the exterior mirror can be turned on/off by setting the interior mirror’s auto-dimming feature to on or off. Refer to “To Operate the Auto-Dimming Feature” section for operation. 2. Alternez jusqu’à la zone voulue et relâchez l’interrupteur. Fonctionnement du compas 5. Note Le compas doit être calibré. Parcourez un cercle complet au moyen du véhicule à PLKRXPRLQVMXVTX¶jFHTXHO¶DI¿FKDJHLQGLTXHXQH direction. Vous pouvez aussi calibrer le compas en conduisant le véhicule selon votre routine quotidienne. Le compas sera calibré lorsqu’il aura parcouru un cercle complet. 3. Direction de compas incorrecte 3. Inaccurate Compass Direction 1. With the display turned on, push the button for 6 seconds, until the Zone selection comes up (a number will be displayed in the mirror compass window). 2. Toggle until correct zone is found and release switch. 3. The display will return to the normal compass mode within 10 seconds of no switch activity. 4. If the vehicle changes zone, repeat steps 1 thru 3. See map. 5. If adjusting the zone setting did not correct the compass heading error, or if the zone was already properly set for your area, then recalibrate the compass per section 4. 9pUL¿H]TXHODWHQVLRQGHODEDWWHULHG¶DOOXPDJHHWOHV¿OVGHPDVVHVRQW convenablement raccordés. /¶DI¿FKHXUGXFRPSDVLQGLTXHODOHWWUH& *550-0566-000* 550-0566AAA ANNEAU CHROMÉ EXTÉRIEUR SANS FONCTION ANTIÉBLOUISSEMENT La fonction antiéblouissement automatique du rétroviseur extérieur est commandée par le rétroviseur antiéblouissement intérieur et s’activera automatiquement au UpJODJHGXUpWURYLVHXULQWpULHXUSRXUpOLPLQHUOHVUHÀHWVHWSURWpJHUYRWUHYLVLELOLWp Vous pouvez activer ou désactiver la fonction antiéblouissement automatique du rétroviseur extérieur en réglant la fonction antiéblouissement du rétroviseur intérieur à la position ON ou OFF. Reportez-vous à la section « Pour utiliser la fonction DQWLpEORXLVVHPHQWDXWRPDWLTXHªSRXUFRQQDvWUHVRQIRQFWLRQQHPHQW /¶pFODLUDJHG¶DSSURFKHLOOXPLQHOHVSRUWHVDYDQWHWDUULqUHGHPrPHTXHOHVROD¿Q d’éclairer l’espace devant les portes lorsqu’on les déverrouille ou qu’on les ouvre. 11 5 10 6 9 7 8 *550-0568-000* $$$