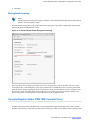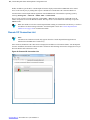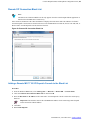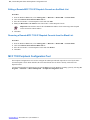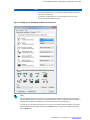
1
System Release 7.14
ASTRO® 25
INTEGRATED VOICE AND DATA
MCC 7100 IP DISPATCH
CONSOLE SETUP AND
USER GUIDE
November 2013
6871024P93-A
©
2013 Motorola Solutions, Inc. All rights reserved
Copyrights
The Motorola products described in this document may include copyrighted Motorola computer programs. Laws in
the United States and other countries preserve for Motorola certain exclusive rights for copyrighted computer
programs. Accordingly, any copyrighted Motorola computer programs contained in the Motorola products described
in this document may not be copied or reproduced in any manner without the express written permission of Motorola.
©
2013 Motorola Solutions, Inc. All Rights Reserved
No part of this document may be reproduced, transmitted, stored in a retrieval system, or translated into any language
or computer language, in any form or by any means, without the prior written permission of Motorola Solutions, Inc.
Furthermore, the purchase of Motorola products shall not be deemed to grant either directly or by implication,
estoppel or otherwise, any license under the copyrights, patents or patent applications of Motorola, except for the
normal non-exclusive, royalty-free license to use that arises by operation of law in the sale of a product.
Disclaimer
Please note that certain features, facilities, and capabilities described in this document may not be applicable to or
licensed for use on a particular system, or may be dependent upon the characteristics of a particular mobile subscriber
unit or configuration of certain parameters. Please refer to your Motorola contact for further information.
Trademarks
MOTOROLA, MOTO, MOTOROLA SOLUTIONS, and the Stylized M Logo are trademarks or registered
trademarks of Motorola Trademark Holdings, LLC and are used under license. All other trademarks are the property
of their respective owners.
European Union (EU) Waste of Electrical and Electronic Equipment (WEEE)
directive
The European Union's WEEE directive requires that products sold into EU countries must have the crossed out
trash bin label on the product (or the package in some cases).
As defined by the WEEE directive, this cross-out trash bin label means that customers and end-users in EU countries
should not dispose of electronic and electrical equipment or accessories in household waste.
Customers or end-users in EU countries should contact their local equipment supplier representative or service centre
for information about the waste collection system in their country.
6871024P93-A | November 2013 | Send Feedback
Contact Us
Motorola Solution Support Center
The Solution Support Center (SSC) is the primary Motorola Solutions support contact. Call:
•
•
Prior to any software reload.
To confirm troubleshooting results and analysis prior to removing and replacing a Field Replaceable Unit (FRU)
and Field Replaceable Entity (FRE) to repair the system.
For...
Phone
Domestic Calls
800-221-7144
International Calls
302-444-9800
North America Parts Organization
For assistance in ordering replacement parts or identifying a part number, contact the Motorola Parts organization.
Your first response when troubleshooting your system is to call the Motorola SSC.
For...
Phone
Phone Orders
800-422-4210 (US and Canada Orders)
For help identifying an item or part number: select choice 3 from
the menu.
302-444-9842 (International Orders)
includes help for identifying an item or part number and for
translation as needed
Fax Orders
800-622-6210 (US and Canada Orders)
Comments
Send questions and comments regarding user documentation to [email protected].
Provide the following information when reporting a documentation error:
•
•
•
The document title and part number
The page number with the error
A description of the error
We welcome your feedback on this and other Motorola manuals. To take a short, confidential survey on Motorola
Customer Documentation, go to docsurvey.motorolasolutions.com or scan the following QR code with your mobile
device to access the survey.
6871024P93-A | November 2013 | Send Feedback
Document History
Version
Description
Date
6871024P93-A
Original release of the MCC 7100 IP Dispatch Console Setup and
User Guide manual.
November 2013
6871024P93-A | November 2013 | Send Feedback
Contents | 9
Contents
Copyrights........................................................................................................................................ 3
Contact Us........................................................................................................................................ 5
Document History............................................................................................................................ 7
List of Figures................................................................................................................................ 15
List of Tables.................................................................................................................................. 17
List of Processes............................................................................................................................. 19
List of Procedures.......................................................................................................................... 21
About MCC 7100 IP Dispatch Console Setup and User Guide.................................................25
What is Covered In This Manual?.......................................................................................................................25
Helpful Background Information........................................................................................................................ 25
Related Information.............................................................................................................................................25
Chapter 1: MCC 7100 IP Dispatch Console – Overview....................................27
MCC 7100 IP Dispatch Console in Console Site Architectures......................................................................... 29
MCC 7100 IP Dispatch Console Features...........................................................................................................29
System Level Features.............................................................................................................................29
ASTRO 25 Trunking Features................................................................................................................ 30
ASTRO 25 Conventional Features..........................................................................................................30
MDC 1200 Analog Conventional Features............................................................................................. 30
Analog Conventional Features................................................................................................................ 31
Encryption Features.................................................................................................................................31
Integrated Tone Paging Encoder Features...............................................................................................31
MCC 7100 IP Dispatch Console System Components....................................................................................... 32
MCC 7100 IP Dispatch Console............................................................................................................. 32
PRX 7000 Console Proxy....................................................................................................................... 32
Console Site Control Room Firewall...................................................................................................... 33
License Server......................................................................................................................................... 33
Key Management Facility for MCC 7100 IP Dispatch Console.............................................................33
Customer Enterprise Network Components............................................................................................33
DNS Server..................................................................................................................................33
DHCP Server...............................................................................................................................34
VPN Server..................................................................................................................................34
MCC 7100 IP Dispatch Console Theory of Operations......................................................................................34
Zone Database Server and LDAP........................................................................................................... 34
MCC 7100 IP Dispatch Console – Encryption....................................................................................... 34
MCC 7100 IP Dispatch Console – Link Op............................................................................................34
MCC 7100 IP Dispatch Console and ISSI 8000 / CSSI 8000.................................................................34
Centralized Event Logging......................................................................................................................34
Audio Logging and the MCC 7100 IP Dispatch Console....................................................................... 35
Aux I/O in the MCC 7100 IP Dispatch Console..................................................................................... 35
Chapter 2: MCC 7100 IP Dispatch Console – Setup and Installation.............. 37
MCC 7100 IP Dispatch Console Software Requirements...................................................................................37
MCC 7100 IP Dispatch Console Hardware Requirements................................................................................. 37
MCC 7100 IP Dispatch Console Cohab Configurations.....................................................................................38
MCC 7100 IP Dispatch Console Call Capacities................................................................................................39
Dynamic System Resilience Considerations.......................................................................................................39
Setting Up the MCC 7100 IP Dispatch Console................................................................................................. 40
10 | Contents
Windows Installation and Motorola OS Installer (MOSI).................................................................................. 41
Configuring Windows Components....................................................................................................................41
Setting Display Properties....................................................................................................................... 42
Setting Windows Power Options............................................................................................................ 42
Setting Up SNMP Services Inside the ASTRO RNI...............................................................................43
Configuring Windows SNMP Components for a Console inside the ASTRO RNI............................... 43
Configuring Primary DNS Suffix............................................................................................................45
Installing the .NET Framework 3.5 on the Windows 8 Operating System Outside the ASTRO RNI... 46
Generating License Certificates for the MCC 7100 IP Dispatch Console.......................................................... 46
Installing the MCC 7100 IP Dispatch Console Software....................................................................................47
CRYPTR micro Installation Considerations........................................................................................... 48
Associated Windows Components Software Installation................................................................................... 49
Load Secure Keys and Algorithms .........................................................................................................49
Hardware Key Storage (CRYPTR micro)-Based Encryption.....................................................49
Software Keyfiles-Based Encryption.......................................................................................... 52
Third Party or Cohab Software Installation............................................................................................ 54
MOTOPATCH Installation..................................................................................................................... 55
Windows Supplemental Configuration................................................................................................... 55
Network Interface Card (NIC) Configuration......................................................................................... 56
Configuring the Network Interface Card for an MCC 7100 IP Dispatch Console Inside the
ASTRO RNI.......................................................................................................................... 56
Peripheral Configuration......................................................................................................................... 57
Modifying the Default Audio Peripherals................................................................................... 58
Disabling/Enabling Audio Devices in Windows.........................................................................58
Disabling Feedback Audio for Headset Devices.........................................................................58
Setting Up Network.................................................................................................................................59
Setting Up a Proxy Server Connection Outside the ASTRO RNI.............................................. 59
Setting Up the Domain for an MCC 7100 IP Dispatch Console Inside the ASTRO RNI.......... 60
Configuring the Local Hosts File for Consoles in Conventional K1/K2 Systems and
Outside the ASTRO RNI....................................................................................................... 61
Configuring the External NTP Time Source on Consoles in ASTRO 25 Conventional
K1/K2 System........................................................................................................................62
Credentials for Secure SNMPv3 Common Agent (Optional)..................................................... 62
Adding a Remote Console to the ASTRO DNS Server.............................................................. 63
Hardware CRYPTO Configuration......................................................................................................... 63
Changing the Default CRYPTR micro Password....................................................................... 63
CRYPTR micro Software Upgrade ............................................................................................64
Enable / Disable FIPS .............................................................................................................................64
MCC 7100 IP Dispatch Console Maintenance and Troubleshooting................................................................. 65
Dispatch Console PC Firewall Exceptions..............................................................................................65
Upgrading the MCC 7100 IP Dispatch Console Software......................................................................65
Failure to Upgrade or Uninstall the MCC 7100 IP Dispatch Console Software.....................................65
Elite Console Application Stuck in Application Initializing State..........................................................66
Restoring the Windows User Account Profile............................................................................ 66
Elite Console was Denied Access due to an Embedded Password Mismatch........................................ 67
Elite Console was Denied Access due to an Embedded Password Mismatch after Reinstalling All
Software............................................................................................................................................. 67
Adding a New Domain Console User......................................................................................... 67
Troubleshooting Audio on MCC 7100 IP Dispatch Console..................................................................68
Audio Quality Issues................................................................................................................... 68
Volume Levels Are Too Low......................................................................................................68
No Audio Sent or Received from the Peripherals....................................................................... 68
Troubleshooting Secure Audio on MCC 7100 IP Dispatch Console with CRYPTR micro-Based
Encryption..........................................................................................................................................69
CRYPTR Password Issues ......................................................................................................... 69
Testing an Unresponsive CRYPTR micro Card .........................................................................70
Contents | 11
Secure Call Failures.....................................................................................................................71
SD Host Controller Driver Considerations (CRYPTR Failures)................................................ 72
Troubleshooting Detection of CRYPTR micro Device.............................................................. 73
Troubleshooting Connection Issues (Outside the ASTRO RNI)............................................................ 74
License Troubleshooting – MCC 7100 IP Dispatch Console................................................................. 75
Troubleshooting the Instant Recall Recorder License Issues..................................................................75
Changing the Maximum Transmission Unit (MTU)...............................................................................76
MCC 7100 IP Dispatch Console Disaster Recovery...........................................................................................76
Recovering an MCC 7100 IP Dispatch Console Installation.................................................................. 76
Critical Backup Files for the MCC 7100 IP Dispatch Console...............................................................77
Recovering a Damaged or Missing CRYPTR micro Card......................................................................78
Chapter 3: PRX 7000 Console Proxy – Setup and Installation......................... 81
PRX 7000 Console Proxy Software and Hardware Requirements..................................................................... 81
PRX 7000 Console Proxy Cohab with MCC 7500 Installations........................................................................ 81
Setting Up the PRX 7000 Console Proxy........................................................................................................... 81
Operating System Installation for the PRX 7000 Console Proxy....................................................................... 82
Windows Installation and Motorola OS Installer (MOSI)...................................................................... 82
Setting Windows Power Options............................................................................................................ 82
Generating License Certificates for the PRX 7000 Console Proxy.................................................................... 83
Installing the PRX 7000 Console Proxy Software.............................................................................................. 84
Configure a Black List for Remote MCC 7100 IP Dispatch Consoles (Optional)............................................. 85
MOTOPATCH Installation................................................................................................................................. 85
Windows Supplemental Configuration (K-Core)................................................................................................85
Network Interface Card (NIC) Configuration..................................................................................................... 86
Configuring the PC Network Interface Card for the PRX 7000 Console Proxy.....................................86
Setting Up the Domain for the PRX 7000 Console Proxy on L and M Core..................................................... 87
PRX 7000 Console Proxy Maintenance and Troubleshooting............................................................................88
Upgrading the PRX 7000 Console Proxy Software................................................................................ 88
Uninstalling the PRX 7000 Console Proxy Software............................................................................. 88
Remote Console Cannot Connect to the Proxy Server............................................................................89
License Troubleshooting – PRX 7000 Console Proxy............................................................................89
Changing the Maximum Transmission Unit (MTU)...............................................................................90
PRX 7000 Console Proxy Disaster Recovery..................................................................................................... 90
Recovering a PRX 7000 Console Proxy Installation.............................................................................. 90
Critical Backup Files for the PRX 7000 Console Proxy......................................................................... 91
Chapter 4: USB Audio Interface Module............................................................ 93
USB Audio Interface Module Connections.........................................................................................................93
Peripherals Supported with USB Audio Interface Module................................................................................. 94
Desk Microphone.................................................................................................................................... 94
Footswitch............................................................................................................................................... 95
Headset Jacks.......................................................................................................................................... 96
External Paging Encoder Port................................................................................................................. 97
Local Logging Recorder Port.................................................................................................................. 97
Telephone/Headset Port.......................................................................................................................... 98
Local Console Relay Outputs..................................................................................................................99
Enabling the Relays in the Windows Registry............................................................................99
USB Audio Interface Module Specifications....................................................................................................100
USB Audio Interface Module FRU/FRE Information...................................................................................... 100
USB Audio Interface Module – Bonding and Grounding Requirements......................................................... 101
Installing and Configuring USB Audio Interface Module................................................................................ 102
Connecting USB Audio Interface Module............................................................................................ 102
Configuring USB Audio Interface Module........................................................................................... 103
12 | Contents
Upgrading the USB Audio Interface Module Software.................................................................................... 103
USB AIM Device Information.............................................................................................................. 104
USB Audio Interface Module Troubleshooting................................................................................................ 104
USB Audio Interface Module Indicators...............................................................................................104
USB AIM Status Icon............................................................................................................................106
Diagnosing Audio Malfunction in USB Audio Interface Module........................................................ 106
Troubleshooting USB Audio Interface Module USB Communication Issues......................................107
Troubleshooting USB Audio Interface Module Upgrade Issues...........................................................107
Troubleshooting Problems with Peripherals......................................................................................... 107
Chapter 5: Console Dispatch Status and Peripheral Configuration Tool...... 109
Console Dispatch Status (MCC 7100 IP Dispatch Console)............................................................................ 109
Console Dispatch Status Taskbar Icon..................................................................................................109
Customizing the Console Dispatch Status Taskbar Icon...........................................................110
Proxy Server List...................................................................................................................................110
Proxy Server List Status Indicator.............................................................................................111
Proxy Server List Buttons......................................................................................................... 111
ASTRO Domain Configuration.................................................................................................112
Adding a Proxy Server Connection...........................................................................................112
Editing a Proxy Server Connection........................................................................................... 112
Removing a Proxy Server Connection...................................................................................... 112
Encryption/Licensing............................................................................................................................ 113
Console Dispatch Status (PRX 7000 Console Proxy).......................................................................................113
Remote OP Connection List..................................................................................................................114
Remote OP Connection Black List....................................................................................................... 115
Adding a Remote MCC 7100 IP Dispatch Console to the Black List...................................... 115
Editing a Remote MCC 7100 IP Dispatch Console on the Black List......................................116
Removing a Remote MCC 7100 IP Dispatch Console from the Black List............................. 116
MCC 7100 Peripheral Configuration Tool........................................................................................................116
Audio Outputs Tab................................................................................................................................ 117
Mapping and Unmapping a Speaker......................................................................................... 118
Testing a Speaker...................................................................................................................... 118
Configuring a non-Motorola Headset........................................................................................119
Audio Inputs Tab...................................................................................................................................119
Mapping and Unmapping a non-Motorola Desktop Microphone............................................. 119
PTT/Monitor Tab.................................................................................................................................. 120
Configuring a non-Motorola USB Footswitch..........................................................................120
USB AIM Tab....................................................................................................................................... 120
Mapping and Unmapping Motorola Peripherals....................................................................... 120
Peripheral Configuration Summary.......................................................................................................122
Peripheral Configuration Profile........................................................................................................... 122
Creating a Profile with non-Motorola Peripherals.................................................................... 123
Customizing a Profile with Motorola Peripherals.....................................................................123
Deleting a Profile.......................................................................................................................124
Control Panel Button............................................................................................................................. 124
Motorola Peripherals – Audio Gain.......................................................................................... 125
Chapter 6: Instant Recall Recorder................................................................... 127
Audio Types Recorded by the Instant Recall Recorder Application................................................................ 127
Configuring the Instant Recall Recorder Application.......................................................................................128
Instant Recall Recorder Basic Operations.........................................................................................................129
Starting the Instant Recall Recorder Application..................................................................................129
Closing the Instant Recall Recorder Application.................................................................................. 129
Fixing the Instant Recall Recorder Window on the Top of the Desktop.............................................. 130
Contents | 13
Switching the Instant Recall Recorder Window to the Compact Mode................................................130
Expanding and Collapsing Sections in the Instant Recall Recorder Window...................................... 130
Managing Detail Columns in the Instant Recall Recorder Call List.....................................................130
Playing Back Calls in the Instant Recall Recorder Application........................................................................131
Filtering Calls in the Instant Recall Recorder Application................................................................... 132
Call Filters in the Instant Recall Recorder Application........................................................................ 132
Sorting Calls in the Instant Recall Recorder......................................................................................... 132
Rewinding and Fast Forwarding Calls in the Instant Recall Recorder Application............................. 133
Changing the Playback Speed in the Instant Recall Recorder Application.......................................... 133
Modifying the Playback Volume and Playback Quality in the Instant Recall Recorder Application.. 133
Zooming In and Zooming Out Waveform in the Instant Recall Recorder Application........................134
Saving Calls to a File in the Instant Recall Recorder Application....................................................................134
Appendix A: MCC 7100 IP Dispatch Console - Additional Procedures and
Information........................................................................................................ 135
Removing All MCC 7100 IP Dispatch Console Applications.......................................................................... 135
Removing the Elite Admin and Elite Dispatch Applications Only...................................................................135
Configuring a Preconfigured Patch Console (Inside the ASTRO RNI)............................................................136
Configuring an Automatic Windows Login..........................................................................................136
Adding Windows Domain Username and Password to Windows Registry............................. 137
Configuring the Domain Controller for the Preconfigured Patch OP....................................... 137
Adding Elite Authentication Username and Password to the Windows Registry................................ 138
Creating Batch File for Automatic Network Authentication................................................................ 138
Fault Managment...............................................................................................................................................139
Fault Management for Devices Inside the ASTRO RNI.......................................................................139
MCC 7100 IP Dispatch Console Fault Management................................................................ 139
PRX 7000 Console Proxy Fault Management.......................................................................... 140
Control Room Firewall Fault Management...............................................................................140
Fault Management for Devices Outside the ASTRO RNI.................................................................... 140
Embedded Password Management....................................................................................................................140
Appendix B: Enhanced Alert Tones................................................................... 141
Enhanced Alert Tones Overview...................................................................................................................... 141
Enhanced Alert Tones – Audio File Specifications.......................................................................................... 141
Enhanced Alert Tones – Audio Files Configuration......................................................................................... 142
Appendix C: MCC 7100 IP Dispatch Console – System Release
Compatibility..................................................................................................... 147
ASTRO 7.14 MCC 7100 IP Dispatch Console System Components in an ASTRO 7.11 System................... 147
Setting Up the ASTRO 7.14 MCC 7100 IP Dispatch Console in an ASTRO 7.11 System............................. 148
ASTRO 7.14 MCC 7100 IP Dispatch Console System Components in an ASTRO 7.13 System................... 149
Setting Up the ASTRO 7.14 MCC 7100 IP Dispatch Console in an ASTRO 7.13 System............................. 149
Configuring Console Alias Manager for MCC 7100 Software in an ASTRO 7.11 System.............................150
MCC 7100 IP Dispatch Console – Other System Updates and Considerations............................................... 151
14 | Contents
List of Figures | 15
List of Figures
Figure 1: MCC 7100 IP Dispatch Console System Diagram ......................................................... 28
Figure 2: Administrative Tools - Services ......................................................................................43
Figure 3: SNMP Service Properties ................................................................................................44
Figure 4: SNMP Service Configuration – Security ........................................................................ 44
Figure 5: SNMP Service Configuration – Traps ............................................................................ 45
Figure 6: microSD to SD Adapter .................................................................................................. 50
Figure 7: KVL 4000 Model T7537B with CRYPTR micro Keyloading Cable ............................. 51
Figure 8: CRYPTRmicroManagement – Selecting About CRYPTRmicroManagement .............. 70
Figure 9: About CRYPTRmicroManagement – Version Numbers ................................................71
Figure 10: About CRYPTRmicroManagement – None ................................................................. 71
Figure 11: USB Audio Interface Module – Audio Routing ........................................................... 93
Figure 12: USB Audio Interface Module Port Connections ...........................................................94
Figure 13: Gooseneck Microphone ................................................................................................ 95
Figure 14: Footswitch ..................................................................................................................... 95
Figure 15: Headset Jack ..................................................................................................................96
Figure 16: USB Audio Interface Module State Indicators ........................................................... 105
Figure 17: Console Dispatch Status Taskbar Icon ........................................................................109
Figure 18: Windows 7 Taskbar Notification Area ........................................................................110
Figure 19: Console Dispatch Status Proxy Server List ................................................................ 111
Figure 20: Proxy Server List Status Indicator .............................................................................. 111
Figure 21: Console Dispatch Status Encryption/Licensing .......................................................... 113
Figure 22: Remote OP Connection List ........................................................................................114
Figure 23: Remote OP Connection Black List ............................................................................. 115
Figure 24: Motorola Peripheral Configuration Tool .................................................................... 117
Figure 25: Mapping and Unmapping Speakers ............................................................................ 118
Figure 26: Speaker Test ................................................................................................................ 118
Figure 27: Mapping and Umapping the Motorola Peripherals ..................................................... 121
Figure 28: Peripheral Configuration Summary ............................................................................ 122
Figure 29: Peripheral Configuration Summary – Motorola peripherals .......................................122
Figure 30: Sound and Game Controller in the Windows operating system ................................. 125
16 | List of Figures
List of Tables | 17
List of Tables
Table 1: System Level Feature for the MCC 7100 IP Dispatch Console ....................................... 29
Table 2: ASTRO 25 Trunking Feature for the MCC 7100 IP Dispatch Console ...........................30
Table 3: ASTRO 25 Conventional Feature for the MCC 7100 IP Dispatch Console .................... 30
Table 4: MDC 1200 Analog Conventional Feature for the MCC 7100 IP Dispatch Console ....... 30
Table 5: Analog Conventional Feature for the MCC 7100 IP Dispatch Console ...........................31
Table 6: Encryption Feature for the MCC 7100 IP Dispatch Console ........................................... 31
Table 7: Integrated Tone Paging Encoder Feature for the MCC 7100 IP Dispatch Console ......... 31
Table 8: Hardware Specifications – HP Z420 Workstation ........................................................... 37
Table 9: Hardware Specifications – Customer Provided Laptop ................................................... 38
Table 10: MCC 7100 IP Dispatch Console Call Capacities ........................................................... 39
Table 11: MCC 7100 IP Dispatch Console Files to Backup .......................................................... 77
Table 12: PRX 7000 Console Proxy Files to Backup .....................................................................91
Table 13: USB Audio Interface Module Peripherals ......................................................................94
Table 14: Footswitch Pinout ........................................................................................................... 96
Table 15: External Paging Encoder Port Pinout ............................................................................. 97
Table 16: External Phone Interface Connector Pinout ................................................................... 98
Table 17: Generic Auxiliary Outputs Pinout .................................................................................. 99
Table 18: USB Audio Interface Module Specifications ............................................................... 100
Table 19: USB Audio Interface Module FRU/FRE Information ................................................. 101
Table 20: USB Audio Interface Module States ............................................................................ 105
Table 21: Proxy Server List Buttons ............................................................................................ 111
Table 22: ASTRO 7.14 MCC 7100 IP Dispatch Console System Components in an ASTRO
7.11 System .............................................................................................................................. 147
Table 23: ASTRO 7.14 MCC 7100 IP Dispatch Console System Components in an ASTRO
7.13 System .............................................................................................................................. 149
18 | List of Tables
List of Processes
Setting Up the MCC 7100 IP Dispatch Console ............................................................................ 40
Configuring Windows Components ............................................................................................... 41
Generating License Certificates for the MCC 7100 IP Dispatch Console ..................................... 46
Setting Up Network ........................................................................................................................ 59
Upgrading the MCC 7100 IP Dispatch Console Software ............................................................. 65
No Audio Sent or Received from the Peripherals ...........................................................................68
Recovering an MCC 7100 IP Dispatch Console Installation ......................................................... 76
Recovering a Damaged or Missing CRYPTR micro Card ............................................................. 78
Setting Up the PRX 7000 Console Proxy .......................................................................................81
Generating License Certificates for the PRX 7000 Console Proxy ................................................83
Upgrading the PRX 7000 Console Proxy Software ....................................................................... 88
Recovering a PRX 7000 Console Proxy Installation ......................................................................90
Installing and Configuring USB Audio Interface Module ........................................................... 102
Configuring a Preconfigured Patch Console (Inside the ASTRO RNI) ....................................... 136
Configuring an Automatic Windows Login ................................................................................. 136
Setting Up the ASTRO 7.14 MCC 7100 IP Dispatch Console in an ASTRO 7.11 System .........148
6871024P93-A | November 2013 | Send Feedback
List of Procedures
Setting Display Properties .............................................................................................................. 42
Setting Windows Power Options ....................................................................................................42
Setting Up SNMP Services Inside the ASTRO RNI ...................................................................... 43
Configuring Windows SNMP Components for a Console inside the ASTRO RNI ...................... 43
Configuring Primary DNS Suffix ................................................................................................... 45
Installing the .NET Framework 3.5 on the Windows 8 Operating System Outside the ASTRO
RNI .............................................................................................................................................46
Installing the MCC 7100 IP Dispatch Console Software ............................................................... 47
Configuring the Network Interface Card for an MCC 7100 IP Dispatch Console Inside the
ASTRO RNI ...............................................................................................................................56
Modifying the Default Audio Peripherals ...................................................................................... 58
Disabling/Enabling Audio Devices in Windows ............................................................................ 58
Disabling Feedback Audio for Headset Devices ............................................................................ 58
Setting Up a Proxy Server Connection Outside the ASTRO RNI ..................................................59
Setting Up the Domain for an MCC 7100 IP Dispatch Console Inside the ASTRO RNI ............. 60
Configuring the Local Hosts File for Consoles in Conventional K1/K2 Systems and Outside
the ASTRO RNI .........................................................................................................................61
Configuring the External NTP Time Source on Consoles in ASTRO 25 Conventional K1/K2
System ........................................................................................................................................ 62
Adding a Remote Console to the ASTRO DNS Server ................................................................. 63
Changing the Default CRYPTR micro Password ...........................................................................63
Restoring the Windows User Account Profile ................................................................................66
Adding a New Domain Console User ............................................................................................ 67
Testing an Unresponsive CRYPTR micro Card ............................................................................. 70
SD Host Controller Driver Considerations (CRYPTR Failures) ....................................................72
Troubleshooting the Instant Recall Recorder License Issues ......................................................... 75
Changing the Maximum Transmission Unit (MTU) ...................................................................... 76
Setting Windows Power Options ....................................................................................................82
Installing the PRX 7000 Console Proxy Software ......................................................................... 84
Configuring the PC Network Interface Card for the PRX 7000 Console Proxy ............................ 86
Setting Up the Domain for the PRX 7000 Console Proxy on L and M Core .................................87
Uninstalling the PRX 7000 Console Proxy Software .....................................................................88
Changing the Maximum Transmission Unit (MTU) ...................................................................... 90
6871024P93-A | November 2013 | Send Feedback
22 | List of Procedures
Enabling the Relays in the Windows Registry ............................................................................... 99
Connecting USB Audio Interface Module ................................................................................... 102
Configuring USB Audio Interface Module .................................................................................. 103
Upgrading the USB Audio Interface Module Software ................................................................103
Diagnosing Audio Malfunction in USB Audio Interface Module ................................................106
Troubleshooting USB Audio Interface Module USB Communication Issues ............................. 107
Troubleshooting USB Audio Interface Module Upgrade Issues .................................................. 107
Troubleshooting Problems with Peripherals .................................................................................107
Customizing the Console Dispatch Status Taskbar Icon .............................................................. 110
Adding a Proxy Server Connection .............................................................................................. 112
Editing a Proxy Server Connection .............................................................................................. 112
Removing a Proxy Server Connection ......................................................................................... 112
Adding a Remote MCC 7100 IP Dispatch Console to the Black List ..........................................115
Editing a Remote MCC 7100 IP Dispatch Console on the Black List ......................................... 116
Removing a Remote MCC 7100 IP Dispatch Console from the Black List ................................ 116
Mapping and Unmapping a Speaker .............................................................................................118
Testing a Speaker ..........................................................................................................................118
Configuring a non-Motorola Headset ........................................................................................... 119
Mapping and Unmapping a non-Motorola Desktop Microphone ................................................ 119
Configuring a non-Motorola USB Footswitch ............................................................................. 120
Mapping and Unmapping Motorola Peripherals .......................................................................... 120
Creating a Profile with non-Motorola Peripherals ........................................................................123
Customizing a Profile with Motorola Peripherals ........................................................................ 123
Deleting a Profile .......................................................................................................................... 124
Configuring the Instant Recall Recorder Application .................................................................. 128
Starting the Instant Recall Recorder Application ......................................................................... 129
Closing the Instant Recall Recorder Application ......................................................................... 129
Fixing the Instant Recall Recorder Window on the Top of the Desktop ......................................130
Switching the Instant Recall Recorder Window to the Compact Mode ....................................... 130
Expanding and Collapsing Sections in the Instant Recall Recorder Window ..............................130
Managing Detail Columns in the Instant Recall Recorder Call List ............................................ 130
Playing Back Calls in the Instant Recall Recorder Application ................................................... 131
Filtering Calls in the Instant Recall Recorder Application ...........................................................132
Sorting Calls in the Instant Recall Recorder .................................................................................132
Rewinding and Fast Forwarding Calls in the Instant Recall Recorder Application .....................133
Send Feedback | November 2013 | 6871024P93-A
List of Procedures | 23
Changing the Playback Speed in the Instant Recall Recorder Application ..................................133
Modifying the Playback Volume and Playback Quality in the Instant Recall Recorder
Application ...............................................................................................................................133
Zooming In and Zooming Out Waveform in the Instant Recall Recorder Application ............... 134
Saving Calls to a File in the Instant Recall Recorder Application ............................................... 134
Removing All MCC 7100 IP Dispatch Console Applications ..................................................... 135
Removing the Elite Admin and Elite Dispatch Applications Only .............................................. 135
Adding Windows Domain Username and Password to Windows Registry .................................137
Configuring the Domain Controller for the Preconfigured Patch OP .......................................... 137
Adding Elite Authentication Username and Password to the Windows Registry ........................138
Creating Batch File for Automatic Network Authentication ........................................................138
Setting Up the ASTRO 7.14 MCC 7100 IP Dispatch Console in an ASTRO 7.13 System .........149
Configuring Console Alias Manager for MCC 7100 Software in an ASTRO 7.11 System ........ 150
6871024P93-A | November 2013 | Send Feedback
About MCC 7100 IP Dispatch Console Setup and User
Guide
This manual provides setup and user guide descriptions for the MCC 7100 IP Dispatch Console (software only)
feature. It also describes the requirements and considerations necessary for implementing this feature in an ASTRO®
25 system.
What is Covered In This Manual?
This manual contains the following chapters:
•
•
•
•
•
•
•
•
•
MCC 7100 IP Dispatch Console – Overview on page 27, describes the MCC 7100 IP Dispatch Console, its
components and operational features.
MCC 7100 IP Dispatch Console – Setup and Installation on page 37, provides setup and installation procedures
for all components related to the MCC 7100 IP Dispatch Console.
PRX 7000 Console Proxy – Setup and Installation on page 81, provides information and activities associated
with the setup and installation of the PRX 7000 Console Proxy.
USB Audio Interface Module on page 93, provides information and activities associated with the setup and
installation of the USB Audio Interface Module.
Console Dispatch Status and Peripheral Configuration Tool on page 109, provides descriptions and procedures
for using the Peripheral Configuration Tool and Console Dispatch Status that are installed as part of the MCC
7100 IP Dispatch Console and PRX 7000 Console Proxy installations.
Instant Recall Recorder on page 127 provides descriptions and procedures for using the Instant Recall Recorder
that is installed as part of the MCC 7100 IP Dispatch Console.
MCC 7100 IP Dispatch Console - Additional Procedures and Information on page 135, provides additional
helpful procedures and information that are not part of the typical MCC 7100 IP Dispatch Console installation.
Enhanced Alert Tones on page 141, provides information about creating customized alert tones and using them
on the MCC 7100 IP Dispatch Console.
MCC 7100 IP Dispatch Console – System Release Compatibility on page 147, provides support for using the
MCC 7100 IP Dispatch Console in ASTRO 7.11 and ASTRO 7.13 systems.
Helpful Background Information
Motorola offers various courses designed to assist in learning about the system. For information, go to http://
www.motorolasolutions.com/training to view the current course offerings and technology paths.
Related Information
For associated information about the radio system, see the following documents.
Related Information
Purpose
Standards and Guidelines for
Communication Sites
Provides standards and guidelines that should be followed when setting up a
Motorola communications site.
Table continued…
6871024P93-A | November 2013 | Send Feedback
26 | About MCC 7100 IP Dispatch Console Setup and User Guide
Related Information
Purpose
Also known as R56 manual. This manual may be purchased on CD 9880384V83,
by calling the North America Parts Organization at 800-422-4210 (or the
international number: 302-444-9842).
System Documentation
Overview
For an overview of the ASTRO® 25 system documentation, open the graphical
user interface for the ASTRO® 25 system documentation set and select the System
Documentation Overview link. This opens a file that includes:
•
•
•
ASTRO® 25 system release documentation descriptions
ASTRO® 25 system diagrams
ASTRO® 25 system glossary
For an additional overview of the system, review the architecture and descriptive
information in the manuals that apply to your system configuration.
Dynamic System Resilience
Provides information necessary to understand, operate, maintain, and troubleshoot
the Dynamic System Resilience (DSR) feature which may be implemented on your
ASTRO® 25 system. This feature adds a geographically separate backup zone core
to an existing zone core to protect against catastrophic zone core failures.
Conventional Operations
Provides information regarding conventional channel resource operating
characteristics in standalone systems or ASTRO® 25 radio communication systems
with K Series, L Series or M Series.
MCC 7500 Dispatch Console
with Voice Processor Module
Describes site-level characteristics of VPM-based Console Dispatch sites including
theory of operation, installation and configuration for hardware and software,
operation, maintenance, and troubleshooting information.
MCC 7500/7100 Elite Admin
User's Guide
Provides administrators with information required to configure and administer the
Elite Dispatch software application to enable communication paths between
dispatch console operators and radio system resources for the MCC 7500 and
MCC 7100 dispatch consoles.
MCC 7500/7100 Elite Dispatch Provides user guide information intended for dispatch console operators. This
User's Guide
manual describes how to use the Elite Dispatch software application supporting the
MCC 7500 and MCC 7100 dispatch consoles.
Dispatch Console Backward
Compatibility Guide
The Dispatch Console Backward Compatibility Guide is a reference guide that
provides a list of console features supported by various ASTRO® 25 system
releases. While the backward compatibility feature makes it possible to use an
MCC 7500 Dispatch Console or MCC 7100 IP Dispatch Console in a system
release previous to the system release in which the console was introduced, the
features available for a backward compatible console can be limited to those
identified in this manual.
Send Feedback | November 2013 | 6871024P93-A
Chapter
1
MCC 7100 IP Dispatch Console – Overview
The MCC 7100 IP Dispatch Console is a software-based dispatch console that requires no external hardware
connections to perform dispatch operations. The MCC 7100 IP Dispatch Console can be located inside the ASTRO
RNI at a console site or conventional subsystem. It can also be deployed outside the ASTRO RNI and connected over
the Internet through a firewall to a console proxy located inside the ASTRO RNI.
6871024P93-A | November 2013 | Send Feedback
28 | MCC 7100 IP Dispatch Console – Overview
Figure 1: MCC 7100 IP Dispatch Console System Diagram
NM/Dispatch Site
NICE
Logger
DC
Conv
Rptrs
CSC
NM Dispatch
Router
CCGW
Router
Zone Core
Ethernet
Switch
Console
Proxy
MCC 7500
MCC 7100 IP
Dispatch
Console
VPM
NICE
Applications
NM Client
Control
Room
Firewall
IPv4
Tunnel
DHCP
Server
DNS
CEN Interior
Gateway
ASTRO Advanced
Messaging Solution
Server
KMF
Host
Control Room
CEN
Border
Router
Customer Network
VPN
Firewall
MCC 7100 IP
Dispatch Console
RNI DMZ CEN
VPN Server
Customer Network
Internet
MCC 7100 IP
Dispatch Console
The following are the system components for the MCC 7100 IP Dispatch Console:
•
•
•
•
MCC 7100 IP Dispatch Console Software
PRX 7000 Console Proxy
Console Site Control Room Firewall
Customer Supported Components:
-
DNS Server
DHCP Server
Customer Enterprise Network (CEN) Firewall
Virtual Private Network (VPN)
Send Feedback | November 2013 | 6871024P93-A
MCC7100_Sys_Arch_C
MCC 7100 IP Dispatch Console – Overview | 29
MCC 7100 IP Dispatch Console in Console Site Architectures
Dispatch console sites can have one or more console operator positions. The location of the dispatch console, the
system architectures it supports, and your organizational requirements determine the equipment required at a console
site.
An MCC 7100 IP Dispatch Console is supported in K, L, and M core system architectures. An MCC 7100 IP
Dispatch Console is not supported in ASTRO Express systems.
The MCC 7100 IP Dispatch Console can be located in the following console sites:
•
•
•
Console Site - inside the ASTRO Radio Network Infrastructure (RNI)
Remote Console Site - outside the ASTRO RNI
Remote Console Site at a Distributed Conventional Hub Site in a Conventional Subsystem
MCC 7100 IP Dispatch Console Features
This section provides a list of features supported by the MCC 7100 IP Dispatch Console as compared to the MCC
7500 Dispatch Console:
The section lists the features that are supported with the MCC 7100 IP Dispatch Console within the following areas:
•
•
•
•
•
•
•
•
•
•
System Level
ASTRO® 25 Trunking
ASTRO® 25 Conventional
MDC 1200 Conventional
Analog Conventional
General Security
Integrated Tone Paging Encoder
Peripheral Configuration Tool
Console Dispatch Status
Integrated Instant Recall Recorder
Related Links
MCC 7100 Peripheral Configuration Tool on page 116
Console Dispatch Status (MCC 7100 IP Dispatch Console) on page 109
Instant Recall Recorder on page 127
System Level Features
The system level features supported by the MCC 7100 IP Dispatch Console are listed in this section.
Table 1: System Level Feature for the MCC 7100 IP Dispatch Console
System Level Feature
Co-hab with ASTRO Advanced Messaging Solution
Smart Client
Full Participation in Radio System Agency Partitioning
Configured via Radio System Configuration Manager
Participation in Radio System Fault Management when
in ASTRO RNI
Deployment inside or outside the ASTRO RNI
Supports Enhanced Local Alias Management (ELAM)
6871024P93-A | November 2013 | Send Feedback
30 | MCC 7100 IP Dispatch Console – Overview
ASTRO 25 Trunking Features
The ASTRO® 25 trunking features supported by the MCC 7100 IP Dispatch Console are listed in this section.
Table 2: ASTRO 25 Trunking Feature for the MCC 7100 IP Dispatch Console
ASTRO 25 Trunking Feature
AMBE Half Rate Vocoder for Phase II TDMA
Resources
Trunked Private Calls
IMBE/AMBE Vocoder for ASTRO 25 Resources
Trunked PTT ID and Alias
Trunked Announcement Group Calls
Trunked Tactical/Normal
Trunked Call Alerts
Trunked Talk Group Calls
Trunked Emergency Alarms
Trunked Remote Monitor
Trunked Emergency Calls
Trunked Repeater On/Off
ASTRO 25 Conventional Features
The ASTRO® 25 conventional features supported by the MCC 7100 IP Dispatch Console are listed in this section.
Table 3: ASTRO 25 Conventional Feature for the MCC 7100 IP Dispatch Console
ASTRO 25 Conventional Feature
Autokey Key Display
Secure Keyset Select
Call Alert
Radio Check
Emergency Alarm and Call
Radio Enable/Disable
Ignore Mobile to Mobile Calls
Radio Message Display
Mixed Mode (Analog/Digital) Operation
Radio Status Display
Momentary Key Override
Radio Status Request
PTT ID and Alias
Received Key Display
Secure Call
Remote Monitor
Secure Key Select
Voice Selective Call
MDC 1200 Analog Conventional Features
The MDC 1200 analog conventional features supported by the MCC 7100 IP Dispatch Console are listed in this
section.
Table 4: MDC 1200 Analog Conventional Feature for the MCC 7100 IP Dispatch Console
MDC 1200 Conventional Feature
Call Alert
Radio Check
Emergency Alarm
Radio Message Display
Emergency Call
Radio Status Display
Ignore Mobile to Mobile Calls
Radio Status Request
Table continued…
Send Feedback | November 2013 | 6871024P93-A
MCC 7100 IP Dispatch Console – Overview | 31
MDC 1200 Conventional Feature
PTT ID and Alias
Remote Monitor
Radio Enable/Disable
Voice Selective Call
Analog Conventional Features
The analog conventional features supported by the MCC 7100 IP Dispatch Console are listed in this section.
Table 5: Analog Conventional Feature for the MCC 7100 IP Dispatch Console
Analog Conventional Feature
Analog Talk & Listen
Private Line (PL) Selection
E & M Control
Repeater On/Off
Frequency Selection
RF Cross Busy
Line Operated Busy Light (LOBL)
RF Cross Mute
Main/Alternate Conventional Interfaces
Tone Remote Control
Monitor
Supervisor Takeover (via Relay)
Mute Second Receiver
WildCard I & II
Encryption Features
The encryption features supported by the MCC 7100 IP Dispatch Console are listed in this section.
Table 6: Encryption Feature for the MCC 7100 IP Dispatch Console
Encryption Feature
AES Algorithm
Multi-Select Cross-Mode Alert
ADP Algorithm
Patch Cross-Mode Alert
Clear Audio Alert
Receive Cross-Mode Indication
DES-OFB Algorithm
Software or Hardware based encryption
Key Management via KVL for Micro SD card only
Supports Multiple Algorithms Simultaneously
Key Management via OTEK (Over The Ethernet
Keying)
Supports up to 5, 10, 15, 20 Encrypted Calls
Simultaneously
Key Management via Store and Forward for Micro SD
card only
Integrated Tone Paging Encoder Features
The integrated tone paging encoder features supported by the MCC 7100 IP Dispatch Console are listed in this
section.
Table 7: Integrated Tone Paging Encoder Feature for the MCC 7100 IP Dispatch Console
Integrated Tone Paging Encoder Feature
ASTRO 25 Conventional Call Alert
Simultaneous Paging Operation
Table continued…
6871024P93-A | November 2013 | Send Feedback
32 | MCC 7100 IP Dispatch Console – Overview
Integrated Tone Paging Encoder Feature
Digital Dial 1 (1500 Hz)
Quick Call I
Digital Dial 2 (2805 Hz)
Quick Call II B - Tone & Voice
Digital Dial 3 (1500/2805)
Quick Call II C - Tone Only
Knox
Quick Call II D - Battery Saver
Manual Group Pages
Quick Call II E - Competitive
Manual Individual Pages
Quick Page Buttons
MDC 1200 Call Alert
Selected Channel" Paging
Motorola 5/6 Tone
Single Tone 0.5
Pre-Defined Group Pages
Single Tone 1.5
Pre-Defined Individual Pages
Talk Extend
Private Line Stripping
Touch Code
Sequential Paging Operation
Trunked Call Alert
MCC 7100 IP Dispatch Console System Components
The main system components that are used with the MCC 7100 IP Dispatch Console are described in this section.
MCC 7100 IP Dispatch Console
The MCC 7100 IP Dispatch Console is a software-based dispatch console that requires no external hardware
connections to perform dispatch operations. Audio Vocoding is performed within the Windows 7 operating system.
The MCC 7100 IP Dispatch Console can work with the computer's built-in speakers and microphone, if equipped.
External peripherals such as a microphone, headset and footswitch are also supported. A minimum audio quality of
DAQ 3.4 is highly recommended when using certified commercially available peripherals. The MCC 7100 IP
Dispatch Console can be configured to dispatch trunking and/or conventional resources. The MCC 7100 IP Dispatch
Console supports secure (AES, ADP, and DES-OFB) end-to-end audio encryption. Key storage can be performed
through hardware CRYPTR micro or software. See Load Secure Keys and Algorithms on page 49 for details.
The MCC 7100 IP Dispatch Console can be located inside the ASTRO RNI at a console site or conventional
subsystem. The MCC 7100 IP Dispatch Console can also be deployed outside the ASTRO RNI and connect through a
firewall to a PRX 7000 Console Proxy located inside the ASTRO RNI.
PRX 7000 Console Proxy
The PRX 7000 Console Proxy is used when MCC 7100 IP Dispatch Consoles are deployed outside the ASTRO RNI.
Due to routing issues, multicast audio packets are unable to be sent outside of the ASTRO RNI into the customers
network and ultimately over the Internet. The PRX 7000 Console Proxy is located at a traditional console site or in a
conventional subsystem. The PRX 7000 Console Proxy is an application that converts multicast audio packets
(delivered inside the ASTRO RNI) to unicast audio packets and sends them outside of the ASTRO RNI to an MCC
7100 IP Dispatch Console. The PRX 7000 Console Proxy is also used to perform link maintenance inside the ASTRO
RNI on behalf of the MCC 7100 IP Dispatch Consoles when deployed outside of the ASTRO RNI.
Send Feedback | November 2013 | 6871024P93-A
MCC 7100 IP Dispatch Console – Overview | 33
Console Site Control Room Firewall
The SSG 140 control room firewall is used at a console site to allow secured communications with outside networks.
It is configured for Network Address Translation (NAT) functionality to help eliminate conflicts between an IP
address in a Customer Enterprise Network (CEN) and an IP address in the ASTRO RNI. The control room firewall is
configured to only allow dispatch console related traffic to and from the CEN. The control room firewall
communicates with the CEN interior gateway using Internet Protocol version 4 (IPv4).
The PRX 7000 Console Proxy communicates to the remote MCC 7100 IP Dispatch Console through a firewall. The
firewall is located at the console site to allow traffic to/from the PRX 7000 Console Proxy and CEN. Any VPN
functionality in the CEN must be provided by the customer.
The interior gateway in the CEN and the console site control room firewall share the link from the console site to the
zone core.
A control room firewall can be installed at any console site in the system. There can be multiple control room
firewalls in a system; one at each console site. The control room firewall is the demarcation point for the ASTRO
network. The networking equipment used to establish a path to a remote MCC 7100 IP Dispatch Console is provided
by the customer.
Note: An intrusion detection system (IDS) is not required at each console site, but is an option for security
conscious customers.
License Server
The license server is a web server used to generate a license file for activating an MCC 7100 IP Dispatch Console
during installation. This file contains the required licensing information as well as the number of connections that the
PRX 7000 Console Proxy supports. The license server is not part of the ASTRO RNI or the CEN. It is hosted by
Motorola.
Note: The generation of license files is performed by Motorola’s Licensing group. Instructions on how to
allocate and download license files are provide to the customer.
Key Management Facility for MCC 7100 IP Dispatch Console
The Key Management Facility (KMF) is the centralized key manager in the ASTRO system. The KMF delivers keys
securely, using the OTEK feature, to the MCC 7100 IP Dispatch Consoles configured with hardware-based
encryption. For MCC 7100 IP Dispatch Consoles configured with software-based encryption, the KMF exports a file
that is used to import keys into the console.
Note: The Key Management Facility does not support ADP keys.
Customer Enterprise Network Components
The network components that are provided by the customer are defined in this section. The following components
reside within the Customer Enterprise Network (CEN):
•
•
•
DNS Server
DHCP Server
VPN Server
DNS Server
The Domain Name System (DNS) server contains a database of network hostnames and their associated IP addresses
for Intranet resources connected to the Intranet. The DNS server contains entries for the ASTRO RNI devices (PRX
7000 Console Proxy, ELAM Server, KMF, etc…).
6871024P93-A | November 2013 | Send Feedback
34 | MCC 7100 IP Dispatch Console – Overview
DHCP Server
The Dynamic Host Configuration Protocol (DHCP) server assigns an IP address to a computer from a defined range
of numbers configured for a given network. Each MCC 7100 IP Dispatch Console that is remote from the ASTRO
RNI will be assigned a static IP address in the DHCP Server.
VPN Server
The VPN server allows for virtual private network (VPN) connections by an MCC 7100 IP Dispatch Console
deployed outside the CEN. The MCC 7100 IP Dispatch Console connects to the CEN over the Internet. This provides
individual dispatch operators with secure access to the CEN and ultimately to the ASTRO RNI.
MCC 7100 IP Dispatch Console Theory of Operations
This section describes the functional relationships between components that support the MCC 7100 IP Dispatch
Console:
Zone Database Server and LDAP
The MCC 7100 IP Dispatch Console uses Lightweight Directory Access Protocol (LDAP). The Dynamic Host
Configuration Protocol (DHCP) server assigns an IP address to a computer from a defined range of IP address
numbers configured for a given network. Each MCC 7100 IP Dispatch Console outside the ASTRO RNI is assigned a
static address in the DHCP Server.
MCC 7100 IP Dispatch Console – Encryption
The MCC 7100 IP Dispatch Console supports secure encryption. See Load Secure Keys and Algorithms on page 49
for a complete description on encryption.
MCC 7100 IP Dispatch Console – Link Op
The first dispatch console at a console site that registers with the system and assigns a resource is known as the Link
Op. The Link Op refers to the console that is in control of the active link between the site and the zone controller or
site controller.
A Link Op is required at a site that contains a PRX 7000 Console Proxy so that an MCC 7100 IP Dispatch Console
outside the ASTRO RNI can operate. Every site, including remote console sites, require a Link Op inside the ASTRO
RNI in order to operate. An MCC 7100 IP Dispatch Console outside the ASTRO RNI cannot become a Link Op.
Note: For more information, see the “MCC 7500/7100 Dispatch Console - Control Paths and Affiliation”
section in the Conventional Operations manual.
MCC 7100 IP Dispatch Console and ISSI 8000 / CSSI 8000
The MCC 7100 IP Dispatch Console operator position supports the ISSI 8000 feature. The MCC 7100 IP Dispatch
Consoles receive foreign talk group and other foreign system configuration data downloaded from the PRX 7000
Console Proxy (LDAP server). See the ISSI 8000/CSSI 8000 – InterSystem Gateway manual for details.
Centralized Event Logging
The MCC 7100 IP Dispatch Console inside the ASTRO RNI sends event logs to the Centralized Event Logging
server in the same way as supported by the MCC 7500 Dispatch Console inside the ASTRO RNI, except for
Send Feedback | November 2013 | 6871024P93-A
MCC 7100 IP Dispatch Console – Overview | 35
connection information. The MCC 7100 IP Dispatch Console deployed outside the ASTRO RNI does not send event
logs to the Centralized Event Logging server. The PRX 7000 Console Proxy logs the following events with
Centralized Event Logging server:
•
•
•
Remote clients connected
Remote clients disconnected
Remote clients refused
See the Centralized Event Logging manual.
Audio Logging and the MCC 7100 IP Dispatch Console
The AIS / Logger supports the logging of audio from an MCC 7100 IP Dispatch Console (inside and outside the
RNI), as follows:
•
•
Recording of console audio by the AIS/ Logging recorder is supported.
Local (VPM-based) audio logging is not supported.
Note: See the MCC 7500 Dispatch Console with Voice Processor Module manual for details.
Aux I/O in the MCC 7100 IP Dispatch Console
The Aux I/O comparator display function in the MCC 7100 IP Dispatch Console uses modified MOSCAD RTUs.
The Aux I/O architecture is a client-server model where the MOSCAD RTU and the MCC 7100 IP Dispatch Console
provide the server and client functionality, respectively.
The Aux I/O data for the comparator display function, (i.e., comparator controls, report status changes, etc.), between
the RTU-server and the MCC 7100 IP Dispatch Console client is communicated through a TCP/IP connection
established between the RTU and the MCC 7100 IP Dispatch Console.
The MCC 7100 IP Dispatch Console can connect to one or more RTUs by establishing a TCP/IP connection with
each RTU. Similarly, an RTU can support multiple MCC 7100 IP Dispatch Console connections.
If the link between the remote MCC 7100 IP Dispatch Console and the Aux I/O server is lost, the affected MCC 7100
IP Dispatch Consoles will no longer receive any of the comparator display functionality until it reestablishes a
connection.
The MCC 7100 IP Dispatch Console supports up to 200 Aux I/Os on the SDM 3000 units ( “global” Aux I/O)
functionality.
Note: The MCC 7100 IP Dispatch Console supports four local Aux Outputs. They have very specific
functions tied to them:
•
•
•
•
Indicating Emergency;
Indicating presence of an inbound call on the currently selected channel
Indicating a console PTT
Providing an external output to report activity of one or more general AuxIOs of the console.
If you employ the Aux I/O Server device in a Conventional Subsystem, you must configure it properly to support the
Unified Network Configurator (UNC) discovery. You perform the configuration by using the SDM3000 Builder
application. If the Aux I/O Server device used in a Conventional Subsystem is not configured properly, UNC
discovery lists the device in the UNC Lost and Found folder. If this situation occurs, you must configure the device
properly and rediscover it. For detailed information about the SDM3000 Builder, see the MOSCAD Network Fault
Management manual. After the Aux I/O Server device in a Conventional Subsystem is recognized by UNC, you can
use UNC to configure the device. For more information, see the Unified Network Configurator manual.
6871024P93-A | November 2013 | Send Feedback
Chapter
2
MCC 7100 IP Dispatch Console – Setup and Installation
This chapter provides setup and installation procedures for all components related to the MCC 7100 IP Dispatch
Console.
MCC 7100 IP Dispatch Console Software Requirements
The MCC 7100 IP Dispatch Console requires a Windows-based PC or workstation running at least Windows 7
Professional operating system.
Windows XP and Windows Vista operating systems are not supported.
Windows 8 64-bit operating system is supported only outside the ASTRO Radio Network Interface (RNI).
Note: Windows 7 Ultimate is supported but not required.
MCC 7100 IP Dispatch Console Hardware Requirements
The MCC 7100 IP Dispatch Console software is supported by the Motorola certified HP Z420 desktop computer. The
software is also supported by a customer provided laptop or desktop computer meeting the minimum hardware
requirements in Table 9: Hardware Specifications – Customer Provided Laptop on page 38.
Motorola Certified HP Z420 Hardware Specifications
The following hardware specifications are for the Motorola certified HP Z420 workstation:
Note: The HP Z400 workstation does not support the MCC 7100 IP Dispatch Console software.
Table 8: Hardware Specifications – HP Z420 Workstation
Hardware
Specification
Processor
Intel® Xeon E5-1603, 2.8GHz,1066Mhz memory, Quad Core
Chipset
Intel® C602
Hard Drive
250 GB 7200 rpm SATA 3.0 Gb/s NCQ
Hard Disk Controller
Integrated SATA controller
System Memory
4 GB total memory (2 x 2 GB DDR3 1600MHz ECC)
LAN
Integrated Intel 82579LM PCIe GbE Controller
Table continued…
6871024P93-A | November 2013 | Send Feedback
38 | MCC 7100 IP Dispatch Console – Setup and Installation
Hardware
Specification
Optical Storage
16X SuperMulti DVDRW SATA
Keyboard
HP USB Standard Keyboard
Mouse
Microsoft Wheel Optical 3-button USB Mouse
Graphics
NVIDIA Quadro NVS 310 512MB Dual Head
Expansion Slots
2 PCI Express Gen3 x16 mechanical/electrical
1 PCI Express Gen3 x8 mechanical/electrical
1 PCI Express Gen2 x8 mechanical/x4 electrical
1 PCI Express Gen2 x4 mechanical/x1 electrical
1 Legacy PCI
Built-in I/O Ports
6 USB 2.0, 3 Serial, 1 Parallel
Power Supply
600W (90% efficient power supply)
Power Consumption
max 600W
Customer Provided Laptop Minimum Hardware Requirements
The following hardware specifications are the minimum requirements for a laptop provided by the customer.
Table 9: Hardware Specifications – Customer Provided Laptop
Hardware
Specifications
Processor
Intel® Core™ i5-560M Processor (2.66 GHz, 3 MB L3 cache)
System Memory
minimum 4 GB total memory
Hard Drive
minimum 320 GB internal drive
Optical Storage
minimum CD drive to install software
Expansion slots
1 USB 2.0 port per peripheral, 100Mb Ethernet
Native SD Host controller bus Interface required when using hardware key storage
MCC 7100 IP Dispatch Console Cohab Configurations
You can install the MCC 7100 IP Dispatch Console as a standalone product or cohabited with other applications.
Important: Before you install the MCC 7100 IP Dispatch Console software, you must uninstall any prior
installations of dispatch console software, for example, MCC 7500 Dispatch Console software. See the
MCC 7500 Dispatch Console with Voice Processor Module manual for removing the MCC 7500 Dispatch
Console software.
Note: The Local Alias Service Client is the only application that can be installed as an additional cohabited
application.
Inside the ASTRO Radio Network Infrastructure (RNI), the following Cohab Applications are supported:
•
•
•
K-core Configuration Manager
ASTRO Advanced Messaging Solution Smart Client
Radio Control Manager
Send Feedback | November 2013 | 6871024P93-A
MCC 7100 IP Dispatch Console – Setup and Installation | 39
•
•
•
Local Alias Service Server
Voting Control and Display Client
Local Alias Service Client
Outside the ASTRO RNI, the following Cohab Applications are supported:
•
•
ASTRO Advanced Messaging Solution Smart Client
Local Alias Service Client
In the ASTRO 7.11 System, the following Cohab Applications are supported:
•
•
•
•
•
•
K-core Configuration Manager
ASTRO Advanced Messaging Solution Smart Client
Radio Control Manager
Local Alias Service Server
Voting Control and Display Client
Local Alias Service Client
In the ASTRO 7.13 System, the following Cohab Applications are supported:
•
•
•
ASTRO Advanced Messaging Solution Smart Client
Local Alias Service Server
Local Alias Service Client
MCC 7100 IP Dispatch Console Call Capacities
The MCC 7100 IP Dispatch Console supports four capacities that are enforced by licensing. The capacities can also
depend on the location of the dispatch console.
Table 10: MCC 7100 IP Dispatch Console Call Capacities
Maximum Number of
Simultaneous Streams
Maximum Number of
Resources Configured
5
Location
Voice Encryption
15
Inside ASTRO Radio
Network Infrastructure
(RNI) and outside ASTRO
RNI
AES, DES-OFB, and ADP
10
30
Inside ASTRO RNI and
outside ASTRO RNI
AES, DES-OFB, and ADP
15
45
Inside ASTRO RNI only*
AES, DES-OFB, and ADP
20
60
Inside ASTRO RNI only*
AES, DES-OFB, and ADP
* If you deploy a higher tier dispatch console outside the ASTRO RNI, the number of the simultaneous streams it
supports is automatically downgraded to ten streams.
Dynamic System Resilience Considerations
Dynamic System Resilience (DSR) strengthens ASTRO®25 voice and data communications networks for greater
redundancy to ensure operational continuity in the event of disaster. Each zone in a system with DSR is supported by
two cores: a primary core and a geographically separate backup core. For more information, see the Dynamic System
Resilience manual.
6871024P93-A | November 2013 | Send Feedback
40 | MCC 7100 IP Dispatch Console – Setup and Installation
Warning: Dynamic System Resilience feature is not supported in ASTRO® 25 Conventional IV&D K1/K2
System.
When you install or upgrade a dispatch console in a system with DSR, the dispatch console must apply the DSR
configuration to operate in the DRS mode. To enable the DSR mode, meet the following the requirements during the
installation:
•
•
Allow the dispatch console to apply the DSR configuration: Start the Elite application to receive the following
critical change notification that appears in the status bar of the application: Critical configuration
parameters have changed. Please reboot the PC to utilize the updates. At this
point reboot the computer. Otherwise the dispatch console cannot apply the DSR configuration and operate in
DSR mode, for example, it cannot operate when switching between the primary and backup Master Switching
Office (MSO).
Configure the primary and secondary DNS server addresses for both master sites: For the correct network settings,
see Setting Up the Domain for an MCC 7100 IP Dispatch Console Inside the ASTRO RNI on page 60 and the
system configuration documentation or contact Motorola Solution Support Center (SSC) for further assistance.
Note: The console site can operate seamlessly on the primary master site with some dispatch consoles in a
DSR mode and others in non-DSR mode until the reboot of all dispatch consoles.
Setting Up the MCC 7100 IP Dispatch Console
Use the following process to install the MCC 7100 IP Dispatch Console in your system together with all the necessary
system components on which it depends.
Prerequisites: If you use a system with Dynamic System Resilience (DSR), see Dynamic System Resilience
Considerations on page 39.
Process:
1 Install and configure the Windows 7 operating system on the workstation that you want to use as a dispatch
console:
a) Run the Motorola Operating System Installer (MOSI). See Windows Installation and Motorola OS Installer
(MOSI) on page 41.
b) Configure Windows Components. See Configuring Windows Components on page 41.
2 Generate License Certificates for the MCC 7100 IP Dispatch Console. See Generating License Certificates for the
MCC 7100 IP Dispatch Console on page 46.
3 Install the MCC 7100 IP Dispatch Console software. See Installing the MCC 7100 IP Dispatch Console Software
on page 47.
4 Load secure keys and Algorithms. See Load Secure Keys and Algorithms on page 49.
5 Install third party or cohab software. See Third Party or Cohab Software Installation on page 54.
6 Install MOTOPATCH. See MOTOPATCH Installation on page 55.
7 Perform Windows Supplemental Configuration. See Windows Supplemental Configuration on page 55.
8 Configure Network Interface Card (NIC) on PC or server inside the ASTRO Radio Network Infrastructure (RNI).
See Configuring the Network Interface Card for an MCC 7100 IP Dispatch Console Inside the ASTRO RNI on
page 56.
9 Setup the peripherals. See Peripheral Configuration on page 57.
10 Setup the network. See Setting Up Network on page 59.
11 Only for dispatch consoles inside the ASTRO RNI: Discover the MCC 7100 IP Dispatch Console in the
Unified Event Manager. See the “Discovering Devices” procedure in the Unified Event Manager manual.
Send Feedback | November 2013 | 6871024P93-A
MCC 7100 IP Dispatch Console – Setup and Installation | 41
Windows Installation and Motorola OS Installer (MOSI)
Before you install the MCC 7100 IP Dispatch Console software, you must update the Windows 7 operating system
with an approved service pack.
The installation of a fresh Windows 7 Professional operating system with an approved service pack is required to
ensure proper operation. Motorola provides two different installations depending on the computer hardware.
•
•
MOSI 64-bit installation DVD for Motorola purchased workstations (i.e., HP Z420).
Windows 7 Professional OEM DVD for customer laptop installations.
Note: For Windows 7 OEM installations, customers are responsible for installing all required drivers.
Note: The following restrictions must be followed when naming a laptop during the installation of the
Windows 7 operating system:
-
Minimum length: 2
Maximum length: 48
Allowed numbers: [0–9]
English letters: [a-zA-Z]
Special characters: . –
No leading and trailing spaces
Note: Workstations purchased from Motorola are imaged with the correct Windows 7 operating system and
approved service pack. All required drivers are configured and installed. The MOSI installation and
configuration (local or over-the-network) minimizes the wait time normally experienced during OS
installations. The MOSI media is updated periodically to provide continual support for installations on
Motorola purchased workstations. Information on using MOSI is available on the Motorola Online (MOL)
web portal. See the MOSI media label or readme.txt for information regarding access to Motorola Online
(MOL).
Configuring Windows Components
Before you instal the MCC 7100 IP Dispatch Console software, configure the general Windows 7 Professional
operating system components.
Prerequisites: Install the required Windows 7 operating system with an approved service pack. See Windows
Installation and Motorola OS Installer (MOSI) on page 41 or contact the Motorola.
Note:
When and where to use: The general configuration of Windows 7 components is applicable for all MCC 7100 IP
Dispatch Console installations, inside or outside the ASTRO Radio Network Infrastructure (RNI).
Process:
Set display properties. See Setting Display Properties on page 42.
Set power save properties. See Setting Windows Power Options on page 42.
Set up SNMP services. SeeSetting Up SNMP Services Inside the ASTRO RNI on page 43.
Configure SNMP Components for a console inside the ASTRO RNI. See Configuring Windows SNMP
Components for a Console inside the ASTRO RNI on page 43.
5 Configure primary DNS suffix. See Configuring Primary DNS Suffix on page 45.
1
2
3
4
6871024P93-A | November 2013 | Send Feedback
42 | MCC 7100 IP Dispatch Console – Setup and Installation
Setting Display Properties
The settings for screen resolution and color is dependent on the video adapter install on the PC. See the Windows 7
documentation or the PC manufacturer documentation for assistance with changing display settings.
Procedure:
1 In the Control Panel of the Windows operating system, navigate to the Screen Resolution pane.
2 In the Resolution drop-down menu, set the resolution to 1024x768 or greater.
The available options depend on the installed video adapter.
3 Click Advanced settings.
4 In the Monitor tab, from the Colors drop-down list, select True Color (32 bit).
5 Click OK on all subsequent windows.
Setting Windows Power Options
The power options for Windows 7 must be set correctly to ensure uninterrupted operation. See the Windows 7
documentation or the PC manufacturers documentation for information regarding the steps for setting power options.
The steps described in this procedure may not reflect recent updates to the operating system. For installations on HP
laptop/workstation, disable the “HP Power Assistant Service”. See the relevant HP documentation for details.
Procedure:
1 In the Control Panel of the Windows operating system, navigate to the Power Options pane.
2 For the Balanced (recommended) plan, click Change plan settings.
3 Click Change advanced power settings.
Step result: The Power Options window appears.
4 Expand Hard disk → Turn off hard disk after and perform one of the following actions:
• If you use a laptop, from the On battery and Plugged in lists, select Never.
• If you use a desktop computer, from the Setting list, select Never.
5 Expand Sleep → Sleep after and perform one of the following actions:
• If you use a laptop, from the On battery and Plugged in lists, select Never.
• If you use a desktop computer, from the Setting list, select Never.
6 Expand Sleep → Allow hybrid sleep and perform one of the following actions:
• If you use a laptop, from the On battery and Plugged in lists, select Off.
• If you use a desktop computer, from the Setting list, select Off.
7 Expand Sleep → Hibernate after and perform one of the following actions:
• If you use a laptop, from the On battery and Plugged in lists, select Never.
• If you use a desktop computer, from the Setting list, select Never.
8 Expand Sleep → Allow wake timer and perform one of the following actions:
• If you use a laptop, from the On battery and Plugged in lists, select Disable.
• If you use a desktop computer, from the Setting list, select Disable.
9 Expand USB settings → USB selective suspend setting and perform one of the following actions:
• If you use a laptop, from the On battery and Plugged in lists, select Disabled.
• If you use a desktop computer, from the Setting list, select Disabled.
10 Expand Display → Turn off display after and perform one of the following actions:
• If you use a laptop, from the On battery and Plugged in lists, select Never.
• If you use a desktop computer, from the Setting list, select Never.
11 Click OK.
12 Close the Control Panel window.
Send Feedback | November 2013 | 6871024P93-A
MCC 7100 IP Dispatch Console – Setup and Installation | 43
Setting Up SNMP Services Inside the ASTRO RNI
The services for Windows Simple Network Management Protocol (SNMP) are initially configured in Windows.
Procedure:
1
2
3
4
5
In the Control Panel of the Windows operating system, navigate to the Programs and Features pane.
From the left-hand menu, select Turn Windows features on or off.
In the Windows Features window, expand the Simple Network Management Protocol (SNMP) node.
Select the WMI SNMP Provider check box.
Click OK.
Configuring Windows SNMP Components for a Console inside the ASTRO
RNI
The configuration of Simple Network Management Protocol (SNMP) allows the computer to receive SNMP trap
messages. These message are then forwarded to SNMP management programs running on the computer.
When and where to use: Use this procedure for SNMP version 1 or 2 only. For SNMPv3 configuration, see the
SNMPv3 manual.
Note: The SNMP services are not available for a console deployed outside the ASTRO RNI.
Procedure:
1 In the Control Panel of the Windows operating system, navigate to the Administrative Tools pane.
2 Double-click Services.
Note: If a User Account Control dialog box displays, click Continue.
Figure 2: Administrative Tools - Services
3 In the Services window, double-click SNMP Trap.
4 In the General tab of SNMP Trap Properties window, from the Startup type drop-down list, select Disabled.
Click OK.
5 In the Services window, double-click SNMP Service.
6871024P93-A | November 2013 | Send Feedback
44 | MCC 7100 IP Dispatch Console – Setup and Installation
Figure 3: SNMP Service Properties
6 In the Security tab of the SNMP Service Properties window, ensure that Send authentication trap check box is
selected.
7 In the Accepted community names section, click Add.
Figure 4: SNMP Service Configuration – Security
8 In the SNMP Service Configuration window, add a community:
a) From the Community rights drop-down list, select READ WRITE.
b) In the Community Name field, enter M.
c) Click Add.
9 In the SNMP Service Configuration window, add another community:
a) From the Community rights drop-down list, select READ ONLY.
b) In the Community Name field, enter D.
c) Click Add.
10 In the SNMP Service Configuration window, add one more community:
a) From the Community rights drop-down list, select READ ONLY.
b) In the Community Name field, enter public.
c) Click Add.
11 Select the Accept SNMP packets from these hosts radio button.
12 If localhost in not listed in the list of accepted hosts, perform the following actions:
Send Feedback | November 2013 | 6871024P93-A
MCC 7100 IP Dispatch Console – Setup and Installation | 45
a) Under the list, click Add.
b) In the Host name, IP or IPX address field, enter localhost. Click Add.
13 In the Security tab, click Apply.
14 In the Traps tab, in the Community name drop-down list, enter M. Click Add to list.
15 Under the Trap destinations list, click Add.
Figure 5: SNMP Service Configuration – Traps
16 In the Host name, IP or IPX address field, enter 127.0.0.1 and click Add.
17 In the Traps tab, click Apply.
18 Click OK.
Configuring Primary DNS Suffix
Configure the primary DNS suffix for an MCC 7100 IP Dispatch Console inside the ASTRO Radio Network
Infrastructure (RNI).
Note: Do not follow this procedure for MCC 7100 IP Dispatch Consoles outside the ASTRO RNI. If you
have an MCC 7100 IP Dispatch Console outside the ASTRO RNI that is on the CEN domain, verify that it
meets one of the following conditions:
•
•
They are installed in an ASTRO 7.11 system.
They are installed in an ASTRO 7.13 system or later and the suffix was input as part of the hostname in
the Provisioning Manager.
If it meets one of the following conditions, enter the DNS suffix for the ASTRO domain in the Console
Status application of this console. See ASTRO Domain Configuration on page 112.
Procedure:
1 In the Run window of the Windows operating system, enter sysdm.cpl and press ENTER.
2 In the Computer Name tab, click Change.
3 In the Computer Name/ Domain Changes window, click More.
4 In the DNS Suffix and NetBIOS Computer Name window, perform the following actions:
a) In the Primary DNS suffix for this computer field,, enter the DNS suffix in the form of
nmd<XX>.zone<Y>
where <XX> is the console site ID and <Y> is the zone ID.
Important: This DNS suffix naming convention is valid only for consoles inside the ASTRO RNI.
b) Clear the Change primary DNS suffix domain membership changes check box.
c) Click OK.
5 Close the Control Panel windows.
6 When prompt to restart the computer, click Restart Later.
6871024P93-A | November 2013 | Send Feedback
46 | MCC 7100 IP Dispatch Console – Setup and Installation
Installing the .NET Framework 3.5 on the Windows 8 Operating System
Outside the ASTRO RNI
Perform this additional procedure only if you use the Windows 8 operating system. The Windows 8 operating system
comes with the .NET Framework, version 4.5. The MCC 7100 IP Dispatch Console software requires the .NET
Framework, version 3.5.
Prerequisites: Locate the installation media form which you installed the Windows 8 operating system. The
installation media can be a DVD-ROM or an ISO Image.
Procedure:
1 Open the command prompt window as an administrator.
For more information, see the Windows Help and Support online help.
2 Install the .NET Framework 3.5 from the \sources\sxs folder on the installation media by running the
following command:
DISM /Online /Enable-Feature /FeatureName:NetFx3 /All /LimitAccess /
Source:<.Net Framework 3.5 files location>
where <.NET Framework 3.5 files location> is the full path to the .NET files necessary to restore
the feature, for example, d:\sources\sxs
Generating License Certificates for the MCC 7100 IP Dispatch
Console
Use the following procedure to obtain a capacity license for the MCC 7100 IP Dispatch Console software and any
other licenses for additional licensed features used with the consoles from the FlexNet Operations Portal.
Process:
1 Place the software order that includes the number of the MCC 7100 IP Dispatch Console licenses and the number
of licenses for additional features to be used with the consoles.
2 Wait for an order fulfillment E-mail sent by Motorola.
The E-mail contains an Entitlement ID and instructions on how to acquire license files. If you do not have the
Entitlement ID, you cannot access the server and obtain the license certification.
3 Log on to
http://licensing.motorolasolutions.com
.
Note: If you do not have a user account, use the Entitlement ID to create it. After you create the
account, you receive an automated E-mail that contains a default password. The E-mail is sent to the
registered E-mail address.
4 After you log on, manage, select, and activate all relevant entitlements.
The FlexNet Operations Portal guides you through the fulfillment process.
5 Configure the server host by either selecting an existing host or adding a new host.
When asked to configure a server host, enter the Ethernet MAC address for the target PC without dashes. The list
of MAC addresses along with their associated network adapters can be found by running a Windows command
prompt and entering ipconfig /all from the target PC.
Important: It is highly recommended that the MAC address selected in this step be the address
associated with a permanent network adapter on the server. The licensing services could be adversely
affected by choosing a network adapter that is frequently enabled or disabled.
6 Enter 1 for the fulfillment count.
Send Feedback | November 2013 | 6871024P93-A
MCC 7100 IP Dispatch Console – Setup and Installation | 47
Note: The fulfillment count is the number of licensed audio streams for the MCC 7100 IP Dispatch
Console. The number of allowable audio streams is associated with the license and available in 5, 10,
15, or 20 streams.
7 After you review the license information, generate the license files and complete the process.
8 Manage the licences and either save the license files to the PC or send them in an E-mail.
You use the license files when prompted during the installation of the MCC 7100 IP Dispatch Console software.
Installing the MCC 7100 IP Dispatch Console Software
Use the following procedure to manually install the MCC 7100 IP Dispatch Console software. Before you install the
MCC 7100 IP Dispatch Console software, ensure that you use Motorola recommended computers with the latest
approved service pack.
Prerequisites:
Ensure that you meet the following requirements:
•
•
The Windows PC or workstation on which you want to install the software is running Windows 7 Professional
with an approved service pack;
You have valid license files for the console.
During the installation, the CRYPTR micro install package installs an SD host controller driver. See CRYPTR micro
Installation Considerations on page 48.
Procedure:
1 Log on to the Windows 7 operating system as an administrator.
2 If you upgrade from a previous version of the MCC 7100 IP Dispatch Console software, close the Elite Admin
and Elite Dispatch applications and stop all third party software.
3 Insert the MCC 7100 installation media into the CD/DVD drive.
4 Double-click the Setup.exe file.
5 In the User Account Control window, click Yes.
Numerous command windows can open and close as prerequisite programs are installed.
6 From the welcome page of the Motorola MCC 7100 setup wizard, click Next.
7 From the next page, browse to the folder that contains the license files. Click Next.
By browsing for the license files you import them to a predefined location. If the license files already exist in the
predefined location, you do not have to import them again. If you do not have the license files at the moment of
installation, you can still continue. As long as the license files are not available in the predefined location, the Elite
applications and other licensed application do not start. As soon as you copy the license files to the predefined
location, you can start all the licensed applications.
8 Select the intended location to install the console software by performing the following actions:
If…
Then…
If you want to use the click MCC 7100 IRNI.
console software inside
the Motorola Radio
Network,
If you want to use the
console software
outside the Motorola
Radio Network,
perform the following actions:
1 Click MCC 7100 ORNI.
2 Perform one of the following actions:
6871024P93-A | November 2013 | Send Feedback
48 | MCC 7100 IP Dispatch Console – Setup and Installation
If…
Then…
•
•
If you install the software on a K-core system or the console is already
configured with a primary DNS suffix that matches the nmdXX.zoneY
format, click Install.
If you install the software on an M-core or L-core system and the DNS suffix is
not configured, enter the required compatible ASTRO RNI domain for the
configured console.
Note: The ASTRO RNI domain must be appropriate for the
platform configured in Network Manager and take the form of
nmdXX.zoneY, where XX is the configured console site ID and Y
is the configured zone ID.
9 Confirm that you agree to install the software and reboot the computer by clicking Yes in the confirmation
window.
Step result: The computer reboots up to two times.
Related Links
Dynamic System Resilience Considerations on page 39
CRYPTR micro Installation Considerations
During the installation of the MCC 7100 IP Dispatch Console software, observe the CRYPTR micro installation
considerations.
Note: Windows 8 64-bit operating system that you can install on dispatch consoles outside ASTRO Radio
Network Infrastructure (RNI), does not support hardware-based encryption which is the CRYPTR micro
device.
Perform the installation correctly:
•
•
•
•
Place the CRYPTR micro in the SD slot before or after the installation of the MCC 7100 software. If you insert
the CRYPTR micro in the SD slot after the MCC 7100 software installation completes, the CRYPTR micro driver
installation completes at the time of insertion.
A dialog box prompting to allow or cancel an installation from an unknown publisher appears during the
installation. Select Allow.
During the CRYPTR micro driver installation, messages appear to notify the user about the configuration and the
resetting of the CRYPTR micro. No user interaction is required in response to these messages.
On rare occasions, the CRYPTR micro driver installation cannot proceed without rebooting the computer
immediately. If you reboot the computer, the MCC 7100 software installation fails and rolls back. Reboot the
computer and restart the installation of the MCC 7100 software.
Resolve any issues you encounter:
•
•
During the CRYPTR micro driver installation, the Microsoft's Standard Compliant SD Host Controller is possible
to overwrite the EOM SD Host Controller Driver of the computer. As the result, the CRYPTR micro may stop
working after a Windows operating system update. If the problem occurs, reinstall the CRYPTR micro driver by
using the instructions in SD Host Controller Driver Considerations (CRYPTR Failures) on page 72.
If the CRYPTRmicro software upgrade fails during installation, the following message appears: CRYPTRmicro
software upgrade failed. Use the CRYPTRmicroUpgrade application at a later
time to upgrade the device.. Use the CRYPTRmicroUpgrade application at a later time to ensure that
the CRYPTR micro image is upgraded to the current version. For more information, see CRYPTR micro Software
Upgrade on page 64.
Send Feedback | November 2013 | 6871024P93-A
MCC 7100 IP Dispatch Console – Setup and Installation | 49
Associated Windows Components Software Installation
Load Secure Keys and Algorithms
Note: This section is applicable only for secure-capable MCC 7100 IP Dispatch Console software
installations.
In order to encrypt outgoing audio from an MCC 7100 IP Dispatch Console and decrypt incoming audio from other
consoles and subscriber radios, the MCC 7100 IP Dispatch Console must have its talkgroups associated with
encryption keys.
The association of talkgroups, patches, and MSEL with a secure key is configured in the ASTRO system Network
Manager. Each key is assigned a Common Key Reference (CKR) that helps identify the key. The Network Manager
associates a talkgroup or a special call type with a CKR. This information is downloaded from the Network Manager
to the MCC 7100 IP Dispatch Console.
The key material for performing actual encryption and decryption is stored locally on the MCC 7100 IP Dispatch
Console, either in the CRYPTR micro device or in the software key file. This key material is also associated with a
CKR, so that the appropriate key can be selected for a given talkgroup or a special call type.
Note: Windows 8 64-bit operating system that you can install on dispatch consoles outside ASTRO Radio
Network Infrastructure (RNI), does not support hardware-based encryption which is the CRYPTR micro
device.
A CKR, Keyset, Key ID, Algorithm ID, and key material are stored for each key. The crypto administrator for your
organization defines these values. These values are defined as common for all devices on an ASTRO system that need
to communicate securely to one another. The crypto administrator initiates updates to the keys as needed using Over
the Ethernet Keying (OTEK), keyloading the CRYPTR micro using a KVL, or distributing software key files.
Note: CKR and Keyset pairs must be unique. Duplicate CKR to Keyset pairs are not allowed by the tools
and device, since the combination of CKR and Keyset uniquely identifies how audio is encrypted on a
talkgroup.
On MCC 7100 IP Dispatch Console, the secure keys are stored in one or more software key files located on the
console or on the CRYPTR micro card. The two configurations are mutually exclusive. During startup, MCC 7100 IP
Dispatch Console first checks for the presence of the CRYPTR micro hardware storage device. If absent, the MCC
7100 IP Dispatch Console checks for the presence of one or more software key files. If neither one is present, the
MCC 7100 IP Dispatch Console cannot support secure communication. In this case, the Console Dispatch Status
application reports that it is configured for hardware encryption mode, but the CRYPTR micro device is not present.
To check the secure status of an MCC 7100 IP Dispatch Console, see Console Dispatch Status (MCC 7100 IP
Dispatch Console) on page 109 for details.
Hardware Key Storage (CRYPTR micro)-Based Encryption
In this mode of operation, the encryption keys are stored on a SDIO-based secure device CRYPTR micro. The
CRYPTR micro is inserted into the SD slot of an MCC 7100 IP Dispatch Console and can be left there throughout
laptop reboots and MCC 7100 IP Dispatch Console software installations.
6871024P93-A | November 2013 | Send Feedback
50 | MCC 7100 IP Dispatch Console – Setup and Installation
Note:
Windows 8 64-bit operating system that you can install on dispatch consoles outside ASTRO Radio
Network Infrastructure (RNI), does not support hardware-based encryption which is the CRYPTR micro
device.
On certain laptops, the CRYPTR micro must be removed after a reboot and then reinserted. This behavior
is dependent on specific peripheral hardware installed in the laptop. See Troubleshooting Detection of
CRYPTR micro Device on page 73 for details.
The device has a form factor of a microSD card and uses a microSD to SD adapter in order to fit into the SD slot of a
PC.
Figure 6: microSD to SD Adapter
Encryption keys stored on the CRYPTR micro have the following information:
•
•
•
•
•
Common Key Reference (CKR)
Keyset
Key ID
Algorithm ID
Key Material
Keyset information is also store on the CRYPTR micro. The MCC 7100 IP Dispatch Console reads this information
from the CRYPTR micro when the dispatch application starts up. It then associates each key with a talkgroup or a call
type (MSEL, Patch) by matching the CKRs. If a match is successfully found for a talkgroup or a call type, the MCC
7100 IP Dispatch Console is able to make secure calls on that talkgroup and able to decrypt incoming audio. If a
match is not found, the Dispatch Console reports key failure during an attempt to use that talkgroup in secure mode.
A CRYPTR micro does not have any keys following an initial installation or an upgrade. There are two methods of
loading keys onto the CRYPTR micro:
Note: Before ejecting the CRYPTR micro, close all applications that use the CRYPTR micro. Eject it using
the Windows Safely Remove Hardware feature in the desktop tray. The name for the CRYPTR micro
device is “generic SDIO device".
1 For keyloading using a Key Variable Loader (KVL 4000), eject the CRYPTR micro from the MCC 7100 IP
Dispatch Console and insert it into the KVL 4000 using a keyloading cable for CRYPTR micro.
2 Use the KVL 4000 user interface to program the needed keys into the CRYPTR micro. Then, reinsert the
CRYPTR micro into the MCC 7100 IP Dispatch Console and restart the MCC 7100 IP Dispatch Console
Dispatch.
Send Feedback | November 2013 | 6871024P93-A
MCC 7100 IP Dispatch Console – Setup and Installation | 51
Important:
CRYPTR micro is a device introduced in at the end of 2012. The programming and hardware key
management of the CRYPTR micro can only be done by using the KVL 4000 Version B. KVL 4000
Version B (T7537B) is required and consists of two components which are PDA MC55A0 and the
Security Adapter NTN2564B. To determine the correct KVL 4000 version, ensure that it meets the
following requirements:
•
•
PDA: The label must read: MC55A0. The information is located on the back of the PDA. To read the
information, remove the battery.
Security Adapter: The label must read: T7537B. The information is located on the back of the Security
Adapter.
Previous versions of the KVL 4000, Version A (T5737A), are not compatible with this feature and no
upgrade options are available. Owners of the KVL 4000 Version A must purchase KVL4000 Version B
(T5737B - PDA MC55A0 and the Security Adapter NTN2564B) to support this feature. See the KVL
product documentation for the most recent information.
In addition, TKN1039A cable is required. This cable is used to interface the KVL 4000 to the CRYPTR
micro.
Note: See the KVL 4000 ASTRO 25 User Guide to perform key loading.
Figure 7: KVL 4000 Model T7537B with CRYPTR micro Keyloading Cable
6871024P93-A | November 2013 | Send Feedback
52 | MCC 7100 IP Dispatch Console – Setup and Installation
Encryption keys on the CRYPTR micro can be automatically updated when centrally managed by a Key Management
Facility (KMF). A KMF can be present in the ASTRO network and configured to manage a particular CRYPTR
micro.
Note: A KMF may be located inside or outside the ASTRO RNI. If located outside the ASTRO RNI, see
Configuring the Local Hosts File for Consoles in Conventional K1/K2 Systems and Outside the ASTRO
RNI on page 61 for details.
A CRYPTR micro must also be pre-configured to accept updates from a particular KMF. A crypto administrator
configures the CRYPTR micro, using a KVL: Individual RSI is the ID of the CRYPTR micro itself, KMF RSI is the
ID of the KMF that manages keys on the CRYPTR micro. See Key Management Facility manual.
A crypto administrator can perform initial key provisioning using the Store and Forward procedure on the CRYPTR
micro as follows:
1
2
3
4
Connect a KVL 4000 to the KMF and download encryption keys for a CRYPTR micro to the KVL 4000.
Insert a CRYPTR micro into the KVL 4000 with the CRYPTR micro keyloading cable.
Initiate a Store and Forward procedure from the KVL 4000. See the KVL 4000 ASTRO 25 User Guide .
Reconnect the KVL 4000 back to the KMF and upload responses from the CRYPTR micro back to the KMF.
Once this is configured and the CRYPTR micro is inserted in the MCC 7100 IP Dispatch Console, the CRYPTR
micro can accept Over the Ethernet Keying (OTEK). OTEK can take place when the MCC 7100 IP Dispatch Console
is operational, no Elite restart necessary.
For security reasons, the MCC 7100 IP Dispatch Console software logs into the CRYPTR micro every time the
dispatch application is started. During normal operation, the login process takes place without user intervention.
Manual password reset is required when the CRYPTR micro is newly programmed and its password is defaulted. The
default password for the User account is CryptrAdmin12345. The default password for the Admin account is also
CryptrAdmin12345.
To change the passwords, use the CRYPTRmicroManagement application. After you use the
CRYPTRmicroManagement to update the password on the CRYPTR micro, it also securely writes in the new
password, so that from that point on, automatic logins into the CRYPTR micro can take place.
For status of the CRYPTR micro, refer to the Encryption/Licensing tab of the Console Dispatch Status application.
Specifically, mismatched and default passwords errors are reported in the Console Dispatch Status application. For
more information, see Console Dispatch Status (MCC 7100 IP Dispatch Console) on page 109.
Note:
If recovering from a backup installation, the previously saved password vault files must be recovered and
imported again. To recover and import, log on as an administrator, open a command prompt and execute
the following command:
C:\Program Files (x86)\Motorola\PWVault\pwvadmin.exe import –app
APP_GROUP_CRYPTO –fpath <PATH>
where PATH is the directory and filename where the files were backed up.
Software Keyfiles-Based Encryption
In this mode of operation, the encryption keys are stored in one or more files on the MCC 7100 IP Dispatch Console.
The key files’s format is XML. The key files can be generated by the KMF and manually transferred to the MCC
7100 IP Dispatch Console. Or, they can be generated by the Keyfile Generation tool right on the MCC 7100 IP
Dispatch Console or another computer, and manually transferred to the MCC 7100 IP Dispatch Console.
Encryption keys stored on software keyfiles have the following information:
•
•
•
Common Key Reference (CKR)
Keyset
Key ID
Send Feedback | November 2013 | 6871024P93-A
MCC 7100 IP Dispatch Console – Setup and Installation | 53
•
•
Algorithm ID
Key Material
Note: The Key Management Facility does not support ADP keys.
Keyset information is also store on software keyfiles. The MCC 7100 IP Dispatch Console reads this information
from the software keyfiles when the dispatch application starts up. It then associates each key with a talkgroup or a
call type (MSEL, Patch) by matching the CKRs. If a match is successfully found for a talkgroup or a call type, the
MCC 7100 IP Dispatch Console is able to make secure calls on that talkgroup and able to decrypt incoming audio. If
a match is not found, the Dispatch Console reports key failure during an attempt to use that talkgroup in secure mode.
Note: If Secure/Crypto keys need to be loaded after an installation or upgrade of an MCC 7100 IP Dispatch
Console software, they can be reloaded at any time after the MCC 7100 IP Dispatch Console software is
installed. A restart of the dispatch application is required to make use of any updated loaded keys.
The Key Store button in the Console Dispatch Status application launches the keystorage directory in Windows
Explorer, where the key files are placed. Up to 10 files will be read in, from the newest to the oldest. Errors will be
reported in the Event Viewer if the key files format and contents do not pass strict validation rules. Since key files are
not created manually, but with the use of the KMF or the Keyfile Generation application, most of the validation rules
are enforced by both key entry tools. Additional errors that can happen but cannot be enforced by the key entry tools
include:
•
•
•
•
•
•
Exceeding total supported number of keys across all key files (500)
Exceeding total supported number of ADP keys across all key files (8)
Inability to decrypt contents of encrypted keys (no KEK/invalid KEK in the MCC 7100 IP Dispatch Console)
Conflicting entries across multiple key files: entries with the same CKR and Keyset values. The key from the
newer keyfile is kept and the duplicate entry from an older keyfile is ignored.
Conflicting entries across multiple key files: conflicting keyset names and which one is active. In this case, data
from the newer keyfile is kept and a conflicting entry from an older keyfile is ignored.
There are no keyfiles and thus no keys following an initial installation or an upgrade.
A KMF can manage the MCC 7100 IP Dispatch Console in software encryption mode by generating keyfiles, which
then are copied to the MCC 7100 IP Dispatch Console. OTEK is not supported when using software based key
storage. In order to generate a keyfile on the KMF, the crypto administrator creates a group of keys on the KMF and
exports it to an XML key file. For details of this procedure, see Key Management Facility manual. In this case, each
key entry in the file will be encrypted with a Common Key Encryption Key (CKEK). The crypto administrator must
distribute the CKEK to the MCC 7100 IP Dispatch Console, for the MCC 7100 IP Dispatch Console to be able to
decrypt the key(s). The MCC 7100 IP Dispatch Console can store up to 20 CKEKs. The following is an example of
the command to execute on the MCC 7100 IP Dispatch Console in order to store a CKEK:
1 Log on as an administrator.
2 Open a command prompt and execute the following command:
pwvadmin changeproperty -app APP_GROUP_CRYPTO -property keyfile_KEK1 -value
"Algid=AES256,KeyID=0xF5A1,Key=0x0101010101010101010101010101010101010101010
101010101010101010101"
The format of this command includes password property name “keyfile_KEK1”, “keyfile_KEK2”, …,
“keyfile_KEK20”. The command also includes the name of the algorithm, keyed, and the key material. The order of
parameters and spacing between them must be adhered to for the key to be properly stored.
Backing up and restoring the KEKs in the MCC 7100 IP Dispatch Console is essential for restoring secure
communications after an upgrade. However, if you only use clear key files or the CRPYPTRmicro, there is no need
for storing KEKs in the MCC 7100 IP Dispatch Console.
If secure communications in the MCC 7100 IP Dispatch Console are not managed by a KMF, encryption keys are
entered manually in a spreadsheet and then exported as an XML file. The MCC 7100 IP Dispatch Console comes
with a macros-enabled spreadsheet KeyfileGen.xlsm.
6871024P93-A | November 2013 | Send Feedback
54 | MCC 7100 IP Dispatch Console – Setup and Installation
Open Software Keyfiles using Excel
KeyfileGen.xlms can be opened using Microsoft Excel or OpenOffice. Macros need to be enabled. If KeyfileGen.xml
is to be used on a computer other than the MCC 7100 IP Dispatch Console where it was installed, it may be copied to
another computer. In this case, the schema file ikmf-app-file.xsd must be copied with it and placed in the same folder.
The spreadsheet has a sheet for entering up to 500 keys and a sheet for entering two keysets. Enter the CKR, Keyset
ID, KeyID, Algorithm and key data in clear (unencrypted). The spreadsheet enforces ranges of data as follows:
•
•
•
•
•
•
•
CKR from 0 to 4095
Keysets 1 and 2
Key ID from 0000 to FFFF (hex values, leading 0s required)
Encryption Algorithms limited to AES256, DES, ADP
Key Material length as appropriate for the algorithm
Odd parity per byte for DES keys
Total number of keys (500)
Note: Keys generated by the KeyfileGen tool are not encrypted. Use the “Keysets” sheet to enter keyset
names and select which keyset is active.
Important: All the features of Microsoft Excel to copy data across keys and keysets are supported.
However, do not delete rows as the number of keys is restricted to 500 and the number of keysets is exactly
two. You can also save the spreadsheet for later use.
If a row on the “Keys” sheet has a blank CKR field, this row is ignored and will not be exported to the XML file.
If ADP keys are used, always set their keyset to “1”. ADP keys have no concept of keysets. You may keep default
values in the “Keyset” sheet, unless there are DES and/or AES256 keys, which truly use keysets.
Export the XML file by pressing the “Validate and Save” button on top of the “Keys” sheet. If the button cannot be
pressed, you may need to enable macros in Excel.
Note: If any of the keys or keysets cannot be validated, the XML file will not be generated and an error
message will be displayed. You can then correct the problem and attempt to export the XML file again.
Some of the errors detected during validation are:
•
•
•
•
Invalid parity for DES keys
Length of key material not matching what the algorithm requires
Duplicate CKR/Keyset pairs
Maximum number of ADP keys exceeded
Note: From the Console Dispatch Status application, click KeyStore under the Encryption/Licensing tab to
open the keystorage directory where the keyfiles are to be stored.
XML files containing keys can also be imported into KeyfileGen.xlsm. To import, open KeyfileGen.xlsm, right-click
on a cell and select XML → Import, then browse to the file. Changes can be made and export the updated file using
the “Validate and Save” button.
Third Party or Cohab Software Installation
After you install the MCC 7100 IP Dispatch Console software and load secure keys and algorithms, you can install
the certified third party or cohab software, for example, McAfee antivirus, Motorola’s Syslog, and Motorola’s
MOSCAD FSA application.
Because each system is different, the certified applications for the specific system may be unique and not all software
is compatible. See the system planner for the specific applications and configuration of the third party and cohab
software for the system.
Send Feedback | November 2013 | 6871024P93-A
MCC 7100 IP Dispatch Console – Setup and Installation | 55
Some third party or cohab software may require a network connection to complete or configure its application. Then,
you must revisit these actions after you establish the network connection, for example, when you recover or set up a
new MCC 7100 IP Dispatch Console.
In all cases, see the appropriate third-party installation manuals.
Note:
For an outside the ASTRO RNI MCC 7100 IP Dispatch Console installation, special considerations must
be made when installing other software, and when running other software at the same time as the MCC
7100 IP Dispatch Console application.
These considerations include the following issues:
•
•
•
•
•
•
•
High CPU usage
High network utilization
High disk usage
High priority anti-virus scans
System restore
Audio processing
Multimedia applications
Running these types of programs at the same time as the MCC 7100 IP Dispatch Console may disrupt the
audio performance of the MCC 7100 IP Dispatch Console application so you must minimize it or avoid it if
possible.
MOTOPATCH Installation
Ensure that the correct Windows 7 Professional operating system service pack is installed before inserting and
opening the MOTOPATCH for Windows DVD. See the instruction in the README.txt file included in the the
MOTOPATCH for Windows DVD.
Windows Supplemental Configuration
The ASTRO® 25 Windows Supplemental CD is used to install specific Windows supplemental files using a Windows
Install Framework script.
Important: The Windows supplemental installations must be reinstalled when upgrading/installing the
MCC 7100 IP Dispatch Console software, when the Windows Supplemental CD changes, or when
reinstalling the operating system.
Note: Before processing, ensure that any cohab applications are installed prior to applying the Windows
Supplemental CD.
The installation of the Windows Supplemental CD is only required for an MCC 7100 IP Dispatch Console inside the
ASTRO RNI in a K-core system.
For an MCC 7100 IP Dispatch Console outside the ASTRO RNI, the following supplemental configuration template
must be executed from the Windows Supplemental CD:
•
\\Windows Security Configurations\Scripts\AHT\MCC 7100 IP Console Outside
RNI\ApplyAHT.exe
For an MCC 7100 IP Dispatch Console outside the ASTRO RNI that is joined to a CEN domain, then the MCC 7100
IP Consoles Outside RNI Group Policy Objects can be imported from the \\ActiveDirectory\data\GPO
folder on the Windows Supplemental CD and linked to the appropriate Organizational Unit on the CEN domain
controller.
6871024P93-A | November 2013 | Send Feedback
56 | MCC 7100 IP Dispatch Console – Setup and Installation
Note:
The supplemental configuration template and GPO for an MCC 7100 IP Dispatch Console outside the
ASTRO RNI will disable the Windows system restore feature. System restore has the potential to disrupt
the audio of an active call when a system restore point is initiated.
For best performance of the MCC 7100 IP Dispatch Console application, it is recommended to leave
system restore disabled. However, if system restore is required, then it should be scheduled while the MCC
7100 IP Dispatch Console application is shutdown or during off hours, when it could cause the least
amount of disruption to dispatch operations.
.
Note: See the Windows Supplemental Configuration manual for installation procedures.
The following optional component is installed from the Windows Supplemental CD:
•
Event Logging Client (Syslog) - logging.xml
All other required components are installed automatically from the MCC 7100 IP Dispatch Console installation.
Network Interface Card (NIC) Configuration
The configuration of the network interface card on the PC must be modified to support the console proxy.
Note: The IP address of the console PC directly affects SNMPv3 functionality. Modifying the IP address of
the console PC for any reason after its initial setting may require SNMPv3 user credentials on the PC be
reset. See the SNMPv3 manual for details.
Configuring the Network Interface Card for an MCC 7100 IP Dispatch Console
Inside the ASTRO RNI
The Network Interface Card (NIC) enables communication of an MCC 7100 IP Dispatch Console inside the ASTRO
RNI. The configuration of the NIC is only required for new installations and as part of the disaster recovery process.
Note: The steps provided in this procedure are intended as a guide and may not reflect recent updates to the
Windows 7 operating system. See the relevant Microsoft operating system documentation or the computer
manufacturer's documentation for specific help on how to configure the network interface card.
Prerequisites: Acquire the following DNS network settings:
•
•
•
List of DNS server IP addresses
List of DNS suffixes
An Ethernet network cable
Note: See the system configuration documentation (provided by Motorola) for the correct network settings
and relevant lists of DNS server IP addresses and DNS suffixes, otherwise contact Motorola Solution
Support Center (SSC) for further assistance.
When and where to use: Configure the Network Interface Card (NIC) on the PC or server running the MCC 7100 IP
Dispatch Console software inside the ASTRO RNI.
Note: In Windows 7, the Local Area Connection icon in Managed Network Connections may indicate that
the network connection is partially available (yellow triangle with an exclamation mark) even though there
is network connectivity to the ASTRO Radio Network Infrastructure (RNI). This icon may indicate partial
availability when there is no connection from the ASTRO RNI to the external internet, which is a typical
system configuration.
Procedure:
1 Log on to the Windows 7 operating system as an administrator.
2 Connect the Ethernet network cable between the dispatch console computer and the ASTRO RNI network.
Send Feedback | November 2013 | 6871024P93-A
MCC 7100 IP Dispatch Console – Setup and Installation | 57
3
4
5
6
In the Control Panel, navigate to the Network and Sharing Center pane.
From the left-hand menu, select Change adapter settings.
If the Local Area Connection is disabled, right-click it. Select Enable.
Right-click Local Area Connection. Select Properties.
7
8
9
10
Step result: The Local Area Connection Properties window appears.
Under the Connect using field, click Configure.
In the Network Connection Properties window, select the Advanced tab.
From the Property list, select Link Speed & Duplex.
From the Value drop-down list, select one of the following options:
• If you use a computer purchased from Motorola, for example HP Z420, select 100 Mb Full. Click OK.
• If you use other computer, select 100 Mbps/Full Duplex. Click OK.
11 Right-click Local Area Connection. Select Properties.
12 Double-click Internet Protocol (TCP/IPv4) and perform the following actions:
Important: Do not use (TCP/IPv6) to configure Internet protocols.
a) In the General tab, select the Use the Following IP address option.
b) In the IP address, Subnet mask and Default gateway fields, enter values provided for this network interface
card.
c) Select the Use the following DNS server addresses: option.
d) Click Advanced.
e) In the Advanced TCP/IP Settings window, select the DNS tab.
f) Under the DNS server addresses in order of use list, click Add.
g) In the TCP/IP DNS Server window, enter the DNS server address. Click Add.
h) Repeat 12.f on page 57 and 12.g on page 57 for each DNS server in the order of use.
i) Select the Append these DNS suffixes (in order): option.
j) Under the list of DNS suffixes, click Add.
k) In the TCP/IP Domain Suffix window, enter the domain suffix. Click Add.
l) Verify that Register this connection's addresses in DNS check box is selected.
m) In the WINS tab, verify that the Enable LMHOSTS lookup check box is not selected.
n) On all subsequent windows, click OK.
o) When prompted to reboot, click No.
13 Connect a network interface cable to the network interface card.
Peripheral Configuration
During the installation, the MCC 7100 IP Dispatch Console software automatically configures the input (internal
microphone) and output (external speakers) of the console computer as the source for voice and audio. These settings
are saved as the default profile in the Peripheral Configuration Tool.
See the following procedures that you perform in the Control Panel of the Windows operating system if you want to
modify the following settings:
•
•
If you want to modify the default profile in the Peripheral Configuration Tool.
Note: You can modify the Peripheral Configuration Tool default profile only from the Windows
operating system level. If you modify the profile in the Peripheral Configuration Tool, you can only
save it as a new profile. You cannot save changes to the default profile.
If you want to disable a specific peripheral connected to the computer. In this way you prevent it from appearing
in the Peripheral Configuration Tool and being available to Windows operating system as a selectable default
audio device.
6871024P93-A | November 2013 | Send Feedback
58 | MCC 7100 IP Dispatch Console – Setup and Installation
•
•
If you want to enable a specific peripheral connected to the computer. In this way you get it available in the
Peripheral Configuration Tool and to Windows operating system as a selectable default audio device.
If you want to disable feedback for headset devices. Feedback in a headset device appears when audio spoken into
the headset microphone is played back into the headset speaker.
To create new configurations in the Peripheral Configuration Tool or perform more advanced configuration, see the
Peripheral Configuration Tool instructions.
Related Links
MCC 7100 Peripheral Configuration Tool on page 116
Modifying the Default Audio Peripherals
You can modify the audio peripherals settings initially configured during the installation of the MCC 7100 IP
Dispatch Console software only within the Windows operating system. This modification changes the default profile
created by the Peripheral Configuration Tool. You cannot delete the profile or modify it within the Peripheral
Configuration Tool.
Procedure:
1 In the Control Panel of the Windows operating system, navigate to the Sound window.
2 In the Playback tab, from the list of connected audio devices, select the device that you want to be the default
device. Click Set Default.
Note: If the Peripheral Configuration Tool is in the default mode, the default speakers automatically
switch to the new devices.
3 In the Recording tab, from the list of connected audio devices, select the device that you want to be the default
device. Click Set Default.
4 Close all subsequent windows.
Disabling/Enabling Audio Devices in Windows
A dispatcher can permanently disable audio services configured in the Windows operating system. Depending on the
MCC 7100 IP Dispatch Console installation, it may be necessary to disable unused devices such as a line-in audio
jack. This prevents the device from being listed and mapped in the Peripheral Configuration Tool or available to the
Windows operating system as a selectable default audio device.
Note: If the Elite application is started when you perform this procedure and the device that you disable is
currently mapped to a peripheral, the audio is lost.
Procedure:
1 In the Control Panel of the Windows operating system, navigate to the Sound window.
2 To disable or enable a speaker, select the Playback tab and perform the following actions:
a) Select the device from the list of connected audio devices.
b) Right-click the device and select Disable or Enable.
3 To disable or enable a microphone, select the Recording tab and perform the following actions:
a) Select the device from the list of connected audio devices.
b) Right-click the device and select Disable or Enable.
4 Close all subsequent windows.
Disabling Feedback Audio for Headset Devices
In the Windows operating system, a connected USB headset by default plays audio spoken into the headset
microphone back into the headset speaker. You must turn off this option if the Peripheral Configuration Tool includes
headset peripherals.
Send Feedback | November 2013 | 6871024P93-A
MCC 7100 IP Dispatch Console – Setup and Installation | 59
The headset device may be labeled as Speakers. See the description of the device for details.
Procedure:
1
2
3
4
5
In the Control Panel of the Windows operating system, navigate to the Sound window.
In the Playback tab, select the connected audio headset device.
Click Properties.
In the Levels tab, click the speaker icon.
Click all subsequent windows.
Setting Up Network
Process:
Setup network for the dispatch console that you installed by performing the following actions:
If…
Then…
If you set up network for a
console inside the ASTRO
Radio Network
Infrastructure (RNI) in an
M-core or L-core system,
perform the following actions:
1 Set up the domain for the console. See Setting Up the Domain for an MCC
7100 IP Dispatch Console Inside the ASTRO RNI on page 60.
2 Optional: Configure credentials for Secure SNMPv3 Common Agent. See
Credentials for Secure SNMPv3 Common Agent (Optional) on page 62.
If you set up network for a
console inside the ASTRO
RNI in a Conventional Kcore system,
perform the following actions:
If you set up network for a
console outside the ASTRO
RNI,
perform the following actions:
1 Configure the local hosts file for the console. See Configuring the Local
Hosts File for Consoles in Conventional K1/K2 Systems and Outside the
ASTRO RNI on page 61.
2 Configure the External NTP Time Source for the console. See Configuring
the External NTP Time Source on Consoles in ASTRO 25 Conventional
K1/K2 System on page 62.
3 Optional: Configure credentials for Secure SNMPv3 Common Agent. See
Credentials for Secure SNMPv3 Common Agent (Optional) on page 62.
1 Set up a proxy server connection. See Setting Up a Proxy Server
Connection Outside the ASTRO RNI on page 59.
2 Configure the local hosts file for the console. See Configuring the Local
Hosts File for Consoles in Conventional K1/K2 Systems and Outside the
ASTRO RNI on page 61.
3 Add the console to the ASTRO DNS server. See Adding a Remote Console
to the ASTRO DNS Server on page 63.
Setting Up a Proxy Server Connection Outside the ASTRO RNI
Remote MCC 7100 IP Dispatch Consoles must be configured to connect to the PRX 7000 Console Proxy located
inside the ASTRO Radio Network Infrastructure (RNI). The IP address (or hostname) for the PRX 7000 Console
Proxy is referring to the IP address of the server that is assigned in the Customer Enterprise Network and not the
ASTRO RNI configured IP address.
Procedure:
1 From the Windows Start menu, select All Programs → Motorola → MCC 7100 Dispatch → Console Status.
2 Select the Proxy Sever List tab.
3 Click Add to create a new proxy server entry.
6871024P93-A | November 2013 | Send Feedback
60 | MCC 7100 IP Dispatch Console – Setup and Installation
4 In the Host IP field, enter the <hostname> or <IP address> for the PRX 7000 server.
Note: When using an IP address, use the NAT’d IP address of the CEN for the PRX 7000 Console
Proxy. The proxy server is only included if a proxy is configured by hostname in the Console Dispatch
Status application.
5 Enter a text string to uniquely identify each proxy server entry.
Step example: Site 55 Server
6 Click Save.
Setting Up the Domain for an MCC 7100 IP Dispatch Console Inside the ASTRO
RNI
After you configure the IP and DNS information of the dispatch console, the MCC 7100 IP Dispatch Console is
added to the console site Active Directory domain.
Prerequisites: Configure the DNS server IP addresses and DNS suffixes. See Configuring the Network Interface
Card for an MCC 7100 IP Dispatch Console Inside the ASTRO RNI on page 56.
Note: A domain administrator account and password associated with this domain account are required to
join the Active Directory domain. For additional domain authentication information, see the Authentication
Services manual.
Important: It is highly recommend that the user apply a secure password to the Administrator account at
this time. Failure to do so may result in a security breach. Follow standard Microsoft procedures to change
the password on this account.
Procedure:
1 In the Windows operating system, navigate to <systemdrive>\Program Files (x86)\Motorola\AAA\bin
2 Double-click JoinADomain.exe.
Note: If the Active Domain (AD) cannot be found, manually enter the domain name.
3 If the User Account Control window appears, click Yes.
4 In the Join Active Directory Domain window, enter the <user name> and <password> for the domain
account used to join the Windows-based device to the active directory domain.
Step result: The Organization Unit (OU) selection gets updated.
5 From the Organization Unit (OU) drop-down list, select the relevant organization unit.
The basic OUs are:
• Windows 7 MCC 7100 IP Consoles
• Windows 7 MCC 7100 IP Consoles with Ext Voice Encryption
• Windows 7 MCC 7100 Patch IP Consoles
• Windows 7 MCC 7100 Patch IP Consoles with Ext Voice Encryption
• Windows 7 MCC 7100 Patch OP Testing
6 Click Join.
Note: Once your computer has joined the domain, the local administrator account (not the domain
account) is renamed to MotoSec.
7 When prompted to reboot, click Yes
8 Log on to the Windows operating system with a domain account and perform a group policy update:
a) In the Start menu search box, enter cmd.
b) From the list of results, right-click cmd and select Run as administrator.
c) When prompted in the User Account Control window, select Yes.
d) In the command prompt window, enter gpupdate /force and wait for the operation to complete.
Send Feedback | November 2013 | 6871024P93-A
MCC 7100 IP Dispatch Console – Setup and Installation | 61
e) Close the command prompt window.
f) Reboot the computer.
Configuring the Local Hosts File for Consoles in Conventional K1/K2 Systems
and Outside the ASTRO RNI
A conventional K1/K2 system is a conventional system that contains no core so no Zone Controller (ZC), Unified
Event Manager (UEM), and Domain Controller are available in this system.
You perform all configurations by using the Configuration Manager application. Call processing is handled through
conventional site controllers. No DNS exists in the system.
Similarly, for an MCC 7100 IP Dispatch Console located outside the ASTRO Radio Network Infrastructure (RNI),
the DNS configuration in the Customer Enterprise Network (CEN) may or may not contain the proper DNS entries
for the key ASTRO RNI devices.
To make it possible for the installed MCC 7100 IP Dispatch Console software to continue using DNS APIs, edit the
local hosts file.
Prerequisites: In the Windows operating system of the PC on which you installed the dispatch console, navigate to
C:\Windows\System32\drivers\etc and create a backup copy of the hosts file.
Procedure:
1 In the Windows operating system of the PC on which you installed the dispatch console, navigate to the Notepad
editor.
Instead of the Notepad editor, you can use a different editor, for example, Notepad ++.
2 Right-click the editor and select Run as administrator.
3 From the editor, navigate to C:\Windows\System32\drivers\etc\hosts
4 In the hosts file, map the IP addresses to the host name for the listed devices.
Perform this step by following the instructions in the hosts file and the tips in this step.
Zone Controller (Site Control Path)
Include the hostname and the actual IP address. Do not use fully-qualified host names.
Example:
10.5.231.255scp1
10.5.232.255scp2
Conventional Site Controller
Include the hostname and the actual IP address. Use fully-qualified host names.
Example:
10.5.55.95 z005s055csc01.nmd55.zone5
MOSCAD RTU
Include the hostname and the NAT’d IP address. Use fully-qualified host names.
Example:
172.76.9.243 rtu1.nmd13.zone5
KMF Server
Include the hostname and the NAT’d IP address. Use fully-qualified host names.
Example:
172.76.9.1kmf01.cen1
6871024P93-A | November 2013 | Send Feedback
62 | MCC 7100 IP Dispatch Console – Setup and Installation
CAM Server (ELAM feature)
Include the hostname and the NAT’d IP address. Do not use fully-qualified host names.
Example:
172.76.9.140 z1nmd55cam1
LDAP Server
Include the hostname and the NAT’d IP address. Do not use fully-qualified host names.
Example:
172.76.9.101 zds01
Proxy Server
Include the hostname and the NAT’d IP address. The hostname must exactly match the hostname configured
in the Console Status application.
Example:
172.76.9.3 Proxy1
Note: Include the IP address and hostname for the proxy server in the Customer Enterprise Network
(CEN). The proxy server is only included if a proxy is configured by hostname with the use of the
Console Dispatch Status application. See Adding a Proxy Server Connection on page 112.
5 Save changes to the hosts file.
Configuring the External NTP Time Source on Consoles in ASTRO 25
Conventional K1/K2 System
A net time command is used to configure the external time source for an MCC 7100 IP Dispatch Console in Kcore systems.
Procedure:
1 In the Run window of the Windows operating system, enter cmd and press ENTER.
2 In the DOS command window, enter net time /setsntp:<IPAddress>.
Note: Since no domain controller exists in a K1/K2 system, you must use an IP Address instead of a
hostname.
3 Press ENTER.
Credentials for Secure SNMPv3 Common Agent (Optional)
You set up or restore the secure SNMPv3 credentials only for an MCC 7100 IP Dispatch Console inside the ASTRO
Radio Network Infrastructure (RNI). Read the following topic to learn about the rules to follow when you use
SNMPv3 credentials.
The IP address of the dispatch console directly affects SNMPv3 functionality. If you modify the IP address after its
initial setting, it can require that you reset the SNMPv3 user credentials on the dispatch console PC. For more
information, see the “Configuring Console Site Elements for SNMPv3” procedure in the SNMPv3 manual.
The Unified Event Manager (UEM) is a fault management application designed to handle the critical fault
management functions. To configure secure settings for fault management, see the “Configuring the UEM for
SNMPv3” section in the SNMPv3 manual.
Send Feedback | November 2013 | 6871024P93-A
MCC 7100 IP Dispatch Console – Setup and Installation | 63
Important:
When you launch the SNMPv3 Common Agent GUI, the account must be a member of the Network
Security Administrators group. A local administrator or domain administrator that are not part of the
Network Security Administrators group, must launch the GUI from an elevated command prompt.
If you must re-image the dispatch console or re-install the operating system, make a backup copy of the
snmpd.conf file. When you restore the credentials, simply copy the backed-up file to C:
\ProgramData\Motorola\Motorola Common Agent\persist\snmpd.conf.
Modifications to secure SNMPv3 credentials do not take effect until the PC is restarted.
Adding a Remote Console to the ASTRO DNS Server
You must add an MCC 7100 IP Dispatch Consoles outside the ASTRO Radio Network Infrastructure (RNI) to the
Domain Name Server (DNS). This action involves adding the hostname and IP address of the remote console to the
DNS inside the ASTRO RNI.
Note: The IP address on the connecting remote console must be the IP address of the ASTRO RNI and not
the IP address of the CEN.
Procedure:
1 In the Control Panel of the Windows operating system, navigate to the Administrative Tools pane.
2 Double-click DNS.
3 In the DNS Manager window, on the left pane, expand <DNS hostname> → Forward Lookup Zones.
4 Right-click the location of the Proxy Server, for example nmd1.zone1 and select New Host.
5 In the Name field, enter the remote console ASTRO RNI hostname.
6 In the IP address field, enter the remote console ASTRO RNI IP address.
Note: For example, z001s001op01.nmd1.zone1, and 10.1.1.1. This should correspond to the
actual hostname of the remote console combined with the ASTRO RNI suffix configured during the
installation or in the Console Dispatch Status, for example myOP.CENsuffix.nmd1.zone1.
7 Select the Create Associated Pointer (PTR) Record check box.
8 Click OK.
9 Click Done.
Hardware CRYPTO Configuration
Changing the Default CRYPTR micro Password
The CRYPTR micro officer (administrative) and user passwords are both changed using the CRYPTR micro
Management application.
When and where to use: After an installation or upgrade, the passwords will be reset to the default values and must
be changed prior to running Elite Dispatch and processing secure calls.
Procedure:
1 Navigate to C:\Program Files (x86)\Motorola\Motorola CRYPTR micro Support
Applications\.
2 Right-click CRYPTRmicroManagement.exe and select Run As Administrator.
Note: Running as Administrator is only required when changing the officer/user passwords and is not
required to use other functionality provided by the Management application.
3 From the main screen, choose Login Admin to change the Office password, or Login User to change the user
password.
6871024P93-A | November 2013 | Send Feedback
64 | MCC 7100 IP Dispatch Console – Setup and Installation
4 Where prompted, enter the default password and click OK.
5 Where prompted, enter the default password again along with the new password.
6 Click OK.
CRYPTR micro Software Upgrade
The CRYPTR micro software can be upgraded during MCC 7100 IP Dispatch Console software installation or
upgrade.
In this case, the CRYPTR micro upgrade is silent and does not require user intervention. If the CRYPTR micro device
is inserted during the MCC 7100 IP Dispatch Console upgrade, it will be upgraded automatically. If it is inserted postupgrade, it will be upgraded immediately.
If the CRYPTR micro software needs to be upgraded on its own, not as part of the MCC 7100 IP Dispatch Console
upgrade, use the CRYPTR micro Upgrade utility:
1 Open the CRYPTR micro Upgrade application.
2 Select the CRYPTR micro binary image to program into the CRYPTR micro.
3 Initiate programming. If ejection of the CRYPTR micro is required, the utility will prompt you to do so.
The version of CRYPTR micro software can be verified post-upgrade by using CRYPTRmicroManagement utility:
1 Insert the CRYPTR micro into the SD slot.
2 Open the CRYPTR micro Management utility.
3 View the contents of About... box to see the CRYPTR micro version numbers.
Enable / Disable FIPS
In order to support DES-OFB and ADP encryption algorithms, Federal Information Processing Standard (FIPS)
compliance must first be disabled in Windows. The console software must be restarted if FIPS is disabled while Elite
is running.
To disable FIPS in systems where the console is joined to an ASTRO domain, the “MCC7100 IP Consoles FIPS
Disable” GPO must be linked to the “Windows7 MCC7100 IP Consoles” OU. This GPO is not linked by default and
must be done manually. This can be done in the ASTRO Domain Controller Group Policy Management Console. See
the Authentication Services manual for details.
To disable FIPS in systems where the console is joined to a CEN domain (outside the ASTRO RNI), the “MCC7100
IP Consoles FIPS Disable” GPO must be imported into the appropriate OU for the console. See the Authentication
Services manual for details and consult with the CEN network administrator.
Note: Linking the GPO must be done in the correct order – Disable FIPS GPO must be at the top of the
link order (this applies to MCC 7100 IP Dispatch Console on an ASTRO or CEN domain).
The above solution to disable FIPS through a GPO will not work on K-core systems or on MCC 7100 IP Dispatch
Console outside the ASTRO RNI (where the OP could be joined to a different domain or no domain at all). Use a
local application supplemental configuration template from the supplemental CD to disable FIPS, as follows:
1 Insert the supplemental CD.
2 Open an explorer window and navigate to \Windows Security Configurations\Scripts\AHT\MCC7100 IP
Consoles FIPS Disable\
3 Double click ApplyAHT.exe
4 Reboot the PC.
Send Feedback | November 2013 | 6871024P93-A
MCC 7100 IP Dispatch Console – Setup and Installation | 65
MCC 7100 IP Dispatch Console Maintenance and Troubleshooting
See the following topics for information and procedures that help maintenance the MCC 7100 IP Dispatch Console
and resolve any issues that can occur.
Dispatch Console PC Firewall Exceptions
When you run a firewall application on the dispatch console PC, the firewall application may prompt you to allow
traffic from certain components of the dispatch console.
Depending on the configuration of the firewall application, you can be prompted for any of the following dispatch
console processes:
•
•
•
•
•
•
•
AuxioManager.exe
FileAudioDSP.exe
IRR.exe
ProxyClient.exe
RCSync.exe
RCSyncUser.exe
WinQUICC.exe
If the firewall application prompts you for any of the processes, allow the traffic so that it does not disrupt the
dispatch console operation.
Upgrading the MCC 7100 IP Dispatch Console Software
This process is used to upgrade an existing installation of the MCC 7100 IP Dispatch Console software.
Prerequisites: A previous version of the MCC 7100 IP Dispatch Console software was installed on a Motorolacertified PC. The MCC 7100 Elite and Admin applications have been closed, and all third party software has been
closed or stopped.
Warning: For MCC 7100 IP Dispatch Console using a CRYPTR micro for encryption, Secure/Crypto keys
and algorithms may be erased during the upgrade. This is dependent upon the type of change to the secure
software from version to version. It is recommended to reload this information into the secure card if
necessary.
Process:
1 Log on to the Windows 7 operating system as an administrator.
2 Install the MCC 7100 IP Dispatch Console software. See Installing the MCC 7100 IP Dispatch Console Software
on page 47.
Note: If any issues occur during the upgrade process, manually remove the existing version of the MCC
7100 IP Dispatch Console software. See Removing All MCC 7100 IP Dispatch Console Applications on
page 135 for details. Afterwards, repeat the upgrade process.
3 Install software of associated Windows components. See Associated Windows Components Software Installation
on page 49.
Failure to Upgrade or Uninstall the MCC 7100 IP Dispatch Console
Software
Symptom:
While upgrading or uninstalling the MCC 7100 IP Dispatch Console software, an error message is displayed similar
to “Another app has exclusive access to the file C:\...\Debug.mdb".
6871024P93-A | November 2013 | Send Feedback
66 | MCC 7100 IP Dispatch Console – Setup and Installation
Solution:
Click Retry.
Note: If unsuccessful, restart the PC and perform and repeat the upgrade or uninstall procedure.
Elite Console Application Stuck in Application Initializing State
Symptom:
After starting the Elite dispatch console and choosing the Elite configuration file, the Internal system error
occurred window opens and reads, See Event Viewer application log for details. After
authenticating with the console user credentials, the Elite dispatch console application fails to assign resources and the
Application Initialization window opens and reads The application is initializing, please
stand by …. The Elite dispatch console application never finishes initializing and remains stuck in the
application's initializing state.
The Windows Application Event log error message states to check this troubleshooting procedure in the installation
manual.
The Application Initialization windows opens after choosing the Elite configuration file, specifying the console user
credentials, and completing database synchronization. It is normal for this window to be displayed briefly in a
working scenario. However, in this case, the application will never initialize. This error condition may occur after
upgrading the MCC 7100 IP Dispatch Console software, applying the Windows Supplemental CD, or restarting
Windows.
Solution:
The Windows user account profile must be deleted and recreated. See Restoring the Windows User Account Profile
on page 66 for the required steps.
Note: Elite dispatch console application files are not stored in the user profile folder. However, other
program files stored in the user profile folder must be backed up and copied to a different folder, otherwise
they will be deleted. When the process is completed, the copied data can be moved back to the user profile
folder.
Restoring the Windows User Account Profile
Restoring the Windows user account profile is necessary as a troubleshooting measure when Elite console application
is stuck in the initialization state.
Procedure:
1 Close the Elite application
2 Log out of Windows 7.
3 Log into Windows 7 as an administrator (either domain or local admin).
Note: The account must be different than the account used for the Elite dispatch.
4 Delete the profile as follows:
a) In Windows 7, click Start, right-click Computer, and click Properties.
b) Click Change settings.
c) Click the Advanced tab in the System Properties window.
d) Click Settings under User Profiles.
Step result: The User Profiles window opens.
e) Select the relevant profile and click Delete.
Send Feedback | November 2013 | 6871024P93-A
MCC 7100 IP Dispatch Console – Setup and Installation | 67
f) Click OK.
5 Log out of Windows 7.
6 Log into Windows 7 with the original account.
Step result: The account profile is recreated and is used by the Elite console.
Elite Console was Denied Access due to an Embedded Password
Mismatch
Note: Running Elite as a local Admin or domain Admin on a system with Full (not transparent)
Information Assurance (IA) will also result in this error. Elite must be ran from an elevated Command
prompt when using local Admin or domain Admin accounts on fully IA secured system.
Symptom:
The Elite application shows the error, The console was denied access to data due to an
embedded password mismatch or internal error. Contact System Administrator. and
does not launch (has cached NM data) or launches based on cached data but still displays the error message.
Solution:
Uninstall and reinstall the MCC 7100 IP Dispatch Console software, as follows:
1 Manually uninstall the MCC 7100 IP Dispatch Console software. See Removing All MCC 7100 IP Dispatch
Console Applications on page 135.
2 Install the MCC 7100 IP Dispatch Console software. See Installing the MCC 7100 IP Dispatch Console Software
on page 47.
Elite Console was Denied Access due to an Embedded Password
Mismatch after Reinstalling All Software
Symptom:
The Elite application shows the error, The console was denied access to data due to an
embedded password mismatch or internal error. Contact System Administrator. after
the MCC 7100 IP Dispatch Console software is reinstalled.
Solution:
Add a new domain console user to the local pwvault group. See Adding a New Domain Console User on page 67.
Adding a New Domain Console User
Procedure:
1
2
3
4
5
6
7
8
9
10
In the Control Panel of the Windows operating system, navigate to the Administrative Tools pane.
Double-click Computer Management.
In the left-hand navigation tree, expand Local Users and Groups → Groups.
Double-click Power Users.
In the Power Users Properties window, click Add.
In the Select Users, Computers, Service Account, or Groups window, click Advanced.
Click Find Now.
Select the domain console user. Click OK.
Click OK on all remaining widows.
Reboot the computer.
6871024P93-A | November 2013 | Send Feedback
68 | MCC 7100 IP Dispatch Console – Setup and Installation
Troubleshooting Audio on MCC 7100 IP Dispatch Console
The MCC 7100 IP Dispatch Console uses on-board peripherals and interfaces to those devices through the Windows
audio layer. If the system is experiencing an absence of audio through the peripheral devices, the first step is to verify
that the devices are present and enabled in the Windows Sound control panel application.
Audio Quality Issues
Symptom:
A connection to the console proxy is being established, but there are send and receive audio quality issues (choppy or
non-existent voice, dropped calls). The MCC 7100 IP Dispatch Console provides a utility to check the current health
of the link to the console proxy.
Solution:
Check the link to the console proxy as follows:
1 From the Windows Start menu, select Start → All Programs → Motorola → MCC 7100 Dispatch → Console
Status.
2 The active proxy connection will be displayed along with a three-bar indicator of the link health. If this indicator
is fluctuating or consistently display one or zero bars, then contact a system administrator to help diagnose any
potential network issues.
Volume Levels Are Too Low
The MCC 7100 IP Dispatch Console contains controls (configurable in Elite Admin) to adjust the speaker volume for
the individual speakers mapped through the Peripheral Configuration Tool. Ensure that the speaker volume is set to
an appropriate level for the given speakers. See the MCC 7500 Elite Dispatch User Guide for details.
No Audio Sent or Received from the Peripherals
The Peripheral Configuration Tool and the Windows Sound applet can both be used to diagnose any potential
peripheral issues. For example, a connection is established between a remote console and the console proxy but no
audio is heard at the peripherals.
Process:
1 From the Windows Start menu, select All Programs → Motorola → MCC 7100 Dispatch → Peripheral
Configuration Tool.
2 Examine the Audio Input and Audio Output tabs.
Note: Verify the name and description of the currently mapped peripherals. The mapped peripherals
drop-down list displays the current peripheral type (Speaker1-8, Headset Microphone, etc.)
3 Verify that mappings are present.
Note: The minimum set of peripherals required for dispatch is at least one desktop speaker and one
desktop microphone. Verify that one speaker is mapped in the Output tab and one desktop microphone
is mapped in the Input tab.
Note: If any of the mapped peripherals display an icon that is grayed out, then that peripheral is
disconnected or disabled. Reconnect the device if necessary, or re-enable the device in the Windows
Sound panel. See Disabling/Enabling Audio Devices in Windows on page 58 for details. Upon
correcting the problem, the grayed out icon of the device in the Peripheral Configuration Tool should
change to a solid icon.
Send Feedback | November 2013 | 6871024P93-A
MCC 7100 IP Dispatch Console – Setup and Installation | 69
Note: If the mapped speaker devices appear enabled, connected, and mapped then the Peripheral
Configuration Tool will allow the user to send a test tone to a selected output device.
4 Select the relevant audio device.
5 Right-click on the row and select the Test option.
Step result: A test tone plays through the selected device.
6 If audio is still not heard, then verify the audio levels are not muted, as follows:
a) From the Start menu, enter Adjust System Volume and click on the application.
Note: If the system audio is muted, then a speaker icon with a red circle will be displayed. Click on
the icon to unmute the audio.
b) If the audio is unmuted and sound is still not heard, then verify and fix the audio levels for each audio device.
c) From the Sound control panel, right-click the relevant audio device and select Properties.
d) In the Levels tab, verify that the slider is set to the appropriate volume.
7 Perform additional troubleshooting steps for audio, if necessary:
a) Verify that no console features are enabled that would prevent audio from being played on the speaker (e.g.,
acoustic cross mute).
b) Verify that Elite Dispatch is correctly configured to route select/unselect audio to that peripheral. The speaker
must be mapped in the Peripheral Configuration Tool, connected, and it must be configured in the Elite
Dispatch Audio menu.
c) Verify that the MCC 7100 mixer is not muted. All audio devices may appear to be configured correctly but the
slider on the 7100 mixer is set to 0.
Troubleshooting Secure Audio on MCC 7100 IP Dispatch Console with
CRYPTR micro-Based Encryption
CRYPTR Password Issues
Symptom:
Console Dispatch Status application indicates a problem with CRYPTR micro password. Secure Audio does not
work.
Solution:
The following actions could be taken:
1 If the password in the CRYPTR micro is known, but it does not match, update the password in the MCC 7100 IP
Dispatch Console. This applies to both User and Admin passwords for the CRYPTR micro.
2 If the password(s) in the CRYPTR micro is the default password, use the CRYPTRmicroManagement utility to
change the password. The password in the MCC 7100 IP Dispatch Console will be updated automatically at the
same time.
3 If the password(s) in the CRYPTR micro are not known, use the CRYPTRmicroManagement utility to reset the
password. Enter an invalid password 15 times in a row, at which point the contents of the CRYPTR micro will be
erased and the password will be defaulted.
Note: Any keys previously stored in the CRYPTR micro will be lost.
6871024P93-A | November 2013 | Send Feedback
70 | MCC 7100 IP Dispatch Console – Setup and Installation
Testing an Unresponsive CRYPTR micro Card
An unresponsive CRYPTR micro card must be tested to determined whether or not it should be replaced or if the SD
Host Controller driver was not installed correctly in the MCC 7100 IP Dispatch Console.
Symptom:
The CRYPTR micro card in the MCC 7100 IP Dispatch Console has become unresponsive. The
CRYPTRmicroManagement application does not display the version numbers for the CRYPTR micro software in the
About CRYPTRmicroManagement window.
Note: The CRYPTR micro card has no visual or audible user interface that can determine its state.
Therefore, an additional working CRYPTR micro card is used as part of the troubleshooting process to
determine the state of the unresponsive card.
Solution:
The CRYPTR micro card is visually inspected and tested using the MCC 7100 IP Dispatch Console and/or the KVL
4000 to determine if the card is functioning properly.
Note: If a KVL 4000 is used and cannot detect the unresponsive CRYPTR micro card when attempting to
perform any action on the CRYPTR micro, the CRYPTR micro card is damaged and must be replaced. See
Recovering a Damaged or Missing CRYPTR micro Card on page 78 for details.
Procedure:
1 Eject the unresponsive CRYPTR micro card from the MCC 7100 IP Dispatch Console.
2 Insert the working CRYPTR micro card into the MCC 7100 IP Dispatch Console.
Note: A working CRYPTR micro card is used to determine if the card is defective or if the MCC 7100
IP Dispatch Console was configured properly.
3 Open an explorer window and browse to C:\Program Files (x86)\Motorola\Motorola CRYPTR
micro Support Applications
4 Double-click the CRYPTRmicroManagement application.
5 Click on the Motorola symbol in the upper left-hand corner and select About CRYPTRmicroManagement.
Figure 8: CRYPTRmicroManagement – Selecting About CRYPTRmicroManagement
6 From the About CRYPTRmicroManagement window, view the version numbers for the CRYPTR micro
software to determine the following:
If…
Then…
If the window returns meaningful version numbers,
the unresponsive CRYPTR micro card
is damaged and must be replaced with
a new one. See Recovering a
Damaged or Missing CRYPTR micro
Card on page 78 for details.
Send Feedback | November 2013 | 6871024P93-A
MCC 7100 IP Dispatch Console – Setup and Installation | 71
If…
Then…
Figure 9: About CRYPTRmicroManagement – Version
Numbers
If the window becomes unresponsive and then displays “None” for
version numbers,
Figure 10: About CRYPTRmicroManagement – None
the MCC 7100 IP Dispatch Console
may be improperly configured (e.g.,
does not contain a driver for the
CRYPTR micro card). See SD Host
Controller Driver Considerations
(CRYPTR Failures) on page 72 to
troubleshoot the configuration issue.
Secure Call Failures
The most common secure call failures are defined, along with a possible solution.
Symptom:
CRYPTR micro is in place but secure audio does not work.
Solution:
6871024P93-A | November 2013 | Send Feedback
72 | MCC 7100 IP Dispatch Console – Setup and Installation
Verify that CRYPTR micro is keyloaded with the appropriate keys. Use the CRYPRmicroManagement utility to
display the list of keys in the CRYPTR Micro.
Symptom:
CRYPTR micro is in place, some keys are loaded, but secure audio does not work.
Solution:
Verify that CRYPTR micro is keyloaded with the appropriate keys. Use the CRYPRmicroManagement utility to
display the list of keys in the CRYPTR Micro.
Symptom:
CRYPTR micro is in place, but OTEK does not work.
Solution:
Verify that the OTEK settings for the MCC 7100 IP Dispatch Console are correct. While the MCC 7100 IP Dispatch
Console software is running, open the Console Dispatch Status application to the Encryption/Licensing tab and
check the OTEK Status. If it reports OTEK Not Configured, enable OTEK in Network Manager. If the Console
Dispatch Status application reports OTEK Not Connected, check with your administrator whether the configured
KMF is in service. If the Console Dispatch Status application reports OTEK Connected, and OTEK is still not
functional, safely remove the CRYPTR micro and verify with a KVL 4000 that the individual RSI and KMF RSI are
programmed as intended.
Symptom:
Software key files are in place, but secure audio does not work.
Solution:
Check Windows Event Log for errors and warnings regarding reading of the software key files during dispatch
application start up.
SD Host Controller Driver Considerations (CRYPTR Failures)
Symptom:
Previously working CRYPTR micro card is no longer recognized by the MCC 7100 IP Dispatch Console software
and secure calls are no longer working. The Console Dispatch Status application shows “None” even though the
CRYPTR micro is inserted into the SD slot.
Solution:
The MCC 7100 IP Dispatch Console package will install and overwrite the SD Host Controller driver currently
installed in Windows.
Note: System updates, service packs, and other installation packages may all subsequently overwrite the
driver needed by the console. If this occurs, then the console SD card driver must be re-installed.
Procedure:
1 In Windows 7 main menu, right-click Computer and select Properties.
2 In the Control Panel window, click Device Manager.
3 Verify that CRYPTR micro SDIO Device is found under Memory Technology Devices.
Note: If not found, eject the CRYPTR micro and insert it again. Then, verify that the CRYPTR micro
SDIO Device is now found. If still not found, check the Windows Event Log for any errors from the
CRYPTR micro driver. Report any errors to Motorola.
4 If no errors, reinstall the CRYPTR micro driver as follows:
a) Log on as an administrator and open a command DOS window.
b) Enter
Send Feedback | November 2013 | 6871024P93-A
MCC 7100 IP Dispatch Console – Setup and Installation | 73
"C:\Program Files (x86)\Motorola\Motorola CRYPTR micro Support
Applications\Driver\CRYPTRmicro_install_app.exe" /i "C:\Program Files
(x86)\Motorola\Motorola CRYPTR micro Support Applications\Driver
\CRYPTRmicroDriver.inf" somerandomstring "Soft Console" "Soft Console
Product" "Motorola Solutions"
c) Reboot the computer.
d) Eject and reinsert the CRYPTR micro.
e) Look for the CRYPTR micro SDIO Device in the Device Manager.
Troubleshooting Detection of CRYPTR micro Device
Use Windows’ Device Manager to check whether the CRYPTR micro is detected by the computer. The CRYPTR
micro is represented by a node called “CRYPTR micro SDIO device” in the Memory Technology Driver Folder in
Device Manager.
Note: See Microsoft Windows’ help in order to locate and open your Device Manager with administrator
privileges.
When the CRYPTR micro is present in the SD slot, the node is present in Device Manager. When the CRYPTR micro
is absent from the slot, the node is absent. In some cases, the entire Memory Technology Driver Folder in Device
Manager is also absent. Device Manager adds and removes the node upon insertion and removal of the CRYPTR
micro. Some examples of abnormal behavior are as follows:
•
•
The CRYPTR micro SDIO Device node remains present in the Memory Technology Folder after the CRYPTR
micro is ejected.
The CRYPTR micro SDIO Device node remains absent from the Memory Technology Folder even though the
device is in place.
The following symptoms and solutions for detecting the CRYPTR micro are provided:
Symptom:
The CRYPTR micro is in place but secure audio does not work following a computer reboot. All non secure
functionality of the MCC 7100 IP Dispatch Console is still operational. The Console Dispatch Status application
reports “Not Present”. The CRYPRmicroManagement application returns “None” for the version information.
For all other operations, it returns “Link Down Error. Crypto module is not present”.
Note: A specific laptop will either always exhibit this behavior or always work properly following a
reboot. During testing by Motorola, this issue was observed on HP Elitebook 8440p laptops with Ricoh SD
Host Controller. A laptop equipped with a Ricoh SD Host Adapter is more likely to exhibit this issue than
other laptops. Technicians can use Device Manager to display the properties of the SD Host Adapter/SD
Host Controller. In the Details tab, display the Hardware IDs property. If some of the properties contain the
string “VEN_1180”, the computer has a Ricoh SD Host Controller. Laptops equipped with a JMicron or an
O2Micro SD Host controller are not likely to exhibit this issue.
Solution:
Eject and reinsert the CRYPTR micro. Use Device Manager to verify that the CRYPTR micro node was not present
prior to ejection and reinsertion, but is now present. Restart the MCC 7100 IP Dispatch Console application. The
CRYPTR micro should now be detected by the Console Dispatch Status and CRYPTRmicroManagement
applications.
Symptom:
The CRYPTR micro is in place but secure audio does not work following an ejection and reinsertion of the CRYPTR
micro while MCC 7100 applications are running. All non secure functionality of the MCC 7100 IP Dispatch Console
is still operational. The Console Dispatch Status application reports “Not Present”. The
CRYPTRmicroManagement application returns “None” for the version information. For all other operations, it
returns “Link Down Error. Crypto module is not present”.
6871024P93-A | November 2013 | Send Feedback
74 | MCC 7100 IP Dispatch Console – Setup and Installation
Solution:
Use Device Manager to view the CRYPTR micro node. If present, eject the CRYPTR micro. If the CRYPTR micro
node is still present, reboot the computer, insert the CRYPTR micro, and restart the MCC 7100 IP Dispatch Console
application. The CRYPTR micro should now be detected by the Console Dispatch Status and
CRYPTRmicroManagement applications.
Symptom:
The CRYPTR micro is in place but secure audio does not work. All non secure functionality of the MCC 7100 IP
Dispatch Console is still operational. The Console Dispatch Status application reports “Not Present”. The
CRYPTRmicroManagement application returns “None” for the version information. For all other operations, it
returns “Link Down Error. Crypto module is not present”.
Solution:
Use Device Manager to view the CRYPTR micro node. If it does not appear despite rebooting the computer or
ejecting and reinserting the CRYPTR micro multiple times, reinstall the CRYPTR micro driver as described in SD
Host Controller Driver Considerations (CRYPTR Failures) on page 72. If the CRYPTR micro node is still not
present when it’s ejected and reinserted, use Device Manager to display the properties of the SD Host Adapter/SD
Host Controller. In the Details tab, display the Hardware IDs property. Contact Motorola for further troubleshooting
and provide all hardware IDs.
Troubleshooting Connection Issues (Outside the ASTRO RNI)
The state of the connection between the remote MCC 7100 IP Dispatch Console and the PRX 7000 Console Proxy
can be checked using the Console Dispatch Status application, as follows:
1 Open the PRX 7000 Console Dispatch Status, see Console Dispatch Status (PRX 7000 Console Proxy) on page
113.
2 Once connected, right-click on the IP address of a remote connection in the Remote OP Connection List and select
Link Details.
Note: If the link state shows zero bars then the connection is not established.
Check the following items if a remote MCC 7100 IP Dispatch Console cannot connect to the PRX 7000 Console
Proxy server:
•
•
•
•
•
•
•
Verify that a network path exists from the connecting remote MCC 7100 IP Dispatch Console to the control room
firewall.
Verify (if using a VPN connection) that a network path exists from the VPN server to the control room firewall.
Verify that a proxy connection is configured on the connecting remote MCC 7100 IP Dispatch Console. This can
be done from the Status application.
Verify that the system clocks for the PRX 7000 Console proxy and remote MCC 7100 IP Dispatch Console are
time synchronized. Due to security restrictions on the remote link, the clocks must be within 24 hours of each
other.
Check for an affiliated console on the console site.
Open the Console Dispatch Status application on the PRX 7000 Console Proxy and verify that the connecting
remote MCC 7100 IP Dispatch Console is not included on the black list.
Open the Console Dispatch Status application on the PRX 7000 Console Proxy and check the remote MCC 7100
IP Dispatch Console capacity.
-
•
Verify that the number of connecting remote MCC 7100 IP Dispatch Consoles does not exceed the licensed
capacity and that the licensed capacity is not zero. If the licensed capacity is zero, see License Troubleshooting
– MCC 7100 IP Dispatch Console on page 75 for details.
Check the power mode settings on the PRX 7000 Console Proxy and remote MCC 7100 IP Dispatch Console.
-
Verify the power mode setting, as described in Setting Windows Power Options on page 42, and restart the
FLEXlm licensing service, if necessary.
Send Feedback | November 2013 | 6871024P93-A
MCC 7100 IP Dispatch Console – Setup and Installation | 75
•
•
Using the Console Dispatch Status application on the remote MCC 7100 IP Dispatch Console, verify that the
proxy server hostname or IP address is the address configured in the CEN.
It is possible that network elements between the MCC 7100 IP Dispatch Console and the PRX 7000 Console
Proxy do not support standard MTU (Maximum Transmission Unit) or MTU Path Discovery. See Changing the
Maximum Transmission Unit (MTU) on page 76 for details.
License Troubleshooting – MCC 7100 IP Dispatch Console
Symptom:
When you log on to the Elite Dispatch or Elite Admin application, the following error appears: Operating
License could not be found. Please install a valid license before invoking the
application.
To verify the licensed remote OP connection capacity, you can use the Console Dispatch Status application. You can
find the licensed capacity in the Licensing/Encryption tab in the Console Dispatch Status application. Use the
following steps to determine the issue:
•
•
•
•
Verify that the licenses are in the correct directory:
- C:\ProgramData\Motorola MCC 7100\Licensing
Verify that the MAC address obtained during the license generation phase corresponds to an enabled network
device. The licensing services will not run if this network device is disabled.
Verify that the power settings are correctly configured. See Setting Windows Power Options on page 42 for
details.
If you use a temporary license, open the license file in a text editor and verify that the license has not expired:
-
•
Look for a similar line in the license file. The expiration date in non-temporary cases is set to permanent:
+ INCREMENT soft_console_capacity motsol 1.0 07-feb-2012 20 \
Verify that the FLEXlm License Manager service is running:
-
If the service is not running, start the service.
If the service is running, check the task manager and verify that motsol.exe is running. If not, restart the
service.
Troubleshooting the Instant Recall Recorder License Issues
If you cannot start the Instant Recall Recording application, use the following procedure to determine the issue.
When and where to use: When start the Instant Recall Recorder application, the following error appears:
Operating License could not be found. Please install a valid license before
invoking.
Procedure:
•
•
•
•
Verify that the license is in the following directory: C:\ProgramData\Motorola MCC
7100\Licensing
Verify that the MAC address that you obtained during the license generation is the address of an enabled network
device.
If this network device is disabled, the licensing services do not run.
Verify that the Windows power settings are correct. See Setting Windows Power Options on page 42
If you use a temporary license, open the license file in a text editor and verify that the license did not expire by
looking for a similar line:
? INCREMENT software_irr motsol 1.0 07-feb-2012 1 \
•
The expiration date in non-temporary cases is set to permanent.
Verify that the FLEXlm License Manager service is up and running:
-
If the service is not running, start the service.
6871024P93-A | November 2013 | Send Feedback
76 | MCC 7100 IP Dispatch Console – Setup and Installation
-
If the service is running but the motsol.exe executable is not running in the Task Manager, restart the
service.
Changing the Maximum Transmission Unit (MTU)
In the event that intermediate network elements (routers, switches) drop packets greater than 1500 bytes, it may be
necessary to change the value of the MTU on the PRX 7000 Console Proxy or the MCC 7100 IP Dispatch Console to
be a lower value.
Warning: The MTU should only be modified as a last resort and after the all network settings have been
check and verified.
Procedure:
1 In Windows 7, select Start and enter regedit in the search field.
2 In the registry editor, navigate to HKEY_LOCAL_MACHINE\SYSTEM\CurrentControlSet\Services
\Tcpip\Parameters\Interfaces\interface-name.
3 Right-click MTU of type REG_DWORD and select Modify.
4 Enter the desired MTU size in hexadecimal.
Note: The range of the MTU is 0x44 to the dynamically determined MTU (in bytes). Set this value to
0xFFFFFFFF, to change the MTU back to the default value of the network interface’s dynamically
determined MTU.
5 Click OK.
6 Close the Registry Editor.
7 Restart the computer.
MCC 7100 IP Dispatch Console Disaster Recovery
This section provides details and references to help recover the MCC 7100 IP Dispatch Console in the event of a
failure.
Recovering an MCC 7100 IP Dispatch Console Installation
The recovery of an MCC 7100 IP Dispatch Console installation during a disaster recovery event requires a full
installation.
When and where to use: Disaster recovery is used in the event that the current installation of the MCC 7100 IP
Dispatch Console has become unstable or inoperable. Follow this process in this section to reinstall all necessary
components.
Process:
1 Backup critical files used by the MCC 7100 IP Dispatch Console. See Critical Backup Files for the MCC 7100 IP
Dispatch Console on page 77 for a list of files.
2 Install the recommended Windows 7 operating system, if not previously installed and configured.
a) Run the Motorola Operating System Installer (MOSI). See Windows Installation and Motorola OS Installer
(MOSI) on page 41.
b) Configure Windows Components. See Configuring Windows Components on page 41.
3 Install the MCC 7100 IP Dispatch Console software. See Installing the MCC 7100 IP Dispatch Console Software
on page 47.
4 Install all associated Windows 7 components. See Associated Windows Components Software Installation on page
49 for all required installation and configuration procedures.
Send Feedback | November 2013 | 6871024P93-A
MCC 7100 IP Dispatch Console – Setup and Installation | 77
5 Restore critical files backed up in step 1.
6 Only for dispatch consoles inside the ASTRO Radio Network Infrastructure (RNI): Rediscover the MCC
7100 IP Dispatch Console in the Unified Event Manager:
a) Delete the MCC 7100 IP Dispatch Console from the Unified Event Manager. See the “Deleting Devices”
procedure in the Unified Event Manager manual.
b) Discover the MCC 7100 IP Dispatch Console in the Unified Event Manager. See the “Discovering Devices”
procedure in the Unified Event Manager manual.
Critical Backup Files for the MCC 7100 IP Dispatch Console
The archiving of critical files is essential to the operation of the MCC 7100 IP Dispatch Console. You must perform it
periodically. Archive the files to an external device, for example, external storage or network storage.
Table 11: MCC 7100 IP Dispatch Console Files to Backup
File Type
Location
Note
License files
C:\ProgramData\Motorola MCC
7100\Licenses
Back up the license files to
speed up the recovery process.
Proxy Connection List
C:\ProgramData\Motorola MCC
7100\ProxyClient
\clientOptions.txt
The Proxy Connection List is a
single file.
Peripheral Configuration files
C:\ProgramData\Motorola MCC
7100\PeripheralConfig
Back up all the .xml files.
Network hosts file
C:\Windows\System32\drivers\etc These files are only used for
\hosts
configurations that are outside
the ASTRO RNI or in K-core
systems.
SNMPv3 file
C:\ProgramData\Motorola
\Motorola Common Agent\persist
\snmpd.conf
The SNMPv3 file is a single
file.
Elite configuration files
C:\Users\Public\Documents
\Motorola MCC 7100\config
Back up all the .elt files.
Secure Configuration files
C:\ProgramData\Motorola\PWVault Back up the
\Data
CRYPTO.context file and
the CRYPTO.data file.
Note: The Proxy
Connection List file
is available for
dispatch consoles
outside the ASTRO
Radio Network
Infrastructure
(RNI).
To backup the secure
configuration data, log on as an
administrator, open a command
prompt and execute the
following command:
C:\Program Files
(x86)\Motorola
Table continued…
6871024P93-A | November 2013 | Send Feedback
78 | MCC 7100 IP Dispatch Console – Setup and Installation
File Type
Location
Note
\PWVault\pwvadmin.exe
export –app
APP_GROUP_CRYPTO –
quiet –fpath <PATH>
where PATH is the directory
and filename where the backed
up data are to be placed.
Secure Software Key files
If you use software key storage mode, locate
and back up your key files.
To open the keystorage
directory in which the keyfiles
are to be stored, in the Console
Dispatch Status application,
select the Encryption/
Licensing tab, and click Key
Store.
Note: You must
perform these
actions only when
you uninstall the
dispatch console.
Keyfiles are
preserved during an
upgrade.
Recovering a Damaged or Missing CRYPTR micro Card
Troubleshooting procedures have indicated that the CRYPTR micro card must be replaced and reconfigured.
Prerequisites: Before performing this process, see Testing an Unresponsive CRYPTR micro Card on page 70 to
ensure that the CRYPTR micro card was tested and determined to be defective.
Process:
1 Insert the replacement CRYPTR micro card into the MCC 7100 IP Dispatch Console and launch the
CRYPTRmicroManagement application. Using the About CRYPTRmicroManagement window, view the
version numbers for the CRYPTR micro software, see Testing an Unresponsive CRYPTR micro Card on page 70
for details. Verify that these version numbers are up-to-date.
2 If the version numbers are not up-to-date, the CRYPTR micro card needs to be updated.
Note: The up-to-date versions of the CRYPTR micro software image are located at C:\Program
Files (x86)\Motorola\Motorola CRYPTR micro Support Applications
\Driver\red_cryptr_upgrade.prod.bin
a) Open an explorer window and browse to C:\Program Files (x86)\Motorola\Motorola
CRYPTR micro Support Applications
b) Double-click the CRYPTRmicroUpgrade application.
c) Browse to C:\Program Files (x86)\Motorola\Motorola CRYPTR micro Support
Applications\Driver\red_cryptr_upgrade.prod.bin
Note: The CRYPTRmicroUpgrade application will guide you through the upgrading process for the
CRYPTR micro card, including ejecting and reinserting the CRYPTR micro card.
3 Use the CRYPTRmicroManagement application to change Admin and User passwords on the CRYPTR micro
card. See Changing the Default CRYPTR micro Password on page 63 for details.
Send Feedback | November 2013 | 6871024P93-A
MCC 7100 IP Dispatch Console – Setup and Installation | 79
4 Reload key management parameters and encryption keys. If using manual key management, use a KVL 4000 to
program encryption keys into the CRYPTR micro card. If using centralized key management, use a KVL 4000 to
load the Individual RSI, KMF RSI, and MNP, if not using defaults. Then, perform a Store and Forward procedure.
See Load Secure Keys and Algorithms on page 49 for details.
6871024P93-A | November 2013 | Send Feedback
Chapter
3
PRX 7000 Console Proxy – Setup and Installation
This chapter provides information and activities associated with the setup and installation of the PRX 7000 Console
Proxy. This chapter also includes setup verification information and activities, maintenance and troubleshooting and
field replacement unit information as well as disaster recovery information to support the PRX 7000 Console Proxy.
PRX 7000 Console Proxy Software and Hardware Requirements
The PRX 7000 Console Proxy requires a Windows-based PC or workstation running a 64-bit version of Windows 7
Professional. The server must also conform to the minimum supported hardware specifications of an MCC 7500
Console when running in a cohab environment. See the MCC 7500 Dispatch Console with Voice Processor Module
manual for details.
Note: The HP Z420 is the recommended workstation to use for the PRX 7000 Console Proxy. See Table 8:
Hardware Specifications – HP Z420 Workstation on page 37 for details.
PRX 7000 Console Proxy Cohab with MCC 7500 Installations
The PRX 7000 Console Proxy can be installed as a standalone product or cohabited with an MCC 7500 Dispatch
Console (VPM-based) installation inside the ASTRO RNI. Either or both can be installed with no impact to
performance. See the MCC 7500 Dispatch Console with Voice Processor Module manual for MCC 7500 Dispatch
Console installation procedures.
Warning: The PRX 7000 Console Proxy installation will not allow the console proxy to be installed
cohabited with an MCC 7100 IP Dispatch Console installation (or vice versa).
Setting Up the PRX 7000 Console Proxy
This process provides the order in which the components associated with the PRX 7000 Console Proxy must be
installed and/or configured.
Process:
1 Install the recommended Windows 7 operating system, as follows:
a) Run the Motorola OS Installer (MOSI). See Windows Installation and Motorola OS Installer (MOSI) on page
82.
b) Configure the PC's power settings. See Setting Windows Power Options on page 82.
2 Generate Flexera License files. See Generating License Certificates for the PRX 7000 Console Proxy on page
83.
6871024P93-A | November 2013 | Send Feedback
82 | PRX 7000 Console Proxy – Setup and Installation
3 Install PRX 7000 Console Proxy software. See Installing the PRX 7000 Console Proxy Software on page 84.
4 Configure black list of remote MCC 7100 IP Dispatch Console. See Adding a Remote MCC 7100 IP Dispatch
Console to the Black List on page 115.
5 Install MOTOPATCH. See MOTOPATCH Installation on page 85.
6 Install Supplemental CD. See Windows Supplemental Configuration (K-Core) on page 85.
7 Configure Network Interface Card (NIC) on PC or server inside the ASTRO RNI. See Configuring the PC
Network Interface Card for the PRX 7000 Console Proxy on page 86.
8 Setup the Domain for the console site. See Setting Up the Domain for the PRX 7000 Console Proxy on L and M
Core on page 87.
Operating System Installation for the PRX 7000 Console Proxy
The current Windows operating system must be updated with Windows 7 Professional with an approved service pack
before installing the PRX 7000 Console Proxy software.
Windows Installation and Motorola OS Installer (MOSI)
Before you install the MCC 7100 IP Dispatch Console software, you must update the Windows 7 operating system
with an approved service pack.
The installation of a fresh Windows 7 Professional operating system with an approved service pack is required to
ensure proper operation. Motorola provides two different installations depending on the computer hardware.
•
•
MOSI 64-bit installation DVD for Motorola purchased workstations (i.e., HP Z420).
Windows 7 Professional OEM DVD for customer laptop installations.
Note: For Windows 7 OEM installations, customers are responsible for installing all required drivers.
Note: The following restrictions must be followed when naming a laptop during the installation of the
Windows 7 operating system:
-
Minimum length: 2
Maximum length: 48
Allowed numbers: [0–9]
English letters: [a-zA-Z]
Special characters: . –
No leading and trailing spaces
Note: Workstations purchased from Motorola are imaged with the correct Windows 7 operating system and
approved service pack. All required drivers are configured and installed. The MOSI installation and
configuration (local or over-the-network) minimizes the wait time normally experienced during OS
installations. The MOSI media is updated periodically to provide continual support for installations on
Motorola purchased workstations. Information on using MOSI is available on the Motorola Online (MOL)
web portal. See the MOSI media label or readme.txt for information regarding access to Motorola Online
(MOL).
Setting Windows Power Options
The power options for Windows 7 must be set correctly to ensure uninterrupted operation. See the Windows 7
documentation or the PC manufacturers documentation for information regarding the steps for setting power options.
Send Feedback | November 2013 | 6871024P93-A
PRX 7000 Console Proxy – Setup and Installation | 83
The steps described in this procedure may not reflect recent updates to the operating system. For installations on HP
laptop/workstation, disable the “HP Power Assistant Service”. See the relevant HP documentation for details.
Procedure:
1 In the Control Panel of the Windows operating system, navigate to the Power Options pane.
2 For the Balanced (recommended) plan, click Change plan settings.
3 Click Change advanced power settings.
Step result: The Power Options window appears.
4 Expand Hard disk → Turn off hard disk after and perform one of the following actions:
• If you use a laptop, from the On battery and Plugged in lists, select Never.
• If you use a desktop computer, from the Setting list, select Never.
5 Expand Sleep → Sleep after and perform one of the following actions:
• If you use a laptop, from the On battery and Plugged in lists, select Never.
• If you use a desktop computer, from the Setting list, select Never.
6 Expand Sleep → Allow hybrid sleep and perform one of the following actions:
• If you use a laptop, from the On battery and Plugged in lists, select Off.
• If you use a desktop computer, from the Setting list, select Off.
7 Expand Sleep → Hibernate after and perform one of the following actions:
• If you use a laptop, from the On battery and Plugged in lists, select Never.
• If you use a desktop computer, from the Setting list, select Never.
8 Expand Sleep → Allow wake timer and perform one of the following actions:
• If you use a laptop, from the On battery and Plugged in lists, select Disable.
• If you use a desktop computer, from the Setting list, select Disable.
9 Expand USB settings → USB selective suspend setting and perform one of the following actions:
• If you use a laptop, from the On battery and Plugged in lists, select Disabled.
• If you use a desktop computer, from the Setting list, select Disabled.
10 Expand Display → Turn off display after and perform one of the following actions:
• If you use a laptop, from the On battery and Plugged in lists, select Never.
• If you use a desktop computer, from the Setting list, select Never.
11 Click OK.
12 Close the Control Panel window.
Generating License Certificates for the PRX 7000 Console Proxy
This procedure is used to obtain a license certificate from the FlexNet Operations Portal before installing the PRX
7000 Console Proxy software.
Note: Before obtaining a license certification, an Entitlement ID is required to access the server. The
entitlement ID is emailed to the customer by Motorola and contains instructions on how to acquire license
files.
Process:
1 The customer places the software order, including the number of licenses required.
2 An order fulfillment email, containing an Entitlement ID and instructions, is sent to the customer.
3 The customer logs onto
http://licensing.motorolasolutions.com
6871024P93-A | November 2013 | Send Feedback
84 | PRX 7000 Console Proxy – Setup and Installation
.
Note: The Entitlement ID is used to initially create a user account, if one does not exist. An automated
email, containing a default password, is sent to the registered email address.
4 Once logged on, the customer manages, selects, and activates all relevant entitlements.
Note: The FlexNet Operations Portal guides the user through the fulfillment process.
5 The customer then configures the server host by either selecting an existing host or adding a new host.
Note: When asked to configure a server host, enter the Ethernet MAC address for the target PC without
dashes. The list of MAC addresses along with their associated network adapters can be found by
running a Windows command prompt and entering ipconfig /all from the target PC.
Important: It is highly recommended that the MAC address selected in this step be the address
associated with a permanent network adapter on the server. The licensing services could be adversely
affected by choosing a network adapter that is frequently enabled or disabled.
6 The customer enters 1 for the fulfillment count.
Note: The license for the PRX 7000 Console Proxy can have a maximum of 10 remote connections.
7 After reviewing the license information, the customer generates the license file and completes the process.
8 Next, the customer manages the license and either saves the license file to the PC or emails the license.
Note: This is the license file that is used when prompt during the installation of the PRX 7000 Console
Proxy software installation.
Installing the PRX 7000 Console Proxy Software
Use the following procedure to install the PRX 7000 Console Proxy software on a computer approved by Motorola.
By performing the following procedure, you install the PRX 7000 Console Proxy software and the following setup
programs:
OpenSSL
A toolkit implementing the Secure Sockets Layer, Transport Layer Security, and general purpose cryptography
library.
Certificate Generation and Deployment (CGD)
A tool that creates and distributes Motorola default certificates for target windows devices to authenticate with the
installed Trusted Root Certificate.
DirectX
Collection of application programming interfaces (APIs).
.NET Framework
Runtime and associated files required to run applications developed to target the .NET Framework.
7-Zip
File archiving utility with a high compression ratio.
Password Vault
Secured password manager for storing passwords.
Prerequisites: Ensure that the PC or workstation on which you want to install the PRX 7000 Console Proxy is
running Windows 7 Professional.
Procedure:
1 Insert the PRX 7000 installation media into the CD/DVD drive.
2 Open the PRX 7000 installation media and double-click Setup.exe.
Send Feedback | November 2013 | 6871024P93-A
PRX 7000 Console Proxy – Setup and Installation | 85
3 From the welcome page of the Motorola PRX 7000 setup wizard, click Next.
4 On the next page, perform one of the following actions:
If you install the PRX 7000 software for the first time and you did not import the licenses before, browse to the
folder that contains the generated FLEXnet license files.
• If you installed the PRX 7000 software or imported the licenses to the predetermined location used by the
Flexera before, click Install.
5 Confirm that you agree to install the software and reboot the computer by clicking Yes in the confirmation
window.
6 Verify the installation of the PRX 7000 services, as follows:
a) From the Windows Start menu, select All Programs → Motorola → PRXY 7000 → Console Status.
b) Verify the value for the licensed capacity in the Remote OP Connection List window.
•
Configure a Black List for Remote MCC 7100 IP Dispatch Consoles
(Optional)
The black list is meant to block specific remote MCC 7100 IP Dispatch Consoles from connecting to the PRX 7000
Console Proxy inside the ASTRO RNI. Any remote dispatch console that is inadvertently added to the black list will
be prevented from establishing a connection. See Adding a Remote MCC 7100 IP Dispatch Console to the Black List
on page 115 for details.
MOTOPATCH Installation
Ensure that the correct Windows 7 Professional operating system service pack is installed before inserting and
opening the MOTOPATCH for Windows DVD. See the instruction in the README.txt file included in the the
MOTOPATCH for Windows DVD.
Windows Supplemental Configuration (K-Core)
The ASTRO® 25 Windows Supplemental CD is used to install specific Windows Supplemental CD files using a
Windows Install Framework script.
Important: The Windows supplemental installations must be reinstalled when upgrading/installing console
proxy software, when the supplemental CD changes, or when reinstalling the operating system.
The following software and operational installations are performed using the Windows Supplemental CD:
•
•
PuTTY
Group Policy Objects - scripts related to Active Directory and DNS, including script for Windows devices to join
the domain.
Note: See the Windows Supplemental Configuration manual for installation procedures. The installation of
programs such as OpenSSL and CGD are performed as part of the PRX 7000 Console Proxy installation.
See Installing the PRX 7000 Console Proxy Software on page 84 for details.
6871024P93-A | November 2013 | Send Feedback
86 | PRX 7000 Console Proxy – Setup and Installation
Network Interface Card (NIC) Configuration
The configuration of the network interface card on the PC must be modified to support the console proxy.
Note: The IP address of the console PC directly affects SNMPv3 functionality. Modifying the IP address of
the console PC for any reason after its initial setting may require SNMPv3 user credentials on the PC be
reset. See the SNMPv3 manual for details.
Configuring the PC Network Interface Card for the PRX 7000 Console
Proxy
The Network Interface Card (NIC) enables communication from the console proxy to an MCC 7100 IP Dispatch
Console inside the ASTRO RNI or to remote MCC 7100 IP Dispatch Console outside the ASTRO RNI through a
control room firewall. The configuration of the NIC is only required for new installations and as part of the disaster
recovery process.
Note: The steps provided in this procedure are intended as a guide and may not reflect recent updates to the
Microsoft Windows 7 operating system. See the relevant Microsoft operating system documentation or the
computer manufacturer's documentation for specific help on how to configure the network interface card.
Prerequisites: Acquire the following DNS network settings:
•
•
List of DNS server IP addresses
List of DNS suffixes
Note: See the system configuration documentation (provided by Motorola) for the correct network settings
and relevant lists of DNS server IP addresses and DNS suffixes, otherwise contact Motorola Solution
Support Center (SSC) for further assistance.
When and where to use: Configure the Network Interface Card (NIC) on the PC or server running the console proxy
software inside the ASTRO RNI.
Note: In Windows 7, the Local Area Connection icon in Managed Network Connections may indicate that
the network connection is partially available (yellow triangle with an exclamation mark) even though there
is network connectivity to the ASTRO Radio Network Infrastructure (RNI). This icon may indicate partial
availability when there is no connection from the ASTRO RNI to the external internet, which is a typical
system configuration.
Procedure:
1
2
3
4
5
Log on to the Windows 7 as an administrator.
In the Control Panel, navigate to the Network and Sharing Center pane.
From the left-hand menu, select Change adapter settings.
If the Local Area Connection is disabled, right-click the Local Area Connection. Select Enable.
Right-click Local Area Connection and select Properties.
Step result: The Local Area Connection Properties window opens.
6 Click Configure under Connect using.
Step result: The Network Connection Properties window for the specific card opens.
7 Click the Advanced tab.
8 Select Link Speed & Duplex from Property:.
9 Select 100Mbps/Full Duplex from the Value drop-down list and click OK.
Note: For Motorola purchased PCs (i.e., HP Z420), select 100 Mb Full.
10 Right-click Local Area Connection and select Properties.
Send Feedback | November 2013 | 6871024P93-A
PRX 7000 Console Proxy – Setup and Installation | 87
11 Double-click Internet Protocol (TCP/IPv4) and set the following values:
a) Select Use the Following IP address: in the General tab.
b) Enter the IP address, Subnet mask and Default gateway provided for this network interface card.
c) Select Use the following DNS server addresses: if not selected.
d) Click Advanced to open the Advanced TCP/IP Settings window.
e) Select the DNS tab.
f) Click Add..., enter the DNS server address in the TCP/IP DNS Server window, and click Add the save the
address.
Note: Repeat this step for each DNS server in the order of use.
g) Select Append these DNS suffixes (in order):.
h) Click Add... under the list of DNS suffixes, enter the Domain suffix in the TCP/IP Domain Suffix window,
and click Add to save the suffix.
i) Verify that Register this connection's addresses in DNS is checked.
j) Select the WINS tab and verify that the Enable LMHOSTS lookup check box is NOT selected.
k) Click OK on all subsequent windows to save all IP settings.
l) Click on No when prompt to reboot.
Setting Up the Domain for the PRX 7000 Console Proxy on L and M
Core
Prerequisites: Configure the DNS server IP addresses and DNS suffixes. See Configuring the PC Network Interface
Card for the PRX 7000 Console Proxy on page 86.
Note: A domain administrator account and password associated with this domain account are required to
join the Active Directory domain. For additional domain authentication information, see the Authentication
Services manual.
Important: It is highly recommend that the user apply a secure password to the Administrator account at
this time. Failure to do so may result in a security breach. Follow standard Microsoft procedures to change
the password on this account.
When and where to use: Perform this procedure on the server running the console proxy software inside the ASTRO
Radio network Infrastructure (RNI).
Procedure:
1 In the Windows operating system, navigate to the PRX 7000 bin directory:
•
•
On a 32 bit OS: <systemdrive>\Program Files (x86)\Motorola\AAA\bin
On a 64 bit OS: <systemdrive>\Program Files\Motorola\AAA\bin
2 Double-click JoinADomain.exe.
Note: If the Active Domain (AD) cannot be found, manually enter the domain name.
3 If the User Account Control window appears, click Yes.
4 In the Join Active Directory Domain window, enter the <user name> and <password> for the domain
account used to join the Windows-based device to the active directory domain.
Step result: The Organization Unit (OU) selection gets updated.
5 From the Organization Unit (OU) drop-down list, select the correct organization unit.
6 Click Join.
6871024P93-A | November 2013 | Send Feedback
88 | PRX 7000 Console Proxy – Setup and Installation
Note: Once the computer has joined the domain, the local administrator account (not the domain
account) is renamed to MotoSec.
7 Log on to the Windows operating system with a domain account and perform a group policy update:
a) In the Start menu search box, enter cmd.
b) From the list of results, right-click cmd and select Run as administrator.
c) When prompted in the User Account Control window, select Yes.
d) In the command prompt window, enter gpupdate /force and wait for the operation to complete.
e) Close the command prompt window.
f) Reboot the computer.
PRX 7000 Console Proxy Maintenance and Troubleshooting
Upgrading the PRX 7000 Console Proxy Software
This process is used to upgrade an existing installation of the PRX 7000 Console Proxy software.
Process:
1 Log on to the Windows 7 as an administrator.
2 Install the PRX 7000 Console Proxy software. See Installing the PRX 7000 Console Proxy Software on page 84.
Note: If any issues occur during the upgrade process, manually remove the existing version of the PRX
7000 Console Proxy software. See Uninstalling the PRX 7000 Console Proxy Software on page 88 for
details. Afterwards, repeat the upgrade process.
Uninstalling the PRX 7000 Console Proxy Software
This procedure is used to uninstall a previous installation of the PRX 7000 Console Proxy software that was not
installed incorrectly.
Prerequisites: The proxy server software must be removed from the computer using the built-in functionality of the
operating system, e.g., Using Programs and Features under Control Panel and selecting Motorola Solutions PRX
7000 Server.
Note: Executing the PRX 7000 Uninstall will ONLY remove the PRX 7000 application package. Other 3rd
party packages installed by the master installer such as the Password Vault, 7zip, OpenSSL, .NET
runtimes, and CGD are not automatically removed and would need to be uninstalled manually to remove
them from the system.
Procedure:
1
2
3
4
Log on to the Windows 7 as an administrator.
In the Control Panel of the Windows operating system, navigate to the Programs and Features pane.
Select Motorola Solutions PRX 7000 Server.
Click Uninstall.
Note: During the uninstall process, the following error can appear: ERROR 1306: Another app
has exclusive access to the file C:\...\Debug.mdb. Please shutdown
all other apps and retry. If the error appears, wait one minute and click Retry.
5 Reboot the computer.
Send Feedback | November 2013 | 6871024P93-A
PRX 7000 Console Proxy – Setup and Installation | 89
Remote Console Cannot Connect to the Proxy Server
The state of the connection between the remote MCC 7100 IP Dispatch Console and the PRX 7000 Console Proxy
can be checked using the Console Dispatch Status application, as follows:
1 Open the PRX 7000 Console Dispatch Status, see Console Dispatch Status (PRX 7000 Console Proxy) on page
113.
2 Once connected, right-click on the IP address of a remote connection in the Remote OP Connection List and select
Link Details.
Note: If the link state shows zero bars then the connection is not established.
Check the following items if a remote MCC 7100 IP Dispatch Console cannot connect to the PRX 7000 Console
Proxy server: test
•
•
•
•
•
•
•
Verify that a network path exists from the connecting remote MCC 7100 IP Dispatch Console to the control room
firewall.
Verify (if using a VPN connection) that a network path exists from the VPN server to the control room firewall.
Verify that a proxy connection is configured on the connecting remote MCC 7100 IP Dispatch Console. This can
be done from the Status application.
Verify that the system clocks for the PRX 7000 Console proxy and remote MCC 7100 IP Dispatch Console are
time synchronized. Due to security restrictions on the remote link, the clocks must be within 24 hours of each
other.
Check for an affiliated console on the console site.
Open the Console Dispatch Status application on the PRX 7000 Console Proxy and verify that the connecting
remote MCC 7100 IP Dispatch Console is not included on the black list.
Open the Console Dispatch Status application on the PRX 7000 Console Proxy and check the remote MCC 7100
IP Dispatch Console capacity.
-
•
Verify that the number of connecting remote MCC 7100 IP Dispatch Consoles does not exceed the licensed
capacity and that the licensed capacity is not zero. If the licensed capacity is zero, see License Troubleshooting
– MCC 7100 IP Dispatch Console on page 75 for details.
Check the power mode settings on the PRX 7000 Console Proxy and remote MCC 7100 IP Dispatch Console.
-
•
•
Verify the power mode setting, as described in Setting Windows Power Options on page 82, and restart the
FLEXlm licensing service, if necessary.
Using the Console Dispatch Status application on the remote MCC 7100 IP Dispatch Console, verify that the
proxy server hostname or IP address is the address configured in the CEN.
It is possible that network elements between the MCC 7100 IP Dispatch Console and the PRX 7000 Console
Proxy do not support standard MTU (Maximum Transmission Unit) or MTU Path Discovery. See Changing the
Maximum Transmission Unit (MTU) on page 90 for details.
License Troubleshooting – PRX 7000 Console Proxy
The Status application can be used to verify the licensed remote OP connection capacity. The licensed capacity can be
found in the Remote OP Connection List tab underneath the list of remote connections. See Remote OP Connection
List on page 114 for details. If the capacity is zero, an issue may exist in the license configuration. Use the following
to determine the issue:
•
•
•
•
Verify that the licenses are in the correct directory, as follows:
- C:\ProgramData\Motorola Dispatch\Licenses
Verify that the MAC address obtained during the license generation phase corresponds to an enabled network
device. The licensing services will not run if this network device is disabled.
Verify that the power settings are correctly configured. See Setting Windows Power Options on page 82 for
details.
If using a temporary license, open the license file in a text editor and verify that the license has not expired:
6871024P93-A | November 2013 | Send Feedback
90 | PRX 7000 Console Proxy – Setup and Installation
•
Look for a similar line in the license file. The expiration date in non-temporary cases is set to permanent:
+ INCREMENT console_proxy_conn motsol 1.0 07-feb-2012 10 \
Verify that the FLEXlm License Manager service is running, as follows:
-
If the service is not running, start the service.
If the service is running, check the task manager and verify that motsol.exe is running. If not, restart the
service.
Changing the Maximum Transmission Unit (MTU)
In the event that intermediate network elements (routers, switches) drop packets greater than 1500 bytes, it may be
necessary to change the value of the MTU on the PRX 7000 Console Proxy or the MCC 7100 IP Dispatch Console to
be a lower value.
Warning: The MTU should only be modified as a last resort and after the all network settings have been
check and verified.
Procedure:
1 In Windows 7, select Start and enter regedit in the search field.
2 In the registry editor, navigate to HKEY_LOCAL_MACHINE\SYSTEM\CurrentControlSet\Services
\Tcpip\Parameters\Interfaces\interface-name.
3 Right-click MTU of type REG_DWORD and select Modify.
4 Enter the desired MTU size in hexadecimal.
Note: The range of the MTU is 0x44 to the dynamically determined MTU (in bytes). Set this value to
0xFFFFFFFF, to change the MTU back to the default value of the network interface’s dynamically
determined MTU.
5 Click OK.
6 Close the Registry Editor.
7 Restart the computer.
PRX 7000 Console Proxy Disaster Recovery
This section provides details and references to help recover the PRX 7000 Console Proxy in the event of a failure.
Recovering a PRX 7000 Console Proxy Installation
The recovery of a PRX 7000 Console Proxy during a disaster recovery event requires a full installation.
When and where to use: Disaster recovery is used in the event that the current installation of the PRX 7000 Console
Proxy has become unstable or inoperable. Follow this process in this section to reinstall all necessary components.
Process:
1 Backup critical files used by the PRX 7000 Console Proxy. SeeCritical Backup Files for the PRX 7000 Console
Proxy on page 91 for a list of files.
2 If necessary, install the Window operating system. See Operating System Installation for the PRX 7000 Console
Proxy on page 82.
3 Install the PRX 7000 Console Proxy software. See Installing the PRX 7000 Console Proxy Software on page 84.
4 Install MOTOPATCH. See MOTOPATCH Installation on page 55.
5 If necessary, configure the NIC. See Network Interface Card (NIC) Configuration on page 56.
Send Feedback | November 2013 | 6871024P93-A
PRX 7000 Console Proxy – Setup and Installation | 91
6 If necessary, set up the Active Directory Domain. See Setting Up the Domain for the PRX 7000 Console Proxy on
L and M Core on page 87.
7 Restore critical files backed up in step 1.
Critical Backup Files for the PRX 7000 Console Proxy
The archiving of critical files is essential to the operation of the PRX 7000 Console Proxy. You must perform it
periodically. Archive the files to an external device, for example, external storage or network storage.
Table 12: PRX 7000 Console Proxy Files to Backup
File Type
Location
Note
License files
C:\ProgramData\Motorola
Dispatch\Licenses
Back up the license files to
speed up the recovery process.
Proxy Black List
C:\ProgramData\Motorola PRX
7000\ProxyServer\blacklist.txt
The Proxy Black List is a
single file.
6871024P93-A | November 2013 | Send Feedback
Chapter
4
USB Audio Interface Module
The USB Audio Interface Module (USB AIM) is an external device that you connect to the MCC 7100 IP Dispatch
Console. It functions as an interface between analog devices and the console position and as a general-purpose input/
output module.
The USB Audio Interface Module supports audio routing between the dispatch operator and peripherals. The dispatch
operator uses Motorola-standard peripherals that connect to the USB Audio Interface Module device. The USB AIM
connects to the MCC 7100 IP Dispatch Console with a USB cable.
The instant recall recorder (IRR) software installed at the console position computer supports short-term audio
logging so there is no need to support an external IRR port on the USB AIM device. The dispatch operator can replay
the recorded audio directly from the hard drive of the console position computer.
Figure 11: USB Audio Interface Module – Audio Routing
USB Audio Interface Module Connections
The USB Audio Interface Module supports all the Motorola-standard peripherals except for the desktop speakers.
Instead of the Motorola-standard speakers, you use common off-the-shelf USB speakers that you connect directly to
the console operator position computer. In addition to the ports for standard peripherals and external devices, the USB
6871024P93-A | November 2013 | Send Feedback
94 | USB Audio Interface Module
AIM supports four generic local auxiliary outputs. They activate warning lights that inform about the operations
performed by the dispatch operator.
Figure 12: USB Audio Interface Module Port Connections
The USB port is used to connect the USB AIM device to the MCC 7100 IP Dispatch Console. Other ports are used to
connect peripherals.
Note: Do not connect the USB Audio Interface Module to the telephone network directly.
Table 13: USB Audio Interface Module Peripherals
Port Type
Peripheral Type
Two DB15 connectors
Two headset jacks
Eight RJ45 connectors
One desk microphone
One footswitch
One external paging encoder
One telephone/headset port
One local logging recorder
One auxiliary output port for four generic auxiliary
output channels
Peripherals Supported with USB Audio Interface Module
The USB Audio Interface Module supports most of the Motorola-standard peripherals. Read the following topics to
learn more about the Motorola-standard peripherals that you can connect to the USB Audio Interface Module device
and about the USB Audio Interface Module ports.
Desk Microphone
The USB Audio Interface Module is capable of supporting a desktop microphone. The desktop microphone contains a
transmit button and a monitor button in the base for use with the selected radio channel or channels. For each dispatch
console, you can use one desktop microphone.
Send Feedback | November 2013 | 6871024P93-A
USB Audio Interface Module | 95
Figure 13: Gooseneck Microphone
The desk microphone can be attached to a horizontal surface or left freestanding so that the dispatcher can pick it up.
The 18-inch long, flexible shaft makes it possible for the dispatcher to position the microphone head within a few
inches of their mouth even when the base is placed behind a keyboard or writing area.
If a desk microphone is connected to a dispatch console while no headsets are connected, the desk microphone is
active whenever any transmit function is active.
Each MCC 7100 dispatch console can support 1 desktop microphone.
If a desk microphone is connected to a dispatch console while one or two headsets are connected, the desk
microphone is only active during a transmit function when the dispatcher presses the transmit button on it. This
solution prevents the desk microphone from picking up unwanted background sound when the dispatcher uses a
headset to transmit.
Footswitch
Each MCC 7100 IP Dispatch Console can support one footswitch.
The footswitch provides two foot pedals in a rugged, metal housing with a 10 foot cable. One pedal is for the general
transmit feature and the other pedal is for the monitor feature.
The footswitch makes it possible for a dispatch operator to operate these features with their feet so their hands are
freed for other tasks.
If necessary, the footswitch can be permanently fastened to the floor.
Figure 14: Footswitch
6871024P93-A | November 2013 | Send Feedback
96 | USB Audio Interface Module
Table 14: Footswitch Pinout
This table presents footswitch connector pinout. The pinout is the same as for Voice Processor Module (VPM)
footswitch port.
Pin Number
Description (+) and (–) symbols indicate pin polarity
3
PTT In (+)
4
PTT In (–)
5
Monitor In (–)
6
Monitor In (+)
Headset Jacks
The USB Audio Interface Module can support up to two headset jacks. A headset jack allows a dispatch console user
to use a headset while operating the dispatch console. The headset jack supports headsets that use either PJ7 (6-wire)
or PJ327 (4-wire) long frame connectors. The 6-wire headsets have a PTT button while the 4-wire headsets do not
have a PTT button. The headset jacks shipped from the factory are configured for the 6-wire headsets. For the 4-wire
operation, you must open the housing and cut a wire inside the headset jack.
Figure 15: Headset Jack
The headset jack has two volume controls:
•
•
For adjusting the level of the received radio audio
For adjusting the level of the received telephone audio
A small dimple is molded into the headset jack housing near the telephone volume control so that a dispatcher can tell
them apart without having to look at them. The headset jack allows the dispatch console users to use headsets, which
both decreases the ambient noise in a control room and reduces the effect of any ambient noise on dispatch console
transmissions. This solution improves the quality of the audio being transmitted from the control room and allows the
dispatch console users to hear received audio more clearly.
When a headset is plugged into a headset jack, the selected receive audio is typically removed from the speaker(s) and
routed to the headset earpiece.
Send Feedback | November 2013 | 6871024P93-A
USB Audio Interface Module | 97
Note: A radio resource may be configured so its selected receive audio remains in a speaker even when a
headset is in use. If two headsets are connected to a dispatch console, the same audio is heard in the
earpieces of both headsets.
If a telephone set connected to a dispatch console telephone/headset port is taken off hook while a headset is
connected to a dispatch console, the selected radio audio is removed from the headset earpiece and routed to the
appropriate speaker(s). The received telephone audio is routed to the headset earpiece. The headset microphone
becomes live and its audio is routed to the external telephone set. In this way, a dispatch console user can talk and
listen on the telephone set in a hands-free full-duplex mode.
The headset jack is mounted either underneath a writing surface or on top of a writing surface. The headset jack is
designed with a low profile and rounded edges to minimize “knee banging” when mounted underneath a writing
surface.
External Paging Encoder Port
The external paging encoder port allows an external tone paging encoder to be used with a dispatch console to
provide tone paging services. The dispatch console transmits the paging tones generated by the encoder on the
selected conventional radio resource or resources. If a dispatcher wants to send paging tones on an ASTRO® 25
Conventional channel, an external paging encoder is required.
This feature has an RJ45 connector with an analog 600 Ohm audio input to which the paging tones are applied. A
paging push-to-talk (PTT) input enables a dry contact closure to be applied that indicates when the dispatch console
should transmit the tones on the radio channel or channels.
When the dispatch console sees the paging PTT input go active, it transmits the audio appearing at the audio input on
the selected conventional channel(s). If PL Stripping is enabled on a conventional channel, the PL is stripped when
the paging tones are transmitted.
No de-emphasis filtering is performed and no talk extend is provided with externally generated tones. Generally, the
external paging encoder provides these functions.
Table 15: External Paging Encoder Port Pinout
Pin Number
Description (+) and (–) symbols indicate pin polarity
1
Paging PTT In (–)
2
Paging PTT In (+)
3
Paging Audio In (–)
6
Paging Audio In (+)
Local Logging Recorder Port
The local logging recorder port allows an external logging recorder to be connected to a dispatch console. The port
provides an RJ45 connector with a 600 Ohm analog output. The audio that appears on this output is configured and is
typically the audio that is transmitted and/or received at that dispatch console.
The configuration of audio presented at this port is tied to the physical dispatch console, so that no matter what user is
logged on the dispatch console, the same type of audio is logged. This configuration is done as part of configuring the
dispatch console at the Provisioning Manager. The local logging recorder port is configured to log any combination of
the following audio sources:
•
•
•
Audio received from the currently selected radio resources. The level of this audio is not affected by either the
individual volume setting of the radio resource or the master volume control on the speaker or headset jack.
Microphone audio being transmitted to the radio resources currently selected by the operator.
Microphone audio being transmitted to the radio resources not selected by the operator.
6871024P93-A | November 2013 | Send Feedback
98 | USB Audio Interface Module
•
•
Any tones generated by the dispatch console that appear in its speakers, for example, trunking tones and
emergency tones.
Tones generated by an external paging encoder.
Long-term, console-specific audio recording is used to record a portion of the inbound and outbound audio present on
a specific dispatch console. This recording is usually done by providing a logging port at the dispatch console and
wiring that port to a track of an audio recording device. These recordings are typically archived for long-term storage
and provide a historical record of the radio communications made at a given dispatch console.
In the local logging recorder port, audio out to logger pins are pins 4 and 5. This pinout is the same as for the Voice
Processor Module (VPM) local logging recorder port.
Telephone/Headset Port
The telephone/headset port allows an external telephone set to be connected to the dispatch console. This allows the
dispatch operator to use their headset to communicate on both the radio system and the telephone set. The port
provides the following inputs and outputs:
•
•
•
•
A 600 Ohm analog audio output for the microphone audio from the headset
A 600 Ohm analog audio input for the audio received from an external telephone
An input buffer for the Off-Hook signal from the external telephone
An input buffer for an Auxiliary Jack Sense signal from the external telephone
When a dispatch console senses a dry closure on the Off-Hook input buffer, it removes the selected radio audio from
the headset earpiece and routes it into the appropriate speaker(s). Then it routes any audio appearing at the telephone/
headset port audio input to the headset earpiece. The dispatch console also routes the headset microphone audio to the
telephone/headset port audio output, which allows the dispatch console user to communicate hands-free on the
telephone set.
When the dispatch console senses a dry closure on the Auxiliary Jack Sense input buffer, it ignores any closures on
the Off-Hook input buffer. This causes the headset to work with the radio system instead of the external telephone
system, and allows the dispatch console headset to be used for radio operations when another person is staffing the
telephone set.
If the dispatch console user transmits on any radio resources while the Off-Hook signal is active, the headset
microphone is rerouted to the radio system for the duration of the transmission. When the transmission ends, the
headset microphone is routed back to the telephone/headset port audio output. The headset earpiece audio routing is
not changed during the transmission, so the dispatch console user can still hear the audio received on the telephone.
The telephone/headset port allows a dispatcher to use a single headset to communicate on both the radio system and a
telephone system, such as a 911 system.
Note: Do not connect the USB Interface Module to the telephone network directly.
The ability to communicate with a 911 system is available even when the USB Audio Interface Module cannot
communicate with the MCC 7100 IP Dispatch Console PC.
Table 16: External Phone Interface Connector Pinout
This table presents external phone interface connector pinout. The pinout is the same as for Voice Processor Module
(VPM) phone port.
Pin Number
Description (+) and (–) symbols indicate pin polarity
1
Jack Sense In (–)
2
Jack Sense In (+)
Table continued…
Send Feedback | November 2013 | 6871024P93-A
USB Audio Interface Module | 99
Pin Number
Description (+) and (–) symbols indicate pin polarity
3
Audio In from Phone System (–)
4
Audio Out to Phone System (–)
5
Audio Out to Phone System (+)
6
Audio In from Phone System (+)
7
Off Hook In (+)
8
Off Hook In (–)
Local Console Relay Outputs
The Local Console Relay feature uses the existing Aux output ports on the USB Audio Interface Module (USB AIM)
to provide relay closures whenever:
•
•
•
•
the dispatcher is transmitting audio on a radio resource
an inbound call is occurring on a selected channel
there is emergency activity (acknowledged or unacknowledged) on the console
a pre-designated alarm auxio is activated
The relay closures are used to activate warning lights that serve as an indication that the dispatcher is busy and should
not be disturbed. The alarm auxio acts as a notification that a critical situation has arisen that requires attention.
The Elite Admin user interface is used to set Aux/IO that triggers the auxio alarm relay. The Alarm off button on the
console GUI is used to turn off the auxio alarm relay. The selected receive relay is disabled by default to reduce
excess relay chatter during dispatch operations. It can be enabled for a console OP by modifying a local registry key.
See the Enabling the Relays in the Windows Registry on page 99 procedure to enable the relays. There can be
multiple public Aux/IOs mapped to a single Alarm Auxio port on the console, the activation of any of these Aux/IO
will trigger the alarm.
Table 17: Generic Auxiliary Outputs Pinout
Pin Number
Description (+) and (–) symbols indicate pin polarity
1
Aux Out 1 (–) Op PTT
2
Aux Out 2 (+) Call on Selected channel (if configured)
3
Aux Out 3 (–) Emergency Alarm
4
Aux Out 4 (+) Audible Alarm on Public Aux I/O
5
Aux Out 4 (–) Audible Alarm on Public Aux I/O
6
Aux Out 3 (+) Emergency Alarm
7
Aux Out 2 (–) Call on Selected Channel (if configured)
8
Aux Out 1 (+) Op PTT
Enabling the Relays in the Windows Registry
Procedure:
1 Press the Windows logo key + R to access the Run dialog box.
2 Type regedt32 and click OK.
Step result: The Registry Editor appears.
6871024P93-A | November 2013 | Send Feedback
100 | USB Audio Interface Module
3 In the Registry Editor, to modify the values, navigate to: HKEY_LOCAL_MACHINE\SOFTWARE
\Wow6432Node\Motorola\Console\PM\LocalRelayDisable
4 Change the value in the Edit String dialog box and click OK.
• Value of 1 (default on install) means the selected receive relay is disabled.
• Value of 0 means all local relays are enabled.
5 Close the Registry Editor.
USB Audio Interface Module Specifications
Before you mount and install the USB Audio Interface device (USB AIM), verify that you meet the environmental
requirements necessary for the device to operate.
Table 18: USB Audio Interface Module Specifications
USB Audio Interface Module Feature
Specifications
Physical dimensions
Height (excluding the rubber foot): 1.65 inches (42
millimeters)
Width: 8.39 inches (213 millimeters)
Depth: 5.23 inches (133 millimeters)
Weight
1.43 lbs (0.65 kg)
AC Operating Voltage for the USB AIM Power Supply
90 VAC - 264 VAC
Minimum input voltage 90 VAC with 57~63 Hz
Maximum input voltage 264 VAC with 47~53 Hz
Typical input voltages are 115 VAC and 230 VAC
DC Operating Voltage for the USB AIM Device
12 VDC (nominal)
Maximum Power Consumption
0.5 A at 12 VDC (6 Watt)
Operating Temperature
5 °C (41 °F) — 40 °C (104 °F)
Storage Temperature
-25 °C (-13 °F) — 70 °C (158 °F)
Relative Humidity Operating
0% — 90% relative humidity at 40 °C non-condensing
USB Audio Interface Module FRU/FRE Information
If you cannot resolve your issues with the USB Audio Interface Module (B1941) by performing basic diagnostics and
troubleshooting, you can replace the item.
For the information about the Field Replaceable Units (FRUs) and Field Replaceable Entities (FREs) for the USB
AIM, see the following table.
Send Feedback | November 2013 | 6871024P93-A
USB Audio Interface Module | 101
Table 19: USB Audio Interface Module FRU/FRE Information
Part Number
Description
PMPN4052A
USB Audio Interface Module Interchangeable Power
Supply without Adaptor (1 piece)
RLN6349A
North American Power Adaptor (1 piece)
RLN6234A
European Power Adaptor (1 piece)
1564027V01
UK Power Adaptor (1 piece)
58012005001
Australia Power Adaptor (1 piece)
RLN6448A
Brazil Power Adaptor (1 piece)
PMHN4249A
Mounting Bracket Kit
30009477001
USB 2.0 Cable for USB Audio Interface Module (1
piece)
USB Audio Interface Module – Bonding and Grounding Requirements
General Bonding and Grounding Requirements
You mount the USB Audio Interface Module device under the writing surface or on the top of the writing surface by
using the mounting brackets that are shipped together with the device.
For the information about grounding and bonding equipment in dispatch centers, see the following sections in the
Standards and Guidelines for Communication Sites manual:
•
•
“Bonding to Equipment and Ancillary Support Apparatus”
“Grounding (Earthing) for Dispatch Centers and Network Operator Positions and Work Areas”
Grounding Cabling Standards
When you attach the equipment grounding (earthing) conductors to your equipment and the ancillary support
apparatus, meet the following bonding standards:
•
•
Each electronic equipment chassis must have a separate and independent equipment grounding conductor.
Paint, enamel, lacquer, and other electrically non-conductive coatings must be completely removed from threads
and bonding surface areas to ensure good electrical continuity (NFPA 70-2005, Article 250.12).
Note: Using a star washer does not alleviate the requirement to remove non-conductive coatings from
attachment surfaces because the star washer does not provide enough contact surface area.
•
•
•
•
Connections to steel and galvanized steel pipes, conduit, or other round member items must be made by using a
UL 486A listed, bolted clamp with stainless steel securing hardware or other suitable listed means. In high
humidity areas, the clamps must be stainless steel or tin-plated UL 486A listed to prevent galvanic corrosion.
Connections to vibrating or moveable items must be made by using an exothermic weld or a compression-type
two-hole lug.
Connections to structural building steel must be made by using an exothermic weld, listed irreversible high
compression-type connection, or listed tin-plated flange-type bonding connector that is equipped with two
securing bolts.
Connections to the raised flooring support system must be made by using a tin-plated listed compression lug,
listed pedestal clamp, or exothermic welding. Where practical the lug should be effectively bonded to the upper
support plate of the pedestal or to cross connecting stringer.
6871024P93-A | November 2013 | Send Feedback
102 | USB Audio Interface Module
Equipotential bonding at a network operator position should be integrated into the position equipment to the greatest
extent possible. This solution largely reduces the need to place equipment grounding conductors. All
telecommunication cable shields, data cable shields, and the equipment or furniture AC equipment ground (ACEG)
should be bonded together at the Sub-System Ground Bus Bar (SSGB) position or within the equipment. Outer
shields of telecommunication cables serving the network operator position or cluster of positions (to or from a
different location) should be bonded directly to the SSGB or by using conductors:
•
•
16 mm2 csa (#6 AWG) insulated copper conductor for lengths not exceeding 3.9 m (13ft.)
6 mm2 csa (#10 AWG) insulated copper conductor for lengths not exceeding 1.8 m (6ft.)
The outer shield ground is provided automatically when the cable connector contains a shield-to-chassis connection.
Installing and Configuring USB Audio Interface Module
The USB Audio Interface Module (USB AIM) is an external device that you connect to the MCC 7100 IP Dispatch
Console. Use the following process to cable, ground, and configure the USB Audio Interface Module device.
Prerequisites:
Verify that you have the USB AIM power supply and the USB cable necessary to connect the device to the MCC
7100 IP Dispatch Console PC. The cables necessary to connect peripherals to the USB Audio Interface Module
device are provided together with the peripherals.
Verify that you have the brackets necessary to mount the USB AIM device.
Plan out mounting and grounding the USB AIM device. See USB Audio Interface Module – Bonding and Grounding
Requirements on page 101 andUSB Audio Interface Module Specifications on page 100.
Process:
1 Connect the USB Audio Interface Module.
See Connecting USB Audio Interface Module on page 102.
2 Configure the USB Audio Interface Module by using the Peripheral Configuration Tool application.
See Configuring USB Audio Interface Module on page 103.
Connecting USB Audio Interface Module
To prepare the USB Audio Interface Module (USB AIM) device for operating in your system, connect it to the MCC
7100 IP Dispatch Console, plug in all the necessary peripherals, and power it on.
Procedure:
1 Connect the USB AIM device to the MCC 7100 IP Dispatch Console PC by using the provided USB cable.
2 Connect the peripherals to the appropriate USB AIM ports.
See USB Audio Interface Module Connections on page 93.
3 Connect the USB AIM device to an 12V power socket by using the provided power supply.
Step result: The green and red LEDs on the front of the device are on for a while. Then the red LED goes off and
the green LED stays on.
Result: The USB Audio Interface Module is operational but not configured.
Related Links
Installing and Configuring USB Audio Interface Module on page 102
Configuring USB Audio Interface Module on page 103
Send Feedback | November 2013 | 6871024P93-A
USB Audio Interface Module | 103
Configuring USB Audio Interface Module
After you connect the USB Audio Interaface Module to the MCC 7100 IP Dispatch Console, it is operational but not
configured. To use the peripherals connected to the USB AIM device, create a configuration in the Peripheral
Configuration Tool application installed on the MCC 7100 IP Dispatch Console PC.
Prerequisites:
Verify the state of the LEDs on the front of the device. If only the green LED is on, the device is fully operational and
you can continue. If the state of the LEDs is different, solve the issue. See USB Audio Interface Module Indicators on
page 104
Ensure that the MCC 7100 IP Dispatch Console PC has the Windows 7 Service Pack 1 installed.
Procedure:
1 From the Windows Start menu, select All Programs → Motorola → MCC 7100 Dispatch → Peripheral
Configuration Tool.
Step result: The application automatically detects the USB AIM device connected to the dispatch console. In the
Summary pane, the USB AIM device status is Connected. A default configuration or a configuration created
by a user is displayed. If a default configuration is displayed, the mapped devices are non-Motorola peripherals
connected to the dispatch console or Motorola-standard peripherals connected to the USB AIM. If the mapped
peripherals are Motorola-standard, the Motorola logo appears for them.
2 Click Configure AIM.
Note: The External Phone Interface operates only with the Motorola-standard headset connected to the
USB Audio Interface Module. If you use the External Phone Interface, keep the Motorola-standard
headset mapped the Peripheral Configuration Tool and connected to the USB AIM device.
Step result: In the Summary pane, the appropriate graphical icons are highlighted and the Motorola logo appears
for the Motorola-standard peripherals connected to the USB AIM device.
3 If the speakers are not configured, perform the following actions:
a) Go to the Audio Outputs tab.
b) Map the MCC 7100 IP Dispatch Console speakers to physical speakers connected to the dispatch console PC
by selecting them from the drop-down lists available for each physical speaker.
4 In the Profile pane, click Save As.
5 In the Save As window, enter the name of the new configuration. Click Save.
Step result: The application automatically selects the new configuration as the currently used configuration.
Related Links
Installing and Configuring USB Audio Interface Module on page 102
Connecting USB Audio Interface Module on page 102
To prepare the USB Audio Interface Module (USB AIM) device for operating in your system, connect it to the MCC
7100 IP Dispatch Console, plug in all the necessary peripherals, and power it on.
Upgrading the USB Audio Interface Module Software
If you experience problems with the USB Audio Interface Module (USB AIM), it is possible that you use an old
software version. Perform the procedure to upgrade the software to the newest version.
Prerequisites: Ensure that you do not have any active calls. During the upgrade of the USB AIM software the audio
peripherals connected to the device are not usable. Additionally, the USB AIM device restarts during the upgrade
process and all the operations performed by the USB AIM device are terminated.
6871024P93-A | November 2013 | Send Feedback
104 | USB Audio Interface Module
Procedure:
1 From the Windows Start menu, select All Programs → Motorola → MCC 7100 Dispatch → Peripheral
Configuration Tool.
2 From the File menu, select USB AIM Software Upgrade.
3 In the firmware information window, select Upgrade.
4 In the warning window, click Yes.
Step result: The upgrade process takes a few minutes. After the upgrade process finishes, the USB AIM device
restarts. In the firmware information window, you get a message about a successful software upgrade.
5 Click OK.
USB AIM Device Information
If you need details about your USB Audio Interface Module device, you can easily retrieve it by using the USB AIM
Device Information window in the Peripheral Configuration Tool application.
The window contains the following information:
•
•
•
Firmware version
Kit number
Tanapa number
Accessing the USB AIM Device Information
In the main menu of the Peripheral Configuration Tool application, click File → USB AIM Device Information.
Note: If the Peripheral Configuration Tool cannot access the information about the USB Audio
Interface Module device, an error appears in the USB AIM Device Information window. If you
encounter this issue, close the window and unplug the USB cable from the USB AIM device and from
the MCC 7100 IP Dispatch Console PC. Wait a while, plug the cable in again and reopen the USB AIM
Device Information window.
Copying the USB AIM Device Information
In the USB AIM Device Information window, click Copy to clipboard.
USB Audio Interface Module Troubleshooting
To diagnose problems with the USB Audio Interface Module device, use the LED indicators on the front of the
device. They provide helpful information about the possible causes of the problem.
If you cannot diagnose the problem by using the LED indicators, review the troubleshooting scenarios for a procedure
that can work for the symptoms you observe.
If you cannot find a scenario for the issue you have or the provided scenario does not work, contact Motorola Solution
Support Center (SSC).
USB Audio Interface Module Indicators
USB Audio Interface Module (USB AIM) has one green LED and one red LED on the front panel. Use these LEDs to
verify the status of the device and resolve any issues.
When the USB Audio Interface Module (AIM) is fully operational the green LED on the front of the device is on and
the red LED is off. It means that device is in the online state. Any other configuration indicates possible issues.
Send Feedback | November 2013 | 6871024P93-A
USB Audio Interface Module | 105
Figure 16: USB Audio Interface Module State Indicators
Table 20: USB Audio Interface Module States
Green
LED
State
Red LED USB AIM
State
Device
State
USB AIM Device State Description
On
Off
Online
The USB AIM device is operational. The USB interface is up and working.
Flashing
Off
Link Down
The USB AIM device is operational but the USB interface is not active.
External Phone Interface is active.
Possible Issues:
The USB cable is unplugged.
The host PC is down.
See:
Troubleshooting USB Audio Interface Module USB Communication
Issues on page 107
On
Flashing
Impaired
The USB AIM can be operational but requires servicing. The state of the
USB interface is unknown. Codecs initialized.
Possible Issues:
An alternate field-programmable gate array (FPGA) image is present
but it is corrupt and failed to boot.
The EE Non-Volatile Memory (NVM) checksum failure occurred.
There is a mismatch between the FPGA version and the NVM version.
See:
Upgrading the USB Audio Interface Module Software on page 103
Off
On
Failure
Hardware or firmware failure.
Possible Issues:
The host PC is in the sleeping mode.
Power-On Self Test (POST) failed.
Codecs failed to initialize.
I2C failed.
See:
Troubleshooting USB Audio Interface Module USB Communication
Issues on page 107
Upgrading the USB Audio Interface Module Software on page 103
Table continued…
6871024P93-A | November 2013 | Send Feedback
106 | USB Audio Interface Module
Green
LED
State
Red LED USB AIM
State
Device
State
USB AIM Device State Description
On
On
The device hung in the booting state that takes place just after you power
on the device.
Booting
Possible Issues:
The USB AIM FPGA did not configure.
USB AIM Status Icon
Go to the Summary pane of the Peripheral Configuration Tool and use the USB AIM status icon to verify the state of
the device. The icon shows one of the three possible states of the device.
The USB Audio Interface Module device is connected and fully operational.
The USB Audio Interface Module device is not connected.
The USB Audio Interface Module device is connected but not operational. By
hovering over the icon, you can learn more details about the problem.
Diagnosing Audio Malfunction in USB Audio Interface Module
If you experience problems with the USB Audio Inteface Module (USB AIM) audio, the possible issues are the
problems with the USB connection between the USB AIM device and the dispatch console, problems with the USB
AIM device, or problems with the MCC 7100 IP Dispatch Console PC.
Procedure:
1 In the Control Panel of the Windows operating system, navigate to the Sound window.
2 In the Recording tab, for each device on the list, perform the following actions:
a) Right-click the device and select Properties.
b) In the Properties window, select the Listen tab.
c) Ensure that the Listen to this device check box is not selected.
d) Click OK.
3 In the Sound window, click OK to save changes to all the devices.
4 Disconnect the USB AIM device from the MCC 7100 IP Dispatch Console PC.
5 Ensure that the External Phone Interface (EPI) is connected to the USB AIM device.
6 Restart the USB AIM device by unplugging the power supply, waiting a while, and plugging it in again.
Step result: The USB AIM device goes into the External Phone Interface fallback mode.
7 Verify that the USB AIM audio works in the EPI fallback mode by performing a phone call.
8 Connect the USB device to the MCC 7100 IP Dispatch Console.
9 Perform one of the following actions:
•
If the audio in the EPI fallback mode worked properly, verify the USB communication between the USB AIM
device and the dispatch console.
Send Feedback | November 2013 | 6871024P93-A
USB Audio Interface Module | 107
•
See Troubleshooting USB Audio Interface Module USB Communication Issues on page 107
If the audio in the EPI fallback mode did not work properly, try to upgrade the USB AIM software.
See Upgrading the USB Audio Interface Module Software on page 103.
Troubleshooting USB Audio Interface Module USB Communication Issues
If you experience problems with the USB communication between the USB Audio Interface Module (USB AIM) and
MCC 7100 IP Dispatch Console the issue can be the connection itself or a problem with the MCC 7100 IP Dispatch
Console PC. The symptoms can be the USB AIM device indicating the Link Down or Failure state and the audio
malfunction.
Procedure:
Verify the state of the LED indicators on the front of the USB AIM device:
If…
Then…
If the green LED flashes and the red
LED is off,
perform the following actions:
If the green LED is off and the red
LED is on,
verify that the dispatch console is not in the sleep mode.
1 Verify that the USB cable is properly connected to the USB AIM
device and the dispatch console PC.
2 Verify that the dispatch console PC is turned on.
Result: If you solved the problem by using these simple verification actions, the green LED is on and the red LED is
off which means that the USB AIM is again online and fully operational. If the USB AIM state did not change, the
problem can be the USB AIM device failure.
Post requisites: If you did not manage to solve the issue, try to upgrade the USB AIM software.
Troubleshooting USB Audio Interface Module Upgrade Issues
If you did not manage to upgrade the USB Audio Interface Module (USB AIM), the reason can be, for example, a lost
USB connection. If you encountered any upgrade issues, use the following scenario to retry to upgrade the USB AIM
software.
Procedure:
1 Unplug the USB cable from the USB AIM device and from the MCC 7100 IP Dispatch Console PC, wait a while,
and plug the cable in again.
2 Retry to upgrade the USB AIM software in a typical way.
3 Restart the USB AIM device by unplugging the power supply, waiting a while, and plugging it in again.
Step result: The green and red LEDs on the front of the device are on for a while. Then the red LED goes off and
the green LED stays on.
4 Retry to upgrade the USB AIM software in a typical way.
Troubleshooting Problems with Peripherals
If any of the peripherals that are connected to the USB Audio Interface (USB AIM) do not work properly, verify that
they can communicate with the USB AIM device and that there are no connection issues.
Procedure:
1 Ensure that the peripherals are connected to the appropriate ports.
See USB Audio Interface Module Connections on page 93.
2 Verify that the cables and connections for the peripheral devices are in an operating condition and not worn or
broken and replace the defective cables.
6871024P93-A | November 2013 | Send Feedback
108 | USB Audio Interface Module
3 Verify that the peripherals are mapped correctly in the Peripheral Configuration Tool application.
See Configuring USB Audio Interface Module on page 103.
Send Feedback | November 2013 | 6871024P93-A
Chapter
5
Console Dispatch Status and Peripheral Configuration
Tool
This chapter provides descriptions and procedures for using the Console Dispatch Status and Peripheral Configuration
Tool.
Note: The Console Dispatch Status application is installed as part of the MCC 7100 IP Dispatch Console
and PRX 7000 Console Proxy software installations.
Console Dispatch Status (MCC 7100 IP Dispatch Console)
In an MCC 7100 IP Dispatch Console installation, the Console Dispatch Status application is used to setup and point
to proxy server connections for MCC 7100 IP Dispatch Consoles deployed outside the ASTRO RNI. For inside the
ASTRO RNI configurations, the Console Dispatch Status is only used for licensing and encryption.
Up to five proxy server connections can be configured in the Console Dispatch Status. Once configured, the Console
Dispatch Status application can access any of the proxy server connections to establish a secure link to the ASTRO
RNI. Only one proxy server connection can be accessed at any time. Additional proxy server connections that are
configured are used as a backup in case the current connection is not available. The Console Dispatch Status
application displays the current status of the active proxy connection. The status of inactive proxy server connections
is unknown.
You launch the Console Dispatch Status application from the Start menu of the Windows operating system by
selecting All Programs → Motorola → MCC 7100 Dispatch → Console Status.
The File menu is used to Exit the application. Clicking File → Exit exits the application. Clicking X closes the
window and places an icon in the Windows taskbar. The Help menu is used to launch the online help or open the
About window.
Console Dispatch Status Taskbar Icon
The Console Dispatch Status taskbar icon allows the user to monitor the Link Statistics, Open the Console Dispatch
Status window, or close (Exit) the application. By default, the taskbar icon does not appear in the Windows taskbar
until the Console Dispatch Status application is opened and minimized. See Customizing the Console Dispatch Status
Taskbar Icon on page 110 for details.
Figure 17: Console Dispatch Status Taskbar Icon
6871024P93-A | November 2013 | Send Feedback
110 | Console Dispatch Status and Peripheral Configuration Tool
Customizing the Console Dispatch Status Taskbar Icon
The Console Dispatch Status taskbar icon must be customized before it can appear in the taskbar notification area.
Procedure:
1 Open the Console Dispatch Status application.
2 Click X in the upper right hand corner to close the Application.
Step result: This allows the application to appear in the list of icons that can be customized to appear in the
taskbar notification area.
3 Click the Show hidden icons arrow in the Windows taskbar notification area.
Figure 18: Windows 7 Taskbar Notification Area
4 Select Customize.
5 Locate ConsoleStatusApp and set the behaviors to Show icons and notifications.
6 Click OK.
Result:
Note: Selecting File → Exit closes the application and removes the icon from the taskbar notification area.
Clicking X to close the application minimizes the application as an icon in the taskbar notification area.
Proxy Server List
Note:
The Proxy Server List tab only appears when the Console Dispatch Status application is launched from the
MCC 7100 IP Dispatch Console.
The status of configured proxy server connections are monitored and displayed in the under the Proxy Server List tab.
The Proxy Server List tab is only visible for MCC 7100 IP Dispatch Consoles deployed outside the ASTRO RNI.
For consoles inside the ASTRO RNI, only the Encryption / Licensing tab is shown.
Send Feedback | November 2013 | 6871024P93-A
Console Dispatch Status and Peripheral Configuration Tool | 111
Figure 19: Console Dispatch Status Proxy Server List
Proxy Server List Status Indicator
The current state of the connection is displayed under the Link column. The three bar link indicator moves up and
down, indicating the strength of the connection to the proxy server. The status can change from three green bars
(excellent) to all grayed out (no connection).
Figure 20: Proxy Server List Status Indicator
Proxy Server List Buttons
The buttons located on the Proxy Server List are used to manage the proxy server connections configured for the
MCC 7100 IP Dispatch Console, as follows:
Table 21: Proxy Server List Buttons
Button
Link Metrics
Description
Opens the Link Statistic window that is used to diagnostic
network issues.
Table continued…
6871024P93-A | November 2013 | Send Feedback
112 | Console Dispatch Status and Peripheral Configuration Tool
Button
Description
Add
Used to setup and configure proxy server connections.
Edit
Used to modify the currently selected proxy server connection
Remove
Used to remove the currently selected proxy server connection
Up and Down Arrows
Used to change the ordering of the selected proxy server
connection
ASTRO Domain Configuration
During installation, the DNS suffix assigned to the domain controller is configured and automatically assigned as the
Configured ASTRO Domain. For consoles outside the ASTRO RNI that are on the CEN domain, enter the DNS
suffix for the ASTRO domain. The domain can be changed by clicking on Edit Domain. However, any change to the
ASTRO Domain Configuration requires a restart of the Elite Dispatch.
Adding a Proxy Server Connection
Proxy server connections are managed by the Console Dispatch Status application by adding proxy server’s host
name or IP address.
Note: The proxy server connections added to the Console Dispatch Status application can be from any
proxy server within the same site or from a different site.
Procedure:
1 From the Windows Start menu, select All Programs → Motorola → MCC 7100 Dispatch → Console Status.
2 Click Add from the Proxy Server List tab.
3 Enter a Host Name or IP address for the proxy connection in the site.
Note: The IP address that is used in the Console Dispatch Status is the IP address mapped in the
Control Room Firewall for the PRX 7000 Proxy Server.
4 If necessary, enter a description in the Notes field when only using an IP address for the proxy connection.
5 Click Save.
Editing a Proxy Server Connection
Procedure:
1
2
3
4
5
From the Windows Start menu, select All Programs → Motorola → MCC 7100 Dispatch → Console Status.
Select an existing proxy server connection in the Proxy Server List.
Click Edit.
Modify the Host Name/IP or Notes fields.
Click Save.
Removing a Proxy Server Connection
Procedure:
1 From the Windows Start menu, select All Programs → Motorola → MCC 7100 Dispatch → Console Status.
2 Select an existing proxy server connection in the Proxy Server List.
3 Click Remove.
Send Feedback | November 2013 | 6871024P93-A
Console Dispatch Status and Peripheral Configuration Tool | 113
4 Click Save.
Encryption/Licensing
Note:
The Encryption/Licensing tab only appears when the Console Dispatch Status application is launched from
the MCC 7100 IP Dispatch Console.
The Encryption/Licensing tab provides status information regarding the Crypto Status, OTEK Status, and Licensing
Status for the MCC 7100 IP Dispatch Console.
Figure 21: Console Dispatch Status Encryption/Licensing
The Crypto Status section displays the method used to store encryption keys. This can be either software key files
located on the MCC 7100 IP Dispatch Console or keys loaded onto a CRYPTR micro device. The Key Store button
opens an explorer window and displays the directory defined in the Key Storage Path and is used to manage key files
stored in the console. The OTEK Status section displays the current status of the OTEK connection and the server.
The Licensing Status section displays the current call capacity for the configured license.
Console Dispatch Status (PRX 7000 Console Proxy)
In a PRX 7000 Console Proxy installation, the Console Dispatch Status application displays a list of MCC 7100 IP
Dispatch Consoles that are connected to the PRX 7000 Console Proxy, along with the quality of their connection (link
6871024P93-A | November 2013 | Send Feedback
114 | Console Dispatch Status and Peripheral Configuration Tool
health). In addition, specific MCC 7100 IP Dispatch Consoles deployed outside the ASTRO RNI can be denied
access to the console proxy by adding their respective IP addresses to the Remote OP Connection Black List.
You launch the Console Dispatch Status application form the Start menu of the Windows operating system by
selecting All Programs → Motorola → PRXY 7000 → Console Status.
The File menu is used to Exit the application. Clicking File → Exit exits the application. Clicking X closes the
window and places an icon in the Windows taskbar. The Help menu is used to launch the online help or open the
About window.
Note: The taskbar icon for the Console Dispatch Status running on a PRX 7000 Console Proxy is similar to
the taskbar icon when running on the MCC 7100 IP Dispatch Console. See Console Dispatch Status
Taskbar Icon on page 109 for customization details.
Remote OP Connection List
Note:
The Remote OP Connection List tab only appears when the Console Dispatch Status application is
launched from the PRX 7000 Console Proxy.
Once connected, the Remote OP Connection List displays the IP addresses of all connected MCC 7100 IP Dispatch
Consoles. In addition, the number of allowed remote connections and remaining connections is displayed in text just
below the Remote OP Connection List tab.
Figure 22: Remote OP Connection List
Send Feedback | November 2013 | 6871024P93-A
Console Dispatch Status and Peripheral Configuration Tool | 115
Remote OP Connection Black List
Note:
The Remote OP Connection Black List tab only appears when the Console Dispatch Status application is
launched from the PRX 7000 Console Proxy.
Once connected, the Remote OP Connection Black List displays the Host Names and/or IP addresses of all MCC
7100 IP Dispatch Consoles that are not allowed access to the ASTRO RNI. From this tab, the user can Add, Edit, or
Remove MCC 7100 IP Dispatch Consoles from the black list.
Figure 23: Remote OP Connection Black List
Adding a Remote MCC 7100 IP Dispatch Console to the Black List
Procedure:
1 From the Windows Start menu, select All Programs → Motorola → PRXY 7000 → Console Status.
2 Click on the Remote OP Connection Black List tab and click Add.
3 Enter the Host Name or IP Address of the remote MCC 7100 IP Dispatch Console to add to the console proxy
black list.
Important: This IP address must be the ASTRO RNI IP address for the connecting remote dispatch
console and not the CEN IP address.
4 Click Save.
5 Restart Elite Dispatch.
6871024P93-A | November 2013 | Send Feedback
116 | Console Dispatch Status and Peripheral Configuration Tool
Editing a Remote MCC 7100 IP Dispatch Console on the Black List
Procedure:
1
2
3
4
From the Windows Start menu, select All Programs → Motorola → PRXY 7000 → Console Status.
Click on the Remote OP Connection Black List tab.
Select the remote MCC 7100 IP Dispatch Console and click Edit.
Modify the Host Name or IP Address of the remote MCC 7100 IP Dispatch Console.
Important: This IP address must be the ASTRO RNI IP address for the connecting remote dispatch
console and not the CEN IP address.
5 Click Save.
Removing a Remote MCC 7100 IP Dispatch Console from the Black List
Procedure:
1
2
3
4
From the Windows Start menu, select All Programs → Motorola → PRXY 7000 → Console Status.
Click on the Remote OP Connection Black List tab.
Select the remote MCC 7100 IP Dispatch Console and click Remove.
Click Save.
MCC 7100 Peripheral Configuration Tool
The Peripheral Configuration Tool is used to configure the audio input and audio output devices used by the MCC
7100 IP Dispatch Console. When launched, the tool reads all audio devices that are currently connected to the
dispatch console.
You launch the Peripheral Configuration Tool from the Start menu of the Windows operating system by selecting All
Programs → Motorola → MCC 7100 Dispatch → Peripheral Configuration Tool.
Send Feedback | November 2013 | 6871024P93-A
Console Dispatch Status and Peripheral Configuration Tool | 117
Figure 24: Motorola Peripheral Configuration Tool
Related Links
Peripheral Configuration on page 57
Audio Outputs Tab
The Audio Outputs tab displays all the audio speaker devices that are currently configured in the Windows operating
system. All the types of audio devices in this tab are speakers. They can be the internal PC speakers, external desktop
speakers, or the headset speakers. The Peripheral Configuration Tool separates all available channels of an audio
output device. By using the Peripheral Configuration Tool, you can selectively map or unmap the channels to audio
speaker devices and, in this way, make the devices available for use by the Elite Dispatch. For PCs containing a
special sound card that supports more than 2 speakers, all the speakers are available in the tool, except for any
subwoofer output. Up to 8 desktop speakers are supported.
To remove a device from the list of available devices, disable the output device in the Sound panel of the Windows
operating system. You open the Sound panel by clicking the Control Panel button in the Peripheral Configuration
Tool.
6871024P93-A | November 2013 | Send Feedback
118 | Console Dispatch Status and Peripheral Configuration Tool
Mapping and Unmapping a Speaker
You map or unmap speaker devices by changing the current settings in the Audio Outputs tab of the Peripheral
Configuration Tool. The Elite Dispatch can be configured to selectively choose which speakers to enable or disable.
Procedure:
1 From the Windows Start menu, select All Programs → Motorola → MCC 7100 Dispatch → Peripheral
Configuration Tool.
2 Select the Audio Outputs tab.
Step result: The list of speaker devices currently configured in the Windows operating system appears.
3 Map or unmap a speaker device by performing one of the following actions:
•
•
To map a speaker device, go to the drop-down list next to the device and select the speaker (channel) that you
want to hear on this device.
To unmap a speaker device, go to the drop-down list next to the device and select the blank selection.
Figure 25: Mapping and Unmapping Speakers
Step result: The number in the speaker icon in the Summary section changes to indicate the number of mapped
speakers. If you unmap a speaker from the configuration, the number in the speaker icon changes from green to
yellow to indicate that all available speakers are not currently configured.
4 Close the Peripheral Configuration Tool by clicking OK.
Testing a Speaker
After you configure speaker devices in the Peripheral Configuration Tool, identify each of them by sending an
audible tone to them.
Procedure:
1 From the Windows Start menu, select All Programs → Motorola → MCC 7100 Dispatch → Peripheral
Configuration Tool.
2 In the Audio Outputs tab, right-click the speaker device that you want to test. Click Test.
Figure 26: Speaker Test
Step result: An audible tone is sent to the speaker.
3 Close the Peripheral Configuration Tool by clicking OK.
Send Feedback | November 2013 | 6871024P93-A
Console Dispatch Status and Peripheral Configuration Tool | 119
Configuring a non-Motorola Headset
To configure a non-Motorola headset, you associate the headset speaker and the headset microphone. If the headset
has a PTT button, you also configure the headset PTT. You can configure the non-Motorola headset only as Headset
1.
Procedure:
1 From the Windows Start menu, select All Programs → Motorola → MCC 7100 Dispatch → Peripheral
Configuration Tool.
2 Select the Audio Outputs tab.
3 From the drop-down list next to the device that you want to configure as your headset speaker, select Headset 1
Speaker.
Step result: The ear piece speaker on the headset icon in the Summary pane is highlighted.
4 Select the Audio Inputs tab.
5 From the drop-down list next to the device that you want to configure as your headset microphone, select Headset
1 Microphone.
Step result: The microphone on the headset icon in the Summary pane is highlighted.
6 If the headset contains a push-to-talk button, select the PTT/Monitor tab.
7 From the drop-down list next to the device that you want to configure as your headset PTT, select Headset 1
PTT.
8 Save the profile:
• To save the changes to the existing profile, select Apply.
• To save the changes as a new profile, select Save As.
9 Close the Peripheral Configuration Tool by clicking OK.
Audio Inputs Tab
The Audio Inputs tab displays all the audio microphone devices currently configured in the Windows operating
system.
To remove a device from the list of available devices, disable the input device in the Sound panel of the Windows
operating system. You open the Sound panel by clicking the Control Panel button in the Peripheral Configuration
Tool.
Mapping and Unmapping a non-Motorola Desktop Microphone
You map or unmap microphone devices by changing the current settings in the Audio Inputs tab.
Procedure:
1 From the Windows Start menu, select All Programs → Motorola → MCC 7100 Dispatch → Peripheral
Configuration Tool.
2 Select the Audio Inputs tab.
3 Map or unmap a microphone device by performing one of the following actions:
•
•
To map a microphone device, go to the drop-down list next to the device and select Desktop Microphone.
To unmap a microphone device, go to the drop-down list next to the device and select the blank selection.
Note:
Only one desktop microphone can be configured for the MCC 7100 IP Dispatch Console.
If you use a non-Motorola desktop microphone and either a non-Motorola headset or the Motorolastandard headset is mapped in the Peripheral Configuration Tool and connected to the dispatch console,
you cannot transmit by using the desktop microphone. You must use the headset microphone.
4 Close the Peripheral Configuration Tool by clicking OK.
6871024P93-A | November 2013 | Send Feedback
120 | Console Dispatch Status and Peripheral Configuration Tool
PTT/Monitor Tab
The PTT/Monitor tab displays a list of dispatch Push To Talk (PTT) devices that are connected to the PC. USB foot
switches, USB headsets with push-to-talk functionality, and joysticks are supported.
Configuring a non-Motorola USB Footswitch
You configure a USB footswitch as a Push To Talk (PTT) in the Peripheral Configuration Tool.
Prerequisites: Connect the USB footswitch to the PC and install all the necessary USB footswitch drivers.
Procedure:
1 From the Windows Start menu, select All Programs → Motorola → MCC 7100 Dispatch → Peripheral
Configuration Tool.
2 Select the PTT/Monitor tab.
3 From the drop-down list next to the device that you want to use as the PTT device, select Footswitch.
Step result: The footswitch icon in the Summary pane is highlighted.
4 Optional: Test the PTT device by using the test buttons in the Button Test pane.
You can use the test buttons only to test non-Motorola PTT devices. The buttons are not available for the
Motorola PTT devices connected to the USB Audio Interface Module.
5 Save the profile:
• To save the changes to the existing profile, select Apply.
• To save the changes as a new profile, select Save As.
6 Close the Peripheral Configuration Tool by clicking OK.
USB AIM Tab
The USB AIM tab contains a list of Motorola peripherals that can be connected to the USB Audio Interface Module
(USB AIM) device. The list is visible only when the USB AIM device is connected to the MCC 7100 IP Dispatch
Console. When the device is connected to the console PC, all the Motorola peripherals are listed, no matter whether
they are actually connected to the USB AIM. By using the USB AIM tab, you can map or unmap the peripherals.
Mapping and Unmapping Motorola Peripherals
Use the procedure to map or unmap the peripherals that are connected to the USB Audio Interface Module device
(USB AIM).
Prerequisites: Connect the USB Audio Interface Module to the MCC 7100 IP Dispatch Console PC.
Procedure:
1 From the Windows Start menu, select All Programs → Motorola → MCC 7100 Dispatch → Peripheral
Configuration Tool.
2 Map the peripherals by performing one of the following actions:
If…
Then…
If you want to map all the
Motorola peripheral devices,
click Configure AIM.
If you want to map or unmap perform the following actions:
a single Motorola peripheral
1 Select the USB AIM tab.
device,
2 For the peripheral that you want to map or unmap, perform one of the
following actions:
Send Feedback | November 2013 | 6871024P93-A
Console Dispatch Status and Peripheral Configuration Tool | 121
If…
Then…
•
•
To map a peripheral device, go to the drop-down list next to the device
and select it from the list.
To unmap a peripheral device, go to the drop-down list next to the
device and select the blank selection.
Figure 27: Mapping and Umapping the Motorola Peripherals
Note:
The External Phone Interface operates only with the Motorola headset connected to the USB Audio
Interface Module. Before you use the External Phone Interface, make sure that the Motorola headset is
mapped in the Peripheral Configuration Tool and connected to the USB AIM device.
You can use up to two Motorola headsets. If you want to use a Motorola headset together with a nonMotorola headset, map the Motorola headset as Headset 2. You can map the non-Motorola headset
only as Headset 1.
6871024P93-A | November 2013 | Send Feedback
122 | Console Dispatch Status and Peripheral Configuration Tool
3 Close the Peripheral Configuration Tool by clicking OK.
Peripheral Configuration Summary
The Summary pane consists of icons that represent the peripheral device types that you can map to the MCC 7100 IP
Dispatch Console, the USB AIM icon that represents the state of the USB Audio Interface Module, and the Button
Test pane that contains two buttons to test the PTT function of non-Motorola PTT devices. The peripheral device
icons indicate that the devices are mapped but not necessarily connected.
Figure 28: Peripheral Configuration Summary
The peripheral devices that you map to the MCC 7100 IP Dispatch Console can be Motorola and non-Motorola
peripherals. To map the Motorola peripherals, you need the USB Audio Interface Module (USB AIM). You connect
the peripherals to the USB AIM device. After you connect the USB AIM device to the dispatch console PC and
configure it, then all the mapped Motorola peripherals are displayed in the Summary pane, no matter whether they
are actually connected or not. All the mapped Motorola peripherals are indicated with the Motorola logo.
Figure 29: Peripheral Configuration Summary – Motorola peripherals
The included graphical icons are for two headsets, speakers, a microphone, an external phone interface, a local
logging recorder, an external paging encoder, and USB foot pedal switches. The graphical icons are dynamically
updated as each audio device is mapped. The graphical icons for headset 2, the external phone interface, local logging
recorder, and external paging encoder always represent Motorola devices that can only connect to the USB AIM
device. The bookshelf speaker icon indicates the number of non-Motorola speakers currently mapped. The icons for
headset 1, desktop microphone, and USB foot pedal switches can represent either Motorola or non-Motorola
peripherals depending on what is mapped. Motorola headsets are either mapped or unmapped as single devices. For a
non-Motorola headset that can be mapped as headset 1 you can configure the speaker, microphone and PTT switch
independently. When only a speaker or microphone is mapped for the non-Motorola headset, a red X appears instead
of a green check mark on the headset graphical icon.
Peripheral Configuration Profile
The Profile pane is used for managing audio profiles. The user can select from the list of existing profiles, apply
changes to existing profiles, create and save a new profile, or delete existing profiles.
Note:
When you try to save a profile in which no device is mapped, an error appears.
When you try to save a profile in which a headset is configured incorrectly, for example, a headset speaker
is mapped and no headset microphone is mapped, an error appears.
Send Feedback | November 2013 | 6871024P93-A
Console Dispatch Status and Peripheral Configuration Tool | 123
The default profile uses the current audio output and input devices from the Windows operating system. If no USB
audio devices are connected, the internal speakers and microphones are used. If a USB device, such as a headset, is
connected, the speaker and microphone of this device are used.
Any changes to the default devices in the Windows operating system cause an immediate change in the Peripheral
Configuration Tool and also in the Elite Dispatch, if running. For example, a change to the default microphone will
immediately cause the Elite Dispatch to switch to the new default device.
Creating a Profile with non-Motorola Peripherals
Create and use custom profiles to allow users to selectively choose which audio input and output devices to use.
Procedure:
1 From the Windows Start menu, select All Programs → Motorola → MCC 7100 Dispatch → Peripheral
Configuration Tool.
2 In the Audio Outputs, map the speaker devices.
3 In the Audio Inputs, map the microphone devices.
4 In the PTT/Monitor tab, map the push-to-talk devices.
5 Save the profile by performing the following actions:
a) In the Profile pane, click Save As.
b) In the Save As window, enter the name for the profile. Click Save.
6 Close the Peripheral Configuration Tool by clicking OK.
Note: If default devices switch in the Windows operating system, no notification is made. Only the
configured devices in the custom profile are used. If the devices are disconnected, audio is lost from
those devices. Default mode automatically switches to devices configured in the Windows operating
system.
Customizing a Profile with Motorola Peripherals
Use this procedure if you want to customize a profile that uses the Motorola peripherals by unmapping the Motorola
peripherals or replacing them with non-Motorola peripherals. The Motorola peripherals that you can replace with
non-Motorola peripherals are headset 1, desktop microphone, and footswitch.
Prerequisites: Connect and configure the USB Audio Interface Module. See Configuring USB Audio Interface
Module on page 103.
Procedure:
1 Perform one of the following actions:
If…
Then…
If you want to unmap a
Motorola peripheral,
1 Select the USB AIM tab.
2 From the drop-down list next to the device that you want unmap, select the
blank selection.
If you want to replace the
Motorola headset 1 with a
non-Motorola peripheral,
1 Select the Audio Outputs tab.
2 From the drop-down list next to the device that you want to configure as
your headset speaker, select Headset 1 Speaker.
3 Select the Audio Inputs tab.
4 From the drop-down list next to the device that you want to configure as
your headset microphone, select Headset 1 Microphone.
5 Select the PTT/Monitor tab.
6 From the drop-down list next to the device that you want to configure as
your headset PTT, select Headset 1 PTT.
6871024P93-A | November 2013 | Send Feedback
124 | Console Dispatch Status and Peripheral Configuration Tool
If…
Then…
If you want to replace the
1 Select the Audio Inputs tab.
Motorola desktop microphone 2 From the drop-down list next to the device that you want map as your
with a non-Motorola
desktop microphone, select Desktop Microphone.
peripheral,
If you want to replace the
Motorola footswitch with a
non-Motorola peripheral,
1 Select the PTT/Monitor tab.
2 From the drop-down list next to the device that you want map as your
footswitch, select Footswitch.
2 Save the profile:
• To save the changes to the existing profile, select Apply.
• To save the changes as a new profile, select Save As.
3 Close the Peripheral Configuration Tool by clicking OK.
Deleting a Profile
You can selectively choose which profiles to remove from the tool or delete all profiles except for the currently active
profile that does not appear in the list of profiles to delete.
Procedure:
1 From the Windows Start menu, select All Programs → Motorola → MCC 7100 Dispatch → Peripheral
Configuration Tool.
2 In the Profile pane, click Delete.
3 In the Select Profile(s) to Delete window, perform one of the following actions:
• To remove all the profiles except for the currently active profile, select the Select All check box.
• To remove a single profile, select the check box next to it.
4 Click Delete.
5 Confirm the deletion by clicking OK.
Control Panel Button
When the Audio Outputs tab , the Audio Inputs tab, or the USB AIM tab is selected, the Control Panel button
opens the Window Sound panel. When the PTT/Monitor tab is selected, the Control Panel button opens the Game
Controller window. The default audio devices currently configured in the Windows operating system are shown both
in the Sound panel and in the Peripheral Configuration Tool.
Send Feedback | November 2013 | 6871024P93-A
Console Dispatch Status and Peripheral Configuration Tool | 125
Figure 30: Sound and Game Controller in the Windows operating system
The Playback and Recording tabs in the Sound panel are similar to the Audio Outputs and Audio Inputs tabs in
the Peripheral Configuration Tool, respectively. The only difference is that only one speaker is shown in the Sound
panel whereas two speakers are shown and configurable in the Peripheral Configuration Tool. This separation of
speakers allows each speaker to be treated as a separate channel for use by the Elite Dispatch.
Note: To prevent speakers or microphones configured in the Windows operating system from appearing in
the Audio Outputs and Audio Inputs tabs of the Peripheral Configuration Tool, disable them from the
Sound panel.
Motorola Peripherals – Audio Gain
It is important to adjust the audio gain for the peripherals so that the communication can be effective.
You can adjust the audio gain for all the Motorola peripherals:
•
•
•
•
•
External Telephone Interface
Local Logging Recorder
External Paging Encoder
Two pairs of the Motorola headsets
Motorola desktop microphone
The Motorola peripherals are connected to the USB Audio Interface Module (USB AIM) device.
To change the audio gain for the Motorola peripherals, for each of them, adjust the audio gain parameters in the
Provisioning Manager or Configuration Manager application. See the Provisioning Manager manual or the
Configuration Manager manual.
Note: If you change the audio gain for the Motorola peripherals locally in the Windows operating system,
the changes are temporary. When you edit the profile in the Peripheral Configuration Tool, restart the Elite
application, or disconnect and connect the USB AIM device, the previous settings are restored.
6871024P93-A | November 2013 | Send Feedback
Chapter
6
Instant Recall Recorder
The Instant Recall Recorder (IRR) is a licensed application that is installed as part of the MCC 7100 IP Dispatch
Console software. The IRR software makes it possible to record audio traffic on the dispatch console on which it is
installed. By using the IRR application the dispatch operator can replay the recorded audio traffic to, for example,
verify a specific piece of information.
The Instant Recall Recorder application does not require any additional installation tasks. If you want to make your
dispatch operators able to replay the calls that took place on their dispatch consoles, order the number of IRR licenses
you need. When you follow the standard procedure for installing the MCC 7100 IP Dispatch Console software, the
IRR software is installed automatically. As soon as you place the IRR license files in the right folder on the dispatch
console position, the dispatch operator can start using the software.
After you install the MCC 7100 IP Dispatch Console software, you can start the application directly from the
Windows operating system or from the Elite Dispatch application
Before you start using the Instant Recall Recorder (IRR), you can use the default settings or perform a short and easy
configuration in the application to adjust it your specific needs. For example, you can specify the audio types that you
want to record, the time after which the IRR application deletes the stored audio, and the peripheral in which you
want to play back the recorded audio. The configuration is the only action that you perform to be able to easily
manage and play back the calls recorded on your MCC 7100 IP Dispatch Consoles.
Audio Types Recorded by the Instant Recall Recorder Application
The Instant Recall Recorder (IRR) application is capable of recording four audio types that appear on the dispatch
console position on which it is installed. Depending on the configuration, the IRR application records one or more
types of audio.
Recorded Audio Types
The IRR application is capable of recording the following audio types:
•
•
•
•
Inbound audio from the currently selected channels;
Outbound audio from the microphone to the selected channels;
Outbound audio from the microphone to the unselected channels;
Tones generated by the dispatch console that appear in the speakers of the dispatch console.
The IRR application can record the outbound audio from the dispatch console microphone, the audio that appears on
selected resources, and any locally generated tones. Depending on the configuration, the IRR application records only
inbound audio on the selected resources or more audio types. To select one of the two available configurations, use
the Configuration dialog.
Receive Audio
The IRR application records only the inbound audio on the currently selected resources which is the audio that
appears in the headset or selected speakers of the dispatch console.
Receive and Transmit Audio
The IRR application can record all the audio types that are within the scope of the IRR functionality.
6871024P93-A | November 2013 | Send Feedback
128 | Instant Recall Recorder
Note: The types of audio that the IRR application records when you specify receive and transmit audio
as the recording source depends on the platform configuration in the Provisioning Manager or
Configuration Manager.
Audio Types That Are Not Recorded
The IRR application is capable of recording defined types of audio. The IRR application does not record the
following types of audio:
•
•
Inbound audio on the unselected resources which is the audio that appears in the unselected speakers of the
dispatch console.
Outbound audio other than the audio from the dispatch console microphone. For example, it does not record
outbound audio the dispatch console retransmits from other consoles or subscriber radios.
The IRR application does not record outbound patch audio.
If the dispatch console is configured in the Provisioning Manager or Configuration Manager to record inbound audio
from the currently selected channels, it can record the inbound patch audio that comes from a patch resource that is
currently selected.
The IRR application never records audio from patch resources that are not selected. Although entries for these
resources can appear in the call list, the IRR application does not record audio for them as it is outbound audio the
dispatch console retransmits to other resources in the patch.
The IRR application does not record audio for cross muted and cross busied resources. However, entries for these
resources can appear in the call list as they are valid calls in progress.
Audio Only Records
The IRR application is capable of recording private calls between the console position and subscribers or other
dispatch consoles.
However, in the case of inbound private calls, the dispatch console opens all audio paths before the dispatch console
or the other party key up. As the result, for inbound private call entries, the IRR application cannot display all the
details that it normally displays for other calls.
As the result, the IRR application displays the call information in the following way:
•
•
•
No specific Unit Alias appears. Instead, you see an Audio Only entry.
No unit ID and Channel Alias appears.
Start Time, End Time, and Duration data appear as for other calls.
As soon as either private call party keys up, a new entry appears in the call list. The new entry displays all the details
in the standard way.
Configuring the Instant Recall Recorder Application
Before you start using the Instant Recall Recorder (IRR), adjust the application to your needs. For example, specify
the audio types that you want to record, the retention period, and the peripheral in which you want to play back the
recorded audio.
Procedure:
1 Start the IRR application.
See Starting the Instant Recall Recorder Application on page 129.
2 From the main menu, select Settings → Configuration.
Step result: The Configuration dialog appears.
3 In the Recording Source section, specify the audio type that you want to record.
Send Feedback | November 2013 | 6871024P93-A
Instant Recall Recorder | 129
Note: Before you decide about the recorded audio type, learn more about the audio types the IRR
application records and about the audio types that are not within the scope of the IRR functionality. See
Audio Types Recorded by the Instant Recall Recorder Application on page 127.
• To record the inbound calls on the selected resources only, select Receive Audio.
• To record more audio types, select Receive and Transmit Audio.
4 In the Storage Options section, specify where you want to store the recorded audio:
a) Click Browse.
b) In the Browse For Folder window, navigate to the folder in which you want to store the audio.
The default location for storing the IRR audio is C:\Users\<username>\AppData\Roaming\Motorola
MCC 7100\IRRSession.
5 Decide whether you want to make it possible to save calls in a separate .wav file:
• If you want the Save to File to be active, for the Save to File Enabled option, select Yes.
• If you want the Save to File to be inactive, for the Save to File Enabled option, select No.
6 Decide whether you want the location in which you store the recorded audio purged each time you exit the IRR
application:
•
If you want the location purged each time you exit the IRR application, for the Purge on Exit option, select
Yes.
• If you want to keep the IRR audio after you exit the IRR application, for the Purge on Exit option, select No.
7 Decide about the time after which the IRR application deletes the stored audio by using the Retention Period
slider.
By moving the thumb of the Retention Period slider, you change the values in the Record Retention and Disk
Space Used fields. If it is more convenient, you can use the fields instead of the slider.
8 From the Output Devices drop-down list, select the peripheral in which you want to hear the played back IRR
audio.
Instant Recall Recorder Basic Operations
Before you start using the Instant Recall Recorder application, learn how to perform basic operations and about the
options it offers, especially about the customization options.
Starting the Instant Recall Recorder Application
You can start the Instant Recall Recorder (IRR) application directly from the Windows operating system or from the
Elite Dispatch application.
Procedure:
Start the Instant Recall Recorder application by performing one of the following actions:
•
If you start the application from the Windows operating system, from the Start menu, select All Programs →
Motorola → MCC 7100 Dispatch → Instant Recall Recorder.
•
If you start the application from the Elite Dispatch, in the toolbar, click the Open IRR button
.
Closing the Instant Recall Recorder Application
If the Start IRR with Elite option is enabled in the Elite Dispatch configuration, the Instant Recall Recorder (IRR)
closes automatically always when you exit the Elite Dispatch application. If you use a configuration in which this
6871024P93-A | November 2013 | Send Feedback
130 | Instant Recall Recorder
option is not enabled or want to exit the IRR without closing the Elite Dispatch application, use the following
procedure.
Procedure:
From the IRR main menu, select File → Exit.
Fixing the Instant Recall Recorder Window on the Top of the Desktop
If you pin the Instant Recall Recorder (IRR) window and then use other applications, the IRR windows does not hide
under the windows of these applications but stays on the top of your desktop.
Procedure:
In the IRR title bar, click the Pin the window button
.
Instead, from the IRR main menu, you can select View → Stay on Top.
Step result: The IRR window gets fixed on the desktop an the Pin the window button changes into the Unpin the
window button .
Switching the Instant Recall Recorder Window to the Compact Mode
The compact mode is window view in which only playback buttons, the volume control and optionally, the progress
bar are displayed.
Procedure:
1 In the menu bar, click the Compact Mode button .
Instead, from the IRR main menu, you can select View → Compact Mode.
2 Optional: Collapse the progress bar section by clicking the Hide icon .
3 Deactivate the compact mode by clicking the Expanded Mode button
.
Expanding and Collapsing Sections in the Instant Recall Recorder Window
You can adjust the appearance of the Instant Recall Recorder (IRR) window to your needs by collapsing the sections
that you do not use or use rarely. By default, all the sections in the IRR window are expanded.
Procedure:
Expand or collapse sections in the IRR window by performing one of the following actions:
•
•
To collapse a section, in the upper-right corner of the section, click the Hide icon .
To expand a collapsed section, on the right side of the IRR window, click the appropriate Expand icon
.
Instead, you can collapse and expand sections by selecting or clearing the section check boxes in the View menu.
Managing Detail Columns in the Instant Recall Recorder Call List
The call list section consists of six columns that contain details about the recorded calls, for example, the information
about the duration of the calls and the aliases and IDs of the units that took part in the calls. You can adjust the call
list to your needs by changing the sequence of the columns and hiding the columns that you do not need.
Procedure:
Adjust the call list to your needs by performing the following actions:
If…
Then…
If you want to change the sequence of
the columns in the call list,
click the header of column that you want to move and drug it to a new
position.
Send Feedback | November 2013 | 6871024P93-A
Instant Recall Recorder | 131
If…
Then…
If you want to hide a column that you perform the following actions:
do not use,
1 Right-click any column header in the call list.
2 In the sensitive menu, clear the check box next to the name of the
column that you want to hide.
Playing Back Calls in the Instant Recall Recorder Application
Use the Instant Recall Recorder (IRR) application to play back the recorded calls. During a single playback session
you can play back single calls, multiple calls, or portions of calls.
Procedure:
1 Start the IRR application.
See Starting the Instant Recall Recorder Application on page 129.
2 Play back the desired audio portion by performing one of the following actions:
If…
Then…
If you want to play back a
single call,
perform the following actions:
If you want to play back
multiple calls,
perform the following actions:
If you want to play back a
call from somewhere in the
middle,
perform the following actions:
1 In the call list, highlight the call that you want to play back.
2 Click Play.
1 In the call list, select the check boxes for the calls that you want to play
back.
2 Click Play.
1 In the call list, highlight the call that you want to play back.
2 In the sound visualization section, double-click the waveform in the place
from which you want to start playing back the call.
Instead, you can move the thumb in the progress bar.
3 Click Play.
If you want to play back a
portion of a call,
perform the following actions:
1 In the call list, highlight the call that you want to play back.
2 In the sound visualization section, highlight the audio portion that you want
to play back.
You cannot highlight an audio portion that is shorter than 50 milliseconds.
3 Click Play.
3
.
If you want the audio portion continuously repeated, click the Turn Repeat On button
4 If you want to play back a previous or the next call from the call list, perform one of the following actions:
•
•
If you want to play back a call that is one position higher than the call or calls that you selected, click the
Rewind button.
If you want to play back a call that is one position lower than the call or calls that you selected, click the Fast
Forward button.
6871024P93-A | November 2013 | Send Feedback
132 | Instant Recall Recorder
Filtering Calls in the Instant Recall Recorder Application
If you want to reduce the number of calls on the call list, you can filter for specific information.
Procedure:
1 In the call list of the Instant Recall Recorder (IRR), click the Filter icon
you want to filter.
Instead, you can access the filters by using the View menu.
2 In the filter window, enter the required information.
See Call Filters in the Instant Recall Recorder Application on page 132.
3 Activate the filter by clicking the filter magnifier icon .
next to the value according to which
Step result: A box with the filter details appears above the call list.
4 Deactivate the filter by clicking the exit icon
in the box with the filter details.
Call Filters in the Instant Recall Recorder Application
If you want to reduce the number of calls on the call list, you can filter for specific information by using one of the six
filters available in the Instant Recall Recorder (IRR) application.
The filters available in the Instant Recall Recorder correspond with the detail columns in the call list.
Unit Alias
Use to limit the number of entries on the call list to calls with a unit that has a specific unit alias. To use this filter,
you enter the whole unit alias that you look for, or a string of characters from this unit alias, or a specific character
from this unit alias.
Unit ID
Use to limit the number of entries on the call list to calls with a unit that has a specific unit ID or calls with unit
IDs that suit the range that you specify. To use this filter, you enter the whole unit ID that you look for or specify
the minimum and maximum unit ID in the range.
Channel Alias
Use to limit the number of entries on the call list to calls that took place on a channel with a specific alias. To use
this filter, you enter the whole channel alias that you look for, or a string of characters from this unit alias, or a
specific character from this unit alias.
Start Time
Use to limit the number of entries on the call list to calls that took place within a specific range of time. To use
this filter, you specify the range of time by setting the start time and the end time of the call.
End Time
Use to limit the number of entries on the call list to calls that took place a specific time ago. Specify the time that
elapsed from the call or calls that you look for in hours, minutes, or seconds or by using all the values. Yo can also
enter the specific time when the call or calls ended.
Duration
Use to limit the number of entries on the call list to calls of a specific duration. To use the filter, specify the
minimum and maximum duration of the call or calls that you look for.
Sorting Calls in the Instant Recall Recorder
To sort calls in the call list of the Instant Recall Recorder (IRR) application, you click the header of column according
to which you want to sort the calls.
Procedure:
Sort the calls in the call list by performing one of the following actions:
•
•
To sort the calls in the ascending order, click the header of the column according to which you want to sort.
To sort the calls in the descending order, double-click the header of the column according to which you want
to sort.
Send Feedback | November 2013 | 6871024P93-A
Instant Recall Recorder | 133
Rewinding and Fast Forwarding Calls in the Instant Recall Recorder
Application
If you play back a call and want to omit a specific portion or hear it once again, use the Instant Recall Recorder fast
forwarding and rewinding options.
Procedure:
Rewind or fast forward the played back audio by performing one of the following actions:
•
•
If you want to rewind a played back call, click and hold the Rewind button.
If you want to fast forward a played back call, click and hold the Fast Forward button.
Instead of the Rewind and Fast Forward buttons, you can drag the thumb of the progress bar to the left or to the
right.
Changing the Playback Speed in the Instant Recall Recorder Application
If for some reason listening to a call at lower or higher speed can help you retrieve the information you need, adjust
the playback speed to your needs.
Procedure:
1 Change the playback speed by performing one of the following actions:
•
If you want to decrease the playback speed to 50 percent of the original call speed, under the speed slider, click
1/2.
• If you want to increase the playback speed to 200 percent of the original call speed, under the speed slider,
click 2.
• If you want to gradually change the playback speed, in the speed slider, click to the left or to the right of the
thumb.
2 Set the playback speed to the original call speed, by clicking 1 under the speed slider.
Modifying the Playback Volume and Playback Quality in the Instant Recall
Recorder Application
Use the mechanisms available in the Instant Recall Recorder application to adjust the volume and improve the quality
of the played back calls. To adjust the volume, you can use a standard volume slider or enable the automatic gain
control (AGC). To improve the playback quality, you can use the noise reduction option.
Procedure:
•
If you want to change the volume of the played back call, perform one of the following actions:
-
•
•
•
To gradually decrease or increase the volume, in the Volume slider, click to the left or to the right of the
thumb.
To set the volume to a specific volume, click and drag the thumb of the Volume slider.
.
If you want to mute the call, click the Mute icon
If you want to level out the volume of a call for which the signal strength changes, set Automatic Gain Control
to On.
If you have to reduce the irrelevant noise, set Noise Reduction to On.
6871024P93-A | November 2013 | Send Feedback
134 | Instant Recall Recorder
Zooming In and Zooming Out Waveform in the Instant Recall Recorder
Application
Zoom in on the waveform to see more details for the call that you play back.
When and where to use: By default, the whole call audio is visible in the waveform in the Sound Visualization
section of the Instant Recall Recorder (IRR). You can zoom in and zoom out on a call when you play it back or just
before you start playing it back. In the described scenario, you set the zoom options before you start playing the call.
Procedure:
1 In the call list, highlight the call that you want to play back.
2
In the Sound Visualization, set the zoom options by using the Zoom In
3 Click Play.
4
If you want to restore the default waveform view, click the Zoom Out icon
and zoom out
icons.
until it gets inactive.
Saving Calls to a File in the Instant Recall Recorder Application
In the Instant Recall Recorder (IRR) application, you can save a specific call or multiple calls from the call list to
a .wav file in any localization that you specify.
Prerequisites: Enable the Save to File option in your IRR application:
1 From the main menu, select Settings → Configuration.
2 In the Configuration dialog, for the Save to File Enabled option, select Yes.
Procedure:
1 Select the calls that you want to save:
If…
Then…
If you want to save a
single call,
perform the following actions:
If you want to save
multiple calls,
perform the following actions:
If you want to save a
portion of a call,
perform the following actions:
1 In the call list, highlight the call.
2 From the main menu, select File → Save to File.
1 In the call list, select the check boxes for the calls.
2 From the main menu, select File → Save to File.
1 In the call list, highlight the call.
2 In the sound visualization section, highlight the audio portion that you want to
save.
You cannot highlight an audio portion that is shorter than 50 milliseconds.
3 Right-click the highlighted audio portion. Click Save Selection to File.
2 In the Save As dialog, navigate to the location in which you want to save the .wav file.
3 Specify the name for the .wav file.
4 Click Save.
Send Feedback | November 2013 | 6871024P93-A
Appendix
A
MCC 7100 IP Dispatch Console - Additional Procedures
and Information
This appendix provides additional helpful procedures and information that are not part of the typical MCC 7100 IP
Dispatch Console installation.
Removing All MCC 7100 IP Dispatch Console Applications
Use the following procedure to remove a previous version of the MCC 7100 IP Dispatch Console software. The
assumption is that the version that you want to remove is software that was successfully installed and is in an
operational state.
When and where to use: By uninstalling the Motorola MCC 7100 Series software, you only remove the MCC 7100
application package. Other dependency packages that are both Motorola packages, for example, Motorola Password
Vault and Motorola OpenSSL, and non-Motorola packages, for example, 7-zip and DirectX runtimes, are not
automatically removed. To remove them from the system, uninstall them manually.
Procedure:
1
2
3
4
Log on to the Windows operating system as an administrator.
In the Control Panel, navigate to the Programs and Features pane.
Select Motorola MCC 7100 Console Operator Position Series.
Click Uninstall.
Note: An error message can appear stating:ERROR 1306: Another app has exclusive
access to the file C:\...\Debug.mdb. Please shutdown all other apps
and retry. If the message appears, wait one minute and click Retry.
5 Close the Programs and Features window.
6 Reboot the PC.
Removing the Elite Admin and Elite Dispatch Applications Only
By default, both Elite Admin and Elite Dispatch applications are installed on the MCC 7100 IP Dispatch Consoles.
You can remove the Elite Admin or Dispatch application individually. If you want to re-add the removed
components, you must reinstall the application software.
Procedure:
1 Log on to the Windows operating system as an administrator.
2 Select Start → Control Panel.
3 In the Control Panel, navigate to the Programs and Features pane.
6871024P93-A | November 2013 | Send Feedback
136 | MCC 7100 IP Dispatch Console - Additional Procedures and Information
4 From the list, select Motorola MCC 7100 Console Operator Position Series. Click Change.
5
6
7
8
9
10
Step result: The InstallShield Wizard window appears.
On the welcome page, click Next.
On the Program Maintenance page, select Modify. Click Next.
On the Custom Setup page, click the drop-down menu for the feature that you want to remove and select This
Feature will not be available. Click Next.
On the Ready to Modify the Program page, click install.
On the InstallShield Wizard Completed page, click Finish.
When prompted to reboot, click Yes.
Configuring a Preconfigured Patch Console (Inside the ASTRO RNI)
An MCC 7100 IP Dispatch Console can be configured as a preconfigured patch console. This configuration allows
the console to automatically log on to Windows, start Elite, and activate preconfigured Patch Groups.
Prerequisites: Only applies to an MCC 7100 IP Dispatch Console configured as a preconfigured patch console
deployed inside an ASTRO RNI. This process assumes that an ELT file exists for the preconfigured patch console.
See the MCC 7500/7100 Elite Admin User’s Guide for creating Elite configuration files.
When and where to use: A preconfigured patch console must be a member of the preconfigured patch organization
unit at the domain controller in order to prevent the security banner from being displayed during login.
Note: If converting a regular dispatch console to a preconfigured patch console, the console must be
rejoined to the domain, as follows:
•
•
Add the dispatch console to the domain for the console site. See Setting Up the Domain for an MCC
7100 IP Dispatch Console Inside the ASTRO RNI on page 60.
Rejoin the console to the domain. See the “Joining and Rejoining a Windows-Based Device to an
Active Directory Domain Using a Script” section in the Authentication Services manual.
Process:
1 Configure automatic Windows login. See Configuring an Automatic Windows Login on page 136 for details.
2 Add Elite authentication to Windows registry. See Adding Elite Authentication Username and Password to the
Windows Registry on page 138 for details.
3 Create batch file for automatic network authentication. See Creating Batch File for Automatic Network
Authentication on page 138 for details.
4 Reboot the computer.
Note: After a reboot, Windows automatically logs in and starts Elite.
Configuring an Automatic Windows Login
An automatic Windows login is only supported for MCC 7100 IP Dispatch Consoles configured as permanent patch
consoles.
Warning: A security risk exists when configuring automatic Windows Login.
Note: A console previously configured for automatic Windows login may no longer login as anticipated
once the PC is joined to the domain.
Send Feedback | November 2013 | 6871024P93-A
MCC 7100 IP Dispatch Console - Additional Procedures and Information | 137
Note: The user may be required to create the registry keys mentioned in this section.
Process:
1 Add Windows domain username and password to Windows registry.
2 Configure the domain controller for the preconfigured patch OP.
Adding Windows Domain Username and Password to Windows Registry
Procedure:
1 In Windows 7, select Start and enter regedt32 in the search field.
Note: When prompt for permission, click Continue.
2 In the registry editor, navigate to HKEY_LOCAL_MACHINE\SOFTWARE\Microsoft\ WindowsNT
\CurrentVersion\Winlogon.
3 Double-click AutoAdminLogon value.
4 Enter 1 in the Edit String window.
5 Click OK.
6 Ensure that the AutoLogonCount entry does not exist.
Note: If AutoLogonCount exists, delete it from the registry.
7 Double-click the DefaultUserName value.
Note: If DefaultUserName does not exists a new String Value must be created.
8 Enter a valid Windows Local username for the computer in the Edit String box.
9 Click OK.
10 Double-click the DefaultPassword value.
Note: If DefaultPassword does not exists a new String Value must be created.
11 Enter a valid Windows Domain Password for the Username used in step 8.
12 Click OK.
13 Double-click the DefaultDomainName value.
Note: If DefaultDomainName does not exists a new String Value must be created.
14 Enter a valid Windows Domain for the computer In the Edit String dialog box.
15 Click OK.
16 Exit the Registry Editor.
Configuring the Domain Controller for the Preconfigured Patch OP
Note: This procedure is not applicable for ASTRO® 25 Conventional IV&D System (K1/K2).
Procedure:
1 Log on to the Zone Level Domain Controller.
6871024P93-A | November 2013 | Send Feedback
138 | MCC 7100 IP Dispatch Console - Additional Procedures and Information
Note: When prompt for permission, click Continue.
2
3
4
5
6
7
8
9
10
11
12
13
14
15
Open Administrative Tools, and select Group Policy Management.
Locate the Preconfigured Patch Dispatch Console GPO in the list of Group Policy Objects.
Right-click the Preconfigured Patch Dispatch Console GPO and select Edit.
In the Group Policy Object Editor, select Polices from the Computer Configuration section.
Select Administrative Templates from the Policies section.
Select Classic Administrative Templates (ADM) from the Administrative Templates section.
Double-click the Custom Settings folder, and then double-click the Logon folder.
Double-click the Specify password for AutoLogon policy option.
Set the policy to Enabled, and in the Password field specify the password that the preconfigured patch OP uses to
log on to the windows domain, and click OK.
Close the Group Policy Object Editor.
Open Administrative Tools, select Active Directory Users and Computers.
Locate the Preconfigured Patch Dispatch Consoles OU. Make sure that the computer object for the Preconfigured
Patch OP is a member of this OU.
Log on to the Preconfigured Patch OP.
From the Start menu, select Run and enter gpupdate /force. This forces the Preconfigured Patch OP to
download the password that was just specified on the Zone Level Domain Controller.
Adding Elite Authentication Username and Password to the Windows
Registry
Procedure:
1 In Windows 7, select Start and enter regedt32 in the search field.
Note: When prompt for permission, click Continue.
2 In the registry editor, navigate to HKEY_LOCAL_MACHINE\SOFTWARE\Wow6432 Node\Motorola
\Console\Elite.
3 Double-click the U value
4 Enter a valid Username for the Network Authentication in the Value Data field.
Note: This username corresponds to the console user created in Provisioning Manager.
5
6
7
8
9
Click OK.
Double-click the P value.
In the Edit String dialog box, enter the password for the username used in step 4.
Click OK.
Close the Registry Editor.
Creating Batch File for Automatic Network Authentication
Procedure:
1 In the Windows operating system, open Notepad.
2 Enter the following: ping 127.0.0.1 -n 6 >NUL.
Send Feedback | November 2013 | 6871024P93-A
MCC 7100 IP Dispatch Console - Additional Procedures and Information | 139
Note: This line in the bat file pauses the computer for 5 seconds before continuing. This is required for
Elite Dispatch software to properly initialize after Windows has been restarted. The delay required vary
based on the configuration of the device depending on what cohab applications are installed (including
antivirus software), CPU speed, and hardware configuration. If the Elite software does not initialize
with the 5 second delay, it may be necessary to increase the delay time.
To adjust the delay time change the number after the “-n” argument. The delay time is 1 second less
that the number after “-n”. For example “ping 127.0.0.1 –n 11 >NUL” creates a 10 second
delay.
3 Press Enter.
4 On the second line, enter
“<Path to Elite.exe>” “<path to ELT file to be used for preconfigured
patch>” –authenticate
Step example:
If the elite.exe is installed in the default location and an ELT file called preconfiguredpatch.elt exists,
then the line would be as follows (including quotation marks):
“C:\Program Files (x86)\Motorola MCC 7100\bin\elite.exe” “C:\Users\Public
\Motorola MCC 7100\config\precofiguredpatch.elt” -authenticate
5 Save the file as PreconfiguredPatch.bat and save it to the following location:
C:\Users\<Windows AUTHENTICATION USERNAME>\AppData\Roaming\Microsoft\Windows
\Start Menu\Programs\Startup.
Note: The AUTHENTICATION USERNAME should match the one that is used in the Registry for
Automatic Login. The exceptions would be if zone suffixes or enumerated instances exist. (EG “C:
\Users\motosec.zone1.004”) In these cases use the most recent directory that matches your currently
logged in Windows User account.
6 Reboot the computer.
Note: After the computer reboots, Windows automatically logs in and starts Elite.
Fault Managment
Fault Management for Devices Inside the ASTRO RNI
Note: When auto-discovering the MCC 7100 IP Dispatch Console from the UEM, make sure to have the
console application up and running otherwise auto-discovery will fail and the device will need to be
rediscovered.
MCC 7100 IP Dispatch Console Fault Management
The MCC 7100 IP Dispatch Console supports the same fault interface as the MCC 7500 Dispatch Console. The MCC
7100 IP Dispatch Console has the same sysOid as the MCC 7500 Dispatch Consoles. Faults from the MCC 7100 IP
Dispatch Console are displayed as “Motorola Dispatch Console – MCC 7500”.
6871024P93-A | November 2013 | Send Feedback
140 | MCC 7100 IP Dispatch Console - Additional Procedures and Information
PRX 7000 Console Proxy Fault Management
The PRX 7000 Console Proxy is managed as an IP managed device by the UEM. The computer is discovered as a
generic node and is supervised using ICMP requests. The UEM manages and reports the network path status from the
UEM to console proxy PC.
Control Room Firewall Fault Management
Firewalls in an ASTRO® 25 Core are IP managed devices. The Control Room Firewall will be discovered as a generic
node, and will be supervised using Internet Control Message Protocol (ICMP) requests. The UEM will manage and
report communication link status for the Control Room Firewall.
See “Discovering Devices” in the Unified Event Manager manual.
Fault Management for Devices Outside the ASTRO RNI
The MCC 7100 IP Dispatch Console fault management is not supported outside the ASTRO RNI. Due to the nature
of the deployment MCC 7100 IP Dispatch Consoles outside the ASTRO RNI may be active for a brief period of time.
The dispatch consoles are not expected to run in a 24 hours a day, 7 days a week environment. MCC 7100 IP
Dispatch Consoles outside the RNI are not discovered in UEM.
Embedded Password Management
The MCC 7100 IP Dispatch Console supports password management for embedded passwords. For procedures on
using password management, see “Appendix C - Embedded Password Management” in the Authentication Services
manual.
Note: When changing an embedded password for the MCC 7100 IP Dispatch Console, shutdown the Elite
Dispatch application. Restart Elite after the password is changed.
Send Feedback | November 2013 | 6871024P93-A
Appendix
B
Enhanced Alert Tones
Use the following information to create and configure alert tones that meet the specific requirements of your
organization.
Enhanced Alert Tones Overview
The Enhanced Alert Tones feature increases the number of the alert tones that you can use with the dispatch console.
It also provides increased flexibility in using the alert tones as it makes it possible to replace the predefined and
unconfigurable alert tones provided by Motorola with alert tones that you can customize according to your needs.
Before the introduction of the Enhanced Alert Tones feature, the dispatch console supported three distinct,
predefined, and unconfigurable alert tones. They were available based on the console configuration parameters in
Provisioning Manager or Configuration Manager application and based on the dispatch console position setup in the
Elite Admin application.
The Enhanced Alert Tone feature makes it possible to use up to 15 console alert tones. With the initial installation of
the dispatch console software that supports the Enhanced Alert Tone feature, 15 predefined enhanced alert tones are
installed in a predetermined location on the console client.
You can override the default enhanced alert tones by creating customized enhanced alert tones with an audio file
processing software application. The custom files must meet the required audio file specifications and the file location
and naming conventions.
Enhanced Alert Tones – Audio File Specifications
Enhanced Alert Tones feature makes it possible to create custom alert tones on your own. You can create new audio
files or customize the predefined alert tones provided by Motorola. However, all the files must meet some
requirements.
General Specifications
If an enhanced alert tone file does not meet the required criteria, the dispatcher fails to play the tone and instead an
error notification appears in the status line of the Elite application. Your customized enhanced alert tone files must
meet the following requirements:
•
•
•
•
•
The file has .wav extension;
The audio is sampled at 8 ksps;
The audio is mono (single channel);
The audio samples are 16-bit PCM;
The audio is longer than 20 milliseconds but shorter than five minutes.
Motorola recommends the .wav file has an average level of -28 dBov to achieve the desired system output level of
-22 dBm0.
6871024P93-A | November 2013 | Send Feedback
142 | Enhanced Alert Tones
Note:
Motorola recommends the use of commercially available sound editing software to modify or create
customized .wav files for the enhanced alert tone feature.
If you formatted an enhanced alert tone according to the listed specifications and the dispatch console
cannot utilize it, your sound editing software may have saved the alert tone in a non-standard .wav format
which the dispatch console cannot process. If you encounter this issue, the only solution is to re-record the
audio by using an application which saves the .wav files in the standard format that can be processed by
the dispatch console.
Cohabitation of sound editor software on the MCC 7500 operator position PC is not supported. Use of
sound editor software on the MCC 7500 operator position may have unintended effects on the MCC 7500
software.
AMBE+2 Specifications
If you use a digital trunking system that uses the AMBE+2 vocoder, make sure to meet the following requirements:
•
•
The frequencies of the generated tone must be between 120 Hz and 3840 Hz;
The duration of a continuous tone at one frequency must be greater than or equal to 50 milliseconds;
Any tones outside of those boundaries exhibit severe distortions that can be intolerable for listeners. The decoded
frequencies of the generated tones may be outside the tolerance of most analog equipment.
If you use an analog conventional system that uses the G.728 vocoder, there are no restrictions on the content of
the .wav files.
Enhanced Alert Tones – Audio Files Configuration
Read this topic to learn how to override the predefined enhanced alert tones or remove access to an enhanced alert
tone entirely.
Audio File Location
Alert tones are stored in two separate directories. One directory is for the predefined alert tones and the other is for
custom alert tones. The predefined alert tones are stored in the following directory:
C:\Users\Public\Documents\Motorola MCC 7100\alert tones\default
The custom alert tones are stored in the following directory:
C:\Users\Public\Documents\Motorola MCC 7100\alert tones\customized
The Elite application supports up to 15 alert tones. Custom alert tones override their corresponding predefined alert
tones. After the initial installation, the default directory contains 15 predefined alert tone .wav files and the
customized directory is empty.
Custom Alert Tones Installation
If you want to override a predefined alert tone with a custom alert tone, you must meet the following requirements:
•
•
The custom audio file meets the required specifications. See Enhanced Alert Tones – Audio File Specifications on
page 141
The name of the custom audio file is AlertTone<number>.wav
•
where <number> is the number of the predefined alert tone that you want to override.
The custom audio file is in the following directory for the custom alert tones:
C:\Users\Public\Documents\Motorola MCC 7100\alert tones\customized
Send Feedback | November 2013 | 6871024P93-A
Enhanced Alert Tones | 143
For example, if you want to override the predefined alert tone 15 with a custom file, save the custom file in the
customized folder with the name AlertTone15.wav. To restore access to the predefined alert tone, remove the
custom alert tone file from the customized directory. Separate directories for the predefined alert tones and the
custom alert tones make it extremely easy to replace and restore the predefined alert tones.
If the corresponding Alert Tone button or the Alert Tone Selector button is added to the toolbar in the .elt
configuration file that is used by the Elite Dispatch application, you can send the custom alert tone immediately after
you install it. If none of the buttons is configured in the .elt file, you must add the button by using the Elite Admin
application and restart the Elite Dispatch application. See the MCC 7500/7100 Elite Admin User Guide and the MCC
7500/7100 Elite Dispatch User Guide manuals.
Permanent Removal of an Alert Tone
The most common way of making specific alert available or unavailable for dispatchers is by modifying the .elt
configuration files in the Elite Admin application. You make an alert tone available by adding the corresponding
Alert Tone button or the Alert Tone Selector button to the toolbar of the Elite Dispatch application. However, if you
want to be sure that a specific dispatch position does not have access to a specific alert tone, you can remove the alert
tone from both the customized and default directories. A good practice is to keep a backup of the removed
predefined alert tone files in the event you want to quickly restore them.
To remove the corresponding Alert Tone button from the toolbar of the Elite Dispatch application or to remove the
corresponding selection from the list of the Alert Tone Selector button, you must restart the Elite Dispatch
application.
Restoration of a Removed Alert Tone
If you want to restore an alert tone, it means that you removed the alert tone and you want to place it back in the
default or customized directory. The name of the restored default alert tone must be
DefaultAlertTone<number>.wav and the name of the restored customized alert must be
AlertTone<number>.wav
where <number> is the number of the alert tone that you want to restore, for example,
DefaultAlertTone15.wav.
If the corresponding Alert Tone button or the Alert Tone Selector button is configured in the .elt file, the alert
tone is available as soon as you load the .elt file into the Elite Dispatch application. If the corresponding Alert
Tone button and the Alert Tone Selector button are not added to the toolbar in the .elt configuration file, you must
add any of the buttons to the toolbar by using the Elite Admin application.
Note: The customized alert tones have always higher priority than the default alert tones. To restore a
default alert tone, you place it back in the default folder. To use it in the Elite Dispatch application, you
must remove the corresponding alert tone from the customized folder.
The changes are not always visible in the .elt configuration file that is opened in the Elite Dispatch application at
the moment of restoration. See the following scenarios for the actions to perform to use the restored alert tones in a
configuration loaded at the moment of restoration.
When you restore a customized alert tone, one of the following scenarios takes place:
•
•
•
The loaded .elt file is configured for a specific alert tone, but the alert tone is removed both from the default
and customized folder. You restore the alert tone in the customized folder. To see it in the .elt configuration
loaded in the Elite Dispatch application, reload the .elt file.
The loaded .elt file is configured for a specific alert tone which is removed only from the customized folder.
You restore the alert tone in the customized folder to use it instead of the default alert tone. No reload is necessary
for the changes to be visible in the .elt configuration loaded in the Elite Dispatch application.
The loaded .elt is not configured for a specific alert tone. You restore the alert tone in the customized folder
and you want to use it in the loaded .elt configuration. After you restore the alert tone, perform appropriate
configuration in the Elite Admin application and reload the .elt file.
When you restore a default alert tone, one of the following scenarios takes place:
6871024P93-A | November 2013 | Send Feedback
144 | Enhanced Alert Tones
•
•
•
•
The loaded .elt file is configured for a specific alert tone, but the alert tone is removed both from the default
and customized folder. You restore the alert tone in the default folder. To see it in the .elt configuration loaded
in the Elite Dispatch application, reload the .elt file.
The loaded .elt file is configured for a specific alert tone which is removed only from the default folder. You
restore the default alert tone and want to use it in the loaded .elt configuration. After you restore the alert tone,
remove the customized alert tone. No reload is necessary for the changes to be visible in the .elt configuration
loaded in the Elite Dispatch application.
The loaded .elt file is not configured for a specific alert tone. The alert tone is removed both from the default
and customized folder. You restore the default alert and want to use it in the loaded .elt configuration. After
you restore the default alert tone, perform appropriate configuration in the Elite Admin application and reload
the .elt file.
The loaded .elt file is not configured for a specific alert tone. It is removed from the default but not from the
customized folder. You restore the default alert and want to use it in the loaded .elt configuration. After you
restore the default alert tone, remove the customized alert tone, perform appropriate configuration in the Elite
Admin application, and reload the .elt file.
Provisioning Manager Configuration
Before you launch the console application, you must establish the following parameters in Provisioning Manager.
Tone Pre-time Delay
The Tone Pre-time Delay parameter is particular to conventional channels. It defines the amount of time the
console waits to send an alert tone to a voice channel after it indicates the call request to the system for the first
time. This pre-time gives the transmitting station and the receiving radios time to detect that a transmission begins
on the selected voice channel. It prevents any front-end truncation of the audio that can occur on conventional
channels.
For example, if the MDC signaling Pre-time Delay parameter of a channel is configured to truncate alert tones, the
Tone Pre-time Delay must be equal to, or greater than the MDC signaling Pre-time Delay. The default value is 0
with the range between 0 to 3,300 milliseconds, in increments of 100.
Alert Tone Talk Extend Time
The Alert Tone Talk Extend Time (sec) makes it possible to set the amount of time all the resources remain keyed
after the alert tone is generated which allows the dispatcher to transmit a voice message on the selected channels.
By setting the Alert Tone Talk Extend Time parameter, you determine the amount of time the console keeps the
voice channel or talkgroup keyed before it automatically dekeys. During this time, the dispatcher can press the
transmit button on the console and begin speaking without having to re-initiate the transmission. The Alert Tone
Talk Extend Time keeps the resources keyed for the dispatcher after they send the alert tones out. The default time
is 1.2 seconds, the range is 0-7.
For more information about setting the parameters, see the Provisioning Manager manual.
Elite Admin Configuration
After you create the audio files and save them in the appropriate folder on the console dispatch client, you must make
them available for dispatchers by using the Elite Admin application.
When you launched the Elite Admin application, the alert tones are mapped to the application in the following way:
•
•
If the are no custom files, only the available Motorola alert tones are mapped.
If for any of the Motorola alert tones there is a counterpart in the folder with custom alert tones, the custom alert
tone is mapped instead of the Motorola alert tone.
As the result, the number of alert tones that can be available for dispatchers is 15 or less. The available alert tones can
be either Motorola alert tones or custom alert tones, or both types. In the Elite Admin application, you make them
available for dispatchers by adding them to one of the toolbars in the .elt configurations.
Send Feedback | November 2013 | 6871024P93-A
Enhanced Alert Tones | 145
Another configuration that you perform by using the Elite Admin application is setting the transmission methods for
the available alert tones. You perform it by assigning the available alert tones to one of the following categories:
Momentary
Alert tones that are sent only while the dispatcher presses the Alert Tone button on the toolbar in the Elite
Dispatch application.
Latched
Alert tones that are sent for a predefined time after the dispatcher presses the Alert Tone button on the toolbar in
the Elite Dispatch application. They can stop sending the latched alert tone before the predefined time ends by
pressing the Alert Tone button again.
See the MCC 7500/7100 Elite Admin User Guide manual.
Elite Dispatch Configuration and Operation
After you launch the Elite Dispatch application, the software automatically takes the following actions:
•
•
•
•
Obtains the Tone Pre-time Delay and the Alert Tone Talk Extend timers that you set up for the system;
Uses the .elt file that you established in the Elite Admin application to determine which audio files must be
available for transmission;
Checks whether the available audio files conform to the format and specifications;
Enables properly configured audio files for use in the application.
The Elite Dispatch software also compares the number of audio files available in the defined location on the console
client to the number of alert tones defined in the .elt configuration. If any of the audio files that are specified in
the .elt configuration are not present in the defined localization, the corresponding Alert Tone button is not
available to the dispatcher.
To transmit an alert tone, the dispatcher clicks the Alert Tone Selector button or the corresponding Alert Tone
button in the Elite Dispatch application. The Alert Tone buttons are numbered accordingly. If you configured the
micro help text for the Alert Tone buttons, additional information about the alert tone appears when you hover over
the button.
For information about using alert tones in the Elite Dispatch application, see the MCC 7500/7100 Elite Dispatch User
Guide manual.
6871024P93-A | November 2013 | Send Feedback
Appendix
C
MCC 7100 IP Dispatch Console – System Release
Compatibility
The backward compatibility feature makes it possible to use an MCC 7100 IP Dispatch Console together with the
features available on this console in releases previous to the release in which the console was introduced. The ASTRO
7.14 MCC 7100 IP Dispatch Consoles are backward compatible with the ASTRO 7.11 and ASTRO 7.13 systems.
Before you decide between installing and not installing a newer dispatch console in a previous system, see the
Dispatch Console Compatibility Guide manual. The manual contains details about the features available for dispatch
consoles used in system releases previous to the release in which the consoles were introduced.
If you want to use a new dispatch console in a system release previous to the release in which the console was
introduced, ensure to obtain and configure all the required components.
Before you install any application or operating system software, audit each dispatch console to determine which
version of the system release is currently installed.
ASTRO 7.14 MCC 7100 IP Dispatch Console System Components in
an ASTRO 7.11 System
Table 22: ASTRO 7.14 MCC 7100 IP Dispatch Console System Components in an ASTRO 7.11
System
System Components
ASTRO 7.11 Requirements
System Architectures
The System Architectures that support MCC 7100 IP Dispatch
Consoles are K, L1/L2, M1/M2 and M3 cores.
Client Operating System
You must install the MCC 7100 IP Dispatch Console software on a
client running the Windows 7 Professional operating system.
MCC 7100 IP Dispatch Console
Cohabitation
You must install the MCC 7100 IP Dispatch Console on a standalone
client. No cohabitation is supported with the MCC 7100 IP Dispatch
Console in an ASTRO 7.11 system.
PRX 7000 Console Proxy Cohabitation
You can install the PRX 7000 Console Proxy on a standalone client
dedicated to this software application or cohabited with an ASTRO
7.14 MCC 7500 Dispatch Console.
Installation Media
To install the MCC 7100 IP Dispatch Console in the ASTRO 7.11
system, you use the ASTRO 7.14 installation media.
Firewall
You must update the ASTRO 7.11 ZCP firewall configuration.
Console Site LAN Switch
You must update the ASTRO 7.11 console site LAN switch
configuration.
Console Site Router
You must update the ASTRO 7.11 console site router configuration.
6871024P93-A | November 2013 | Send Feedback
148 | MCC 7100 IP Dispatch Console – System Release Compatibility
Setting Up the ASTRO 7.14 MCC 7100 IP Dispatch Console in an
ASTRO 7.11 System
Prepare your ASTRO 7.11 system for installing the ASTRO 7.14 MCC 7100 IP Dispatch Consoles and using the
features that are available for this consoles.
Prerequisites: Before you install any application or operating system software, audit each dispatch console to
determine which version of the system release is currently installed.
Process:
1 Obtain updated configuration files for all the following devices:
• Console site LAN switch. See the System LAN Switch manual.
• Site routers. See the System Gateways – GGM 8000 manual or the System Routers – S6000/S2500 manual.
• Zone Core Protection (ZCP) firewall. See the Firewall manual.
• Control room firewall if equipped. See the Firewall manual.
2 Update the group policies objects (GPO) on the domain controller(s) for the MCC 7100 IP Dispatch Consoles. See
the Authentication Services manual.
3 Set up the MCC 7100 IP Dispatch Console in Provisioning Manager to ensure the console authentication with the
Lightweight Directory Access Protocol (LDAP) database.
4 Install the PRX 7000 Console Proxy. See Setting Up the PRX 7000 Console Proxy on page 81.
In an ASTRO 7.11 system, you can install the PRX 7000 Console Proxy on a dedicated standalone client running
Windows 7 or cohabited with one the following applications:
•
•
ASTRO 7.14 MCC 7500 Dispatch Console
ASTRO 7.13 or ASTRO 7.14 Console Alias Manager (CAM) client
Note: When you install the ASTRO 7.14 PRX 7000 Console Proxy on an ASTRO 7.11 system, it must
use the ASTRO 7.11 version of the windows supplemental configuration (secure) kit. The ASTRO 7.14
application installed on an ASTRO 7.11 system can utilize the ASTRO 7.11 version of the antivirus
software.
5 Install the MCC 7100 IP Dispatch Console (and Anti-Virus Software). See Setting Up the MCC 7100 IP Dispatch
Console on page 40.
6 Update the customer enterprise network (CEN) to support the MCC 7100 IP Dispatch Consoles outside the
ASTRO Radio Network Infrastructure (RNI).
Note: The VPN network in the CEN must be configured to allow the MCC 7100 IP Dispatch Console
deployed outside the ASTRO RNI to access the VPN.
7 Transfer security keys to the MCC 7100 IP Dispatch Console. See Load Secure Keys and Algorithms on page 49.
8 Set up the MCC 7100 IP Dispatch Console peripherals:
•
If you use the Motorola peripherals, see USB Audio Interface Module on page 93 and MCC 7100 Peripheral
Configuration Tool on page 116.
• If you use non-Motorola peripherals only, see MCC 7100 Peripheral Configuration Tool on page 116.
9 Optional: Setup other MCC 7100 IP Dispatch Console-related components:
•
•
If you use the Instant Recall Recorder software, see Instant Recall Recorder on page 127.
If you use the Console Alias Manager client, see Configuring Console Alias Manager for MCC 7100 Software
in an ASTRO 7.11 System on page 150.
Send Feedback | November 2013 | 6871024P93-A
MCC 7100 IP Dispatch Console – System Release Compatibility | 149
ASTRO 7.14 MCC 7100 IP Dispatch Console System Components in
an ASTRO 7.13 System
Table 23: ASTRO 7.14 MCC 7100 IP Dispatch Console System Components in an ASTRO 7.13
System
System Components
ASTRO 7.13 Requirements
System Architectures
The System Architectures that support MCC 7100 IP Dispatch
Consoles are K, L1/L2, M1/M2 and M3 cores.
Client Operating System
You must install the MCC 7100 IP Dispatch Console software on a
client running the Windows 7 Professional operating system.
MCC 7100 IP Dispatch Console
Cohabitation
You can install the MCC 7100 IP Dispatch Console on a standalone
client. It can also operate in parallel win an MCC 7500 Dispatch
Console.
PRX 7000 Console Proxy Cohabitation
You can install the PRX 7000 Console Proxy on a standalone client
dedicated to this software application or cohabited with an ASTRO
7.14 MCC 7500 Dispatch Console.
Installation Media
To install the MCC 7100 IP Dispatch Console in the ASTRO 7.13
system, you use the ASTRO 7.14 installation media.
Firewall
You must update the ASTRO 7.13 ZCP firewall configuration.
Console Site LAN Switch
You must update the ASTRO 7.13 console site LAN switch
configuration.
Console Site Router
You must update the ASTRO 7.13 console site router configuration.
Setting Up the ASTRO 7.14 MCC 7100 IP Dispatch Console in an
ASTRO 7.13 System
Prepare your ASTRO 7.13 system for installing the ASTRO 7.14 MCC 7100 IP Dispatch Consoles and using the
features that are available for this consoles.
Prerequisites: Before you install any application or operating system software, audit each dispatch console to
determine which version of the system release is currently installed.
Procedure:
1 Obtain updated configuration files for all the following devices:
• Console site LAN switch. See the System LAN Switch manual.
• Site routers. See the System Gateways – GGM 8000 manual or the System Routers – S6000/S2500 manual.
• Zone Core Protection (ZCP) firewall. See the Firewall manual.
• Control room firewall if equipped. See the Firewall manual.
2 Update the group policies objects (GPO) on the domain controller(s) for the MCC 7100 IP Dispatch Consoles. See
the Authentication Services manual.
3 Set up the MCC 7100 IP Dispatch Console in Provisioning Manager to ensure the console authentication with the
Lightweight Directory Access Protocol (LDAP) database.
4 Install the PRX 7000 Console Proxy. See Setting Up the PRX 7000 Console Proxy on page 81.
6871024P93-A | November 2013 | Send Feedback
150 | MCC 7100 IP Dispatch Console – System Release Compatibility
In an ASTRO 7.13 system, you can install the PRX 7000 Console Proxy on a dedicated standalone client running
Windows 7 or cohabited with one of the following applications:
•
•
ASTRO 7.14 MCC 7500 Dispatch Console
ASTRO 7.13 or ASTRO 7.14 Console Alias Manager (CAM) client
Note: When you install the ASTRO 7.14 PRX 7000 Console Proxy on an ASTRO 7.13 system, it must
use the ASTRO 7.13 version of the windows supplemental configuration (secure) kit. The ASTRO 7.14
application installed on an ASTRO 7.13 system can utilize the ASTRO 7.13 version of the antivirus
software.
5 Install the MCC 7100 IP Dispatch Console (and Anti-Virus Software). See Setting Up the MCC 7100 IP Dispatch
Console on page 40.
6 Update the customer enterprise network (CEN) to support the MCC 7100 IP Dispatch Consoles outside the
ASTRO Radio Network Infrastructure (RNI).
Note: The VPN network in the CEN must be configured to allow the MCC 7100 IP Dispatch Console
deployed outside the ASTRO RNI to access the VPN.
7 Transfer security keys to the MCC 7100 IP Dispatch Console. See Load Secure Keys and Algorithms on page 49.
8 Set up the MCC 7100 IP Dispatch Console peripherals:
•
If you use the Motorola peripherals, see USB Audio Interface Module on page 93 and MCC 7100 Peripheral
Configuration Tool on page 116.
• If you use non-Motorola peripherals only, see MCC 7100 Peripheral Configuration Tool on page 116.
9 Optional: Setup other MCC 7100 IP Dispatch Console-related components:
•
•
If you use the Instant Recall Recorder software, see Instant Recall Recorder on page 127.
If you use the Console Alias Manager client, see Configuring Console Alias Manager for MCC 7100 Software
in an ASTRO 7.11 System on page 150.
Configuring Console Alias Manager for MCC 7100 Software in an
ASTRO 7.11 System
If you want to use the Console Alias Manager (CAM) in an ASTRO 7.11 system, configure the Fully Qualified
Domain Name (FQDN) for the Console Alias Manager (CAM) server, (e.g., camserver01.nmd55.zone5).
Procedure:
1 Create a text file and name it AliasServerConfig.txt.
2 Save the AliasServerConfig.txt file to C:\Program Files (x86)\Motorola MCC 7100\bin
\.
3 Place the FQDN for the CAM server in the AliasServerConfig.txt file.
4 Shutdown and restart the Elite Dispatch application.
Post requisites:
Note: Delete the AliasServerConfig.txt file when you upgrade the ASTRO 7.11 system, or if you
use aliases from the UCS. Otherwise, the console continues to use the AliasServerConfig.txt file
for CAM configurations.
Send Feedback | November 2013 | 6871024P93-A
MCC 7100 IP Dispatch Console – System Release Compatibility | 151
MCC 7100 IP Dispatch Console – Other System Updates and
Considerations
When you install the MCC 7100 IP Dispatch Console in a release previous to the ASTRO 7.14 system release, review
the relevant features for any updates and considerations related to the backward compatibility feature.
Audio Logging
See the ASTRO 7.14 MCC 7500 Dispatch Console with Voice Processor Module manual for details.
Bandwidth Management
See the ASTRO 7.14 Bandwidth Management manual for details.
Centralized Event Logging
See the ASTRO 7.14 Centralized Event Logging manual for details.
KVL 4000
See the ASTRO 7.14 KVL 4000 ASTRO 25 User Guide manual for details.
MCC 7500 Elite Software
The MCC 7100 IP Dispatch Console is supported by the MCC 7100 Elite Admin and Elite Dispatch software. See the
following manuals for details:
•
•
ASTRO 7.14 MCC 7500/7100 Elite Admin User’s Guide
ASTRO 7.14 MCC 7500/7100 Elite Dispatch User’s Guide
User Configuration Manager and Provisioning Manager
For ASTRO 7.11 system release, see the ASTRO 7.11 User Configuration Manager manual.
For ASTRO 7.13 system release, see the ASTRO 7.13 Provisioning Manager manual.
6871024P93-A | November 2013 | Send Feedback