1
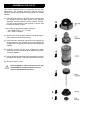
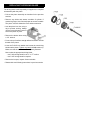
REPLACING THE DRIVING BLADE
The driving blade is sold separately or supplied as a complete
subassembly with the piston.
• Pull-out the piston assembly as described in the previous
sections.
• Remove any debris and assess condition of cylinder. If
marked or gouged, use fine sand paper to smooth out walls.
The piston must be allowed to move without restriction.
• Lock the piston in a vise, using a
rag to prevent scoring. Always
use the top and bottom faces to
secure the piston in place.
• Remove the broken driver using
a 1/2" wrench.
• Put one drop of medium strength adhesive sealant onto the
threads of the piston.
• Insert the P-622C lock washer and screw the new driving
blade onto the piston. Tighten very hard (140 lbAin minimum).
Make sure that the lock washer is completely flattened.
Note: select the appropriate driving blade:
- use P-423 driving blade for the "L" or "T" nailers
- use P-237 driving blade for staplers
• Remove the bumper, inspect & remove debris.
• Reassemble tool following instructions in previous section.