1
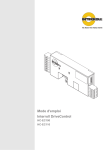
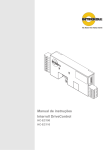
Cutler-Hammer
P49989 Rev 01
Instruction Manual—E68 Series Powered Curve Delay Module
MODELS COVERED IN THIS MANUAL
Setting the Timing Range
E68 Series Style
NEMA 1 Multi Drop
NEMA 1 Daisy Chain
NEMA 4
Position the switches as shown to set the timing range.
Delay Module
1451BSR1216
1451BSC1216
1451BSP1216
INTRODUCTION
The E68 Series Powered Curve Delay Module is designed for
easy integration into an E68 zero-pressure accumulation
sensing and control system. The delay module is designed to
allow zero-pressure accumulation (ZPA) through a powered
curve that is not divided into ZPA controlled zones. Install the
delay module adjacent to the standard E68 unit at the powered
curve infeed and set the time delay to account for the speed of
the curve and the size of the smallest package to ensure two
items are never simultaneously present in the curve.
Delay Timing Ranges
2.56 to 25.6
seconds (default)
1 2
3 4 5 6
0.32 to 3.20
seconds (typical)
7 8
1 2
0.04 to 0.40
seconds (typical)
1 2
3 4 5 6
3 4 5 6
7 8
0.005 to 0.050
seconds (typical)
7 8
1 2
3 4 5 6
7 8
INSTALLATION
Mount the unit in the powered curve infeed zone and insert the
T-cable between the E68 unit in that zone and the downstream
E68 unit at the powered curve discharge (see page 2). Note:
Mount the unit adjacent to and on the downstream side of the
E68 unit in that zone. Set the time delay as shown on the right.
When properly installed, the trailing edge of a package will
trigger the timer. For the length of the time delay, the powered
curve infeed zone will accumulate to allow the transiting
package time to completely clear the curve.
PROGRAMMING THE TIME DELAY MODULE
Set the time delay to account for the speed of the curve and the
size of the smallest package, as shown at right to ensure two
items are never simultaneously present in the curve.
Program the Time Delay Module for the desired mode by
setting the slide switches as shown in the following diagrams.
The shaded areas on the diagrams designate slide switch
positions.
Setting the Time Delay
Using a small screwdriver, turn the R1 potentiometer
clockwise to increase the time and counterclockwise to
decrease the time.
One-Shot
Timing
Time OneDelay
Adjustment
Shot
Delay
Timing
NO/NC
R1
Increase
Increase
1 2
Delay
Timing
3 4 5 6
One-Shot
Mode
7 8
Dark-to-Light/
Light-to-Dark
P49989 Rev 01
Page 2
TYPICAL MULTI-DROP BUSS WIRING
Standard
Sensor
Powered Curve
Delay Module
(1451BSR1216)
Standard
Sensor
Time Delay
Adjustment
(under cover)
Powered Curve
Conveyor Section
Unused Zone
Jumper
(QDJU266A-01B1)
Power Buss
Harness
Direction of
Product Flow
TYPICAL DAISY-CHAIN WIRING*
* NEMA 1 daisy-chain layout (1451BSC1216) is shown below. Installation for the NEMA 4 variant (1451BSP1216) is similar.
Powered Curve
Delay Module
NEMA 1 1451BSC1216
NEMA 4 1451BSP1216
Time Delay
Adjustment
(under cover)
Standard
Sensor
Powered Curve
Conveyor Section
1m Extension Cable
NEMA 1 E68-SVAEXT-C1
NEMA 4 E68-SVAEXT-P1
Direction of
Product Flow
Still Need Help?
Contact the
Cutler-Hammer Sensor
Application Engineers
1-800-426-9184
Fax: 425-513-5356
Cutler-Hammer
720 80th Street SW
Everett, WA 98203-6299
425/513-5300 FAX: 425/513-5302
www.cutlerhammer.com
Effective 8/01
Printed in U.S.A.
Standard
Sensor