1
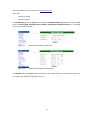
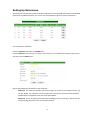
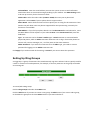
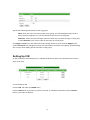
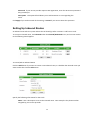
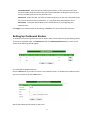
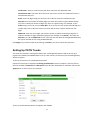
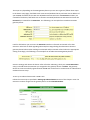
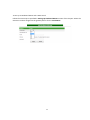
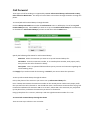
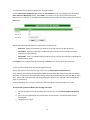
ICE008
User Manual
1
Table of Contents CHAPTER 1 System Overview ........................................................................................ 4 New Era PBX .................................................................................................................. 5 System Features .............................................................................................................. 5 Call Handling Features ................................................................................................... 5 Advanced Features .......................................................................................................... 6 CHAPTER 2 System Installation...................................................................................... 7 Unpacking ICE008.......................................................................................................... 8 Network Requirement ..................................................................................................... 8 Installing ICE008 ............................................................................................................ 9 CHAPTER 3 Setting Up IP PBX .................................................................................... 11 Setting Up Extensions ................................................................................................... 12 Setting Up Ring Groups ................................................................................................ 13 Setting Up IVR ............................................................................................................. 14 System Recordings........................................................................................................ 15 General Setting.............................................................................................................. 16 CHAPTER 4 Connecting To Outside World .................................................................. 18 Setting Up SIP Trunks .................................................................................................. 19 Setting Up Inbound Routes ........................................................................................... 20 Setting Up Outbound Routes ........................................................................................ 21 Setting Up PSTN Trunks .............................................................................................. 22 CHAPTER 5 Advanced Call Features ............................................................................ 25 Call Forward ................................................................................................................. 26 Do-Not-Disturb ............................................................................................................. 30 Follow Me ..................................................................................................................... 31 Call Parking .................................................................................................................. 32 Call Pickup .................................................................................................................... 33 Adhoc Extension ........................................................................................................... 34 Voicemail System ......................................................................................................... 35 Appendix A - Voicemail Flowchart.................................................................................. 37 2
Appendix B - Linking ICE008 with One Another ............................................................ 39 Appendix C - Firmware Upgrade ..................................................................................... 41 Appendix D - Feature Codes............................................................................................. 42 Appendix E - Hardware Specifications............................................................................. 43 3
CHAPTER 1 System Overview
This chapter describes the main features of ICE008. New Era PBX System Features Call Handling Features Advanced Features 4
New Era PBX
ICE008 is a new generation office communication system that delivers traditional PBX (private branch exchange) and advanced call features through Internet protocol technologies. It provides robust and dynamic voice communication for small/medium and home offices over local and wide area networks. System Features
Auto Provisioning Automatically configures an IP phone to a pre‐defined extension when it boots up. Saves the trouble and hazard of manual configuration. Web Browser Based Administration Easy graphical user interface to maintain the system via local and wide area network. Universal access to the system through the Web. SIP Trunking It can connect to Voice‐over‐IP (VoIP) trunks provided by SIP compliant Internet telephony service providers. PSTN Trunking It can also connect to regular PSTN (public switched telephone network) lines through ATA (analog terminal adapter) or VoIP gateway devices. Dialing Plan Assigns different prefix and suffix to outbound calling routes. Allows efficient and cost based usage of trunks. Call Report Keeps detail records of all incoming and outgoing calls that are reviewable online. System Backup/Restore System configuration and report data can be backed up and restored. Built‐In Router With built‐in NAT and DHCP server. By connecting the LAN port to a hub it can create and manage a subnetwork of its own. Call Handling Features
Automated Attendant & Voice Mail User can record system greetings and design interactive voice response (IVR) menu to customize their phone system. Each extension has its own password protected voicemail box with personal greetings and full message management capability. Call Transfer/Call Waiting These are standard PBX call handling functions that deliver calls between trunk lines and extensions. Call Parking/Call Pickup These are enhanced PBX functions that add flexibility and usability to individual and group users. Call Forward & Do‐Not‐Disturb These are convenient call answering options that can be individually set for each extension. Follow‐Me Enhanced call feature that allows a user to be tracked down as desired. Direct Inward Dialing (DID) Based on the incoming call’s number, the call can be routed directly to an extension. Music‐On‐Hold A pre‐loaded musical file will be played while the call is being transferred or put on hold. 5
Advanced Features
Unified Messaging You can be notified of pending voice messages via e‐mail. Calling Group A group of extensions can be called simultaneously. Call Limit Allows you to set the maximum number of minutes the system can call out per day. 6
CHAPTER 2 System Installation
This chapter explains the environmental requirements and the installation steps of ICE008. Unpacking ICE008 Network Requirement Installing ICE008 7
Unpacking
g ICE008
The p
package you received forr ICE008 shou
uld be a stan
ndard packagge; however,, the contentt may vary depending on thee location an
nd the dealerr you have pu
urchased thee unit from. Report any damage or missing items in tthe package to your dealer right away. Itemss in your pacckage should include: ICE00
08 Unit Poweer Supply (5V
V DC) RJ‐45
5 Network Caable Nettwork Requirem
R
ment
It is recommendeed that you p
provide a perrmanent Inte
ernet connecction for ICE0
008, such as that from a ed Line, DSL, or Cable Mo
odem, and as
ssign a static
c IP address (
(real IP addr
Lease
ess if applicaable) to ICE00
08. You ccan also set u
up ICE008 in the DHCP neetwork envirronment, tho
ough. If you assign a pse
eudo (privaate) IP addreess to ICE008
8, either statiic or dynamic IP address,, you need to
o open the fo
ollowing TCP aand UDP ports for the IP address assigned to ICE0
008: TCP/U
UDP ports 50
060‐5082 forr SIP protoco
ol. TCP/U
UDP ports 80
000‐20000 fo
or RTP audio
o transport.
In ord
der for the e‐mail notification of voicce mail messages to workk, a standard
d SMTP e‐maail server with a valid e‐mail account is required. The ffollowing is aa network en
nvironment d
diagram of IC
CE008 with o
other hardware. highly recommended that you use an
n Uninterrupttible Power SSupply (UPS)) in conjuncttion with the It is h
ICE00
08 to protectt against pow
wer surges an
nd failures.
8
Installing ICE008
The following is the picture of the front panel of ICE008: Pwr Indicator A green light indicates the power is on. Sip Indicator Normally in solid green. Flashing green light indicates the SIP protocol is in progress. Wan Indicator Either solid or flashing green, indicating the network traffic status between ICE008 and the wide area network. Lan Indicator Either solid or flashing green, indicating the network traffic status between ICE008 and the local area network. Ez Indicator Reserved for future use. Ez Setup Button Reserved for future use. The following is the picture of the back panel of ICE008: DC 5V Jack Power connection. INT Pinhole Reserved for future use. LAN Jack 10/100M RJ45 Ethernet connection to internal network. WAN Jack 10/100M RJ45 Ethernet connection to external network. STA/BRI Switch Reserved for future use. Follow these steps to install ICE008: Connect your computer with ICE008 using a standard Ethernet (UTP CAT‐5e) cable between your computer and the LAN jack on the ICE008 back panel. Connect your power adaptor to the DC 5V jack on the back panel of ICE008. You should see the Pwr indicator at the front panel turned green immediately. 9
Open the browser on your computer to http://10.19.20.1 Login with Username: admin Password: admin Click WAN Config under the System menu. Select the WAN Port Mode appropriate for your ICE008. Enter the Primary DNS, Secondary DNS, IP address, Subnet Mask, Default Gateway, etc., according to your network environment. Figure 2‐1 WAN Config example: DHCP setup Figure 2‐2 WAN Config example: Fixed IP setup Click Reboot under the System menu to reboot the unit. When it finishes, you should be able to log in with the new IP address assigned to the unit. 10
CHAPTER 3 Setting Up IP PBX
This chapter explains steps to set up ICE008 as a functional IP PBX. Setting Up Extensions Setting Up Ring Groups Setting Up IVR System Recordings General Setting 11
Setting Up Extensions
The extensions are the basic elements of the IP PBX system. Since ICE008 uses industry standard SIP protocol for its PBX transaction, you can use any SIP compliant IP phones to be its extensions. To Create/Edit an Extension Click the Extension tab under the IP PBX menu. Click the Add button if you want to create a new extension, or checkbox the extension you want to edit then click the Edit button. Specify the following information for the extension: Extension The extension number you want to assign. It can be any 2 to 5 digit number, e.g., 10, 101, 50001, etc. However, certain numbers are reserved for system use and should be avoided. Refer to Appendix E for such reserved numbers. Password This is any alpha‐numerical letters and digits of your choosing. It will be used for authenticating operations such as voicemail retrieval. 12
Voicemail Box Enter the email address you want the system to use to send notification email when there are voicemail messages pending in your mailbox. The SMTP Setting needs to be set up correctly for this function to work. Video Codec Select the video codec (H.263 or H.264) that suits your IP phone and application. Selcect None if your IP phone doesn’t support either. Phone Brand Select the brand name of the IP phone you are using for this extension. Those listed in the pull down menu are phones supported for auto‐provisioning. Currently this function is not available. MAC Address If you find your phone brand is on the Phone Brand list and selected it , enter the MAC address of the IP phone. If you selected None in the Phone Brand field, leave this field blank. Type An extension can be of Fixed or Adhoc type. A Fixed extension is associated with a physical IP phone, while an Adhoc extension allows the user to log in from other phones to answer calls, retrieve messages, etc., as if they were at their own extension. Adhoc Password If you select the extension to be of Adhoc type, you need to create a password for logging in as an Adhoc extension user. Click Apply if you are done with all the setting, or Cancel if you want to abort the operation. Setting Up Ring Groups
A ring group is a group of extensions that simultaneously ring when selected. This is typically used for a sales or customer service department, for example, so that any extension in the group can handle an incoming call. To Create/Edit a Ring Group Click the Ring Groups tab under the IP PBX menu Click the Add button if you want to create a new group, the Edit button if you want to edit a group, or checkbox the group then click the Delete button if you want to delete it. 13
Specify the following information for the ring group: Name Enter the name you want to give to this group. Use something descriptive such as Sales, Customer Support, etc., that is indicative of the function of the group. Extension Select from the pull‐down menu the extension you want to assign to this group, or select Remove if you want to take an extension out of the group. Click Apply or Finish if you are done with all the setting. Notice once you click the Apply button, another Extension box will appear and you can add another extension to the group. Continue doing this until you finish adding all the extensions to the group. Setting Up IVR
An IVR (Interactive Voice Response) is a defined call flow that directs the call based on the caller’s touch tone input. To Create/Edit an IVR Click the IVR tab under the IP PBX menu Click the Add button if you want to create a new IVR, or checkbox the IVR then click the Delete button if you want to delete it. 14
Specify the following information for the IVR menu: Name Give something descriptive that indicates where the call will be routed to after the touch tone input from the caller is detected. For example: Customer Service, Sales Dept, etc. Digit Select a digit that will trigger the call routing. Be sure it’s different from other digit selections you made already for other call routing. Destination Select an extension or a ring group that you want the call to go to when the digit selected in the Digit field is detected. Description This optional field allows you to give more description or a note to this IVR menu item. Click Apply if you are done with the setup or Cancel if you want to abort it. System Recordings
ICE008 provides an easy way to recording system greetings such as Business Hour/Non‐Business Hour greetings for IVR and No‐Answer/Busy greetings for voice mail system. Click the System Recordings button under IP PBX menu and you will see the following: 15
To Record a System Greeting Pick up the phone set from any registered extension and dial the code for the greeting you want to record. Enter the default password as listed under Recording Password in this page, then follow the instruction to finish and save the recording. To Change the Recording Password Enter the new password in the New Password field, then retype it in the Confirm New Password field to confirm it. Note: The recording password is only used for system recording purpose and cannot be used to retrieve voice messages, for example. To Restore to System Default Greetings Click the Restore button and all systems greetings will be restored back to factory default. General Setting
These are system settings that help secure and define the system operations. Click the General Setting button under the IP PBX menu, and the following should appear: 16
Call Limitation Enter the maximum number of minutes you want to allow the system to call per day. This helps to prevent the system from being abused by unscrupulous callers. SIP Listen Address Enter the new password in the New Password field, then retype it in the Confirm New Password field to confirm it. Note: The recording password is only used for system recording purpose and cannot be used to retrieve voice messages, for example. Business Hours Enter the time in HH:MM (Hour:Minute), 24‐hour format for the start and end of your business hours. This is the time frame the system uses to play the Business Hour Greeting when a call comes in to the IVR. Lunch Break Hours Enter the time in HH:MM (Hour:Minute), 24‐hour format for the start and end of your lunch break hours. This is the time frame the system uses to play the Lunch Time Greeting when a call comes in to the IVR. 17
CHAPTER 4 Connecting To Outside World
This chapter explains how to connect ICE008 with SIP trunks from an Internet telephony service provider, or PSTN trunks through a PSTN gateway device. Setting Up SIP Trunks Setting Up Inbound Routs Setting Up Outbound Routs Setting Up PSTN Trunks 18
Setting Up SIP Trunks
Trunks are telephone connections that link a PBX such as ICE008 to the outside world. Two types of trunks are supported by ICE008: The PSTN (Public Switched Telephone Network) trunks that come from traditional telephone companies, or SIP trunks that come from Internet telephony service providers (ITSPs) that use SIP protocol to send voice over IP network. To set up a SIP trunk, click Trunks under the Inbound/Outbound menu, and a screen similar to the following should appear: To Create/Edit a Trunk Click the Add button if you want to create a new trunk, or checkbox the trunk you want to edit then click the Edit button. Specify the following information for the trunk: Name Give a descriptive name to the trunk. It can be the name of the ITSP that provides such trunk, or the purpose of such trunk such as Domestic, International, First Outbound, etc. IP Address Enter the IP address or the domain name of the SIP server your ITSP provides you for their SIP trunk service. Need Registration Depending on the service provider you use, some require your IP PBX to register with their SIP server, and some do not. Check the box accordingly. Account If your service provider requires SIP registration, enter the SIP account ID they provide you. 19
Password If your service provider requires SIP registration, enter the SIP account password they provide you. Description This optional field allows you to add comment or note regarding this trunk. Click Apply if you are done with all the setting, or Cancel if you want to abort the operation. Setting Up Inbound Routes
An inbound route tells the system where the call should go after it answers a call from a trunk. To set up an inbound route, click Inbound under the Inbound/Outbound menu, and a screen similar to the following should appear: To Create/Edit an Inbound Route Click the Add button if you want to create a new inbound route, or checkbox the inbound route you want to edit then click the Edit button. Specify the following information for the trunk: Name Give a descriptive name to the inbound route. One example is the phone number assigned by your service provider. 20
Inbound Number Enter the phone number (DID number), or the SIP account ID if your service provider passes the SIP account ID instead of DID when sending the call, that your service provider gives you for this inbound trunk. Destination Select the path you want the inbound call to go to after the trunk picks up the call. You can choose an IVR, an extension, or a ring group from the pull‐down menu. Description This optional field allows you to add comment or note regarding this inbound route. Click Apply if you are done with all the setting, or Cancel if you want to abort the operation. Setting Up Outbound Routes
An outbound route setting allows the user to choose which trunk to dial out by their dialing pattern. To set up an outbound route, click Outbound under the Inbound/Outbound menu, and a screen similar to the following should appear: To Create/Edit an Outbound Route Click the Add button if you want to create a new outbound route, or checkbox the outbound route you want to edit then click the Edit button. Specify the following information for the trunk: 21
Trunk Name Select a trunk from the pull‐down menu for this outbound route. Grandstream ATA Check this box if the trunk you want to use for this outbound route is a Grandstream ATA port. Prefix Enter the digit string you want the user to dial to access this outbound route. Strip No Enter the number of leading digits you want the system to ignore before dialing out. This is usually the number of digits you enter as a prefix string. For example, if your Prefix string is set to 81, and your Strip No is set to 2, then the user needs to dial 81 plus the number they want to dial out to have this trunk dial out their number without the “81” digits. Add Prefix Enter the extra digits you want the system to add to the dialing string after it strips the number of digits specified by Strip No. For example, if the Prefix is set to 81, the Strip No to 2, and the Add Prefix to 011, then after the user dials the string 8161255551234, the system will dial out the string 0116125551234. Click Apply if you are done with all the setting, or Cancel if you want to abort the operation. Setting Up PSTN Trunks
Two tasks are involved in setting up a PSTN trunk: A PSTN gateway device needs to be set up to register with ICE008, and ICE008 needs to set up a SIP account (an extension) for the PSTN gateway device to register. To Set Up an Extension for a PSTN Gateway Device Follow the same steps as explained in Setting Up Extensions section in Chapter 3, but only fill out data for the fields of Extension and Password. Leave all other fields blank or as default and click the Apply button to save it when you are done. To Set Up a PSTN Gateway Device to Register with ICE008 22
The steps vary depending on the PSTN gateway device you use. But in general, follow these steps: In the device setup page, find fields such as SIP Server/Outbound Proxy and enter the IP address of your ICE008; find fields such as SIP User ID/Authenticate ID and enter the Extension number you created for the device; find fields such as Account Password/Authenticate Password and enter the Password you created for the Extension. The following is an example from Grandstream PSTN gateway device: Look for field where you can enter the Extension number to forward an inbound call to that extension. Also look for field regarding One State/Two Stage dialing that determines how the gateway device behave when making an outbound and/or inbound call and select the appropriate setting accordingly. The following is an example from Grandstream PSTN gateway device: Save the settings and reboot the device. After it finishes rebooting, check your ICE008 Extensions setup, it should show the extension you assigned to the gateway device as Online. The gateway device has now successfully registered with ICE008 and can be used as a PSTN trunk for inbound and outbound routes setup. To Set Up an Inbound Route with a PSTN Trunk Follow the same steps as specified in Setting Up Inbound Routes section of this chapter. Enter the extension number assigned to the gateway device as the Inbound Number. 23
To Set Up an Outbound Route with a PSTN Trunk Follow the same steps as specified in Setting Up Outbound Routes section of this chapter. Select the extension number assigned to the gateway device for the Trunk Name. 24
CHAPTER 5 Advanced Call Features
ICE008 This chapter explains advanced call features and ways to use them so to make 100 an effective and efficient communication tool . Call Forward Do‐Not‐Disturb Follow Me Call Parking Call Pickup Adhoc Extension Accessing Voicemail E‐mail Notification 25
Call Forward
Three types of call forwarding are supported by ICE008: Call Forward Always, Call Forward on Busy, Call Forward on No Answer. The setup of each of these can be done through the web or through the phone. To Create/Edit Call Forward Always through the Web Click the Always Forward button under the Call Features menu. It will display a list of existing Call Forward Always setup. Select Add if you want to set up a new Call Forward Always for an extension, or checkbox the Call Forward Always you want to edit then click the Edit button. Specify the following information for Call Forward Always: Extension Select the extension you want to set up Call Forward Always for. Forward To Enter the extension number, or an outside phone number, with proper prefix, that you want the call to forward to always. Description This is an optional field that allows you to put note and comment regarding this call forwarding setup. Click Apply if you are done with all the setting, or Cancel if you want to abort the operation. To Set Up Call Forward Always through the Phone Pick up the phone of the extension you want to set up Call Forward Always for. Press *72XXX, where XXX is the extension number or the outside phone number with proper prefix that you want the call to forward to. You should then hear a confirmation announcement saying “Call Forward Unconditional for extension ABC is set to XXX”, where ABC is the extension you just picked up the phone from, and XXX is the extension you want it to forward to. Hang up the phone if it is correct, redo step 2 with the right destination number if it is not. To Cancel Call Forward Always through the Phone There are two ways to do this. You can either 26
1. Pick up the phone from the extension that you want to cancel Call Forward Always for and press *73. You should hear the confirmation announcement: “Call Forward Unconditional deactivated”. Hang up and it’s done ; Or 2. Pick up the phone from any extension, then press *74. You will be prompted to enter the extension you want to cancel Call Forward Always for, do so then press #. You should then hear the confirmation announcement: “Call Forward Unconditional for extension XXX cancelled”. Hang up and it’s done. 27
To Create/Edit Call Forward on Busy through the Web Click the Busy Forward button under the Call Features menu. It will display a list of existing Call Forward on Busy setup. Select Add if you want to set up a new Call Forward on Busy for an extension, or checkbox the Call Forward on Busy you want to edit then click the Edit button. Specify the following information for Call Forward on Busy: Extension Select the extension you want to set up Call Forward on Busy for. Forward To Enter the extension number that you want the call to forward to when the extension is busy. Description This is an optional field that allows you to put note and comment regarding this call forwarding setup. Click Apply if you are done with all the setting, or Cancel if you want to abort the operation. To Set Up Call Forward on Busy through the Phone Pick up the phone of the extension you want to set up Call Forward on Busy for. Press *90XXX, where XXX is the extension number that you want the call to forward to. You should then hear a confirmation announcement saying “Call Forward on Busy for extension ABC is set to XXX”, where ABC is the extension you just picked up the phone from, and XXX is the extension you want it to forward to. Hang up the phone if it is correct, redo step 2 with the right destination number if it is not. To Cancel Call Forward on Busy through the Phone There are two ways to do this. You can either 1. Pick up the handset from the extension that you want to cancel Call Forward on Busy for and press *91. You should hear the confirmation announcement: “Call Forward on Busy deactivated”. Hang up and it’s done ; Or 2. Pick up the handset from any extension, then press *92. You will be prompted to enter the extension you want to cancel Call Forward on Busy for, do so then press #. You should then hear the confirmation announcement: “Call Forward on Busy for extension XXX cancelled”. Hang up and it’s done.
28
To Create/Edit Call Forward on No Answer through the Web Click the No Answer Forward button under the Call Features menu. It will display a list of existing Call Forward on No Answer setup. Select Add if you want to set up a new Call Forward on No Answer for an extension, or checkbox the Call Forward on No Answer you want to edit then click the Edit button. Specify the following information for Call Forward on No Answer: Extension Select the extension you want to set up Call Forward on No Answer for. Forward To Enter the extension number that you want the call to forward to when the extension is not answering. Description This is an optional field that allows you to put note and comment regarding this call forwarding setup. Click Apply if you are done with all the setting, or Cancel if you want to abort the operation. To Set Up Call Forward on No Answer through the Phone Pick up the phone of the extension you want to set up Call Forward on No Answer for. Press *52XXX, where XXX is the extension number that you want the call to forward to. You should then hear a confirmation announcement saying “Call Forward No Answer for extension ABC is set to XXX”, where ABC is the extension you just picked up the phone from, and XXX is the extension you want it to forward to. Hang up the phone if it is correct, redo step 2 with the right destination number if it is not. To Cancel Call Forward on No Answer through the Phone 1. Pick up the phone from the extension that you want to cancel Call Forward on No Answer for. 2. Press *53. You should hear the confirmation announcement: “Call Forward No Answer deactivated”. 3. Hang up and it’s done. 29
Do-Not-Disturb
This feature allows the user to put their extension in the “unavailable” state so all calls to that extension will be automatically answered with the “unavailable” greeting and directed to the voicemail system without even ringing the extension. There are two ways to set up Do‐Not‐Disturb for an extension: through the web or through the phone. To Create/Edit Do‐Not‐Disturb through the Web Click the Do‐Not‐Disturb button under the Call Features menu. It will display a list of existing Do‐
Not‐Disturb setup. Select Add if you want to set up a new Do‐Not‐Disturb for an extension, or checkbox the Do‐Not‐Disturb you want to edit then click the Edit button. Specify the following information for Do‐Not‐Disturb: Extension Select the extension you want to set up Do‐Not‐Disturb for. Status Enter Enable to activate, or Disable to deactivate, the feature. Click Apply if you are done with all the setting, or Cancel if you want to abort the operation. To Set Up Do‐Not‐Disturb through the Phone Pick up the phone of the extension you want to set up Do‐Not‐Disturb for. Press *78. You should then hear the confirmation announcement: “Do‐Not‐Disturb activated”. Hang up the phone. It’s done. To Cancel Do‐Not‐Disturb through the Phone 1. Pick up the phone from the extension that you want to cancel Do‐Not‐Disturb for. 2. Press *79. You should then hear the confirmation announcement: “Do‐Not‐Disturb deactivated”. 3. Hang up the phone. It’s done. 30
Follow Me
This feature allows the user to redirect calls to their extension to a different destination where they want to be contacted. To Create/Edit Follow Me through the Web Click the Follow Me button under the Call Features menu. It will display a list of existing Follow Me setup. Select Add if you want to set up a new Follow Me for an extension, or checkbox the Follow Me you want to edit then click the Edit button. Specify the following information for Follow Me: Extension Select the extension you want to set up Follow Me for. Status Enter Enable to activate, or Disable to deactivate, the feature. Destination Select the IVR, or Extension, or Ring Group where you want the call to go to when the extension is called. Description This is an optional field that allows you to put note and comment regarding this Follow Me setup. Click Apply if you are done with all the setting, or Cancel if you want to abort the operation. 31
Call Parking
This feature allows the user to “park” a call while in conversation to a temporary location so he/she can retrieve it from another extension and resume the conversation. For example, George is using Extension A to talk to Allen at Extension B, but later during the conversation he needs to move to a different location to fetch some document to explain to Allen. So he parks the call, goes to the location where he can fetch the document, then picks up a phone at the new location, and retrieve the call from the “parking lot” and continues his conversation with Allen. To Set Up Call Parking through the Phone While in conversation with another extension, press #70. You will hear a number announced (default is 71) before you are hung up by the system. This is the pseudo extension (the “parking lot”) where the call is parked now. Keep a note of that number. Go to a new phone extension where you want to continue the conversation. Pick up the phone and dial the “parking lot” number you just heard. You are now connected with the party that you were talking to before. 32
Call Pickup
This feature allows the user to answer any call to any extension from any extension in the system. There is no presetting needed, and the usage is simple: Just pick up any phone and dial *8, and it will pick up any call that is ringing any extension at that time. 33
Adhoc Extension
The “Adhoc” feature of an extension allows the user to “log in” from any phone and use it as their own extension. For example, if extension 101 is set up to have the adhoc capability, then a user can pick up the phone at extension 102 (or any other extension), and logs in to become extension 101, and from then on the phone at extension 102 behaves like extension 101, until the user “logs off” of it. This feature decouples the link between a physical phone set and the extension and allows the user to use whatever phone that is available or convenient to him/her at any given time. To Set Up an Adhoc Extension Follow the same steps as explained in Setting Up Extensions section in Chapter 3, but make sure to select Adhoc as the Type, and enter data in the Adhoc Password field. To Set Up a Phone as an Adhoc Extension (Adhoc User Login) Pick up the phone you want to set up as an adhoc extension. Dial *11. It will prompt you for an extension number. Enter the extension number you want to set up this phone for. Note: the extension should be set up as Adhoc type already. It will prompt you for the password. Enter the Adhoc Password of that extension. If the password is correct, it will say “Thank you, good‐bye”. Hang up the phone, the setup is complete. To Cancel a Phone as an Adhoc Extension (Adhoc User Logout) Pick up the phone you want to cancel as an adhoc extension. Dial *12. It will say “Thank you, good‐bye”. Hang up the phone, the cancellation is complete. 34
Voicemail System
ICE008 has a built‐in, full feature voicemail system for all extensions. Whenever an extension is busy, not answering the call, or on Do‐Not‐Disturb mode, the system will ask and keep messages for the extension and notify the extension/voicemail box owner to retrieve it. The following explains the voicemail box setup and message retrieval operations. For full voicemail operation, refer to Appendix A – Voicemail Flowchart. To Set Up a Voicemail Box for an Extension Since each extension, when created, is automatically assigned a voicemail box, there is no separate step needed to create a voicemail box for an extension. However, when creating an extension, make sure to fill in the Password field with a valid password, and the Voicemail Box field with a valid email address that you want the system to use to send you an email notice regarding the voicemail message. To Retrieve Voicemail Messages through “Native” Phone To retrieve voicemail messages through the phone where the extension/voicemail box resides, do the following: 1. Pick up the phone and press the Voicemail key on your phone set if it is flashing, otherwise press *97. 2. Enter the password when prompted. 3. It will announce how many new and old messages you have and give instructions on how to retrieve them. Follow the instructions to retrieve the messages. To Retrieve Voicemail Messages through “Non‐Native” Phone If you want to retrieve voicemail messages through a phone that is not registered with the extension/voicemail box you intend to get messages from, do the following: 35
1. Pick up the phone and press *98. 2. Enter the voicemail box number you intend to retrieve message from when prompted. 3. Enter the password when prompted. 4. It will announce how many new and old messages it has for that mailbox and give instructions on how to retrieve them. Follow the instructions to retrieve the messages. 36
Appendix A - Voicemail Flowchart
*97 (or the Voicemail button)
Password check OK’d
“You have X messages”
1
2
Retrieve
Messages
3
Change
Folder
Advanced
Options
5
1
Message
Management
Mailbox
Options
3
4
Record
Unavailable
Greeting
Record
Busy
Greeting
0
1
2
Old
Work
Help
#
Exit
Return
2
New
*
*
Leave
Message
“Message received
at HH:MM”
0
Record
Name
37
5
Record
Temporary
Greeting
3
Family
*
Change
Password
4
Friend
Return
#
Cancel
Message
Management
3
Advanced
Options
1
Send
Reply
4
5
Previous
Message
3
Hear
Envelop
6
Replay
7
Next
Messag
5
Leave
Message
Delete
8
Forward
9
*
#
Save
Help
Exit
*
Return
1
Enter
Destination
Extension
2
With
Pre-pending
Message
38
Without
Pre-pending
Message
*
Return
Appendix B - Linking ICE008 with One Another
As a SIP based IP PBX, ICE008 can communicate with any other SIP based IP PBX the same way it communicates with a SIP trunk. The following are instructions on how to set up two ICE008’s so their extensions can call each other: 1. Create an extension in the ICE008 (Target ICE008) whose extensions you want to be able to call from your ICE008 (Origin ICE008). For example, extension 888 is created on Target ICE008.
2. Create a trunk in Origin ICE008. Enter the IP Address with the IP address of Target ICE008, Account with the extension number, and Password with the password of the extension created on Target ICE008. Click Apply when done.
3. Create an outbound route on Origin ICE008. Select the trunk created at the step above as its outbound trunk. Fill in the Prefix and Strip No fields with data you desire. Click Apply when done.
39
4. Now you should be able to make calls from any extension of Origin ICE008 to any extension of Target ICE008. For example, if you pick up any phone at Origin ICE008 and dial 5101, it should ring extension 101 of Target ICE008. 5. Duplicate the steps above but reverse the roles of Target and Origin ICE008es, and you should be able to call from Target to Origin ICE008 as well. 40
Appendix C - Firmware Upgrade
In case you need to upgrade the firmware on your ICE008, follow the steps below: 1. Verify you have the firmware file ramdisk.gz and a TFTP server program such as TFTPSRV.EXE available on your PC. 2. Put the firmware file and the TFTP server program in the same folder on your PC. 3. Run the TFTP server program on your PC. 4. Connect your PC with ICE008 through the LAN port. 5. Open your browser to http://192.168.0.1 and log in to ICE008 6. Click Firmware Upgrade under the System menu. 7. Enter the password “85123000”, then click Submit. 8. The following screen should pop up: 9. Modify the TFTP Server IP Address to match your PC’s IP address if necessary, then click Submit. 10. ICE008 will start upgrading the firmware, with a countdown button showing the remaining seconds of the operation: 11. When the operation is done, you can open your browser to http://192.168.0.1 and log in. You should see the new firmware version now. Note: The firmware upgrade will clear out existing data on your ICE008. If you want to preserve your pre‐upgrade settings, do a system Backup operation before you perform the Firmware Upgrade. 41
Appendix D - Feature Codes
Call Forward
Call Forward Always Activate
Call Forward Always Deactivate
Call Forward Always Prompting Deactivate
Call Forward Busy Activate
Call Forward Busy Deactivate
Call Forward Busy Prompting Deactivate
Call Forward No Answer Activate
Call Forward No Answer Deactivate
*72
*73
*74
*90
*91
*92
*52
*53
Do-Not-Disturb (DND)
DND Activate
DND Deactivate
*78
*79
Core
Simulate Incoming Call to IVR-1
Simulate Incoming Call to IVR-2
Simulate Incoming Call to IVR-3
7777
7778
7779
Voicemail
Dial Voicemail
My Voicemail
*98
*97
Info Service
Announce Your Extension Number
Announce Time
*65
*60
Call Function
Call Parking
Call Back
Call Pickup
Adhoc User Login
Adhoc User Logout
#70
*69
*8
*11
*12
Reserved Extensions
Call Parking
Simulate Incoming Call to IVR-1
Simulate Incoming Call to IVR-1
Simulate Incoming Call to IVR-1
70
7777
7778
7779
42
Appendix E - Hardware Specifications CPU SDRAM Flash Voice Compression Message Storage WAN Port LAN Port Power Dimension Weight Intel IXP420/266 MHz 128M
128M
G.711
2.5 Hours
10/100M RJ45
10/100M RJ45
5V DC
113 x 113 x 30 mm (4.4” x 4.4” x 1.2”) 185g (0.4lb)
43