1
GWM Test Generator User
Manual
SEDS Decision Support laboratory
University of Calgary
August 2015
1
Table of Contents
CHAPTER 1 – INSTALLATION ON WINDOWS
2
SECTION 1.1 REQUIREMENTS
SECTION 1.2 INSTALLING AND RUNNING THE GWM TEST GENERATOR
SECTION 1.3 INSTALLING PYTHON
SECTION 1.4 INSTALLING PYQT5
2
2
2
2
CHAPTER 2 - CATEGORIZATION
3
SECTION 2.1 USING THE CATEGORIZATION TAB
SUBSECTION 2.1.1 SIZE OF ALPHABET SET
SUBSECTION 2.1.2 ITERATIONS
SUBSECTION 2.1.3 ITERATIONS – UP TO AND INCLUDING
SUBSECTION 2.1.4 STRING LENGTH
SUBSECTION 2.1.5 LENGTH – UP TO AND INCLUDING
SUBSECTION 2.1.6 RESULTS
SECTION 2.2 OUTPUT FILES
SUBSECTION 2.2.1 OUTPUT FILE FORMAT
SUBSECTION 2.2.2 SORTING THE RESULTS IN OUTPUT FILES
3
3
3
3
4
4
4
5
5
6
CHAPTER 3 - SYNTHESIZING
7
SECTION 3.1 USING THE SYNTHESIZING TAB
SUBSECTION 3.1.1 SIZE OF ALPHABET SET
SUBSECTION 3.1.2 FINAL NUMBER OF PATTERNS
SUBSECTION 3.1.3 DATAPOINTS PER NODE
SECTION 3.2 OUTPUT FILES
7
7
7
7
8
2
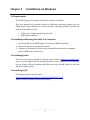
Chapter 1
Installation on Windows
1.1 Requirements
The GWM Support Tool requires Python3.4 or above and PyQt5.
This user manual only provides details for Windows operating systems, but the
GWM Support Tool can also run on Linux and Mac operating systems if Python and
PyQt5 are installed correctly.
Python 3.4 or higher installed in the Path
PyQt5 python module
1.2 Installing and Running the GWM Test Generator
1. Get the zip file for the GWM Support Tool from a SEDS lab member.
2. Extract the zip file to any desired location.
3. Navigate to the extracted folder in the command line and run the command
python GWM_Test_Generator.py
1.3 Installing Python
The most recent binary installer for Python can be found at python.org/downloads/,
select a version higher than 3.4 and download the correct installer for your machine
bit size. Double click the installer and follow the steps, include Python in the path
when the option is given.
1.4 Installing PyQt5
The binary installer can be found at
http://sourceforge.net/projects/pyqt/files/PyQt5/PyQt-5.4.2/.
Double click the installer and follow the steps.
3
Chapter 2
Categorization
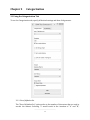
2.1 Using the Categorization Tab
To use the Categorization tab, specify all desired settings and then click generate.
2.1.1 Size of Alphabet Set
The “Size of Alphabet Set” option refers to the number of characters that are used to
encode the itemset. Selecting '2' would result in the iteration of "A" and "B";
4
selecting '3' would result in the iteration of "A", "B", and "C", and so on. The default
setting is an iteration with '2' characters naming “A” and “B”.
2.1.2 Iterations
The iterations option applies particular number of production rules for all the
regular expressions. If the option is set at 10, then the 10th iteration step of all the
regular expression after applying 10 production rules will be outputted.
2.1.3 Iterations - Up to and including
The iterations –“up to and including” option sets how many strings (or more specific
regular expressions) are generated from each regular expression. The default
setting is up to and including 100 iterations which means that the output result
would yield the first 100 strings generated by applying production rules on each
regular expression. For example, for Σ = {A,B}, strings would be A, B, AB, BA AAB,
ABB, BAA, BBA, … up to the strings having 100 characters,
2.1.4 String Length
To generate strings with specific string length the "Set string length" option could be
used. This option sets the output string length to the chosen number. The desired
string length can be selected, which results in the output strings to all be of the
chosen length on the selected set of alphabets. The default setting is to leave the
option unselected and the output would include strings with variety of lengths.
2.1.5 Length – Up to and including
The "Up to and including" checkbox sets the output to being all the strings up to and
including the chosen length. If the option is set to be “Up to and including” 10, then
the output strings will range in length from 1 to 10 characters long.
2.1.6 Results
The "Limit number of strings to " textbox limits the total number of strings that will
be produced by the program. The default setting is to leave "Limit number of results
to" unselected.
2.2 Output Files
The output files can be found in the folder Categorization Tests.
2.1.1 Output File Format
5
The output is in the CSV format being suitable for using in GWM tool support© for
testing. At each use of this test generator tool, one CSV file is created which is
separated into files by iteration, length, or only by using specific regular expression
based on your selected options.
Separating the files by iteration – This choice stores all the strings
produced in a given iteration in one file. The default setting is for the files
to be separated by iteration.
Separating the files by length – This choice stores all the strings produced
by a given length in one file.
Separating the files by regular expression – This choice stores all the
strings following a given regular expression in one file.
The output files will be stored in a folder called "Categorization Tests".
If the files are separated by length, then the name of the CSV file would be
“Length-“followed by a number which is the length of the strings in the
file.
If the files are separated by iteration step, then the CSV files will be
named “Iteration-“followed by a number which is the iteration step of all
the strings in the file.
If the files are separated by the regular expression, then the CSV files will
be named “Regular Expression-“followed by a number that is the entry of
the particular string in the input file.
2.2.2 Sorting the Results in Output Files
The output files can be sorted by the iteration, the length of the strings, and the
specified regular expression.
Sorting by iteration - results in the output files being sorted by the
iteration step in ascending order. Which means that the first iteration
step of all the regular expressions will be stored in one file; the second
iteration step of all the files will be stored in the second file, and so on.
The default setting is for the files to be sorted by iteration.
Sorting by length - results in the output files being sorted by length, in
ascending order.
Sorting by regular expression - results in the output files being sorted in
the same order as they were in the input files
6
Chapter 3
Synthesizing
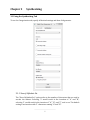
3.1 Using the Synthesizing Tab
To use the Categorization tab, specify all desired settings and then click generate.
3.1.1 Size of Alphabet Set
The “Size of Alphabet Set” option refers to the number of characters that are used to
encode the itemset. Selecting '2' would result in the iteration of "A" and "B";
selecting '3' would result in the iteration of "A", "B", and "C", and so on. The default
setting is an iteration with '2' characters naming “A” and “B”.
7
2.2.1 Final Number of Patterns
This setting represents the final number of patterns that should be in place after
merging. The maximum number depends on the size of the template of the specified
alphabet set. The following is a list of maximum sizes.
Size 1 – Maximum 2 final patterns
Size 2 – Maximum 19 final patterns
Size 3 – Maximum 142 final patterns
Size 4 – Maximum 1207 final patterns
Size 5 – Maximum 12356 final patterns
3.3.1 Datapoints per Node
This option selects the amount of randomly generated datapoints for each node.
3.2 Output Files
The output files can be found in the folder Synthesizing Tests. They name of the file is
dependent on the current date, current time, and specified settings. The output file name
format is as follows:
YYYY-MM-DD HH-mm-ss TemplateSize FinalPatterns Datapoints
8