1
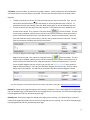
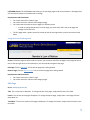
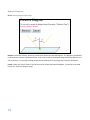
Undergraduate Physics Online Database (UPOD)
User Manual
Administrator and Moderator User Guide
Prepared for: Administrators and Moderators of UPOD.ca
Date: 2009-07-29
Authors : Students of CP317 (Spring 2009)
Project: The Coconut Project
Release Number: 1.0.0 - FINAL
Table of Contents
Introduction...................................................................................................................................... 4
Common Terminology ........................................................................................................................................4
Access ............................................................................................................................................... 5
General Users .....................................................................................................................................................5
Moderators .........................................................................................................................................................5
Administrators ....................................................................................................................................................5
Page Functions .................................................................................................................................. 6
Insert Page ..........................................................................................................................................................6
Search for a Page to Edit or Remove ..................................................................................................................8
Using the Back-End Search .............................................................................................................................8
Using the Front-End Navigation .....................................................................................................................9
Edit Page .............................................................................................................................................................9
Remove Page ................................................................................................................................................... 10
Formula Functions .......................................................................................................................... 11
Insert Formula ................................................................................................................................................. 11
Search for a Formula to Edit or Remove ......................................................................................................... 12
Edit Formula .................................................................................................................................................... 13
Remove Formula ............................................................................................................................................. 14
Diagram Functions .......................................................................................................................... 15
Insert Diagram ................................................................................................................................................. 15
Search for a Diagram to Edit or Remove ......................................................................................................... 16
Edit Diagram .................................................................................................................................................... 17
Remove Diagram ............................................................................................................................................. 18
User Functions ................................................................................................................................ 19
Create User ...................................................................................................................................................... 19
Search for a User to Edit or Remove ............................................................................................................... 20
Your Profile ...................................................................................................................................................... 21
Remove User ................................................................................................................................................... 22
Edit User .......................................................................................................................................................... 23
Appendix A: .................................................................................................................................... 25
Configuration ................................................................................................................................................... 25
URL............................................................................................................................................................... 25
Contact ........................................................................................................................................................ 25
Database Connection ...................................................................................................................................... 25
2
Appendix B: .................................................................................................................................... 25
Defined Database Tables ................................................................................................................................. 25
Page ............................................................................................................................................................. 26
Category....................................................................................................................................................... 26
Role .............................................................................................................................................................. 26
References ...................................................................................................................................... 27
Revision History .............................................................................................................................. 28
3
Introduction
Common Terminology
Here is a list of common terminology used in this document and on the UPOD website:
Front-End: The portion of the website that is visible to General Users of the website (i.e. where the pages are
displayed).
Back-End: The portion of the website that is used to modify the content that is visible to General Users of the
website. This portion can only be accessed by Administrators and Moderators with a valid account.
Parent/Child Pages: If page ‘B’ is a direct subtopic of page ‘A’, then page ‘A’ is the parent of page ‘B’ and page
‘B’ is the child of page ‘A’ (see example below).
Sibling Pages: If page ‘B’ and page ‘C’ are both children of page ‘A’, then pages ‘B’ and ‘C’ are siblings (see
example below).
Example:
In this example
• ‘Classical Mechanics’ is the parent of ‘Newton’s Law of Motion’ and ‘Kinematics’
• ‘Newton’s Law of Motion’ and ‘Kinematics’ are children of ‘Classical Mechanics’
• ‘Newton’s Law of Motion’ and ‘Kinematics’ are siblings
4
Access
The UPOD website allows for three different levels of access.
General Users
A General User can only access the front-end of the website. A General User does not have to log in to the site.
Moderators
A Moderator has access to edit the website’s content by logging in to the back-end portion of the website.
Moderators are also allowed to edit their own account information.
Administrators
An Administrator has the highest level of authority on the site. They have all the privileges that Moderators
have, as well as the ability to insert, edit, and remove Moderator accounts.
5
Page Functions
Page functions can only be accessed from the back-end of the site.
Insert Page
Go to: /admin/page-insert.php
Title: Enter the title of the page that you are inserting. This title will be used to identify the page.
Parent: Select the parent page that the newly inserted page goes under. You may select a root topic or a
subtopic.
6
Text Editor: In the text editor, you can enter the page’s content. A set of rudimentary text manipulation
commands found in most text editors is provided. You can hover over each button to see what it does.
Examples
• To bold a certain portion of text, first select the text that you want to make bold. Then, you can
•
either select the ‘Bold’ button ( ) on the toolbar or use the keyboard shortcut ‘CTRL+B’. To
unbold the text that you selected, select the ‘Bold’ button again (or use the keyboard shortcut).
To insert a formula into the page, first select the place in the textbox where you would like the
formula to be inserted. Then, select the ‘Formula’ button (
) from the toolbar. This will
create a pop-up window in which you can search for the formula you wish to insert (the search is
similar to the search described in the “Formula Functions” section of this document). Once you
have found the formula you wish to insert, click the ‘Select’ button next to the formula. You will
then be returned to the editor with the formula inserted.
•
To insert a diagram into the page, first select the place in the textbox where you would like the
) from the toolbar. This will
diagram to be inserted. Then, select the ‘Diagram’ button (
create a pop-up window in which you can search for the diagram you wish to insert (the search is
similar to the search described in the “Diagram Functions” section of this document). If you are
unsure of which diagram you wish to insert, you can click the ‘Click for Preview’ link to view the
diagram before selecting it. Once you have found the diagram you wish to insert, click the ‘Select’
button next to the diagram. You will then be returned to the editor with the diagram inserted.
*For more examples and descriptions about the text editor and toolbar, please go to http://tinymce.moxiecode.com/
Related To: Select which pages the page you are inserting is related to. Links to these pages will be displayed to
users as ‘Related Topics’ at the bottom of the current page that you are inserting. You can select multiple pages
by holding down the CTRL key and selecting each page.
Related From: Select which pages are related to the page you are inserting. The ‘Related Topics’ section of
each of these pages will include a link to the current page that you are inserting. You can select multiple pages
by holding down the CTRL key and selecting each page.
7
Save: Click the ‘Save’ button to insert the page. You will then either be informed that the insert was successful
or you will be notified of any errors that have been encountered.
Reset: Click the ‘Reset’ button to clear all fields within the page.
Requirements and Restrictions:
• You must enter a title and this title must not already exist for another page
• The title must be less than 128 characters
• You must select a parent page
• Each section heading within the page must be less than 1,024 characters
• You cannot select a main category page in the ‘Related To’ and ‘Related From’ fields
Search for a Page to Edit or Remove
Using the Back-End Search
Go to: /admin/pages.php
Search: If you do not want to manually scroll through the list of pages, you can enter part or all of the title of the
page you wish to find. After clicking the ‘Search’ button, the search will list relevant matches based on your
entry.
Jump To Category: To view the pages in a certain category, click the ‘Category’ link beside “Jump To Category”.
The page will automatically scroll down to where the category is listed.
Edit: Select the ‘Edit’ link next to the page you wish to edit. You may also select the particular ‘Page Name’ to
edit that page.
View: Select the ‘View’ link to view this page on the UPOD website front-end.
Remove: Select the ‘Remove’ link next to the page you wish to remove. You will be prompted to confirm the
removal.
8
UP/DOWN Arrows: The UP/DOWN arrows allow you to rearrange pages under a certain parent. New pages that
are inserted will always be inserted below its siblings.
Requirements and Restrictions:
• You cannot remove the “About” page
• You cannot remove or edit the main category pages
• You cannot use the arrows to move a page to a different parent
o In order to change the parent of a certain page, you must select ‘Edit’ next to the page and
change the ‘Parent’ field
• The first page under a parent cannot be moved up and the last page under a parent cannot be moved
down
Using the Front-End Navigation
Search: To find the page you wish to edit or remove, you can either search for the page’s title (using the search
tool on the top-right corner of the website) or you can manually navigate to the page.
Edit Page: Click the ‘Edit Page’ link to edit the page that is being viewed.
Remove Page: Click the ‘Remove Page’ link to remove the page that is being viewed.
Requirements and Restrictions:
• You cannot remove the “About” page
• You cannot remove or edit the main category pages
Edit Page
Go to: /admin/page-edit.php
Title: The current title is displayed. To change the title of the page, simply edit the text in this field.
Parent: The current parent page is displayed. To change the parent page, simply select a new page from the
drop-down list.
Text Editor: The current content of the page is displayed. To change the content, simply edit the content in the
text editor.
9
Related To: The current topics that the page is related to are highlighted. To change which topics the page is
related to, hold down CTRL and select and/or de-select the appropriate topic.
Related From: The current topics that are related to the page are highlighted. To change which topics are
related to the page, hold down CTRL and select and/or de-select the appropriate topic.
Save: Click the ‘Save’ button to update the page. You will then either be informed that the update was
successful or you will be notified of any errors that have been encountered.
Reset: Click the ‘Reset’ button to set all the fields within the page back to what they originally were.
Requirements and Restrictions:
• You must enter a title and this title must not already exist for another page
• The title must be less than 128 characters
• You must select a parent page and the parent cannot be the current page being edited
• Each section heading within the page must be less than 1,024 characters
• You cannot select a main category page in the ‘Related To’ and ‘Related From’ fields
Remove Page
Go to: /admin/page-remove.php
Remove: Select the ‘Remove’ button to permanently remove the specified page. The page is specified by its
title in bold.
Cancel: Select the ‘Cancel’ button if you do not wish to remove the specified page. You will be re-directed back
to the “Search for Page” page.
10
Formula Functions
Formula functions can only be accessed from the back-end of the site.
Insert Formula
Go to: /admin/formula-insert.php
*For more information on the LaTeX editor, please go to http://www.forkosh.com/mimetexmanual.html
Categories: Select which categories apply to the formula. You can select multiple categories by holding down
CTRL while selecting each category.
11
LaTeX: Enter the LaTeX code for the formula you wish to enter. As you type in the LaTeX code, a preview is
shown under “LaTeX Result:”. To clear the expression you are working on, select the ‘Clear Expression’ button
under the LaTeX textbox. It is best to refrain from using too many spaces to ensure that you do not exceed the
1,024-character limit for the LaTeX field.
Description: Enter a description of the formula that you would like associated with the formula. This description
can be used to narrow down your search when searching for a particular formula.
Save: Click the ‘Save’ button to insert the formula. You will then either be informed that the insert was
successful or you will be notified of any errors that have been encountered.
Reset: Click the ‘Reset’ button to clear all fields within the page.
Requirements and Restrictions:
• You must select at least one category
• You must enter a formula and this formula must not already exist
• You cannot enter more than 1,024 characters in the LaTeX field and in the description field
Search for a Formula to Edit or Remove
Go to: /admin/formulae.php
Categories: Select the categories that you would like to search through (you can select multiple categories by
holding down CTRL and selecting each category, or you may search through all categories by selecting “All”).
LaTeX: Enter part or all of the LaTeX code of the formula you wish to find.
12
Description: Enter part or all of the description of the formula that you wish to find. If you enter multiple words,
the search will only return formulae with a description that contains all the words in the order that is given.
•
Example: Entering “this formula” in the description field and selecting the ‘Search’ button will return a
formula with a description of “look at this formula” but it will not return a formula with a description of
“this is a formula” since “formula” is not directly after “this”.
*Note: Entering both LaTeX code and a description will narrow your search down to formulae where both fields
match the provided data. This is unwise unless you are absolutely sure that is the formula you are looking for.
Search: Click the ‘Search’ button to initiate the search based on the selected categories, LaTeX code, and/or
description. The results will be displayed in the following format:
Edit: Select this to edit the formula’s LaTeX code, description, and/or categories.
Remove: Select this to remove this formula permanently. You will be prompted to confirm the removal before
the formula is permanently deleted.
Edit Formula
Go to: /admin/formula-edit.php
Categories: The current categories that the formula is related to are highlighted. To change which categories
the formula is related to, hold CTRL and select and/or de-select the appropriate category.
LaTeX: The current formula is displayed. To change the LaTeX code, simply edit the text in this field. An
updated preview of the LaTeX is shown as you type.
Description: The current description for the formula is displayed. To change the description, simply edit the
text in this field.
Save: Click the ‘Save’ button to update the formula’s information. You will then either be informed that the
update was successful or you will be notified of any errors that have been encountered.
Reset: Click the ‘Reset’ button to set all the fields within the page back to what they originally were.
Requirements and Restrictions:
• You must select at least one category
• You must enter a formula and this formula must not already exist
• You cannot enter more than 1,024 characters in the LaTeX field and in the description field
13
Remove Formula
Go to: /admin/formula-remove.php
Remove: Select the ‘Remove’ button to permanently remove the specified formula. The formula is specified by
its description in brackets (“Newton’s Second Law: The Law of Resultant Forces” in this case) as well as the
image of the formula below the ‘Remove’ and ‘Cancel’ buttons. If removed, this formula will also be removed
from any pages that previously displayed it.
Cancel: Select the ‘Cancel’ button if you do not wish to remove the specified formula. You will be re-directed
back to the ‘Search for Formula’ page.
14
Diagram Functions
Diagram functions can only be accessed from the back-end of the site.
Insert Diagram
Go to: /admin/diagram-insert.php
Categories: Select the categories that apply to the diagram being inserted (you can select multiple categories by
holding down CTRL and selecting each category).
Picture: Select the ‘Browse…’ button and select the diagram image that you wish to insert.
Description: Enter a description of the diagram that you would like associated with the diagram. This
description can be used to narrow down your search when searching for a particular diagram.
Save: Click the ‘Save’ button to insert the diagram. You will then either be informed that the insert was
successful or you will be notified of any errors that have been encountered.
Reset: Click the ‘Reset’ button to clear all the fields within the page.
15
Requirements and Restrictions:
• You must select at least one category
• You must select a valid image file in the picture field and this image file must not already exist
• You cannot enter more than 256 characters in the description field
Search for a Diagram to Edit or Remove
Go to: /admin/diagrams.php
Categories: Select the categories that you would like to search through (you can select multiple categories by
holding down CTRL and selecting each category, or you may search through all categories by selecting “All”).
Description: Enter part or all of the description of the diagram that you wish to find. If you enter multiple
words, the search will only return diagrams with a description that contains all the words in the order that is
given.
•
16
Example: Entering “this diagram” in the description field and clicking the ‘Search’ button will return a
diagram with a description of “look at this diagram” but it will not return a diagram with a description of
“this is a diagram” since “diagram” is not directly after “this”.
Search: Click the ‘Search’ button to initiate the search based on the selected categories and/or description. The
results will be displayed in the following format:
Click for Preview: Select the ‘Click for Preview’ link to view the diagram before selecting an action. The preview
of the diagram will be shown in a separate window.
Edit: Select the ‘Edit’ link to edit the diagram’s image, description, and/or categories.
Remove: Select the ‘Remove’ link to remove this diagram permanently. You will be prompted to confirm the
removal before the diagram is permanently deleted.
Edit Diagram
Go to: /admin/diagram-edit.php
Categories: The current categories that the diagram is related to are highlighted. To change which categories
the diagram is related to, hold down CTRL and select and/or de-select the appropriate category.
Picture: If you do not wish to change the diagram picture, leave this field blank. If you do wish to change the
diagram picture, select the ‘Browse…’ button and select the diagram picture that you wish to change it to.
Description: The current description for the diagram is displayed. To change the description, simply edit the
text in this field.
Save: Click the ‘Save’ button to update the diagram’s information. You will then either be informed that the
update was successful or you will be notified of any errors that have been encountered.
Reset: Click the ‘Reset’ button to set all the fields within the page back to what they originally were.
Requirements and Restrictions:
• You must select at least one category
• You must either leave the picture field blank or select a valid image file in the picture field
• When editing the diagram picture, you must select an image file that does not already exist
• You cannot enter more than 256 characters in the description field
17
Remove Diagram
Go to: /admin/diagram-remove.php
Remove: Select the ‘Remove’ button to permanently remove the specified diagram. The diagram is specified by
its description in brackets (“Reflection Plane” in this case) as well as the diagram image below the ‘Remove’ and
‘Cancel’ buttons. If removed, this diagram will also be removed from any pages that previously displayed it.
Cancel: Select the ‘Cancel’ button if you do not wish to remove the specified diagram. You will be re-directed
back to the ‘Search for Diagram’ page.
18
User Functions
User functions can only be accessed from the back-end of the site.
Create User
Go to: /admin/user-create.php
*Can only be accessed by Administrator
Username: Enter the desired username of the new user. This is the name used to log in to their account.
Role: You can only create Moderator accounts; therefore the role is set to “Moderator” and cannot be changed.
Email: Enter a valid email address of the user.
Nickname: Enter a nickname for the user (this is the name that appears on the user’s site profile).
Password: Enter a password (must be at least seven characters) that the user will use in conjunction with the
username to log in to the site.
19
Requirements and Restrictions:
• You must be an Administrator in order to create a new user
• The username must be at least 3 characters long
• You cannot change the username in the future
• You cannot change the role
• You must enter a valid email address
• The password must be at least 7 characters long (passwords are case-sensitive)
Search for a User to Edit or Remove
Go to: /admin/users.php
Search: Enter part or all of the username that you wish to search for. Clicking the ‘Search’ button will initiate
the search and return the results in the following format:
All/Administrator/Moderator: Selecting the ‘All’, ‘Administrator’, or ‘Moderator’ link will show all users, only
Administrators, or only Moderators, respectively.
Edit: Select the ‘Edit’ link beside the user to edit their profile.
Remove: Select the ‘Remove’ link beside the user to permanently remove their profile. You will be prompted to
confirm the removal.
Username: Select an individual’s ‘Username’ to view their profile.
Requirements and Restrictions:
• You must be an Administrator to be able to remove an account
• You can only remove Moderator accounts (not Administrator accounts)
• As a Moderator, you may only edit your own account
20
Your Profile
Go to: /admin/profile.php
Email: Your current email address is displayed. To change your email address, simply edit the address in this
field.
Nickname: Your current nickname is displayed. To change your nickname, simply edit the text in this field.
Password: To change your password, enter a new password twice (in the appropriate fields under “New
Password”). If you do not wish to change your password, leave this field blank.
21
Password Validation: In order to make changes to your profile, you must also enter your current password. If
you do not wish to make changes to your profile, leave this field blank.
Save: Click the ‘Save’ button to update your information. You will then either be informed that the update was
successful or you will be notified of any errors that have been encountered.
Reset: Click the ‘Reset’ button to set all the fields within the page back to what they originally were.
Requirements and Restrictions:
• You cannot change your username or role
• You must enter a valid email address
• If a new password is entered, it must be at least 7 characters long (passwords are case-sensitive)
• You must enter your current password to save any changes you made to your profile
Remove User
Go to: /admin/user-remove.php
Remove: Select the ‘Remove’ button to permanently remove the specified user. The user is specified by their
username in bold (“Jane Smith” in this case) and their nickname in brackets (“Jannie” in this case).
Cancel: Select the ‘Cancel’ button if you do not wish to remove the specified user. You will be re-directed back
to the ‘Search for User’ page.
22
Edit User
Go to: /admin/user-edit.php
Email: The current email address is displayed. To change the email address, simply edit the address in this field.
Nickname: The current nickname is displayed. To change the nickname, simply edit the text in this field.
Password: To change the user’s password, type in a new password twice (in the appropriate fields under “New
Password”). If you do not wish to change the user’s password, leave this field blank.
Save: Click the ‘Save’ button to update the user’s information. You will then either be informed that the update
was successful or you will be notified of any errors that have been encountered.
Reset: Click the ‘Reset’ button to set all the fields within the page back to what they originally were.
23
Requirements and Restrictions:
• Only Administrators can edit other users’ profiles
• Administrators can only edit Moderators’ profiles (not other Administrators’ profiles)
• The username and role cannot be changed
• You must enter a valid email address
• If a new password is entered, it must be at least 7 characters long (passwords are case-sensitive)
24
Appendix A:
*Note: This appendix is meant only for the database administrator of the UPOD website
Configuration
If you access admin/config.php, there are several options that might be of concern to you if you are moving the
website to another location. Under normal circumstances, you do not have to make any changes.
You may ignore the publishing information, which was created for implementation purposes. You only need to
view this information if you are going to make changes to the site.
URL
This allows the hyperlinks of the site to point to the correct location. It is also used for embedded referencing of
formulae and diagrams. The URL points to the root of the site.
Contact
This allows feedback from users (using the “Feedback” page) to be emailed directly to [email protected].
Database Connection
This is how the site connects to the database.
db_host: the host of your database (in most cases it would be localhost)
db_user: the user you are using to access the database
db_pass: the password of the user you are using to access the database
db_name: the name database
Appendix B:
*Note: This appendix is meant only for the database administrator of the UPOD website
Defined Database Tables
At the time of release, there are several permanently defined tables in the database (see below).
25
Page
pageID title
categoryID tree lhs rhs
1
Index
0
1
1
2
2
About
0
2
1
2
3
Classical Mechanics
1
3
1
#
4
Electricity and Magnetism
2
4
1
#
5
Fundamentals
3
5
1
#
6
Optics
4
6
1
#
7
Quantum Mechanics
5
7
1
#
8
Statistical Mechanics
6
8
1
#
Page <<table>>
Category
categoryID name
1
Fundamentals
2
Electricity and Magnetism
3
Classical Mechanics
4
Quantum Mechanics
5
Optics
6
Statistical Mechanics
7
Other
Category <<table>>
Role
roleID name
1
Administrator
2
Moderator
Role <<table>>
26
Note: All occurrences of
“#” are initially set to “2”,
but will change as new
pages are inserted
References
TinyMCE: (WYSIWYG Editor)
MoxieCode
http://tinymce.moxiecode.com/
Plug-ins were developed base on the API given from TinyMCE
http://wiki.moxiecode.com/index.php/TinyMCE:API
http://wiki.moxiecode.com/index.php/TinyMCE:Create_plugin/3.x
LaTeX Plug-in: (Insert/Edit Formula)
http://www.forkosh.com/mimetex.html
Graphic Icons: (Administrator/Moderator GUI)
Silk Icons by Mark James
http://www.famfamfam.com/lab/icons/silk/
27
Revision History
Name
Sunny Chan
Date
June 29, 2009
Sunny Chan
Sunny Chan
Rahim Jiwani
Will Schuurman
Dharmesh Mistry
June 30, 2009
July 1, 2009
July 23, 2009
July 24, 2009
July 24, 2009
Dharmesh Mistry
July 25, 2009
Dharmesh Mistry
Rahim Jiwani
July 26, 2009
July 26, 2009
Section
Appendix A,
Appendix B,
References
Appendix B
Sections 1,2
Diagram section
Formula section
Page section,
Format
Editing, and
Consistency
check
User Functions
All
Rahim Jiwani
July 28, 2009
All
Rahim Jiwani
Dharmesh Mistry
Jason Vieira
Rahim Jiwani
Will Schuurman
John Zupancic
Shazam Ramrup
Felix Li
Mark Reinhart
Prasheen Sanghvi
Jason Graham
Tahir Hussain
July 28, 2009
July 28, 2009
All
All
28
Reason for changes
Initial Draft
Version
0.5.0
Revisions to Database Tables
Initial Draft
Initial Draft
Initial Draft
Initial Draft
0.5.1
0.5.2
0.7.0
0.8.0
0.9.0
Initial Draft
0.9.1
Initial Draft
Major edits made for consistency,
content, and correctness
Updated based on Brown’s
comments
Added in section for edit/remove
page using front-end
Updated all screenshots
Other minor edits
Updated screenshots
Final SQA and changes for the User
Manual
0.9.2
0.9.3
0.9.4
0.9.5
1.0.0