1
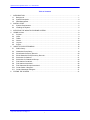
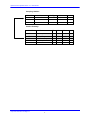
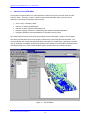
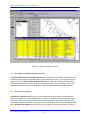
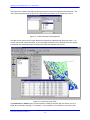
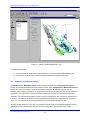
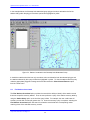
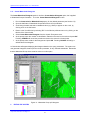
SP.168
AQUATIC ECOZONE SYSTEM
VERSION 1.0
USER MANUAL
Prepared by:
Axys Environmental Consulting Ltd
PO Box 2219, 2045 Mills Road West
Sidney, BC V8L 3S8
Phone: 250-656-0881
Fax: 250-656-4789
Prepared for:
BC Ministry of Environment, Lands and Parks
Water Quality Branch
Victoria, BC
March 1998
Aquatic Ecozone System Version 1.0 – User Manual
Table of Contents
1
2
3
4
5
6
INTRODUCTION .........................................................................................................................1
1.1
Background...........................................................................................................................1
1.2
System Description................................................................................................................2
1.3
Data Management .................................................................................................................3
INSTALLATION ...........................................................................................................................5
2.1
System Requirements............................................................................................................5
2.2
Installing the System..............................................................................................................5
INITIATING THE AQUATIC ECOZONE SYSTEM ..........................................................................6
USING ArcView ...........................................................................................................................8
4.1
Projects ................................................................................................................................8
4.2
Views ...................................................................................................................................9
4.3
Tables ................................................................................................................................ 12
4.4
Charts................................................................................................................................. 13
4.5
Layouts............................................................................................................................... 14
4.6
Scripts ................................................................................................................................ 14
AQUATIC ECOSYSTEM MENU ................................................................................................. 16
5.1
Station Query ...................................................................................................................... 17
5.2
Watershed Group Query ...................................................................................................... 19
5.3
Show Station Summary Records .......................................................................................... 20
5.4
Show Watershed Group Summary Records .......................................................................... 21
5.5
Summarise for Stations ........................................................................................................ 21
5.6
Summarise for Watershed Groups ........................................................................................ 24
5.7
Find Stations Contained ....................................................................................................... 25
5.8
Find Stations Associated...................................................................................................... 26
5.9
Find Watershed Groups Associated...................................................................................... 28
5.10 Create Station Histogram ..................................................................................................... 28
5.11 Create Watershed Histogram ............................................................................................... 31
EXITING THE SYSTEM ............................................................................................................. 31
Axys Environmental Consulting Ltd.
i
Aquatic Ecozone System Version 1.0 – User Manual
1
INTRODUCTION
The manual for the Aquatic Ecozone System accompanies Version 1.0 of the Aquatic Ecozone System
(AES). The AES is a customised ArcView application prepared by Axys Environmental Consulting Ltd.
1.1
Background
In 1997 the Ministry of Environment, Lands and Parks, Water Quality Branch commissioned the
compilation of existing water quality data for the Province of British Columbia for the purpose of aquatic
ecozone classification. The result was the development of a water quality database containing more than
530,000 records from both lakes and streams throughout BC. This large information source provi des:
•
•
•
•
•
•
•
•
improved exchange of limnological information between scientists, resource managers, resource
development companies, and resource interest groups;
a framework for setting water quality objectives to ecozones which may be more relevant than
establishing Province-wide objectives;
information for establishing zonal reference sites for long term monitoring of key water quality
variables;
information to identify regional differences in the abundance of data pertaining to any variable of
interest and thereby assist in planning data collection activities in the Province;
descriptions of limnological and water quality characteristics that are typical on a regional basis;
a data management system that will help standardise data collection and improves data access
for water quality assessments;
regional descriptions of lake and stream limnology that can form a technical basis for preparation
of reference documents on the quality of fresh water resources in British Columbia; and
regional descriptions of lake and stream limnology that can form a technical basis for preparation
of an internet web site from which data can be examined and downloaded for optimising time
used for water quality assessments.
A workshop was held to establish the most meaningful delineation of aquatic ecozones based on the
information in the database. Boundaries for ecologically distinct zones were assigned on the basis of
experience, previous work on assigning limnological regions in BC, and review of summary statistics for
relevant parameters in the database. It was determined that Watershed Groups, the polygons delineated
in the Provincial Watershed Atlas, should form the basic building blocks for aquatic ecozone
classification. Ecozones were mapped in three hierarchical levels; 245 Watershed Groups were grouped
to form 45 Ecoregions, and these Ecoregions were grouped to form 8 Ecoprovinces. Definitions for each
level are as follows:
Watershed Group:
Ecoregion:
Axys Environmental Consulting Ltd.
A precinct enclosing aquatic features at the sub-basin scale that is
practical for detailed mapping of water quality characteristics.
An area within an Ecoprovince where there is a minor macroclimatic
variation, and a characteristic lithology and geomorphology that can
influence morphometry and surface chemistry of aquatic ecosystems.
1
Aquatic Ecozone System Version 1.0 – User Manual
Ecoprovince:
Large lakes, reservoirs and rivers characterise an Ecoregion and
biogeochemical processes within those systems are recognised to
influence water quality.
An area where there are consistent climatic processes, geology, lithology
and relief that determine characteristics of aquatic ecosystems at the
sub-continental level.
Water quality attributes were determined for each of the 245 Watershed Group polygons by an overlay
analysis. Attributes were stratified by site type (stream or lake) and included Watershed Group,
Ecoregion, Ecoprovince, number of observations, minimum value, maximum value, mean, median and
standard deviation. Summary tables were developed to provide a general description of water quality
among and within ecoprovinces.
A graphical user interface, the Aquatic Ecozone System (AES), was written to facilitate access to the data
and summary statistics derived from the source water quality database. The customised interface allows
searches of data in large or small zones of interest and summarises data in any region to provide
information on background characteristics. The interface is intended for wide distribution to potential
users of the aquatic ecozone classification and its database.
A full description of the development of the AES is available in An Ecozone Classification for Lakes and
Streams of British Columbia: Version 1.0, a report prepared by Limnotek Research and Development Inc.
and Axys Environmental Consulting Ltd. for the Ministry of Environment, Lands and Parks (1998) that
accompanies this software application.
1.2
System Description
The Aquatic Ecozone System is a customised ArcView application that allows water quality data for the
province of BC to be queried, viewed and summarised easily. The user interface was written for ArcView
3.0 using Avenue ® and customised to allow searches of data in large or small zones of interest and to
summarise data in any region to provide information on background chemical characteristics for an area
of interest.
All available spatial and attribute data for the Aquatic Ecozone Classification have been imported into
ArcView as tables and linked together to produce various display views. A series of user-defined scripts
have also been developed to perform a number of data analysis scenarios. These scripts have been
incorporated into a customised menu that provides a step by step approach to running queries, locating
records, summarising and displaying specific data and creating histograms. The menu is labelled
Aquatic Ecosystems and is located on the ArcView menu bar when the display view is active. Each of
the components are saved together in an ArcView project (AES.Apr) that can be repeatedly accessed
and manipulated. This environment allows users to view and analyse the Aquatic Ecosystem data in a
simple and consistent manner.
Users should note that no attempt was made to alter data from its original format, with the exception of
unit conversion where necessary. Thus, any errors existing in the source databases will also appear in
the AES. In most cases, this problem has been overcome by allowing the user to define appropriate
Axys Environmental Consulting Ltd.
2
Aquatic Ecozone System Version 1.0 – User Manual
statistical ranges and to review the data in summary tables. However, users are advised to use caution
when running summary statistics and generating graphical output.
1.3
Data Management
There are three types of data used in the user interface: spatial, attribute and summary data. Spatial data,
or map data, are stored as ArcInfo coverages and include watershed group polygons, ecoprovince
polygons, ecoregion polygons and sampling station points. The attributes for the spatial data (e.g., the
sampling location name, type of water body) are stored as a feature of these coverages. Summary data
summarises the samples taken at a specific station, or within a given watershed group, and are stored as
separate tables within the ArcView project. These summary tables contain values for parameters that
were sampled at a given station and are related back to the original data by a unique identifier for the
feature.
The AES utilises a summarised version of the original 530,000 record database. Summary statistics
(mean, median, minimum, maximum and standard deviation) for each parameter measured at each
station have been pre-processed and maintained in summary data tables. This approach is beneficial
because it allows the data to be interpreted more effectively and greatly decreases the time required to
process queries, generate histograms and map the data.
Data maintained within the system has been normalised to reduce the size of the database, decrease
data redundancy and improve the efficiency of data processing. There are 28 possible parameters to
sample (e.g., pH, colour, dissolved oxygen), however, only a small number of these parameters may have
been sampled at a given location. The normalised data structure stores summary values for all
parameters sampled at a given station. As a result, there may be a varying number of records in the
summary tables for any given record in the site or watershed group tables. The following figure shows a
simplified view of the relationship between sampling stations and the summarised samples for each
station. Note that the Site ID in the summary table indicates which station the summary values apply to.
Axys Environmental Consulting Ltd.
3
Aquatic Ecozone System Version 1.0 – User Manual
Sampling Stations:
Site ID
300009
300010
…
Name
Pitt L South
Cultis Lake
…
Site Type
Lake
Lake
…
Source
Seam
Seam
…
…
…
…
…
Station Summary:
Site ID
Parameter
Min
Max
Mean
…
300009
300009
300009
300010
…
pH
Temp
Diss. Oxy
pH
…
4.8
8.0
8.8
6.1
…
7.2
18.0
11.0
7.4
…
6.94
15.2
10.09
7.14
…
…
…
…
…
…
Axys Environmental Consulting Ltd.
4
Aquatic Ecozone System Version 1.0 – User Manual
2
2.1
INSTALLATION
System Requirements
The basic system requirements will be the same as those required for ArcView. The AES application will
also require approximately 72 megabytes of hard drive space for data storage.
2.2
Installing the System
To install the AES on your PC place the AES CD in your CD drive and run the install program
(AESInstal.Exe) provided. After verifying enough disk space is available, the install program will copy all
of the appropriate map, data and program files onto your machine in the correct directory structure
automatically. Please follow the instructions as indicated during the installation process.
The default location for the system and its subdirectories (folders) is beneath C:\Axys\AES\. If you elect
to install the system in a different location it should be noted that when you initiate the AES project
ArcView will prompt you for the new location for each of the files used by the system.
Axys Environmental Consulting Ltd.
5
Aquatic Ecozone System Version 1.0 – User Manual
3
INITIATING THE AQUATIC ECOZONE SYSTEM
Prior to initiating the Aquatic Ecozone System, all system components must be located within the
appropriate directories and ArcView 3.0 must be properly installed. Refer to the ArcView 3.0 manual for
detailed instructions on installing ArcView. The AES system components are stored together as an
ArcView project file (AES.Apr) and must be initiated from within the ArcView mapping software.
To open the project:
1.
2.
Start ArcView. When the application has opened, go to the File menu and select Open Project.
In the Open Project dialogue box, navigate to the directory containing the AES files, highlight the
AES.Apr file and press OK.
Figure 1: Open Project Dialogue Box
3.
The project area opens with the Project window entitled AES.Apr on the left and a View window
with a map of BC on the right, as illustrated below.
Axys Environmental Consulting Ltd.
6
Aquatic Ecozone System Version 1.0 – User Manual
Figure 2: Aquatic Ecozone System Opening Screen
Axys Environmental Consulting Ltd.
7
Aquatic Ecozone System Version 1.0 – User Manual
4
USING ArcView
The following section outlines some of the basic ArcView functions that may be useful to AES users. In
depth instructions for the operation of ArcView are available both in the ArcView User Manual and
through the built-in Help files. In addition, placing the cursor over a menu item or button (without clicking)
displays a summary of the associated function at the bottom left of the screen.
4.1
Projects
A project is a collection of documents (views, tables, charts, layouts, script editors), document user
interfaces, scripts, and other types of objects. Projects are persistent. When you save a project to disk,
you are saving a complete snapshot of the state of ArcView at the time of the save operation. A project
file is normally a text file with an .apr extension. (ArcView Manual)
The Project Window provides access to all the components that make up a project file. Available
component types are: views; tables; charts; layouts; and scripts. Highlighting a component type, such as
View or Table, causes all components of that type to be listed. The desired component can then by
opened either by double-clicking on the component title or by highlighting the title and pressing Open.
New components can be created by highlighting a component type and pressing New. Existing
components can be printed by highlighting the desired component title and pressing Print.
Figure 3: The AES Project Window
When the Project Window is active, the menu bar contains four menu options: File, Project, Window and
Help. The Project menu contains options for altering the current project. The Rename option allows
components to be renamed (new components are given default names such as View 1). This function
will be important as the user queries the data and produces new tabular and graphical data summaries.
Axys Environmental Consulting Ltd.
8
Aquatic Ecozone System Version 1.0 – User Manual
The Project Window must be active to save projects. If it has been hidden in the course of working on a
project, it can be brought to the front by selecting the project from the Window menu. To save a project,
simply select Save Project from the File Menu. To close a project, select the Close Project option from
the File Menu. If you close a project without saving it ArcView will prompt you to save the current
changes. Select OK to save the project area, NO to close the project without saving or CANCEL to
return to the project.
4.2
Views
Views are interactive maps that allow you to display, explore, query and analyse geographic data in
ArcView. A view is made up of layers of geographic information for a particular area or place. Each layer
is a collection of geographic features, such as rivers, lakes, countries, or cities. In ArcView these layers
are called themes. All of the themes in a view are listed to the left of the map in the views Table of
Contents. (ArcView Manual)
The AES contains one View, entitled BC, with eight thematic layers:
1.
2.
3.
4.
5.
6.
7.
8.
Bc_drai_polyline.shp
Bc_drai_region.shp
Place Names
Sites
BC Coastline
Watershed Groups
Ecoprovinces
Ecoregions
Streams from the Digital Chart of the World
Lakes from the Digital Chart of the World
Place names for lakes, major streams, communities
Sampling sites based on all AES data
Coastline from the Digital Chart of the World
Watershed Groups polygons from Watershed Atlas
Ecoprovinces as defined by the Aquatic Ecozone classification
Ecoregions as defined by the Aquatic Ecozone classification
When the AES is initiated the Sites, BC Coastline and Ecoregion themes are displayed. Any of the
themes in the Table of Contents can be toggled on or off according to the user’s requirements.
Turning Layers On/Off: The presence of a checkmark in the box next to each theme indicates that it is
currently turned on. Only themes that are turned on are displayed on the map. To turn a theme on or off,
click on the box.
Active/Inactive Layers: Themes must be active to query or edit features. To make a theme active click on
the theme's name or legend in the Table of Contents. The theme will highlight (appear raised) to show it
is active. To make more than one theme active hold down the SHIFT key and click on the themes one by
one in the Table of Contents. To make an active theme inactive do one of the following: click on another
theme to make it active or hold down SHIFT and click on the active theme (ArcView Manual).
Layer Order: The order in which themes are drawn on a view is based on the order in which they appear
in the Table of Contents. The theme at the top of the Table of Contents is drawn on top of those below it,
and so on down the list. Themes that usually belong in the foreground of the view, like line and point
features (e.g., rivers, lakes, sampling sites), should therefore be kept at the top of the Table of Contents.
Themes that form the background of the view, such as polygon features and images (e.g., watershed
groups, ecoprovinces), should be at the bottom. To change the order a theme is drawn in drag the theme
Axys Environmental Consulting Ltd.
9
Aquatic Ecozone System Version 1.0 – User Manual
up or down in the Table of Contents. When you drop the theme in its new position, the view will
automatically redraw in the new order (ArcView Manual).
Symbol Style: The symbols used to draw the features are listed in the Table of Contents below the theme
name. Symbol, line or region styles can be changed by double-clicking on the desired theme in the Table
of Contents to open a Legend Editor dialogue box. This dialogue box enables edits to be made to several
characteristics of the map features including style, size and colour. To change the display attributes of a
simple or line (e.g., symbol type or line style, colour, size or thickness) double-click on the desired symbol
within the legend editor to access the Symbol Window. A full explanation of the Legend Editor is
available through ArcView's help directory.
Figure 4: The Legend Editor
Figure 5: The Symbol Window
Zooming/Panning: ArcView offers a variety of Zoom and Pan functions in the toolbar located above the
View window, when the View window is active. These include: Zoom to Full Extent, Zoom to Active
Theme(s), Zoom to Selected, Zoom In, Zoom Out, and Zoom to Previous Extent. All of these functions
are fully explained in ArcView's help directory.
Figure 6: Zoom and Pan Buttons
Identify Pointer: The identify pointer is activated by clicking on the Identify button. This pointer allows the
user to view the attribute data associated with individual features (symbols, lines or regions) of active
layers. Clicking on the desired feature opens an Identify Results table that displays the associated data.
Axys Environmental Consulting Ltd.
10
Aquatic Ecozone System Version 1.0 – User Manual
Figure 7: The Identify Button
Thematic Maps: When a theme is first added to a map, all features in that theme are displayed with the
same colour and symbol. While this is useful to show a feature's location, the user may prefer to
customise this display by creating a thematic map. Thematic maps display the features of a theme using
unique or graduated colour and/or symbol size. Options for thematic maps, and the type of data they
represent include:
1.
Graduated Colour
Features are displayed with the same symbol type, but the colours
represent the progression of values for a data attribute you specify. For
example, a colour ramp from yellow to red would have shades of orange
in between (ArcView Manual). In the AES, this would be useful for
representing temperature or pH ranges.
Figure 8: Graduated Colour Classification
2.
Graduated Symbol
Axys Environmental Consulting Ltd.
Features are displayed with the same colours but with varying sized
11
Aquatic Ecozone System Version 1.0 – User Manual
symbols or line thickness, representing a progression of values. This
could be used to represent the number of samples taken at a specific
sample site.
Figure 9: Graduated Symbol Classification
3.
Unique Value
Each unique value in a theme is represented with a unique symbol. This
is the most effective method for displaying categorical data (ArcView
Manual). In the AES, this would be useful for distinguishing between
lake and stream sample sites.
Figure 10: Unique Value Classification
Colour thematic maps are further explained in Section 5.5 of this document. In addition, the ArcView
manual contains detailed instructions for the preparation of these and other types of thematic maps.
4.3
Tables
Spatial data sources such as ARC/INFO coverages or ArcView shape files have attribute tables
containing descriptive information about their features (ArcView Manual). These attribute tables are listed
in the Project Window when the Tables component is highlighted. From this window, new tables can be
created, existing tables edited and additional tables added to the project. The AES system contains five
attribute tables:
1.
2.
3.
4.
Attributes of Sites
Attributes of Watersheds
params.dbf
ssummary.dbf
Axys Environmental Consulting Ltd.
A list of all sampling station throughout the province
A list of all watershed group polygons throughout the province
A list of the parameters measured throughout the province
The summary statistics for each of the parameters measured
grouped by station
12
Aquatic Ecozone System Version 1.0 – User Manual
5.
rsummary.dbf
The summary statistics for each of the parameters measured
grouped by watershed group
The site attribute table stores the station identifier, name, data source, a flag designating whether the
station is lake or stream based, the identifier for the watershed group the station falls within, and the
geographic coordinates for the site.
The watershed group attribute table provides information concerning the watershed group name, and the
polygon’s area and perimeter.
The parameters table (params.dbf) provides a list of the various parameters codes, a description which
standardises various parameters, and measurement units.
The SSummary.Dbf table summarises the measurement results for each of the stations. The table
provides a minimum, maximum, mean, median and standard deviation value for each of the parameters
measured at each of the stations.
The RSummary.Dbf table summarises the measurement results for each of the watershed groups. The
table provides a minimum, maximum, mean, median and standard deviation value for each of the
parameters measured at stations falling within the watershed group.
The data structures for all tables contained in the AES are listed in Appendix A.
As tables are created in the AES System, they appear in the Table of Contents window, in the same order
that they are generated.
4.4
Charts
Charts reference data in a table of a project and define how it will be displayed. A chart can be used to
display, compare, and query the geographic and tabular data effectively. Charts in ArcView are especially
powerful because they are dynamically linked to the maps. For example, the selection of map features in
a view causes them to also be highlighted in the view, table, and chart.
A chart represents all the records in a table unless a subset of records has been selected. Records can
be selected in several ways, such as selecting in the table, building a query, or, if the table you’re charting
is a theme attribute table, selecting features on a view. Anytime you change the selected records, the
chart immediately reflects the new selection (ArcView Manual).
Charts can be created either through the Create Histogram in the Aquatic Ecosystems Menu (see
sections 5.10 and 5.11) or using the ArcView chart interface.
As charts are created in the AES System, they appear in the Table of Contents window, numbered in the
same order that they are generated.
Axys Environmental Consulting Ltd.
13
Aquatic Ecozone System Version 1.0 – User Manual
4.5
Layouts
The Layout Window is where components of a project can be assembled together for final presentation.
Creating a Layout from the View Window: Layouts can be created using templates when the View
Window is active, by choosing Layout in the View menu and selecting a template from the dialogue box
that appears. The layout will contain the view, the title of the view, a legend describing the themes of the
view that are currently turned on, a scale bar and a north arrow. Any of these layout elements can be
edited by double-clicking on them, or deleted by clicking once and then selecting Delete from the Edit
menu.
Creating a Layout from the Project Window: When a new layout is opened from the Project Window, it
appears as a blank page. Any project components to appear in the map, as well as any map features
such as scale bar or title, must be added manually. The Layout Window toolbar has three buttons that
provide most of the features needed in a typical layout:
•
•
The Frame button opens a drop-down menu for inserting views, tables, charts, scale bars,
legends, north arrows and pictures. Simply click on the button for the desired feature, then use
the cursor to create a box where the feature is to appear.
The Draw button opens a drop-down menu for inserting points, lines and regions.
•
The Text button creates a text box for inserting text.
To edit map features of a Layout, first highlight the item to be edited. Then select the Show Symbol
Window item in the Window menu to open an editor dialogue box.
Customised layouts can be saved as templates. This feature provides a useful shortcut when a user
anticipates producing many layouts of standard appearance. To save a custom template, select Save as
Template from the Layout menu. This will open a dialogue box where the new layout style can be
assigned a unique name for future reference. Detailed instructions for the creation of Layouts are
available in the ArcView manual.
As layouts are created in the AES System, they appear in the Table of Contents window, numbered in the
same order that they are generated.
4.6
Scripts
A script is the component of an ArcView project that contains Avenue code. Just like macros, procedures,
or scripts in other programming or scripting languages, ArcView scripts group together the means to
accomplish three general objectives: automate tasks, add new capabilities to ArcView, and build
complete applications (ArcView Manual). To assist users in performing queries, summaries, thematic
maps and histogram generation, a series of scripts have been prepared within the AES project using the
Avenue programming language. The following twelve scripts are used to define the functions of the
Aquatic Ecosystems Menu options (see Section 5):
Axys Environmental Consulting Ltd.
14
Aquatic Ecozone System Version 1.0 – User Manual
1.
2.
Get Sites
Get SiteSummary
3.
Get WG
4.
Get WGSummary
5.
Global Declarations
6.
Poly Contain
7.
Site Histo
8.
Site Query
9.
Site Sum
10. WG Histo
11. WG Query
12. WG Summ
Axys Environmental Consulting Ltd.
Finds the sites related to a set of selected summary records.
Finds the summary records related to a set of currently selected site
records
Finds the watershed groups (WG) related to a set of selected summary
records.
Finds the summary records related to a set of currently selected WG
records.
Defines all global variables used by the APR scripts. This script is called
when the APR file is first opened.
Finds the sites which lie within a selected polygon feature(s). This script
works for any polygon theme with features selected, but it is expected to
be used primarily to select those sampling stations within a given
watershed group.
Creates a histogram of values found in the selected field in the site
attribute table.
Example script to show how a user might be guided through the query
process using the sample table, associating the results back to the site
table.
Allows the user to select a parameter from the summary table to make it
accessible from the site attribute table for purposes of thematic mapping.
Records are exported from the summary table for the selected parameter
and joined to the site table. This script removes any existing joins from
the site attribute table.
Creates a histogram of values found in the selected field in the WG
attribute table.
Example script to show how a user might be guided through the query
process using the summary table, associating the results back to the WG
table.
Allows the user to select a parameter from the summary table to make it
accessible from the WG attribute table for purposes of thematic mapping.
Records are exported from the summary table for the selected parameter
and joined to the watershed group table. This script removes any
existing joins from the site attribute table.
15
Aquatic Ecozone System Version 1.0 – User Manual
5
AQUATIC ECOSYSTEM MENU
The Aquatic Ecosystems Menu is a customised menu located on the main menu bar when the View
screen is active. This menu contains a series of options that allow AES users to perform various
analyses on the Aquatic Ecosystems data including:
•
ad hoc query of summary values
•
•
•
selection of features by spatial pick
selection of station points by watershed group
thematic mapping of stations or watershed groups based on sampled parameters
•
histogram generation showing distributions of selected summary values
All of these functions may be performed using existing ArcView functionality, however, several scripts
have been prepared within the ArcView project to assist users in performing their required tasks. The
menu guides the user through the steps associated with building a complex query, generating a thematic
map, or developing a histogram summarising either the entire dataset or the information associated with a
user-defined study area. Each of these analysis options are described in the following sections.
Figure 11: The AES Menu
Axys Environmental Consulting Ltd.
16
Aquatic Ecozone System Version 1.0 – User Manual
The user can also perform other queries on the aquatic ecozone data by using the ArcView Query Builder
(see the ArcView manual for more detail). Additional scripts can quickly be developed and added to the
system if specific queries are found to be repeatedly performed or cumbersome using the Query Builder.
5.1
Station Query
The Station Query option guides the user through a simple query of the station summary table to identify
all stations where measurements of a particular parameter fall within a specified range of values.
To query the measurement data associated with a station, the user selects the Station Query option.
The user is then prompted to select a parameter from a pick list (e.g., pH) and press OK. Pressing
CANCEL will cancel the procedure and return the user to the View screen. The full list of available
parameters is detailed in Appendix B.
Figure 12: Station Query Parameter List
Subsequent to the selection of a parameter the user is prompted to choose the summary statistic they are
interested in: mean, median, or a minimum or maximum value and press OK. Pressing CANCEL will
cancel the procedure and return the user to the View screen.
Axys Environmental Consulting Ltd.
17
Aquatic Ecozone System Version 1.0 – User Manual
Figure 13: Query Field Pick List
The user is then prompted to select a query type: to locate an exact value; values less than or greater
than a user specified entry; or values that fall within a user specified range.
Select the desired query type and press OK. Pressing CANCEL will cancel the procedure and return the
user to the View screen.
Figure 14: Query Type Pick List
The last step of the query function prompts the user to enter a value on which the query will be based.
Enter the desired value and press OK to perform the query. Pressing CANCEL will cancel the procedure
and return the user to the View screen.
Figure 15: Query Value Dialogue Box
Axys Environmental Consulting Ltd.
18
Aquatic Ecozone System Version 1.0 – User Manual
Figure 16: Station Query Results – Stations with pH Values Less Than 6
In the example above, the query located all of the stations where a median pH value of less than 6 was
recorded. The system automatically highlights their locations in yellow.
5.2
Watershed Group Query
The Watershed Group Query option applies the same script as the Station Query, but this query
locates watershed group polygons meeting specific water quality conditions. The same prompts guide
the user through the query and the selected features are again highlighted yellow on the map. In the
example below, all watershed group polygons with a median pH greater than 8 were queried and
highlighted yellow.
Axys Environmental Consulting Ltd.
19
Aquatic Ecozone System Version 1.0 – User Manual
Figure 17: Watershed Group Query Results – Watershed Groups with pH Values Greater Than 6
5.3
Show Station Summary Records
The selection of the Show Station Summary Records option opens the ssummary.dbf table and
highlights in yellow the Station Summary Records selected in the View window. This feature allows the
user to view the summarised measurements records associated with the active station sites.
To generate a summary table, the Sites theme must first be activated and the Select Feature cursor used
to highlight the sites to be queried. Multiple sites can be highlighted by holding down the SHIFT key while
making selections or by creating a polygon by positioning the selection cursor and dragging the cursor to
form the desired size polygon. When stations are selected a record counter box will appear under the
menu bar indicating how many records are selected out of the total number of station records. If no sites
are selected, the AES will display an error message indicating that sites must be selected. Once the
desired sites are highlighted, the Show Station Summary Records query can be run. To close the
summary table after viewing the query results, either click on the "x" in the top right hand corner of the
Table Window or press <Alt> F4. To unselect features use the Clear Selected Features option from the
Theme menu.
Axys Environmental Consulting Ltd.
20
Aquatic Ecozone System Version 1.0 – User Manual
Figure 18: Display of Summary Records
5.4
Show Watershed Group Summary Records
The Show Watershed Group Summary Records option guides the user through a simple query of the
watershed group polygons and highlights the polygons that satisfy the query. This option performs the
same function as the Show Station Summary Records, but opens the rsummary.dbf table, with all
associated Watershed Group Summary Records highlighted yellow. Prior to initiating the query, the
Watershed Groups theme must be activated and at least one Watershed Group polygon selected.
5.5
Summarise for Stations
Summarise for Stations allows the user to select a parameter from the station summary table and
makes it accessible from the site attribute table. This query is required to create thematic maps and
histograms. Selected records are exported from the summary table for the selected parameter, and
temporarily joined to the site table. The function removes any existing joins from the site attribute table.
When Summarise for Stations is invoked, the user is prompted to choose a parameter for summary.
Axys Environmental Consulting Ltd.
21
Aquatic Ecozone System Version 1.0 – User Manual
The system then creates a new table containing all records for which that parameter was measured. The
user is then prompted to enter a name for the export file and a location on the hard drive to store it.
Figure 19: Station Summary File Dialogue Box
This table can be opened in the Project Window and renamed or deleted through the project menu. If no
records exist for the chosen parameter, an error message will alert the user. Note that if the AES project
is saved with the created table open the project will require the new table in the future.
Figure 20: pH Summary Data Table
The Summarise for Stations query is a prerequisite to creating a thematic map (see Section 4.2 for an
explanation of thematic mapping). For example, if a user wanted to colour stations in accordance with
Axys Environmental Consulting Ltd.
22
Aquatic Ecozone System Version 1.0 – User Manual
the pH values, they would first have to create a station summary table for pH, as illustrated in the
example above. Once the station summary table is created, a thematic map can be generated based on
the summary statistics by following these steps:
1.
Double-click on the Sites theme in the View Window to open the Legend Editor dialogue box.
Figure 21: Building a Thematic Map Using the Legend Editor
2.
3.
4.
5.
6.
In Legend Style, select Graduated Colour.
In Classification Field, select the desired statistic (Max, Min, Mean, Median or Standard
Deviation).
Edit the colour range using the Colour Ramp pull-down menu and edit the value range or legend
text by typing directly into these fields.
The classify button will present the user with ArcView’s classification dialogue box, allowing the
classification variables to be set.
To view the results of the thematic map click on the apply button.
Axys Environmental Consulting Ltd.
23
Aquatic Ecozone System Version 1.0 – User Manual
Figure 22: Station Thematic Map Results - pH
To undo a thematic map:
1.
2.
5.6
In the View window, double-click on the Sites theme to open the Legend Editor dialogue box
In the Legend Type pick-list, select the Single Symbol legend type and click Apply.
Summarise for Watershed Groups
The Summarise for Watershed Groups option functions the same as the Summarise for Stations
function, but utilises the Watershed Groups summary data. When Summarise for Watershed Groups is
invoked, the user is prompted to choose a parameter for analysis. All watershed groups from the
summary table containing information for this parameter will then be selected and joined to the watershed
group table. The system then creates a new table containing all records for which that parameter was
measured. The user is then prompted to enter a name for the export file and a location on the hard drive
to store it. This table can be opened in the Project window and renamed or deleted through the project
menu. If no records exist for the chosen parameter, an error message will alert the user.
Once this script has been run, the user can generate a thematic map for the selected parameter on the
watershed groups or perform other analyses on the summary table. The example below shows
Axys Environmental Consulting Ltd.
24
Aquatic Ecozone System Version 1.0 – User Manual
watershed groups coloured according to the parameter Total Iron. For directions on generating thematic
maps refer to Section 5.5. Note that the Watershed Group polygons with no associated Total Iron
samples are not displayed in the View Window.
Figure 23: Watershed Group Thematic Map Results – Total Iron
5.7
Find Stations Contained
The Find Stations Contained option identifies all sampling stations found within a given polygon feature.
This function could be used, for example, to identify all stations within selected watershed groups, within
an ecoregion or within any user-defined polygon.
Prior to invoking this option, the user must first select one or more polygons from the Watershed Groups,
Ecoregions or Ecoprovinces themes. The user can select specific polygons of interest either by manually
selecting individual polygons with ArcView’s Select Feature pointer or by selecting all the polygons within
a rectangle. Note that features can only be selected when their associated layer is active. Once the
desired polygons are selected, run the Find Stations Contained option to highlight the stations located
within the polygon(s).
Axys Environmental Consulting Ltd.
25
Aquatic Ecozone System Version 1.0 – User Manual
In the example below, the Shuswap Lake watershed group polygon has been selected and all of the
stations falling within the polygon have been queried and highlighted in yellow.
Figure 24: Stations Contained in the Shuswap Lake Watershed Group
It should be noted that ArcView has only one select colour and therefore both the selected polygon and
the stations selected by this query will both be highlighted in yellow. To view the stations after the query
make the appropriate polygonal coverage active and then select the Clear Selected Features option
from the Theme menu.
5.8
Find Stations Associated
The Find Stations Associated option provides the user with the ability to identify all the station records
that meet a specific summary statistic. First, the user performs a query of the station summary table by
using the Station Query option or the ArcView query builder. For example, the user could locate all
summary records with a mean pH greater than 7.0. Once the summary query is complete, selecting the
Find Stations Associated option will search for all station records that have corresponding values
matching those of the selected summary records.
Axys Environmental Consulting Ltd.
26
Aquatic Ecozone System Version 1.0 – User Manual
The figure below illustrates how the user would define an area of interest using a user specified rectangle.
Using this rectangle or a user defined polygon, all of the stations and measurement records within an
area can easily be determined. The feature is ideal for locating data for environmental assessment
purposes, for example, the user can define the zone of influence for a project and easily isolate a water
quality dataset specific to the project.
The example below depicts the station records for a set of selected stations. The stations (near the head
of Seymour Arm on Shuswap Lake) have been highlighted in yellow and their associated attribute records
are also highlighted in the browser window.
Figure 25: Selecting Stations Using the Select Feature Tool
Axys Environmental Consulting Ltd.
27
Aquatic Ecozone System Version 1.0 – User Manual
In addition to viewing the station records the user may also view the measurement summary for each of
the selected stations.
Figure 26: Viewing Station Attributes and Summary Data
5.9
Find Watershed Groups Associated
The Find Watershed Groups Associated option performs the same function as the Find Stations
Associated option, but is applied to Watershed Group polygons. In this case, the user would select one
or more Watershed Groups of interest and run the query to identify the associated watershed groups.
Identified watershed groups will be highlighted yellow in the View window, as will their records in the
summary tables.
5.10 Create Station Histogram
The Create Station Histogram option examines numeric values in a selected field of the station table
and creates a histogram chart indicating the distribution of the values. By default, this script uses the
parameter identified in the most recent Summarise for Stations query. Attempts to initiate this script
Axys Environmental Consulting Ltd.
28
Aquatic Ecozone System Version 1.0 – User Manual
prior to running the Summarise for Stations or selecting a field to graph from the Attributes of Sites table
will result in an error message prompting the user to identify a field.
To create a station histogram:
1.
2.
Run the Summarise for Stations query for the desired parameter (see Section 5.5).
Open the Attributes of Sites table from the Project Window.
Figure 27: Select a Statistical Field
3.
4.
5.
6.
Scroll along the table and select the statistical value (e.g., Median) to appear on the x axis, by
clicking once on the field name.
Return to the View Window by selecting "BC" in the Window pull-down menu or by clicking on the
title bar of the View window.
Select Create Station Histogram from the Aquatic Ecosystem menu.
At the prompt, enter the number of classification intervals to be used on the x-axis and press OK.
Pressing CANCEL will return the user to the View Window.
Axys Environmental Consulting Ltd.
29
Aquatic Ecozone System Version 1.0 – User Manual
Figure 28: Histogram Intervals Dialogue Box
7.
At the prompt, enter a title for the histogram and press OK. Pressing CANCEL will assign a
default title to the histogram.
Figure 29: Histogram Title Dialogue Box
A Chart window will appear displaying a histogram based on the query parameters. The system is now
able to generate a histogram “on-the-fly” for any active stations. The histogram below depicts the pH
values for selected stations in the Shuswap Lake watershed group.
Figure 30: Shuswap Lake Watershed Group pH Histogram
Axys Environmental Consulting Ltd.
30
Aquatic Ecozone System Version 1.0 – User Manual
5.11 Create Watershed Histogram
The Create Watershed Histogram option is similar to Create Station Histogram option, but is applied
to Watershed Groups information. To run the Create Watershed Histogram function:
1.
2.
3.
4.
5.
6.
7.
Run the Summarise for Watershed Group query for the desired parameter (see Section 5.5).
Open the Attributes of Watershed Groups table from the Project Window.
Scroll along the table and select a statistical value (e.g., Mean) to appear on the x axis, by
clicking once on the field name.
Return to the View Window by selecting "BC" in the Window pull-down menu or by clicking on the
title bar of the View window.
Select Create Watershed Histogram from the Aquatic Ecosystem menu.
At the prompt, enter the number of classification intervals to be used on the x-axis and press OK.
Pressing CANCEL will cancel the procedure and return the user to the View window.
At the prompt, enter a title for the histogram and press OK. Pressing CANCEL will assign a
default title to the histogram.
A Chart window will appear displaying the histogram based on the query parameters. The system can
now generate histograms, based upon the chosen parameter, for any selected watersheds. Remember
that the Watershed Group theme must be active to run this option.
Figure 31: Watershed Group pH Histogram
6
EXITING THE SYSTEM
Axys Environmental Consulting Ltd.
31
Aquatic Ecozone System Version 1.0 – User Manual
To exit the Aquatic Ecozone System, simply select Exit from the File menu. A message will appear
prompting whether the user wishes to save changes made during that session, with the options of YES,
NO or CANCEL. Selecting YES will save all changes to the Project, including thematic maps, new tables
and layouts, exactly as they appeared and in the location at the time of saving. The NO option will delete
all changes and revert to the set-up of the previous save. CANCEL will return the user to the Aquatic
Ecozone System without saving or exiting.
Axys Environmental Consulting Ltd.
32
Aquatic Ecozone System Version 1.0 – User Manual
APPENDIX A
Data Structure of Tables in the AES
Axys Environmental Consulting Ltd.
33
Aquatic Ecozone System Version 1.0 – User Manual
APPENDIX B
List of Parameters
Axys Environmental Consulting Ltd.
34