1
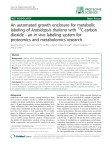
Digital Basin User Manual Contents Introduction .................................................................................................................................................. 2 General Use................................................................................................................................................... 2 View Data by Research Pillar or Geographical Location ........................................................................... 2 Basic Map Navigation................................................................................................................................ 3 Terminology .......................................................................................................................................... 3 Using the Map Tools ............................................................................................................................. 4 Using the Layers Window ............................................................................................................................. 5 Using the Table of Contents...................................................................................................................... 5 Viewing the Legend................................................................................................................................... 6 Changing the Base Map ............................................................................................................................ 6 Using the Data Window ................................................................................................................................ 8 Info Section ............................................................................................................................................... 8 Table Section ............................................................................................................................................. 8 Graph Section............................................................................................................................................ 8 Reports Section ......................................................................................................................................... 9 Interacting with the data .............................................................................................................................. 9 Interacting with the visual data ................................................................................................................ 9 Selecting individual map features ....................................................................................................... 10 Interacting with the tabular data ............................................................................................................ 10 Viewing, Searching, and exporting data ............................................................................................. 10 How to Filter by Location .................................................................................................................... 11 Using the Site Selector Tool ........................................................................................................................ 12 Introduction ............................................................................................................................................ 12 Locating the Tool..................................................................................................................................... 13 Query Criteria.......................................................................................................................................... 14 Executing the Tool................................................................................................................................... 16 1 Introduction The online Digital Basin Assets & Indicators Geospatial Portal, also referred to as the Digital Basin, is an interactive tool for users to access State of the Basin data as it is made available in real time. Users can interact with the data and pull information by economic, social, cultural and environmental indicator or by geographic corridor or community. Datasets presented in the Digital Basin can be further explored through trends analysis briefs and graphs. General Use View Data by Research Pillar or Geographical Location There are two different ways to access the Digital Basin. Under the communities tab on the navigation bar, select the community you are interested in. It will open a new page with information about that community. You can then click the “indicators” button to open up the portal. 2 Another way of accessing the portal is by selecting “Digital Basin” under the “State of the Basin” tab on the navigation bar. From there, you can select which community you are most interested in. If you want to view the data for the whole region, do not select a community and simply hover your mouse over the pillar you are most interested in. A list of the themes of datasets available will appear. Depending on your selection, the portal will open the theme you selected to the extent of the Columbia Basin, or to the community you selected. Basic Map Navigation Terminology There is mapping terminology in this document that may be unfamiliar to users. Extent: A mapping extent is the area that is currently being viewed. Layer: This portal shows many different datasets. When a dataset is turned on, it is drawn onto the map as a new layer. The datasets on the portal are also referred to as layers. 3 Scale: The scale of a map is the ratio of a distance on the map to the corresponding distance on the ground. Using the Map Tools To zoom to your geographic area of interest, click on the zoom bar and pan the map with your mouse by holding your left mouse button down. There are map tools that allow you to reset your map, go back to a previous extent, or pan. These tools are made available by selecting the “map tools” link on the top left of the map. Note that whatever tool is currently on will have a green square highlighting it. This tool will stay selected until you change it. Find Address or Coordinates Enter coordinates or an address here to zoom to that approximate location. Note that this address search uses a geocoding system which is not completely accurate, so it will only give you an approximation. Reset Map This will reset the extent of the map and turn off all layers. Zoom In/Zoom Out Selecting these tools allows you to create a rectangle which you can zoom in or out to. Previous Extent/ Next Extent The extent buttons allow you to go back and forth between various extents. 4 Using the Layers Window On the right hand side of the portal there is a “Layers” window. This window contains the table of contents, the legend, and the base-maps available. To hide this window, click the green tab on the side of the window that says “Layers”. The tab will remain visible so that you can turn the layers window back on at any time. Using the Table of Contents The Layers window automatically opens to the Table of contents. This is a list of the datasets available, organized by research pillar and theme. To choose a research pillar to explore, click on the pillar name and it will open with a list of themes available. Clicking the “+” symbol next to a theme will reveal the datasets available. Note that because the pillars are stored in an ‘accordion design’, as you select one pillar, the location of the pillars will move up or down, but are still visible and available for selection. 5 Viewing the Legend To view the legend of a selected layer, simply click the Legend tab of the layers window. This will only work if you have a layer selected. Changing the Base Map The default base map is the RDI base map, but you can select any one of eleven different base maps. Changing the base map could increase or decrease the visibility of certain layers, but can add an interesting and visually appealing aspect to the map. For example, in the images below, the ‘community forests’ layer is turned on both maps, but contrasts more with the “light grey canvas” base map, so it draws much more of a focus than it does on the RDI base map. To select a new base map, click on the “base maps” tab of the layers window, and click the directional arrows until you see a base map you want. Hover your mouse over the base map, and a yellow box will 6 appear around the image, along with the name of the base map. When this yellow box appears, you can click on the base map to turn it on. 7 Using the Data Window On the bottom of the portal, there is a “Data” window. Just like the layers window, it can be hidden by clicking the green tab on the top that says “Data”. On the left side of the data window it will list the layer which is currently selected and the location filter. At any time you can maximize the data window by clicking the symbol. The data window contains four different sections. Info Section This section contains the metadata for the dataset. It contains a description of the dataset, data source, and data information. Table Section The table section displays the tabular data of the dataset. To Export simply click the button and you will be able to download the original excel file. In this section you can filter the datset by selecting certain attributes, or adding a location filter (see “How to filter by location”) Graph Section Some datasets have graphs attached. These graphs have been produced by the RDI team of researchers. To view a graph, click ‘graph’ tab in the data window, then click the name of the graph you are interested in. The graph will then open in that window. Use the scroll bar on the right to see the whole graph, or select the symbol to enlarge the data window. 8 Reports Section Some datasets have trends analysis briefs attached. These reports have been produced by the RDI team of researchers. To view a report, select the name of the report you are interested in, and it will open as a PDF in a new tab. Interacting with the data On the portal there are two ways to interact with the datasets. You can view them visually as layers on the map, or as tables in the data window. Interacting with the visual data To view a graphic representation of the dataset you are interested in, click on the empty box next to the layer name. This will turn that layer of the map on as an overlay of the base map. If there is no box available, then the map is zoomed out at too large of an extent. Clicking the eye ( ) symbol will set the extent of the map close enough that the data will become visible. Note that you can turn on multiple layers at once. To view the legend of a selected map layer, you must click on the Legend tab in the layer window. 9 Selecting individual map features Once a layer is turned on, you can click an individual section or feature of that layer to find out more information Interacting with the tabular data To veiw the orginal data that the layer was created from, click the symbol next to the layer. This will open the table section of the data window. This window is where you can view the data, export it, search by attributes, and see graphs and reports created the the RDI researchers. Viewing, Searching, and exporting data 10 Under the table tab in the data window, you can view the orginal dataset. To Export the data, click the button and you will be able to download the original excel file. How to Filter by Location When searching for specific records in the data table, there is an option to filter results by a location. Click the checkbox by “Filter by Location” and then click the Search button. Doing so will only return records from that area in the table, but it will still display all records on the map. If you do not choose a location to filter by, the automatic filter is “map extent”, which is the current map extent. Selecting a location To filter data by a location, you must first zoom to your area of interest in the map, or select a community or sub-corridor to filter by. In the Table of Contents (TOC) tab of the layers window, select the arrow beside either “Communities” or “Trading Sub-corridors”. A list of the communities or subcorridors will open under the “Tables” tab in the data window on the bottom of the screen. The default location filter is the current map extent. To replace the default location filter with a community or subcorridor as a filter, click the left arrow symbol in the “Add Filter” column next to the location of your choosing. It will now appear on the left side of the data window under “Location Filter”. Once selected, you can apply the filter to any layer that you choose to review in the Table tab of the DATA pane. Removing a location filter 11 To remove the location filter while searching for records, click the “X” symbol on the left hand side off the data window, under “location filter” Using the Site Selector Tool Introduction The Site Selector Tool was developed in response to an Employment Lands study of the Columbia Basin Boundary Region, which included pulling together into a single database a complete inventory of Cadastral data for the region in order to assess the availability of potential income producing lands. This beta version of the Site Selector Tool searches the entire Columbia Basin Boundary Region for parcels that meet a complex query criteria, including Location Zoning (choose one of 7 major zoning types) Developed (has building or land improvements) or undeveloped Transportation (distance to major highway, transit) Services (distance to power and water) Minimum and Maximum Parcel Sizes % Grade (minimum % of area of parcel under a certain grade) 12 o Slope Classifications 0-3%, 3-10%, 10-20%, >20% Locating the Tool In the TOC, open the Cadastral Fabric folder and click the open data window. symbol next to the Parcels layer. This will The Info tab gives a brief description of the tool. Click on the Table tab to access the tool itself. Warning and Disclaimer This tool generally takes several minutes to execute. If you click on the Search button while the tool is running, it will start running again from the beginning. Many assumptions are used in executing this tool, as described in the following paragraphs. In addition, the parcel data may not be up-to-date, and thus, the user will be responsible for checking the results with the regional district or municipality. This tool does not have parcel sale information. It is the responsibility of the user to check with a local real estate agent for parcels of interest. 13 Query Criteria Location Dropdown In order to reduce the amount of time it takes to query the data, the user must select a location (required). The location corresponds to a particular parcel dataset that was obtained from the Regional Districts or a Municipality. Not all municipalities have their own GIS data, so if they are not listed in the Location dropdown, then you must select the regional district as the location, then select the municipality from the Community dropdown. The data that is searched is within that dataset only and does not cross over to other datasets. Searching for parcels for municipalities that are listed in the Location dropdown: o For example, if you want to find parcels for, say Trail, and include areas within 2 Km outside of Trail, you have to do two queries: One with Location = Trail (searches the Trail data set), then another one with Location = RDKB, Community = Trail, Within (Km) = 2. The second search locates parcels within 2 Km of Trail and excludes Trail. o Municipalities in this category are: Revelstoke Golden Valemount Sparwood Fernie Kimberley Cranbrook Radium Hot Springs Elkford Castlegar Trail Searching for parcels for municipalities that are NOT listed in the Location dropdown: o If you want to search for, say Nelson including 2Km outside of Nelson, you only need to do one search, because Nelson is included in the RDCK data set. You select Location = RDCK, Community = Nelson, Within (Km) = 2. Community Dropdown and Distance Setting This dropdown is available when you search for parcels within a Regional District. You can set a distance to search for parcels within and surrounding a community (Unless it is one of the communities listed above). Zoning If zoning data is available for the dataset, then the Zoning dropdown will be available. The zones listed are general zones. To find zoning codes associated with the general zones, you can explore the Zoning Layer on the map by clicking the box next to the Zoning layer in the TOC. Once the zones are displayed on the map, you can click on individual zones to see the zoning code. The zoning search is conducted by 14 searching for parcels that have their centroids in a particular zone. This works well for a majority of parcels, but there are exceptions, especially larger parcels that might be in multiple zones. In this case, it is hit or miss whether the parcel is selected. Min and Max Parcel Size Entering values for parcel size can be an effective way to reduce the total number of parcels to be searched for more time consuming items such as distance to services, highways, transit or calculation of % grade. Max Service Distance Existence of service data (locations of power and water services) is spotty throughout the region. It is hoped that future iterations of this tool can account for more detail as the regional district and municipalities are better able to provide this. In the meantime, several assumptions are made: Distance to water services o Assumptions are that water services are available inside municipal boundaries, water service areas, and community watersheds. While this is not always true, the user will need to validate specific search results with the regional district or municipality. Distance to power services o Assumptions are that power is available within municipalities and along major roads and highways. Again, this is a rough estimation and the results need to be verified. Developed Dropdown If “Yes” is chosen, then the tool further limits the parcels selected to those that have evidence of a building, address point, or land improvements. There are a number of datasets that do not have this type of information. In those cases, the “Developed” dropdown will not be displayed. Max Highway Distance If a value is entered here, the tool will filter the parcels to the selected distance of a major highway. Max Transit Distance If a value is entered here, the tool will filter the parcels to the selected distance of a transit system. % Grade and Area This query and calculation is performed last, as it is compute intensive and time consuming. 3 grade classes have been created for the entire region based on 30 meter elevation data. Because of the low resolution of the elevation data, this does not work well for very small parcels and should not be used. The % Area within grade calculation is also not a contiguous area. The maximum number of grade calculations that the tool will perform is 20. For example, if the rest of the query criteria results in 150 parcel selections, you might get 8 (that match grade selection) out of 20 parcels evaluated for grade. 15 The 8 parcels are returned. You will also be notified in a popup that you hit this limitation. You could run the query again without the grade calculation to get the 150 parcels. Then you can try filtering the parcels much more to limit the result to 20 or fewer. Executing the Tool Once the query criteria are selected, click on the Search button the initiate the tool execution. You will see a message that it is executing with a spinner indicating it is running. Results Once the tool completes, the parcels that meet the criteria are displayed in a table. The parcel data set that is chosen by the location tool is returned. Each dataset has its own format, so the fields displayed vary greatly. Click on the “Zoom To” icon in the table to zoom to the selected parcel. It will show up as a highlighted polygon on the map. At this point you can choose to turn on the Parcel and Zoning layers (or any other layers of interest) while exploring the results on the map. 16 17