1
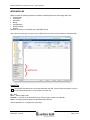
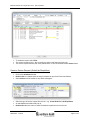
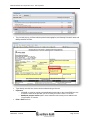
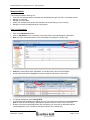
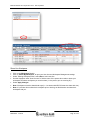
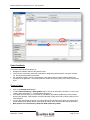
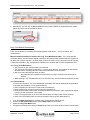
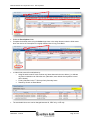
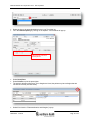
MOIS/ICCIS HOW TO: Physician/Locum – Start Up Guide
Document Quick Links:
WHAT IS MOIS? ............................................................................................................. 1
ACCESSING MOIS FROM YOUR DESKTOP ................................................................ 2
SIGNING IN THE FIRST TIME ............................................................................................. 2
FORGOT YOUR PASSWORD............................................................................................. 3
SET DEFAULT DESKTOP PROVIDER .................................................................................. 3
MOIS MODULES ............................................................................................................ 4
GENERAL TIPS................................................................................................................ 4
SCHEDULER MODULE ...................................................................................................... 5
View Your Schedule .................................................................................................. 5
Document an Encounter (Progress Notes, etc.) ........................................................ 6
Create a Service Request (Referral) ......................................................................... 7
Create a Service Request (Order/Lab Requisition) ................................................... 9
WORKSPACE MODULE................................................................................................... 11
View Your Workspace ............................................................................................. 11
Share Your Workspace ........................................................................................... 12
PATIENT CHART MODULE .............................................................................................. 13
Finding a Patient ..................................................................................................... 13
Long Term Meds & Prescriptions ............................................................................ 14
MAR (Medication Administration Record) ............................................................... 17
Health Maintenance Review (Ctrl-H) ....................................................................... 17
APPENDIX .................................................................................................................... 18
HOT KEYS .................................................................................................................... 18
CONSISTENT DATA ENTRY ............................................................................................. 20
WHERE TO GO FOR HELP............................................................................................... 22
PRINT & POST – PROVIDER START UP QUICK REFERENCE ................................ 22
The intention of this Start Up Guide is to help you as a physician, nurse practitioner, resident or
medical student get your day started quickly and easily, even if this is the first time using the
MOIS program. Only the essentials are noted here. As you become more comfortable with the
program, you may not need to reference this guide again.
WHAT IS MOIS?
•
The Medical Office Information System or more simply “MOIS”, is an Electronic Medical Record
(EMR) designed for managing data and used as a tool to provide quality patient care.
•
Key functionality of MOIS includes documentation of patient medical records, scheduling, billing,
evidence-based patient review, auditing, clinical calculators, and other reporting.
•
Northern Health carefully selected MOIS as the standard EMR to be used in their clinics.
•
Each clinic has their own “instance” of MOIS (i.e. the patient list and information in the Masset
instance differs from the patient list and information in the Valemount instance).
23Mar2015 – version2
Page 1 of 23
MOIS/ICCIS HOW TO: Physician/Locum – Start Up Guide
ACCESSING MOIS FROM YOUR DESKTOP
•
•
Locate the Citrix icon
on your desktop taskbar. (Note: You may need to expand what icons are
shown on your taskbar.)
Select MOIS from your Citrix program list.
Signing in the First Time
•
A logon screen will appear.
•
•
Your User Name will auto-populate with your Windows user name (i.e. Northern Health user name).
Enter your temporary Password, you will be prompted to change your password at this time.
23Mar2015 – version2
Page 2 of 23
MOIS/ICCIS HOW TO: Physician/Locum – Start Up Guide
•
•
Your New Password must fit the following criteria:
• Minimum 8 characters
• Contain at least one capital letter
• Contain at least one number
Select Change.
Forgot Your Password
•
•
Contact your site manager/site administrator, they can re-set your account and give you a new
temporary password.
You will be prompted to change your password the next time you sign in.
Set Default Desktop Provider
•
•
•
•
The Desktop Provider name fills into requisition forms and other areas of the program, it is important
to ensure the correct Desktop Provider is displayed when you are logged in.
If prompted on your initial sign in, select your name from the list of providers and choose “Save as
My Default”.
Note: Medical students should select the provider they are working with.
The Desktop Provider can be changed at any time by left-clicking in the “Desktop Provider” field in the
top right of the screen – a window will pop-up and you can select a new provider name from that list.
23Mar2015 – version2
Page 3 of 23
MOIS/ICCIS HOW TO: Physician/Locum – Start Up Guide
MOIS MODULES
MOIS contains the following modules to enable increased patient care and manage work flow:
• Patient Chart
• Workspace
• Scheduler
• Billing
• Administration
• Data Exchange
• Reports
Modules are shown on the bottom left of the MOIS screen.
Note: Some modules may not show on your MOIS account. Access to each module is role-dependent.
General Tips
The ellipses indicates there is a list associated with the field. Click the three-dot symbol or click in
the space beside and use F4 to prompt the selection list.
F2 – Save
Ctrl-T – Enters today’s date
Calendar – Left click on the date field and use F4 to prompt a month-view calendar.
Ctrl-H – Prompts a patient-specific Health Maintenance Review
See the appendix for a complete list of Hot Keys.
23Mar2015 – version2
Page 4 of 23
MOIS/ICCIS HOW TO: Physician/Locum – Start Up Guide
Scheduler Module
The Scheduler Module allows you to:
• View your schedule for current, past, and future appointments
• Manage patient appointments
• Track patient appointment status (Arrived, In Room, Seen, Discharged, No Show, Cancelled, or
Rebooked)
• Quickly navigate to the patient encounter detail window – where you enter your progress note
View Your Schedule
•
•
Click on the Scheduler Module.
Find your name and select Open Daybook.
•
Your daybook looks like this:
1. The view of your daybook can change – toggle between view types: Scheduler, Provider, Biller.
• The “Provider” view is shown above.
• The columns will show in a different order (and some don’t show at all) in different views.
23Mar2015 – version2
Page 5 of 23
MOIS/ICCIS HOW TO: Physician/Locum – Start Up Guide
2. Use the “Today” button to look at the schedule for the current date.
• << moves back 1 week at a time from the date shown
• < moved back 1 day at a time from the date shown
• > moves ahead 1 day at a time from the date shown
• >> moves ahead 1 week at a time from the date shown
3. Each column in the daybook has a meaning:
• HR MN = Hour Minute
• Code = Visit Code (e.g. “R” usually means it is a Regular visit)
• Mode = How the visit is carried out (e.g. Direct Encounter with the Patient)
• # = Length of the visit in blocks (1 = 5 min, 2 = 10 min, etc.)
• Chart = Chart number of the booked patient
• First Name, Last Name = Legal name of the booked patient
• Visit Reason = Why the patient is booked
• Diag 1 = Diagnostic Code associated with the visit
• Fee 1 = Fee Code associated with the visit
• AS = Arrival Status of the patient (See dropdown on above screen shot. E.g. A = Arrived)
• DS = Document Status (I for Incomplete Progress Note, C for Completed/Saved)
• TM = Number of templates used in the visit
• RP = Number of reports made from the visit (e.g. WCB)
• TK = Number of tasks attached to the visit
• MG = Number of messages attached to the visit
• BS = Billing Status (I for Incomplete, B for Billed)
• Resource = Resources needed for the visit (Site specific)
• Room = Room number for the visit
• M = A down arrow will populate if a General Note is added in the Encounter Detail window
•
= Number of attachments associated with the visit
4. Locums choose the name of the provider they are covering for from the dropdown list by “Alias”.
Document an Encounter (Progress Notes, etc.)
•
•
Double click on a patient name in today’s schedule to open their Encounter Window.
The Encounter Window looks like this:
23Mar2015 – version2
Page 6 of 23
MOIS/ICCIS HOW TO: Physician/Locum – Start Up Guide
1. The patient’s demographic information is shown on the top of the Encounter Window – always
check to ensure you are working in the correct patient’s chart.
2. Date and time of the patient’s booked visit.
3. Navigation tabs to record information from the visit:
• Progress Note(s) – free text area; templates to start notes are also available by clicking in the
blank space and pressing F4.
• Additional notes for the same visit can be added by selecting “New Note” (e.g. a patient is
seen by a student and a physician – 2 separate notes for the same encounter).
• There is a creator and author for each progress note – the creator has 7 days to edit and
the author has 28 days to edit after the note is created.
• Measurements – to enter values from the visit (e.g. BP, weight, smoking status); graphing,
calculator and templates also available
• Detail/Coding – to enter billing information
• Encounter Summary – shows a read-only view of all items associated with the visit
• Encounter Forms – access forms for chronic disease management visits, WCB, pain
management, and others
4. Important Toolbar options:
• Save – F2 is the Save quick key throughout MOIS
• Chart Views – Drop down allows you to easily navigate to a section of the current patient’s chart
• E.g. view previous Encounters, Measures, Health Conditions, Medications, etc.
• Action – Create an external service request, create tasks/messages within MOIS, print a patient
label
• Utilities – Access spell check, Health Maintenance Review
Create a Service Request (Referral)
(Note: This section will need to be edited for CDX EMR to EMR Referrals.)
•
•
•
Click on the Scheduler Module.
Double click on a patient name in today’s schedule to open their Encounter Window.
Select Action from the toolbar, a drop down will appear.
23Mar2015 – version2
Page 7 of 23
MOIS/ICCIS HOW TO: Physician/Locum – Start Up Guide
•
•
Select the type of service request from the list – e.g. Create Order for a Consultation.
An Order Detail window will pop up, fill in the information as appropriate.
•
•
To navigate to the next screen, select Print.
Here you can choose to include different aspects of the patient chart in the service request.
o Note: All tabs say (0) until you choose an item from the tab. The number will change to
reflect how many items you’ve added to your letter.
23Mar2015 – version2
Page 8 of 23
MOIS/ICCIS HOW TO: Physician/Locum – Start Up Guide
•
•
•
To create the report, select Print.
The service request is sent – this is usually via printing and faxing the final copy.
The service request remains part of the patient chart – it can be accessed via the Orders folder.
Create a Service Request (Order/Lab Requisition)
•
•
•
Click on the Scheduler Module.
Double click on a patient name in today’s schedule to open their Encounter Window.
Select Action from the toolbar, a drop down will appear.
•
•
•
Select the type of service request from the list – e.g. Create Order for Lab Requisition.
An Add Attachment window will pop up.
Double-click the form name to select the desired requisition form from the list.
23Mar2015 – version2
Page 9 of 23
MOIS/ICCIS HOW TO: Physician/Locum – Start Up Guide
•
The form will pop up, pre-filled with the patient’s demographics, the Desktop Provider’s name and
MSP practitioner number.
•
•
Type directly onto this form, boxes can be selected using a left-click.
Important:
o LOCUMS: In order for results to be distributed electronically to the correct EMR, be sure
to enter the name of the provider you are covering for in the “Locum For” section.
o Additional provider names (and in some cases the clinic name) can be added in the
“Copy Results To” section.
Print & Save the form.
•
23Mar2015 – version2
Page 10 of 23
MOIS/ICCIS HOW TO: Physician/Locum – Start Up Guide
Workspace Module
The Workspace Module allows you to:
• View and acknowledge patient results that are downloaded through CIX, CDX, or manually entered
• Manage your task list
• Manage your messages
• Share your workspace and access the workspace of the provider(s) you are covering
• Manage your favourite medications list (user specific)
View Your Workspace
•
•
•
Click on the Workspace Module.
Click on “My Basket” to see a summary of items that need to be Acknowledged or Reviewed.
Note: the name associated with the Current Workspace is displayed on the top right.
•
•
Select any of the folders under “My Basket” to view the items in the current workspace.
Details associated with the highlighted results are shown at the bottom of the screen.
•
•
To change workspaces, select Change W/S.
A prompt listing the available workspaces pops up, click on the correct name and choose Selected
User to switch to their workspace. (Workspaces must be shared in order to show on this list.)
Results can now be acknowledged from their workspace (your username is associated with the
acknowledgement, even if results are checked in another user’s workspace).
•
23Mar2015 – version2
Page 11 of 23
MOIS/ICCIS HOW TO: Physician/Locum – Start Up Guide
Share Your Workspace
•
•
•
•
•
•
•
Click on the Workspace Module.
Click on “Share My Workspace” to open your User Account Workspace Management settings.
Under “Sharing Workspace With”, select New to add a new line.
Use the dropdown under “User Account” to find the name of the person who needs to share your
workspace OR whose workspace you need to share (i.e. the person you are covering for).
Select Apply Changes.
Note: Workspaces must be shared both ways (i.e. Joe shares with Bill, Bill must also share with Joe).
Note: If a provider did not share their workspace prior to leaving, an administrator can share their
workspace with you.
23Mar2015 – version2
Page 12 of 23
MOIS/ICCIS HOW TO: Physician/Locum – Start Up Guide
Patient Chart Module
The Patient Chart Module allows you to:
• Navigate the different folders of the patient’s chart
• View previous encounters, lab results, medications, diagnoses, patient-specific care plan, consults,
etc. and add to these folders as needed.
• For examples of what is found in each section of the patient chart, see the Consistent Data Entry
document in the appendix – a Provider Reference version should be posted in the exam rooms in the
clinic.
Finding a Patient
•
•
•
•
•
Click on the Patient Chart Module.
In either Patient Summary or Demographic folder, click on the ellipses by “Chart No” or click in any
“Name” space and press F4 – a master patient list pops up.
In the white search boxes, you can search by Last Name, First Name, Middle Name, Date of Birth,
Home Phone Number, Chart Number, Insurance Number (PHN), short note or Chart Location to find
exact matches.
You can also type directly in the list (e.g. typing “Mouse,M” and hitting enter takes you to the area of
master patient list by Mickey Mouse. It will show all names above and below the search characters.)
Best practice is to search first by PHN, then DOB, followed by Name.
23Mar2015 – version2
Page 13 of 23
MOIS/ICCIS HOW TO: Physician/Locum – Start Up Guide
•
Alternatively, you can click on Go To Chart from any module in MOIS. It prompts the same master
patient list, which can be searched as above.
Long Term Meds & Prescriptions
There are two folders for recording and managing patient medications – “Long Term Meds” and
“Prescriptions”.
Most medications should be entered in the Long Term Medications folder. It is a “best possible
medication history” that documents regular medications and natural health products that are expected to
be taken over a mid to long term. In some cases, it should be used even for, what some would consider
a short term medication - e.g. a prescription for antibiotics to be taken with a COPD exacerbation plan.
About Long Term Medications:
• They will print on the clinical summary and referrals.
• The list has the “Reviewed” functionality. (i.e. users check “Review”; this updates the date beside
the folder name, indicating when the most recent medication review occurred.)
• Both current and discontinued items are listed.
o End dates should be added for items that are no longer required; items should not be
deleted.
• When entering Long Term Medications for the first time, they must be renewed first before printing.
About Prescriptions:
• Record any short term, one-time, trial/sample medications and natural health products prescribed.
• Includes documentation of every product ordered.
• Items prescribed as a short term or trial will be recorded here.
• Items renewed from long term meds will also be recorded here.
• Medications recorded in this folder can be duplicated but not renewed. (note: duplicated is copied
exactly to a new line with the current date)
• Items in Prescriptions will not be sent with referral letters nor listed on the clinical summary.
• Items in the Prescription folder can easily be added to the Long Term Medication list.
•
•
•
•
From the Patient Chart Module, navigate to the correct patient chart as above.
Or from the Encounter Note window, select Chart View from the toolbar.
Select the Long Term Meds folder.
Complete the desired action using the Action drop-down or the action buttons under the folder name.
23Mar2015 – version2
Page 14 of 23
MOIS/ICCIS HOW TO: Physician/Locum – Start Up Guide
•
•
Select the Prescriptions folder.
Complete the desired action using the Action drop-down or the action buttons under the folder name.
Note: the choices in Prescriptions are slightly different than in Long Term Meds.
•
In either folder, search for medications by:
• Using the white “search” boxes to show only items that match the text, add an (*) to indicate
any letter combination can follow the text. (Otherwise, items with the text anywhere in word
will be shown.)
• Put any character in the “F” field to pull only formulary items.
• Search by Generic or Brand Name.
•
The searchable list source can be changed between All, CDIC only, or NP only.
23Mar2015 – version2
Page 15 of 23
MOIS/ICCIS HOW TO: Physician/Locum – Start Up Guide
•
•
Select the item to be prescribed/added to the Long Term Med list.
Fill in the Dose/Frequency by clicking on the ellipses. A new window will pop up.
This part only shows in
Prescriptions.
•
•
•
Select Save/Close.
Select Print Rx to print the prescription.
The patient’s allergies will pop-up. (If no allergies are listed, the patient may have allergies that are
not entered correctly into their chart.)
•
Select X to close the “Pharmacokinetics and Allergies” pop-up.
23Mar2015 – version2
Page 16 of 23
MOIS/ICCIS HOW TO: Physician/Locum – Start Up Guide
•
Select the items to include.
•
“Drug Interaction Results” will pop-up, if applicable.
•
•
Select Print Anyway to print the prescription or Cancel Print to change your selection.
Or if no interactions, simply select Print (F2) to print the prescription.
MAR (Medication Administration Record)
Information regarding this folder will be added when it is available.
Health Maintenance Review (Ctrl-H)
The Health Maintenance Review, commonly referred to as the “Ctrl-H”, is patient, age, sex, and conditionspecific summary, as of the details in their chart at that moment. Common measures and interventions
are shown along with their most recent date/value, the normal range (if applicable), and the patientspecific goals for each measure (if applicable and added to their Care Plan).
23Mar2015 – version2
Page 17 of 23
MOIS/ICCIS HOW TO: Physician/Locum – Start Up Guide
The Ctrl-H looks like this:
•
•
•
From anywhere in the Patient Chart Module
Hold the Ctrl key and type H, the Health Maintenance Review for the open patient chart will pop-up.
The Health Maintenance Review can also be accessed from most folders by going to Utilities and
selecting Health Maintenance Review from the drop-down.
APPENDIX
Hot Keys
Hot Keys are shortcut keys either to navigate to areas of the chart or to quickly complete a task.
The full list is given below. Please note that some hot keys might change depending on what module is
active.
The most up-to-date copies will state August 2014 on the bottom left.
23Mar2015 – version2
Page 18 of 23
MOIS/ICCIS HOW TO: Physician/Locum – Start Up Guide
23Mar2015 – version2
Page 19 of 23
MOIS/ICCIS HOW TO: Physician/Locum – Start Up Guide
Consistent Data Entry
The Consistent Data Entry Guidelines for data entry help to ensure that information is entered into the
correct location in the electronic system so that those using the system can quickly and easily find the
correct information when it is needed. Being able to rely on an electronic medical record for accurate data
means better, safer patient care – a goal that is always at the forefront of our work. Copies of this
document should be posted in the clinic you are working in for easy reference.
These guidelines include the most up-to-date placement for CDX documents, as well as CIX and
Excelleris results that are downloaded directly into the patient chart. These interfaces rely on accurate
patient data to ensure information is matched to the correct patient chart.
The most up-to-date copies will state Version2 on the bottom left.
23Mar2015 – version2
Page 20 of 23
MOIS/ICCIS HOW TO: Physician/Locum – Start Up Guide
23Mar2015 – version2
Page 21 of 23
MOIS/ICCIS HOW TO: Physician/Locum – Start Up Guide
Where to go for Help
•
From any Module in MOIS, select Help from the toolbar. Find the User Manual here.
•
Online, the site on OurNH is currently being updated. NH-specific documentation will be found here.
• Information regarding this website will be added when it is available.
•
For technical issues, contact ITS Service Desk
• by email: [email protected]
• by phone: 1-888-558-4357
PRINT & POST – PROVIDER START UP QUICK REFERENCE
The following reference sheet is a quick reminder for the main items mentioned in this manual. Print &
Post as needed.
23Mar2015 – version2
Page 22 of 23
MOIS/ICCIS HOW TO: Physician/Locum – Start Up Guide
PROVIDER START UP QUICK REFERENCE
General Tips
Accounts
For:
Physician (new or locum), Nurse Practitioner, Resident, Medical Student
Northern Health
Username: jsmith
Password: xxxxxxxx
MOIS
Username: jsmith
Password: aaaaaaaa
Note: Usernames should match, your password for MOIS does not correspond to your NH password (i.e.
updating your NH password does not change your MOIS password and vice versa)
The ellipses indicates there is a list associated with the field. Click the three-dot symbol or
click in the space beside and use F4 to prompt the selection list.
F2 – Save
Ctrl-T – Enters today’s date
Calendar – Left click on the date field and use F4 to prompt a month-view calendar.
Ctrl-H – Prompts a patient-specific Health Maintenance Review
A number below the paperclip indicates there is an attachment. Double-click to view it.
Scheduler
Scheduler – View patients booked for the day.
Enter a Progress Note – Double-click the patient’s name to open the Encounter Window & type
a progress note.
Create a Service Request (Consult/Referral/Lab or X-ray Requisition) – Open the Encounter
Window, select “Action” from the Toolbar, select “Create Order for…”.
View a patient’s previous encounters – Open the Encounter Window, select “Chart Views”
from the Toolbar, select “Encounters” or other chart area.
Workspace
Patient Chart
Create a Prescription – Open the Encounter Window, select “Chart Views” from the Toolbar,
select “Prescriptions” or “Long Term Meds”.
Find a Patient – In Demographics, choose the ellipses beside “Chart No”, or click in the name
space and press F4 – always search using PHN, Date of Birth, Name. Do not add a new patient
MOIS without first searching by each of these fields.
Or
Select “Go To Chart” on the bottom left corner from any screen.
Navigate the Patient Chart – Select the appropriate folder name in the menu on the left of the
screen.
Workspace – View and acknowledge patient results (labs, consults, etc.); manage tasks and
messages. Note: The user’s “Current Workspace” is shown on the right above the toolbar.
Change Workspaces – Select the Measures folder under “My Basket”, select “Change W/S”
from the Toolbar, click on the correct name from the pop-up and choose “Selected User” to view
their workspace.
My Workspace – Go back to your own workspace by selecting “Change W/S” from the Toolbar,
then choosing “My Workspace”.
23Mar2015 – version2
Page 23 of 23