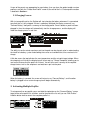
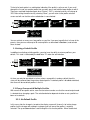
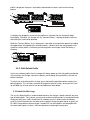
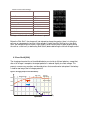
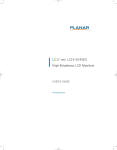
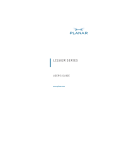
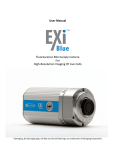
1
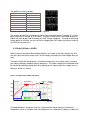
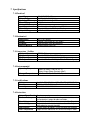
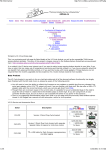
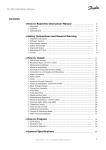
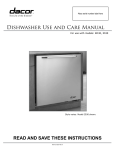
Cycle Satiator User Manual - Preliminary
Congratulations on the purchase of this Cycle Satiator universal charger, for use with all kinds of
24-48V nominal battery packs. We hope that this one device serves you and your batteries for
years to come.
1. Basic Overview
The Satiator was designed with a narrow and compact form factor so that it could be used either
as a portable stand-alone charger, or mounted to the frame of your bike/vehicle as an onboard
charger. It has an AC input power port on the side, (100-240V AC), a DC output cable to
connect the charger to the battery, a graphical display screen for showing the current charging
status, and a pair of buttons to navigate the charger menu.
Mounting
Flange
AC Input Jack
DC
Output
Display Screen
Up/Down Buttons
(Hold to Select)
While most battery chargers are limited to charging one specific battery type and voltage, the
Satiator is programmable so that you can choose between a number of battery charge
behaviours. You could use it to charge a 24V lead acid pack one day, and a 48V lithium ebike
battery the next.
This adjustability is extremely useful. It means a separate charger is no longer needed for each
of your batteries, and when you upgrade to a new pack, the Satiator can be configured to match
even if the voltage and chemistry are different. It also allows you to select between rapid charge
rates for top-up convenience and conservative overnight charging to maximize battery life.
However, the ability to charge multiple battery types with the same charger also introduces the
risk of selecting an incorrect profile when charging your battery. For that reason we recommend
caution before enabling multiple charge profiles on the device. In the safest and default
configuration, you only have the charger set up with one profile suitable to your primary battery.
2. Getting Started
The Satiator does not have an ON/OFF switch, so it will turn on whenever there is power
present on the AC input port. The 3-pin IEC connector is the familiar standard for personal
computers, and if the included cable does not match your country's outlet standard then there
should be no problem finding one locally. Just be sure to use a grounded 3-pin outlet.
2.1.Setting up your First Profile
The Satiator is supplied out of the box without any profiles active. Before you can use it to
charge a battery, you will need to select an output appropriate for your pack. Once powered on,
the display will say "no profiles active" after briefly showing a splash screen.
Pressing the up or down button will let you scroll through a number of preset profiles. When you
see the profile for your battery, press and hold either button to select it. A screen will ask you to
confirm the selection.
The preset profiles are shown in the table below and cover the majority of lithium and lead acid
batteries encountered in ebike applications
Title:
Subtitle:
Bulk Amps:
Full Volts:
36V Lithium
Fast Charge
8.0 A
42.0 V
36V Lithium
Stnd Charge
4.0 A
42.0 V
36V Lithium
80% Charge
4.0 A
40.5 V
36V LiFePO4
Fast Charge
8.0 A
43.2 V
36V LiFePO4
Stnd Charge
4.0 A
43.2 V
Title:
Subtitle:
Bulk Amps:
Full Volts:
48V Lithium
Fast Charge
48V Lithium
Stnd Charge
48V Lithium
80% Charge
48V LiFePO4
Fast Charge
48V LiFePO4
Stnd Charge
7.0 A
54.5 V
4.0 A
54.5 V
4.0 A
52.6 V
7.0 A
57.6 V
4.0 A
57.6 V
Title:
Subtitle:
Bulk Amps:
Full Volts:
Float Volts
24V SLA
Fast Charge
36V SLA
Stnd Charge
48V SLA
Stnd Charge
8.0 A
28.8
27.0
4.0 A
43.2
40.5
4.0 A
57.6
54.0
If none of the presets are appropriate for your battery, then you have the option to add a custom
profile as well with the "Create New Profile" screen at the end of the list. Custom profile creation
is detailed in Section 4.
2.2.Charging Process
With just one profile active, the Satiator will start charging the battery whenever it is connected
to a pack that isn't fully charged. If there is no battery attached, the display screen will say
"Connect Battery" along with a summary of the charge profile. Once it detects a pack has been
plugged in, then the charger will automatically start the charge process, and the display will
show the charging status in real time.
The ability to see the actual amp-hours put into the pack can be of great value in understanding
the health of a battery system and allowing the user to rest confident that it has received a full
charge.
A title bar across the top indicates the case temperature and the set point target voltage. When
the charging has finished, the display bar will invert and say "Charge Complete" allowing you to
see from a distance that the pack has finished. You will also see a summary of the required
charge time as well as the amp-hours and watt-hours put into the pack.
When the battery is removed, the screen will return to say "Connect Battery", and if another
battery is plugged in then a new charge cycle will begin automatically.
3. Activating Multiple Profiles
To setup more than one profile, press and hold the top button on the "Connect Battery" screen
to get to the active profile list, and then scroll to the end of the list until you see "Edit Profiles".
Hold the button here to access the complete profile list.
To the left of each option is a radio button indicating if the profile is active or not. If you scroll
through the list and see another profile that you want, press and hold the lower button to edit it.
Then press and hold the button again when "Active? - NO" is selected, and this will change to
YES. After exiting the edit menu by selecting "Done", you will return to the profile selection
screen and will see that the active radio button is now checked.
You can activate as many or as few profiles as you like. If you want a profile that isn't one of the
presets, then you can create up to 20 custom profiles as described in Section 4, and activate
those instead.
3.1.Setting a Default Profile
In addition to activating or hiding profiles, you also have the ability to set one profile as your
default. This state is indicated by the bold letter "D" under the active button.
As there can only be one default at a time, when a new profile is made as default then this
status will be removed from the previous default profile. If a default profile is disabled or deleted,
then there will be no default profiles in the list.
3.2.Charge Process with Multiple Profiles
With more than one profile active, care must be taken to make sure that the correct output mode
is selected when charging a pack. The selection behavior depends whether or not a profile has
been set as default:
3.2.1. No Default Profile
In this case, after the charger is turned on the display screen will show a list of active charge
profiles, but the charger will not begin a charge cycle until one of the profiles is explicitly
selected. The up and down buttons scroll through the list of active profiles. When the desired
profile is displayed, then press and hold the lower button to select it and start the charge
process.
If a battery was plugged in at the time the profile was selected, then the charge will begin
immediately. Otherwise, the charger will say "Connect Battery", showing the profile summary
and waiting for a pack to be detected.
When the "Connect Battery" text is displayed, it is possible to change active profiles by holding
the upper button and repeating the selection process. However once the charge process has
started, the active profile is fixed and you cannot go back and change it while the battery is
charging.
3.2.2. With Default Profile
If you have a default profile, then the charger will always power on with that profile preselected.
You can plug in the charger, connect the battery, and charging will automatically start with no
button interaction.
To select one of the other profiles instead, press and hold the top button before a battery has
been plugged in. This will return you back to the profile selection screen, where you can scroll
up and down the list and select a new one by holding the lower button.
3.3.Default Profile Usage
The use of a default profile is recommended whenever the charger is being used with only one
type of battery pack. For instance, you may want a default which provides a standard overnight
charge that only gives a 80% charge level at a modest current in order to maximize battery
cycle life, but on occasion you may want to do a rapid 8A charge for quick top-up, or give it the
full 100% charge when maximum range is needed. All 3 of these profiles are compatible with
the same battery pack, so there is little consequence to choosing the wrong one.
If you routinely switch between non-compatible batteries (different voltages or chemistries), then
you should not use the default profile feature. That way you will always need to explicitly select
the correct output for the battery being charged.
4. Creating Custom Profiles
If you want an output not available in the preset profiles, then you can setup your own custom
charger output with the "Create New Profile" screen at the end of the profile list.
You will then select between one of three basic classes of chemistry and associated charge
algorithms.
4.1.Lithium
The lithium battery has a straightforward charge strategy. The battery is bulk charged at a
constant current until the full charge voltage is reached. At that point, the charger maintains the
full voltage while the charging current naturally decreases in an exponential decay. Once the
current gets close to zero amps, the battery is full and the charger says Charge Complete.
If the lithium battery is deeply discharged but not so deep as to cause permanent cell damage
(typically between 1.8-2.6 V/cell), then it is advisable to start the charging process at a low
trickle current until a safe voltage is reached, and only then switch to the full bulk charge
current. If the battery is deeply discharged to a point where any individual cell is dangerously
low (typically less than 1.5-2.0V/cell), then a recharge should not be attempted. The low cells
may appear to recover, but can exhibit reduced capacity, internal leakage currents, high
impedance, and a propensity to catch fire.
Figure 1: Charging Graph of Lithium Pack
Trickle
40V
Bulk Charge
Full Voltage Charge
Complete
30V
20V
10V
Trickle
Start A
Time (Hrs)
When setting up a custom Lithium profile, you are required to set the Full Voltage and Bulk
Charge current on the first screen. The 2nd and 3rd screens contain advanced parameters that
will be populated to sensible default values, but can be tweaked if desired:
Lithium Custom Profile Settings
Basic Parameters:
Bulk Amps
Full Volts
Range
0.2-8.0A*
12-60V
Advanced Parameters:
Min StrtV
Start Amps
Bulk StrtV
Complete A
Default
50% of FullV
0.2 A
70% of FullV
0.15 A
*Charger will limit to 8A or 360W, whichever is greater
Below the "Min StrtV", the charger will not attempt to charge the pack as there is risk that the
cells are at a dangerously low level. If the voltage is higher than Min StrtV but less than Bulk
StrtV, the charger will put a smaller "Start Amps" current into the pack in order to gently bring
the cells to a safe level (as defined by Bulk StartV) before delivering the full bulk charge current.
4.2.Lead Acid (SLA)
The charging characteristics of Lead Acid batteries are similar to Lithium batteries, except that
after a full charge is complete, the output potential is reduced slightly to a float voltage. This
prevents unnecessary reactions and electrolyte loss that can otherwise take place if the battery
is held for too long at the full charge potential.
Figure 2: Charging Graph of Lead Acid Battery
40V
Bulk Charge
Full Volts
Charge
Complete
Float Voltage
30V
20V
10V
Complete A
<FullV Max t
Time (Hrs)
The profile are setup as follows.
Basic:
Bulk Amps
Full Volts
Range
0.2-8.0A*
12-60V
Advanced:
Min Start V
Float Volts
Comlete A
FullV MaxT
Default
6V
94% of FullV
0.15A
4 hrs
*Charger will limit to 8A or 360W, whichever is greater
The charger will hold the full voltage until either the current drops below "Complete A", or it has
been held at the full voltage for "FullV MaxT". At either of these events, the charger output will
drop to the float voltage, and the display will show "Charge Complete". To setup an equalizing
charge profile for instance, you can set the full voltage about 10% higher than normal, and limit
the FullV time to about 2hrs.
4.3.Nickel (NiCad or NiMH)
Nickel Cadmium and Nickel Metal Hydride batteries are unique in that their voltage rises and
then falls again during the charge cycle, so the strategy of charging to a fixed voltage does not
work.
Toward the end of the charge process, the battery temperature rises rapidly, and as the pack
gets hotter the battery voltage eventually decreases. The end of charge can be detected either
by monitoring the battery temperature or by looking for the moment when the voltage starts to
decrease, known as -DeltaV.
Figure 3: Charging Graph of NiMH / NiCad Pack
40V
Start A
-DeltaV
Bulk Charge
Charge
Complete
30V
20V
dT
10V
dt
Topping
Charge
Time (Hrs)
Charging based on a temperature sensor is preferred and should always be used when a
temperature sensor is available. After the temperature rise is detected, the battery is about 95%
charged and the current is greatly reduced while charging is continued for a short amount of
time to reach 100% charged status. This is known as the topping charge. If charging at full
current is carried on to the –DeltaV point, then the pack has already been somewhat
overcharged and there isn't as much need for this additional topping current.
The custom parameters for NiMH/NiCad packs are quite different than for the other chemistries.
In the basic setup, the nominal rather than the full charge voltage is specified, and is mostly
used for pre-populating the advanced parameters and generating the profile name. You can in
general use the same NiMH/NiCad profile for several different battery voltages.
NiMH / NiCad Custom Profile Parameters
NiMH
Basic:
Bulk Amps
Nom. Volts
Thermistor
Range
1.0-8.0A
12-48V
Yes / No
Advanced:
Start Amps
Bulk StrtV
DeltaV
Max T*
dT/dt*
TopUp Amps
TopUp Time
Max V
Default
0.5 A
80% of Nom. Volts
-0.2V
50oC
1 deg / min
0.5 A
1.0 hr
1.4*Nominal V
*only present if "Thrmstr" temperature sensor selected
After any of the charge termination methods are detected, then the charger output current
reduces to "TopUp Amps" for the fixed duration of "TopUp Time" in order to bring the pack to a
100% full charge.
Because the end of charge indicators (Temperature Rise and Voltage Drop) are not pronounced
at low charge currents, we recommend a bulk charge current of at least 1/4 the battery capacity.
So a 12Ah battery should have at least a 3A bulk charging current.
The NiMH/NiCad profile does not run a continuous trickle current into the pack after charge is
complete. This technique was common with NiCad batteries to counteract self-discharge and
keep the battery 100% topped up, but with NiMH a continuous trickle for a long length of time
will damage the cells. If you want a pack to be fully topped up prior to usage, then you should
time your charging so that the charge will finish shortly before you will need the battery.
5. Additional Features and Details
5.1.Force Start
In some situations, you may have a battery attached to the charger but the charger still says
"Connect Battery". For instance, this can happen if the battery has been drained so low that the
battery management system's (BMS's) protection circuit has shut off and disabled the battery
output. If there is no voltage on the battery terminals, the charger will be unaware that a pack
has been plugged in.
In this situation, pressing and holding the lower button will force the charger output to go high for
a few seconds in order to begin a charge process. If it detects current flowing into the battery
with a voltage higher than "MinStart V", the normal charge process will begin.
5.2.Cell Balancing
With lithium packs, it can happen that the battery stops charging abruptly because the BMS
circuitry has tripped from a cell overvoltage fault. If the battery's management circuit does cell
balancing, then this high voltage cell will be bled down to a release voltage and then the
charging will resume again. This process can sometimes repeat many times, especially if the
pack was largely unbalanced. Even though the charger says "Charge Complete", it will still
resume the top up charges as the BMS circuitry allows so that the pack can fully balance out.
5.3.Thermal Rollback
The Cycle Satiator operates with much higher efficiency than standard ebike chargers (94-95%
versus 80-85%). But it also packs twice the power output into a smaller package and eliminates
active fan cooling, so the casing will still get quite warm during use. At full output power in a
room temperature environment, it will typically reach about 58 degrees Celsius. This will feel hot
to the touch but is not a cause for concern.
We recommend placing the charger in a location where it is exposed to free air in order to help
dissipate this heat. If the charger is in an enclosed space (like a pannier bag), or is used in a hot
environment and starts to overheat, then it will automatically scale back the output power so that
the casing does not get beyond 60 Celsius. This will not affect its ability to complete a charge
cycle, but it will take longer as charging current will be reduced.
5.4.Exposure to Rain
The Cycle Satiator has an IP65 rated sealed enclosure and can handle rain, road spay, and
other incidental water exposure when it is not powered up. However, when you have it plugged
in and are charging the battery it is important to be in a dry environment outside the rain. The
input and battery connectors are not waterproof and there is risk of both corrosion and electric
shock if they are powered live when there is water around.
5.5.Orientation and Vent
In general, the Cycle Satiator is easiest to operate when right side up, but it will run and function
fine in any orientation. The only caveat is that the membrane vent on the input end of the
charger should not be covered in water, so if it is mounted vertically care should be taken that it
is not done in such a way that water pools around this vent area.
5.6.Thermistor
The 3rd pin of the XLR charge plug can be used in conjunction with a
thermistor for sensing pack temperature. This is recommended with NiMH
and NiCad batteries. The charger expects a thermistor with 10kOhm
resistance at room temperature, and a Beta constant between 3800-4000.
This thermistor spec is common in industry with nickel based packs.
5.7.Upgrading Firmware
The firmware and stock profile list on the Satiator can both be updated via an optional USB
adapter plug that connects to the charge port and a computer. Details on re-flashing the
firmware are available with the USB communication cable.
6. FCC Notice
This charger has been tested and found to comply with Part 15 of the FCC rules, which governs
the emission limits for a Class B digital device. These limits offer reasonable but not
guaranteed protection against electrical interference between your charger and TV’s, radios,
and other radio-frequency communication devices. If electrical interference is still detected,
which can be confirmed by turning the charger off and on, possible corrective actions include:
•
•
•
•
Reorienting or relocating the receiving antenna of your device
Increasing the separate distance between the charger and receiver
Connecting the charger into a different AC outlet circuit as the receiver
Consulting a dealer or radio/TV technician for help
7. Specifications
7.1.Electrical
Input Range
Output Range
Operating Efficiency
Power Factor
No Load AC Power
Input/Output Isolation
Grounding
Output Leakage
100-240VAC 50-60Hz
24-60V, 0-8A, 0-360 Watts
95% @ 230V, 94% @ 120V
>99%
<1 Watt
Reinforced Insulation, Tested to 3.75 kV
Grounded Chassis, DC Output Floating
<100uA at 60V (>600 kΩ Impedance)
7.2.Mechanical
Dimensions
Weight
IP Rating
Chassis Material
237 x 78 x 48 mm
1.06 kg (1.33 kg with AC-DC cords)
IP40 charging, IP65 non-operating
Powdercoated Aluminum
7.3.Connectors / Cables
AC Input Connector
AC Input Cable
DC Output Connector
DC Output Cable
IEC320-C14
2m with IEC320-C13 / NEMA-15 plugs
IP67 10A MULTICOMP/SINGATRON 2CT3002-W03400
1m with 3-Pin Neutrik XLR, (1=DC+, 2=DC-, 3=Signal)
7.4.Environmental
Operating Temperature
Storage Temperature
-30⁰C to +50⁰C (-22⁰F to 122゚F)
(Note: Output Power Derated >30⁰C)
-40⁰C to +60⁰C (-40⁰F to 140⁰F)
7.5.Certifications
Safety
Emissions
Immunity
UL 1012, CSA C22.2 No. 107.2, CE / IEC 60335-1/2-29
FCC Part 15 B, EN55014, EN 61000-3-2, EN 61000-3-3
EN 61000-4-2/-3/-4/-5/-6/-11
7.6.Protection
Output Short Circuit
Reverse Battery
Over-Voltage
Under-Voltage
Over-Current
Over-Temperature
Requires manual power reset
Output disabled when reverse voltage detected. Internal
fuse protection if output disable overridden
Output disabled if battery voltage exceeds Max Setpoint
Output disabled if battery voltage less than Min Setpoint
(with option for manual override)
Charger output disabled if current exceeds Max Setpoint
Output current reduced to limit enclosure temp to <60⁰C