Transcript
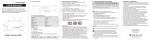
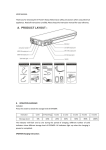
PLUS
USER MANUAL
Thank you for choosing the mPower Jump Plus! Always
follow basic safety precautions when using electrical
appliances. Read all instructions carefully, Please keep
this instruction manual for easy reference
A. PRODUCT LAYOUT
B. OPERATION GUIDANCE
Indicator
Press the switch to check the storage level of mPower Jump Plus
Indicator
Unlit
5 Flashing
1 solid
2 solid
3 solid
4 solid
Clamps
5 solid
Storage level
All indicator lights go off when the charging is paused or completed.
mPower Jump Plus Charging Instruction
1. Plug the home adaptor into the wall outlet.
2. Connect 14V 1A input port of mPower Jump Plus to the other
end of home adaptor.
Or
1. Plug the car adaptor into the socket of cigarette lighter.
2. Connect 14V 1A input port of mPower Jump Plus to the other
end of car adaptor.
Charging Cell Phone or Tablet Instruction:
1. Plug the switch cable B to USB 5V 2A output port.
2. Select appropriate connector and connect it to your mobile
phones or tablet.
3. Press the switch button to charge.
4.If doesn’t work, please try another USB Output port.
For power supply to 12V vehicle products or 12V
electronics
1. Plug the optional switch cable to 12V 10A output port.
2. Connect the optional switch cable and 12V vehicle product
or 12V electronics.
3. Press the switch button to power supply.
Q. How many times can this appliance charge my cell phone?
A. It depends on the battery capacity of your cell phone. (Ex: iPhone4 will fully
charge 14 times)
LED flash light
.Press the switch 3 seconds to start the LED flash light
The 4 modes of LED light appear in order (normal, strobe,
SOS, off) if you press slightly.
Q. How long will this appliance take to fully charge my notebook?
A. 4-6 hours
C. PARTS LIST
Q. What's the lifetime of mPower Jump Plus?
A. Usually 3-5 years under normal operating conditions.
Parts Name
Quantity
Parts Name
Host
Home adaptor
Switch cable A
Car adaptor
Switch cable B
Jumper cable with clamps
N
User Manual
connector
D. TECHNICAL SPECIFICATIONS
Size
Weight: 1.35 lb
Battery Capacity
Output: 5V/1A, 5V/2A, 12V/10A, 19V/3.5A
1. Make sure that the number of indicators is not less than 3.
2. Plug the cord or jumper cable into the jump start socket. (See #1)
3. Connect the RED clamp to the vehicle’s battery positive (+) terminal
and connect the BLACK clamp to the vehicle’s battery negative (-)
terminal. (See #2)
4. Check the Jumper Cable Indicator:
a. If the indicator light is on (See #2), go to Step 5.
b. If the indicator doesn’t light up, check the clamp connection to the
terminals. (See #3) If properly connected and indicator light is still not on
(See #4), press the “TEST” switch and go on to Step 5.
Only for charging/power supply to 19V Notebook
1. Plug the switch cable A to USB 19V 3.5A output port.
2. Select appropriate connector for your Notebook and connect
it to the switch cable A and your Notebook.
3. Press the switch button to charge/power supply.
Input: 14V/1A
Full charging time
Starting current
Peak current
Operating temperature
E. FAQ
Q. How long will this appliance take to fully charge my cell phone?
A. Approx. 1 hour
Q. If the Jump Plus is fully charged, how many times can I jump start a vehicle?
A. Approx. 40 times.
Quantity
Q. How long does the battery last after fully charged?
A. 6-12 months, however, we suggest to recharge it every 3 months.
Q. If the Jump Plus is fully charged, how long will the battery last to jump start a vehicle?
A. 6-12 months
Finding
Cause
Low voltage protection of
mPower Jump Plus is started.
mPower Jump Plus is
a bit hot when
charging a
Notebook.
The charging current is a bit
high (3.5A)
The mPower Jump Plus can be damaged and void the warranty.
!
F. TROUBLE SHOOTING:
No response when
pressing the switch
button.
H. Warning:
1. Always make sure the blue plug of the jumper cable is connected to
the jump start socket tightly on the mPower Jump Plus before jump
starting the vehicle. Otherwise, it will affect the results, even
causing the blue plug to melt.
2. Always check if the jumper clamps are well connected, check if
the vehicle battery connector is rusted or dirty, clean it before
jump starting the vehicle. DO NOT jump start again after 3 attempts.
Otherwise, it will damage the host and void the warranty.
3. DO NOT connect the two clamps. Otherwise, it may be
dangerous!
4. DO NOT disassemble the host. Otherwise, it may be dangerous!
Remedies
G. TOXIC AND HARMFUL SUBSTANCES:
Composition
and amount
of toxic
and harmful
substances
in mPower
Composition
and amount
of toxic
and harmful
substances
in mPower
Jump Jump
Plus Plus
Do not allow the appliance to become wet
Do not immerse the appliance in water
Do not operate the appliance in explosive atmospheres, such as in the
presence of flammable liquids, gases or dust
Do not modify or disassemble mPower Jump Plus. Only a repair
technician may repair this unit
Do not expose the appliance to heat
Do not store in locations where the temperature may exceed 158°F
!
!
Charge only at ambient temperatures between -4 ° F and 140° F
!
At the end of their useful life, discard the appliance with due care for our
Q. How to turn off this appliance?
A. This appliance will power off automatically when there is no load.
Charge only using the charger provided with the appliance
Under extreme conditions, battery leakage may occur. Carefully wipe the
liquid off using a cloth and avoid skin contact when you notice liquid on
the batteries. In case of skin or eye contact, rinse immediately with clean
Indicate all homogeneous materials' hazardous substances content are below the MCV limit specified
Q. How long will it take to fully charge the mPower Jump Plus?
A. Approx. 8 hours through the 14V/1 A input.
This appliance is not intended for use by young or infirm persons without
Do not use as a toy
Remove the battery of your
Notebook and use this
appliance to supply power
directly, or disconnect mPower
Jump Plus from your Notebook
and connect them again when it
cools down.
in the Standard 2002/95/EC(RoHs).
2.The warranty is only valid upon presentation of the original receipt (from
dealer/retailer) by the original purchaser with the product to be repaired or
replaced
3.The warranty is void if the serial number, date of purchase and label has
been removed
4.The warranty does not cover damage or product failure resulting from normal
wear and tear, physical abuse, improper installation, misuse, modification or
repairs by unauthorized third parties
5.We do not assume responsibility for any loss or damage incurred during
shipment or as a result of a force majeure
6.We are not liable for any incidental or consequential damages arising from
the use or misuse of this product
Always take care when using the appliance
supervision
Plug the adaptor into the
14V 1A input port to
activate.
I. WARRANTY INFORMATION:
1.We offer a limited warranty for this product against any defects in material
and workmanship for a period of 6 months from the date of purchase by the end
user/consumer. The conditions of the warranty are as follows:
water and seek medical attention
environment and in accordance with government regulations
7.All warranty claims are limited to repair or replacement of the defective
product and at the sole discretion of us
8.If we repair or replace the product, the product will be covered for the
remaining time of the original warranty period. Repair or replacement may
involve the use of reconditioned units which are equivalent in function.
Replaced part or product becomes the property of us
9.Consumable components such as batteries are not covered by the warranty