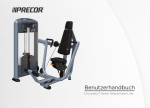
1
Troubleshooting Manual
EasyMarker
Table of content
1
2
3
4
5
6
7
8
Copyright............................................................................................................................ 4
Exclusion of liability .......................................................................................................... 5
Notes on operation of PCA controller................................................................................ 6
3.1
Operation of ControlSys software to read more error messages................................ 6
3.2
Trouble with communication ................................................................................... 14
3.2.1
Embedded graphic is too large ......................................................................... 14
3.2.2
Complex font is used........................................................................................ 15
3.2.3
Latency timer is set in a wrong way................................................................. 15
Error messages UniMark software................................................................................... 16
4.1
Home position X or Y not reached........................................................................... 16
4.1.1
One axis doesn’t move or both axes don’t move respectively......................... 17
4.1.2
The controller doesn’t receive a signal from the sensor................................... 17
4.2
Reset start signal....................................................................................................... 18
4.3
The marking area is exceeded .................................................................................. 18
Error messages in the Signumeric software ..................................................................... 20
5.1
System not ready ...................................................................................................... 20
5.1.1
The controller is not switched on or has not booted ........................................ 20
5.1.2
Problems with the interface.............................................................................. 20
5.2
Invalid port number.................................................................................................. 20
5.3
No access to HPGL file............................................................................................ 26
5.4
No access to font-file................................................................................................ 26
5.5
Reading the old path................................................................................................. 27
The type face is not alright............................................................................................... 28
6.1
Pneumatic stylus for dot peen marking .................................................................... 28
6.1.1
Irregular marking.............................................................................................. 28
6.1.2
Marking depth is not alright ............................................................................. 29
6.1.3
The lines are permanent ................................................................................... 29
6.1.4
The marking is wiggly...................................................................................... 29
6.1.5
Stylus not moving............................................................................................. 29
6.2
Electric marking head for dot peen marking............................................................ 30
6.2.1
Irregular marking.............................................................................................. 30
6.2.2
Marking depth is not alright ............................................................................. 31
6.2.3
The lines are permanent ................................................................................... 31
6.2.4
The marking is wiggly...................................................................................... 31
6.2.5
Stylus not moving............................................................................................. 31
Marking with EasyRot80 ................................................................................................. 32
7.1
Unimark software..................................................................................................... 32
7.1.1
Setup a layout ................................................................................................... 32
7.1.2
Problems with the marking .............................................................................. 34
7.2
Signumeric software................................................................................................. 34
7.2.1
Setup a layout ................................................................................................... 34
Problems by moving the axis ........................................................................................... 39
8.1
Both axes don’t move............................................................................................... 39
8.1.1
With Signumeric software................................................................................ 39
8.1.2
With Unimark software.................................................................................... 39
8.2
One axis doesn’t move ............................................................................................. 40
8.3
One axis mismatches the position ............................................................................ 40
EasyMarker Troubleshooting
2
8.4
Both axes position in the wrong way ....................................................................... 40
8.5
Preventive maintenance............................................................................................ 40
8.5.1
Every week....................................................................................................... 40
8.5.2
Every quarter .................................................................................................... 40
8.5.3
Every year ........................................................................................................ 40
9
Replacement of wearing parts .......................................................................................... 41
9.1
Adjustment of the linear guide ................................................................................. 41
9.2
Adjusting of X-axis .................................................................................................. 42
9.3
Replacing of ball bearings........................................................................................ 43
9.3.1
Ball bearing X .................................................................................................. 44
9.3.2
Ball bearing Y .................................................................................................. 46
9.4
Replacement of a stepper motor............................................................................... 47
10
Notes............................................................................................................................. 52
10.1 Notes on how to improve quality of marking .......................................................... 52
10.1.1
General ............................................................................................................. 52
10.1.2
Pneumatic marking head for dot peen marking ............................................... 52
10.1.3
Electrical marking head for dot peen marking ................................................. 52
10.2 Notes on how to increase marking speed ................................................................. 53
10.3 Optimizing a graphic................................................................................................ 54
10.3.1
Converting a TT font into Signumeric font...................................................... 55
10.4 Unitest programme ................................................................................................... 55
10.4.1 Open the Unitest programme ........................................................................... 55
10.4.2
Change language .............................................................................................. 55
10.4.3
Select I/O Byte ................................................................................................. 56
10.4.4
Set or reset the Outputs .................................................................................... 56
10.4.5
Test the Sensors................................................................................................ 57
11
Overview of the tool board........................................................................................... 58
12
E/A Platine EM-Parallel Version 1 Seriennummer 7000- ........................................... 59
13
E/A Platine EM-Parallel Version 2 7020-.................................................................... 60
14
Flowchart of a standard programme with Unimark ..................................................... 61
EasyMarker Troubleshooting
3
1 Copyright
© 1999-2011 Richter, Systeme und Maschinen
The duplication, distribution or data transfer into an information system of any excerpt of this
manual is strictly prohibited without previous written permission and consent of the company
Joachim Richter, Systeme und Maschinen.
Address:
JOACHIM RICHTER e.K.
Systeme und Maschinen
Erlenhöhe 3-5 – Industriegebiet
D - 6 6 8 7 1
K o n k e n
G
e
r
m
a
n
y
Phone +49 – (0) 63 84 - 92 28 0
Fax +49 – (0) 63 84 - 92 28 77
E-Mail: [email protected]
http://www.jr-richter.de
EasyMarker Troubleshooting
4
2 Exclusion of liability
The company Richter reserves the right to modify the information and specifications
of this operating manual without any previous notice. The reader needs to contact the
company Richter in case he would like to learn about any modifications which habe
been effected.
The company Richter does not take responsibility for coincidental, special or
consequential damage of any kind (incl. all damages occurring out of lost profits),
due to or in relation to this manual or any contained information, not even if the
company Richter referred to the possibility of such damage, had / must have had
knowledge of it.
The contained information in this manual is confidential and is the property of the
company Richter and their licencees.
All indications made in this manual are confidential and subject to change (without
any guarantee).
Despite all care we cannot exclude any kind of errors and/or errors in printing.
We would highly appreciate it if you helped us to improve this manual. So in
case you notice an error or can suggest an improvement to this manual, please
contact us.
EasyMarker Troubleshooting
5
3 Notes on operation of PCA controller
There are Signumeric and ControlSys software installed on the controller. Advanced
error messages can be read with the software ControlSys.
During booting of PCA controller the software ControlSys will be opened first. This
software initializes the hardware. After the process has been executed, the software
is automatically closed and Signumeric software will be opened.
In order to read more error messages the ControlSys software must be switched.
3.1 Operation of ControlSys software to read more error messages
Restart the PCA controller. The programme ControlSys is automatically started by
Autostart. The programme initializes the hardware and after that it will be
automatically closed again. As soon as the programme has been opened, the button
“Settings” has to be activated and then confirmed by the green arrow icon. This must
have been effected before the software is automatically closed.
EasyMarker Troubleshooting
6
After confirming your selection by pushing the error icon, the settings window opens
up. Select the point “View design selection” in the settings. Also confirm this with the
green arrow icon.
EasyMarker Troubleshooting
7
EasyMarker Troubleshooting
8
The view design selection is set in Signumeric when
operating a PCA controller with Signumeric software.
Choose the line „Signumeric“ and confirm your selection
via the green arrow icon.
Select „UniTouch“ in the ComboBox. Confirm your
selection with the icon OK check.
EasyMarker Troubleshooting
9
Exit the menu via the green arrow backwards
icon.
Open a programme. Select the icon
„Programme“ and confirm your selection with the
green arrow forward icon.
EasyMarker Troubleshooting
10
A list of existing programmes appears. Select one
programme (PDR-file) and confirm your selection with the
green OK check.
The main menu appears. Select the „Marking“ icon and
activate your selection via the green arrow forward icon.
EasyMarker Troubleshooting
11
Activate the icon „Change view“ now (2 pages icon).
EasyMarker Troubleshooting
12
The status menu opens up. All relevant messages will be
output here.
EasyMarker Troubleshooting
13
3.2 Trouble with communication
In the event of the communication being too slow or cancelling, this might be caused
by the following:
3.2.1 Embedded graphic is too large
A graphic may be created in each vector-based drawing programme (e.g. Corel
Draw, Auto CAD). In order to integrate this graphic into a marking layout, it must be
saved in HPGL format (plt). Many programmes enable this export feature. In case
your programme is not supporting this format, it can also be saved as DXF file (R12).
There is a DXF/PLT converter integrated into the Signumeric software. The graphic
can be converted with this integrated converter.
During creation of graphic the sequence of objects must be considered. The lines
should be drawn as complete lines. After completion of every vector, the stylus of the
marking system will be lifted and does not touch the workpiece anymore.
Object sequence and direction can be displayed and modified in almost every
graphic programme. In order to optimized the cycle time of the marking, the vectors
need to be consolidated. Please see the picture below.
For some drawn lines it is possible to generate. See the picture below. It is
advantageous that no PU (PinUp) or PD (PinDown) commands are being sent. This
even saves some cycle time.
EasyMarker Troubleshooting
14
If a graphic consists of splines or complex Bezier curves, those will be treated as a
row of vectors. On request we are able to optimize your graphics.
3.2.2 Complex font is used
If a graphic consists of splines or complex Bezier curves, those will be treated as a
row of vectors. This may lead to a delay in communication. Please use a simple font.
3.2.3 Latency timer is set in a wrong way
See operating manual of latency timer.
EasyMarker Troubleshooting
15
3.2.4 MessageControlSys COM3 or COM4 is not available
COM3 and COM4 are virual USB – Ports (USB).
Please open the control Panel and check if the ports are adjusted correctly.
In case the Portnumber is wrong, please adjust them to COM 3 and COM 4 .
4 Error messages UniMark software
Please note that the messages coming up refer to the error occurring.
Example: “Z-axis in home position”
The software is waiting, that the z-axis is travelling to its home position. (Sensor
home position is not active)
4.1 Home position X or Y not reached
Brief explanation: The respective sensor is not active. This may be caused due to
the following 2 reasons:
EasyMarker Troubleshooting
16
4.1.1 One axis doesn’t move or both axes don’t move respectively.
Please look chapter 8.2
4.1.2 The controller doesn’t receive a signal from the sensor
Possible reasons:
• The sensor is broken
• The signal wire of the sensor cable has got a cable break.
• The cam switch has not been adjusted correctly so the maximum traverse
path has been reached before the sensor switches.
• There is a failure in the power supply of the sensor. (e.g. a cable break, fuse is
burnt through ,24V power supply is interrupted )
• The opto-coupler of the I/O board is faulty
• No connection between I/O board, connecting cable of machine and
controller.
• Cable break of the connecting cable of machine (connection of controller to
EasyMarker).
• • The permissible operating distance between sensor and cam switch has
been exceeded. Adjust the sensor in such a way that the distance is less than
0,5mm. (See picture below).
Cam switch X
EasyMarker Troubleshooting
Sensor X
17
Sensor Y
Cam switch Y
4.2 Reset start signal
Brief explanation: The cycle has been interrupted.
Please reset the start signal (E4)
Only machines for automation (EM 200 – 400)
4.3 The marking area is exceeded
EasyMarker Troubleshooting
18
Brief explanation: The marking is out of the traverse range.
Please correct the marking position in teach in mode.
EasyMarker Troubleshooting
19
5 Error messages in the Signumeric software
5.1 System not ready
Brief explanation: There is no connection from PC to the controller.
5.1.1 The controller is not switched on or has not booted
Possible reasons:
•
The controller is not switched on or has not booted. Please connect a monitor at
the controller to check if the controller has booted. If the controller has booted
correctly the message “Programme is in LCD Mode” will be displayed on the
monitor.
5.1.2 Problems with the interface
•
Ensure that the serial cable is connected correctly
•
Ensure that the bios settings at the controller are correct. If the bios battery is
empty the controller will load the default.
•
The serial interface cable is not connected from PC to Com1 at the EM Controller.
Please check the connection.
•
A wrong serial cable is used. Please use one with the following connections
9pol. 1
jack
9pol. 7
jack
•
7
2
3
4
1
3
2
6/
8
6/
8
4
5
5
9
9
In case a USB/serial converter is used, the converter may cause the problem.
Some converters are incompatible to the settings of the controller.
5.2 Invalid port number
Brief explanation: The port number in the software doesn’t correspond to the
connected port.
Suggestion: Please adjust the port number in the Signumeric software. In order to
adjust it, choose parameter / basic setup/port.
Please change the port number in the Signumeric Software or control panel.
EasyMarker Troubleshooting
20
Illustr. 1 Basic setup
It is also possible to adjust the port number in the control panel. In order to do
that, please open the control panel.
EasyMarker Troubleshooting
21
Illustr. 2 Opening the Control Panel
Select the menu point “System”.
Illustr. 3 Control panel
EasyMarker Troubleshooting
22
Illustr. 4 System properties
EasyMarker Troubleshooting
23
Illustr. 5 Device manager
EasyMarker Troubleshooting
24
The values in the tab “port settings” must match.
Illustr. 6 Properties of COM1
By pushing the button “Advanced”, the advanced settings will be displayed. In the
advanced port settings page, there is a drop down menu that enables a change of
the COM port number.
Illustr. 7 Change of COM number
EasyMarker Troubleshooting
25
The port number in Signumeric and in the control panel (connected port) have to
match. In the event of the port number being changed in the Signumeric software,
the settings must be saved.
Illustr. 8 Save configuration
5.3 No access to HPGL file
Brief explanation:
The imported graphic does not exist in the current directory anymore.
The graphic is no longer in the path out of of which it was imported. Signumeric
software does not store the graphic in the layout. It just links it. Due to this reason the
graphic has to stay in the path out of which it was imported.
In order to solve this problem, please copy the graphic into the folder out of which it
was imported or import the graphic out of the recent path again.
5.4 No access to font-file.
The font is no longer in the path out of which it was imported. Signumeric software
does not store the font in the layout. It just links it. Due to this reason the font must
stay in the path out of which it was linked.
In order to solve this problem please copy the font into the folder out of which it was
linked or link the font of the recent path.
From version 6.98
In case that Signumeric can not find the selected text font it will automatically use the
default text font.
EasyMarker Troubleshooting
26
5.5 Reading the old path
It is possible to read the path of the graphic or font in the Signumeric layout. You
have to open the layout with the editor in order to do this.
The paths and the imported font are visible. This information will be separately saved
for each object in the layout. The picture above shows object 1, the picture below
object 2 which is a text..
After reading the paths you can copy the font files and graphics into the path.
EasyMarker Troubleshooting
27
6 The type face is not alright
6.1 Pneumatic stylus for dot peen marking
Please note: Use only dry compressed air.
The most problems are caused by a dirty stylus guiding. Please de-assemble the
stylus and clean the stylus and the case without lubricating.
Most problems are caused by a dirty guiding of the pestle case. Please clean the
pestle case. No strong detergents may be used for cleaning, they can damage the Oring.
6.1.1 Irregular marking
Suggestions:
•
•
•
•
•
•
•
•
•
Ensure the guiding is clean.
Ensure the O-ring is clean and dry. It may not show any cracks or damages.
Check the air pressure (2-5 bar)
Check the distance between stylus tip and workpiece. (2-5mm)
Ensure that the workpiece is put on an even surface in front of the marking
machine. Check if the workpiece is clamped tightly. It may not be clamped
diagonally, as otherwise the distance to the marking stylus is changing as well
as the marking result.
Check the spring. Is the spring OK and not too weak?
Ensure that the pneumatic hose doesn’t bend too much and the air supply is
working.
Check if marking stylus can be easily moved in the pestle case.
Check the tip of the marking stylus.
Hint: You can check the correct function of the stylus. Please adjust the column up
so the stylus can move freely. Now switch on the stylus.
In Signumeric software: Choose parameter/ define home. Now press the button on
and the stylus starts to move permanently. It is possible to check now if the stylus
swings correctly.
In Unimark software: choose manual mode and then press End to switch on the
stylus and Home to switch it off.
EasyMarker Troubleshooting
28
6.1.2 Marking depth is not alright
Suggestion:
•
•
•
•
•
Check air pressure. Kontrollieren Sie die Druckeinstellung des Druckregelventils
(2-5 bar)
Check distance between the stylus tip and the workpiece. Short distance causes
a deep marking. Long distance causes a weak marking.
Change the stylus e.g. heavy pen for light pen
Kontrollieren Sie ob sich der Prägestift im Gehäuse leicht bewegen lässt.
Kontrollieren Sie die Spitze der Prägenadel.
6.1.3 The lines are permanent
•
•
•
•
Please check the distance between the stylus tip and the workpiece. Ensure
that the distance is not too close.
Check the valve of the marking head.
Check the spring of the stylus. Ensure it is not damaged and the spring is not
too weak.
Check if marking stylus is stuck in the guiding of the pestle case.
6.1.4 The marking is wiggly
Suggestion:
•
•
•
•
Decrease the traverse and the positioning speed in the software. Je höher die
Geschwindigkeit, desto geringer ist die Qualität des Schriftbildes.
Check if the stylus guiding is clearance-free.
Check if the axes from EasyMarker are clearance-free.
Check if the workpiece is not loose.
6.1.5 Stylus not moving
•
In the Signumeric software please make sure that there is no check in the field
file/marking/marking head not ready or drive only objects lines.
EasyMarker Troubleshooting
29
•
•
•
Ensure that the stylus is moving smoothly.
Check the valve of the marking head.
Check the compressed air supply.
6.2 Electric marking head for dot peen marking
6.2.1 Irregular marking
Suggestions:
•
•
•
•
•
•
Clean the guiding of the pestle case.
Check the distance between stylus tip and workpiece. (2-5mm)
Ensure that the workpiece on an even surface in front of the marking machine.
Check the spring. Is the spring OK and not too weak?
Check the settings of the electric marking head. In Signumeric choose
parameter/electrical head. In UniMark software main menu/F8/Arrrow Key
down/electric head.
Check the peak of the stylus and ensure that the tip is alright
Hint: You can check the correct function of the stylus. Please adjust the column up
so the stylus can move freely. Now switch on the stylus.
EasyMarker Troubleshooting
30
In Signumeric software: Choose parameter/ define home. Now press the button on
and the stylus starts to move permanently. Now it is possible to check if the stylus is
smoothly running.
In Unimark software: choose manual mode and then press End to switch on the
stylus and Home to switch it off.
6.2.2 Marking depth is not alright
Suggestion:
•
•
•
•
•
Check if the stylus moves smoothly.
Check the tip of the stylus. Ensure that the tip is not damaged.
Ensure that the frequency of the settings is not too high or the power is not too
low.
Ensure that the distance between the workpiece and the stylus tip is not too
close.
Ensure that the workpiece doesn’t swing and if it is a metal name plate that it is
fixed on an even surface.
6.2.3 The lines are permanent
•
•
•
Please check the distance between the stylus tip and the workpiece. Ensure that
the distance is not too close.
Check if the stylus moves in smoothly.
Check the spring of the stylus. Ensure it is not damaged and the spring is not too
weak.
6.2.4 The marking is wiggly
Suggestion:
•
•
•
•
Decrease the traverse and the positioning speed in the software.
Check if the axes from EasyMarker are clearance-free.
Check if the workpiece is not loose.
Check that the guide of the stylus is clearance-free
6.2.5 Stylus not moving
•
•
•
In order to control the switch at the SM/UC is in the position scratching or dotpeen and not in the central position. (Not necessary by EasyMarker with EMController)
Please check the 6,3 A fuse at the rear side of the controller
Check the settings of the electric marking head (depth and frequency). The higher
the frequency has been set, the larger the depth is.
EasyMarker Troubleshooting
31
7 Marking with EasyRot80
7.1 Unimark software
7.1.1 Setup a layout
Programme selection
Manual mode
Marking
On-line mode
Please choose programme selection and press the Enter Key.
NONAME.PRG
Now press the F5 Key
[
.PRG]
Type the name of your programme and press Enter.
Hint :the maximum length of the programme name should not be more than 9
characters.
[EXAMPLE .PRG]
Press Enter.
Object selection
EasyMarker Troubleshooting
32
Text
Press
Date F5
Incrementing number
Incremt. gl. number
Now select the kind of object you want to mark.
Hint: With the arrow down key you can choose the type of object.
If the cursor is on the type of object you like to mark, press Enter.
We choose a text object as an example in this manual.
EXAMPLE TEXT
Type in the text and press F6.
XY
Now keep the arrow key pressed until the word Rotator is displayed.
Rotor
Xp 0
Yp 0
Diameter
Now press ALT + the Arrow keys. That way you can define the start position.
Declaration of the values:
Xp Start position of the X Axis.
Yp Start position of the Y axis. This is the middle of the bar you want to mark.
Diameter is the diameter of the bar you would like to mark.
After completing the settings, please press F2 to save them.
Afterwards press Enter to return to the text.
EXAMPLE TEXT
EasyMarker Troubleshooting
33
Now press Enter
Ap0
Yp 0
H3
W2
Select N
Ang 0
Horiz.
Rad 0
W2
With Alt + the Arrow Keys you are able to teach in the position of the marking.
Hint: The position X will be added to the position X which you have defined yet. The
position Y is the rotator axis now.
The explanations of the other values are a part of the Unimark software manual.
After finishing please press Enter and then press F2 to mark.
EXAMPLE TEXT
With F3 you can start the marking now.
7.1.2 Problems with the marking
•
If the font is anti-proportional please check the diameter you have entered.
7.2 Signumeric software
7.2.1 Setup a layout
At first you have to change the operation mode from XY Mode to Rotator.
In order to change the mode presses the Rotator icon. It is shown in the drawing
below.
The Operation mode windows will pop-up. Change the mode now.
EasyMarker Troubleshooting
34
The diameter box is activated now.
Type in the diameter of your workpiece.
EasyMarker Troubleshooting
35
Afterwards press the button “ Teach IN ”.
The following window will be displayed then.
EasyMarker Troubleshooting
36
By pressing the buttons Y-MINUS or Y-PLUS move the Y to the point you want to
start the marking.
The Y position is normally the middle of your workpiece.
The X axis has no function in this menu.
bar
Y
Start position
In order to confirm the position press OK.
EasyMarker Troubleshooting
37
Create your object and choose the “Teach In” mode to position it.
The „Define Home” window will appear again.
But the Y axis is not relevant now. The Y axis can be moved but the values have no
consequence.
In order to move the Rotator press the button A-Minus or A-Plus
EasyMarker Troubleshooting
38
8 Problems by moving the axis
8.1 Both axes don’t move
8.1.1 With Signumeric software
8.1.1.1 With error message
Message: “System not ready”
Please see chapter 5.1
Message: “invalid port number”
Please see chapter 5.2
Message: “emergency stop”
• Ensure that the emergency Stop is not active
• Please check the 2 A fuse at the rear side of the controller
8.1.1.2 Without an error message
• Please check the bios settings of the controller board. The parallel port must be
on the address 378 and the mode has to be normal. (Board Controller not PC)
• Ensure that the ribbon cable is connected with the motherboard and the controller
board.
8.1.2 With Unimark software
8.1.2.1 With error message
Message: “emergency stop”
•
•
•
•
Ensure that the emergency stop is not active
Please check fuse at the rear side of the controller.
Check the interface (only for machines used in automation)
Check the jumper on the printed circuit board. It can be put into position LPT or
I/O. This position has to match the software version used.
8.1.2.2 Without an error message
• Please check the bios settings of the controller board. The parallel port must be
on the address 378 and the mode has to be normal. . (Board Controller not PC)
• Ensure that the ribbon cable is connected with the motherboard and the controller
board.
EasyMarker Troubleshooting
39
8.2 One axis doesn’t move
Possible causes:
•
•
•
cable break (Connection between SM/UC and Stepper)
motor is out of order
driver card is out of order
8.3 One axis mismatches the position
Possible causes:
•
•
•
•
•
•
•
•
•
•
•
•
cable break (Connection between SM/UC and Stepper)
motor is out of order
the belt pulley is loose at the shaft of the motor
the axis moves stiffly
Cable break or loose contact between driver and motor (e.g. machine cable).
Motor is defective.
Driver is defective.
Belt pulley is loosened.
Sluggish axis.
Defective opto-coupler on I/O board.
Parallel interface is defective.
Sluggish axis caused by defective ball bearing.
8.4 Both axes position in the wrong way
•
•
Parallel interface is defective.
Speed is too high (board clocking and marking speed).
8.5 Preventive maintenance
8.5.1 Every week
•
Clean the pneumatic case and the stylus
8.5.2 Every quarter
•
Check the strainer of the fan at the controller and clean it if required.
8.5.3 Every year
•
Clean the guiding of the axes and lubricate them with oil.
EasyMarker Troubleshooting
40
9 Replacement of wearing parts
9.1 Adjustment of the linear guide
fixed
set screw
adjustable
slot of the linear ball bearing
It is possible to adjust the linear guides. In order to make the X-Axis clearance-free
please adjust the set screw.
EasyMarker Troubleshooting
41
9.2 Adjusting of X-axis
Feste Achse Y
Einstellschraube
einstellbare Achse X
geschlitztes Linearkugellager
The X-axis of the EasyMarker is adjustable. Please correct the clearance at the
adjusting screw if required.
EasyMarker Troubleshooting
42
9.3 Replacing of ball bearings
Ball bearing X
EasyMarker Troubleshooting
Ball bearing Y
43
9.3.1 Ball bearing X
Loosen the 4 screws.
Take the bearing block out of the drive belt.
EasyMarker Troubleshooting
44
Loosen both sides of the bearing block.
Take off the bearings with care.
Mount the new bearings via a press. Please consider that the two different
diameters of the shaft.
Put both bearing fasteners onto the bearings again.
Insert the complete bearing block into the belt.
Fix the bearing block again.
The tension of the belt is not changing. In case it shall be optimized, loosen
the screw of the motor. The tension of the belt can be modified via the
elongated holes of the motor’s mounting angle.
EasyMarker Troubleshooting
45
9.3.2 Ball bearing Y
Screws
Illustr. 1 Ball bearing Y
Loosen the screws. Proceed as described in the previous chapter for replacing of the
bearing.
EasyMarker Troubleshooting
46
9.4 Replacement of a stepper motor
Assembly angle
with long hole
Srews
Toothed belt
clamping
Toothed belt
After the cover is taken off please loosen the screws of the stepper motor. Now it is
possible to take the stepper motor out of the mounting angle. With a special tool it is
possible to disconnect the stepper motor of the marking device. In order to put the
new stepper motor in, the wires must be crimped with the connectors and the belt
pulley must be fixed at the stepper motor. Reconnect the wires to the plug in the
device and mount the stepper motor again to the angle. It is possible to tighten the
toothed belt again via the elongated holes.
If it is not possible to get the belt pulley back into the toothed belt please loosen the
toothed belt clamping. If you change the X-stepper please make sure that the cord
grip is mounted correctly.
Connection diagram before year of build 2004.
EasyMarker Troubleshooting
47
X-Axis
Y-Axis
1
Valve
4
5
9
10
15
16
X-Home
Y-Home
20
21
24
Screen
Connection diagram
Engine side
1:1
DIN 7168
mittel
2 5. 04 .0 3
21 . 0 5 .2 0 0 5 Kessler
L at zk e
Fa. Richter
Gerätebuchse
mit Leitung
Nanotec
Connection diagram Ser.No. 0082-001-000-xxxxx
EasyMarker Troubleshooting
48
X-Axis
Y-Axis
1
Valve
4
5
9
10
15
16
X-Home
Y-Home
20
21
24
Screen
Connection diagram
Engine side
1:1
DIN 7168
mittel
2 5. 0 4 . 03
2 5. 04 . 03
Lat zke
Fa. Richter
Lat zke
Gerätebuchse
mit Leitung
00 82 -2 -4 -022
Connection diagram Ser.No. 0082-001-001-xxxxx
EasyMarker Troubleshooting
49
Component side
Sensor Y
Y blk
Y bn
Y bl
Sensor X
X blk
15
16
17
14
5
PE
19
X bl
3
7
MY
oge
12
2
MX
bl
X bwn
11
1
8
MX
rd
13
4
6
18
MX
yw
10
MX
oge
9
MY
bl
MY
rd
MY
yw
blk
pnk
Ventil
M X wt+blk with head shrink tube
M Y wt+blk with head shrink tube
1:1
2 1.05 .200 7
1 2. 0 9 . 06
Höb el
Fa. Richter
EasyMarker Troubleshooting
K e s s le r
Device plug
00 82 -2 -4 -036
50
Tool
Ordernumber
Eject tool
Eject tool spare bush
Eject tool
Crimp Connectors
female
male
Crimper
Crimper
Crimper
1004343
1004344
1001846
EasyMarker Troubleshooting
Serial Number of marking
device
0082-001-000-xxxxx
0082-001-000-xxxxx
0082-001-001-xxxxx
0082-001-000-xxxxx
0082-001-001-xxxxx
0082-001-000-xxxxx
0082-001-001-xxxxx
51
10 Notes
10.1 Notes on how to improve quality of marking
10.1.1
•
•
•
•
•
Reduce the marking speed. A slow marking speed results in a deeper marking.
The quality of the marking gets poorer when increasing the marking speed.
Use another type of font
The distance between workpiece and tip of marking stylus can be modified. By
changing the distance also the typeface changes (2-5 mm).
By using another type of marking stylus the quality of marking can be changed
(see operating manual of EasyMarker).
10.1.2
•
•
•
•
•
•
General
Pneumatic marking head for dot peen marking
We offer carbide marking pins with 3 different cuts/angles. Standard is 60°, but
we offer 90° and 120° as well. Which pin is suitable for your marking depends on
the material you mark. In order to mark soft materials you should use pin with a
large angle is a pin instead of a small one.
We also offer two different pins. A strong pin with steel piston for tough materials
and a light pin with aluminium piston for soft materials. Standard is the light pin.
High air pressure causes a deeper marking (2 to 5 bar).
Modify the distance between marking stylus and workpiece (2-5 mm).
Slow marking speed results in a deeper marking.
Use another type of marking stylus.
The marking styluses available are listed in the manual of EasyMarker.
10.1.3
•
•
•
•
•
•
Electrical marking head for dot peen marking
We offer carbide pins with 3 different cuts/angles. Standard is 60°, but we offer
90° and 120° too. Which pin is suitable for your marking depends on the material
you mark. In order to mark soft materials you should use pin with a large angle is
a pin instead of a small one.
Modify the distance between marking stylus and workpiece (2-5 mm).
Slow marking speed results in a deeper marking.
A high frequency causes a weak marking and a low frequency a deep marking.
A high force causes a deep marking and a low force causes a weak marking.
Use another type of marking stylus.
The marking styluses available are listed in the operating manual of
EasyMarker.
EasyMarker Troubleshooting
52
10.2 Notes on how to increase marking speed
•
In order to increase the marking speed it is possible to change the order and the
direction of the objects. How to do this is explained in the software documentation
on the software disc.
Order of marking
1
Mark forward
Object
Object
4
•
Mark backwards
2
Object
Object
3
The marking speed also depends on the font type. In order to increase the speed
please use a simple font type.
In Signumeric software: Mark the object, the click on the font icon of the symbol bar
and choose the font you want to use.
EasyMarker Troubleshooting
53
In Signumeric software
It is also possible to optimize a graphic or generate another font type to optimize the
marking.
10.3 Optimizing a graphic
Some graphics require a long marking time.
Those graphics can be optimized.
Max. vector length can be limited.
Consecutive PU or PD commands can be deleted.
We provide you with a graphic converter for this. For details please see operating
manual of the converter. .
EasyMarker Troubleshooting
54
10.3.1
Converting a TT font into Signumeric font
Each installed font can be converted into a Signumeric font. For more details please
see operating manual of the converter.
10.4 Unitest programme
10.4.1 Open the Unitest programme
Connect the monitor on the EM Controller at first. The message “The programme is
in LCD mode” is displayed on the screen.
When pressing the Esc Key you leave the working mode and enter the main menu
•
•
•
•
programme selection
manual mode
marking
On-line mode
Main menu
Now press the Ctrl and the Q Key simultaneously.
The monitor displays now C:\Unimark>
Type in Unitest and press Enter
10.4.2
Change language
With the Tab Key move to Sprache (language) and choose English
EasyMarker Troubleshooting
55
10.4.3 Select I/O Byte
Move with Tab key to menu point options press Enter and select In-Output 1, 2 or 3
and press Enter
10.4.4 Set or reset the Outputs
You can choose by pressing the tab key the output you want to set or reset.
Select the output you want to set and press F4 to set it.
With F5 it is possible to reset the Output.
Attention!!
Please ensure the there will be no Crash if the Output is active, because of the
movement of an actuator.
EasyMarker Troubleshooting
56
10.4.5
Test the Sensors
For testing the Inputs move via the Tab key to Sensoren (sensors) und press enter.
Now you can set an Input and see if it is active or inactive.
In order to leave the Unitest programme and restart the Unimark software again it is
necessary to reboot the controller.
EasyMarker Troubleshooting
57
11 Overview of the tool board
tool output
fuse
serial port
+24V DC
program interface
+5V DC
tool input
EasyMarker Troubleshooting
58
12 E/A Platine EM-Parallel Version 1 Seriennummer 7000X3
X2
motor X
+
+
+
+
-
LPT
motor Y
+24V DC
+24V DC
+24V DC
+24V DC
output
X8
input
X7
tool
X5
sensor X
sensorY
24V fan
X4
X9
Abbildung 2 E/A Platine EM-Parallel Version 1
EasyMarker Troubleshooting
59
13 E/A Platine EM-Parallel Version 2 7020-
LPT 2 verschiednen
Anschlüsse möglich
Motoranschlus
Anschluss Ventilator
Präger
Output Fertig
Sensoren
Start (Anschlüsse parallel)
Abbildung 3 E/A Platine EM-Parallel Version 2
EasyMarker Troubleshooting
60
14 Flowchart of a standard programme with Unimark
Standard marking cycle
Ready to mark
Set ready to mark A4
no
Start E4
yes
•Reset ready to mark A4
•Set marking A5
•Travel to waiting point
mark
•Set ready A1
Reset Start E4
•Reset ready signal A1
•Travel to homeposition
•Reset marking A5
EasyMarker Troubleshooting
61