1
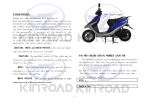
Type B Operating Instructions These Instructions are applicable to Electric Scooters and Motorcycle [please read these Instructions carefully before riding] Warning! Please abide by the relevant traffic rules. To ensure personal safety, the following personnel are not allowed for riding. Psychotics or people with history of mental illness Cardiopath The deaf and mute Other Disabled not suitable for riding Alcoholics Color blind or red, yellow and green amblyopia Warning to users: The range is measured on one-time charging basis and under standard road condition (concrete asphalt pavement, wind speed of ≤3m/s and temperature of about 25℃), with battery capacity fading of ≤5% and speed of ≤20km/h in accordance with the national standards for electric bicycles. Attention: the range will be greatly reduced (shortened) in low temperature, long-period climbing, or high-speed riding. Contents Preface .................................................................................................................................................................... 4 Battery Connection Schematic................................................................................................................................ 5 Precautions for Safe Riding ..................................................................................................................................... 5 Structural Diagram for Complete Bicycle ................................................................................................................ 7 Application of Instruments ..................................................................................................................................... 9 Application of Switches ......................................................................................................................................... 10 Inspection before Riding ....................................................................................................................................... 11 Correct Riding ....................................................................................................................................................... 12 Inspection and Maintenance ................................................................................................................................ 14 Fault Phenomenon and Troubleshooting.............................................................................................................. 17 Electrical Schematic Diagram ................................................................................................................................ 18 Announcement on Battery Recycling.................................................................................................................... 19 Preface Dear users: Thank you for buying “E-BIKES” product. “E-BIKES” from Sweden and the staff thereof hereby extend a sincere welcome and give heartfelt thanks for your choice. These Instructions will introduce the construction, using and functions of fittings, precautions, and maintenance method of the electric bicycles to you. After buying a vehicle, you shall read the Instructions carefully to understand common knowledge on using, so as to ensure easy and free operation, thus guaranteeing your safety in the travel. To protect your vehicle and provide convenience for your using as far as possible in an effective manner, if you find any problem that beyond your ability, or you want to replace a part or component, please contact the shop or repair station of the vehicles to buy standard parts or components. In addition, in buying the product, you shall fill the “Registration Form for Sales (Warranty) of Electric bicycles” completely and clearly, and keep the couplet of “Saving by Users” properly, with the rest couplets delivered to the service station or dealer of the Company stationed in place where you are located, so that we can get in touch with you timely and offer services. As ideal traffic tools for substituting walking and light transport means, “E-BIKES” electric bicycles provide more convenience for your work and make your life more interesting. Any valuable opinions and suggestions are warmly welcomed here. Please read these Instructions carefully and follow the procedures and instructions. “Danger”, “Warning”, and “Attention” etc. are used in places where special attention shall be paid and special meanings are contained, so they shall be read carefully. Danger Ignorance of this sign will cause personal injury So to reduce your or other’s injury, what to do and what not to do are announced in particular. Warning Ignorance of this sign will cause vehicle and device damage, so what to do and what not to do are announced in particular. Attention Ignorance of this sign will cause slight damage of vehicle and device or failure work of vehicle, so what to do and what not to do are announced in particular. 01 Battery Connection Schematic Note: connect one end of each cable with negative pole of storage battery, and another end with the positive pole in series, and connect the 6# positive lead in the battery with positive pole of charging socket (N); and finally connect the 5# negative lead with the negative pole (L). Note: connect one end of each cable with negative pole of storage battery, and another end with the positive pole in series, and connect the 5# positive lead in the battery with positive pole of charging socket (N); and finally connect the 4# negative lead with the negative pole (L). Precautions for Safe Riding Please follow the traffic rules and ride the bicycle within the bicycle lane with the speed controlled within the safe speed. Attention: the safe speed of the bicycle is ≤20km/h. Before riding, you shall get familiar with the contents of these Instructions, perform training on an open space to master the riding skills and get familiar with the construction of the bicycle, which are bases for safe riding. Warning Ride the bicycle at safe speed per hour, and avoid accidents and personal injury and bicycle damage. Warning Make sure not borrow your bicycle to people not familiar with or incapable of riding, or make them use. Riding with single hand or without hands, or after drinking alcohol is quite dangerous. Slow the bicycle down in rain or snow and at slippery sections. A braking distance shall be increased in braking to ensure the safety. The bicycle cannot run in water. If water level exceeds the motor hub axle of rear wheel, internal circuits can be made into short circuits and the appliance will be damaged. Important! Two white contacts at battery case end of the bicycle cannot be touched with wet hand at the same time, or contact with the metal. Or a large short-circuit current will occur, causing accidents. Important! Wear suitable safety helmet correctly and fasten its strap in riding. In riding, wear clothes in vivid color, allowing free movement of whole body, not tight-fitting, and without open cuffs, and low-heeled shoes. The load should not be overlarge. Because overlarge load can make handlebars become trembling easily. The rated load of the bicycle is 1 person, and storage compartment can contain objects of 3kg and below. The larger the load, the greater the dangerousness. Attention: there shall be no load on the positions except those specified to avoid damage of shield. Do not fill fiber, cotton cloth, and other articles alongside the motor. Make sure not put sundries under the seat (outside the storing box) to prevent the accidents happening. Inspection, cleaning, and maintenance before riding: to ensure you traffic safety, we wish you can make inspection before riding, and perform frequent cleaning by scrubbing with soft cloth for the best. Attention: in cleaning, do not splash water directly towards brake drum, motor, front and rear axles, controller junction box to prevent the water from entering, thus affecting usability and service life. And do not use steam and high-pressure pipes. Inspection before riding: (brake and electric systems, and fasteners at main positions) Make sure to check the braking effects of front and rear brakes before riding to ensure normal and effective braking. You shall confirm the normal service of power switch and lighting indicator light with two supports of complete bicycle on the ground and rear wheel away from the ground. You shall check the fastening status of each axle to ensure front and rear wheels and axles and handlebars are fixed and reliable. Structural Diagram for Complete Bicycle 1 Power lock 2 Governor handle 3 Front brake handle 4 Dashboard 5 Rearview Mirror 6 Rear brake handle 7 Left handlebar 1 Front headlight 2 Suspension front fork 3 Front wheel 4 Tire 5 Motor 6 Rear suspension 7 Rear tail light 8 Saddle 1 Front headlight 2 Suspension front fork 3 Front wheel 4 Tire 5 Motor 6 Rear suspension 7 Rear tail light 8 Trunk 9 Saddle Application of Instruments SN Name Function ① Direction indicator This lamp will flicker when the bicycle turns ② Speedometer Indicating the running speed ③ Voltmeter Indicating the voltage status of the battery ④ Headlight indicator Indicating the status of the headlight ① Direction indicator: When the direction indicator is switched on, the lamp will flicker regularly no matter turning left or right, meaning that the left and right direction indicator at front and rear part have been switched on. ② Speedometer: The position the pointer directing at is the running speed of your bicycle, which shall be calculated in the unit of Km / h. The safety speed of the bicycle is 20km/h. ③ Voltmeter: Turn on the power switch, the position the voltmeter pointer directing at means the capacity status of the power. When the pointer is directing at “II” edge, the battery is in full charge; when the pointer is directing at the red zone, the capacity of the battery is about 10% of the rated amount. Therefore, charge timely when the pointer is directing at the red zone. ④ Headlight indicator: Turn on the headlight switch; the lighting up of the indicator shows that the headlight has been switched on and lighted up. 07 Application of Switches ① Power switch: when the key for ON is at this position, the power is on, and motor can be started. In the riding, do not take down the key and close the power supply. After the power supply is OFF, motor stops rotating, and you can the key for theft prevention. Warning: before leaving your bicycle, fit on an anti-theft lock. ② Headlight switch: press this switch, and headlight will become on. Press again, the light will become off. ③ Governor handle: rotate this handle counterclockwise, and the speed will increase. Rotate clockwise, and the speed will decrease. Make reset, and motor stops rotating. ④ Horn switch: with power switch ON, press this button, and horn will sound; and do not use this switch whenever unnecessary and on no horn roads to prevent noise pollution. ⑤ Steering switch: when turning or changing lane, this switch will be used. Turn the switch leftward, and you will turn left. Turn rightward, and you will turn right. After steering, position the button in the middle, and the light will be off. Attention: steering light shall be off upon used to avoid misunderstanding by others. Opening of seat cushion ① Put the key of the power switch inside the keyhole of the seat cushion and rotate the key towards right. ② Lift up the hinder part of the seat cushion and it will be open. Press the seat cushion lightly and it will be locked. ③ The rear luggage carrier of the bicycle is installed with trunk for the convenience of placing raincoat and fragmentary goods. ④ Some bicycles employ the same key for three functions, that is the pin for the power lock, tumbler lock and saddle lock is the same one. The opening method for the saddle lock is as the following: Rotate the key counterclockwise when the power key is in “OFF” position, and it will be enabled. The opening method for the tumbler lock is as the following: Rotate the key counterclockwise when the power key is in “OFF” position, and it will be enabled. Attention: The contents in the storage compartment shall not weigh more than 3 kg. Articles with high temperature and low heat resistance, food and inflammable items shall not be put inside the box. Valuable articles are not advised to put inside. Do not spray water inside the bicycle at cleaning. Do not forget to lock well the seat cushion and tool kit. Try lifting them after locking to see if they are locked firmly. Chemicals or sharp articles are prohibited. At the cleaning of the storage compartment, it is preferable to wipe with vacuum cleaner or soft cloth. Inspection before Riding Inspection of Tires ① Check the tires for their pressures. Depending on settling of tires on the ground, judge where their pressures are appropriate. If a pressure is abnormal, use a circumferentor to inspect, and adjust it to normal pressure. In general, normal pressures of front and rear wheels are 225KPa and 250KPa respectively. ② Check the tires for fracturing and abnormal wearing. ③ Check whether there is main, stone block or glass in tires. Attention: abnormal pressures, fracturing, damage, and abnormal wearing can cause inflexible steering and blowout. ④ Check the depth of grooves. If the lugs are worn for 2/3, replace such tire timely. Inspection of Light Installation and Steering Indicator Lights ① Power on, operate lighting switch, and check front and tail lights for working, and front light beam for normal work. ② Check brake handle for front and rear braking, and power failure respectively. ③ Operate steering switch, and check steering indicator lights for normal working. ④ Check light device for damage. Make sure to check carefully in order not to affect riding. Inspection of Rearview Mirror Imaging ① Check whether the behind or sides clearly from this mirror can be seen at the riding position. ② Check whether this mirror is stained or damaged. Inspection of Handlebars ① Shake the handlebars upward, downward, forward, backward, leftward, and rightward, and check whether there is looseness. ② Check whether there is excessive tightness. ③ Check whether the handlebars collide with others. In case of looseness and collision, contact the dealers so that they can offer you most perfect aftersales services. Correct Riding Starting Method Before starting: stand on the left of the bicycle, make rear support up, and check the complete bicycle for abnormality. ① Set the power switch to ON position, and check whether lights are on, switch work, horn sounds, and brake handle switch works; if there is no abnormality, make rear support down, and rear tire land on the ground. ② Motor starting: when you sit on the bicycle stably, slowly rotate the governor handle inward, and the bicycle will start running. Then make slow acceleration. Danger: after rear wheel lands on the ground and before you sit on the bicycle stably, do not rotate the governor handle. Speed Adjustment The speed can be increased or decreased through governor handle. Acceleration shall be slow after just starting or in climbing, and motor power will increase. In resetting, make deceleration. Application of Brakes A good effect can be achieved if front and rear brakes are used simultaneously. ① After making governor handle reset quickly, close upon brake handle. ② Braking shall be slow, and the ideal practice is to pull up the handle tightly. ③ Do not make hard brake and large steering which are regarded as main factors for side slip or turnover, and extremely dangerous. Attention: if you only brake the front or rear wheel, the bicycle may slip laterally, which is extremely dangerous. Precautions for Riding ① Keep a natural pose for free riding. ② Operational safety of two-wheel bicycle is affected by sitting position. In sitting, keep in the middle of cushion regularly to prevent loss of front wheel load and trembling of handlebars which can cause danger. ③ It is quite difficult to accelerate on roads with damaged pavement or paved with crushed stones. So ride at a low speed and make sure to check. ④ In rainy and snowy days, wet pavement will cause sideslip. So concentrate on riding and prepare to brake in advance at any time. After the vehicle is cleaned or running in water, its braking effect can be reduced. In such case, ride your bicycle at a low speed, making sure safety, applying light braking force, until normal status is recovered. ⑤In heavy rain or rainstorm days, when accumulated water level is higher than the lowest position of outer edge of rear wheel motor, do not ride your bicycle in water to avoid possible property faults in motor and rear brake. Parking Method ① Send a signal, and approach parking place. 1. Open steering light in advance, and pay attention to bicycles in behind and at sides, parking at a low speed. 2. Reset governor handle, and use front and rear brakes in advance. ② After the bicycle stops completely, make steering light switch off, and turn the ignition key to OFF position. ③ Before riding, you shall stand on the left, step on foot bar of rear support with force and raise up the bicycle with right hand on flat ground. Attention: it is not allowed to load child or articles on pedal. Follow the traffic rules and remember the safety speed. When leaving your bicycle, you shall make sure to lock it with anti-theft lock and take the key away for theft prevention. Attention: do not park on ground with loose soft slope to prevent dumping. The bicycle could be supported by the side stay for a short time. Charging and Maintenance of Storage Battery The bicycle shall be fitted with maintenance-free storage battery which can be used at temperature of -15℃ to 45℃(20℃±10℃for best). Too low temperature can reduce the effective capacity, and too high temperature can affect the service life. So in winter or cold areas, the continuous range of a charging is reduced, which is normal. When the temperature recovers to 20℃above, the function will recover automatically. As an important part to protect good properties of bicycle, the battery shall be properly protected in certainty. Make sure the electric energy is not lower than the minimum allowable voltage in each riding. When undervoltage indicator light becomes flickering, charge the battery. It is best to have a habit of charging after each riding, which greatly benefits the battery life, with charging period controlled not more than 8h (preferably 3 to 8h). Application and Maintenance of Charger ① Carefully check whether its rated input voltage (AC220V) is consistent with grid voltage. ② The battery can be directly put on the bicycle and charged, or removed and brought to the indoor for charging. Indoor charging is preferable in winter and cold areas. ③ Connect its output end plug with charging socket properly, and connect the input end plug with AC power supply. Then red power indicator light will become on. Attention: this procedure cannot be carried out in reverse. ④ When the red charging indicator light is on, it means the battery is under charging; when the red light becomes on, it means the battery is fully charged, with charging period of about 3 to 8h (depending on the electric quantity). ⑤ In case of special condition, the longest continuous charging period shall not be more than 12h. Charging Precautions ① In charging, place the charger in safe place cannot be touched by children. ② Do not use the battery not fully charged, or its life will be prejudiced. ③ Do not use chargers of other brands for charging, and the batteries of other types should not be charged with this charger. ④ The charger contains high-voltage circuit, and do not remove it without authorization. ⑤ This charger contains electric parts and components, and do not carry it accompanying the bicycle, or it can be easily damaged by bumpy riding. ⑥ In using and storing the charger, prevent fluid and metal chips from entering, and guard against falling and collision to avoid damages. ⑦ When used in charging, the charger shall not be covered with any articles, and shall far away from inflammables and explosives, or shall not be placed on the saddle. ⑧ This charge is of indoor service type, and shall be used in dry and well ventilated environment. ⑨ When you smelling foreign flavor or temperature is too high in the charging, immediately stop charging and deliver the charger to dealers for repair. Application and Maintenance of Motor and Controller ① Regularly check screws for two end covers of motor for looseness. ② Regularly check cables and insulation of housing of motor. ③ Regularly check cables of controller for looseness. ④ Regularly check fuse for looseness. Inspection and Maintenance To prolong service life of the bicycle, ensure safe and comfortable driving, the bicycle must be inspected and maintained regularly, in case of long time stop, the bicycle shall also be inspected periodically. Inspect and maintain the new bicycle when driving for 300 km. The maintenance period is advised 60 days after the initial maintenance. Full Attention Should be Paid to Safety When Inspecting ① Set up the rear support on spacious and flat place. ② When driving inspection is required, it shall be done on safe place, meanwhile, attention must be paid to surrounding safety. ③ If abnormity is found in inspection, please drive after eliminating the abnormal situation. If the item is difficult to solve, you may ask a repair station for inspection. Inspection of Operation Part ① Check if the front fork is bent or damaged. If there is damage to front fork, shake the bicycle up and down to inspect if there is noise caused due to bending of front fork. Please go to the distribution unit for inspection and repair. ② Inspection of brake Check whether the free gap of brake is within specified scope (10 to 15 mm). The result can be obtained from measurement. And the gap shall be adjusted if the gap is out of the scope. Brake shall be replaced timely if it is severely worn (over 2/3). Attention: please tighten the brake wire set screw after adjusting the brake to prevent danger when driving, meanwhile, pay attention to brake after outage. ③Braking effect Attention: adjust the distance between brake block and rim in case there is no effect after holding the brake handle tightly. Braking distance must be increased when riding in rainy and snowy days. Driving at low speed on day and flat surface, use front and rear brakes respectively, inspect the braking effect of each brake. Please go to the repair station for inspection and replacement if you have no special machine tools or measuring instrument, the bicycle cannot be dissembled by yourself before master the technology, in order to avoid damaging other parts. ④ Inspection of tire Inspect the tire with tire gauge under cooling condition of tire. Attention: Tire crack, pressure abnormity, damage, abnormal wear are the main causes of bad steering, and tire burst. Because the vehicle frequently contracts with the ground, stones, glass and nails on ground may bring damage to your vehicle, when driving, observe the vehicle, moreover, inspect if there are obvious cracks or damages on ground surface and sides of tire, whether sharp objects such as nail stone, glass, etc. have penetrated into the tire, and if there is abnormal wear due to long time driving. Depth of Tire Groove Inspect the wear condition of tire and depth of tire groove, and replace the tire if 2/3 tire lug is worn out. In case of tire abnormity, please go to dealer for inspection or replacing with a new one. The lock torque of the rear-wheel is advised no less than 30N.m and that of the front wheel is no less than 18N.m. Inspection of Battery Liquid Level The bicycle adopts maintenance-free sealed battery, no inspection or filling of battery liquid is required, please inspect in repair station if there is abnormity. Attention: for the battery is sealed, it is not allowed to take it apart, if the battery is not used for a long time, the electric quantity will reduce gradually due to natural discharge, so the battery should be taken out to store, if it is stored in the bicycle, negative pole (-) of the battery must be disconnected. Inspection of Lubricating Condition of All Body Parts Inspect if sufficient lubricating oil is filled to all parts of the body, and whether the handles rotate flexibly, add 20# engine oil in rotate center axle of each tensing wire with oil can if the handles are not flexible, and make sure there is no drip in electric switch. Oil is prohibited to inject into the brake flange, and add proper amount of lubricant after employing for a certain time. Method for Adjusting Brake Adjustment of Front Braking System ① Inspect right brake handle, maximum braking effect shall be realized if stroke of brake handle reaches 3/4X. When stop to apply acting force, the braking force shall also disappear. The control force shall be ≤200N. ② Idle stroke of brake handle is from 10 mm to 20 mm. ③ There shall be no self-braking when driving. Adjustment of Rear Braking System ① Method for inspecting left brake handle is the same with the inspection method of front brake handle. ② Idle stroke of brake handle is 10 mm to 20 mm. ③ There shall be no self-braking when driving. Replacement of Fuse Turn the power switch to OFF, and inspect whether the fuse is intact or not. It shall be replaced immediately in the event that the fuse breaks. ① Pull out the fuse box. ② Open the fuse box, and take down the fuse tube. Attention: fuse fever may be caused if insert position of fuse is loose, and lead to accident. When replacing burned-out fuse, fuse of the same type and specification must be used. If fuse that exceeds the specified volume is used, the principal wire bundle may be fever or burnt out. Other reasons besides fuse may be considered if the fuse burns out immediately after replacement, findi out the reason and adjust and replace the fuse . When cleaning the condition, attention must be paid to avoid impacting the part of fuse tube with strong water flow. Fault Phenomenon and Troubleshooting SN Fault Phenomenon ① Whole bicycle out of power ② The charger does not work ③ Turn on the power, motor operates with maximum speed ④ Motor does not work ⑤ Brake cannot be interrupted ⑥ Fault Reason Troubleshooting Method (1) Fuse is broken Replace fuse (2) Wiring plug is loose Send to outlet for overhaul (3) Power switch is broken Send to outlet for overhaul (4) Battery wiring is disconnected Send to outlet for overhaul (1) Charger fuse is burnt out Send to outlet for overhaul (2)Battery fuse is broken Replace fuse (3) Battery wiring is disconnected Send to outlet for overhaul (4)Charge socket of battery pack is broken Send to outlet for overhaul (5) Charger is broken Replace charger (1) Cathode line of Hall twist has bad contact Send to outlet for overhaul or Hall twist is burnt out (2) Controller is burnt out Send to outlet for overhaul (1) Fuse is burnt out Replace fuse (2) Power switch is broken Send to outlet for overhaul (3) All plugs of motor, control are loose Send to outlet for overhaul (4) Hall twist is broken Send to outlet for overhaul (5) Control is broken Send to outlet for overhaul (6) Outage switch is burnt out Send to outlet for overhaul (7) Motor is burnt out or lack of phase Send to outlet for overhaul (8) Dashboard is burnt out Send to outlet for overhaul (1) Brake outage switch is broken Send to outlet for overhaul (2)Control is burnt out Send to outlet for overhaul (3) Outage plug has bad contact Send to outlet for overhaul (1) Tire pressure is insufficient Inflate the tire fully on a regular basis (2) Insufficient charging or charger failure Charge the battery fully or inspect whether charger plug has bad contact or Continuous range is insufficient after replace charger one time charge (3) Battery aged or damaged Replace battery (5) Under-voltage protection point of Send to outlet for overhaul controller is too high Note: If you cannot shoot the trouble or judge fault by yourself, and there are internal damages to motor, controller, charger, battery pack, etc. please send the bicycle to “E-BIKES” outlet for overhaul, it is prohibited to open the parts above without authorization, otherwise, you may lose the warranty commitment of our company. Electrical Schematic Diagram Hall twist Cruise switch Tri-mode switch Speed indicator Instrument light indicator Power indicator Battery indicator Left and right steering indicator Left brake handle Right brake handle Night light Front headlight Front and rear left steering light Front and rear right steering light Rear brake light Steel horn Steering switch Horn switch Rear brake light Headlight switch Flasher Power switch lock 5A fuse Air switch Battery Controller Orange Red Black Yellow Green Blue Remote control alarm Motor Instrument assembly Announcement on Battery Recycling Do not discard used battery carelessly so as to avoid environmental pollution. The waste lead storage battery is recycled by our company or dealer, or branch appointed by the government. Additional remarks This operation manual is taken as a permanent part of the electric bicycle. You should transfer the manual to someone else when resale or transferring. Please carefully read the important guide on safety operation and drive before drive. “E-BIKES” from Sweden insists on continuous improvement strategies. Therefore, we reserve the right to change and improve the product mentioned in this instruction without prior notice.