1
7. 7. R
esistance measurement of transmission cable
(Measure with breaker OFF)
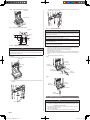
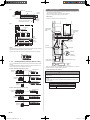
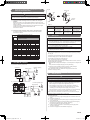
Fig. B
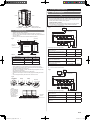
Charging cap
Valve
Spindle
CAUTION
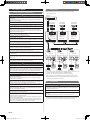
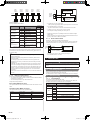
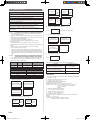
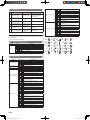
Measure the resistance between 2 terminals of a transmission cable.
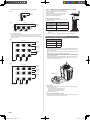
(1) Transmission cable connecting indoor units, outdoor units, and signal
amplifiers
Measure the resistance of the signal amplifier terminal and the terminal of the
indoor and outdoor units connected farthest away from the device where terminal
resistor is measured.
A value from the table is displayed, depending on the distance from the signal
amplifier and the device where the terminal resistor is set.
This value is an estimate.
(2) Transmission cable connecting outdoor units in a refrigerant system
The resistance between the terminals of the transmission cable is 45-60Ω.
This value is an estimate.
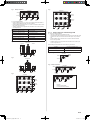
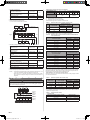
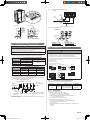
Distance from termination resistor (m)
0 ~100
0 ~ 50
~ 200
~ 300
~400
Approximate resistance (Ω)
Hexagon
wrench
Close
Cap
Close
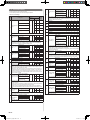
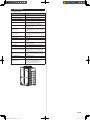
Table. A
Valve type
Cap
Charging cap
Liquid
9.0 to 12.0 N·m
(90 to 120 kgf·cm)
Spindle
20.0 to 24.0 N·m
(200 to 240 kgf·cm)
12.5 to 16.0 N·m
(125 to 160 kgf·cm)
Gas
27.0 to 33.0 N·m
(270 to 330 kgf·cm)
25.0 to 30.0 N·m
(250 to 300 kgf·cm)
12.5 to 16.0 N·m
(125 to 160 kgf·cm)
8. 1. Sealing test
~500
A short circuit somewhere or 2 or more termination
resistors are connected
CAUTION
50
60
70
80
90
100
110
120
130
140
150
160
170
180
190 ~
1K ~∞
Open
Open
Do not turn on the power if the resistance between the terminals of the transmission cable is abnormal. Otherwise, the circuit board may be damaged.
• Use only nitrogen gas.
Never use refrigerant gas, oxygen, in flammable gas or poisonous gas to pressurize the system. (If oxygen is used. There is danger of an explosion.)
• Do not shock during sealing test.
It can rupture the pipes and cause serious injury.
• Do not turn on the power unless all operations are complete.
• Do not block the walls and the ceiling until the sealing test and charging of the
refrigerant gas have been completed.
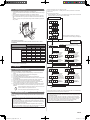
After connecting the pipes, perform a sealing test.
Recheck that the spindle of the 3-way valve are closed before performing a sealing
test. (Fig. B)
Pour nitrogen gas through both the liquid pipe and the gas pipe.
Pressurize nitrogen gas to 4.2 MPa to perform the sealing test.
Faulty contact or wiring length over 500 m
Faulty contact, open circuit, or no termination resistor
Check all flare connection areas and brazed areas.
Then, check that the pressure has not decreased.
Compare the pressures after pressurizing and letting it stand for 24 hours, and check
that the pressure did not decreased.
8. PIPE INSTALLATION II
* When the outdoor temperature changes 5 °C, the test pressure changes 0.05
MPa.
If the pressure has dropped, the pipe joints may be leaking.
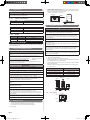
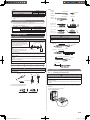
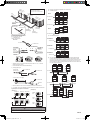
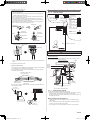
Fig. A Connection system
A) In case of connecting 1 outdoor unit
Outdoor unit
Pressure gauge
Pressure regulating
valve
Nitrogen
If a leakage is found, immediately repair it and perform a sealing test again.
* Decrease the pressure of nitrogen gas before brazing
After completing the sealing test, release the nitrogen gas from both valves.
Release the nitrogen gas slowly.
8. 2. Vacuum process
CAUTION
Indoor
unit
Indoor
unit
Vaccum
pump
B) In case of connecting multiple outdoor units
Outdoor unit
Outdoor unit
Do not turn on the power unless all operations are complete.
Scale
If the system is not evacuated properly, its performance will drop.
• If moisture enter the piping, follow below. (i.e., if doing work during the rainy
Pressure regulating valve
Pressure gauge
season, if the actual work takes long enough that condensation may form on the
inside of the pipes, if rain might enter the pipes during work, etc.)
• After operating the vacuum pump for 2 hours, pressurize to 0.05 MPa (i.e.,
vacuum breakdown) with nitrogen gas, then depressurize down to -100.7kPa
Nitrogen
(-755mmHg) for an hour using the vacuum pump (vacuum process).
• If the pressure does not reach -100.7kPa (-755mmHg) even after depressurizing
for at least 2 hours, repeat the vacuum breakdown - vacuum process.
After vacuum process, maintain the vacuum for an hour and make sure the pressure does not rise by monitoring with a vacuum gauge.
Indoor
unit
Indoor
unit
Vaccum
Scale
pump
Evacuation procedure
1) Remove the caps of the gas pipe and liquid pipe and check that the valves are
closed.
2) Remove the charging cap.
3) Connect a vacuum pump and a pressure gauge to a charging hose and connect
it to the charging port.
4) Activate the vacuum pump and vacuum the indoor unit and connection piping
until the pressure gauge becomes -100.7kPa (-755mmHg).
Evacuate from both the gas pipe and the liquid pipe.
5) Continue evacuating the system for 1 hour after the pressure gauge reads
-100.7kPa (-755mmHg).
6) Remove the charging hose and reinstall the charging cap.
En-20
9378945142-01_IM_EN_130219.indd
20
2013/02/19
11:03:11