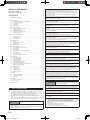
1
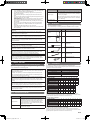
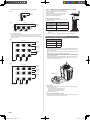
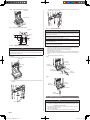
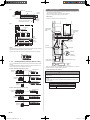
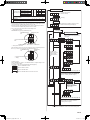
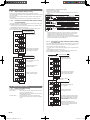
• The drain water from the base of the outdoor unit may generate during operations.
Perform drain processing, as necessary.
• When you want to prevent the drain water from leaking at the perimeter, construct
a ditch for the drain water as shown in the figure.
• Provide a central drain pan, as necessary.
2. 5. Optional parts
CAUTION
Outdoor unit
The following parts are optional parts specific to R410A refrigerant.
Do not use parts other than those listed below.
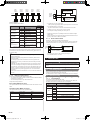
2. 5. 1.
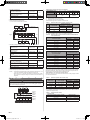
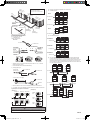
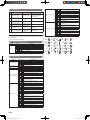
Outdoor unit branch kit
Model
Total cooling capacity of indoor unit (kW)
UTP-CX567A, UTR-CP567X
ALL
2. 5. 2.
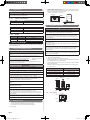
50mm or
more
Separation tube
10mm or more
3. 3. Installation dimensions
Model
Total cooling capacity of indoor unit (kW)
UTP-AX090A , UTR-BP090X
28.0 or less
CAUTION
UTP-AX180A , UTR-BP180X
28.1 to 56.0
When installing the outdoor unit, pay attention to the following items.
UTP-AX567A , UTR-BP567X
56.1 or more
Provide sufficient installation space, such as transportation route, maintenance
space, ventilation space, refrigerant piping space, and passageways.
2. 5. 3.
Header
3-6 branches
3-8 branches
UTR-H0906L
UTR-H0908L
Total cooling capacity of indoor unit (kW)
28.0 or less
UTR-H1806L
UTR-H1808L
28.1 to 56.0
3. INSTALLATION WORK
Please obtain the approval of the customer when selecting the location of installation
and installing the main unit.
3. 1. Selecting an installation location
WARNING
Install the unit in a location that can withstand its weight, and where it will not topple
or fall.
Calculate the proper refrigerant concentration if you will be installing it in an enclosed location.
T otal amount of replenished refrigerant in refrigerant facility (kg) 3
≤
Refrigerant concentration (kg/m3)
(0.3kg/m3)
Capacity of smallest room where unit is installed (m )
If the results of the calculation exceed the concentration limit, increase the room
surface area or install a ventilation duct.
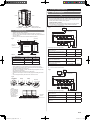
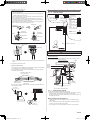
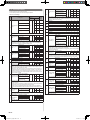
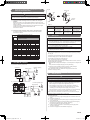
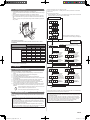
Pay attention to the specifications of the installation space as shown in the figure.
If the unit is not installed according to specifications, it may cause short circuit or
poor performance. The unit may be prone to lapse into non-operation due to high
pressure protection.
Do not place obstructions in the air flow outlet direction. If there is an obstruction in
the outlet direction, install an outlet duct.
When there is a wall in front of the unit, provide a space of 500mm or more as
maintenance space.
When there is a wall at the left side of the unit, provide a space of 30mm or more
as maintenance space.
An outdoor temperature of 35 degrees in air-conditioned operation is assumed for
the installation space in this item. If the outdoor temperature exceeds 35 degrees
and the outdoor unit is operating at a load exceeding its rated ability, provide a
larger inlet space.
If you are installing more outdoor units than indicated here, please ensure sufficient
space or consult your distributing agent as it may affect the performance due to
short circuit and other problems.
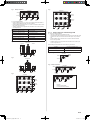
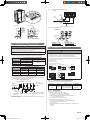
3. 3. 1.
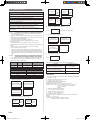
When install near by limited height wall
(1) Single and multiple installations
• There are no restrictions on the height of the side wall.
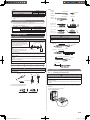
• Provide installation spaces L1 and L2 in accordance with the table below according
to the wall height (front side, rear side) conditions.
• Provide installation spaces other than L1 and L2 in accordance with the conditions
shown in the figure below.
CAUTION
Select an installation location by observing the following precautions:
• Ventilation resistance can be ignorable when the distance from a wall or product,
etc. is larger than 2m.
Install the unit level. (Within 3 degrees)
Wall height condition
Necessary installation space
Install this unit in a location with good ventilation.
When H1 is 1500 (mm) or less
L1 ≥ 500 (mm)
If the unit must be installed in an area within easy reach of the general public, install
as necessary a protective fence or the like to prevent their access.
When H1 is 1500 (mm) or more
L1 ≥ 500+h1÷2 (mm)
Fig. 1
L2 ≥ 100 (mm)
L2 ≥ 100+h2÷2 (mm)
<Front>
Install the unit in an area that is away from the exhaust or vent ports that discharge
vapor, soot, dust, or debris.
For maintenance purposes, do not bury the piping.
3. 2. Drain processing
• The drain water is discharged from the bottom of the equipment. Construct a drain
ditch around the base and discharge the drain water properly.
• When installing on a roof, perform floor waterproofing properly.
L2
L1
Wall
Fig. 2
Single installation
H2
Install the unit in an area that has no heat sources, vapors, or the risk of the leakage
of flammable gas in the vicinity.
Keep the length of the piping of the indoor and outdoor units within the allowable
range.
<Rear>
H1
1500
Install the unit in an area that would not cause problems even if the drain water is
discharged from the unit. Otherwise, provide drainage that would not affect people or
objects.
Install the indoor unit, outdoor unit, power supply cable, transmission cable and
remote control cable at least 1 meter away from a television or radio.
The purpose of this is to prevent TV reception interference or radio noise. (Even if
they are installed more than 1 meter apart, you could still receive noise under some
signal conditions.)
<Side view>
500 h2
If the unit is installed in a cold region that is affected by snow accumulation, snow fall,
or freezing, take appropriate measures to protect it from those elements.
To ensure a stable operation, install inlet and outlet ducts.
When H2 is 500 (mm) or less
When H2 is 500 (mm) or more
h1
Install the unit in an area that would not inconvenience your neighbors, as they could
be affected by the airflow coming out from the outlet, noise, or vibration.
If it must be installed in proximity to your neighbors, be sure to obtain their approval.
Wall
<Top view>
<Rear>
L2
<Front>
L1
30mm or more
10mm or more
Drain processing:
En-3
9378945142-01_IM_EN_130219.indd
3
2013/02/19
11:02:55