1
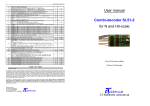
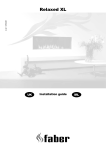
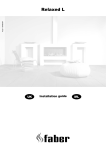
Installation manual
Part no.: E8581136,
EAN no: 7331002600084
KIMA ZONE 50 Version 3
LCD Display
4. Don’t turn the heating on to early, before concrete or liquid concrete have cured enough. See manufactures specifications.
5. LED light will be red when the Heating Cable/Heating Mat is energized. Depending
on the thickness of the floor construction and how low surrounding temperature are, it will take longer time to achieve set temperatures. If the heat losses are high, it could be a problem to achieve set temperatures.
If their will be no heat, see fault finding list.
Red, increase
temperature
Programming
button
Blue, decrease
temperature
ZONE 50 is an electronic thermostat for electric underfloor heating system with external floor
sensor.
ZONE 50 can be installed in standard wall box or flush mounted on the wall with an external
frame box.
ZONE 50 controls and regulate the floor temperature to achieve the best room comfort.
ZONE 50 is using the adaptive PWM- and PI-technics to to give the best performance and to
extend ZONE 50s lifetime.
ZONE 50 should not be used to eliminate over temperatures in the floor construction.
The only way to eliminate overtemperatures is to design the floor construction with the right
W/m2 and compensate for the floor constructions thermal insulation and the Wattage per
linear meter Warm Floor Heating Cable or Wattage per square meter Warm Floor Mat.
If the buildings insulation properties is poor it can be compensated with another external
heat source. If ventilation/heat pump/air-condition are chosen as the external heat source
it is important that the temperature setting for this heat sources will not be lower than the
floor temperature, this will save energy.
The under floor heating construction should never be exposed to high temperatures to eliminate the risk of fire. The worst situation will be when the construction have a high power
output per sqm floor and the floor construction is thin with a good thermal insulation and
the floor surface will be covered with a carpet or any other good thermal insulating material.
The maximum allowed temperatures is depending on the surrounding material and regulated
by the electrical standards, regulations and directives.
- Maximum temperature in a floor construction according to electrical standards is 80˚C.
- The general maximum temperature for combustible material is 80˚C.
- Maximum operating temperature for Heating Cable or Heating Mat see the products
technical specifications.
- The maximum temperature for water membrane are quite low (50˚C), see the
producers technical specifications.
ZONE 50 complies with the directives for electrical safety and EMC compatibility.
ZONE 50 are CE-marked and complies with the following standards:
- EN 61000-6-2, EN 61000-6-3 EN 60730-1 and 60320-2-9.
ZONE 50 should only be used when the whole installation complies with electrical standards,
regulations, directives and KIMAs installation manuals.
ZONE 50 should only be installed by authorized installers.
If ZONE 50 have been exposed to violence or got damaged, it should be carefully controlled
by qualified personnel before it will be connected to the mains.
Installation floor sensor
It makes it easier if the floor sensor is installed in an end sealed electric conduit pipe, if it
needs to be replaced.
The floor sensor should be installed in an open floor area between two heating cables about
0,5 m from the wall. It is important that the sensor will not be placed in an area were the
heat can be thermally blocked with fixed or movable furniture, wardrobes, kitchen cupboards,
etc.
If needed the floor sensor cable can be extended with a separate ordinary 1,5 mm2 installation cable (maximum length see technical specifications). The floor sensor should not be
installed in the same electrical conduit pipe as the heatingcables/heatingmats cold tail or
any other electrical cables. If the floor sensor is connected to a cable with metallic sheath.
Don´t earth the metallic sheath.
Economy function, Day or Night setback
Lowering the floor temperature with a preset value, see Technical specifications, with an external signal. This function doesn’t need to be used if not needed. The external timer should
be installed on a suitable place for example at the switchboard or a manual switch that could
be installed next to ZONE 50. The timer or switch can control more than one thermostat at
the same time. Important to use the right control signal, see technical specifications.
LED light will be green when the economy signal is active and red when the heatingcable/
heatingmat is energized. (see Fig. 1)
Frost protection
Frost protection will maintain the floor/room temperature at a low temperature, see technical specifications. This function doesn’t need to be used if not needed. The external timer
should be installed on a suitable place for example at the switchboard or a manual switch
that could be installed next to ZONE 50.
The timer or switch can control more than one thermostat at the same time. Important
to use the right control signal (the signal should be connected via a rectifier diode), see
technical specifications. (See Fig. 2)
Installing ZONE 50
1. Open the plastic front cover and unscrew the screw. The thermostat should not be opened in any other way.
2. Connecting cables (see fig.)
Terminal 1: Live (L)
Terminal 2: Neutral (N)
Terminal 3-4: Heaingcable/Heatingmat (Maximum Load 3600W/16Amp)
Terminal 5-6: Floor sensor
Terminal S: Control signal from external timer or switch to operate Economy function, Day or Night setback or Frost protection if decided to use.
PS. Before the Heating Cable or Heating Mat is connected to ZONE 50 the resistance and insulation properties should be checked. See Heating Cable or Heating Mat
installation manual.
Fig. 1
Fig. 2
Documentation
Installations manual, Users manuals and any other documents for the floor construction
should be filed near by the switchboard together with Warranty documents that can prove
that it has been an authorized installer that are responsible for the installation.
Environmental disposal
ZONE 50 is an electronic product and should therefor be returned to any environmental approved depo stations.
Products marked with this symbol can’t be disposed together with the normal
household waste. It should be delivered to a waste collection centre in
accordance with the local regulations.
Faultfinding ZONE 50
Fault tracing should be done by KIMA authorized fault finder.
The floor will not be warm
A. Check that the cables have been connected in the right way and the terminal screws are tight.
B. Check the voltage on terminal 1 and 2.
C. Check that the switch on ZONE 50 is switched on. Check the voltage on terminal 3 and 4 when the Heating Cable/Heating Mat is on and the LED light is lit as said in
paragraph 5. Measure the electric current with a clamp meter and compare it with the technical specifications for the Heating Cable/Heating Mat
D. Disconnect the Heating Cable/Heating Mat and check the total resistance and the insulation properties and compare them with the recorded values from the installation that should be filed near the switchboard and compare it with the technical
specifications.
E. If the measured electrical values are correct according to the technical specifications and the construction doesn’t get warm enough the problem could be that the heat
losses are greater than the input power and the reasons could be cold spots. (PS. Do not increase the power out put, that will instead increase the risk of fire and also
shorten the ageing properties of the Heating Cable/Heating Mat) Analyze the total building constructions insulation properties and try to find any cold spot that can cause the problem. If the floor construction is a concrete slab on the ground check the moisture, that could be a great problem due to better heat conductivity. Another problem could be that their is a could area under the floor construction and that’s why it important to insulate the construction well.
F. Disconnect the floor sensor on terminal 5-6 and there will be an error code in the LCD display ”E1”, the LED light will flash red once. The same will happened if terminal 5-6 are shortened.
G. Check the floor sensors resistance and compare it with the technical specifications. The reading should only change with the temperature.
H. If ZONE 50 are turned on and the surrounding temperature are lower than -20˚C,
ZONE 50 will turn the relay off and when the temperature increase over -20˚C it will turn on again.
I. If the temperature in the thermostat will be greater than 70˚C it will turn the relay of for 10 minutes so the temperature will decrease and the LED light will flash red five times and a error code ”E5” will be presented in the LCD display.
J. Contact the distributor ZONE 50 has been purchased from.
The floor is energized all the time
a. Check that the cables have been connected in the right way and the terminal screws are tight.
b. Disconnect the floor sensor on terminal 5-6 and there will be an error code in the LCD display ”E1”, the LED light will flash red once. The same will happened if terminal 5-6 are shortened.
c. Check the floor sensors resistance and compare it with the technical specifications. The reading should only change with the temperature.
d. Contact the distributor ZONE 50 has been purchased from.
Problem programing ZONE 50, see Users manual.
Error codes in the LCD display
E1 - Sensor fault. The sensor are shortened or disconnected. The LED light will flash red
once.
E5 - Overheating. The temperature will be higher than 70degree C in the thermostat and the relay will be switch off for 10 minutes so the temperature will decrease and the LED light will flash red five times.
Programing ZONE 50
See Users manual.
Warranty
Installation should be done by an authorized installer according to regulations, directives
and KIMAs installation manual.
Time of Warranty, see KIMA Warranty.
3. Install ZONE 50 with the frame against the wall or over a wall box and fix it with screws. Fit the covers.
www.kima.com
INST0104010 Rev 111121
On/Off,
switch
Users manual
ZONE 50 with a floor sensor are the best and an easy way to control and regulate the
underfloor heating system and to achieve the best comfort. Underfloor Heating system are
always slow reacting system and that depends on the thickness of the floor construction.
Thicker cement based floor constructions gives also a possibility to accumulate heat.
If the building have poor insulation value and the heat losses are considerable is it possible to lower the energy consumption by using the Economy function with an external
switch or external timer, see technical specifications.
ZONE 50 factory set value are 5,0 LCD-display = 25,0˚C floor temperature.
ZONE 50 LCD-display controls between 0-10. To change setting press blue or red button
and the LCD-display will change 0,1 up or down. It is possible to change the LCD-display
to degree C operating mode, see Programming.
With ZONE 50 their is also the possibility to change the temperature reading in the
LCD-display (Offset) compared with the actual floor temperature to match measured room
temperature, maximum offset 8˚C up or down. This will only work when ZONE 50 is operating in the degree C mode.
ZONE 50 is maintenance free.
Technical specifications ZONE 50
Voltage
230 VAC +/-15% 50/60 Hz
Max output resistance load
3600 W
Max current
16 Amp
Relay
Normally open
Energy consumption
<1W
Switch
2-pole, 16 Amp
Control range
0-50 ˚C
Preset temp floor sensor 25 ˚C (= 5,0 in the display)
Economy function (fixed value) 5˚C (LCD-display minus 5˚C)
Economy function, control signal
230 VAC
Frost protection, fixed limittemp. 10˚C
Frost protection, control signal
230 VDC (rectified, serial connected diode)
HousingIP21
Classification
Class II
Category overvoltage
III (Pulse voltage 4kV acc to IEC 60664-1)
Min/Max surrounding temp, turned on
0/+40 ˚C
Min/Max storage temp
-20/+50 ˚C
Limit surrounding airpollution
Class 2 (= normal aircirculation domestic home)
Length sensor cable
3,0 m
Max extension sensor cable
50 m, with min 1,5 mm2 conductor
Floor sensor resistance
se separate table below
Dimensions
H/82, W/82, d/38 mm
ZONE 50 can only operate with a resistive load (such as a heating cable or a heating
mat), an external contactor should be used if the load is larger than 3600 W or a 3-phase
construction.
Programming
To program parameter values, press and hold the programming button for 3 seconds.
In the LCD-diplay Lcd // nU will be displayed . At first Lcd for 1 second, then nU ready
to be changed. To continue with the programming with the next parameter press the
programming button. If no button is being pressed within 30 seconds it will return to it’s
operating mode.
Sensor resistance at diffrent temperatures
Temperature
Sensor ohm
-10˚C
64000
0˚C
38000
1
LED-display 0-10
or degree C
10˚C
23300
2
Offset
20˚C
14800
30˚C
9700
Pos.
Parameter / Mode
Shown in
LED-display
Factory setting
Possible to select
Lcd // nU
nU
nU or C
oFF //
0
(+/-8)
Warranty
Name property owner:...............................................................................................................................................................
Installation Company name:.........................................................................................................................................
Installation Adres:.......................................................................................................................................................................
Installation Company adres:.........................................................................................................................................
...............................................................................................................................................................................................................
.......................................................................................................................................................................................................
...............................................................................................................................................................................................................
Installer Company tph no:.............................................................................................................................................
Installed in type of room:......................................................................................................................................................
Purchasing place Company name:..............................................................................................................................
Installed date:...............................................................................................................................................................................
Purchasing date:..................................................................................................................................................................
Installed Wattage:............................................................................................................................................................ Watt
Installed floor surface:.............................................................................................................................................sqm
Installed Wattage per sqm floor:.................................................................................................................. Watt/sqm
Where Documents are filed:...........................................................................................................................................
Functional test
Thermostat is operating when the temperature settings are changed up and down Yes/No:......
Measured current when energizedc:.............................................................................................................. Amp
Drawing or photo showing thermostat and floor sensors (with measurement distance from wall ) location.
Signature property owner:
Signature installer:
www.kima.com