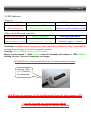
1
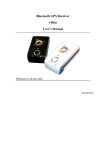
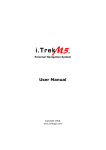
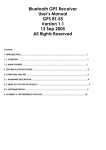
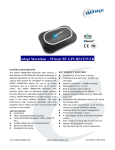
ROHS Compliance
Ultra Low Power GPS Bluetooth® Receiver with Speed
Camera Detector Functionality
User’s Manual
Table of content
1
2.
3.
4.
5.
6.
7.
8.
9.
10.
11.
12
13
Read Me First
Introduction
Box Contents
Hardware Description
LED Indicator
Connecting to your Bluetooth PDA
Working modes
Volume control/Database update
Auto Power ON/OFF function
Specification
Revision History
Appendix A
Appendix B
……………………………………………………………..
……………………………………………………………..
……………………………………………………………..
……………………………………………………………..
……………………………………………………………..
……………………………………………………………..
……………………………………………………………..
……………………………………………………………..
……………………………………………………………..
……………………………………………………………..
……………………………………………………………..
……………………………………………………………..
……………………………………………………………..
2
P.3
P.3
P.3
P.5
P.6
P.7
P.11
P.13
P.13
P.14
P.15
P.16
P.17
User’s Manual
1. Read Me First
1. The battery must be charged for at least 8 hours for the ‘INITIAL’ use. The LED2 (GREEN) will turn
off after 3 hours’ charging, please keep on charging for 5 more hours. Thereafter, for each time’s
battery charging please fully charge for 3 hours.
2. We strongly recommend that remove the battery if the device will not be used for over 2 weeks. Do
not remove the battery within 2 weeks.
3. For fast data tracking purpose staying still before get fixed is recommended. (FIX then GOES!!)
4. Please note that the device will only receive the signal under the open sky. In this case, putting the
device under the windshield is recommended.
2. Introduction
The Bluetooth GPS receiver, a total solution of GPS Bluetooth wireless technology, is dedicated design
for the user who is usually carries the portable device such as PDAs/smart phones all the time.
It allows 22 hours continuous use with a single battery charge. It uses GPS technology to provide
accurate warnings to fixed and mobile speed cameras in the road ahead. The unit also including some
nice features, such as vibration sensor for power management and POI update, which are the unique
benefits to the users.
Not only transmit satellite information to the PDA or smart phone via Bluetooth but also become a
G-Mouse GPS receiver through a data cable to deliver satellite information to the device without
Bluetooth interface.
3. Box Contents
1.
2.
3.
4.
5.
6.
GPS Bluetooth Receiver
Lithium-ion rechargeable battery
Car charger
AC adapter
CD (Documentation)
Anti-slip rubber pad
3
User’s Manual
BT GPS Receiver
AC Adaptor
Car Charger
Li-ion rechargeable
Battery
CD (Documentation)
Anti-Slip Rubber Pad
4
User’s Manual
4. Hardware Description
LED 2:
Power Status
Speaker
LED 3:
LED 1:
Bluetooth Status
GPS Fixed Status
1. Volume up
Power button
2. Add data
1. Volume down
2. Erase data
External antenna connector
LED alarm
1. Charge socket
Slip-resistant
2. USB G-mouse socket
5
User’s Manual
5. LED Indicator
Power on:
LED1: GPS Fix Status
LED2: Power Status
LED3: Bluetooth Status
Red (OFF)
GPS not fixed yet!
Green (ON)
Blinking for every 1 second
Blue (ON)
Blinking very quickly (in paring mode)
GPS get fixed/Bluetooth connected:
LED1: GPS Fix Status
LED2: Power Status
LED3: Bluetooth Status
Red (ON)
Green (ON)
Blinking for every 1 second
Blue (ON)
Blinking for approx. 1 second
Blinking for approx. 1 second
Low battery: Notified by voice “battery low” when low battery; notified by “beep” sound and go
to sleep mode if battery is too low to support operation
Charging: LED2 (GREEN) blinking 2 times/second
Battery is fully charged: 1. LED2 (GREEN) turns off if charged by AC adaptor. 2. LED2 (GREEN)
blinking for every 1 second if charged by car charger
BT GPS Receiver will automatically turns on if powered by AC adaptor
Charging: LED2
(Green) blinking
2 times/second
GPS Bluetooth operates on OS with Bluetooth function that supports SPP
In order to avoid any unexpected problem,
DO NOT attempt to change the default baudrate
6
User’s Manual
6. Connecting to your Bluetooth PDA
1. Turn on the BT GPS Receiver
Press power button for 1 second, the LED2 (Power Status LED) and LED3 (Bluetooth Status) start
blinking.
2. Activate Bluetooth function of your PDA / smart phone
Prior to activating the Bluetooth function of your PDA / smart phone, please make sure the device is
equipped with Bluetooth function, and the driver software has been installed.
3. Activate Bluetooth Manager & Established New Connections
Illustrations by using HP 2100 PDA shown as follows:
I.
II.
III.
IV.
First, find the device with which you wish to establish connection.
Open “Bluetooth Manager” on your PDA.
Press “New”.
Press "Connect”.
7
User’s Manual
BTGPS
Click here
Click here to select
installation
BTGPS
****
Enter Pass Key "0000",
then Press “Enter”
Enter key
8
User’s Manual
BTGPS
BTGPS
Click
here
Click
here
Connection
established
BTGPS: SPP slave
The connection between BT GPS Receiver and PDA has been successfully established
9
User’s Manual
4. Turn off the BT GPS Receiver
Press power button for 1 seconds, LED goes off.
We strongly recommend that close the E-map before turning off the BT GPS Receiver,
in order to avoid any possible PDA /Smart phone freeze
10
User’s Manual
7. Working Modes
Mode A: GPS + Bluetooth + Speed Camera Detector
1. Power on BT GPS Receiver by pressing power button for 1 second
2. “Bluetooth On” by voice alarm
3. Bluetooth status LED (LED3: BLUE) blinking quickly
4. Connecting BT GPS Receiver to your Bluetooth PDA (please refer to 6: connecting to your
Bluetooth PDA)
5. GPS status LED (LED1: RED) blinking when GPS get fixed (with voice alarm)
Speed Camera Voice Reminder
1. Notified by voice “GPS positioned” after GPS get fixed
2. Notified by voice alarm if speed camera is nearby (BT GPS Receiver will automatically comparing
the current position with the database)
3. Voice alarm can be set under certain distance, for instance, 500 meters, 300 meters, 200 meters,
100 meters (or equivalent miles, please refer to remark A)
a. 500 meters (or equivalent miles)
(a.1) Notified by voice “500 meters (or XXX miles) ahead, a fix (or mobile, please refer to remark
B) camera”
(a.2) LED alarm blinking slowly in turn
(a.3) LED alarm blinking quickly if over speed (please refer to remark C)
b. 300 meters (or equivalent miles)
(b.1) Notified by voice “300 meters (or XXX miles) ahead, a fix (or mobile) camera”
(b.2) LED alarm blinking quickly in turn
(b.3) Noticed by voice “slow your speed” and LED alarm blinking quickly if over speed
c. 200 meters (or equivalent miles)
(c.1) Noticed by “beep” sound
(c.2) LED alarm blinking quickly in turn
(c.3) Noticed by voice “slow your speed” and LED alarm blinking quickly if over speed
d. 100 meters (or equivalent miles)
(d.1) Noticed by “beep” “beep” sound
(d.2) LED alarm blinking quickly in turn
(d.3) Noticed by voice “slow your speed” and LED alarm blinking quickly if over speed
11
User’s Manual
Remark:
A. All GPS x,y graphic, speed camera database, and distance setting can be provided by request
B. Two types of camera: fix and mobile, depending on database setting
C. Over speed alarm: depending on database setting, there’s “no” over speed warning if the
camera speed has not been recorded in the database
Mode B: GPS + Speed Camera Detector (Bluetooth Off)
1.
2.
3.
4.
Power on BT GPS Receiver by pressing power button for 1 second
Switch Bluetooth off by pressing power button for 1 second (please refer to remark D)
“Bluetooth Off” by voice alarm
Bluetooth status LED off
5.
GPS status LED (LED1: RED) blinking when GPS get fixed (with voice alarm)
Remark:
D. Bluetooth can be turned on anytime by pressing power button for 1 second, user will heard
“Bluetooth On” by voice alarm
Speed Camera Voice Reminder
Speed camera detector can be working without Bluetooth, please see previous page for operational
setting
Mode C: G-Mouse + Speed Camera Detector (Bluetooth Off)
The BT GPS Receiver can be used as a G-mouse by simply connecting to laptop PC via USB cable
1. Connecting BT GPS Receiver to laptop PC via USB cable, (USB to mini USB cable) please make
sure that the Bluetooth is off
2. Please install USB driver (in document CD) to your laptop PC
3. COM port set-up: start – control panel – system – hardware – device manager – ports (COM&LPT)
4. GPS status can be read by running GPS software (i.e. Visual GPS)
5. Speed camera detector can be working under G-mouse mode, please see previous page for
operational setting
12
User’s Manual
8. Volume control/Database update
a. Volume up/Add data
(a.1) Volume up: press shortly the “volume up” button (notified by “beep” sound)
(a.2) Add data: press “volume up” button for 3 seconds
b. Volume down/Erase data
(b.1) Volume down: press shortly the “volume down” button (notified by “beep” sound)
(b.2) Erase data: press “volume down” button for 3 seconds
Remark:
A. Add/Erase data has to be made under GPS positioned status
B. User can edit database via dedicated software (User_DB_modify.exe, please refer to appendix
A) in document CD
C. Notified by voice “data add complete”/”data delete complete” if add/erase is completed
D. Notified by voice “data add failed” if BT GPS Receiver is not under positioned status
E. Notified by voice “data delete failed” if database is empty
9. Auto Power ON/OFF function
The BT GPS Receiver equipped with vibration sensor for power management (auto power on or goes
to sleep mode)
a. Auto power on/off function is available under all working modes except G-mouse mode
b. Goes to sleep mode if vehicle stays still for 15 minutes
c. Auto power on in 3 sec. when detecting vibration (back to previous working mode)
13
User’s Manual
10. Specification
GPS Features
Datum
Chipset
NEMERIX low power chipset
WGS-84
Frequency
L1, 1575.42MHz
Dynamic Conditions
C/A Code
1.023MHz chip rate
Altitude
<18,000 m (60,000feet)
Channels
Supports 16 channels
Velocity
<515 m/s (1000 knots)
Antenna (Internal)
Built-in low noise patch antenna
Acceleration
<4G
External MMCX antenna port
Motional Jerk
20m/sec3 max.
Sensitivity
Interface
To – 152dBm Tracking, Superior Urban Canyon Performance Communication Protocol: Communicate with host platform
Time to First Fix (TTFF)
via Bluetooth (class 2) serial port profile
Cold Start
45 sec, average
Bluetooth communication distance 10meters (Typical)
Warm Start
38 sec, average
GPS Protocol: Default: NMEA-0183 - GGA, GSA, GSV,
Hot Start
6 sec, average
RMC
Reacquisition
1 sec
Data bit: 8, stop bit: 1(Default)
Update Rate
1 Hz (max.)
Device Size and Weight
Accuracy
77.4 (L) X 46.3 (W) X 22.5 (H) mm
Position
5m CEP (50%); 9m (90%)
3.05 (L) X 1.82 (W) X 0.89 (H) inch
Velocity
0.1m/sec, without SA
68g (battery included)
Time
±100ns synchronized to GPS time
Accessories
Power
Car charger (12V in, 5V output)
Built-in rechargeable 1100mAh Li-ion battery and 5V DC input
AC adaptor (5.3V output, 500mA)
Operation Current
45mA (Typical)
Camera Detector
Operation Time
22hrs, fully charged, in continuous mode
Number of POI: factory default 180,000; my favorite point: 256
Sleeping Mode
Sustain more than 2000 hours
Goes to sleep mode if vehicle stays still for 15 minutes
Charging Time
3.0hrs. (Typical)
Auto power on in 3 sec. when detecting vibration
Environmental Characteristics
Speaker: 1 watt/ 8 ohm
Operating Temperature - 20°C to + 60°C
Storage Temperature - 20°C to + 85°C
14
User’s Manual
11. Revision History
Revision
V6.06
Date
26_June_2006
Comments
First release
15
User’s Manual
12. Appendix A
User Database Utility
a. The software supports Windows XP
b. Support WGS84 Longitude /Latitude input
Step1: Please use under G-Mouse mode
Step2: Execute “User_DB_Modify.exe”
Step3: Choose COM port and choose “Open COM Port” button to open COM port
Step4: Choose “Load user database from device” button to load user database
Step5: Choose “Read next page” or “Read previous page” to read more data
Step6: if you had modified data on one page, choose “Save this page” button to save page
Step7: If the update has been completed, please choose “Exit and write to Device” button to update
flash and exit application software
Step8: If you are not willing to update your database, please choose “Exit” button to exit application
software
Step9: Disconnect, the device will automatically into suspend mode
Note:
Speed :
Unit = kilometer or mile
Speed : 0 ~ 999
or
Speed : NULL (don’t have over speed alarm)
Direction :
Camera Direction : 0 ~ 359
or
Camera Direction : NULL (not direction Camera)
Type :
0 = fixed Camera
1 = mobile Camera
16
User’s Manual
13. Appendix B
How to update database
a. Database can be updated under G-Mouse (USB GPS) mode
b. Please contact your distributor/agent for more information (software and database etc.)
17