1
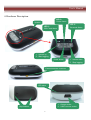
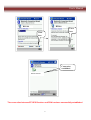
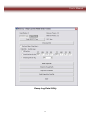
SiRF Star III GPS Bluetooth® Receiver with
Data Logger Functionality
User’s Manual
Table of content
1
2.
3.
4.
5.
6.
7.
8.
9.
10.
11.
12.
Read Me First
Introduction
Box Contents
Hardware Description
LED Indicator
Connecting to your Bluetooth PDA
Operation Modes
Software Utility
Output Formats
USB Driver
DLL (sample code)
Specifications
……………………………………………………………..
……………………………………………………………..
……………………………………………………………..
……………………………………………………………..
……………………………………………………………..
……………………………………………………………..
……………………………………………………………..
……………………………………………………………..
……………………………………………………………..
……………………………………………………………..
……………………………………………………………..
……………………………………………………………..
2
P.3
P.3
P.3
P.5
P.6
P.7
P.11
P.12
P.16
P.20
P.21
P.22
User’s Manual
1. Read Me First
1. The battery must be charged for at least 8 hours for the ‘INITIAL’ use. The LED2 (GREEN) will turn
off after 3 hours’ charging, please keep on charging for 5 more hours. Thereafter, for each time’s
battery charging please fully charge for 3 hours.
2. We strongly recommend that remove the battery if the device will not be used for over 2 weeks. Do
not remove the battery within 2 weeks.
3. For fast data tracking purpose staying still before get fixed is recommended. (FIX then GOES!!)
4. Please note that the device will only receive the signal under the open sky. In this case, putting the
device under the windshield is recommended.
2. Introduction
The SiRF Star III BT GPS receiver is the industry leading Bluetooth GPS receiver that offers
simultaneous use of real-time GPS reception and data logging. It features extended battery life, (up to
17 hours) with rechargeable battery and increased memory size. (4MB) It can interface with any
Bluetooth-enable mobile device to provide GPS data to applications.
The SiRF Star III BT GPS receiver is capable of keeping up to 250,000 records or positions, including
longitude, latitude, speed, UTC, and tag data. The log file can be downloaded for analysis via
high-speed USB connection, the location histories can also be exported to mapping software such as
Google Earth or TrackMaker.
It can be used as a wireless and mobile data logger for asset tracking, fleet management, heavy
logistics and dangerous goods transportation.
3. Box Contents
1.
2.
3.
4.
5.
6.
GPS Bluetooth Receiver
Lithium-ion rechargeable battery
Car charger
AC adapter
CD (Documentation)
Anti-slip rubber pad
3
User’s Manual
BT GPS Receiver
AC Adaptor
Car Charger
Li-ion rechargeable
Battery
CD (Documentation)
Anti-Slip Rubber Pad
4
User’s Manual
4. Hardware Description
LED 2:
Power Status
Speaker
LED 3:
LED 1:
Bluetooth Status
GPS Fixed Status
1. Volume up
2. Start logging
Power button
1. Volume down
2. Stop logging
External antenna connector
LED alarm
1. Charge socket
Slip-resistant
2. USB G-mouse socket
5
User’s Manual
5. LED Indicator
Power on:
LED1: GPS Fix Status
LED2: Power Status
LED3: Bluetooth Status
Red (OFF)
GPS not fixed yet!
Green (ON)
Blinking for every 1 second
Blue (ON)
Blinking very quickly (in paring mode)
GPS get fixed/Bluetooth connected:
LED1: GPS Fix Status
LED2: Power Status
LED3: Bluetooth Status
Red (ON)
Green (ON)
Blinking for every 1 second
Blue (ON)
Blinking for approx. 1 second
Blinking quickly
Low battery: Notified by voice “battery low” when low battery; notified by “beep” sound and go
to sleep mode if battery is too low to support operation
Charging: LED2 (GREEN) blinking 2 times/second
Battery is fully charged: 1. LED2 (GREEN) turns off if charged by AC adaptor. 2. LED2 (GREEN)
blinking for every 1 second if charged by car charger
BT GPS Receiver will automatically turns on if powered by AC adaptor
Charging: LED2
(Green) blinking
2 times/second
GPS Bluetooth operates on OS with Bluetooth function that supports SPP
In order to avoid any unexpected problem,
DO NOT attempt to change the default baudrate
6
User’s Manual
6. Connecting to your Bluetooth PDA
1. Turn on the Bluetooth GPS Receiver
Press power button for 1 second, the LED2 (Power Status LED) and LED3 (Bluetooth Status) start
blinking. (With voice alarm “satellite positioning”) satellite fixed
2. Activate Bluetooth function of your PDA / smart phone
Prior to activating the Bluetooth function of your PDA / smart phone, please make sure the device is
equipped with Bluetooth function, and the driver software has been installed.
3. Activate Bluetooth Manager & Established New Connections
Illustrations by using HP 2100 PDA shown as follows:
I.
II.
III.
IV.
First, find the device with which you wish to establish connection.
Open “Bluetooth Manager” on your PDA.
Press “New”.
Press "Connect”.
7
User’s Manual
BTGPS
Click here
Click here to select
installation
BTGPS
****
Enter Pass Key "0000",
then Press “Enter”
Enter key
8
User’s Manual
BTGPS
BTGPS
Click
here
Click
here
Connection
established
BTGPS: SPP slave
The connection between BT GPS Receiver and PDA has been successfully established
9
User’s Manual
4. Turn off the BT GPS Receiver
Press power button for 1 seconds, LED goes off.
We strongly recommend that close the E-map before turning off the BT GPS Receiver,
in order to avoid any possible PDA /Smart phone freeze
10
User’s Manual
7. Operation Modes
a. Idle Mode
“Power Button”: to power on the device by short pressing the power button
b. Normal (GPS Bluetooth) Mode
“Power Button”: switching “GPS with Bluetooth” or “GPS only” by short pressing the
power button
“Power Button”: turn off the device by long pressing the power button
“Volume Up Button”: volume up by short pressing the button
“Volume Down Button”: volume down by short pressing the button
“Volume Up Button”: tag maker start by long pressing the button
“Volume Down Button”: tag maker end by long pressing the button
c. G-mouse Mode: (GPS is get fixed)
“Volume Up Button”: volume up by short pressing the button
“Volume Down Button”: volume down by short pressing the button
“Volume Up Button”: tag maker start by long pressing the button
“Volume Down Button”: tag maker end by long pressing the button
11
User’s Manual
8. Software Utility
A. Set Data Log Utility
1. Please choose “Set Data Log Utility” folder
2. Execute “Set_Log_Data.exe”
3. Please make sure that the device is well-connected to your PC by USB cable, the system will get
COM port automatically
4. Select “Log Interval”
a. “By Time”: log interval by time
b. “By Distance”: log interval by distance
5. Select “Vibration Mode”
a. “Disable”: Vibration disable
b. “Enable”: Vibration enable
6. Select “Tag Function”
a. “Disable”: Tag function disable
b. “Enable”: Tag function enable
7. Select “Log Min. Speed Limit”
If the speed (NMEA output) is beyond the predefine limit, (to be set by users) the device will stop
logging data
8. Select “Update Setting Value” for saving your settings
9. Select “Erase All Log Data” to erase all log data
10. Select “EXIT” to exit Set Data Log Utility
12
User’s Manual
Data Log Setting Utility
13
User’s Manual
B. Dump Log Data Utility
1. Please choose “Dump Log Data utility” folder
2. Execute “Dump_Log_Data.exe”
3. Please make sure that the device is well-connected to your PC by USB cable, the system will get
COM port automatically
4. Press “Dump Log Data” to dump all log data from device to SortDB.sr
5. Select “Use Local Time (Time Zone)” to convert UTC to your local time zone
6. Select “Output File Mode”:
a. “All log data”: output all log data
b. “Search log data by date”: output log data under the certain range
c. “Search log data by Tag”: output log data under the certain tag
7. Select “Build Output File”: *.CSV for Excel will be created by selecting this output mode
8. Select “Output for Google Earth”: *.KML for Google Earth will be created by selecting this output
mode
9. Select “Output for Trackmaker”: *.TXT for Trackmaker will be created by selecting this output
mode
10. Select “Build Output Raw Data File”: *.dat (NMEA output) will be created by selecting this output
mode
11. Select “EXIT” to exit Dump Log Data Utility
14
User’s Manual
Dump Log Data Utility
15
User’s Manual
9. Output Formats
a. *.CSV for Excel
16
User’s Manual
b. *.KML for Google Earth
17
User’s Manual
c. *.TXT for Trackmaker
18
User’s Manual
d. *.dat for NMEA output
19
User’s Manual
10. USB Driver
The USB driver is also included in this CD. Please choose this folder and execute the setup.exe for
installation.
20
User’s Manual
11. DLL (sample code)
The DLL (sample code) is also included in this CD. There are two different examples:
a. DLL – VB
The code can be generate by using Visual Basic
b. DLL – VC
The code can be generate by using Visual C
21
User’s Manual
12. Specifications
GPS Features
Datum
Chipset
SiRF Star III
WGS-84
Frequency
L1, 1575.42MHz
Dynamic Conditions
C/A Code
1.023MHz chip rate
Altitude
<18,000 m (60,000feet)
Channels
Supports 20 channels
Velocity
<515 m/s (1000 knots)
Antenna (Internal) Built-in low noise patch antenna Acceleration
External MMCX antenna port
Motional Jerk
Sensitivity
<4G
20m/sec3 max.
Interface
To – 159dBm Tracking, Superior Urban Canyon Communication Protocol: Communicate with host
Performance
platform via Bluetooth (class 2) serial port profile
Time to First Fix (TTFF)
Bluetooth communication distance 10meters (Typical)
Cold Start
42 sec, average
GPS Protocol: Default: NMEA-0183 - RMC
Warm Start
38 sec, average
Data bit: 8, stop bit: 1 (Default)
Hot Start
1 sec, average
Reacquisition
0.1 sec
Device Size and Weight
Update Rate
1 Hz (max.)
77.4 (L) X 46.3 (W) X 23.2 (H) mm
Accuracy
3.05 (L) X 1.82 (W) X 0.90 (H) inch
Position
5 – 25m CEP without SA
56.5g (battery included)
Velocity
0.1m/sec, without SA
Accessories
Time
1μs synchronized to GPS time
Car charger (12V in, 5V output)
Power
AC adaptor (5.3V output, 500mA)
Built-in rechargeable 1100mAh Li-ion battery and 5V
DC input
Operation Current 65mA (Typical)
Operation Time
17hrs,
fully
Data Logger
Log 249,856 records in flash memory (4M bytes)
charged,
continuous mode
Sleeping Mode
Sustain more than 2000 hours
Charging Time
3.0hrs. (Typical)
Environmental Characteristics
in Log data: NMEA format (Longitude, Latitude, Speed,
UTC, Tag)
Output data format: WGS84 2-degree transverse
mercator
Mapping software: a. Google Earth b. TrackMaker c.
*.csv (logdata.csv)
Log interval: by time (1sec~30mins) or distance
(2~65535meters)
Operating Temperature
- 20°C to + 60°C
Vibration setting: disable/high/middle/low sensitivity
Storage Temperature
- 20°C to + 85°C
Goes to sleep mode if vehicle stays still for 15 minutes
Auto power on in 3 sec. when detecting vibration
22