1
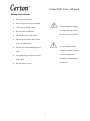
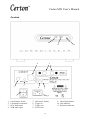
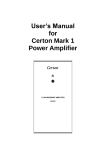
User’s Manual for Certon M21 Power Amplifier Certon M21 User’s Manual Safety Instructions Do not use near water Do not expose to rain or moisture Clean only with dry cloth A lightening bolt triangle Do not block ventilation is used to alert the user of Do not place on a soft surface the risk of electric shock. Do not operate near a heat source or in a confined area An exclamation point Do not use with a damaged power triangle is used to alert the cord user of an important Use main plug to disconnect from operating or maintenance power grid instruction. Do not remove cover 2 Certon M21 User’s Manual Getting Started Thank you for purchasing the Certon M21 monaural power amplifier. The M21 features patent awarded technology for achieving powerful high-fidelity sound from a small enclosure. The M21 is typically used in a stereo or multi-channel set-up. Each channel requires its own power amplifier. Simply connect each M21 in a set-up to its respective loudspeaker. The M21 has loudspeaker output binding posts that accept bare wire, banana plugs or forks. Pay attention to the polarity of the loudspeaker. Make sure the wires are firmly attached, and are not short-circuiting the outputs of the amplifier. Connect the RCA-type phono or XLR input of the M21 to the audio output of your pre-amplifier, home-theater processor or other similar audio equipment. Make sure the audio source toggle switch in the back is in its corresponding position. Attach the power cord to the power inlet of the amplifier, and to a power grid outlet. Turn on the power switch at the back of the M21, and press the on/off push-button on the front panel. Your M21 should be ready for operation in a few seconds, in which case a steady light from a LED on the push-button would indicate this. 3 Certon M21 User’s Manual Controls 10 11 4 2 5 3 6 7 1 1. 2. 3. 4. 9 On/off mains switch Loudspeaker terminals RCA audio input XLR audio input 8 5. 6. 7. 8. Bal./unbal. Switch Trigger in Trigger out Power inlet 4 9. On/off push-button 10. Clip indicator 11. Protection indicator Certon M21 User’s Manual Installation Place the M21 on a stable surface. The unit has a self-resetting heat-switch, however: Do not place the amplifier on a thick cloth or carpet, as ventilation would be obstructed. Do not place in a confined area. Clearance should be allowed for heat dissipation on the top and sides of the enclosure. The M21 is equipped with a mains power switch (1) at the back of the unit. During installation, keep the power switch in the “off” position. Firmly attach all wires. Attach the loudspeaker cables to the positive and the negative loudspeaker binding posts (2) of the M21. Pay attention to the phase. In general, the positive terminal of the loudspeaker should be connected to the positive binding post of the amplifier, and the negative terminal of the loudspeaker should be connected to the negative binding post of the amplifier. Tightly secure the terminals. The M21 is non-inverting. Do not short-circuit the loudspeaker terminals. Protection circuitry within the amplifier will protect the unit from most overload conditions, but short-circuits may seriously harm your M21. It is recommended not to use loudspeakers with a nominal impedance of less than 4 ohms. It is advised not to use highly capacitive loudspeaker cables, as this reduces the phase margin of the amplifier and may potentially cause failure. M21 has both RCA-type and XLR inputs. Attach an RCA-type or XLR signal cable between the audio input (3,4) of the M21 and your pre-amplifier, home-theater processor or corresponding unit. The RCA-type connector offers unbalanced operation, while the XLR connector offers balanced operation. Be sure to put the toggle switch (5) in its appropriate position. Do not connect both RCA-type and XLR cables simultaneously, as this may harm your pre-amplifier, home-theater processor or corresponding unit. Be sure not to connect the audio input of the M21 to a line output. Doing so may cause damage to your loudspeakers and your hearing. 5 Certon M21 User’s Manual M21 has a 12 VDC trigger input (6) and output (7). You may daisy-chain several amplifiers. Simply connect a trigger output of one unit to a trigger input of another unit. Doing this enables all units to be powered-up by control from your pre-amplifier, home-theater processor or corresponding unit. Attach the power cord between the power inlet (8) of the amplifier and a power grid outlet. Turn the power switch at the back of the M21 to the “on” position. Operation Your Certon M21 is now responsive to a 12 VDC signal on the trigger input (6), and to the actuation of the on/off push-button (9) on the front of the unit. Either or both take the M21 out of stand-by mode, provided there is no fault condition. The unit should be ready for operation within a few seconds. A blinking operation mode indicator at the center of the push-button indicates that the unit is starting, while a steady light indicates that the unit is ready for use. Removing the 12 VDC signal and/or pressing the on/off push-button again takes the amplifier back to stand-by mode. When the unit switches on or off, a discrete click, pop or chirp may be heard in the loudspeaker. This is normal for the M21, because of the absence of a relay in the audio signal path. The amplifier has a clip indicator (10). The clip indicator is an instrument to determine an operating condition called clipping. Frequent clip-indicator blinking (e.g. less than a second apart) or a steady light is generally indicative of extensive clipping that may seriously harm your loudspeakers. Subjecting your loudspeakers to extensive clipping may void warranty. A low wattage amplifier like the M21 is more prone to clipping than a high wattage amplifier, and may thus be more harmful to loudspeakers at a specific loudness than a high wattage amplifier. Immediately turn down the volume or halt playback in the event of a frequently blinking or steady clip-indicator light. Maintenance It is recommended to use a dry non-abrasive cloth to clean the amplifier. Do not use detergents or other strong chemicals to clean your Certon M21 amplifier. 6 Certon M21 User’s Manual There are no user-serviceable parts inside the enclosure. Opening the cover exposes high-voltage surfaces that may cause electric shock. Your Certon M21 has a DC protection circuit through which DC faults are detected. In the event of a malfunction within the unit, or in another component of your audio system that leads to a DC offset, the M21 shuts down. A LED indicator (11) indicates that a DC fault has occurred. This may be a single event or a persistent condition. Try to reset the amplifier by turning it off, and then back on. If the problem persists, try a different pre-amplifier (or completely turn off the pre-amplifier) and reset the M21 once more. If this does not rectify the problem, your M21 may require servicing by a qualified technician. Do not repeatedly reset the M21 without taking consecutive action to try to resolve the problem with DC offset, as this may subject the amplifier to unnecessary stress. In the event of loud thumps, clicks or pops from the loudspeaker at reset, do not proceed but seek assistance from a qualified technician. There is a heat switch inside the enclosure. The heat switch protects the amplifier against excessive and potentially harmful temperatures that may result e.g. from loud listening for prolonged periods at elevated ambience temperatures. When the heat switch trips, the amplifier turns off. As soon as the temperature is safe again, the amplifier is ready to be turned on again. Specification Power (8 Ohms) Damping factor (8 Ohm) Input impedance (RCA/XLR) Input voltage (at full power) (RCA/XLR) THD+N Output binding posts Audio input jack Remote trigger voltage Remote trigger connector Enclosure Weight Size of enclosure: (width x depth x height) Mains voltage 25 Watts RMS >450 @ 100 Hz 40 kOhm/80 kOhm 1 Volt RMS/0.5 Volt RMS < - 60 dB WBT RCA phono type (cinch) and XLR 12 VDC (either polarity) 3.5 mm. tele jack (mono) Steel 2.8 kg (6.2 lb) 205 x 200 x 120 mm. (8.1 x 7.9 x 4.7 in.) AC 110 - 230 Volts, 50 – 60 Hz 7