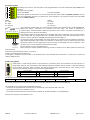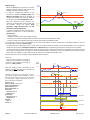
1
EMS‐96 Electrical Measurement Supervisor User Manual IM1200‐U v1.0 Index Description .......................................................................................................................................................................................... 4 Configuration Models ..................................................................................................................................................................... 4 Software Options ............................................................................................................................................................................ 4 Measures Table ............................................................................................................................................................................... 4 Installation .......................................................................................................................................................................................... 5 Connections ........................................................................................................................................................................................ 5 Auxiliary power supply .................................................................................................................................................................... 6 Voltage Inputs ................................................................................................................................................................................. 6 Current Inputs ................................................................................................................................................................................. 6 Digital Outputs ................................................................................................................................................................................ 9 Digital Inputs (option) ..................................................................................................................................................................... 9 Analog outputs (opzione) ................................................................................................................................................................ 9 I/O options .................................................................................................................................................................................... 10 Serial ports (option) ...................................................................................................................................................................... 12 Profibus port (option) ................................................................................................................................................................... 12 Ethernet port (option)................................................................................................................................................................... 13 MBUS (option) .............................................................................................................................................................................. 13 Function keys .................................................................................................................................................................................... 14 Frontal led ......................................................................................................................................................................................... 14 Maps ................................................................................................................................................................................................. 15 Menu ............................................................................................................................................................................................. 15 Measures ...................................................................................................................................................................................... 17 Graphics ........................................................................................................................................................................................ 19 Device ............................................................................................................................................................................................ 20 Setup ............................................................................................................................................................................................. 21 Communication ............................................................................................................................................................................. 22 Slaves read map ............................................................................................................................................................................ 22 Setup Items ....................................................................................................................................................................................... 23 Measure ........................................................................................................................................................................................ 23 Instrument .................................................................................................................................................................................... 27 I/O ................................................................................................................................................................................................. 29 Setpoint ......................................................................................................................................................................................... 31 Timeband ...................................................................................................................................................................................... 33 User pages ..................................................................................................................................................................................... 35 Log ................................................................................................................................................................................................. 36 Communication ............................................................................................................................................................................. 38 Acronym tables ................................................................................................................................................................................. 40 Acronyms group table ................................................................................................................................................................... 40 Acronyms table of Instantaneous group ....................................................................................................................................... 40 Acronyms table of Energies and TB (from 1 to 16) groups ........................................................................................................... 40 Acronyms table of Average group ................................................................................................................................................ 40 Dimensions ....................................................................................................................................................................................... 41 Technical features ............................................................................................................................................................................. 41 EMS‐96 Instruction Manual IM1200‐U v1.0 Pag. 2 / 42 Information in this document is subject to change without notice and does not represent a commitment on the part of Contrel Elettronica Srl. This documentation is consigned to the customer to enable the correct and safe operation of the instrument; any other use of documentation is strictly prohibited. The information contained herein is the property of Contrel Elettronica Srl, and by law, no part of it may be reproduced, transcribed, stored in any retrieval system, or translated into any language by means (even for internal purposes by the customer) without the express written permission of Contrel Elettronica Srl. In addition, no part of this manual may be transmitted in any form by any means, including photocopying and recording, for any purposes, without the express written permission of Contrel Elettronica Srl. In case of Copyright violation the customer is directly responsible. TERMS OF WARRANTY The warranty is valid for the period of twelve months after material receipt. The warranty covers free repair or replacement of equipment parts, which are recognized as faulty due to manufacturing defects. Warranty does not cover those parts which results defective due to misuse or improper use, incorrect installation or maintenance, operation by unauthorized personnel, damage during transportation, or which in any case do not show manufacturing defects of the equipment. Not included in the warranty terms are technical interventions regarding equipment installation to electrical systems. The manufacturer declines any responsibility for eventual injury or damage to persons, animals or things as result of failure to follow the instructions in the user manual or caused by improper use of equipment. The expenses of transport as well as the relative risks of same both to and from the place of repair, will be the sole responsibility of the user. This warranty expires after the date of purchase and any assistance required after said date including spare parts, labour, transport of personnel and material will be charged to the user following the tariffs in force for Technical Assistance Service at the time of such requested service. In any case the replacement of the equipment as well as the extension of warranty after such breakdown is excluded. EMS‐96 Instruction Manual IM1200‐U v1.0 Pag. 3 / 42 Description The EMS (Electrical Measurement Supervisor) has advanced analysis functions that allow the measurement of the main electrical parameters: voltage, current, frequency, power factor, active and reactive power, active and reactive energy. The instrument allows the measurement and analysis in real time of electrical parameters, also verifying the quality of the energy thanks to THD measurement. Bidirectional metering of energy allows both production and consumption of energy to be monitored with a single device. All information monitored by the analyzer can be transmitted to remote locations through communication interfaces RS485, Ethernet with the support of numerous protocols including Modbus RTU, Modbus TCP/IP and Profibus DP. Interaction with the control and supervision systems is possible using inputs and outputs, all programmable. EMS reads and displays the energy values measured in other energy meters connected to the network. This is achieved thanks to digital inputs, which are able to acquire the impulses generated by the counters. In this case, EMS acts as a data concentrator. It not only collects information from the electricity meters but also from the water, gas meters or other. EMS allows a complete, in‐depth analysis of the network quality thanks to the measurement of the harmonic distortion (20th order) of the voltage and current signals. Configuration Models Model Class CT EMS‐96 1 1A 5A TT EMS‐96H EMS‐96‐ETH/WEB** 1 0.5S 0.2S Neut. CT Supply Option 90÷250 Vac/dc 24÷48 Vac/dc OPTION STANDARD * Ethernet port with Modbus TCP/IP protocol I/O COM1 COM2 Exp. Mem. 2DO RS485 2AO Profibus RS485 ‐‐‐ 2AO+2DO MBUS 4AO LON 4AO+2DO ETH/Modbus* ETH/Modbus* + Wifi RS485 2DO 2DO+4DI 4DO+2DI /S*** 6DO Option 2AO RS485 Wifi 2AO+2DO 4AO /S*** + Wifi 4AO+2DO ** Ethernet port with Modbus TCP/IP protocol and Web server *** RS485 managed by ETH port Software Options * Model Timeband* & Preset EMS‐96 to enable EMS‐96H enabled EMS‐96‐ETH/WEB enabled 4 Timebands, optionally is possible to choose 8 or 16 Timebands Harmonics & SAG to enable enabled enabled Energy Graphics & Log to enable enabled enabled To enable one or more options it’s necessary to input a code (Enable option item) in the instrument setup. If the options are requested at the moment of the order the code is already loaded and showed on the instrument report. After the installation, to enable one or more options it is necessary to request the code to the seller, sending the serial number. The seller will deliver the new code to load in the instrument setup. Measures Table Parameters Voltage L‐N Voltage L‐L Current Power Factor Cos Tan Active Power Reactive Power Apparent Power Frequency THD Voltage THD Current Harmonics Active Energy OUT Reactive Energy IN Reactive Energy OUT Apparent Energy Expected Power SAG (X): only the selected electric line EMS‐96 System X X X X X X X X X X X X X X X X X L1 X X X X X X X X X X X X X* X X X X X (X)* Instruction Manual L2 X X X X X X X X X X X X X* X X X X X (X)* L3 Min‐Max Rel. X X X X X X X X X X X X X X X X X X X X X X X X X* X X X X X (X)* *: option IM1200‐U v1.0 Min‐Max Abs. X X X X X X X X X X X X Average X X X X X X X X X Max Demand X X X X X X X X X Pag. 4 / 42 Installation Warning for the user Read carefully the instructions/indications contained in this manual before installing and using the instrument. The instrument described in this manual is intended for use by properly trained staff only. Safety This device has been manufactured and tested in compliance with EN 61010‐2 standards. In order to maintain these conditions and to ensure safe operation, it need to comply with the indications and markings contained in the manual. When the device is received, before beginning installation, check that it's O.K. And it has not suffered any damage during transport. When starting installation make sure that the operating voltage and mains voltage are compatible with the device instructions. The device power supply must not be earthed. Maintenance and/or repair must be carried out only by qualified and authorized personnel. If there is ever the suspicious that, that there is a lack of safety, during operation, the device must be disconnected and cautions taken against accidental use. Operation is no longer safe when: ‐ The instrument doesn't work. ‐ The measured value are obviously wrong or unreasonable. ‐ There is visible damage. ‐ After serious damage incurred during transport. ‐ After a storage under unfavourable conditions. During normal operation of the devices, hazardous voltages at its terminals and in particular on the terminals of voltage and current transformers connected and on the terminals of the digital input and outputs. The secondary circuits of the voltage and current transformers are capable of generating hazardous voltages and currents when their primary circuit is powered. Follow the standard safety precautions when performing any installation or service (such as making sure that the power supply is disconnected, disconnecting the fuses of the transformer voltages, short‐circuiting the secondary of current transformers etc.). Don’t use the instrument when failure may cause injury or death, or generate sufficient energy to cause a fire. The instrument is equipped with a fuse on the power supply type: 5x20mm 1A 250V time lag. Connections ETHERNET PORT COM PORTS 1‐ 8+ 1+ 7‐ 2‐ 7+ 2+ 6‐ 3‐ 6+ 3+ 5‐ 4‐ 5+ 4+ Do N VL3 8‐ 1‐ S1 8+ 1+ S2 7‐ 2‐ 7+ 2+ 6‐ 3‐ 6+ 3+ 5‐ 4‐ 5+ 4+ S2 S1 VL2 S2 S1 VL1 S2 S1 I2 I1 Do I/O 3‐ 1‐ 3+ 1+ 4‐ 2‐ 4+ 2+ Do Do 2 1 EMS‐96‐ETH with all I/O and COM ports terminal boards. EMS‐96 I3 C 8‐ Instruction Manual N S2 S1 VL3 S2 S1 VL2 S2 S1 VL1 S2 S1 I3 I2 I1 I/O 3‐ 1‐ 3+ 1+ 4‐ 2‐ 4+ 2+ Do Do 2 1 EMS‐96 or EMS‐96H with all I/O, COM port terminal boards and profibus port. IM1200‐U v1.0 Pag. 5 / 42 AUX Auxiliary power supply The instrument can be supplied with a voltage independent by the monitoring line. In this case, the instrument 2 continues to operate independently by the voltage present on the lines under control. Alternatively, only for 90÷250Vca/cc version, it is possible to take the power from the network under test, using 1 the phase and neutral for a 4‐wire network, phase to phase in a 3‐wire system without neutral or from a VT in a MT application. In this case when the voltage of the monitored line falls below the minimum limit, the instrument turns off. The instrument can be supplied in two different configurations of power supply: Standard Version Option Version 90÷250 Vac/dc 24÷48 Vac/dc Voltage Inputs 4 terminals are available for direct connection to 3 phase network with neutral. In case of a 3 phase balanced N system without neutral, or non distributed neutral to leave terminal N free. 3 inputs, range 30 ÷ 400Vac phase to neutral ‐ 52 to 693Vac phase to phase (see Technical Features table for VL3 details); over these values must used the external voltage transformers. Frequency range: 50/60Hz. VL2 Permanent overvoltage allowed: 480Vac phase to neutral ‐ 830VAC phase‐phase. Overvoltage category: II (permanent installations). VL1 Pollution degree: 2 (normally non‐conductive, conductive condensation temporary). Input resistance: > 1.8MΩ. Load (Burden) for each voltage input: 0.09VA. Note: To detect the frequency of the network the terminal VL1 must be always connected. Current Inputs Current measurements can be performed by connecting the terminals of Current inputs. S2 In All current inputs are isolated by current transformers with different ranges depending on the model of the S1 instrument. S2 I3 They can be interfaced directly to the line to be monitored or to be connected to the output of external CT S1 with higher range. S2 I2 The connections to the lines to be monitored are described in chapter “Wiring diagrams”. S1 With neutral current input option installed, the instrument allows the direct measurement of neutral current in S2 I1 the same way described for the line inputs. S1 NOTE: it is essential to observe the correct phase sequence, not invert the connections between the phases of the current inputs and voltage (i.e. the CT placed on L1 phase must absolutely match at I1 Current and VL1 voltage). Do not invert the terminals S1 and S2 of the CT because the measurement of power factors, and the powers would no longer be trusted. Version 5A Version 1A Three‐phase current inputs isolated by 3 internal current Three‐phase current inputs isolated by 3 internal current transformers. transformers. Nominal current range 50mA÷5A; over these values must Nominal current range 10mA÷1A; over these values must be used the external current transformers. be used the external current transformers. Load (Burden) for each current input: 0.0009VAmax. Load (Burden) for each current input: 0.0009VAmax. Neutral Current: the nominal current range according with CT version (5A or 1A). EMS‐96 Instruction Manual IM1200‐U v1.0 Pag. 6 / 42 Three‐Phase, 4‐Wires Y Configuration EMS S1 S2 S1 P1 S2 S1 P2 S1 S2 S1 S2 S2 In I3 I2 I1 N VL3 VL2 VL1 LOAD L1 L2 L3 S1 N S1 P1 S1 P1 P1 Three‐Phase, 3‐Wires Configuration. ARON insertion (2CT) EMS S1 S2 S1 P1 S2 S1 P2 S1 S2 S1 S2 S2 In I3 I2 I1 N VL3 VL2 VL1 LOAD L1 L2 L3 S1 P1 Single‐Phase, 2‐Wires Configuration EMS S1 S2 S1 P1 S2 S1 P2 S1 S2 S1 S2 S2 In I3 I2 I1 N VL3 VL2 VL1 LOAD L1 N Single‐Phase, 3 multiple loads in the same network, 2‐Wires Configuration EMS S1 S1 S2 P1 S1 S1 P2 S2 S2 S1 S2 S2 In I3 I2 I1 N VL3 VL2 VL1 LOAD In case of connection in a 3 phase network (without neutral or with neutral not distributed) don’t connect the N terminal. This connection with only 2 CT allows to measure accurately the three‐phase currents. This connection can be used with distributed and equal loads. It is possible to measure the current on one phase (using only one CT). The unmonitored phase currents are mathematically calculated. The measurement of neutral current is optional. In presence of multiple balanced loads in a three‐phase network, the instrument calculates the electrical parameters checking a single phase current for each load, allowing to limit the number of CT used. L1 N LOAD S2 S1 P2 P1 L1 N LOAD S2 S1 P2 P1 L1 N EMS‐96 Instruction Manual IM1200‐U v1.0 Pag. 7 / 42 Single‐Phase, 2‐Wires Configuration EMS S1 S2 S1 P1 S2 S1 P2 S1 S2 S1 S2 S2 In I3 I2 I1 N VL3 VL2 VL1 LOAD L1 N Single‐Phase, 3 multiple loads in the same network, 2‐Wires Configuration EMS S1 S2 S1 P1 S2 S1 P2 S1 S2 S1 S2 S2 In I3 I2 I1 N VL3 VL2 VL1 LOAD L1 N LOAD S2 S1 P2 P1 L1 N LOAD S2 S1 P2 P1 L1 N Multiple Single‐Phase, 3 multiple loads in 3 different networks, 6‐Wires Configuration EMS S1 S2 S2 P1 S1 S2 S1 P2 S1 S2 S1 S2 In I3 I2 I1 N VL3 VL2 VL1 LOAD It is mandatory to connect the current input I1 and voltage input VL1. The electrical parameters are measured for individual loads. For correct calculation of power and energy, is mandatory to connect the voltage inputs related to the used current inputs. If necessary to apply a multiplier factor “K” to adapt the measure read, please consider that only one K for voltages and only one K for currents can be set. L1 N1 LOAD S2 S1 P2 P1 L2 N2 LOAD S2 S1 P2 P1 L3 N3 Two‐Phase, 3‐Wires Configuration EMS S1 S2 S2 P1 S1 S2 S1 P2 S1 S2 S1 S2 In I3 I2 I1 N VL3 VL2 VL1 LOAD L1 N EMS‐96 S2 S1 P2 P1 Instruction Manual L2 IM1200‐U v1.0 Pag. 8 / 42 Digital Outputs 2 pulse / state digital outputs are available on the device. In option it is possible to have others pulse / state Do1+ digital outputs or simply others state digital outputs. Do2- The technical features are: Do2+ ‐ Compliance with CEI EN62053‐31 (Class A devices) ‐ Maximum of digital output available: 8 ‐ Isolation level: 4KVRMS for 60 sec. ‐ Output type: Photo‐MOS (solid state); a “non‐closed Output” is comparable to an open contact ‐ Output voltage/current: 10÷300VDC 150mAmax; 12÷250VAC 150mAmax ‐ RON = 8Ωtyp. (12ΩMAX) ‐ “Pulse” output mode: ‐ TON_min 30ms; TOFF_min 30ms ‐ Pulse output period adjustable from 60ms to 1000ms ‐ Pulse polarity programmable (active closed or active open) ‐ Programmable pulse “weight”. Output protections: varistor for transients; current limiting to be provided externally. The PhotoMOS have a behaviour identical to a mechanical contact which closes. Therefore, there are not problems with the polarity. Digital Inputs (option) The EMS can be equipped with isolated Digital Inputs. The Digital Inputs are available only with the relative option. The technical feature are: ‐ Number of Digital Input: 2 or 4 depending on the option version ‐ Input Configuration: independent inputs (no common pins) ‐ Isolation level 3.5KVRMS for 60 sec ‐ Voltage Input Range: 24, 48, 115, 230Vac/dc (only one of the available options to choose in the order) ‐ Nominal Input Current: max 5mA each @ all nominal voltages ‐ Input Filter: Digital ‐ Basic Operation Mode: pulse counter, status, change of time‐band ‐ TON_min 30ms; TOFF_min 30ms; The Voltage input must be defined before to order the instrument. The AC/DC digital input are independent (no common pin) and can be wired without polarity care. Analog outputs (opzione) The instrument can be equipped with analog outputs. The options available allow to have 2 or 4 analog outputs matched or not with 2 digital outputs. Each output can operate independently of others in voltage or current. The technical features are: ‐ Isolation level: 3.5KVRMS for 60 sec ‐ Lenght of connection: up to 1200m ‐ Resolution: 12 bit (4096 values) ‐ Range*: 0÷20mA or 4÷20mA 0÷10V or ‐10÷10V or 0÷5V or ‐5÷5V ‐ Load*: Max: 600Ω Min: 1KΩ ‐ Settling time*: 50µs (‐10 ÷10V) @RLOAD=1K, 50µs (0÷20mA) @RLOAD=1K, CLOAD=200pF, LLOAD=1mH CLOAD=200pF ‐ Error*: Max 0.5 on E.S. Max 0.3 on E.S. Typical 0.2 on E.S. Typical 0.1 on E.S. ‐ Linearity:0.01 on E.S. ‐ Thermal stability: 0.01 on E.S. Do1- * The values indicated in the left column are referred to the current analog output; in the right column to the voltage analog output. The analog outputs are polarized. EMS‐96 Instruction Manual IM1200‐U v1.0 Pag. 9 / 42 I/O options It’s possible to add 7 optional configurations of I/O at the standard configuration: a) 4 digital inputs and 2 digital outputs e) 2 analog outputs and 2 digital outputs b) 6 digital outputs f) 4 analog outputs c) 2 digital inputs, 4 digital outputs g) 4 analog outputs and 2 digital outputs d) 2 analog outputs 4 digital inputs and 2 digital outputs (option) 6 digital outputs (option) With this option the instrument will be equipped with: With this option the instrument will be equipped with 8 ‐ 4 digital inputs digital outputs divided in the following way: ‐ 4 digital outputs ‐ 4 pulse / state digital outputs. ‐ 4 pulse / state digital outputs. Di1- Do8- Di1+ Do8+ Di2- Do7- Di2+ Do7+ Di3- Do6- Di3+ Do6+ Di4- Do5- Di4+ Do5+ Do3- Do1- Do3- Do1- Do3+ Do1+ Do3+ Do1+ Do4- Do2- Do4- Do2- Do4+ Do2+ Do4+ Do2+ 2 digital inputs, 4 digital outputs (option) With this option the instrument will be equipped with: ‐ 2 digital inputs ‐ 2 digital outputs ‐ 4 pulse / state digital outputs. Di1Di1+ Di2Di2+ Do6Do6+ Do5Do5+ EMS‐96 Do3- Do1- Do3+ Do1+ Do4- Do2- Do4+ Do2+ Instruction Manual IM1200‐U v1.0 Pag. 10 / 42 2 analog outputs (option) With this option the instrument will be equipped with: ‐ 2 pulse / state digital outputs ‐ 2 analog outputs. 2 analog outputs, 2 digital outputs (option) With this option the instrument will be equipped with: ‐ 4 pulse / state digital outputs ‐ 2 analog outputs. Ao1- Ao1- Ao1+ Ao1+ Ao2- Ao2- Ao2+ Ao2+ Do1- Do3- Do1- Do1+ Do3+ Do1+ Do2- Do4- Do2- Do2+ Do4+ Do2+ 4 analog outputs (option) With this option the instrument will be equipped with: ‐ 2 pulse / state digital outputs ‐ 4 analog outputs. 4 analog outputs, 2 digital outputs (option) With this option the instrument will be equipped with: ‐ 4 pulse / state digital outputs ‐ 4 analog outputs. Ao1- Ao1- Ao1+ Ao1+ Ao2- Ao2- Ao2+ Ao2+ Ao3- Ao3- Ao3+ Ao3+ Ao4- Ao4- Ao4+ Ao4+ Do1- Do3- Do1- Do1+ Do3+ Do1+ Do2- Do4- Do2- Do2+ Do4+ Do2+ Analog Outputs Digital Inputs/Outputs Iout Iout Vout Vout 150mA max fuse Load Load V 24, 48, 115, 230 Vaa/dc depending by the version Ao1- Ao2- V Ao1+ Ao3- Ao2+ Ao3+ Ao4- V 12÷230 Vac/dc Ao4+ Di1- Di2- Di1+ V 12÷230 Vac/dc EMS‐96 Di2+ Do2- Do1- Do2+ Do1+ fuse EMS 150mA max EMS Load Load Load Load Min 1K Min 1K Max 600 Max 600 Voltage analog outputs Current analog outputs Instruction Manual IM1200‐U v1.0 Pag. 11 / 42 COM1-RS485 COM2-RS485 Serial ports (option) Depending on the version, the instrument can be equipped with one or two isolated half duplex RS485 serial A2 interface. B2 Two options are available: C2 1 serial port RS485 2 serial ports RS485 A1 With these options the instrument can communicate with the external with the Modbus protocol. The two B1 ports are independent and they can perform the same operations. The presence of the serial port RS485 C1 allows the software update. COM1 A1: +data B1: ‐data C1: common EMS A1+ B1- C1 C2 B2- A2+ A+ B- COM Master o Concentrator o Other instrument COM2 A2: +data B2: ‐data C2: common The instrument communicates via a asynchronous isolated serial interface in the standard RS485 Half‐ duplex that allows a connection in a network up to 247 nodes. This allows to implement a communication network between different instruments and a master unit (data concentrator) for a detailed control of an electrical installation. The maximum length of the line depends on variables such as the transmission rate and characteristics of the cables used. It’s recommend to use a shielded twisted pair cable with low attenuation, with a minimum section of 0.36mm2 (22AWG) and capacity of less than 60pF / m. The maximum length is about 1200m. For longer distances it’s need to use signal amplifiers (repeaters). High networking length and/or where environments are electrically "noisy", it requires the use of two termination resistors (at the beginning and end of the line) of 100‐120Ω. The use of repeaters is also necessary in the case of networks with more than 32 nodes. At each repeater can be connected 32 units. Please note that complex networks with large number of nodes cause a slower speed of response by the instruments. Connection type: half‐duplex (2 wires + common). Isolation: opto‐couples (3750 Vrms min.). In the figure is showed a connection with a not shielded cable. In the shielded cable connection it’s necessary to connect the shield to COM terminal. Profibus port (option) Profibus‐DP is a multi‐master systems. In the networks it’s possible to have up to 126 devices on the same bus. In profibus‐DP networks, the interchange of data between peripheral modules and the master is made automatically 5 9 by the profibus controller, which ‘virtualise’ the data exchange memory of the DP devices in the memory of the master. In the following picture the pin‐out of the Profibus‐DP port: 1 Not connected 4 RTS 7 Not connected 6 1 2 Not connected 5 Gnd 8 RxD/TxD‐N (A) 3 RxD/TxD‐P (B) 6 Alimentazione (+5V) 9 Not connected The profibus interface detects automatically the baud rate of the network; the baud rate available are: 9.6 Kbit/s 19.2 Kbit/s 45.45 Kbit/s 93.75 Kbit/s 187.5 Kbit/s 500 Kbit/s 1.5 Mbit/s 3 Mbit/s It’s possible to request to the manufacturer application examples, GSD files and protocol manual (IM157). The 3 yellow led on the back have the following meanings: ‐ instrument not parameterized: the 3 led turn on continuously in the sequence PAR ‐ ExB ‐ ExA ‐ instrument parameterized: led PAR turned on ‐ instrument parameterized and in communication: led PAR on, led ExA and ExB turn on independently Service: port used by the manufacturer only. EMS‐96 Instruction Manual IM1200‐U v1.0 Pag. 12 / 42 Ethernet port (option) COM1-RS485 MBUS The Ethernet port (RJ45 connector) of EMS96 incorporates 4 LED (2 status LED and 2 Ethernet status LED). The green LED of Ethernet status, Link/Data, is turned on when the Yellow Led Ethernet Ethernet cable is plugged into the device. The LED blinks whenever an Status Green Led status Ethernet pack is received. The yellow LED of the Ethernet status, Led led Green Led Red Led 100BaseT, is turned on when the device links with the hub at 100Mb. The LED is off when the link is established at 10Mb. The status LED indicates the communication in transmission TX (green LED) and the communication in receiving RX (red LED). The SERVICE button has the function to restore the factory parameters following this steps: turn off the instrument, turn on the instrument, wait for end of blinking green LED, press and hold the button for at least 10 seconds, turn off and turn on the instrument. The options available with the Ethernet port are: a) Ethernet port with Modbus TCP/IP protocol b) Ethernet port and Wifi with Modbus TCP/IP protocol c) Ethernet port with Modbus TCP/IP protocol and Web server built d) Ethernet port with Modbus TCP/IP protocol, Web server and an additional RS485 serial port used as Modbus RTU‐TCP/IP converter e) Ethernet port and Wifi with Modbus TCP/IP protocol, Web server and an additional RS485 serial port used as Modbus RTU‐ TCP/IP converter. MBUS (option) The wiring is performed using two conductors (MBUS1 and MBUS2 connected to A2 and B2) that are used for A2 the data transmission and power supply of the MBUS communication module. The connection is B2 independent of the polarity. C2 A1 B1 C1 EMS‐96 Instruction Manual IM1200‐U v1.0 Pag. 13 / 42 Function keys Directional keys (Up/Down/Left/Right) The directional keys are used to change the pages in Measures, Graphics, Info Device e Setup. In the next chapters the maps show how to move between pages. At the same time the directional keys allow to move and select items inside the Menu. The Up and Down keys are used to increases and decrease or simply to change the set values in the Setup pages. Pressing at the same time the Left and the Right keys it’s possible to define the default page. The title page will change the colour and the “home icon” will appear near the text to confirm the new default. Pressing at the same Up and Down keys to return to default from the actual page. Enter key The Enter key when pressed in Measures, Graphics, Info Device and Setup pages allows to enter in the Menu and it is used to confirm the item selected. In the Setup it allows to modify and to confirm the set value. Esc key This key is used: ‐ to skip without to confirm the modify ‐ when a page of Measures, Graphics, Info Device and Setup is displayed, pressing Esc the display will show all levels path to reach the last page opened by using the menu from the turning on of the instrument. Frontal led On the frontal panel there are two led that blink proportionally to the energy read. For default the right red led shows the “System Active Energy IN” and the left red led shows the “System Reactive Energy IN”. In the setup is possible to modify the default set with the following parameters: ‐ System Active Energy IN ‐ System Active Energy OUT ‐ System Reactive Energy IN ‐ System Reactive Energy OUT ‐ System Apparent Energy The weight of the pulses of these led is 0.1 Wh, VArh, VAh for each pulse. This value is not modifiable. EMS‐96 Instruction Manual IM1200‐U v1.0 Pag. 14 / 42 Maps Menu Menu Measures Measures Graphics Info Device Setup Communication Slaves read*** (Password) Instantaneous Voltages Instantaneous Voltages Phase‐Neutral Relative Min Currents Phase‐Phase Relative Max Power Factor Absolute Min Cos Powers Active Absolute Max Average Powers Max Demand Frequency Reactive Apparent Energies THDs Counters Harmonics Voltage Exp. Power Phase angles Current Relative Min Harmonics THDs SAG Graphics Relative Max Voltage Voltages trend Absolute Min Current Currents trend Absolute Max Load Bars Voltages Powers Currents Energies Power Factor Harmonics Cos Phasor diagram Tan Voltages Power Info Device Device Info Frequency Date / Time Com.Monitor Max Demand Currents Options Log summary Cos Log Details Tan On/Off Events Power Frequency Setup Energies Slaves read ‐‐‐‐‐‐‐‐‐‐‐‐‐‐‐‐‐‐‐ Active OUT Reactive IN Reactive OUT Apparent Voltages trend Current trend Complete Zoom Energies Daily Weekly Monthly Yearly Log summary Log Details Setpoint Generic Smart Trigger Timed EMS‐96 Instruction Manual Apparent Voltage Current Power Active Reactive Apparent Active IN ‐‐‐‐‐‐‐‐‐‐‐‐‐‐‐‐‐‐‐ Active Reactive Voltages Power Factor Communication Power THDs Average SW/HW Version ‐‐‐‐‐‐‐‐‐‐‐‐‐‐‐‐‐‐‐ Phase‐Phase THDs Digital I/O Status Setpoint Status Phase‐Neutral IM1200‐U v1.0 : this item is selectable only with the presence of relative option. ***: this item is selectable only if COM1 or COM2 is present and in Master mode. To move inside the menu it’s necessary to use the directional keys. The arrow near the items indicates the presence of submenu (with right or enter key it’s possible to enter). Pressing Enter key to go to show the page or the item selected. The cursor position is showed with different color text. Pag. 15 / 42 Menu Measures Measure Measures ‐‐‐‐‐‐‐‐‐‐‐‐‐‐‐‐‐‐‐ Trasform Ratio Time window Graphics Info Communication Slaves read*** Frequency ‐‐‐‐‐‐‐‐‐‐‐‐‐‐‐‐‐‐‐ Setup SAG (Password) Wiring Info Preset Energies ‐‐‐‐‐‐‐‐‐‐‐‐‐‐‐‐‐‐‐ Instrument Setup Password Measure Reset Instrument Date/Time I/O Utility Setpoint Display Timeband Graphics User Pages I/O I/O Log DO 1, 2, 3, 4 Service DO 5, 6, 7, 8 Communication DI 1, 2, 3, 4 COM1* AO 1, 2, 3, 4 COM2** Timeband Slaves read Mode DPO COM1 Preset DO COM2 User pages Preset Daily Period Composition Holiday Titles Rows text Log Generic Smart Trigger No COM1 COM1 RS485 Timed COM1 RS485 Setting Slave typology No COM2 Slave name COM2 RS485 COM2 RS485 Profibus Setting Ethernet Slave typology Ethernet Wifi MBUS Slave name MBUS Setting Readout data COM1 Slave 1 ........... Slave 20 COM2 Slave 1 ........... Slave 20 EMS‐96 Instruction Manual IM1200‐U v1.0 : this item is selectable only with the presence of relative option. : this item is selectable only if the relative COM is set as Master mode. * options: ‐ No COM1 ‐ COM1 RS485 ** options: ‐ No COM2 ‐ COM2 RS485 ‐ Profibus ‐ Ethernet ‐ Ethernet wifi ‐ MBUS ***: this item is selectable only if COM1 or COM2 is present and in Master mode. The item Service is underlined because it is available only for the constructor. Pag. 16 / 42 Measures The default page showed at the power on is “Phase Voltage”. It’s possible to change it using the keys (left and right pressed at the same time). Relative Minimum Relative Maximum Absolute Minimum Absolute Maximum Average Max Demand Voltages Min Relative Voltages Max Relative Voltages Min Absolute Voltages Max Absolute Voltages Average Voltages Max Demand Voltages Phase‐Phase Voltages Min Relative Phase‐Phase Max Relative Phase‐Phase Min Absolute Phase‐Phase Max Absolute Phase‐Phase Currents Min Relative Currents Max Relative Currents Min Absolute Currents Max Absolute Currents Average Currents Max Demand Currents Power Factor Min Relative Power Factor Max Relative Power Factor Min Absolute Power Factor Max Absolute Power Factor Average Power Factor Max Demand Power Factor Cos Min Relative Cos Max Relative Cos Min Absolute Cos Max Absolute Cos Average Cos Max Demand Cos Tangent Min Relative Tan Max Relative Tan Min Absolute Tan Max Absolute Tangent Average Tan Max Demand Tan Active Power Min Relative Active Power Max Relative Active Power Min Absolute Active Power Max Absolute Active Power Average Active Power Max Demand Active Power Reactive Power Min Relative Reactive Power Max Relative Reactive Power Min Absolute Reactive Power Max Absolute Reactive Power Average Reactive Power Max Demand Reactive Power Apparent Power Min Relative Apparent Power Max Relative Apparent Power Min Absolute Apparent Power Max Absolute Apparent Power Average Apparent Power Max Demand Apparent Power Frequency Min Relative Frequency Max Relative Frequency Min Absolute Frequency Max Absolute Frequency Average Frequency Max Demand Frequency THD Voltages Min Relative THD Voltages Max Relative THD Voltages Min Absolute THD Voltages Max Absolute THD Voltages THD Currents Min Relative THD Currents Max Relative THD Currents Min Absolute THD Currents Max Absolute THD Currents Voltage Harmonics (1‐5) Voltage Harmonics (6‐10) Voltage Harmonics (11‐15) Voltage Harmonics (16‐20) Current Harmonics (1‐5) Current Harmonics (6‐10) Current Harmonics (11‐15) Current Harmonics (16‐20) SAG (1‐5) SAG (6‐10) HARMONICS Instantaneous Active Power Max Demand EMS‐96 Instruction Manual IM1200‐U v1.0 Pag. 17 / 42 Timeband 1 Timeband 2 Timeband 16 Reactive Power Max Demand Timeband 1 Timeband 2 Timeband 16 Total Active Energy IN Timeband 1 Timeband 2 Timeband 16 Total Active Energy OUT Timeband 1 Timeband 2 Timeband 16 Total Reactive Energy IN Timeband 1 Timeband 2 Timeband 16 Total Reactive Energy OUT Timeband 1 Timeband 2 Timeband 16 Total Apparent Energy Timeband 1 Timeband 2 Timeband 16 Total Counters Timeband 1 Timeband 2 Timeband 16 User Page (2/4) User Page (3/4) Expected Power Phase Angles User Page (1/4) User Page (4/4) : this item is selectable only with the presence of relative option. Phase Voltage EMS‐96 ENERGIES Active Power Max Demand MAX DEMAND SAG (1‐5) Instruction Manual IM1200‐U v1.0 Pag. 18 / 42 Graphics Voltages Trend Voltages Trend Zoom Help Currents Trend Currents Trend Zoom Help Load Bars Help Monday Power Daily Energy (Active‐Reactive) Weekly Energy (Active‐Reactive) Sunday Power Help Help Help Jan Energy Dec Energy (Active‐Reactive) (Active‐Reactive) Jan Energy Dec Energy (Active‐Reactive (Table) (1‐16) (Active‐Reactive) (Table) (1‐16) Help Help Jan Energy Dec Energy (Active‐Reactive) (Table) (17‐31) (Active‐Reactive) (Table) (17‐31) Help Energy Year YYYY Energy Year YYYY‐1 Energy Year YYYY‐2 Energy Year YYYY‐3 Energy Year YYYY‐4 Energy Year YYYY‐5 Voltage Harmonics L1 Voltage Harmonics L2 Voltage Harmonics L3 Current Harmonics L1 Current Harmonics L2 Current Harmonics L3 Help Phasor diagram Voltages Trends EMS‐96 Instruction Manual IM1200‐U v1.0 Pag. 19 / 42 Device Info Device Digital I/O Status Setpoints Summary Setpoint 1 Setpoint 2 Setpoint 32 Date/Time COM1 Monitor COM2 Monitor Device Version Options 1/5 Options 2/5 Options 3/5 Options 4/5 Options 5/5 Info Setpoint Log Info Generic Log Info Smart Log Info Trigger Log Info Timed Log Setpoint Log page 1 Setpoint Log page 2 Setpoint Log page 32 Generic Log page 1 Generic Log page 2 Generic Log page XXXX Smart Log page 1 Smart Log page 2 Smart Log page XXXX Trigger Log page 1 Trigger Log page 2 Trigger Log page XXXX Timed Log page 1 Timed Log page 2 Timed Log page XXXX Events 1/4 Events 2/4 Events 3/4 Events 4/4 Info Device EMS‐96 Instruction Manual IM1200‐U v1.0 Pag. 20 / 42 Setup To move inside the Setup pages it’s necessary to use left and the right keys. Press the Enter key to go to see the item to set. Measure Transform ratio Time window Frequency SAG Wiring Preset total energies : this item is selectable only with the presence of relative option. Instrument Password Reset Display Utility Date/Time Graphics I/O Digital outputs 1, 2, 3, 4 Digital output 5 Digital output 6 Digital output 7 Digital output 8 Digital input 1 Digital input 2 Digital input 3 Digital input 4 Analog output 1 Analog output 2 Analog output 3 Analog output 4 : this item is selectable only with the presence of relative option. Setpoint Setpoint 1 ................ Setpoint 32 Timeband Mode Timeband Daily Plan 1 Period Plan 16 Holiday ................ Daily Plan 16 Period Plan 1 ................ : this item is selectable only with the presence of relative option. User pages User page 1 User page 2 User page 3 User page 4 Editing titles Editing rows texts Log Generic log Smart log Trigger log Trigger log : this item is selectable only with the presence of relative option. EMS‐96 Instruction Manual IM1200‐U v1.0 Pag. 21 / 42 Communication COM1 setting COM1 slaves read COM1 editing slaves name COM2 setting Profibus Ethernet Mbus setting Mbus Readout Data COM2 slaves read COM2 editing slaves name : this item is selectable only with the presence of relative option. : this item is selectable only if the relative COM is present and in Master mode. Slaves read map Slave 1 Slave 3 .......... Slave 17 Slave 19 Slave 2 Slave 4 .......... Slave 18 Slave 20 : this item is selectable only if the relative COM is present and in Master mode. The number of Slaves displayable (from 1 to 20) depends from the set of “Slaves to read”. EMS‐96 Instruction Manual IM1200‐U v1.0 Pag. 22 / 42 Setup Items Measure Transform Ratio Range CT ratio 1 ÷ 10000 It’s the ratio between the primary and the secondary circuit of the external current transformers. CT‐N ratio 1 ÷ 10000 It’s the ratio between the primary and the secondary circuit of the external neutral current transformers. VT ratio 1 ÷ 5000 It’s the ratio between the primary and the secondary circuit of the voltage transformers. Time window Range Upgrade time [minutes] 1 / 2 / 3 / 5 / 6 / 10 / 12 / 15 / 20 / 30 / 60 The time used to calculate the average, maximum, minimum values and the expected power. Type Shifting / Fixed The type of the window to calculate the average values and expected power. Frequency Range Fundamental [Hz] 50 / 60 Select the base frequency of the inputs (voltages and currents). Phase monitored L1 / L2 / L3 It’s the phase that will be monitored to detect of SAG and to read the actual frequency. SAG (option) Range Threshold [RMS voltage] 30 ÷ 400 If the voltage value drops below the setting, the software considers the event as SAG. Time [ms] 1 ÷ 1000 If the voltage value drops below for a time greater than the setting, the software considers the event as SAG. Default 1 1 1 Default 15 Shifting Default 50 L1 Default 210 32 Fig.1: Sag parameters Fig.2: Sag Explanation A sag is defined as an under voltage condition that persists for more than one period of base frequency. A shorter under voltage condition is called a dip (see Fig. 2). The occurrence of sag could announce an impending loss of power. To set the sag register the voltage must be under the Threshold value for a minimum time defined in Time. Wiring Range Default Type of wiring 3‐phase Aron / balanced 3 phase / 3‐ph multiload 3‐phase Aron balanced / Single‐phase / 1‐phase multiload / Multi single‐phase / 2‐phase 3 wires See table below. Neutral current Measured / Computed See below On this item appears Measured if the CT is present or Computed if the CT is not present. The user can change the set showed. Power factor convention SIGN / IEC / DIN IEEE SIGN See the following picture for details on the selected configuration. EMS‐96 Instruction Manual IM1200‐U v1.0 Pag. 23 / 42 EMS‐96 Three Phase Balanced Three Phase Multi Load Balanced Single Phase Single Phase Multi Load Multi Single Phase Two Phase 3 Wires SYSTEM VOLTAGE PHASE VOLTAGE L1‐N PHASE VOLTAGE L2‐N PHASE VOLTAGE L3‐N LINE TO LINE VOLTAGE L1‐2 LINE TO LINE VOLTAGE L2‐3 LINE TO LINE VOLTAGE L3‐1 SYSTEM CURRENT LINE CURRENT L1 LINE CURRENT L2 LINE CURRENT L3 SYSTEM POWER FACTOR POWER FACTOR L1 POWER FACTOR L2 POWER FACTOR L3 SYSTEM COS φ PHASE COS φ1 PHASE COS φ2 PHASE COS φ3 SYSTEM APPARENT POWER APPARENT POWER L1 APPARENT POWER L2 APPARENT POWER L3 SYSTEM ACTIVE POWER ACTIVE POWER L1 ACTIVE POWER L2 ACTIVE POWER L3 SYSTEM REACTIVE POWER REACTIVE POWER L1 REACTIVE POWER L2 REACTIVE POWER L3 NEUTRAL CURRENT(according with version) THD VOLTAGE L1 THD VOLTAGE L2 THD VOLTAGE L3 THD CURRENT L1 THD CURRENT L2 THD CURRENT L3 ANGLE 1‐2 ANGLE 2‐3 ANGLE 3‐1 SYSTEM TANGENT φ PHASE TANGENT φ1 PHASE TANGENT φ2 PHASE TANGENT φ3 SAG SYSTEM ACTIVE ENERGY IN SYSTEM ACTIVE ENERGY OUT SYSTEM REACTIVE ENERGY IN SYSTEM REACTIVE ENERGY OUT SYSTEM APPARENT ENERGY ACTIVE ENERGY IN L1 ACTIVE ENERGY OUT L1 REACTIVE ENERGY IN L1 REACTIVE ENERGY OUT L1 APPARENT ENERGY L1 ACTIVE ENERGY IN L2 ACTIVE ENERGY OUT L2 REACTIVE ENERGY IN L2 Aron Description Wiring Three Phase Wiring Parameters X X X X X X X X X X X X X X X X X X X X X X X X X X X X X X X X X X X X X X X X X X X X X X X X X X X X X X X X X X X X X X X X X X X X X X X X X X X X X X X X X X X X X X X X X X X X X X X X X X X X X X X X X X X X X X X X X X X X X X X X X X X X X calculated X calculated calculated calculated X calculated calculated calculated X calculated calculated calculated X calculated calculated calculated X calculated calculated calculated X calculated calculated X X X X X calculated calculated X X X calculated X calculated calculated X calculated calculated calculated calculated calculated X X X X X calculated calculated calculated X X X X X X X X x3 x3 x3 X X X X X X X X X x3 x3 x3 X x3 x3 x3 X x3 x3 x3 X X X X X X X X X X X X X X X x3 x3 x3 x3 x3 x3 x3 x3 x3 x3 x3 x3 x3 X X X X X X X X X X X X X X X X X X X X X X X X X X X X X X X X X X X X X X X X X X X X X X X X X X X X X X X X X X X X X X X X X X X X X X X X X X X X X X X X X X X X X X X X X X X X X X X X X X X X X X X X X X X X X X X X X X X X X X X X X X X X X X X X X X X X X X X X X X X X X X X X X X X X X X X X X X X X X X X Instruction Manual IM1200‐U v1.0 Pag. 24 / 42 REACTIVE ENERGY OUT L2 X X REACTIVE ENERGY OUT L2 X X APPARENT ENERGY L2 X X ACTIVE ENERGY IN L3 X X ACTIVE ENERGY OUT L3 X X REACTIVE ENERGY IN L3 X X REACTIVE ENERGY OUT L3 X X APPARENT ENERGY L3 X X : the values read in this configuration aren’t significant. calculated calculated calculated calculated calculated calculated calculated calculated x3 x3 x3 x3 x3 x3 x3 x3 X X X X X X X X X X X X X X X X X X X In the WIRING setup page it’s possible to modify the wiring type and in the DEVICE STATUS page it’s showed the voltage and current wiring state. For the voltage wiring item it is possible to have the following option: ‐ Correct. ‐ Not Correct. The order of voltage connections is not correct (the angles between phases is different by 120°) in the following insertion: Three phase, Three phase balanced, Three phase multi load balanced, Single phase multi load and Multi single phase. ‐ Not applied. All voltage inputs must be apply. For the current wiring item it possible to have the following option: ‐ Correct. ‐ Not correct: the order of current connections not be correct in the following insertion: Three phase, Three phase balanced, Three phase multi load balanced, Single phase multi load and Multi single phase. L1 reverse: the current of the L1 phase has the opposite sign respect others two phases. L2 reverse: the current of the L2 phase has the opposite sign respect others two phases. L3 reverse: the current of the L3 phase has the opposite sign respect others two phases. ‐ Not applied. All current must be apply and the loads must be balanced. Sign power factor convention Reactive Power W(‐) VAR(+) P.F.(‐) Q2 Q1 Q3 Q4 Reactive Power W(+) VAR(+) W(‐) VAR(+) P.F.(+) P.F.(+) Active Power Q1 Q3 Q4 W(+) VAR(+) W(‐) VAR(+) P.F.(‐) P.F.(+) Active Power W(+) VAR(+) P.F.(+) Q2 Q1 Q3 Q4 Active Power W(‐) VAR(‐) W(+) VAR(‐) W(‐) VAR(‐) W(+) VAR(‐) W(‐) VAR(‐) W(+) VAR(‐) P.F.(‐) P.F.(+) P.F.(‐) P.F.(+) P.F.(‐) P.F.(‐) IEC Power Factor Sign Convention EMS‐96 Q2 Reactive Power DIN/IEEE Power Factor Sign Convention Instruction Manual IM1200‐U v1.0 SIGN Power Factor Sign Convention Pag. 25 / 42 Preset Total Energies Wh IN [0.1kWh] Value to add at the actual system active energy IN counter. Wh OUT [0.1kWh] Value to add at the actual system active energy OUT counter. VArh IN [0.1kVArh] Value to add at the actual system reactive energy IN counter. VArh OUT [0.1kVArh] Value to add at the actual system reactive energy OUT counter. VAh [0.1kAh] Value to add at the actual system apparent energy counter. Wh IN L1 Value to add at the actual L1 active energy IN counter. Wh OUT L1 Value to add at the actual L1 active energy OUT counter. VArh IN L1 Value to add at the actual L1 reactive energy IN counter. VArh OUT L1 Value to add at the actual L1 reactive energy OUT counter. VAh L1 Value to add at the actual L1 apparent energy counter. Wh IN L2 Value to add at the actual L2 active energy IN counter. Wh OUT L2 Value to add at the actual L2 active energy OUT counter. VArh IN L2 Value to add at the actual L2 reactive energy IN counter. VArh OUT L2 Value to add at the actual L2 reactive energy OUT counter. VAh L2 Value to add at the actual L2 apparent energy counter. Wh IN L3 Value to add at the actual L3 active energy IN counter. Wh OUT L3 Value to add at the actual L3 active energy OUT counter. VArh IN L3 Value to add at the actual L3 reactive energy IN counter. VArh OUT L3 Value to add at the actual L3 reactive energy OUT counter. VAh L3 Value to add at the actual L3 apparent energy counter. EMS‐96 Instruction Manual Range 0 ÷ 1000000000 Default 0 0 ÷ 1000000000 0 0 ÷ 1000000000 0 0 ÷ 1000000000 0 0 ÷ 1000000000 0 0 ÷ 1000000000 0 0 ÷ 1000000000 0 0 ÷ 1000000000 0 0 ÷ 1000000000 0 0 ÷ 1000000000 0 0 ÷ 1000000000 0 0 ÷ 1000000000 0 0 ÷ 1000000000 0 0 ÷ 1000000000 0 0 ÷ 1000000000 0 0 ÷ 1000000000 0 0 ÷ 1000000000 0 0 ÷ 1000000000 0 0 ÷ 1000000000 0 0 ÷ 1000000000 0 IM1200‐U v1.0 Pag. 26 / 42 Instrument Password Range Default Access key 0 ÷ 999999999 0 The code to enter to modify the setup. Validity key [minutes] 1 ÷ 60 5 Time of free use of the setup after one access with password. Keys protect Yes / No No If is enabled, to modify the setup (from keys) it’s necessary insert the password. Communication protect Yes / No No If it’s enabled, to modify the setup (from communication interface) send the password command before another setup command. Enable options 0 ÷ 999999999 0 After the insertion of the code, switch off/on the instrument to enable software options. Reset Range Default Global Yes / No No Reset to factory settings. Default setup Yes / No No Reset all settings in setup. All energies Yes / No No Reset all energies counted. TB energies Yes / No No Reset all energies timebands (not total energies). Counters Yes / No No Reset all counters. TB counters Yes / No No Reset all counters timebands. (not total counters). Min‐Max Yes / No No Reset all min and max values. Max demand Yes / No No Reset max demand values. Energies log Yes / No No Reset energies log. Setpoint log Yes / No No Reset setpoint log. G/S/T log Yes / No No Reset generic and smart log. Events log Yes / No No Reset events log. Date / Time Range Default Hour 0 ÷ 23 XX Actual hour. Minute 0 ÷ 59 XX Actual minutes. Second 0 ÷ 59 XX Actual seconds. Day of Week Monday ÷ Sunday XX Actual day of week. Day 1 ÷ 31 XX Actual day. Month January ÷ December XX Actual month. Year 2000 ÷ 2099 XX Actual year. EMS‐96 Instruction Manual IM1200‐U v1.0 Pag. 27 / 42 Utility Language Language used for the display text. Theme Range English / (optional language) Default English Winter / Winter night / Autumn / Autumn night / Summer / Summer night Winter Theme is a different combination of colour. Text dimension Normal / Big Set the dimension of the char of the instantaneous values showed in the display. Led left 0.1 Wh/VArh/VAh See Acronym table of Energy Measured associated at the left frontal led. Led right 0.1 Wh/VArh/VAh See Acronym table of Energy Measured associated at the right frontal led. LED min period [ms] 10 ÷ 100 Pulse period associated at frontal led. Normal Varh IN Wh IN 60 Display Range Return default page [min] 1 ÷ 30 After this time the instrument comes back to default page. Backlight keys Off / In standby / Always on Set the type of the key illumination. Standby No / Yes / Short bright / Change page Set the type of the standby mode. Standby entry [min] 1 ÷ 60 After this time the instrument goes in the standby mode, as selected in the previous item. Short bright on period [s] 1 ÷ 600 In Short bright mode the display will stay on for this time. Short bright off period [s] 1 ÷ 600 In Short bright mode the display will stay off for this time. Change page [s] 1 ÷ 600 In Change page mode the instrument will change the page after this time. Category page 1 Measure / Graphics Category of the 1st page showed in Change page mode. Page 1 See the table of displayable pages 1st page showed in Change page mode. Category page 2 Measure / Graphics Category of the 2nd page showed in Change page mode. Page 2 See the table of displayable pages 2nd page showed in Change page mode. Category page 3 Measure / Graphics Category of the 3rd page showed in Change page mode. Page 3 See the table of displayable pages 3rd page showed in Change page mode. Category page 4 Measure / Graphics Category of the 4th page showed in Change page mode. Page 4 See the table of displayable pages th 4 page showed in Change page mode. Table of the displayable pages in the Change page mode Measures voltages active power Wh in phase‐phase voltages reactive power Wh out currents apparent power VArh in power factor frequency VArh out cos‐phi thd voltages Vah tan‐phi thd currents expected power Graphics V/A sampling [Seconds] Sampling time for the voltage and current graphic trend. Clear max bar Reset the maximum signal on the graphic bars. EMS‐96 Instruction Manual Default 5 In standby Yes 10 5 55 10 Graphics Voltages zoom Graphics Currents zoom Graphics Daily energy Graphics Weekly energy Graphics user page 1 user page 2 user page 3 user page 4 voltages trend currents trend load bars daily energy weekly energy yearly energy phasor diagram Range 1 ÷ 60 Default 5 Yes / No No IM1200‐U v1.0 Pag. 28 / 42 I/O Digital Outputs 1, 2, 3, 4 (pulse/state) Range Level Active low / Active high Active Low: initial state high level. Active High: initial state low level. Mode Status / Pulse / Setpoint Status: see the Status item set. Pulse: see the measure associated (Associated DO‐1). Setpoint: the digital output to be controlled by setpoint functionality. Pulse weight [Wh‐VArh] 1 ÷ 10000 The pulse is generated every time that the energy selected is increased of the selected value. Duration [ms] 60 ÷ 1000 The pulse has a duty cycle of 50% (Ton equal Toff) and the duration selected. Status DO‐1 0 / 1 Select ON to close the output, OFF to open it. Associated DO‐1 See Acronym table of Energy Associated measure to the digital output DO‐1. Status DO‐2 0 / 1 Select 1 to close the output, 0 to open it. Associated DO‐2 See Acronym table of Energy Associated measure to the digital output DO‐2. Status DO‐3 0 / 1 Select 1 to close the output, 0 to open it. Associated DO‐3 (option) See Acronym table of Energy Associated measure to the digital output DO‐3. Status DO‐4 0 / 1 Select 1 to close the output, 0 to open it. Associated with DO‐4 (option) See Acronym table of Energy Associated measure to the digital output DO‐4. Digital output X* (option) Range Status 0 / 1 Select 1 to close the output, 0 to open it. Level Active low / Active high Active Low: initial state high level. Active High: initial state low level. Mode Status / Not used / Setpoint Status: see the Status item set. Not used. Setpoint: the digital output to be controlled by setpoint functionality. Default Active high Status 100 500 0 Wh IN 0 Wh OUT 0 VArh IN 0 VArh OUT Default 0 Active high Status * These settings are used for the optional digital outputs from DO‐5 to DO‐8. Digital input X* (option) Range Mode See below ‐ Status ‐ Counter ‐ Change energy timeband actually used (see example) ‐ Change counter timeband actually used (see example) ‐ Change energy and counter timeband actually used (see example) ‐ External trigger Example: DI‐4 = 1, DI‐3, = 0 DI‐2 = 0, DI‐1 = 1 The timeband selected is 1001bin ‐> TB 9 DI‐4 = 0, DI‐3, = 0 DI‐2 = 1, DI‐1 = 1 The timeband selected is 0011bin ‐> TB 3 Multiplier 1 ÷ 1000 If the digital inputs mode is counter this parameter multiply the input pulse for the coefficient set. Default Status 1 * These settings are used for the optional digital inputs from DI‐1 to DI‐4. EMS‐96 Instruction Manual IM1200‐U v1.0 Pag. 29 / 42 Analog output X* (option) Range Default Range 0÷5V / 0÷10V / ±5V / ±10V / 4÷20mA / 0÷20mA 0 ÷5V Selection of the modality of the output (current or voltage) and relative limits. Measure group See Acronyms Group table Selection of the group for the actual analog output. Measure associated See acronym in the table of the group selected ‐‐‐ Selection of the measure to associate of the actual analog output, inside the selected Measure group. High threshold ± 9999 0 Maximum value associated to the high threshold associated. High threshold unit See below See below underlined Unit measure of threshold. Active Power: W‐kW‐M‐GW Temperature: °C Voltage: mV‐V‐kV‐MV Current: mA‐A‐kA‐MA Reactive Power: VAr‐kVAr‐MVAr‐GVAr THD and harmonics: %*100 Frequency: mHz Angle: degree*10 Apparent Power: VA‐kVA‐MVA‐GVA Low threshold ± 9999 0 Minimum value associated to the low threshold. Low threshold unit See below See below underlined Unit measure of threshold. Active Power: W‐kW‐M‐GW Temperature: °C Voltage: mV‐V‐kV‐MV Reactive Power: VAr‐kVAr‐MVAr‐GVAr THD and harmonics: %*100 Current: mA‐A‐kA‐MA Frequency: mHz Angle: degree*10 Apparent Power: VA‐kVA‐MVA‐GVA * These settings are used for the optional analog outputs from AO‐1 to AO‐4. Example: to associate the L1 phase voltage to the analog output it is necessary select instantaneous for the item Measure group and the acronym V L1 for the item Measure associated. If the maximum value is set to 300V and 100V to the minimum, with the scale of 0÷20mA, it will have that with 200V as measured voltage, the output will be 10 mA. Only for the power factor, cos and tan is used a different logic (see the following example). Selecting the cos or the power factor as a measure to associate to the analog output, the intermediate output value (10 or 12 mA) is set to cos=1 (and coinciding with cos=‐1). The value of the output signal will trend to increase when the positive values of cos decrease from 1 to 0 while for the negative values, it will decrease when the value trend to 0. Example: Setting +800 and ‐800 as maximum and minimum values when cos=0.9 the value will be 15 mA, while when the cos=‐0.9 it will be 5 mA. In the case of selection of tan the intermediate output value (10 or 12 mA) is set to tan=0 and the output signal will be directly proportional to the variation of the measure. EMS‐96 Instruction Manual IM1200‐U v1.0 Pag. 30 / 42 Setpoint Setpoint XX (from 1 to 32) Range Default Enable Yes / No No Enable or disable the setpoint function. Source Internal measures / Measures node X Internal measures Select the instrument from which the measure to analyze it will be read. Measure group See Acronyms Group table ‐‐‐ Selection of the group for the actual setpoint if it is set Internal measures as Source. Measure controlled See acronym in the table of the group selected ‐‐‐ Selection of the measure in the selected Measure Group of the actual setpoint. High threshold ± 9999 0 The Action is executed if the measure exceed the set value. High threshold unit See below See below underlined With Measure node X as Source, the multiplier factor will be 1, 1000, 1000000 while with Internal measures there will be: Reactive power: VAr‐kVAr‐MVAr–GVAr Angle: degree*10 Voltage: mV‐V‐kV‐MV Frequency: mHz Apparent energy: VAh*100‐kVAh‐MVAh‐GVAh Current: mA‐A‐kA‐MA Active energy: Wh*100‐kWh‐MWh‐GWh Apparent power:VA‐kVA‐MVA‐GVA Temperature: °C THD and harmonics: %*100 Reactive energy: VArh*100‐kVArh‐MVArh‐GVArh Active power: W‐kW‐MW‐GW Low threshold ± 9999 0 The Action is executed if the measure is lower than the set value. Low threshold unit See below See below underlined See the description of High threshold unit. Over debounce [seconds] 0 ÷ 10000 0 0: instantaneous execution of the Action 1÷10000: execution of the Action if the condition is kept for the time set Entry debounce [seconds] 0 ÷ 10000 0 0: instantaneous execution of the Action 1÷10000: execution of the Action if the condition is kept for the time set Hysteresis (for high & low threshold) See below ‐‐‐ ‐‐‐ 50,000% 25,000% 12,500% 6,250% 3,125% Logic operation over See below Disabled ‐ No logic: the Action is executed without to verify the status of others setpoint [Default]. ‐ OR logic: the Action is execute after the check of result of the OR logic operation with the setpoint selected in operands. ‐ AND logic: the Action is execute after the check of result of the AND logic operation with the setpoint selected in operands. WARNING: it’s not possible to set OR logic for logic operation over and logic operation entry at the same time. Logic operation entry See below Disabled ‐ No logic: the Action is executed without to verify the status of others setpoint [Default]. ‐ OR logic: the Action is execute after the check of result of the OR logic operation with the setpoint selected in operands. ‐ AND logic: the Action is execute after the check of result of the AND logic operation with the setpoint selected in operands. WARNING: it’s not possible to set OR logic for logic operation over and logic operation entry at the same time. Operands (1‐16) See below No Operands Setpoint 1: select Yes to include the setpoint 01 in the logic. ‐ ‐ ‐ ‐ ‐ ‐ ‐ ‐ ‐ ‐ ‐ ‐ ‐ ‐ ‐ ‐ ‐ ‐ ‐ Setpoint 16: select Yes to include the setpoint 16 in the logic. Operands (17‐32) See below No Operands Setpoint 17: select Yes to include the setpoint 17 in the logic. ‐ ‐ ‐ ‐ ‐ ‐ ‐ ‐ ‐ ‐ ‐ ‐ ‐ ‐ ‐ ‐ ‐ ‐ ‐ Setpoint 32: select Yes to include the setpoint 32 in the logic. Action over See below None It possible to select one, more or anything action: ‐ Display and save the event. ‐ Increase a variable that indicates the number of events. ‐ Change the DO‐X state. ‐ Increase a variable that indicates the duration time of the event. Action entry See below None It possible to select one, more or anything action: ‐ Change the DO‐X state ‐ Display and save the event. DO used See below None It possible to select (with Yes) one or more DO: DO‐1, DO‐2, DO‐3, DO‐4, DO‐5, DO‐6, DO‐7, DO‐8. WARNING: for a correct functioning before to select the output it’s necessary to set the SETPOINT mode under the item MODE in the setup page of the DO group (DO‐1, 2, 3, 4 or DO‐5, 6, 7, 8). EMS‐96 Instruction Manual IM1200‐U v1.0 Pag. 31 / 42 Thrend Setpoint setup: Measure ‐ Select the Source of the measure to control between internal measures and external (via Debounce Modbus network in Master mode). High (Sec) DO ACTION ‐ In order to simplify the selection of the parameter is divided in Measure group and High Threshold Measure controlled so that, for example, to Hysteresis RECOVERY monitor the active power (internal measure) ACTION it’s necessary to select Instantaneous + W. ‐ After the selection of the measure, it’s RECOVERY ACTION necessary to decide what are the limits that Hysteresis the measure should not exceed (High Low Threshold threshold + High threshold unit and Low DO ACTION threshold + Low threshold unit). Debounce Low (Sec) ‐ In case of exceeding the limits set before, it’s Sec possible to make one or more operations (Actions over): ‐ save the event; ‐ change the state of one or more digital outputs; ‐ increment a counter that indicate how many times the parameter exceeded the limits; ‐ enable a counter that indicate show many time the parameter exceeded the limits. If it’s necessary, there is also the possibility to save the event and/or to switch another time the digital outputs in case of resetting of alarm condition (Action entry). ‐ To avoid continuous switching or saves, at the minimum variation of the parameter near at the thresholds set, it’s possible to modify the parameters of Over/Entry debounce and Hysteresis (see the following picture) that are left at zero for default. ‐ To allow to control more parameters at the same time and to have a single action if limits are exceeded, it’s possible to relate more setpoint using the two main logical operations (AND and OR). It’s necessary to set more setpoint with the limits chosen by the user and to define in one of them the list of setpoint to consider and the logic used. See the next picture for an example of logic applied to three setpoints. Operands: ‐ Setpoint 1 (with parameter Line Voltage 1) ‐ Setpoint 2 (with parameter Line Voltage 2) ‐ Setpoint 3 (with parameter Line Voltage 3) Logic Set: V1 AND V2 AND V3 After the setting of the parameters of the setpoint, and only at the end, it’s necessary to select yes for the item Enable. Example of setting (in the correct order) to set an alarm when the power exceed 1000W on phase 1 with saving of the date and time of the event and the switching of a digital output when the alarm is present and when it disappear. Source: Internal Measure group: instantaneous Measure controlled: W L1 High threshold: 1000 High threshold unit: W Acton over: ‐ save the event: yes ‐ change DO: yes Action entry: ‐ save the event: yes ‐ change DO: yes DO used: ‐ DO‐1: yes Enable: yes Thrend Measure Debounce V1 Threeshold Sec Debounce V2 Threeshold Sec Debounce V3 Threeshold Sec State Set Point 1 State Set Point 2 State Set Point 3 DO ACTION EMS‐96 Instruction Manual IM1200‐U v1.0 Pag. 32 / 42 Timeband Timeband (option) Range Energy changing Manual / From DI / Preset It’s possible to select the modality to change the timeband: ‐ Manual. ‐ From DI: the combination of digital inputs select the actual timeband used. ‐ Preset (see timeband Daily and Period plan for more information). Counter changing Manual / From DI It’s possible to select the modality for change the timeband: ‐ Manual. ‐ From DI: the combination of digital input select the actual timeband used. Daily Plan X (from 1 to 16) (option) Range Start Hour 1 00 ÷ 23 Hour at which the timeband will be changed. Start Minute 1 00 ÷ 59 Minute at which the timeband will be changed. Timeband Used 1 Not used ÷ Timeband 16 New Timeband set. ……………….. ……………….. Start Hour 16 00 ÷ 23 Hour at which the timeband will be changed. Start Minute 16 00 ÷ 59 Minute at which the timeband will be changed. Timeband Used 16 Not used ÷ Timeband 16 New Timeband set. Period Plan X (from 1 to 16) (option) Range Enable Disabled / Enabled Enable or disable the plan. WARNING: Set all the following parameters before to enable it. Start Month January ÷ December Month at which the period start. Start Day 1 ÷ 31 Day at which the period start. End Month January ÷ December Month at which the period finish. End Day 1 ÷ 31 Day at which the period finish. Monday Plan Plan 1 ÷ Plan 16 Plan used for this day. Tuesday Plan Plan 1 ÷ Plan 16 Plan used for this day. Wednesday Plan Plan 1 ÷ Plan 16 Plan used for this day. Thursday Plan Plan 1 ÷ Plan 16 Plan used for this day. Friday Plan Plan 1 ÷ Plan 16 Plan used for this day. Saturday Plan Plan 1 ÷ Plan 16 Plan used for this day. Sunday Plan Plan 1 ÷ Plan 16 Plan used for this day. EMS‐96 Instruction Manual IM1200‐U v1.0 Default Manual Manual Default 0 0 Not used 0 0 Not used Default Disabled January 1 December 31 Plan 1 Plan 1 Plan 1 Plan 1 Plan 1 Plan 1 Plan 1 Pag. 33 / 42 Holiday (option) Range Month Holiday 1 January ÷ December Month in which the holiday is present. Day Holiday 1 1 ÷ 31 Day in which the holiday is present. Plan Holiday 1 Not Used ÷ Plan 16 Plan used for this holiday. When the plane setting is different from ‐‐‐ the Holiday Plan is enabled. ……………….. ……………….. Month Holiday 48 January ÷ December Month in which the holiday is present. Day Holiday 48 1 ÷ 31 Day in which the holiday is present. Plan Holiday 48 Not Used ÷ Plan 16 Plan used for this holiday. When the plane setting is different from ‐‐‐ the Holiday Plan is enabled. EMS‐96 Instruction Manual IM1200‐U v1.0 Default January 1 ‐‐‐ January 1 ‐‐‐ Pag. 34 / 42 User pages User Page X (from 1 to 4) Range Row 1 – Group See Acronym Group table Selection of the group for the 1st measure on the User Page XX. Row 1 – Measure See acronym in the table of the group selected Selection of the measure showed on the 1st row of the User Page XX in the Row 1 ‐ Group. Row 2 – Group See Acronym Group table nd Selection of the group for the 2 measure on the User Page XX. Row 2 – Measure See acronym in the table of the group selected Selection of the measure showed on the 2nd row of the User Page XX in the Row 2 ‐ Group. Row 3 – Group See Acronym Group table Selection of the group for the 3rd measure on the User Page XX. Row 3 – Measure See acronym in the table of the group selected rd Selection of the measure showed on the 3 row of the User Page XX in the Row 3 ‐ Group. Row 4 – Group See Acronym Group table Selection of the group for the 4th measure on the User Page XX. Row 4 – Measure See acronym in the table of the group selected Selection of the measure showed on the 4th row of the User Page XX in the Row 4 ‐ Group. Row 5 – Group See Acronym Group table Selection of the group for the 5th measure on the User Page XX. Row 5 – Measure See acronym in the table of the group selected Selection of the measure showed on the 5th row of the User Page XX in the Row 5 ‐ Group. Row 6 – Group See Acronym Group table Selection of the group for the 6th measure on the User Page XX. Row 6 – Measure See acronym in the table of the group selected Selection of the measure showed on the 6th row of the User Page XX in the Row 6 ‐ Group. Editing Titles Range Title in User Page X. ‐‐‐ Title showed in the User Page X. Default Instantaneous V Instantaneous A Instantaneous W Instantaneous Var Energies Wh IN Energies VArh IN Default ‐‐‐ Note: X indicates the number of user page from 1 to 4. Editing rows texts Text 1 Text showed in the row 1 of the User Page. Text 2 Text showed in the row 2 of the User Page. Text 3 Text showed in the row 3 of the User Page. Text 4 Text showed in the row 4 of the User Page. Text 5 Text showed in the row 5 of the User Page. Text 6 Text showed in the row 6 of the User Page. EMS‐96 Instruction Manual Range ‐‐‐ Default ‐‐‐ ‐‐‐ ‐‐‐ ‐‐‐ ‐‐‐ ‐‐‐ ‐‐‐ ‐‐‐ ‐‐‐ ‐‐‐ ‐‐‐ IM1200‐U v1.0 Pag. 35 / 42 Log Generic Log (option) Enable Enable or disable the generic log. Sampling Range Yes / No Default No 1 sec / 2 sec / 3 sec / 5 sec / 6 sec / 10 sec / 12 sec / 15 sec / 20 sec / 30 sec / 1 min / 2 min / 3 min / 5 min / 6 min / 10 min / 12 min / 15 min / 20 min / 30 min / 60 min / end of day / end of week / end of month 15 min Acquisition timing. Storage Type FIFO / End memory Type of storage. Note: FIFO after 10 consecutive cycles is automatically disabled. Group 1 See Acronym Group table Selection of the group for the 1st measure sampled for the generic log. Measure 1 See acronym in the table of the group selected Selection of the 1st measure sampled for the generic log. ……………….. ……………….. Group 15 See Acronym Group table Selection of the group for the 15st measure sampled for the generic log. Measure 15 See acronym in the table of the group selected st Selection of the 15 measure sampled for the generic log. End memory ‐‐‐ ‐‐‐ ‐‐‐ ‐‐‐ Warning: All recordings for all log will be lost if any parameter is changed. Smart Log (option) Enable Enable or disable the smart log. Analyse window Range Yes / No Default No 1 min / 2 min / 3 min / 5 min / 6 min / 10 min / 12 min / 15 min / 20 min / 30 min / 60 min / end of day / end of week / end of month / end of year 15 min Acquisition timing Storage Type FIFO / End memory Type of storage. Note: FIFO after 10 consecutive cycles is automatically disabled. Group 1 See Acronym Group table Selection of the group for the 1st measure sampled for the smart log. Measure 1 See acronym in the table of the group selected st Selection of the 1 measure sampled for the smart log. ……………….. ……………….. Group 15 See Acronym Group table Selection of the group for the 15st measure sampled for the smart log. Measure 15 See acronym in the table of the group selected st Selection of the 15 measure sampled for the smart log. End memory ‐‐‐ ‐‐‐ ‐‐‐ ‐‐‐ Warning: All recordings for all log will be lost if any parameter is changed. EMS‐96 Instruction Manual IM1200‐U v1.0 Pag. 36 / 42 Trigger Log (option) Range Enable Yes / No Enable or disable the trigger log. Sampling [seconds] 1 ÷ 3600 Acquisition timing. Storage Type FIFO / End memory Type of storage. Note: FIFO after 10 consecutive cycles is automatically disabled. Trigger input DI active high, DI active low, Setpoint Input that active the log. DI used 1 ÷ 4 Digital input used for the trigger. Setpoint used 1 ÷ 32 Setpoint used for the trigger. Group 1 See Acronym Group table Selection of the group for the 1st measure sampled for the trigger log. Measure 1 See acronym in the table of the group selected st Selection of the 1 measure sampled for the trigger log. ……………….. ……………….. Group 15 See Acronym Group table Selection of the group for the 15st measure sampled for the trigger log. Measure 15 See acronym in the table of the group selected Selection of the 15st measure sampled for the trigger log. Default No 10 End memory DI active high 1 1 ‐‐‐ ‐‐‐ ‐‐‐ ‐‐‐ Warning: All recordings for all log will be lost if any parameter is changed. Timed Log (Option) Enable Enable or disable the timed log. Sampling Range Yes / No Default No 1 sec / 2 sec / 3 sec / 5 sec / 6 sec / 10 sec / 12 sec / 15 sec / 20 sec / 30 sec / 1 min / 2 min / 3 min / 5 min / 6 min / 10 min / 12 min / 15 min / 20 min / 30 min / 60 min / end of day / end of week / end of month 15 min Acquisition timing. Storage Type FIFO / End memory Type of storage. Note: FIFO after 10 consecutive cycles is automatically disabled. Start hour 0 ÷ 23 Start time of log. Start minute 0 ÷ 59 Start time of log. End Hour 0 ÷ 23 End time of log. End minute 0 ÷ 59 End time of log. Monday Yes / No Enable or disable the log in this day of the week. ……………….. ……………….. Sunday Si / No Enable or disable the log in this day of the week. Group 1 See Acronym Group table Selection of the group for the 1st measure sampled for the timed log. Measure 1 See acronym in the table of the group selected Selection of the 1st measure sampled for the timed log. ……………….. ……………….. Group 15 See Acronym Group table Selection of the group for the 15st measure sampled for the timed log. Measure 15 See acronym in the table of the group selected Selection of the 15st measure sampled for the timed log. End memory 0 0 23 59 No No ‐‐‐ ‐‐‐ ‐‐‐ ‐‐‐ Warning: All recordings for all log will be lost if any parameter is changed. EMS‐96 Instruction Manual IM1200‐U v1.0 Pag. 37 / 42 Communication COM1/2 setting (option) Range Default Mode Slave / Master Slave Slaves to read 1 ÷ 20 1 Number of slave connected in master mode. Master Timeout [ms] 0 ÷ 10000 800 Time after than it will be set the no slave response flag and increase the NO RESPONSE COUNTER if the answer isn’t received (Master Mode). Scan rate [ms] 0 ÷ 10000 1000 Delay between two master request (Master mode). Note: this value must be greater than TIMEOUT. Node address 1 ÷ 247 1 Instrument identifier on the modbus network. Note: valid only in Slave Mode. Baud rate [kbit/s] 4800 / 9600 / 19200 / 38400 / 57600 / 115200 38400 The communication speed. Stop bits 1 / 2 stop 1 stop Communication parameters. Parity None / Odd / Even None Communication parameters. Min. response delay [ms] 5 ÷ 100 10 Modify this value if use a slow external converter. COM1/2 Slave read (option) Slave node 1 Range TTC‐V / CTT‐4 / CTT‐8 / HRI / EMM‐h / EMT‐4s / EMS‐96 / RI‐SM Type of slave (instrument) connected to the address 1. ……………….. ……………….. Slave node 20 TTC‐V / CTT‐4 / CTT‐8 / HRI / EMM‐h / EMT‐4s / EMS‐96 / RI‐SM Type of slave (instrument) connected to the address 20. Default ‐‐‐ ‐‐‐ Note: Accessible only with COM in master mode. The number of slave node is equal of the value set in “Slave to read”. COM1/2 Editing Slaves name (option) Slave node 1 Edit the name of the slave. ……………….. ……………….. Slave node 20 Edit the name of the slave. Range Default Slave 1 Slave 20 Note: Accessible only with COM in master mode. Profibus (option) Address [node] Instrument identifier on the profibus network. Range 1 ÷ 126 Default 1 Range 1 ÷ 247 Default 1 0.0.0.0 ÷ 255.255.255.255 10.0.0.100 0.0.0.0 ÷ 255.255.255.255 255.0.0.0 0.0.0.0 ÷ 255.255.255.255 10.0.0.254 0 ÷ 65535 502 0.0.0.0 ÷ 255.255.255.255 1.0.0.1 Ethernet (option) Address [node] Identification instrument in the Modbus network. IP address IP address associated to the instrument. Subnet mask Subnet mask associated to the instrument. IP gateway IP address of the gateway associated to the instrument. IP Port Number of the TCP port for the Modbus communication. IP Wifi IP Wifi address associated to the instrument. EMS‐96 Instruction Manual IM1200‐U v1.0 Pag. 38 / 42 M‐Bus (option) Range Address [node] 0 ÷ 250 Instrument identifier on the M‐BUS network. Baud rate [kbit/s] 300 / 600 / 1200 / 2400 / 4800 / 9600 / 19200 / 38400 Communication speed. Stop bits 1 / 2 stop bits Communication parameters. Parity None / Odd / Even Communication parameters. Min Response delay [ms] 0 ÷100 If set 0 the instrument responds as soon as possible. M‐Bus Readout Data (option) Range Group 1 See Acronym Group table Group of the 1st measure read. Measure 1 See acronym in the table of the group selected 1st measure read. ……………….. ……………….. Group 20 See Acronym Group table Group of the 20st measure read. Measure 20 See acronym in the table of the group selected 20th measure read. Default 1 2400 1 stop Even 10 Default (*) Instantaneous V Energies VArh OUT (*) Default Table Group / Measure of M‐BUS Readout Data Number of Group and Measure Group Measure 1 Instantaneous V 2 Instantaneous V L1 3 Instantaneous V L2 4 Instantaneous V L3 5 Instantaneous A 6 Instantaneous A L1 7 Instantaneous A L2 8 Instantaneous A L3 9 Instantaneous PF 10 Instantaneous PF L1 11 Instantaneous PF L2 12 Instantaneous PF L3 13 Instantaneous W 14 Instantaneous VAR 15 Instantaneous N 16 Instantaneous Hz 17 Energies Wh IN 18 Energies Wh OUT 19 Energies VArh IN 20 Energies VArh OUT EMS‐96 Instruction Manual IM1200‐U v1.0 Pag. 39 / 42 Acronym tables Acronyms group table Acronym Instantaneous Average Energies * Text Energies TB‐1 Energies TB‐2 Energies TB‐3 *: only for User pages Acronym Energies TB‐4 Energies TB‐5 Energies TB‐6 Energies TB‐7 Energies TB‐8 Energies TB‐9 Energies TB‐10 Acronym Energies TB‐11 Energies TB‐12 Energies TB‐13 Energies TB‐14 Energies TB‐15 Energies TB‐16 Acronyms table of Instantaneous group Acronym V V L1 V L2 V L3 V L1‐L2 V L2‐L3 V L3‐L1 A A L1 A L2 A L3 PF PF L1 PF L2 PF L3 COS COS L1 Explanation System Voltage Voltage L1 Voltage L2 Voltage L3 L1‐L2 Voltage L2‐L3 Voltage L3‐L1 Voltage System Current Current L1 Current L2 Current L3 System Power Factor Power Factor L1 Power Factor L2 Power Factor L3 System COS COS L1 Acronym COS L2 COS L3 VA VA L1 VA L2 VA L3 W W L1 W L2 W L3 VAR VAR L1 VAR L2 VAR L3 N Hz TEMP Explanation COS L2 COS L3 System Apparent Power Apparent Power L1 Apparent Power L2 Apparent Power L3 System Active Power Active Power L1 Active Power L2 Active Power L3 System Reactive Power Reactive Power L1 Reactive Power L2 Reactive Power L3 Neutral Current Frequency Temperature Acronym THD V L1 THD V L2 THD V L3 THD A L1 THD A L2 THD A L3 DEG L1‐L2 DEG L2‐L3 DEG L3‐L1 TAN TAN L1 TAN L2 TAN L3 EXP W EXP W L1 EXP W L2 EXP W L3 Explanation THD Voltage L1 THD Voltage L2 THD Voltage L3 THD Current L1 THD Current L2 THD Current L3 Phase Angle L1‐L2 Phase Angle L2‐L3 Phase Angle L3‐L1 System Tan Tan L1 Tan L2 Tan L3 System Expected Power Expected Power L1 Expected Power L2 Expected Power L3 Explanation Reactive Energy L1 IN Reactive Energy L1 OUT Apparent Energy L1 Active Energy L2 IN Active Energy L2 OUT Reactive Energy L2 IN Reactive Energy L2 OUT Acronym VAh L2 Wh L3 IN Wh L3 OUT VArh L3 IN VArh L3 OUT VAh L3 Explanation Apparent Energy L2 Active Energy L3 IN Active Energy L3 OUT Reactive Energy L3 IN Reactive Energy L3 OUT Apparent Energy L3 Acronyms table of Energies and TB (from 1 to 16) groups Acronym Wh IN Wh OUT VArh IN VArh OUT VAh Wh L1 IN Wh L1 OUT Explanation System Active Energy IN System Active Energy OUT System Reactive Energy IN System Reactive Energy OUT System Apparent Energy Active Energy L1 IN Active Energy L1 OUT Acronym VArh L1 IN VArh L1 OUT VAh L1 Wh L2 IN Wh L2 OUT VArh L2 IN VArh L2 OUT Acronyms table of Average group Acronym AVG V AVG V L1 AVG V L2 AVG V L3 AVG A AVG A L1 AVG A L2 AVG A L3 AVG PF AVG PF L1 AVG PF L2 AVG PF L3 AVG COS EMS‐96 Explanation System Average Voltage Average Voltage Phase 1 Average Voltage Phase 2 Average Voltage Phase 3 System Average Current Average Current L1 Average Current L2 Average Current L3 System Average Power Factor Average Power Factor L1 Average Power Factor L2 Average Power Factor L3 System Average COS Acronym AVG COS L1 AVG COS L2 AVG‐COS‐3 AVG VA AVG VA L1 AVG VA L2 AVG VA L3 AVG W AVG W L1 AVG W L2 AVG W L3 AVG VAR AVG VAR L1 Instruction Manual Explanation Average COS L1 Average COS L2 Average COS L3 System Average Apparent Power Average Apparent Power L1 Average Apparent Power L2 Average Apparent Power L3 System Average Active Power Average Active Power L1 Average Active Power L2 Average Active Power L3 System Average Reactive Power Average Reactive Power L1 IM1200‐U v1.0 Acronym AVG VAR L2 AVG VAR L3 AVG N AVG Hz AVG TAN AVG TAN L1 AVG TAN L2 AVG TAN L3 EXP W EXP W L1 EXP W L2 EXP W L3 Explanation Average Reactive Power L2 Average Reactive Power L3 Average Neutral Current Average Frequency Average System Tan Average Tan L1 Average Tan L2 Average Tan L3 System Expected Active Power Expected Active Power L1 Expected Active Power L2 Expected Active Power L3 Pag. 40 / 42 Dimensions 96 89.5 EMS‐96 Esc Default Menu Set Electrical Measurement Supervisor 96 10 9.8 100 12 For fixing the flush mount version instrument to the panel, use the fixing devices supplied, by inserting them in the side groves of the enclosure and tighten the screws. For safety reasons, place an external fuse protection at the input voltages, and use adequate cables for the working voltages and currents, with a cross sections from 0,5 to 2,5 mm2. Technical features Auxiliary power supply Voltage range 90÷250 Vac/dc 24÷48 Vac/dc 50/60 Hz 1A Time Lag 8VA max – 1VA min (depending on the options and activities) Frequency range Protection fuse Power consumption Measures / precision Energy Factory Default: CEI EN 62053‐21 compliant – Class 1 (1%) CEI EN 62053‐22 compliant – Class 0.5 S (0.5%) CEI EN 62053‐22 compliant – Class 0.2 S (0.2%) 40÷70 Hz ± 1.000 ± 1.000 ± tan 89.9° IEC62053‐22 Compliant Up to 20th Harmonics – IEC62053‐22 Frequency Power factor Cos Tan THD Harmonics Measurement range Voltage Current 1A Current 5A Installation Distribution networks Voltageinputs Inputs type Permitted over voltage 30÷400VAc phase to neutral (52÷693 Vac phase to phase) 10mA÷1A (for 1, 0.5S or 0.2S Class accuracy, depending on the option) 50mA÷5A (for 1, 0.5S or 0.2S Class accuracy, depending on the option) low and medium voltage ‐ single phase connection ‐ three phase with neutral ‐ three phase without neutral 3 phase inputs + Neutral 480 Vac phase to neutral (830Vac continuous phase to phase) Over‐voltage category: III (permanent installations) >1.8M 50/60 Hz Note: V1 terminal must be connected 0.09 VA Input resistance Frequency range Load (Burden) for each input Current inputs Inputs type Maximum continuous overload 1A Maximum continuous overload 5A Load (Burden) for each input Mechanical Overall dimension Weight Communication RS485 Protocol Standard Baud rate Node ID Parity Stop bit EMS‐96 3 inputs isolated by internal current transformers additional input for neutral current with the same characteristics to the phase inputs 1.3A 6.5A 0.00055 VAMAX 96x96x130 mm 450 gr Modbus RTU RS485 half‐duplex with optical isolation 4.8 ‐ 9.6 ‐ 19.2 ‐ 38.4 ‐ 57.6 ‐ 115.2 kbps 1÷247 Even ‐ Odd – None 1, 2 Instruction Manual IM1200‐U v1.0 Pag. 41 / 42 Communication Profibus Protocol Baud rate Address Connector Communication Ethernet Protocol Connector Communication Mbus Baud rate Address Parity Stop bit Digital Inputs Number of digital inputs Input voltage range Input current Inputs configuration Isolation voltage Input filter Pulse duration Digital Outputs Number of digital outputs Type Voltage/Current range Voltage isolation Output functionality Profibus with slave DP‐V0 9.6Kbits/s ‐ 3Mbits/s 0‐126 DB 9 female connector ModbusTCP, SNMP RJ45, WiFi 0.3 ‐ 0.6 ‐ 1.2 ‐ 2.4 ‐ 4.8 ‐ 9.6 ‐ 19.2 ‐ 38.4 kbps 0‐250 Even ‐ Odd ‐ None 1, 2 2, 4 Input rated voltage VINPUT 24, 48, 115, 230 Vac/dc (only one defined in the order) Rated input current IINPUT @ VINPUT: 5mAMAX @ VINPUT=all voltages 2 terminals (A‐K) for each input: NPN, PNP 3.5KV for 60 sec. Digital TON_min 30ms, TOFF_min 30ms 2, 4, 6, 8 Photo‐MOS (solid state); RON= 8 typ. (12 MAX) 10÷300Vdc 150mAMAX; 12÷250Vac 150mAMAX 4KV for 60 sec. Digital Output programmed as alarm Selectable pulse period 60ms÷1000ms Programmable pulse polarity (active close or active open) Programmable pulse “weight” TON_min 30ms, TOFF_min 30ms Pulse duration Analog outputs Number of analog outputs Auxiliary power supply Insulation level Maximum lenght of connection Resolution Analog outputs type Mode Load Error 2, 4 Not required 3.5KV for 60 sec. 1200m 12bit (4092 valori) Settling time Clock calendar Data Update Data retention in absence of voltage Storage Type of memory Current Voltage 0÷20mA or 4÷20mA 0÷10V or ‐10÷10V or 0÷5V or ‐5÷5V Max 600 Min 1K Max: 0.5% on E.S. – Typical 0.2% on E.S. Max: 0.3% on E.S. – Typical 0.1% on F.S. Linearity: 0.01 on F.S. ‐ Thermal stability: 0.01 on F.S. 50µs(0÷20mA)@RLOAD=1K, CLOAD=200pF, LLOAD=1mH 50µs(‐10 ÷10V)@RLOAD=1K, CLOAD=200pF Hours, minutes, seconds, day of week, date, month, year Through modbus command and synchronization from digital inputs 1 week backup guaranteed Internal memory (factory default) – MicroSD card (option) CE COMPLIANCE AND STANDARDS The instrument was tested in compliance with EMC 89/336/EEC and complies with the following standards: EMISSIONS = EN 50081‐2, 1992 ‐ EN 55022‐CLASS B CISPR 22 IMMUNITY = EN 50082‐1, 1992 ‐ EN 61000‐6‐2 SAFETY = EN 61010‐2 EMS‐96 Instruction Manual IM1200‐U v1.0 Pag. 42 / 42