1
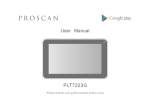
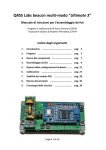
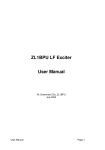
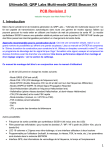
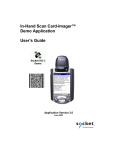
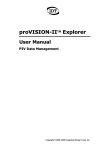
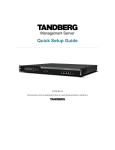
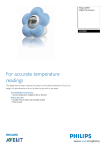
CPR4 Handheld Radar User manual 1. INTRODUCTION ..................................................................................................................... 2 The power to sense through walls – in your hand ........................................................... 2 How it works ..................................................................................................................... 3 Typical Applications .......................................................................................................... 3 2. QUICK START GUIDE .............................................................................................................. 4 Controls............................................................................................................................. 4 Starting up the device....................................................................................................... 4 Turning off the device....................................................................................................... 4 The display ........................................................................................................................ 4 Typical use ........................................................................................................................ 5 3. DESCRIPTION ......................................................................................................................... 6 Indicators .......................................................................................................................... 6 Understand Operation...................................................................................................... 7 Menus ............................................................................................................................... 8 Menu 1 – Everyday use..................................................................................................... 8 Menu 2............................................................................................................................ 10 Menu 3............................................................................................................................ 11 Power options................................................................................................................. 12 Mounting support........................................................................................................... 13 CPR4 system basic content ............................................................................................. 13 CPR4 optional accessories .............................................................................................. 13 CPR4 spare parts ............................................................................................................. 14 4. USING CPRMon ON A REMOTE TERMINAL ......................................................................... 14 See what your CPR4 is seeing – on your PC or Android device ...................................... 14 Installation steps for CPRMon on Android ..................................................................... 14 Wired Remote Control, WRC .......................................................................................... 16 5. TECHNICAL SPECIFICATIONS ............................................................................................... 17 Display............................................................................................................................. 17 Radar ............................................................................................................................... 17 Communication .............................................................................................................. 17 Power management/batteries ....................................................................................... 17 Dimensions and other .................................................................................................... 18 Human safety.................................................................................................................. 18 6. Warranty ............................................................................................................................. 18 For your satisfaction – 2 Year Functional Warranty ....................................................... 18 7. ADDITIONAL INFORMATION ............................................................................................... 19 Explanation of CPR4’s backward sensitivity ................................................................... 19 Which sensitivity level to use? ....................................................................................... 19 Troubleshooting and common questions? ..................................................................... 20 CPR4 User Manual V2.1, 20 Jan 2014 1 1. INTRODUCTION Thank you and congratulations for purchasing Cinside CPR4! In this user manual you will find: A quick start guide Detailed description of options A brief guide about the monitoring software CPRMon (for Android) and Command Center (for Windows). There is a separate document describing these programs in more detail. Technical specifications Warranty information We advise you to read the whole manual carefully in order to use the equipment correctly and to learn about its functions. Look out for these symbols when you are reading: Pay attention Tips and information We recommend you to store the user manual together with the equipment for easy access in the field. You can also download the latest version of the manual from our website. Before starting up, we would like to give you some background information about CPR4. The power to sense through walls – in your hand CPR4 is a handheld easy-to-use device for detection of moving objects behind walls or other obstacles. A person hiding may be detected several meters behind a wall. If there are any moving objects, the operator will be alerted immediately. CPR4 can also be fixed mounted or simply put in a bag to observe an area of interest. Up to 4 units can be remotely controlled and monitored, by wire or wireless. 2 New features in CPR4: AEC – Automatic Environment Compensation The device automatically compensates for operator and environment motions Motion classification: place – direction – speed The operator can now receive a rough estimation of the distance to the detected motion visualised by graphical symbols Internal charge of batteries with a USB-cable (CPR4B) How it works The CPR4 radar is primarily measuring motion compared to other radar technologies that are measuring distance and from that may calculate a motion. The CPR4 radar transmits electromagnetic energy (radio waves) of a certain frequency, which is reflected in all surfaces it hits. The energy also penetrates all kind of materials except a homogenous metal plate. Eventually some of the energy returns back to the radar. The returned frequency is the same as the transmitted for static objects and for moving objects the returned frequency is different. The detection of the difference gives the alert. The measured level of motion is dependent on the size of the object, size of motion, speed of motion, distance to object and of course the obstacles in between. Typical Applications Military and police break in or search operations. Searching for humans in enclosed rooms or voids. Monitor areas to be cleared, free from humans with a hidden sensor. Monitor an enclosed room for presence and health status of a human, ie in a Prison cell, with a hidden sensor. 3 2. QUICK START GUIDE Controls You control the CPR4 using six buttons: The POWER button is used for turning on and switching off the device. A short press returns to main menu. The LEFT (←) and the RIGHT (→) arrows are used to move the cursor to the left and right to select a parameter. The UP (↑) and the DOWN (↓) arrow are used to increasing or decreasing the value of a chosen parameter. The LAMP button us used for turning on and off the background lighting. Fig. 1 - Front of CPR4 Starting up the device Turn on CPR4 by pressing the POWER button and holding it for a few seconds until display shows information. If you don’t hold the button, the CPR4 will switch off automatically. This is to avoid unintentional start-up of the device, for example in a bag, which will drain the batteries. Turning off the device Press the power button and hold for a few seconds until the display tell to release button. The display The upper part of the display shows results from the collected data. Here you receive information about movements with the main indicator to the right. The thin line to the left represents the history 4 Fig 1 Standard view of movements, time scale is selectable by “Graph Mode”. The lower part of the display is used for symbols as the result of classifying the movement. The lower part is also used for navigating in the menus. The menu automatically appears when pressing an arrow button. The menu also automatically disappears after seconds of inactivity (not pressing buttons nor moving the unit). There are three menu pages in the CPR4. You navigate to and in-between them using the LEFT and RIGHT arrow. Menu 1, here you can manage settings for sensitivity level, sound level and background lighting. The Menu 2 and 3, when you navigate to the right, is used for advanced settings. When you are inactive in the menus for a while, the device will return to standard view. Fig 3 Menu 1 Fig 2 Menu 2 - more settings Typical use When the device is turned on, simply hold it still against the wall, or preferable monopod-mounted. Observe and analyse what happens on the display. To make best use of CPR4 and be able use higher sensitivity it is preferred to mount the CPR4 against the wall on a monopod or similar to reduce the influence of the operator. To further increase the robustness of measurements it´s recommended to monitor the CPR4 remotely a couple of meters away wirelessly on a Android device with our CPRMon app or wired with our simple WRC device. 5 3. DESCRIPTION Indicators The main indicator is placed in the top right corner and contains three symbols: A blinking cross indicates self-motion of the radar or that the radar is calibrating. OK – indicates that the radar is active and that no movement is detected. The motion symbol indicates that movement is detected When a movement occurs, the CPR4 may also show more detailed information about the motion itself – if possible. The information given is place – direction – speed. This is represented by three sets of symbols: Tree symbols – indicates whether the movement is detected close to the CPR4 or far away. The scale ranges from 1-4 trees. If one tree is shown, then the movement is close to the operator (typically less than 2m) and if four trees are shown, then the movement is far away from the operator (typically more than 5m). It should be noted that this estimate of range is very hard to make indoor, where you have a lot of objects reflecting the energy in addition to the object of interest. The built in signal processing has functions to deal with this multi path issue but there will be situations where this cannot be resolved and thus indicating, most often, to many trees for a short period of time. This “faulty behaviour” has a natural cause and is not an error. Arrows – an UP arrow indicates that the detected object is moving away from the operator and a DOWN arrow indicates object is moving towards the operator. 6 Standing and walking man – indicates whether the detected object is standing relatively still or if it is moving. 1. 2. 3. 4. 5. 6. 7. 8. Main indicator Place Direction Speed Battery indicator Histograph Motion value Threshold value 6 7 8 1 5 2 3 4 Fig 4 Standard view and identification of standard indicators The two sets of numbers shown in the picture above (0 and 12 in this case) are the measured movement value (0) and alert threshold value (12) is dependent of the sensitivity. The movement value is changing constantly when movement occurs and the threshold value is set up in menu 1. To the right in the lower part of the display you will find another indicator, the battery indicator. If the battery is fully charged, all ten bars will appear inside the battery symbol. Fully charged batteries will last for 6-16 hours depending on what functions and resources used. To optimize operating time turn display background light off or use as low intensity as possible. If wireless communication is not used turn this off in menu 3, set “Bluetooth active” to 0. Also the AEC (Automatic Environment Compensation) takes some extra power, so if “background noise” is not an issue you may turn it off setting the parameter AEC to 0 in menu 3. Understand Operation The motion detection of CPR4 is highly sensitive. It is therefore very important that the CPR4 itself is fixed and the environment around the unit is as still as possible. When used as a handheld piece of equipment, it is very important that the operator is holding the CPR4 in a firm grip while lightly pressing it against the wall. It takes some practice. The surrounding movement level, including the operator, will decide how high sensitivity can be used. The new function AEC (Automatic Environment Compensation) will 7 help to reduce the influence of the operator and adapt the sensitivity accordingly. The best way to familiarise yourself with CPR4 is to find a still environment with as little surrounding movements as possible. Start with a low sensitivity, level 2 or 3. The first goal is to get no alert, the OK, when there is nothing moving. Therefore, the most important factor is for the operator to understand what is required for the CPR4 not to alert. A very good aid in the learning process of the CPR4 is the CPRMon software. With a portable PC or Android device with Bluetooth, and the CPRMon software, it is easy to investigate and understand how the CPR4 responds to movements. Put the monopod-mounted CPR4 on one side of the wall and the operator can move around on the other side and at the same time view the results from the CPR4. (See more on page 11) Menus There are three menu pages in the CPR4. You navigate to and in-between them using the LEFT and RIGHT arrow. In standard mode the classification symbols are normally shown in the lower part of the display. The menu automatically appears in the same area when pressing an arrow button. The menu also automatically disappears after seconds of inactivity (not pressing buttons nor moving the unit). In classic mode (CPR3 look) there is no classification and the menu is shown all the time. Menu 1 – Everyday use The first – and the most important setting to understand – is the sensitivity setting. There are five sensitivity levels and each level corresponds to an alert threshold value. If the measured movement exceeds the threshold value, the operator will be alerted with the Wave symbol flashing and an optional sound. The current movement and threshold values are displayed in the center of the display when DisplayMode>=1. In certain circumstances it is possible to classify the motion in terms of distance, direction and speed and corresponding symbols are presented for that. 8 SENSITIVITY LEVEL Sensitivity level 1 2 3 4 5 Alert threshold value 250 120 60 30 12 VOLUME BACKGROUND LIGHTING Fig 5 Menu 1 – for everyday use To enter Menu 1 – press an arrow to activate the menu and navigate to the desired parameter. If not in Menu 1 press POWER button to return. To change sensitivity level, mark “Sensitivity” and use the UP and DOWN arrow to change the value. The same procedure is used for volume and background light as well. The volume setting has 5 levels and a mute level (indicated by an X next to the speaker) The background lighting setting ranges from 1-100% in varying steps. You could also use the LAMP button to quickly toggle between on and off. A higher level of sensitivity requires a minimal amount of movement on the operator’s part. Do not use to high sensitivity setting unless necessary as it aggravates usability. Full backlighting will result in a high battery usage. Use the LAMP button to quickly turn the background lighting on and off! 9 Menu 2 The menu 2 is accessed by pressing the RIGHT button from menu 1. The marked function name appears at the bottom of the display. To change a parameter, simply mark the function and then press UP arrow or DOWN arrow to choose the preferred setting Function Filter mode Display mode Interval 0-15 0-3 Graph mode Graph showing the past alerts in 80 points Classification of motion 0-5 Alert backlight 0-1 Unit still auto 0-1 0-2 Default Description 4 A higher value filters out fast motion 1 Extra information may be presented on the display. 0: numerical information turned off. 1: numerical presentation of motion level and threshold. 2: and 3: more information is presented, useful for technichans 1 0: Graph off 1-5: 0.5 sec steps for each point 1: 40 sec of history data 5: 3 min 20 sec of history data 2 0 = OFF, CPR3 style 1 = AEC active 2 = AEC + Classification active 0 0 = normal mode 1 = backlight on when alert 1 0 = alert always (good for testing) 1 = alert only when the unit is still 10 Menu 3 The third menu is accessed by pressing the RIGHT button from menu 2. To change a parameter, simply mark the function and then press UP arrow or DOWN arrow to choose the preferred setting Function (in order) AEC level Interval 0-9 Bluetooth address Bluetooth active -0-1 USB pow auto on 0-1 USB to BAT auto 0-1 Charge enable 0-1 Default Description 3 A higher value compensate more for the motion behind the sensor -Press UP to show unit ID 1 0 = Bluetooth off, 1= on Status indicated in display, NB= off, BR= ready, BT= connected 1 CPR4 turns on automatically when USB power connected 1 CPR4 continues on batteries when USB power is removed 1 Turn off if using alkaline (nonchargeable) batteries You can always return to the main menu by a short press on the POWER button not needing to press LEFT many times. 11 Power options There are two ways to charge the batteries, internally or externally. The CPR4 will automatically charge the batteries when USB power is connected and charge enabled in menu 3. For a full charge of high capacity and empty batteries more than 12 hours will be needed. For faster charging or you feel that batteries are not fully charged internally an external charger must be used. Fig 6 The battery compartment To replace the batteries follow these instructions: To open the battery compartment, simply unscrew the ¼-turn screw located on the backside of the CPR4. Dash the device into your hand to remove the batteries. You may need a tool to get the batteries out. Do NOT use your nails to get the batteries out. Four AA batteries are required. Rechargeable NiHM and disposable alkaline batteries can be used. If non-chargeable (alkaline) batteries are used, disable charging in menu 3. Don´t mix different kind of batteries. Please note the symbols indicating the direction in which to insert the batteries. Make sure to use a high quality USB-cable, 2 m cable 24AWG or 5 meter cable 22AWG is recommended otherwise operation can be undeterministic. If the USB cable is connected, then the device will always remain turned on and receive its energy supply. When the USB-power is removed the device will continue on batteries or switch off depending on setting in menu 3. There are two types of rechargeable NiMH batteries, the normal High Capacity and the Low Discharge batteries. The latter have a bit less capacity but may remain 80% of its capacity after one year of storage while the more common High Capacity may discharge itself in one 12 month. Depending how the equipment will be used this is worth thinking of. If the equipment is not be used for a longer period of time, remove the batteries to avoid leakage. Mounting support There is support for a mono-pod (or tri-pod) with ¼" camera screw to ease the fix mounting of CPR4. Fig 9 Mono-pod connection Fig 7 CPR4 mounted on a tripod CPR4 system basic content Your new CPR4 is delivered in a hard or soft case for storage, transport and protection. The case content: The CPR4 device, rubber details selectable in standard or custom color. Standard colors to select from are black, gray and yellow. One set of rechargeable batteries USB power adapters 110-230VAC (europlug) and 12-24VDC (cigarette lighter) Connection cable, USB 2 m long User manual Fig 8 CPR4 hard case CPR4 optional accessories External Battery charger 110-230VAC/12VDC Power adapter 4xUSB, 110-230VAC international AU, EU, UK, US 13 Extra set of batteries, 4x R6 NiMH 1.2V/2500mAh Extra set of batteries, 4x R6 NiMH 1.2V/2000mAh Low self-discharge and long life Connection cable 2.0 m USB Type A – USB Type B mini 24AWG Connection cable 5.0 m USB Type A – USB Type B mini 22AWG Monopod Butyl stripes, to easy attach the CPR4 on the wall. Works on dry wood, concrete and bricks. Soft bag to carry one or two CPR4 and room for accessories. WRC, a simple remote monitoring device with two LED indicators and a speaker, connected with a 5 m fixed cable USB Type B mini. Ruggedized Android smartphone for outdoor and indoor use. CPR4 spare parts Spare rubber feet, 6 pcs. 4. USING CPRMon ON A REMOTE TERMINAL See what your CPR4 is seeing – on your PC or Android device From an Android device with Bluetooth you may remotely supervise and control up to four CPR4 units. An external adapter for Bluetooth Class 1 gives the longest range, up to 100 meters. Bluetooth Class 2, which is normally built into computers and smartphones, gives a useful range of 5 to 20 meters depending on the environment. The CPR4 have Bluetooth Class 1 and a built-in antenna. Installation steps for CPRMon on Android There are some steps you have to walk through when you connect to a CPR4 for the first time. We have one description for all operating systems so some terms and procedures may be slightly different on your system. 14 You get the CPRMon software (an apk-file) from your distributor on request. The basic version is free of charge for CPR4 customers. 1) To install the apk-file on the Android device there are several ways to do it. If your computer and Android device are connected to internet, the fastest way is to use the site http://www.apkinstall.com/, upload the file from PC and then download it to Android device. Another way if you have got a link to the file, just use the browser in the Android device and the installation will start. During install you may have to accept that Bluetooth will be used. 2) Make sure that you have the Bluetooth enabled on both devices. 3) Power on the CPR4 and keep it within range. Use the Bluetooth settings on your mobile phone or PC to pair the devices together (PIN code: 0000) 4) After starting the CPRMon app, the paired devices should connect automatically. If not, you can connect manually in the individual view with “Tap to connect”. 5) When the connection has been completed, ”BT” can be read next to the battery symbol on the CPR4 display. Fig 11 Monitor several CPR4 devices on an Android device 15 Fig 10 Individual view in CPRMon If several CPR4’s are running at the same time, it might be helpful to identify them with the serial number or a friendly name. The serial number is printed on the label on the bottom of the battery compartment and/or on the front panel of CPR4. You could also display the serial number with the second option in menu 3. You may set a Friendly name for each CPR4 monitored. In the smart phone app CPRMon it’s also possible to take a photo to pair with each device to further simplify identification of units and describe the setup. Wired Remote Control, WRC The WRC may be used to monitor CPR4 motion detections on a distance of up to 5 m via a USB cable. This is desired when you don’t want to use the wireless communication for some reason or you like a simpler and easy to maintain remote monitoring than an Android device. As always it is recommended to keep ambient movements very low within 3 m behind the sensor to make use of the highest sensitivity. 16 5. TECHNICAL SPECIFICATIONS Display Graphical 128x64 pixels, monochrome with trans-reflective background and adjustable LED backlight. It is readable in sunlight and darkness. Radar Type: Operating frequency: Max output power: Antenna: Detection range: Approvals: DFCW, Dual Frequency Continuous Wave 10 GHz +10dBm, 10mW Built in 2-10 meters in a 70 degrees sector depending on wall type and motion EN300440, EN50371:2002 Communication Type: Bluetooth 2.0 Class 1, Fully Bluetooth pre-qualified Operating frequency: 2.400 – 2.485 GHz Max / Min output power: +6dBm / -27dBm Antenna: Built in Range: 100 m in open air, typically 10-30 m indoor Approvals: Radio EN 300 328 V1.5.1 (2004 – 08), EN 301 489 – 1 V1.4.1 (2002 – 08) EN 301 489 – 17 V1.2.1 (2002 – 08) EMC Emissions FCC15B Class B, EN55022 Class B EMC Immunity EN55024 Class Environmental EN300 019-2-4 v2.2.2 (2003-2004) Power management/batteries Type: Standard pen light size AA, rechargeable or alkaline Capacity: 2500-2700 mAh standard or 2000-2200 mA low selfdischarge Number of cells: 4 Operating time: Up to 16 hours depending on what features are activated, e.g backlight, Bluetooth, AEC 17 External power: 5V DC 0,5 A, USB mini connector Dimensions and other Size: 90/120 mm width, 220 mm height, 40 mm thick Weight: 600 grams operational Enclosure material: Reinforced ABS Oper. temperature: -20 - +50 degrees Celsius Water resistance: IP67 (approval pending) 0.15 m depth in 30 minutes Mechanical chock: TBD Air Pressure: Operational up to 4000 m height Human safety The CPR4 is safe to use. The RF power levels radiated by the CPR4 are extremely low under all conditions, and many orders of magnitude below the maximum recommended levels. The maximum transmitted power is less than 10 mW. This power is distributed within the coverage pattern of the CPR4. The maximum power density is 1mW/cm² at a distance of 5 mm from the front face of the unit, reduced to 0.72 μW/cm² at a distance of 1 meter. CPR4 fulfills the requirements for maximum human exposure to electromagnetic fields under the safety aspects of the R&TTE directive per EN 50371:200 and in IEEE standard C95.1-1991. 6. Warranty For your satisfaction – 2 Year Functional Warranty The warranty is valid during two year after purchase and as long as the unit’s enclosure remains undamaged. CPR4 is a sensitive instrument. If attempts are made to open CPR4 the equipment will be damaged and the guarantee is no longer valid. CPR4 contains no repairable parts. If any faults or errors are encountered, please contact the distributor or Cinside directly to get a RMA-code before returning any goods. Faulty equipment is exchanged free of charge during the warranty period, the sender pay the freight costs. We strive for 100% customer satisfaction. If you have any questions or issues, don’t hesitate to contact us via e-mail: [email protected] 18 7. ADDITIONAL INFORMATION Explanation of CPR4’s backward sensitivity The radar itself is not particularly sensitive to movements behind the unit (operator side). This can easily be verified in a setup with no reflecting objects within a 10 meter range in front of the radar, and then move your hand or body behind the unit. When static reflectors, e.g. a wall surface and the internal layers of the wall, are present in front of the radar, the movements behind the radar may be mirrored in these reflectors and cause unwanted alerts. AEC, Automatic Environment Compensation, is a new special function to suppress unwanted alerts that origin from the operator or other motion behind the sensor. The AEC is implemented to automatically and dynamically adjust the sensitivity to the surrounding noise. You can compare the impact of different motions by observing the measured value and the threshold value on the display (see fig. 2) The risk of backwards reflection increases if the radar is not placed face to face with the wall. If the radar is placed a distance from the wall the penetration will probably be as good as in the normal use but the wall may be a very good mirror for the radar waves as well. Which sensitivity level to use? The transmitted waves are reflected in the different layers of the wall to different degrees. An interior wall may consist of several layers. Each layer reflects radar waves to a small degree, which increases the operators’ risk to cause an alert. On the other hand, the interior wall layers are often easy to penetrate, resulting in using a low sensitivity level (2 or 3). A concrete wall is more homogeneous and thicker. Fewer layers means less reflections but the material is also harder to penetrate resulting in that a higher sensitivity level must be used (3 or 4). Sensitivity level 5 is probably only useful when the equipment is fixed mounted and used in an extremely “quiet” environment. 19 Troubleshooting and common questions? Also see updated information on our web site www.cinside.eu Problem: If the self motion indicator, the X, flashes continuously even though the unit have been still for several seconds Solution: - If on external power, try run the device on batteries, check cables, make sure at least AWG22 for 5 m cables and AWG24 for 2 m, try a shorter cable or another power supply. - If WRC is used together with external power the cable length will be too long to charge the device at the same time, therefore disable charging in menu 3 option 6, “Charge Enable”. - Maybe the self motion sensor is damaged, to be able to continue using the device, disable the self motion detection in menu 2 option 6, “Unit still auto”. Problem: The radar seems to be insensitive compared to experience. Solution: Maybe the AEC (Automatic Environment Compensation) doesn’t work properly. - If WRC is used together with external power the cable length will be too long to charge the device at the same time, therefore disable charging in menu 3 option 6, “Charge Enable”. - Check the value of “AEC level”, menu 3 option 1, try 0 to turn it off. Question: How to understand AEC operation and set the right parameter? Answer: Let us display some more information maybe we can figure out if settings or something else is wrong. In menu 2 option 2, set the “Display Mode” to 2. You see two numbers at the top, the right one corresponds to the background motion. You should see higher values when moving your hand on the operator side of the device. When there are no movements around the device the value should be at 10 or below if good, not fluctuating at higher numbers. The top left value is the lowest level of operator motion this session. 20 www.cinside.eu