1
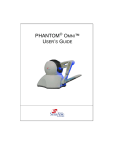
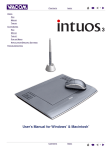
USB Graphics Tablet
User’s Guide
Installing the Battery into the Pen
Unscrew the end cap of the pen. Slide off the pen clip and cover. Insert the
battery (1.5 volt, size AAAA) with the minus (-) side of the battery facing
toward the pen tip. Replace the pen cover and clip. Screw the end cap.
Pen Cover
Pen Tip
Battery
End Cap
Pen Clip
Note!
If you place this pen in a container where the pen rests on the tip,
the pen remains active and battery life is shortened. We recommend
you to place the pen horizontally on the table. For 5"x3.75" tablet,
you also can place the pen in the tablet’s pen holder case.
Installing the Tablet for Windows
Note!
Before you install the tablet for your Windows, you must remove any
tablet driver if you have installed any tablet driver in your Windows.
1. Turn on your computer and start Windows.
2. Plug the USB connector of the tablet into an USB port. The LED on the
tablet will light. If the LED does not light, this USB port may not be
available.
3. Insert the tablet CD into your CD-ROM drive. The setup menu of the
tablet should automatically display. If the setup menu does not display,
double-click the Setup icon on the tablet CD. Click Install USB Tablet
Driver.
4. For Windows 2000, click Finish. Click Yes and then click OK.
For Windows XP, click Finish. Click Continue Anyway and then click
OK.
5. When finished, the tablet is a Windows system pointing device for all
Windows applications. Use the pen tip to quickly click anywhere to turn
on the pen. Now you can use the pen on the tablet to move the screen
Version 3.40UG • Page 1
User’s Guide
cursor.
Note!
The pen operates on one battery. If the pen tip clicking or
pressing has not occurred for about three minutes, the pen
automatically turns off to save the life of battery and then you
can not use the pen to move the screen cursor. (The LED on the
tablet shows red when the pen turns off and is within the reading
range of the tablet.) To turn on the pen, use the pen tip to quickly
click anywhere. Then you can use the pen again to move the
screen cursor. (The LED on the tablet shows green when the
pen turns on and is within the reading range of the tablet.)
Whether the pen turns on or off, the LED shows red when the
pen is out of the reading range of the tablet.
Customizing the Pen and Tablet in Windows
In Windows, open the Tablet icon from the Control Panel window. The
Tablet dialog box appears. In this dialog box, you can change the following
settings for the way you like to work.
z
Button Functions
To change the button functions of the pen, click the Buttons tab. From
the list boxes of the Button Label and Action, you can redefine the
button functions such as Left-Click, Left Double-Click, Right-Click,
Middle-Click, Copy, Paste, and so on.
z
Tip Feel
You can adjust the tip feel you prefer when clicking or drawing. To
adjust the amount of pressure needed to click with the pen tip or to draw
non pressure-sensitive lines, click the Tip Feel tab and then drag the
Click Pressure slider toward Soft or Hard.
z
Other Settings — Please refer to the User’s Manual in the tablet CD.
Installing the Tablet for Mac
1. Turn on your computer.
2. Plug the USB connector of the tablet into an USB port. The LED on the
tablet will light. If the LED does not light, this USB port may not be
available.
Note!
Before you install the tablet driver, you can use the pen on the
tablet to move the screen cursor but the functions of the pen are
not yet available.
Page 2 • Version 3.40UG
User’s Guide
3. Insert the tablet CD into your CD-ROM drive. Open the Tablet CD icon.
Open the folder according to your Mac OS system software version.
(Only for Mac 10.2 or later, then open the Open Inkwell icon to set the
Inkwell application ready for use.)
4. For Mac OS 10.x, open the Installer.mpkg icon. Follow the instructions
on the window to install the tablet driver. When successfully installed,
click Restart to restart your system.
For Mac OS 8.6 through 9.x, open your familiar language folder. Open
the Installer icon. The Welcome dialog box appears. Then press
ENTER. The Tablet Installation window will appear. The default item of
the pop-up box is Easy Install. Click the Install button or press ENTER
to install the tablet driver. When finished, press ENTER to restart your
system.
5. Use the pen tip to quickly click anywhere to turn on the pen. Then you
can use the pen on the tablet to move the screen cursor with absolute
positioning. And all functions are available.
Note!
The pen operates on one battery. If the pen tip clicking or
pressing has not occurred for about three minutes, the pen
automatically turns off to save the life of battery and then you
can not use the pen to move the screen cursor. (The LED on the
tablet shows red when the pen turns off and is within the reading
range of the tablet.) To turn on the pen, use the pen tip to quickly
click anywhere. Then you can use the pen to move the screen
cursor again. (The LED on the tablet shows green when the pen
turns on and is within the reading range of the tablet.)
Using the Electronic Eraser Button Function of the Pen in
Mac
The pen has a powerful electronic Eraser button function. The default
Eraser button is the upper barrel button of the pen. You can customize
either barrel button of the pen to the Eraser button. To use this Eraser
button function, your applications must support this function.
While pressing the defined Eraser button of the pen, the tool selection in
these applications automatically switch to the Eraser drawing tool and you
can use the pen tip to erase without selecting the Eraser drawing tool. When
the defined Eraser button of the pen is released, the tool selection will
automatically switch back to the previously selected drawing tool such as
Pencil. This Eraser button function make it easy to switch back and forth
between the Eraser drawing tool and the other one such as Pencil.
Version 3.40UG • Page 3
User’s Guide
Customizing the Pen and Tablet in Mac OS 10.x
Open the Applications folder in the Finder window. Open the Tablet folder
and then open the Tablet icon. The Tablet window appears. You can use
the Tablet window to customize the following settings to suit your own
needs.
z
Button Functions
The available button functions of the pen include Single Click, Double
Click, Eraser, Undefined, Modifiers, and Keystroke. The Modifiers
button function simulates holding down any combination of keyboard
modifier keys (Command, Control, Shift, or Option) and can include a
click, such as Control-Click.
The Keystroke button function simulates a keyboard key or sequence of
keys such as Command-C (Copy), Command-A, TEST ...etc.
To change the button functions of the pen, click the Button tab. Clear
the Default checkbox. From these pop-up menus of the buttons, you
can redefine the button functions.
If you select the Modifiers or Keystroke button function, you can set up
the Modifiers or Keystroke button function which you want.
z
Tip Feel
You can adjust the tip feel you prefer when clicking or drawing.
To adjust the amount of pressure needed to click with the pen tip or to
draw non pressure-sensitive lines, click the Tip Feel tab and then drag
the Click Pressure slider toward Soft or Hard.
To adjust the tip feeling when drawing pressure sensitive lines with the
pen tip, click the Tip Feel tab and then drag the Pressure Sensitivity
slider toward Soft or Firm. When drawing pressure sensitive lines, a
softer Pressure Sensitivity setting can produce a larger pressure value
(such as thicker lines or denser color) with less force you exert upon the
pen.
The Pressure Test area lets you experiment with the pressure sensitive
pen to see the effect of your adjustment. Press hard for thick lines and
press gently for thin lines.
z
Other Settings — Please refer to the User’s Manual in the tablet CD.
Customizing the Pen and Tablet in Mac OS 8.6 through 9.x
Select the Control Panels item from the Apple menu. Open the Tablet icon
from the Control Panels window. Then the Tablet control panel appears.
Page 4 • Version 3.40UG
User’s Guide
You can use the Tablet control panel to customize the following settings to
suit your own needs.
z
Button Functions
The available button functions of the pen include Single Click, Double
Click, Eraser, Undefined, Modifiers, and Keystroke.
The Modifiers button function simulates holding down any combination
of keyboard modifier keys (Command, Control, Shift, or Option) and can
include a click, such as Control-Click.
The Keystroke button function simulates a keyboard key or sequence of
keys such as Command-C (Copy), Command-A, TEST ...etc.
To change the button functions of the pen, select the Button item from
the Functions pop-up menu in the Tablet control panel. The Button
Setup dialog box will appear. From these pop-up menus of the buttons,
you can redefine the button functions.
If you select the Modifiers or Keystroke button function, a dialog box will
appear. In this dialog box, you can set up the Modifiers or Keystroke
button function which you want.
z
Tip Feel
You can adjust the tip feel you prefer when clicking or drawing. To
adjust the tip feel, select the Tip Feel item of the Functions popup menu
in the Tablet control panel. The Tip Feel Setup dialog box will appear.
To adjust the amount of pressure needed to click with the pen tip or to
draw non pressure-sensitive lines, drag the Click Pressure slider
toward Soft or Hard.
z
Other Settings — Please refer to the User’s Manual in the tablet CD.
Reading the Tablet User’s Manual in CD
For more information about the tablet, please refer to the tablet User’s
Manual in the tablet CD. On the tablet CD, open the MANUAL folder. Open
your familiar language folder. Double-click the Reader Installer icon to install
the Acrobat Reader. After installation, open the file PENGUIDE.PDF to read
the tablet User’s Manual.
Caring for the Pen
z
If you place this pen in a container where the pen rests on the tip, the
pen remains active and battery life is shortened. We recommend you to
place the pen horizontally on the table. For 5"x3.75" tablet, you also can
Version 3.40UG • Page 5
User’s Guide
place the pen in the tablet's pen holder.
z
If you can not turn on the pen, the battery inside the pen should be
running low. Please replace the battery (1.5 volt, size AAAA).
z
With extended use, the pen tip may become worn. To replace the pen
tip, you may use a small clip to gently pull it out and replace a new one.
©2005 ACE CAD Enterprise Co., Ltd. All rights reserved. All trademarks may be registered by
their respective companies.
91100-40500 English version Printed in China 11/05
Page 6 • Version 3.40UG