1
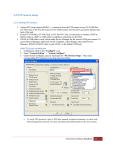
The Printing Mode of POS System/Cash Register Table of Contents Before You Start Verifying the Printing mode with HyperTerminal DB9-Interface POS System DB9-Interface Cash Register DB25-Interface POS System DB25-Interface Cash Register Sending a Transaction Data File to GV-system The Steps to Send a Transation Data File GeoVision Inc. 1 Revision Date: 2005/7/21 The Printing Mode of POS System/Cash Register The Printing Mode of POS System/Cash Register GeoVision provides separate solutions for the text-mode and graphic-mode POS system/cash register. However, how do you know the printing mode of your POS system/cash register? This document answers the question with the HyperTerminal program. Included in all versions of Microsoft Windows, HyperTerminal offers an easy way to verify the printing mode of your POS system/cash register. The latter part of this document describes how to use HyperTerminal to send transaction data to GV-System. Before You Start To facilitate the process of verifying the printing mode, please read the following explanatory notes first. POS System: POS stands for Point of Sale. It is an electronic device that records sales transaction data with a receipt printer attached externally. Cash Register: Like POS System, Cash Register is also an electronic device that records sales transaction data but with a receipt printer attached internally. DB9: This type of connector can be identified as having 9 pins. DB25: This type of connector can be identified as having 25 pins. GeoVision Inc. 2 Revision Date: 2005/7/21 The Printing Mode of POS System/Cash Register Verifying the Printing Mode with HyperTerminal The following instructions explain how to verify the printing mode of your POS system/cash register. DB9-Interface POS System Equipment Needed 1 PC/Notebook with the HyperTerminal program 1 GV-Data Capture V2 box Verifying the Printing Mode of a DB9-Interface POS System 1. Attach the computer to the POS system as illustrated below. RS232 DB9 Male / Female POS System GeoVision GV-DATA CAPTURE V2 RS232 RS232 PC/Notebook Printer 2. Click Windows Start/Programs/Accessories. Within Accessories, click HyperTerminal. (If you don’t see HyperTerminal, click the Communications folder and then click HyperTerminal.) GeoVision Inc. 3 Revision Date: 2005/7/21 The Printing Mode of POS System/Cash Register 3. When the Location Information window displays, click the Cancel button. Then just click Yes for the prompt and OK for the next prompt. 4. Type a name under the Name field, and then click OK. GeoVision Inc. 4 Revision Date: 2005/7/21 The Printing Mode of POS System/Cash Register 5. The same window in Step 3 may appear again. Follow Step 3 to close the window and the prompts. 6. In the Connect Using field, select the COM port that is connected to the POS system. Then click OK. 7. Select the corresponding POS port values, choose None in the Flow Control field, and then click OK. (If you are not sure about these values, it is recommended to contact your POS manufacturer or check its user manual.) GeoVision Inc. 5 Revision Date: 2005/7/21 The Printing Mode of POS System/Cash Register 8. Click the Transfer menu, and select Capture Text. 9. Click Browse and assign a path to store the testing file. Then click Start to start the POS test session. 10. Enter a transaction at the POS system; the transaction data will then be sent to and captured by HyperTerminal. One of the three conditions may occur here: A. If the connection is established, the transaction data will appear in the HyperTerminal window. See the following illustration of the HyperTerminal window, compared with a copy of receipt from the same transaction. When the data is displayed in the HyperTerminal window, it is verified that the POS system is text mode. Note: 1) A small amount of garbage text may occur here, the problem can be solved later by our customized solutions. 2) Remember to keep the verified values, including Baud Rate (Bits per second), Data Bits, Parity and Stop Bits for GV-System configuration later. GeoVision Inc. 6 Revision Date: 2005/7/21 The Printing Mode of POS System/Cash Register Figure 1 The HyperTerminal window after receiving the transaction data B. Figure 2 The copy of receipt If the HyperTerminal window does not respond or respond entirely with garbage text, the port settings may be configured incorrectly in HyperTerminal. Go back to Step 7 to ensure the port values are the same in both the POS system and HyperTerminal. C. If the HyperTerminal window is halted after you enter a transaction at the POS system or after all port re-settings, it is verified that the POS system is graphic mode. 11. Click the File menu, and then select Exit to stop the testing. GeoVision Inc. 7 Revision Date: 2005/7/21 The Printing Mode of POS System/Cash Register DB9-Interface Cash Register Cash registers may not be integrated to GV-System, unless with the following characteristics. Please check these characteristics before the verification. 1. Check if your cash register has an output port for a printer. 2. Connect a receipt printer to the output port and see if it functions well. If it does, the integration is then possible. Equipment Needed 1 PC/Notebook with the HyperTerminal program 1 RS232 crossover cable Verifying the Printing Mode of a DB9-Interface Cash Register 1. Attach the computer to the cash register as illustrated below. Cross-over RS232 PC/Notebook Cash Register 2. Follow Steps 2 to 11 as described in the DB9-Interface POS System section. GeoVision Inc. 8 Revision Date: 2005/7/21 The Printing Mode of POS System/Cash Register DB25-Interface POS System Equipment Needed 1 PC/Notebook with the HyperTerminal program 1 GV-Data Capture V2 box Verifying the Printing Mode of a DB25-Interface POS System 1. Attach the computer to the POS system as illustrated below. RS232 DB25 Male / Female POS System GeoVision GV-DATA CAPTURE V2 RS232 RS232 PC/Notebook Printer 2. Follow Steps 2 to 11 as described in the DB9-Interface POS System section. GeoVision Inc. 9 Revision Date: 2005/7/21 The Printing Mode of POS System/Cash Register DB25-Interface Cash Register Cash registers may not be integrated to GV-System, unless with the following characteristics. Please check these characteristics before the verification. 1. Check if your cash register has an output port for a printer. 2. Connect a receipt printer to the output port and see if it functions well. If it does, the integration is then possible. Equipment Needed 1 PC/Notebook with the HyperTerminal program 1 GV-Data Capture V2 box Verifying the Printing Mode of a DB25-Interface Cash Register 1. Attach the computer to the cash register as illustrated below. RS232 DB25 Male / Female Cash Register GeoVision GV-DATA CAPTURE V2 RS232 PC/Notebook 2. Follow Steps 2 to 11 as described in the DB9-Interface POS System section. GeoVision Inc. 10 Revision Date: 2005/7/21 The Printing Mode of POS System/Cash Register Sending a Transaction Data File to GV-System With the saved file from the HyperTerminal testing, you can send it to any GV-System anywhere. This section explains how to use a computer as a POS system/cash register, sending the transaction data file to GV-System. Equipment Needed 1 GV-Data Capture V2 Box The Steps to Send a Transaction Data File 1. Use a GV-Data Capture V2 box to attach GV-System to the computer stored with the data file, as illustrated below. RS232 PC/Notebook GeoVision GV-DATA CAPTURE V2 RS232 2. GV-System With the verified port values by HyperTerminal, configure GV-System for the application of POS system/cash register. If you don’t know how to configure GV-System, refer to another documentation: Connecting DB9-Interface POS System, Connecting DB25-Interface POS System, Connecting DB9-Interface Cash Register or DB25-Interface Cash Register. 3. At the computer, open the Hyper Terminal window. Click the Transfer menu and select Send Text File. GeoVision Inc. 11 Revision Date: 2005/7/21 The Printing Mode of POS System/Cash Register 4. When the following window appears, locate that data file and then click Open. HyperTerminal will start sending the data to GV-System. 5. When GV-System receives the data file, the data will appear on the screen. See the illustration below. Figure 3 The transaction data is displayed on the GV-System screen Note: A small amount of garbage text may occur here, which could be fixed by our customized solutions. Refer to another documentation: What to do if the transaction data displays incorrectly? GeoVision Inc. 12 Revision Date: 2005/7/21