1
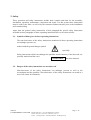
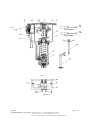
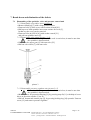
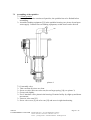
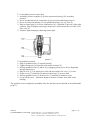
Maintenance and Operating Instructions
PERROT
Pop-up sprinkler with integrated valve
LVZE 22-1 VAC
LVZE 22-1 WVAC
LVZE 22-1 WDVAC
TDP018
Perrot REGNERBAU CALW GmbH
Page 1 / 12
Industriestraße 19-27 / D-75382 Althengstett / Germany
Telefon : 0049-7051-162-0 / Fax : 0049-7051-162–133
E-mail : [email protected] / E-mail Konstruktion : [email protected]
Contents
1. General
2. Safety
3. Description
4. Assembly
5. Commissioning
6. Maintenance
7. Break-down and elimination of the defects
8. Spare parts list
1. General
We presume, that you are experienced in the field of irrigation. Therefore we have kept this
instruction as brief as possible, and have included such information only, which you must have
for the use of this product.
A guarantee can be accepted only, if the sprinkler has been operated in accordance with these
instructions, and if the defect occurs within the guarantee period.
1.1. Application
The sprinkler is used for the uniform distribution of the water. The water should be precleaned, and free of coarse and fibrous impurities.
Max. water temperature will be 50 degree C.
Max. ambient temperature will be 75 degree C.
TDP018
Perrot REGNERBAU CALW GmbH
Page 2 / 12
Industriestraße 19-27 / D-75382 Althengstett / Germany
Telefon : 0049-7051-162-0 / Fax : 0049-7051-162–133
E-mail : [email protected] / E-mail Konstruktion : [email protected]
2. Safety
These operation and safety instructions include basic remarks and hints for the assembly,
installation, operation, maintenance, inspection and repair. For this reason these instructions
must be read by the fitter, as well as by the customers authorised staff, prior to the installation
and commissioning.
Apart from the general safety instructions of this paragraph the special safety instructions
included in other paragraphs of these operating instructions have to be observed also.
2.1. Symbols of hints given in these operating instructions
The non-observance of the safety instructions mentioned in these operating instructions
can endanger persons, are
marked with the general danger symbol
especially.
Safety instructions which can endanger the sprinkler and its function, if not observed, are
specially marked and the word
has been inserted.
ATTENTION
2.2. Dangers if the safety instructions are not observed
Non-observance of the safety instructions can endanger persons as well as the
environment and the sprinkler. Non-observance of the safety instructions can result in a
loss of all claims for indemnity.
TDP018
Perrot REGNERBAU CALW GmbH
Page 3 / 12
Industriestraße 19-27 / D-75382 Althengstett / Germany
Telefon : 0049-7051-162-0 / Fax : 0049-7051-162–133
E-mail : [email protected] / E-mail Konstruktion : [email protected]
3. Description
Recommended operating pressure
Permissible operating pressure
ATTENTION
5 to 6 bar
3 to 8 bar
The pressure at the sprinkler must not exceed 10 bar.
For further data please refer to the separate data leaflet.
4. Assembly
Flush pipe work thoroughly before assembling
ATTENTION
Threaded connection on the sprinkler is 1“ female thread.
For sealing the thread, hemp and a jointing compound has to be used e.g. Fermit special
Installation of the sprinkler should occur according to the “Installation layout for PERROT
pop-up sprinkler LVZE 22 VAC“ (see next side).
To avoid burden pressure on the conduit pipe use in any rate a sprinkler swing joint.
It is recommended to assemble a gravel package, as shown in the installation layout.
The connection of the control cables is only allowed with approved watertight connections.
To screw the sprinkler on the swing joint hold on to the housing border or use a strap
wrench.
ATTENTION
Do not pinch control pipe of the sprinkler with pipe wrench.
TDP018
Perrot REGNERBAU CALW GmbH
Page 4 / 12
Industriestraße 19-27 / D-75382 Althengstett / Germany
Telefon : 0049-7051-162-0 / Fax : 0049-7051-162–133
E-mail : [email protected] / E-mail Konstruktion : [email protected]
TDP018
Perrot REGNERBAU CALW GmbH
Page 5 / 12
Industriestraße 19-27 / D-75382 Althengstett / Germany
Telefon : 0049-7051-162-0 / Fax : 0049-7051-162–133
E-mail : [email protected] / E-mail Konstruktion : [email protected]
5. Commissioning / Winterise
5.1
Commissioning
a) Check of electrical function :
Before the water supply to the valve is opened, the coil has to be triggered through a control
unit. Through an acoustic “click” on the coil, the correct electrical function can be
determined. (The click arise through attracting the relay armature.)
b) Make sure that the manual operation stands on AUTO or OFF (Turn screw totally in or
out). In both positions it is warrant that the valve closes after the water supply.
c) Open water supply to the sprinkler slowly. Probably the valve opens for a short time, but
after 30 sec. it should close on its own.
Pressure regulation
Manual operation
picture 1
d) After opening the water supply and after the max. working / operation pressure is reached,
every seal has to be checked / examined.
e) Check valves and sprinkler for perfect function, when opening the valve manual.
That can be executed by turning the manual operation to the right, until the sprinkler head
pops up. So that the water jet do not hit the operator, the manual operation should be
opened carefully. You can see the spray direction of the sprinkler on the out gushing water
and so the operator can see where he has to stay for not getting wet.
f) The desired pressure on the sprinkler nozzle, can be adjusted on the pressure regulation
screw while the sprinkler is working.
If on the sprinkler nozzle the min. pressure is adjusted, there is appr. 3 bar pressure on
the nozzle.
TDP018
Perrot REGNERBAU CALW GmbH
Page 6 / 12
Industriestraße 19-27 / D-75382 Althengstett / Germany
Telefon : 0049-7051-162-0 / Fax : 0049-7051-162–133
E-mail : [email protected] / E-mail Konstruktion : [email protected]
When turning the screw 360° once in direction (+) the pressure always
raises up 1 bar.
The perfect / ideal working pressure is appr. 6 bar.
g) While operation of the sprinkler, there is the possibility to adjust the desired irrigation
sector on the spring stop [18].
h) After the complete ventilation of the sprinkler the manual operating must be set on position
„AUTO“ , than the sprinkler have to close.
i) Check electrical function by turning on and off the sprinkler with help of a control unit.
5.2 Winterise
Before beginning of the frost period the sprinkler has to be totally drained off.
Therefore there must be connected a powerful compressor on the network / main circuit.
Open the valve on the sprinkler until only air is coming out of the nozzle.
After the blowing out the magnetising coil has to be triggered electrically several times.
6. Maintenance
Clean interior space of the sprinkler with a industrial type vacuum cleaner or a similar device.
Clean / Relieve sprinkler housing from overgrown grass. This work should be done
conveniently before commissioning in spring.
TDP018
Perrot REGNERBAU CALW GmbH
Page 7 / 12
Industriestraße 19-27 / D-75382 Althengstett / Germany
Telefon : 0049-7051-162-0 / Fax : 0049-7051-162–133
E-mail : [email protected] / E-mail Konstruktion : [email protected]
View X
View X
picture 2
TDP018
Perrot REGNERBAU CALW GmbH
Page 8 / 12
Industriestraße 19-27 / D-75382 Althengstett / Germany
Telefon : 0049-7051-162-0 / Fax : 0049-7051-162–133
E-mail : [email protected] / E-mail Konstruktion : [email protected]
7. Break-down and elimination of the defects
7.1
Dismantling of the sprinkler, valve and pressure control unit
7.1.1 Disassembly of sprinkler insert (picture 2)
Remove blind cap [1] with a sharp pointed object.
Unscrew bolt [2] in the cover with a socket wrench [20].
Pull up cover with sprinkler insert, turn retainer for cover [3],
In that way the cover can be removed.
Unscrew bolt (4x) SW10 [43] with socket wrench [21]
and pull out sprinkler insert [5].
7.1.2 Disassembly valve piston (picture 2+3)
Before the following mentioned work is carried out, it must be sure that
the sprinkler is depressurised.
Unscrew valve upper part [6] with ram valve [22]
Pull out valve insert [7] with ram valve.
seal
picture 3
7.1.3 Disassembly pressure regulator unit (picture 2+5)
Before the following mentioned work is carried out, it must be sure that
the sprinkler is depressurised.
Remove cover for protection housing [8], by pressing snap fit [11] with help of screw
driver in direction outside. (View X)
Pull off downwards control pipe [9], by pressing locking ring [10] upwards. Unscrew
screw [12] and remove pressure regulator.
TDP018
Perrot REGNERBAU CALW GmbH
Page 9 / 12
Industriestraße 19-27 / D-75382 Althengstett / Germany
Telefon : 0049-7051-162-0 / Fax : 0049-7051-162–133
E-mail : [email protected] / E-mail Konstruktion : [email protected]
7.2
Assembling of the sprinkler
7.2.1 Flush sprinkler
In case that the valve contains soil particles, the sprinkler has to be flushed before
assembling.
Assemble flushing equipment [23] in the sprinkler housing (see picture 4) and open
water supply. Connect hose on flushing equipment, so that water can be derived.
picture 4
7.2.2 Assembly valve
Take care that all pieces are clean.
Screw on valve insert on valve ram, do not forget spring [14] (see picture 3)
Grease seal slightly.
Feed / introduce valve piston in the housing. Examine facility by slight up and down
movements.
Unscrew valve ram [22]
Screw valve cover [6] on valve ram [22] and screw in tight into housing.
TDP018
Perrot REGNERBAU CALW GmbH
Page 10 / 12
Industriestraße 19-27 / D-75382 Althengstett / Germany
Telefon : 0049-7051-162-0 / Fax : 0049-7051-162–133
E-mail : [email protected] / E-mail Konstruktion : [email protected]
7.2.3 Assembly pressure control unit
Assembly pressure regulator [14] in the protection housing [15] according
picture 5.
Screw in tight both screw connections [16] in protection housing (picture 2)
Screw in protection housing [15] on sprinkler housing [16]. (see view X)
Plug in control pipe [9] in screw connections [16] (Attention! Take care of the right
position). Plug in longest control pipe in the screw connection at the coil side. (Left
side, view X)
Examine right clamping by drawing control pipe.
picture 5
7.2.4 Sprinkler assembly
Plug in sprinkler insert [5] in guide housing
Tighten fixing nuts [4] crosswise with socket wrench [21]
Pull up sprinkler insert [5] and fix it, by plugging a long screw driver diagonally
through impact lever.
Plug in cover [17] on impact lever axle and turn retainer for cover [3] in slot.
Fasten cover [17] with bolt [2] and press blind cap [3] in screw hole.
Pull up sprinkler insert [5] on the cover [17] and take screwdriver away.
Let go off the cover – Attention! Bounces because of elastic force back to the
housing.
The sprinkler is now completely assembled. Now the function can be checked as described under
point 5.1.
TDP018
Perrot REGNERBAU CALW GmbH
Page 11 / 12
Industriestraße 19-27 / D-75382 Althengstett / Germany
Telefon : 0049-7051-162-0 / Fax : 0049-7051-162–133
E-mail : [email protected] / E-mail Konstruktion : [email protected]
7.3 Break-down and elimination of the defects
Break down
Valve opens / closes only
manual not by electrical,
Control signal
Valve does not open, even
not manual
Valve does not close, even
not manual,
Cause / reason
Coil or coil seat is dirty
Supply voltage is to low
(24VAC/DC)
Coil is broken
Plunger in coil is seated
Seal of valve insert is
defect
Control water exit on
cylinder of the valve is
blocked
Filter for control water is
dirty
Leakage in the control
water path
The pressure on the
sprinkler nozzle is to low.
Pressure regulator is set on
min. position.
Pressure regulator is dirty
Valve is blocked
Elimination
Remove coil and clean it,
see point 7.1.3
Check supply voltage and
cable connections
Check coil resistance
(must be appr. ca. 30Ω)
Change coil
Change valve insert (see
point 7.1.2)
Disassembly control pipe
out off connection and
blow through backwards
Disassembly valve insert
and clean filter or change it
(see point 7.1.3)
Check all connections,
control pipe and pressure
regulators units for
leakage’s and eliminate
them.
Turn adjustment screw in
direction (+)
Change pressure regulator
Disassembly valve and
flush pipes (see point 7.2.1)
Subject to change without prior notice.
TDP018
Perrot REGNERBAU CALW GmbH
Page 12 / 12
Industriestraße 19-27 / D-75382 Althengstett / Germany
Telefon : 0049-7051-162-0 / Fax : 0049-7051-162–133
E-mail : [email protected] / E-mail Konstruktion : [email protected]