1
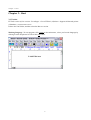
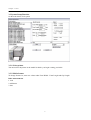
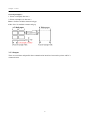
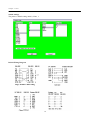
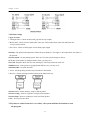
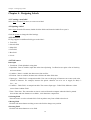
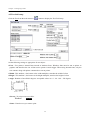
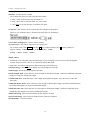
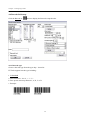
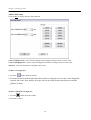
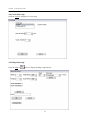
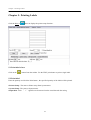
EZ TAG User Manual
Label Printing Software
Table of Contents
Chapter 1 : Introduction……………………………………………………………….……………
2
Chapter 2 : Installation……………………………………………………………………………..
4
Chapter 3 : Start…………………………………………………………………………………… 5
Chapter 4 : Designing Labels………………………………………………………………… 12
Chapter 5 : Printing Labels…………………………………………………………………… 23
Chapter 6 : Printer Driver……………………………………………………………………….25
English Version
1
Chapter 1 : Introduction
Chapter 1 : Introduction
EZ TAG is a label design and printing software to develop in domestic by oneself. This program allows you
to print text、barcode、graphic images or database connection . EZ TAG has the features to help you design
and print labels with ease.
Function
1. Supports all major barcode symbologies, including 2-D symbologies.
2. Import of graphics in various file format, including :BMP, PCX, TIF.
3. Printing barcodes, labels, or tags.
4. For windows 95/98/2000/XP operating system.
5. Printing text, barcode lines, boxes and graphics.
6. Sequential number printing.
7. What you see is what you get design module.
8. Supports rotation, bar width reduction and other adjustment of barcodes.
9. Language choice English/Chinese/China.
10. Offering printer graphic preview function.
11. Offering built-in printer fonts and Windows fonts.
12. EZ TAG are currently developed for the following printer brands .
2
Chapter 1 : Introduction
Supports print type
1. ARGOX
: 1000
CHALLENGER
2. Brady
: 2024
2034
3. C.ITOH
: T4 Printer
4. Datamax
: Allegro 2
DMX E-4203
DMX I-4206 / I-4208 / DMX I-4308 / I-4406 / I-4604
DMX W-6208 / W-6308 / W-8306
MAX 300 / MAX 600
Ovation 2
Prodigy MAX
Titan 6200
5. Eltron
: LP2142
TLP 2044 / TLP 2046 / TLP 2242
6. Fargo
: Allegro
Fargo D400
Prodigy Plus / Prodigy
7. Godex
: EZ-4TK / EZ-4TT
8. Intermec
: 3400 / 3440
9. Ring
: 4012 PH / 4012 PL / 4012 PM
10. SATO
: 8400 / 8450
11. TSC
: TDP522 / TDP542
12. TEC
: 472 / 572
B30 / B872
13. TTP
: 2410/242 Clever / 243 / 243M / 342
14. UBI
: 401 (Test only)
15. Zebra
: 105S / 105SE
140Xii / 170Xi / 170 Xii / 90Xii
95
S300 / S400 /
T300
3
Chapter 2 : Installation
Chapter 2 : Installation
2-1 EZ TAG Installation
1. Execute 〝Setup B7.84A(808F).exe〞in the CD.
2. Follow the instructions displayed on the screen to select and install the software.
3. Plug the Keyport into a parallel port on your computer. Without the Keyport the program will run as a
Demo version and admit free 9 times printing.
4. Or visit our web sit at www.eztag.net to download the software.
5. After installing the TAG program, it will display the TAG folder including:
For Windows 95/98/Me operating system.
Long File Name version for Windows95/98/Me operating system.
For Windows95/98/Me/2000/XP operating system.
DataBase version for Windows95/98/Me/2000/XP.
2-2 Make a shortcut
1. Open TAG folder, choose you want Bar.exe of icon to make a shortcut.
2. Click and hold the right mouse button, letting go on the desktop and choosing create shortcut.
4
Chapter 3 : Start
Chapter 3 : Start
3-1 Version
EZ TAG version (1)Lite version : For Allegro、Clever TTP243. (2)Deluxe : Supports all barcode printer.
(3)Database : External Data Sources.
Point to the TAG folder, and then select the Bar.exe version.
Working Language : To start program, click system on the main menu , select you favorite language by
clicking it in the drop-down list. Then click OK button.
Label Edit Area
5
Chapter 3 : Start
3-2 About Toolbars
Button
Cursor
Tool Name
Purpose
Rotation button Rotate the view 90 or 270 degrees of the label.
Move button
Drag it to a new position using your mouse. DELETE with
[DEL]key, COPY with[menu/edit/COPY] and PASTE.
Text button
Add text object to the label.
Barcode button Add a barcode object to the label.
Map button
Add a graphic to the label.
Black button
Add a black rectangle box to the label.
Box button
Add a rectangle box to the label.
Line button
Add a line to the label.
Circle button
Add a circle to the label.
Test button
Test the label and output by print
Print button
Print the label.
Print setup
Change the printer options.
button
6
Chapter 3 : Start
3-3 System Setup Function
On the main menu, click system.
3-3-1 Select printer
You must select the printer in the model list before you begin creating your label .
3-3-2 Media format
To change format size, enter new values under Form Width、Form Length and Gap Length.
Ruler measurements
1. inch
2. millimeter
3. dots
7
Chapter 3 : Start
General principles :
1. Prints at 203dpi(8 dots/mm )
2. Prints at 300dpi(11.8 dots/mm )
Rows : Set Row modulus amount and gap.
Cols : Set Cols modulus amount and gap.
3-3-3 Output
There are serial data and parallel data communication interfaces between the printer and PC’s
communication.
8
Chapter 3 : Start
Comport setup
The serial interface is factory preset to match the typical PC environment with RS-232
communication. If you need to change your printer’s serial communications settings to match those of your
host computer, as below . (Baud Rate、Data、Parity、Stop bits)
1. Zebra :
90Xii
:9600 , 7 , Even , 1
105S / 105SE
:9600 , 7 , Even , 1
170Xi / 170Xii
:9600 to 57600 , 7 , Even , 1
S300
:9600 , 7 , Even , 1
2. DATAMAX :
Allegro/Allegro2
:9600 , 8 , None , 1
D400
:9600 , 8 , None , 1
Prodigy/Prodigy Plus
:9600 , 8 , None , 1
Prodigy Max
:9600 to 19200 , 8 , None , 1
Max600
:9600 to 57600 , 8 , None , 1
3. Brady : 2024/2034
:9600 to 19200 , 8 , None , 1
4. Eltron :
LP2142/TLP2242/2044/2046
:9600 , 8 , None , 1
5. C.ITOH T4
:9600 , 8 , None , 1
6. Ring : 4012PL
:9600 , 8 , None , 1
7. TEC :
:9600 , 8
B30/B472/B572/B872
, None , 1
8. Clever TTP242
: 2400 to 19200 ,
8 , None , 1
9. Intermec : 3400
: 9600 , 8 , None , 1
9
Chapter 3 : Start
Switch settings
The printer’s default setting 9600, 8, None, 1
RS-232 Wiring Diagram
10
Chapter 3 : Start
3-4 Printer Setup
z
Type of sensor
1. Through sensor : Check on label with gap and set Gap Length.
2. Black mark : Check on black mark label. enter new values under black mark with and black line
to top of form position.
3. No sensor : Check on Plain paper and set Feed paper length.
z Density
:The print-head temperature defines the print darkness. The higher is the temperature, the darker is
the printout .
z Printer
z Use
z Peel
speed : Set the printing speed. There are five print speed settings to choose.
cut : If the printer is equipped with a cutter, you may set it.
off : Dispense labels one at a time waiting for sensor input between each one.
z Ribbon
saver : If the printer is equipped with ribbon saver, you may set it.
z Rotation
180° : Set print direction.
1. Front : Set the printing from the top of the label to the bottom.
2. Reverse : Set the printing from the bottom of the label to the top .
z Printer
reset : Printer memory setup for Eltron printer.
z Printer
config : Print out of printer config for Eltron printer.
z Printer
Map : Print out of Map set values for Eltron printer.
z Test
: To test print once label.
3-5 System set values from user’s set values , the system will auto load when to start
the program.
11
Chapter 4 :Designing Labels
Chapter 4 : Designing Labels
4-1 Creating a new label
Select New from the File menu, to create a new label.
4-2 Opening a label
Select Open from the File menu, double-click the folder and locate the label file to open it.
Click the system to change the label settings .
4-3 Label field
EZ Tag supports six different field types on the label :
1. Text field
2. barcode field
3. Map field
4. Line field
5. Box field
6. Circle
4-4 Field source
Data input
1. Fixed data : Fixed alphabetic string data.
2. Input data : Data is variable, input date at the time of printing . It offered to user quite a few of elasticity
and convenience .
3. Combine : Data is variable, the data source from txt files .
4. File data : Data is variable, the data source follows the other field value.
5. Input type – Table Field : A comparison table. User can set code page of character set to enter code value
instead of character. For example, instructs the printer character set to be set A: Apple, B: Bird, C:
Car ,…etc.
6. Combine – Table Field : A comparison table. The same as Input type - Table Field, difference is data
source from Combine Field.
7. Date / Time data : The current date or time is retrieved form the computer when the label is printed.
Several date and time formats are available , click Date/time composition.
z Selecting
Field
Place the mouse over the selected field. Click anywhere away from a field to deselect it.
z Moving
Field
Click the left mouse button and drag to move the field to change new position.
z Revising
Field
Click the left mouse button to revise field.
12
Chapter 4 :Designing Labels
4-5 Text field setup
Click the Text from the main menu or
button to display the Test Field setup .
Set the following settings as appropriate for text object :
z
Font : User printer’s internal fonts instead of windows fonts. Windows fonts must be sent to printer as
graphics and therefore the size of data sent to printer is much bigger. When using internal fonts, only the
text contents along with printer commands are sent to printer.
z Width
: This attribute , also known as the width multiplier, stretches the width of a font.
z Height
: This attribute , also known as the height multiplier, stretches the height of a font.
z Angle
: Rotation of text field in degrees. Acceptable values are : 0、90、180、270 degrees.
z Invert
: To print reverse text effect.
Normal
z Data
Reverse
: Enter the text you want to print.
13
Chapter 4 :Designing Labels
z Inc/Dec
: Set the counter variable .
For example, the print out value of serial 0001 to 0005
1. Enter a value in the Inc/Dec, the increment is 1.
2. Enter a start value in the Data field . the value is 001.
3. Click Print to set print quantity 5 and then click print.
z Chat
sets : The counter can be calculated by the computer or the printer.
There are six calculation bases , default is Decimal (base 10 calculation).
z No-counter
z Counter
trailing bytes : Set no-counter trailing.
bytes : Set counter whether to carry prior bytes.
For example, Data value A19911 , Inc/Dec +1 , No-counter trailing bytes 2 , printer quantity 10.
Output: A19911 , A10011 , A10111 , A10211 , A10311 , A10411 ,
A10511 , A10611 ,A10711 , A10811 .
z
Data source
1. Fixed data : This is default. Select this data input if you would like to have an exact, non-changeable
content of the text field. Click it , to enter text in this data field.
2. Input data : Click the setup button to display the Input data field setup .
z Prompt
z Data
string : Click the Print to display and will prompt user message.
length : Set the character length of the data.
z END-stuff
BLANK : Enter character is not enough for default data length , automatic stuff blank until data
length to be equal to default data length.
z NONE-stuff
char : Enter character is not enough for default data length , only show user to enter the
data value.
z Stuff
char-before head : Enter character is not enough for default data length , automatic stuff blank from
front until data length to be equal to default data length.
z Stuff
char-after tail : Enter character is not enough for default data length , automatic stuff blank from
behind until data length to be equal to default data length.
z PRE-stuff
string :Enter fixed text field from the character of front
z POST-stuff
z Field
string : Enter fixed text field from the character of behind.
identity : Text field identity.
14
Chapter 4 :Designing Labels
4-6 Barcode field setup
Click the Barcode or
button to display the Barcode setup function .
4-6-1 Barcode type
Choose a barcode type from the type drop – down list.
EZ TAG supports barcode type including :
1. CODABAR
a. Valid characters : 0 to 9 , + - * / $ . :
b. Four special start/stop characters, A, B , C or D
c. Example :
15
Chapter 4 :Designing Labels
2. CODE128
a. Valid characters : 0 to 9, Uppercase and lowercase alphabetic, Punctuation , Special function
b. Example :
3. CODE 39
a. Valid characters : 0 to 9, A to Z, Space , + - . $ % */
b. Example :
4. CODE 39 FULL ASCII
a. Valid characters : 0 to 9 , Uppercase and lowercase alphabetic , Control codes.
b. Example :
5. EAN13
a. Valid characters : 0 to 9
b. EAN13 is used to encode 13 characters and the last character is the checksum character.
c. Example :
16
Chapter 4 :Designing Labels
6. EAN8
a. Valid characters : 0 to 9
b. EAN8 is used to encode 8 characters and the last character is the checksum character.
c. Example :
7. Interleaved 2 of 5 (I 25 )
a. Valid characters : 0 to 9
b. Example :
8. UPC A
a. Valid characters : 0 to 9
b. UPC A is used to encode 13 characters and the last character is the checksum character.
c. Example :
9. UPCE
a. Valid characters : 0 to 9
b. UPC E is used to encode 8 characters and the last character is the checksum character.
c. The first digit is “ 0 ‘’
d. Example :
17
Chapter 4 :Designing Labels
10. UCC/EAN 128(called only EAN128 to make it short)
EAN128 is a special from of the code 128, EAN 128 is based on code128 but has a double start
character.
Example :
11. CODE 93
Code 93 is an alphanumeric code similar to code 39 and can encode 48 different characters.
Example :
12. PDF417
Portable Data File 417 is a 2D barcode that supports full ASCII, binary, and numeric data, and can
encode foreign language character sets .
Example :
z Width
z Angle
: Narrow Ratio : Sets the relative size between thick and thin bars and spaces.
: Allows you to rotate a barcode to 0, 90, 180 or 270 degrees .
0 degree
z Height
z Data
90 degrees
180 degrees
270 degrees
: This specifies the height of the barcode in millimeters.
: Enter barcode text.
z Barcode
z Check
text : Enables you to choose weather printer out barcode text.
byte : Enables you to choose weather printer out check byte.
18
Chapter 4 :Designing Labels
4-7 Line field setup
Click the Line or
z dots
z
button to display the Line setup function .
of line : Choose from line thickness setting or an exact value.
Hot key : Press the dot button to designate dots of line.
To draw a line
1. Click the
button from the toolbox.
2. Press the left mouse button and hold it down while you drag the cursor the point where you want the line
to end, release the mouse button and line is drawn in the length of your mouse move.
19
Chapter 4 :Designing Labels
4-8 Box field setup
Click the Box to display the Box setup function .
z dots
of Up/Down line : Choose from Up/Down line thickness setting or enter an exact value.
z dots
of Left/Right line : Choose from Left/Right line thickness setting or enter an exact value.
z Hot
key : Press the dot button to designate dots of box.
To draw a rectangle box
1. Click the
button from the toolbar.
2. Press the left mouse button and hold it down while you drag the cursor to the corner diagonally
opposite the corner from which you began, release the mouse button and the box around the
graphics is draws.
To draw a black fill rectangle box
1. Click the
button from the toolbar.
2. The same as above.
20
Chapter 4 :Designing Labels
4-9 Circle field setup
Click the Circle to display the Circle setup.
4-10 Map field setup
Click the Map or
button to display the Map setup function .
21
Chapter 4 :Designing Labels
z Width
: Changing width a of Graphic
z Height
: Changing height of Graphic
z Width
Ratio : Choose a width ratio
z Height
Ratio : Choose a height ratio
z Browse
: Select Browse , click the graphic file name and then click open.
EZ TAG supports commonly used graphic formats including BMP、PCX、TIF.
Map adjustment : Click on the image to select it , then click on of the four corners of the image
handles and drag to the desired size.
Original image
Enlarge and reduce point
22
Chapter 5 :Printing Labels
Chapter 5 : Printing Labels
Click the Print or
button to display the printer setup function .
5-1 Print label of test
Click on the
button from the toolbar. Use the TEST print button to print a single label .
5-2 Print label
Enter the quantity and click the Print button , the specified quantity of the labels will be printed.
z Printer
Setup : The same as Printer setup from System menu.
z System
Setup : The same as System menu.
z Input
data : Each 〝 ? 〞signifies one character from the actual barcode data string.
23
Chapter 5 :Printing Labels
z
File-input print : The currently selected File-input will be sent to a printer.
User and import standard txt field to designate print and repeat field to use File-input print.
24
Chapter 6 :Printing Driver
Chapter 6 : Printer Driver
6-1 Icon
Change the PRINT DRIVER icon.
1. Choose a Bar.exe shortcut on your desktop.
2. Right-click the shortcut and choose Properties.
3. Click Change Icon to see
icon.
4. Click OK.
- Label Edit icon standard
- PRINT DRIVER icon
6-2 BAR.EXE Parameter method
EZ TAG offers three mode of printer, allowing you to print of right just that unable to change system settings.
For example, user has TAG file and path is c:\demo.tag.
a. Parameter / RUN
For example: c:\tag\bar.exe c:\demo .tag/RUN
Starting the EZ TAG program will be automatically opening path c:\demo.tag file, and then display the
PRINT to print label . Such as select Open from the File menu , and then to open c:\demo.tag file.
Printing label finish will be end program.
b. Parameter / PRINT
For example : c:\tag\bar.exe
c:\demo.tag/PRINT
Starting the EZ TAG program will be automatically opening path c:\demo.tag file, and then display the
PRINT to File-input print and instructs to print the label . Such as select Open from the File menu to open
c:\demo.tag file to File-input print and instructs to print the label. Printing label finish will be end
program.
c. Parameter / EXE
For example : c:\tag\bar.exe
c:\demo.tag/EXE
Starting the EZ TAG program will be automatically opening path c:\demo.tag file, and then display the
PRINT to print label. Printing label finish will be end program.
25
Chapter 6 :Printing Driver
Parameter/EXE method is to match File-input print user or program designer can create a text file (TXT)and
sent the text file to the print the label.
Click main menu File , select <Bar.EXE PRINT driver Save as . DRI>function. Lets the user to easily will
design all of TAG field to convert File-input format and will automatically create demo of the some text file
name (.TXT) and data structure table (*.LST) , which is useful for Parameter / EXE.
EZ TAG File-input print can only designate horizontal data as print data once, row by row to print.
Parameter/EXE method can design fixed TAG format and then change text file (.TXT) to come to print.
26