1
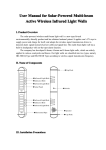
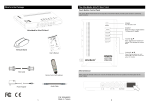
User Manual for Solar-Powered
Multi-beam Active Wireless Infrared
Light Walls
HB-T001Q3
R3
HB-T001
HB-T001R
1、 Product Overview
Solar-powered multi-beam active wireless infrared light walls for engineering
applications is a new-type hi-tech environmentally- friendly product and has obtained
national patent. It applies sun's UV rays to supply power and charge for itself, and
adopts the wireless signal transmission device to transmit alarm signal instead of
power cable and signal line. It is widely installed in houses, schools, workshops and
perimeter fencing of residential quarters etc.
2、 Name of Parts
3、 Installation Precautions
Note 1: Never inst all light walls at an inclined angle.
Note 2: Make sure that there is no obstacle between the transmitting terminal and the
receiving terminal.
Note 3: Multiple light walls shall be installed for long-distance alarm in accordance
with the installation instructions shown in the above-mentioned figure to avoid
mutual interference among beams.
Note 4: Keep the In-frared light holeex-posed to direct sunlight.
Note 5: The high-voltage tower and the signal tower may influence wireless
transmission distance.
Other Important Precautions
① Before installation, remove the plastic film on the solar panel of the light wall.
② Never install this light wall near door access systems, passages, areas prone to
trigger an alarm, or areas which could trigger an alarm more than 50 times per 24
hours.
③This product is a solar-powered wireless product, so it shall not be installed, tested
or operated indoors or in any dark place with a sunlight intensity of less than 2200lux.
④This product can trigger an alarm less than 50 times when this product is tested
under normal sunlight conditions. Never try to test maximum alarm times indoors,
otherwise, it may cause batteries subject to low voltage problem, which may impede
normal operation of this product, and even cause damage to this product.
⑤Before first operating this product, please follow the technical guide provided by
the supplier.
Special Statement: Any loss resulting from failure or damage caused by improper use
or failure to observe precautions or instruction manual shall be borne by users.
4、 Operating Phenomena
①Short press the ON/OFF button at the rear of the transmitting terminal <F>
and the receiving terminal <S> N times(N=3-10), and after about 3 seconds, there are
3-8 beeps respectively from the transmitting terminal<F> and the receiving terminal
<S> of the multi-beamlight wall, and at the same time, the indicator lamp of the
multi-beam light wall will flash 3 times, which signifies the
multi-beam light wall is normally powered on.When the “ON/OFF”key is pressed, it
means the light wall is turned on if there is a“Beep” sound prompt.
②Once normal prompt is given out at start-up, the indicator lamp at the
transmitting terminal <F> is continuously on for 30 seconds and then goes out, and
the receiving terminal <S> will light up for a long time. Keep the transmitting
terminal <F> aligned with the receiving terminal <S>. If the indicator lamp at the
receiving terminal <S> flashes for 30 seconds and then goes out, it signifies the
multi-beam light wall is normally operating.
③After the indicator lamp at the receiving terminal <S> normally goes out,
Block up three infrared holes of the light wall with thick materials , let the receiving
terminal <S>transmit wireless alarm signals, the indicator lamp at the receiving
terminal will light up for about 5 seconds, and then the indicator lamp at the receiving
terminal will flash for 30 seconds, which signifies the multi-beam light wall is
operating again. Repeat the above-mentioned steps.
④Press the ON/OFF button at the rear of the transmitting terminal <F> and the
receiving terminal <S> N times(N=3-10), and after about 3 seconds, there are long
beeps lasting for about 10 seconds respectively from the transmitting terminal<F> and
the receiving terminal <S>of the multi-beam light wall, and at the same time, the
indicator lamps at the transmitting terminal <F> and the receiving terminal <S>will
light up, and later beeps stop and indicator lamps go out, which signifies the
multi-beam light wall is normally powered off. When the “ON/OFF ”key is pressed
again, it means the light wall is turned off if there are two “Beep, Beep” sound
prompts.
Other Precautions
①In normal operation state, when the “ON/OFF”key is pressed twice, a turn-off
signal will be sent after an alarm signal is transmitted.
②If the receiving terminal fails to receive the infrared light pulse emitted by the
transmitting terminal, the indicator lamp at the receiving terminal will light up
continuously for 30 minutes, and then go out. Once the receiving terminal
has received the infrared light pulse emitted by the tran smitting terminal, the
indi-cator lamp at the receiving terminal will light up intermittently, and then flash,
which signifies the multi-beam light wall is normally operating.
③After the multi-beam light wall is normally powered on, if no natural light or light
with an intensity of more than 2200LX is reflected onto the multi-beam light wall
every 100 hours, the multi-beam light wall will be automatically powered off.
④For the finished multi-beam light wall, the transmitting terminal has been well
paired with the receiving terminal. Any unauthorized pairing of the transmitting
terminal and the receiving terminal is impermissible. If any special circumstance
occurs, please contact the manufacturer or distributor immediately.
⑤Never put the multi-beam light wall in any dark place or cover the solar panel with
any materials at power-on, otherwise, the multi-beam light wall may not be normally
powered on.
⑥Press the ON/OFF button of the multi-beam light wall to confirm if the multi-beam
light wall is under power on or power off mode. If a beep prompt is given out, it
means the multi-beam light wall is under power on mode, otherwise, it is under power
off mode.
5、 Installation Procedures
1
Fasten the iron cross part and right angle iron part with screws, and ensure
installation direction of screws is correct.
2 Fasten the arc-shaped iron holder and the iron cross holder in iron brackets.
3 Fasten the other set of iron parts in the iron bracket in the same way as mentioned
above according to height of the ligth wall.
4
Determine a suitable installation height, make holes in wall with a percussion drill,
and then fasten iron brackets in wall with metal screws. Try to keep two brackets
respectively for transmitting terminal and the receiving terminal of the light wall
in the same horizontal height.
5 Get the wide temperature range active wireless infrared light wall prepared for
installation, tighten screw No. 1, and adjust the light wall to ensure the
transmitting terminal <F> and the receiving terminal <S> are located in the same
vertical and horizontal planes. If any deviation occurs during calibration, move
two terminals le ft or right. Determine suitable position for screw holes, keep the
transmitting terminal aligned with the receiving terminal, and finally tighten screw
No. 2. For more calibration precautions, please refer to Part VI in User Manual.
6、 Installation & Calibration Precautions and Test Methods
Calibration Precautions
①Make sure that the power switch of the active light wall is turned on.
②Make sure that the light wall is normally operating.
③Fasten the light wall in iron brackets with screws through screw holes in the cap
peak. Fasten and tighten screw No. 1, and move two terminals le ft or right according
to light wall calibration requirements, keep the transmitting terminal aligned with the
receiving terminal, and finally tighten screw No. 2.
Test Method for Verifying if the Light Wall is Well Mounted
①Verify if the detector is normally operating by confirming if the indicator lamp of
the light wall normally flashes.
②Hole Block-up:
a) The light wall does not alarm when two infrared light holes at the upper end of
the light wall are blocked up.
b) The light wall does not alarm when two infrared light holes at the lower end of
the light wall are blocked up.
c) The light wall alarms when three infrared light holes are blocked up.
Alarm Mode
①Infrared light holes are not completely blocked up (Fingers do not completely
block up the infrared light holes at the transmitting terminal and the receiving
terminal when keeping the transmitting terminal aligned with the receiving
terminal).
②The light wall does not alarm if the intruding object moves under free fall.
③The infrared light holes of the light wall are completely blocked up for more
than 1s by thick materials.
Note: If the host can receive alarm information when the light wall correctly
alarms more than 3 times, that indicates the light wall is well installed.
7、 Check for Abnormality
Failure Symptoms
The multi-beam
light wall does not
alarm, but the
alarm lamp lights
up
Failure Reasons
①The light holes of the multi-beam light
wall are not completely blocked up.
②The host is not armed.
Failure Recovery Methods
Completely block up infrared
light holes with thick materials
Arm the host by remote control,
and then
trigger an alarm
③The antenna of the host is not retracted,
and wireless distance does not conform to
product specifications.
④The multi-beam light wall does not
automatically learn code with the host.
The alarm lamp of
multibeam light wall does
not light up
The multi-beam
light wall does not
normally work
when powered on
The multi-beam
light wall gives out a
prompt sound
lasting for 2 seconds
when powered on
The multi-beam
light wall
does not give out a
sound
prompt when
powered on
①The multi-beam light wall has been not
calibrated for a long time, and battery
protection works.
②The battery voltage of multi-beam light
wall is too low, so that the multi-beam
light wall a utomatically runs in battery
protection mode.
③If the alarm lamp does not light up, but
the multi-beam light wall can alarm, it
means the lamp does not work.
1 Inappropriately powered on
Retract the antenna
Keep the multi-beam light wall
automatically learn code with the
host
Calibrate the multi-beam light
wall again
Charge the multi-beam light wall
in a sunny place. Return batteries
to the manufacturer if batteries
fail to work.
Return the alarm lamp to the
manufacturer
①The battery voltage of multi-beam
light wall is too low
②When powered on, the light wall shall
be kept in a shady place or the solar panel
of the light wall shall be covered with
something.
①Any operation error occurs when
pressing the ON/OFF button
Check if the active infrared light
wall works normally when
powered on
Keep the transmitting terminal of
the light wall aligned with the
receiving terminal of the light
wall.
Charge the light wall in a sunny
place.
Make sure the solar panel of the
light wall is kept in a sunny
place when turning on the light
wall.
Press the ON/OFF button in a
proper way
②The multi-beam light wall is kept in a
dark place or the solar panel is covered
with any materials when powered on.
③The multi-beam light wall does not
work.
Keep the multi-beam light wall
in a sunny place when powered
on
Return the multi-beam light wall
to the manufacturer
2
Not keep the transmitting terminal of
the light wall aligned with the
receiving termi-nal of the light wall.
8、 Technical Parameters
Technical Parameters
Infrared Distance
Wireless Transmitting
Distance
Wireless Transmitting
Solar-Powered Multi-beam Active Wireless Infrared
Light Walls
100m
HB-T001Q3 100m
HB-T001R3 1km
FM:433MHz
Frequency
Maximum alarm times
in 24 hours
Battery Capacity
Working environment
temperature range
Number of infrared
beams
Operating Voltage
Static Operating Current
Infrared light frequency
Infrared light
wavelength
Solar electric panel
output current
9、 Dimension
Not more than 50 times
500mAh (Transmitting Terminal), 1000mAh (Receiving
Terminal)
-30℃~70℃
3beams
3.3V
Transmitting terminal ≤0.5mA, receiving terminal ≤
0.5mA
secondary modulation & encoding based on 38KHZ
940nm±20nm
≥2mA at a light intensity of 1800LX (Note :The outdoor
light intensity in cloudy or rainy days is about 2000LX)