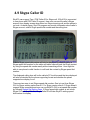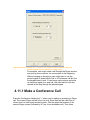
1
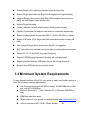
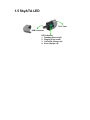
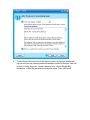
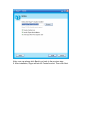
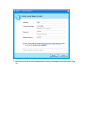
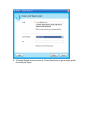
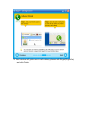
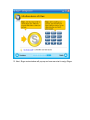
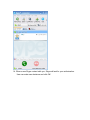
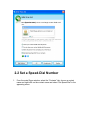
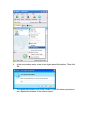
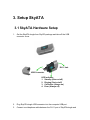
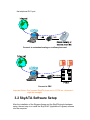
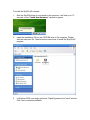
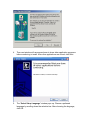
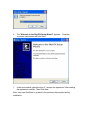
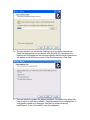
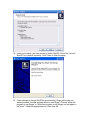
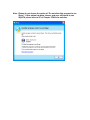
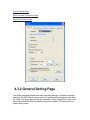
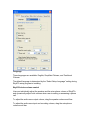
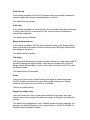
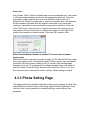
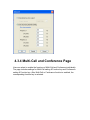
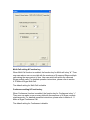
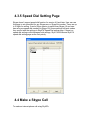
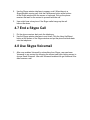
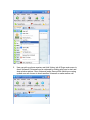
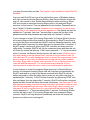
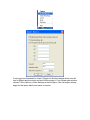
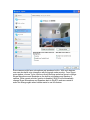
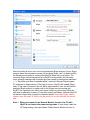
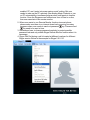
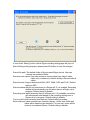
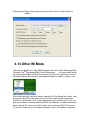
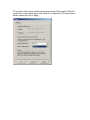
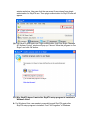
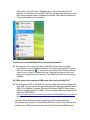
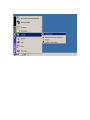
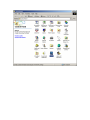
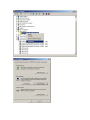
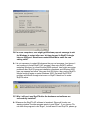
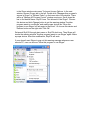
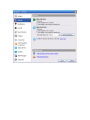
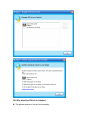
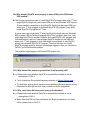
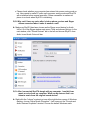
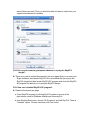
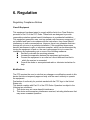
SkyATA User Manual Table of Contents 1. Introduction ....................................................................................................... 2 1.1 Package Contents ................................................................................... 3 1.2 Product Specification ............................................................................... 3 1.3 Main Features .......................................................................................... 3 1.4 Minimum System Requirements .............................................................. 4 1.5 SkyATA LED ............................................................................................ 5 2. Install Skype Software ...................................................................................... 6 2.1 Install Skype and Quick Start ................................................................... 6 2.2 Set a Speed-Dial Number ...................................................................... 17 3. Setup SkyATA................................................................................................. 19 3.1 SkyATA Hardware Setup ....................................................................... 19 3.2 SkyATA Software Setup ........................................................................ 20 4. Use SkyATA.................................................................................................... 28 4.1 Before Making a Call ............................................................................. 28 4.2 SkyATA Icons ........................................................................................ 28 4.3 SkyATA GUI .......................................................................................... 29 4.3.1 Option ............................................................................................ 29 4.3.2 General Setting Page .................................................................... 30 4.3.3 Phone Setting Page....................................................................... 33 4.3.4 Multi-Call and Conference Page .................................................... 36 4.3.5 Speed Dial Setting Page ............................................................... 38 4.4 Make a Skype Call ................................................................................. 38 4.5 Make a SkypeOut™ Call........................................................................ 39 4.6 Answer a Skype/SkypeIn™ Call ............................................................ 40 4.7 End a Skype Call ................................................................................... 41 4.8 Use Skype Voicemail ............................................................................. 41 4.9 Skype Caller ID ...................................................................................... 43 4.10 Make a Skype Multi-Call ...................................................................... 44 4.10.1 Make a Multi-Call ......................................................................... 45 4.10.2 Switch calls in a Multi-Call ........................................................... 45 4.10.3 Hang up a Multi-Call .................................................................... 45 4.11 Make a Skype Conference Call ........................................................... 46 4.11.1 Make a Conference Call .............................................................. 47 4.11.2 Hang up a Conference Call ......................................................... 48 4.12 Skype Remote Monitor ........................................................................ 48 4.13 Skype Recording ................................................................................. 54 4.14 Other IM Mode ..................................................................................... 56 5. FAQs............................................................................................................... 58 6. Regulation ....................................................................................................... 73 1. Introduction Thank you for choosing SkyATA, the compact analog telephone adapter for Skype™ application. SkyATA allows you to make PC to PC free calls or PC to landline calls through SkypeOut™ at very low rates anytime, anywhere. You can make long distance calls or even international calls at dramatically low cost via Skype using regular phones. By connecting SkyATA with a cordless phone or a DECT phone, you can make/ receive a Skype call through the handset without having to stay close to your computer. SkyATA provides a simple and convenient way of making a Multi-Call (call switching among multiple Skype contacts) or a Conference call (talking to several Skype contacts simultaneously) via dialing phone keypad. With SkyATA's easy and friendly User-Interface, you can make Skype calls in the similar way as you can do with the traditional landline. Skype doesn’t support Speed Dial function after version 4.0, you can set a speed dial number for a Skype contact or a SkypeOut contact from SkyATA Speed Dial setting page. Speed dial number can be up to 5 digits 0~9 Arabic numerals. Now SkyATA also supports other IM/Softphone(such as QQ, MSN, Google voice) as an audio device. User can make/receive an IM call from PC and then pick up phone for conversation. Latest SkyATA device can integrate Skype video function and web camera to let you monitor home remotely. And it is easy and free. With Remote Monitor function enabled, you can make a Skype call to home’s Skype account which is running with SkyATA. After pressing the preset password, SkyATA will automatically pick up the incoming Skype call and enable Skype video. With a smart phone which supports Skype video, you can easily make a Skype call to check home status. Many IP CAMs need to have a fixed IP address for remote access, but there is no such limit for SkyATA. Even when you travel abroad, it is easy and free to care your pets at home. And SkyATA also supports Skype recording. The document of SkyATA comprises of several parts as following: A quick installation guide can help you install and use SkyATA quickly. For any questions about this product, please refer to the SkyATA user manual or SkyATA on-line help. On-line help can be accessed from the SkyATA system tray icon at the right-bottom corner of Windows desktop once the SkyATA AP program is running. Also, FAQs (Frequently Asked Questions) can be found from on-line help and user manual. For further questions, please feel free to contact us directly. Thank you again. 1.1 Package Contents SkyATA VoIP USB Adapter Installation CD including SkyATA AP setup program, quick installation guide and user manual 1.2 Product Specification Model Number SkyATA Dimensions L x W X H: 67.4 X 36.2 X 17.8 mm( New 69x 37x 19 mm) Operating System Support Microsoft Windows 8, 7, Vista, Windows XP or Windows 2000(SP4 or later) Skype Version Support 6.14 or above Interface Ports One USB port to computer One RJ11 port to connect with an analog phone LED Indicator: Blue Stand by (Slow on/off) Ringing (Fast on/off) Call Active (Always on) Error (Always off) Audio 16 bit PCM Power USB power and no external power needed Operation Temperature 0 to 55 degrees Celsius Regulatory Compliance FCC Class B, CE Warranty 1 year Note: Specifications are subject to change without notice. 1.3 Main Features Connect Skype through analog phone. No more microphone and speaker Support international busy tone generation. Feasible to connect with PBX Dial Skype call through phone keypad directly or Skype client GUI Answer Skype call by picking up handset same as home line Support Skype speed dial and SkypeOut through phone keypad directly Integrate Skype video function with Web CAM to support remote monitor easily and free(Support latest device only) Support Skype recording Create a Multiple Call and switch between holding calls circularly Create a Conference Call and join new calls into conference sequentially Support cordless phone set including DECT, 2.4GHz, 900 MHz or others Support FSK caller ID for Skype calls with speed dial number for easy call back. Auto configure Skype audio device when SkyATA is plugged in SLIC (subscriber line interface circuit) interface for analog phone connection Support 20, 25, 30 and 50Hz ring signal frequency Support 2 REN(Ringing Equivalent Number) with standard loads Support standard windows USB audio device with unique device ID Support other IM/Softphone as an audio device 1.4 Minimum System Requirements To keep normal functions of SkyATA, user needs to make sure his/her system to meet the following minimum requirements: One Computer running at 400 MHz or better, 128 MB RAM with a USB port, and a CD-ROM drive Microsoft Windows 8, 7, Vista, Windows XP or Windows 2000(SP4 or later) 50MB free hard disk space Skype version 6.14 or above( free download from http://www.skype.com) Internet connection(WiFi, ADSL, 56kbps Modem, ...., etc 1.5 SkyATA LED RJ11 Jack USB Connector LED Indicator: 1. Standby (Slow on/off) 2. Ringing (Fast on/off) 3. Call active (Always on) 4. Error (Always off) 2. Install Skype Software The first step of setting up SkyATA is to install Skype on the computer. This chapter describes Skype version 2.5 installation procedures in two sections: Install Skype and Quick Start and Set a Speed-Dial Number. 2.1 Install Skype and Quick Start If Skype has been installed, check if it is the version which SkyATA claims to support as SkyATA user manual section 1.4 Minimum System Requirements. If the answer is yes, user can skip this section and go to the next section. If not, download the most updated Skype version. Since Skype might change API for the new release, we can't guarantee our current SkyATA AP can work with the new update seamlessly. You should be able to adopt it for a basic Skype talk, but you always can download the latest SkyATA AP program from our web site or get help from our supporting people. 1. Open an Internet browser, and, in the address bar, enter: http://www.skype.com/ 2. When the Skype web page appears, click Download Skype. The download is free. 3. After downloading, double-click on the SkypeSetup.exe icon. 4. The Skype welcome window as below will appear. Follow blue circles 1~3 to select a language by scrolling the bar, accept Skype End User License Agreement and click Install. 5. If user choose Options button in the previous step. An Options window will pop up and user can choose preferred installation folder by Browse. User can choose to check boxes for Create a desktop icon, Launch Skype after installation, or Start Skype when the computer starts. Then click Install. Note: user can always click Back to go back to the previous step. 6. After installation, Skype will ask for Create Account. Then click Next. 7. User can provide e–mail address and country information and then click Sign In. 8. A Getting Started window comes up. Press Start button to get a simple guide for setting up Skype. 9. The next window will help user to check your sound settings by making a Skype test call. Click Next. 10. The next window will guide user to add friends to user’s Skype contact list. Click Next. 11. Then user can try to call friends. Click Next. 12. Next window will guide user to call ordinary phones with Skype(SkypeOut) and click Finish. 13. Next, Skype main window will pop up and user can start to enjoy Skype. 14. When a new Skype contact calls you, Skype will ask for your authorization. User can make own decisions and click OK. 2.2 Set a Speed-Dial Number 1. From the main Skype window, select the “Contacts” tab, choose a contact name and right-click on the contact name and select “Set Speed-Dial” in the appearing menu. 2. In the next window, enter a one or two digits speed-dial number. Then click OK 3. The speed-dial number is set to the contact. Follow the same procedure to set a Speed-Dial Number to the other contacts. 3. Setup SkyATA 3.1 SkyATA Hardware Setup 1. Get the SkyATA dongle from SkyATA package and take off the USB connector cover. RJ11 Jack USB Connector LED Indicator: 1. Standby (Slow on/off) 2. Ringing (Fast on/off) 3. Call active (Always on) 4. Error (Always off) 2. Plug SkyATA dongle USB connector into the computer USB port. 3. Connect one telephone cable between the RJ-11 port of SkyATA dongle and the telephone RJ11 port. Connect to a standard analog or cordless phone set Connect to PBX Important Notes: Don’t connect SkyATA phone port to PSTN line, otherwise it might be damaged. 3.2 SkyATA Software Setup After the installation of the Skype software and the SkyATA dongle hardware setup, the next step is to install the SkyATA AP (Application Program) software into the computer. To install the SkyATA AP software: 1. After the SkyATA dongle is connected to the computer, it will take up to 15 seconds for the “Found New Hardware” window to appear. 2. Insert the Installation CD into the CD-ROM drive of the computer. Double click the setup.exe file. Then follow the instructions to install the SkyATA AP program. 3. In Windows 2000, user might get below “Digital Signature Not Found” window. Click Yes to continue installation. 4. Then next window will recommend user to close other application programs before continuing to install. After other applications are closed, click Next. 5. The “Select Setup Language” window pops up. Choose a preferred language by scrolling down the selection bar. After choosing the language, click OK. 6. The “Welcome to the SkyATA Setup Wizard” appears. on-screen instructions and click Next. 7. In the next window, check the box of “I accept the agreement” after reading the agreement carefully. Then Click Next. Read the Note: User can click Back to go back to the previous step anytime during installation. 8. In the next window, designate a folder for the installation. A default folder will appear. If this is not a preferred folder for user, click Browse and choose a folder from the list. After deciding folder for the installation, click Next. 9. In the next window, choose a preferred folder for SkyATA program’s shortcuts in Start Menu folder. A default folder will appear. If this is not a preferred folder, click Browse and choose a folder from the list. User can choose not to create a Start Menu folder. If this is the case, check the box of “Don’t create a Start Menu folder”. Click Next when the setting is done. 10. The next window is to create the Desktop icon or the Quick Launch icon. Check the appropriate box as desired. After SkyATA AP is launched, the Desktop icon will appear on the computer desktop and the Quick Launch icon will appear in the left bottom corner of the Windows screen. Click Next. 11. The next window contains the related installation information and allows the user to select to start the installation. Carefully examine the configurations. If configurations need to be changed, click Back to make necessary modifications. If not, click Install to start the installation. 12. In the next window, user can choose to launch SkyATA. Check the “Launch SkyATA” box (default is enable). Click Finish to finish the setup. 13. If user chooses to launch SkyATA in previous step, Skype will invoke one warning window “Another program wants to use Skype”. Choose “Allow this program to use Skype” or “Allow this program to use Skype, but ask again in the future”. Check the appropriate box. Then click OK. Note: Please do not choose the option of “Do not allow this program to use Skype”. If this option has been chosen, and user still wants to use SkyATA, please refer to Q7 of Chapter 5 FAQs for solution. 4. Use SkyATA 4.1 Before Making a Call Before making a call with SkyATA, make sure the following requirements have been met: The whole computer system and internet connection meet or exceed the minimum system requirements in Minimum System Requirements section The computer is connected to the Internet SkyATA dongle is connected to the computer USB port A telephone is connected to the SkyATA dongle RJ11 port via the phone cable A Skype program version 6.14 or above is installed and launched in the computer A Skype account has been created and contacts have been added SkyATA AP program is installed and launched in the computer Important Notes: Please don’t combine the Skype window interface with the phone keypad for use when you make a call. For example, user might make a call through the Skype window and pick up phone receiver for conversation in the beginning. Without hanging up the phone, user might want to use the phone keypad to make a Multi-Call or a Conference call but find the keypad doesn’t work. If user hangs up the phone and picks up the phone again for a new call, user can start the call and operate all the way through the phone keypad. 4.2 SkyATA Icons Desktop and Quick Launch icon System tray icons at the right-bottom corner of Windows desktop Initializing Ready Call Active Hardware failure Skype unavailable IM Mode 4.3 SkyATA GUI There are seven choices (Option, Remote Monitor, Skype Recording, About, Help, IM Mode, and Exit) when user clicks SkyATA system tray icon at the right-bottom corner of Windows desktop. Option has all settings for SkyATA. Remote Monitor (Please refer section 4.12 Remote Monitor) allows user to have Skype video monitor remotely. Skype Record (Please refer section 4.13 Skype Recording) lets user make Skype voice recording during a Skype call. About will tell user SkyATA AP software version. The on-line help will be launched when user chooses Help from SkyATA system tray icon. On-line help supports language English, Traditional Chinese and Simplified Chinese. IM Mode can be an audio device for other IM/Softphone. Exit will close SkyATA AP (Application Program) program. Following are detailed descriptions about Option for SkyATA settings. 4.3.1 Option The Option dialogue includes the settings most commonly selected by users. When user clicks the OK button at the bottom of Option dialogue after making a new setting, the new setting will be activated and Option dialogue closes immediately. If user clicks the Apply button at the bottom of Option dialogue after making a new setting, the new setting will be activated immediately and user can continue to make more changes if necessary. User chooses either OK or Apply button, then the new setting will be saved and user has the updated setting when user launches SkyATA again. User can use Cancel button to cancel the changes and Option dialogue closes immediately. Besides, user can click Default button to refresh settings to default settings in every pages. There are four Option pages: General Setting Page Phone Setting Page Multi-Call and Conference Page Speed Dial Setting Page 4.3.2 General Setting Page This option dialogue provides the basic operation settings, including Language selection, SkyATA device volume control of speaker and microphone, Auto start up, Initial ring, Skype window pop-out, call delay, Route, SkypeOut country code , area code and When Remote Monitor function is enabled, PC won’t enter into power saving mode. Language Three languages are available: English, Simplified Chinese, and Traditional Chinese. The default language is determined by the “Select Setup Language” setting during SkyATA setup program is installing. SkyATA device volume control User can individually adjust the speaker and the microphone volume of SkyATA and dynamically adjust both volumes when user is making or answering a phone call. To adjust the audio wave output volume, drag the speaker volume scroll bar. To adjust the audio wave input and recording volume, drag the microphone volume scroll bar. Auto start up If this setting is enabled, the SkyATA program will be automatically loaded and executed when the computer operating system is started. The default setting is enable. Initial ring If this setting is enabled, an initial ring from the connected phone will be activated to inform user SkyATA is now ready for use, once the device initialization is successfully completed. The default setting is disable. Skype window pop-out If this setting is enabled, SkyATA will automatically bring up the Skype window when user picks up the phone receiver and bring down the Skype window when user hangs up the phone. The default setting is enable. Call delay Call delay means how long the Skype call will be dialing out if user doesn't add "#" key after pressing the Skype number. User can input number like 5, then the Skype number will be dialed out after 5 seconds if user doesn't add "#" key after the Skype number. The default setting is 5 seconds. Route User can use this function to add fixed pre-dial digits for certain application. SkyATA software will send out the pre-dialing digits following your dialing numbers from keypad once this function is enabled. There is no default setting. SkypeOut country code User can choose the country code number where the user stays, then user doesn't need to add country code when user makes a SkypeOut call within this country. The default setting depends on user's Window operation system language. For example, the default SkypeOut country code setting is +1(USA*& Canada) for English Windows operation system. Area code Only Taiwan, China, USA and Canada area code are supported now. User needs to click Area code checkbox and choose the appropriate area code. After that, user doesn't need to dial the area code of a traditional local number for a SkypeOut call. SkyATA program tries to collect the complete area code numbers, but user needs to add area code by himself in case there is any area code missing or new added to prevent possible wrong number dialed out. After user clicks "Add" button, there will be one "Input a new area code" window pop out, user needs to fill in the area code or mobile prefix number and the digit of the tradition local number or mobile number. Then click OK to make it valid. When Remote Monitor function is enabled, PC won’t enter into power saving mode When user wants to use remote monitor function, the PC with SkyATA can’t enter into power saving mode. If user doesn’t want PC keep running, user can disable this setting. But user needs to wake up the PC remotely (like sending Magic Packets) or turn on PC automatically via software program when user wants to use this function. Once the Skype account status turns from off-line to on- line, then user can start to use remote monitor function. Default setting is enable. 4.3.3 Phone Setting Page This page provides the related configurations about phone settings, such as Ring signal frequency selection, Busy tone setting, and the Advanced setting of busy tone will cover country selection for International Busy tone and Busy tone parameter. Ring signal frequency selection Here supports four types of ring signal frequency, 20Hz, 25Hz, 30Hz & 50Hz. User can choose a proper ring signal frequency according to the ring frequency of the phone user adopts. Usually the ring signal frequency adopted in the U.S.A. is 20Hz. The ring signal frequency in Europe is 25Hz. The ring signal frequency adopted by the major countries in the world ranges from 20 to 50Hz. The default setting is 25Hz. Busy tone setting User can choose a preferred duration time for playing busy tone. The shortest duration time setting is 5 seconds. The longest time limit is 120 seconds. The default setting is 5 seconds. Under either one of the following conditions, user can hear a busy tone being played on the phone: User picks up the phone receiver when user’s Skype status is Offline. User makes a Skype call to an Offline contact. User makes a Skype call with a wrong speed dial number. User is on line with a Skype contact, but the Skype contact hangs up the phone before user hangs up. Advanced setting of busy tone User can choose the living country from country selection list to get the familiar busy tone. When user can’t find the living country from the list, user can configure the busy tone parameters themselves if they know the appropriate setting. Then click OK. It is not necessary for user to change this setting for general application. This feature also allows user to set the appropriate settings of busy tone when SkyATA is connected with one PBX for different application. By selecting a country, the device will activate the specific busy tone frequency and cycle adopted by local Public Switched Telephone Networks in that country. Sometimes, the connecting PBX doesn't have the exact busy tone parameter as defined in user's country. For this case, user might encounter busy tone detection and unfamiliar busy tone problems even selecting user's country. User can configure the busy tone parameters themselves if they know the appropriate setting. Enable user's busy tone parameter setting option as below figure and fill in appropriate parameters and then click OK. The parameter will be saved and active. The default international busy tone country setting is United States. SkyATA supports busy tone for 23 countries now. 4.3.4 Multi-Call and Conference Page User can select to enable the functions of Multi-Call and Conference individually. The page includes settings for Multi-Call setting & Function key and Conference setting & Function key. After Multi-Call or Conference function is enabled, the corresponding function key is selected. Multi-Call setting & Function key When Multi-Call function is enabled, the function key for Multi-call is key “#”. Then user can make a one-on-one talk with the maximum of 9 reserved Skype multiple calls during the same period of time. User can switch talk within the reserved Skype multiple calls. For detailed operation instructions, please refer to section 4.10 Make a Skype Multi-Call. The default setting for Multi-Call is disable Conference setting & Function key When Conference function is enabled, the function key for Conference is key “*”. Then user can make a one-on-many talk with the maximum of 4 Skype contacts simultaneously. For detailed operation instructions, please refer to section 4.11 Make a Skype Conference Call. The default setting for Conference is disable 4.3.5 Speed Dial Setting Page Skype doesn't support speed dial function for version 4.0 and later. User can use this page to set speed dial for any Skype user or SkypeOut number. There are up to 5 digits for setting. If user's Skype version is earlier than Skype 4.0 and user has set some speed dial numbers in Skype GUI, these settings still work unless they conflict with the settings in SkyATA Speed Dial setting page. If there is a speed dial setting conflict between both settings, SkyATA will choose SkyATA speed dial setting page as the first priority. 4.4 Make a Skype Call To make an internet phone call using SkyATA: 1. Pick up the phone receiver. Wait for a dial tone. Then dial the speed dial number of the Skype contact. Wait for 5 seconds for the call to be dialed out. Or, to make an immediate call without wait by adding “#” key after speed dial number. 2. Use the Skype window interface to make a call. Choose the contact name in the Skype window and click the Call/Answer button at the bottom of the Skype window with the mouse or keyboard. Then pick up the phone receiver and wait for the contact to proceed with the call. 3. User might hear a busy tone if the Skype contact doesn’t answer the call. Please refer to Busy tone setting section of Phone Setting page in section 4.3.3 for more possible cases. Note: User can set a Speed-Dial number for a contact or a SkypeOut number by following the instruction in Speed Dial Setting Page 4.5 Make a SkypeOut™ Call User needs to subscribe for SkypeOut credits in advance of making a SkypeOut Call. Subscription can be made on Skype web site www.skype.com . When the on-line subscription has been completed, user should be able to find one “service” message bar with account status added in the Skype window. Then user can start to use SkypeOut service. Calls, even the international calls, can be made at PSTN numbers or at mobile phone numbers. The rate is much cheaper than the regular PSTN rate. 1. Assign a Speed-Dial number for the SkypeOut contact. User can refer to Speed Dial Setting Page for detailed procedures. Pick up the phone receiver. Wait for a dial tone. Then dial the speed dial number of the Skype contact. Wait for 5 seconds for the call to be dialed out. Or to make an immediate call without wait by adding “#” key after the speed dial number. 2. Use the Skype window interface to make a call. Choose the SkypeOut contact name in the Skype window and click the Call/Answer button at the bottom of the Skype window with the mouse or keyboard. Then pick up the phone receiver and wait for the contact to proceed with the call. 3. Another method of making the call is to dial the number directly from the phone keypad without the effort of making SkypeOut contact. SkypeOut call number format is 00 (or “+” key) + country code + local PSTN/Mobile number. For example, user can make a call to U.S.A. by pressing 00-1-408-888-8888. User can omit 00 + country code when making a SkypeOut call by selecting SkypeOut country code from General page after choosing "Option" of SkyATA system tray icon. SkyATA supports smart dialing for calling to USA, Canada, Taiwan and China. When user's dialing number for these areas reaches a valid phone number, SkyATA will dial out immediately. For other areas, user needs to add "#" key after the dialing number to call out immediately or wait for 5 seconds call delay. The delay time between two dialing digits of the SkypeOut number can't exceed call delay time 5 seconds, or an incomplete number will be dialed out. 4. User might hear a busy tone if the SkypeOut contact doesn’t answer the call. Please refer to Busy tone setting section of Phone Setting page in section 4.3.3 for more possible cases. 4.6 Answer a Skype/SkypeIn™ Call 1. Pick up the phone receiver and proceed with the call when there is an incoming call. 2. Use the Skype window interface to answer a call. When there is a Skype/SkypeIn coming call, click the Call/Answer button at the bottom of the Skype window with the mouse or keyboard. Pick up the phone receiver and wait for the contact to proceed with the call. 3. User might hear a busy tone if the Skype caller hangs up the call before user does. 4.7 End a Skype Call 1. 2. Put the phone receiver back onto the telephone. Use the Skype window interface to end a call. Click the Hang Up/Reject button at the bottom of the Skype window and put the phone receiver back onto the telephone. 4.8 Use Skype Voicemail 1. After user enables Voicemail by subscribing from Skype, user can leave Voicemail to any contact by choosing the contact and right-clicking mouse to choose Send Voicemail. User with Voicemail enabled can get Voicemail if he didn't answer a call. 2. User can pick up phone receiver and click History tab of Skype main menu to check Voicemail. Voicemail can be retrieved by clicking play icon to start and stop as below picture. Once Voicemail ends, there will be a dial tone coming up and user can choose to check another Voicemail or make another call. 4.9 Skype Caller ID SkyATA can support Type I FSK Caller ID for Skype call. If SkyATA is connected to one phone with FSK Caller ID support, then user can see the caller's Skype account from display screen when there is a Skype incoming call and the phone is on-hook. As below figure, SkyATA program can provide information about caller's Skype account, caller's Skype speed dial number and the calling time. Caller's Skype speed dial number will only be displayed if callee did setup a Skype speed dial number for the caller and callee can call back the Skype contact by using the speed dial number easily without searching efforts. User might be able to use phone's redial function to call back the contact by Skype speed dial number. The displayed calling time will be the callee's PC local time and the time displayed will also be decided by the phone supporting format and whether the phone supports time display or not. There are two ways to set Skype speed dial number: One is to set from Skype GUI for Skype version earlier than 4.0. For Skype version after 4.0, Skype doesn't support Skype speed dial and user can use SkyATA GUI to set speed dial number by following Speed Dial Setting Page. If Skype speed dial number is set in both Skype GUI and SkyATA GUI, Skype Caller ID will take SkyATA setting speed dial number for display. 4.10 Make a Skype Multi-Call Enable the Multi-Call function before making a Multi-Call and Multi-Call function key is “#”. User can engage in a one-on-one talk with the maximum of 9 Skype contacts and switch between them by using the function key “#”. Multi-Call can be done when user is making or answering a Skype call. Important Notes: Please don’t combine the Skype window interface with the phone keypad for use when you make a call. For example, user might make a call through the Skype window and pick up phone receiver for conversation in the beginning. Without hanging up the phone, user might want to use the phone keypad to make a Multi-Call or a Conference call but find the keypad doesn’t work. If user hangs up the phone and picks up the phone again for a new call, user can start the call and operate all the way through the phone keypad. 4.10.1 Make a Multi-Call 1. When a Skype call is undergoing, pressing the Multi-Call function key “#” will put the current Skype call on hold. There will be a dial tone to inform user it is time to add another Skype contact by dialing the speed dial number (followed by “#” key for an immediate call). The same procedure can be repeated until the maximum of 9 Skype contacts have been added. 2. User can also use the Skype window interface to make a Multi-Call. Then pick up the phone receiver and wait for the contacts to proceed with the call. (Please don’t combine the Skype window interface with the phone keypad for use when user makes a Multi-Call.) 3. User might hear a busy tone for 3 seconds if the Skype contact doesn’t answer the call or hang up during conversation when user tries to call more than one contact or there are at least three Skype users in the call. When there are only two Skype users in the call, the busy tone period will be set according to the Busy tone period setting in Phone Setting page. Please refer to Busy tone setting section of Phone Setting page in section 4.3.3 for more possible cases. 4.10.2 Switch calls in a Multi-Call To switch between the Skype multiple contacts, press the Multi-Call function key “#”. There will be a dial tone coming up. Press the Multi-Call function key “#” again after hearing the dial tone. Then the Skype call is switched to the next reserved Skype contact. The previous call will be put on hold. The sequence of the switch circulation is the same as the sequence these calls were established. For example, user sets up call 1 to call 5. When user talks to call 5 and next switch will be call 1. 4.10.3 Hang up a Multi-Call 1. In the SkyATA Multi-Call operation mode, press the “*”key to hang up the current Skype contact. Then a dial tone comes up and user needs to press the Multi-Call function key “#” to switch call to the next reserved Skype contact. 2. When user wants to cancel current dialing call, press the “*” key. The dialing call can be cancelled and then a dial tone comes up. User can decide to make a new call or press Multi-Call function key “#” to switch to next reserved call. 3. When user makes a Multi-Call to a contact with Skype Voicemail function enable, user can decide to hang up the call by pressing “*” or Multi-Call function key “#” when the call enters contact’s Voicemail. Then a dial tone comes up and user can decide to make a new call or switch to a reserved contact by pressing Multi-Call function key “#” again. 4. When user makes a Multi-Call to a contact with an answering machine phone, user can decide to hang up the call by pressing “*” key when the call enters contact’s answering machine voice mailbox. Then a dial tone comes up and user can decide to make a new call or switch to a reserved contact by pressing Multi-Call function key “#”. 5. If user wants to hang up all contacts, on-hook the phone. 4.11 Make a Skype Conference Call To make a Skype Conference call, the Conference Call function needs to be enabled, and the Conference function key is “*”. The one-on-many talk (maximum of 4 Skype contacts simultaneously) can be done when user is making or answering a Skype call. When user enables "*" key for conference call, user can't use *3, *4 or *5 to control Skype recording function. User needs to use SkyATA recording GUI to control recording function. However, user can choose "**" as conference call function key, then there is no such limit. Important Notes: Please don’t combine the Skype window interface with the phone keypad for use when you make a call. For example, user might make a call through the Skype window and pick up phone receiver for conversation in the beginning. Without hanging up the phone, user might want to use the phone keypad to make a Multi-Call or a Conference call but find the keypad doesn’t work. If user hangs up the phone and picks up the phone again for a new call, user can start the call and operate all the way through the phone keypad. 4.11.1 Make a Conference Call Press the Conference function key “*” when user is making or answering a Skype call. The current Skype call will be put on hold. Soon there will be a dial tone to inform user it is time to add another contact. Dial the speed dial number of the second Skype contact (followed by “#” key for an immediate call). Then three parties will be in a Conference. The same procedure can be repeated until the maximum of 5 Skype users join the Conference. 1. User can also use the Skype window interface to make a Conference Call. Then pick up the phone receiver and wait for the contacts to proceed with the call. (Please don’t combine the Skype window interface with the phone keypad for use when user makes a Conference Call.) 2. During Conference Call, when any contact hangs up the call or is disconnected incidentally, there will be a busy tone coming up. It will only last for 3 seconds and this busy tone duration won’t be changed according to the Busy tone period setting in Phone Setting page unless there are only two Skype user in the call. Please refer to Busy tone setting section of Phone Setting page in section 4.3.3 for more possible cases. 3. When user makes a Conference Call to a contact with Skype Voicemail enable, the call will be put separately when Voicemail function starts. The call won’t join Conference automatically. User can decide to hang up the call by pressing “*” key. Then a dial tone comes up and user can decide to make a new call or go back to the Conference by pressing Conference function key “*” again. 4. When user makes a Conference Call to a contact with an answering machine phone, please be reminded the Conference conversation might be recorded by the answering machine. For confidences, user can choose to hang up the phone and re-establish the Conference call for this case. 4.11.2 Hang up a Conference Call User can hang up the phone to close the Conference call. 4.12 Skype Remote Monitor SkyATA can integrate Skype video function and Web CAM to let user monitor home remotely. And it is easy and free. With Remote Monitor function enabled, user can make a Skype call to home’s Skype account which is running with SkyATA. (Don’t set Skype’s built-in call forwarding function in home’s Skype account or login this Skype account in another PC.) SkyATA will automatically pick up the incoming Skype call and enable PC Skype video after user presses the preset password. With a smart phone which supports Skype video, user can easily make a Skype call to check home status. Compared with many existing IP CAMs which need a fixed IP address for remote access, SkyATA’s remote monitor function is easy and free. Even when user travels abroad, you can care your pets at home easily and free. This function is only available for latest SkyATA hardware. User can click SkyATA tray icon at the right-bottom corner of Windows desktop with right mouse and choose Remote Monitor, then Remote Monitor window will pop out. User needs to click “Enable Remote Monitor when receiving a Skype call” and choose to accept all incoming Skype calls or only assigned Skype accounts for this function. Then set password for this function. Password can be up to 6 digits 0~9 Arabic numerals. Password is not necessary, but we strongly suggest user to set a password for general applications. The default wait time for password is 7 seconds. User has 7 seconds time to press the first digit of the password and the delay between each input digit can't exceed 7 seconds. If user chooses to accept ”All incoming Skype calls” for Remote Monitor function, all incoming Skype calls will be picked up automatically by SkyATA and there is no ring for the phone connected with SkyATA until two beeps are heard by caller and caller doesn’t press any key within wait time for password(like 7 seconds). If SkyATA doesn’t receive any phone key/DTMF tone after two beeps from the caller within 7 seconds, SkyATA will ring the connected phone and then this call will follow the normal call process. If the correct password + "*" key are pressed within 7 seconds, the Remote Monitor function will start to work. With this option, any caller needs to wait two beeps plus 7 seconds to ring the callee to talk. Or user can press "#" key after hearing two beeps to shorten the ring-time wait if user wants to make a voice call to the Skype account with remote monitor enabled. Even after Skype video is started, user can press "#" key to ring the phone for a voice talk with the remote site. For security and privacy reasons, it is not recommended to enable this option unless user needs a specific application. If user chooses to accept the assigned Skype accounts for Remote Monitor function, the assigned incoming Skype calls will be picked up automatically by SkyATA and there is no ring for the phone connected with SkyATA until two beeps are heard by caller and caller doesn’t press any key within wait time for password(like 7 seconds). If SkyATA doesn’t receive any phone key/DTMF tone after two beeps from the caller within 7 seconds, SkyATA will ring the connected phone and then this call will follow the normal call process. User can press "#" key after hearing two beeps to shorten the ring-time wait if user wants to make a voice call with the assigned Skype accounts. Even after Skype video is started, user can press "#" key to ring the phone for a voice talk with the remote site. If the correct password + "*" key are pressed within 7 seconds, the Remote Monitor function will start to work. For incoming Skype calls from unassigned Skype accounts, SkyATA will ring the phone immediately and follow the normal call process once there is an incoming call. It is strongly recommended to check if Skype can find the camera which user will use for Skype remote monitor and test it before using it. From Skype main window, choose Tools->Options->Video Settings as below figure. User can adjust camera angle for the space which user wants to monitor. Some camera might have microphone and speakers built-in. With such devices, user can also have voice interaction with the people under monitor. From Skype main window, choose Tools->Options->Audio Settings as below figure to change Skype Microphone and Speakers as the built-in microphone and speaker of camera. When remote monitor function is disabled, SkyATA will automatically change Skype Microphone and Speakers back to SkyATA and user needs to make the change again when he/she wants to use this feature. After the setting is done, user can use the assigned Skype account (or any Skype account when user chooses to accept “All incoming Skype calls”) to make a call to the Skype account which is running with SkyATA when user is not home. The incoming Skype call will be picked up by SkyATA automatically and two beep tones (prompt message) will be played and user needs to press preset password + "*" key within wait time for password(like 7 seconds) through Skype keypad, PC keyboard or Skype device. If the input is correct, SkyATA will enable Skype video. If the input is incorrect, the call will be disconnected. User can still use the assigned Skype account to make a call to the Skype account running with SkyATA for a general voice talk if user doesn’t press any phone key within the wait time for password or press “#” key after hearing two beeps. However SkyATA will have a longer delay to ring the connected phone. Even after Skype video is started, user can press "#" key to ring the phone for a voice talk with the remote site. Note: 1. When user wants to use Remote Monitor function, the PC with SkyATA can’t enter into power saving mode. If user doesn’t want the PC keep running, user can disable “When Remote Monitor function is enabled, PC won’t enter into power saving mode“ setting. But user needs to wake up the PC remotely (like sending Magic Packets) or turn on PC automatically via software program when user wants to use this function. Once the Skype account status turns from off-line to on-line, then user can starts to do remote monitor. 2. When user wants to use Remote Monitor function via smart phone, please make sure there is no internet down load or running too many programs when user needs to send out password+ key. Password and key need to be sent in time. 3. Recommend user to change password regularly to protect possible password leak and only enable Skype Remote Monitor function when it is necessary. 4. Skype Dial Pad during a call is located at different locations for different Skype version. Below is the example for Skype 5.6.0.110. 4.13 Skype Recording User can choose Skype recording for caller, callee or both during a Skype call. The recording files will be saved under My document/Skype record folder. User can manually delete it. User can click SkyATA tray icon at the right-bottom corner of Windows desktop with right mouse and choose Skype Recording, then Skype Recording window will pop out. When there is a Skype/SkypeOut call in progress, user can press Record button to start recording (or press *3 from phone), press Pause button to pause recording (or press *4 from phone), or press Stop button to stop recording (or press *5 from phone). When user enables "*" key for conference call, user can't use *3, *4 or *5 to control Skype recording function. User needs to use SkyATA recording GUI to control recording function. However, user can choose "**" as conference call function key, then there is no such limit. If user clicks “Setting” button, below Skype recording setting page will pop out. After finishing setting changes, please press OK button to save the changes. Record file path: The default folder is My document/Skype record. User can choose own preferred folder. Record source option: User can choose to record voices from caller & caller, caller only or callee only. Default setting is Record caller & callee. Record format: Support data format WAV, MP3, WMA, OGG and FLAC. Default setting is MP3 Record window will pop out once there is a Skype call: If it is enabled, Recording window will automatically pop out when there is a Skype call in progress. Default setting is disable. Recording auto-starts whenever there is a Skype call: If it is enabled, recording will automatically start based on the recording setting once a Skype call is in progress. Default setting is disable. Tray icon will inform recording start and end: Default setting is enable. Save caller and callee voices at two channels (stereo): Voices from Caller and callee will be saved at two channels. If it is not set, voices will be saved at one channel (Mono). Default setting is disable. Recording file folder will be opened once recording is done: Default setting is disable. 4.14 Other IM Mode User can use SkyATA for other IMs/Softphones like AOL Instant Messenger/AIM, Windows LiveTM Messenger/MSN, Yahoo! Messenger, ... , etc as an audio device by choosing IM mode from SkyATA system tray icon at the right bottom corner of Windows desktop. But user can’t press phone keypad to make or answer a call. Some IMs have their own audio device selection GUI like Skype and Yahoo. User can choose SkyATA as the audio device from IM’s audio device setting when SkyATA is connected to a PC. After making/receiving a call from a PC, user can pick up the phone connected with SkyATA for conversation. For IMs without audio device setting GUI, user can set PC system audio device as SkyATA. However, PC’s music output will go to the phone instead of user’s PC speaker. Changing PC’s system audio device setting can be done through Option page of SkyATA system tray icon as below figure. After SkyATA is chosen as PC’s system audio device, please click OK or Apply. 5. FAQs Any encounters of problems regarding using this product, please refer to the following troubleshooting information, which contains a list of many frequently asked questions (FAQ). Q1: Why SkyATA can't work properly after SkyATA is correctly installed in my PC USB port? A: SkyATA is quite different with regular USB devices like USB keyboard or mouse. It needs 5V, 500mA power from the USB port. If SkyATA can't work properly after this device is successfully installed, please unplug this device and plug into another PC USB port, or replace the USB cable with a new good quality one between this device and PC USB port or use USB hub with enough power supply to connect this device and PC USB port. We found some PC USB port is extended from motherboard through extension connector/cable and sometimes the connector/cable is at bad quality, it will cause SkyATA malfunction. For this case, we recommend you to re-plug SkyATA into another USB port or use one USB hub with enough power to connect PC USB port and SkyATA. Q2: User needs to manually allow SkyATA to access Skype if user gets one pop up window as below after SkyATA and Skype version 3.6.0.248 or above are installed and launched. Otherwise SkyATA can't be allowed to access Skype and work with Skype properly. The change is due to Skype's change on API access control after version 3.6.0.248 release. The latest SkyATA AP will automatically allow the access, but user can follow below instruction if there is any problem. A: User can follow below procedures to manually allow SkyATA to access Skype. (a) After SkyATA and Skype version 3.6.0.248 or above are installed and launched, user might get above pop up window to ask user to accept or deny SkyATA to access Skype. The pop up window just shows up for around 3 seconds. If user clicks the pop up window, there will be one new event and possible one plugin authorization for SkyATA.exe shown in Skype main window as below. User can click the new event if user doesn't see plugin authorization for SkyATA.exe. Then plugin authorization for SkyATA.exe will appear. (b) Click SkyATA.exe under one Plugin authorization, then one Skype “Manage API Access Control” window will pop up. Choose “Allow this program to use Skype” and click OK button. Q3: Why SkyATA doesn't work after SkyATA setup program is installed in Windows Vista? A: For Windows Vista, user needs to manually launch SkyATA again after SkyATA setup program is installed. From "All Programs" of Windows start menu or SkyATA icon in Windows desk, user can launch SkyATA program. For Windows XP and 2000, SkyATA will automatically be launched after setup program finishes installation in default. The reason is because of Vista's new architecture for security. Q4: How do I know that SkyATA is successfully installed? A: The easy way is to check the status of SkyATA system tray icon at the right-bottom corner of Windows desktop. If you can see the SkyATA system tray icon presented as or system tray icon shows SkyATA when mouse cursor is put on SkyATA system tray icon. And you can hear the dial tone when you pick up the phone receiver. Then SkyATA should be successfully installed. Q5: Why some of my computer USB ports don't work with SkyATA? A: Some Windows 2000 or Windows XP systems might have driver problem with their USB 2.0 ports since both operation systems have been released before USB 2.0 is available. However, Microsoft's Windows 2000/XP latter service pack has added support for USB2.0. User can access Microsoft web site and search by USB/FAQ or link http://www.microsoft.com/whdc/system/bus/USB/USBFAQ_intro.mspx to find more information. User can check Windows device manager as following procedures to see whether your problem is related with USB driver or not. After USB driver is updated, your USB ports should work with SkyATA and other USB devices. Q6: In some computers, user might get Windows pop-out message to ask for Windows to restart after user 1st time plugged in SkyATA dongle into one USB port. Should user restart Windows to make the new setting valid? A: It is not necessary to restart Windows as the pop-out message. Just ignore it and continue to install SkyATA AP program, then enjoy SkyATA without restarting Windows. In some Windows 2000 systems, user might encounter problems after SkyATA program installation completes and Windows 2000 pops up message as below. User can click OK button, then unplug SkyATA dongle and plug again or restart Windows 2000. Re-install SkyATA AP program and launch through start menu or SkyATA desk icon to make SkyATA active. Q7: Why I still can’t use SkyATA after the hardware and software are successfully installed? A: Whenever the SkyATA AP software is launched, Skype will invoke one warning window "Another program wants to use Skype". If you choose "Do not allow this program to use Skype", but still want to use SkyATA, please go to the Skype window main menu Tools and choose Options. In the next window, choose Privacy tab in the left. Double click "Manage other program's access to Skype” in "Related Tasks" on the lower side of the window. There will be a "Manage API Access Control" window coming up. Scroll down the bar to find device Name: SkyATA.exe. "Not allowed to use Skype". Choose this device and click Change button to get the warning window "Another program wants to use Skype" and make proper choice like "Allow this program to use Skype, but ask again in the future". Or choose this device and Remove button on the right side. Click OK. Re-launch SkyATA through start menu or SkyATA desk icon. Then Skype will invoke the warning window "Another program wants to use Skype" again. Make a proper choice. After this modification, SkyATA will work. If user doesn't want Skype to pop out this warning message whenever user reboots PC, user can choose "Allow this program to use Skype". Q8: Why does SkyATA fail to initialize? A: The phone receiver is not on-hook properly. Q9: Why doesn’t SkyATA work properly in some USB ports of Windows 2000 system? A: We strongly recommend user to install SkyATA AP program when user 1 st time plugs SkyATA dongle into one certain USB port of any Windows 2000 system. Or user needs to remember to plug SkyATA dongle into the same USB port which user 1st time plugged in and install SkyATA AP program if user didn't install SkyATA AP program at 1st time. In some case, user might have 1st-time plug SkyATA dongle into one Windows 2000 system USB port without installing SkyATA AP program. Next time, user might plug SkyATA into another USB port and install SkyATA AP program and it worked perfect. Later on if user plugged SkyATA dongle into the USB port which user 1st time plugged in, then user might have problem to use SkyATA unless user re-install SkyATA AP program. The quick solution is to install SkyATA program again as the pop-up message suggests. Also you can refer to FAQ 5 if you still encounter problem. This problem might happen in Windows 2000 system only. Q10: Why doesn’t the phone ring when there is an incoming call? A: a. Please make sure whether SkyATA is successfully installed or not as description in FAQ 4. b. Try to change the Ring signal frequency selection in Phone Setting page. c. Try with other analog phone because some phone might have special driving requirements although we have tried to make our device compatible. Q11: Why can't I hear dial-tone when I pick up the handset? A: a. Please make sure whether SkyATA is successfully installed or not as description in FAQ 4. b. Make sure SkyATA has been chosen as the Skype sound device for Audio In/Out, please refer to FAQ 12. c. Please check whether your computer has entered into power saving mode or not. User needs to make PC wake up from power saving mode and SkyATA will re-initialize before normal operation. Please remember to make sure phone is on-hook when SkyATA is initializing. Q12: Why can't I hear any voice after I pick up phone receiver and Skype shows connected when I make or answer a call? A: Make sure SkyATA has been chosen as the Skype sound device for Audio In/Out. Go to the Skype window main menu Tools and choose Options. In the next window, click "Sound Devices" tab in the left and choose SkyATA from Audio In and Audio Out scroll bar. Q13: After I connected SkyATA dongle with my computer, I couldn't hear music or voice from my computer. What can be done so that I can listen to music from the original sound device? A: Right-click the "volume" system tray icon at the right-bottom corner of Windows desktop, choose "Adjust Audio Properties". It will come out the "Sounds and Audio Devices Properties" window. Choose the default Windows audio device like sound card. Then you should be able to listen to music from your original sound device like speaker. Q14: Do I need to restart my computer whenever I re-plug the SkyATA dongle? A: There is no need to restart the computer, but we suggest that you re-open your Skype software, then launch SkyATA. We recommend that you plug in the SkyATA dongle first then launch SkyATA AP program and close the SkyATA AP program first before you un-plug the SkyATA dongle. Q15: How can I uninstall SkyATA AP program? A: Please follow below two steps. a. Close SkyATA program by clicking SkyATA system tray icon at the right-bottom corner of Windows desktop and choosing Exit. b. Use Windows Start menu, choose "All Programs" and find SkyATA. There is "Uninstall” option. Choose it and then click Yes button. Q16: How can I dial "+" sign when making a SkypeOut call? A: You can use "00" to stand for "+". Q17: Why can't I start my computer after I plug in SkyATA dongle? A: Please check your computer's system BIOS Boot up device option setting. Your computer might have boot up device setting as USB device. You can refer to your computer BIOS setting procedure to change USB boot up setting. Q18: How can I know the SkyATA AP program version? A: Right-click SkyATA system tray icon at the right-bottom corner of Windows desktop and choose "About". Q19: Why does SkyATA system tray icon at the right-bottom corner of Windows desktop show Hardware Error ? A: a. SkyATA might not plug in the computer USB port properly. Please unplug SkyATA dongle and make sure to plug SkyATA dongle into the computer USB port properly. User can try to use USB cable to connect SkyATA and USB port to make sure solid plug into USB port. b. The Phone receiver is picked up before SkyATA finishes initialization. Please make sure phone is on-hook before SkyATA initialization completes. Q20: Why does SkyATA system tray icon at the right-bottom corner of Windows desktop show Skype unavailable ? A: Please make sure Skype is launched and on-line. User can refer to the following possible cases. a. Skype is not active owing to no internet access and SkyATA program is launched. b. Skype program is closed after SkyATA program is launched. c. User changes Skype status to Offline and picks up the phone receiver. User needs to change Skype status to Online for normal operation. Q21: Why can't I use existing Skype audio devices after SkyATA is installed? A: After SkyATA is installed, Skype sound device will be set as SkyATA as figure in FAQ 12. If user wants to use other Skype device, user can change Skype sound device as the one user wants to use. Similarly, user needs to change Skype sound device as SkyATA if other Skype USB audio device is adopted first and then user wants to use SkyATA. Q22: Can I use Skype version later than SkyATA claims to support in Minimum System Requirements? A: Since Skype might change API for the new release, we can't guarantee our current SkyATA AP can work with the new update seamlessly. You should be able to adopt it for a basic Skype talk, but you always can download the latest SkyATA AP program from our web site or get help from our supporting people. Q23: Why can't I use conference or multiple call function? A: In some case, user might need to dial "*" key before the Skype call, but the " *" key will conflict with the default conference call function key "*". User can change the default conference call function key setting "*" to "**". Then conference call will be OK to make. There is a similar function key option "# #" for the default multiple call function key "#" as below. 6. Regulation Regulatory Compliance Notices Class B Equipment This equipment has been tested to comply with the limits for a Class B device, pursuant to Part 15 of the FCC Rules. These limits are designed to provide reasonable protection against harmful interference in a residential installation. This equipment generates, uses, and can radiate radio frequency energy and, if not installed and used in accordance with the instructions, may cause harmful interference to radio communications. However, there is no guarantee that interference will not occur in a particular installation. If this equipment does cause harmful interference to radio or television reception, which can be determined by turning the equipment off and on, the user is encouraged to try to correct the interference by implementing one or more of the following measures: Reorient or relocate the receiving antenna; Increase the separation between the equipment and receiver; Connect the equipment to an outlet on a circuit different from that to which the receiver is connected; Consult the dealer or an experienced radio or television technician for help. Modifications The FCC requires the user to note that any changes or modifications made to this device that are not expressly approved may void the users’ authority to operate the equipment. Declaration of conformity for products marked with the FCC logo in the United States only. This device complies with Part 15 of the FCC Rules. Operation is subject to the following two conditions: 1. This device may not cause harmful interference 2. This device must accept any interference received, including interference that may cause unwanted operation.