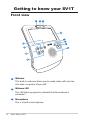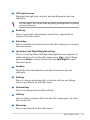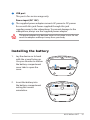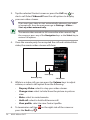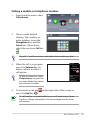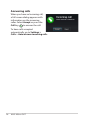
1
AiGuru SV1T
Internet Video Phone
User Manual
E4773
First Edition V1
May 2009
Skype™ Version 1.9
Copyright 2003-2009 Skype Limited
Patents Pending, Skype Limited
Skype, SkypeIn, SkypeOut, associated trade marks and logos and the “S” symbol are
trade marks of Skype Limited.
Portions Copyright © 2001-2009 Joltid™ Limited. All rights reserved.
Patents Pending, Joltid Limited. www.joltid.com
Copyright © 2009 ASUSTeK COMPUTER INC. All Rights Reserved.
No part of this manual, including the products and software described in it, may
be reproduced, transmitted, transcribed, stored in a retrieval system, or translated
into any language in any form or by any means, except documentation kept by the
purchaser for backup purposes, without the express written permission of ASUSTeK
COMPUTER, INC. (“ASUS”).
Products and corporate names mentioned in this manual may or may not be
registered trademarks or copyrights of their respective companies, and are used
for identification purposes only. All trademarks are the property of their respective
owners.
Every effort has been made to ensure that the contents of this manual are correct
and up to date. However, the manufacturer makes no guarantee regarding the
accuracy of its contents, and reserves the right to make changes without prior
notice.
Contents
Contents........................................................................................................ 3
Notices........................................................................................................... 5
Federal Communications Commission Statement................. 5
Safety precautions..................................................................................... 6
Notes for this manual............................................................................... 6
Safety information..................................................................................... 7
Setting up your device...................................................................... 7
Care during use.................................................................................... 7
Welcome.......................................................................9
What is Skype?...................................................................................... 9
Enjoy ASUS AiGuru SV1T Internet Video Phone!...................... 9
Package contents.....................................................................................10
AiGuru SV1T product specifications.................................................11
Getting to know your SV1T.......................................12
Front view...................................................................................................12
Rear view.....................................................................................................14
Installing the battery..............................................................................15
Turning on the videophone.................................................................16
Setting up your SV1T................................................17
Using the touch screen..........................................................................17
Basic and network settings..................................................................18
Using your SV1T........................................................22
Idle screen..................................................................................................22
Main menu.................................................................................................22
Calls.............................................................................................................23
Video calling people in your Contact list........................................23
Calling a mobile or telephone number.....................................25
Answering calls..................................................................................26
ASUS AiGuru SV1T
Contents
Contacts......................................................................................................27
Viewing a Contact.............................................................................27
Adding a Contact..............................................................................28
Searching a Contact.........................................................................28
History..........................................................................................................29
Status............................................................................................................30
See myself...................................................................................................30
Account.......................................................................................................30
Settings.......................................................................................................31
Network settings...............................................................................31
Advanced settings............................................................................33
ASUS AiGuru SV1T
Notices
Federal Communications Commission Statement
This device complies with Part 15 of the FCC Rules. Operation is
subject to the following two conditions:
• This device may not cause harmful interference, and
• This device must accept any interference received including
interference that may cause undesired operation.
This equipment has been tested and found to comply with the limits
for a Class B digital device, pursuant to Part 15 of the FCC Rules.
These limits are designed to provide reasonable protection against
harmful interference in a residential installation. This equipment
generates, uses and can radiate radio frequency energy and, if not
installed and used in accordance with manufacturer’s instructions,
may cause harmful interference to radio communications. However,
there is no guarantee that interference will not occur in a particular
installation. If this equipment does cause harmful interference to
radio or television reception, which can be determined by turning
the equipment off and on, the user is encouraged to try to correct
the interference by one or more of the following measures:
• Reorient or relocate the receiving antenna.
• Increase the separation between the equipment and receiver.
• Connect the equipment to an outlet on a circuit different from
that to which the receiver is connected.
• Consult the dealer or an experienced radio/TV technician for
help.
The use of shielded cables for connection of the monitor to
the graphics card is required to assure compliance with FCC
regulations. Changes or modifications to this unit not expressly
approved by the party responsible for compliance could void the
user’s authority to operate this equipment.
ASUS AiGuru SV1T
Safety precautions
For your safety and to keep the product in good operating
condition, read the following tips and reminders carefully before
using the product.
Always keep the product dry and free from dust.
Make sure that the product is switched off before
removing/replacing the battery.
Refer product servicing only to qualified personnel.
Use the product following the instructions in this User
Manual.
Notes for this manual
To ensure that you perform certain tasks properly, take note of the
following symbols used throughout this manual.
WARNING: Vital information that you MUST follow to prevent
injury to yourself.
IMPORTANT: Instructions that you MUST follow to complete a
task.
TIP: Tips and useful information that help you complete a task.
NOTE: Additional information for special situations.
ASUS AiGuru SV1T
Safety information
This device is designed and tested to meet the latest standards of
safety for information technology equipment. However, to ensure
your safety, it is important that you read the following safety
instructions.
Setting up your device
• Do not use this device near water or a heated source such as a
radiator.
• Set up the device on a stable surface.
• Use this device in environments with ambient temperatures
between 5˚C and 35˚C.
• If you use an extension cord, ensure that the total ampere rating
of the devices plugged into the extension cord does not exceed
its ampere rating.
Care during use
• This ����������������������������������������������������
device����������������������������������������������
is intended for use with power supplied from
supplied battery charger and/or power supply unit. Other usage
will invalidate any certification given to this ������������������
device������������
and may be
dangerous.
• The supplied battery model is ASUS, AL21-SV1. ������������������
Risk of explosion
if battery is replaced by an incorrect type. Dispose of used
batteries according to the manufacturer’s instructions.
• Do not walk on the power cord or allow anything to rest on it.
• Do not spill water or any other liquids on the device.
• When the device is turned off, a small amount of electrical
current still flows. Always unplug power and network cables from
the power outlets before cleaning the device.
• If you encounter the following technical problems with the
device, unplug the power cord and contact a qualified service
technician or your retailer.
•
The power cord or plug is damaged.
ASUS AiGuru SV1T
•
•
•
•
Liquid has been spilled into the device.
The device does not function properly even if you follow
the operating instructions.
The device was dropped or the cabinet is damaged.
The device performance changes.
This symbol of the crossed out wheeled bin indicates that the
product (electrical, electronic equipment, and mercury-containing
button cell battery) should not be placed in municipal waste.
Check local regulations for disposal of electronic products.
ASUS AiGuru SV1T
Welcome
Thank you for choosing ASUS AiGuru SV1T Internet Video Phone.
This device is designed to facilitate Skype™-related features,
allowing you to make calls using your wired/wireless network
connection.
What is Skype?
With Skype you can make free voice and video calls to other people
on Skype. You can also call landlines and mobiles anywhere in the
world at fantastically low rates.
Get started by creating your own unique Skype Name and then
signing in—done directly on ASUS AiGuru SV1T. You will soon be
enjoying free Skype-to-Skype calls to friends and family. And best of
all, you will hear them with excellent sound quality and see them in
perfect vision.
Enjoy ASUS AiGuru SV1T Internet Video Phone!
ASUS AiGuru SV1T gives you the calling functionality of using
Skype—without needing a computer. Your Skype contact list is
displayed on the SV1T screen. Choose who you want to talk to from
the list, press the Call key, and get ready to talk. SV1T also supports
calling landlines and mobiles. It rings when you have an incoming
call, and shows the caller’s ID on the screen. You can also listen to
your Skype voicemail on SV1T.
ASUS AiGuru SV1T
Package contents
Congratulations on your purchase of ASUS AiGuru SV1T. The
following illustration displays the package contents of your new
videophone. If any of the below items is damaged or missing,
contact your retailer.
AiGuru SV1T
AC adapter
Power cord
Quick
10
Lithium battery
Ethernet cable
Support CD
Warranty card
ASUS AiGuru SV1T
Guide
Quick Start Guide
AiGuru SV1T product specifications
Key feature
Videophone for Skype supports
• Skype-to-Skype calls (video & audio)
• Calls to landlines and mobiles
• Incoming calls via an online number
• Call forwarding
• Skype Voicemail
• Conference calls (as a guest only)
Interface
Wireless: 802.11 b/g
Wired: 10/100Mb Ethernet port
Protocols
DHCP/Static IP/PPPOE
Dimension
202 (L) x 123 (W) x 253 (H) mm
Weight
1.6 kg
Display
800 x 480 Pixel 7”TFT-LCD touch screen
Camera type
0.3 Megabyte Pixels CMOS (640 x 480)
Audio
Speaker
Internal Microphone
Power supply
AC Adaptor: 12V/3A
Battery life
Talking Time: 20 mins
Standby Time: 30 mins
Battery charging time 2 hours
Operating distance
Wireless : 50 m (actual transmission distance may vary
depending on operating conditions)
Keys
Power button
Volume keys
5-way Navigation keys (Up, Down, Left, Right, and
Select)
Menu key
Back key
Call key
End key
3.5 mm Headphone jack and Microphone jack
RJ-45 connector
I/O connectors
USB type A connector
DC Jack
Battery connector
ASUS AiGuru SV1T
11
Getting to know your SV1T
Front view
1
2
3
4
5
6
12
7
11
8
10
9
12
1
Webcam
This built-in webcam allows you to make video calls and can
also take a snapshot of yourself.
2
Webcam LED
This LED lights up green to indicate that the webcam is
activated.
3
Microphone
This is a built-in microphone.
ASUS AiGuru SV1T
4
LCD touch screen
Navigate through your contacts and see the person you are
talking to.
You can adjust the screen angle by gently pushing down or pulling
up the front panel.
5
Back key
Press to go back to the previous menu. Press repeatedly to
return to the idle screen.
6
Select key
Press to confirm your choice. From the idle screen, press to open
the main menu.
7
Up, Down, Left, Right Navigation keys
Press to scroll up/down/left/right through the menu options to
make selections. From the idle screen, press Up to select Skype
presence, Down to enter Contact list, and Left/Right to open
the main menu.
8
Speaker
The built-in loudspeaker lets you hear the person you are
talking to.
9
End key
Press to stop an incoming call or cancel a call you are dialing.
Press to go directly to the idle screen.
10 Volume keys
Press to increase/decrease the volume.
11 Call key
Press to dial or answer calls. From the idle screen, press to show
the Contact list.
12 Menu key
Press to go directly to the main menu.
ASUS AiGuru SV1T
13
Rear view
13
18
17
16
15
14
13 Power button
Press to turn on/off the videophone.
14 Microphone jack
This jack allows you to connect a microphone. Using this jack
automatically disables the built-in microphone.
15 Headphone jack
This jack allows you to connect amplified speakers or
headphones. Using this jack automatically disables the built-in
speakers.
16 LAN port
The RJ-45 LAN port supports a standard Ethernet cable for
connection to a local network.
14
ASUS AiGuru SV1T
17 USB port
This port is for service usage only.
Power input (DC 12V)
18
The supplied power adapter converts AC power to DC power
for use with this jack. Power supplied through this jack
supplies power to the videophone. To prevent damage to the
videophone, always use the supplied power adapter.
The power adapter may become warm or hot when in use. Do not
cover the adapter and keep it away from your body.
Installing the battery
1. Lay the device on its back
with the screen facing up.
Use your thumbs to release
the battery compartment
cover tabs to open the
cover.
2. Insert the battery into
the battery compartment
noting the correct
orientation.
ASUS AiGuru SV1T
15
3. Insert the battery cover into
the compartment slots and
firmly press down the cover
until it snaps in place.
Turning on the videophone
Connect the supplied AC adapter to the DC IN jack on the rear panel,
and then press the power button to turn on the device. The device
screen lights up to show the Skype welcome message.
4
2
3
1
16
ASUS AiGuru SV1T
Setting up your SV1T
Using the touch screen
Use the touch screen to set up your SV1T, make calls, and use other
functions.
• Drag left or right on the top
or bottom to scroll the Menu
screen or the Contacts screen.
• Tap any function on the Menu
screen to activate it.
• Double-tap any advanced
function to enter it.
Basic and network settings
After turning on your SV1T for the first time, you will need to
configure the following settings.
1. Tap or press the Up/
Down key to choose your
language and press the
Select key to confirm your
choice.
2. Read Skype’s Terms of
service. Tap or press the
Left/Right key to highlight
Accept, and then press the
Select key.
3A. Configure network settings for the device.
Wireless connection (not plugging in the Ethernet cable)
A list of wireless networks
displays. Double-tap or
highlight one you have
access to and then press
the Select key to start
connecting.
If the network is secured, enter the password using the onscreen
keyboard.
18
ASUS AiGuru SV1T
3B. Wired connection (plugging in the Ethernet cable)
If the device has already been connected to your home router, it
will connect to the Internet automatically.
• For other types of network connections, refer to “Network
settings” section on page 30.
• It is not possible to connect to networks that require web
browser authentication.
4. To set hour, tap the Up/
Down marks or press the
Up/Down key to select
a number and press the
Select key to confirm. Set
minute in the same way, and
then select OK.
5. To set day, month, and year,
follow the instructions as
above. When done, select
OK.
6. To set time zone, double-tap
or press the Up/Down key
to highlight your time zone
and press the Select key to
confirm.
ASUS AiGuru SV1T
19
7. Double-tap or highlight the
country you are calling from
and press the Select key to
confirm.
8. Choose a Skype Name.
If you already have one,
select the first option. If not,
select the second option
and follow the onscreen
instructions to set up a new
name.
9. Tap or highlight the Skype
Name field and press the
Select key to display the
onscreen keyboard.
10. Tap or highlight a letter/
number and press the
Select key to enter. When
done, tap or highlight the
onscreen Enter key and
then press the Select key to
confirm.
Select the Delete key
to delete text. Select ABC
display more text options.
20
ASUS AiGuru SV1T
to
11. Tap or highlight the
Password field and press
the Select key to display the
onscreen keyboard.
12. Enter your password
following the instructions in
step 10.
13. Tap or highlight Sign in and
press the Select key.
14. If you want to sign yourself
in automatically when you
turn on the device, select
Yes. If not, select No.
You will be asked if you would like to take a video snapshot of
yourself to use in your profile. Select Yes and the device webcam
will be activated. Select Snapshot and your photo will be taken.
ASUS AiGuru SV1T
21
Using your SV1T
Idle screen
Tapping the Back icon on the upper left corner of the screen,
pressing the End key
or pressing the Back key repeatedly
returns the device to its idle mode. The idle screen displays the
following information: AC power status/battery level, your Skype
presence and Skype Name, network connection status, and time.
If you already have contacts added to your account, they will scroll
across the screen so that you can see at a glance who is online.
Main menu
Tap the Home icon on the upper left corner of the screen or pressing
the Menu key from any screen opens the main menu. The menu
options are (from left to right): Settings, Search, Add Contact, Call
phones, Contacts, History, Status, See myself, and Account.
Drag left and right or press the Left and Right keys to display more
menu options. When an option is focused, its icon is enlarged.
22
ASUS AiGuru SV1T
Calls
Video calling people in your Contact list
1. From the idle screen, press the Call key
to display the
Contact list. Or, from the main menu, select Contacts.
2. Scroll left/right to find a Contact or a SkypeOut Contact.
Your Contacts are displayed alphabetically. You can scroll left and
right through your Contact list. To jump quickly through your
Contacts, tap an address book tab and drag left/right to navigate
through the Contact list. You can also press the Down key to
highlight the address book tab, and then or press Left/Right to
scroll through tabs. When a tab is in focus, press the Select key to
jump letter by letter.
To call landlines or mobile phones, you will need to buy Skype
Credit or a Skype subscription. Visit www.skype.com for more
information.
ASUS AiGuru SV1T
23
3. Tap the selected Contact screen or press the Call key
to
start a call. Select Video call from the call options to display
your own video stream.
If you want your video to start automatically whenever you make
or accept calls, from the main menu go to Settings > Video >
Start my video automatically.
The remote video extends to full screen after a few seconds. Tap
the screen or press any of the Navigation keys or the Select key to
restore Call options.
4. Once the remote party has accepted the call and initiated their
video, the remote video stream will show.
Local party
Remote party
Call options
5. While in a video call, you can press the Volume keys to adjust
volume, or select a call option from the following:
• Stop my Video: select to stop your video stream.
• Change view: select to hide/show the picture-in-picture
view.
• Mute: select to mute/unmute.
• Hold call: select to hold call/resume call.
• View profile: select to view Contact profile.
6. To terminate a call, tap
press the End key
.
24
ASUS AiGuru SV1T
on the right side of the screen or
Calling a mobile or telephone number
1. From the main menu, select
Call phones.
2. The onscreen dialpad
displays. Tap numbers or
enter numbers using the
Navigation keys and the
Select key . When done,
select the onscreen Call key
.
Do add “+” and the country code before the number you dial.
3. When the call is in progress,
press the Volume keys to
adjust volume, or select a
call option.
To dial an extension, select
Dialpad tones to open the
onscreen dialpad and enter
the extension number.
4. To terminate a call, tap
press the End key
.
on the right side of the screen or
To call landlines or mobile phones, you will need to buy Skype
Credit or a Skype subscription. Visit www.skype.com for more
information.
ASUS AiGuru SV1T
25
Answering calls
When you have an Incoming call,
a full screen dialog appears with
information on the incoming
caller. Select Accept or press the
Call key
to answer the call.
To have calls accepted
automatically, go to Settings >
Calls > Auto-answer incoming calls.
26
ASUS AiGuru SV1T
Contacts
Viewing a Contact
1. From the main menu, select
Contacts to display the
Contact list.
2. Select a Contact or a
SkypeOut Contact.
3. The Action list displays options that
may vary with Contacts.
You can make a Video call, a Voice
call, or Send voicemail to the Contact.
You can also View profile, Rename,
Remove, or Block the Contact, and
send Request details.
ASUS AiGuru SV1T
27
Adding a Contact
1. From the main menu, select
Add Contact.
2. Choose to Add a Skype
Contact or Add a
telephone number.
3. Enter a Skype Name or telephone number using the onscreen
keyboard or dialpad. When done, select the onscreen Enter key.
Searching a Contact
1. From the main menu, select
Search.
28
ASUS AiGuru SV1T
2. Enter a Skype Name, user
name, or e-mail address to
find a Skype Contact.
History
When there are unseen events in History, a red badge will show on
the History icon to indicate this state.
1. From the main menu, select
History to display the
History list.
2. The history is divided into
events: All calls, Missed
calls, Incoming calls,
Outgoing calls, Voicemails,
and Authorization
requests. Select an event to
view details.
3. The number opposite to an
event indicates how many
events require action.
For example, the screen on
the right shows there are
three Voicemails that have
not been listened.
4. Select Voicemails and then
select each voicemail to
perform further action.
ASUS AiGuru SV1T
29
Status
You can change your Skype status by pressing the Up key from the
idle screen or by selecting Status from the main menu.
1. Select presence.
2. Your presence will be
updated.
See myself
You can take a snapshot of yourself to put in your profile.
1. From the main menu, select
See myself, and the webcam
will be activated.
2. Select Snapshot to get
ready to take snapshot. You
can also select Brightness
or Advanced to configure
further image settings.
3. Select Snapshot. After a 3-2-1 countdown, your photo is taken.
You can Save the photo to your Skype profile, Try again, or
Cancel the action.
Account
Select Account from the main
menu to view your account details.
You will be able to check your
Skype Credit balance and check
your subscriptions (for example,
voicemail or online numbers).
Visit www.skype.com for more
information.
30
ASUS AiGuru SV1T
Settings
From the main menu, select Settings to display various options
including Video, Sound, Profile, Calls, Privacy, Network, and
Advanced. Select an option and follow the onscreen instructions to
configure settings for your videophone.
Network settings
The following instructions are for a videophone using a wired
connection.
1. Go to Settings > Network.
To change connection from
Wired to Wireless, select
Change connection and
follow the instructions in
step 3A on page 17.
2. To modify your wired
connection type, select
Current connection >
Modify connection.
ASUS AiGuru SV1T
31
PPPoE connection
1. Select PPPoE settings.
The texts opposite to these
options indicate current
status.
2. Select Username and
Password respectively to
enter the text using the
onscreen keyboard.
Dynamic IP connection
1. If you use a router, select IP
addresses.
2. Select Configure
automatically (the other
options become unavailable).
Static IP connection
1. If you have a static IP, select
IP addresses.
32
ASUS AiGuru SV1T
2. Enter IP address, Subnet
mask and other information
using the onscreen dialpad.
Advanced settings
The Settings > Advanced menu allows you to configure settings
including Screen brightness, Time and Date, Language, Incoming
connection port, Software update, Device information, Touch
Screen Calibration, and Device reset.
Touch Screen Calibration: adjusting the touch screen precision
Select Touch Screen Calibration and then tap the onscreen marks
in a designated order to finish the calibration.
Software update: installing the latest software
1. Select Software update.
2. The “Check for updates”
dialog displays. Select Yes.
3. The device will download
and install the latest
software from the Internet.
Device reset: restoring the device to its factory settings
1. Select Device reset.
2. Choose to Reset
everything or Reset all
except network.
ASUS AiGuru SV1T
33
3. The “Reset device?” dialog
appears. Select Yes to
confirm the action.
34
ASUS AiGuru SV1T