1
AppCross Studio User Manual
AppCross Cloud-based Content Mobilized Platform
AppCross Studio User Manual
Windows Plug-ins Version: 1.14.1121
Mac Plug-ins Version: 1.14.1121
AppCross Studio User Manual
Table of Contents
I.
INTRODUCTION..............................................................................................................................................1
1.
AppCross Plugins installation Environment Steps (Windows & MAC) ........................................................1
2.
PRODUCTION PROCESS ..................................................................................................................................2
3.
PLUG-INS FUNCTIONS ....................................................................................................................................3
II.
BASIC INSTRUCTIONS ..................................................................................................................................4
1.
TERMINOLOGY ...............................................................................................................................................4
2.
OPERATING MODE ..........................................................................................................................................5
3.
REMINDER .....................................................................................................................................................7
4.
DYNAMIC OBJECT DISPLAY HIERARCHY ..........................................................................................................7
5.
CREATE NEW DOCUMENT................................................................................................................................8
III.
PLUG-INS INSTRUCTIONS .....................................................................................................................10
1.
MOVING OBJECT ..........................................................................................................................................10
2.
SCROLLABLE ...............................................................................................................................................12
3.
EVENT IMAGE ..............................................................................................................................................19
4.
INTERACTIVE BUTTON ..................................................................................................................................21
5.
LINK BUTTON ...............................................................................................................................................25
6.
SLIDES ........................................................................................................................................................31
7.
APPEARANCE ORDER ...................................................................................................................................34
8.
POSTCARD ..................................................................................................................................................39
9.
HTML EMBED ...............................................................................................................................................42
10.
INSERT MAP ............................................................................................................................................47
11.
INSERT VIDEO .........................................................................................................................................52
12.
DOOGLE PICTURE ....................................................................................................................................55
13.
GRID PUZZLE ..........................................................................................................................................54
14.
SUPPORT INDESIGN BUILD-IN FUNCTIONS ..................................................................................................56
EXPORT AND PREIVEW………………………………………………………………...…………….………60
IV.
1.
IP UPLOAD………………………………………………………………………………………………………..…61
2.
ITUNES UPLOAD………………………………………………………………………………….………..…………61
AppCross Studio User Manual
I.
Introduction
AppCross is a platform that makes it easy to create e-books and build apps without an engineer.
The editor can use InDesign software to edit the content of e-books and use plug-ins to add interactive
effects. The 15 plug-ins for moving objects, slides, event images, appearance order, interactive button,
scrollable, link button, HTML embedding, insert map, insert video, insert ads, postcards, doodle
pictures, grid puzzles and drag to collection make e-books more interactive. The editor can even use
AppCrossReader to preview the e-book being produced through the reader, or use the AppCrossServer
to package the e-book for distribution.
The coming of the new media age has increased the speed and reach of information flow. The
emergence of e-books breaks down the many constraints of traditional publishing. Apart from giving
the editor more freedom in the layout of text and graphics, the addition of different interactive effects
and multimedia makes it easier to achieve resonance with the reader and create an all-new reading
experience.
(1) AppCross Plugins installation Environment
Please double confirmed that you have installed Indesign 5.5 or 6.0 (Currently still no support for
the CC version), and the installation root needs to be under C drive under program files
(2) AppCross Plugins Installation Environment (Windows & MAC)
~ For Windows ~
Step 1: Please close Indesign
Step 2: If you have already installed Plugins, please go to control panel and remove the old Plugins
first
Step 3: After removing the older version of the Plugins, please open Indesign again and check if the
plugin has been removed from Indesign manual bar and close Indesign again
Step 4: If you are 1st time installer and have removed the older version of Plugins, please download
the AppCross .zip file and select exe file to decompress the software and select setup.exe to install
Step 5: After installation you should able to see the plugins tool bar after opening
~ For MAC ~
Step 1: Close Indesign program
Step 2: please select the PGK file to install
Step 3: after installation please open InDesign and in the upper tool bar there will be Plugins
1
AppCross Studio User Manual
1.
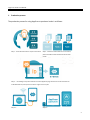
Production process
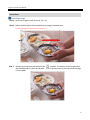
The production process for using AppCross to produce e-books is as follows:
Step 1:Think about the theme or topics of the e-book
Step 2:Collect the related material such as content,
photos and videos and set the basic structure of the
e-book
Step 3: Use Indesign to layout the content and use the AppCross plugin functions to create interactive and
multimedia features, then export to the to the original e-book .zip file
Step 4-1:
Step 4-2:
2
AppCross Studio User Manual
Use iTunes to export the original .zip file and add to the
2.
Upload the original .zip file to AppCross Server for
AppCross Reader in iPad then one can preview what’s
final layout, package and publish to AppStore for
been made
user to download
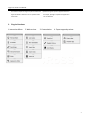
Plug-ins Functions
1. Interactive effects
2. Web services
3. Customization
4. Export app and preview
3
AppCross Studio User Manual
II.
III. Basic Instructions
1.
Terminology
Supported image formats: png, jpg
Supported video formats: MP4 (must use H.264 encoding)
Non-dynamic objects: Objects without any other plug-ins.
Individual object: A section of text, an image or a frame.
Group object: Made up of multiple objects.
Drawing board: The InDesign editing area.
Double-tap: Click the left button twice.
Reader: Tablet or other smart devices.
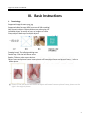
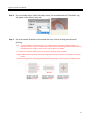
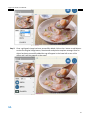
Object frame and picture frame: insert picture will have object frame and picture frame(refer to
below photo
▲ Picture in the left have a blue frame as object and brown frame as picture frame, picture on the
right is the original picture
4
AppCross Studio User Manual
2.
Operating mode
AppCRoss Studio provides3 type of plugins operating mode based on different combinations there will
be different ease of use.
Modes
Mode 1:Select the object frame and use check box method to add the object to give plugins
function.
Mode 2:Select the object frame use add and remove methods to add or remove the object to give
plugins function.
Mode 3:Define external link object, drag the extracted thumbnail to page layout .
操作組合
Combination 1:CheckBox
Ease of Usage: ★ ☆ ☆ ☆
This objective after putting into plugin effect still
retains the status of a single object
Plugins:Moving object, scrollable, Html Embed, and interactive
button
Combination 2:CheckBox+Add
Ease of Usage: ★ ★ ☆ ☆
Select the major objective and add other
object the the plugin objective will
become not a single object but a group
object
Plugins:Event Image, Interactive button, postcard,
5
AppCross Studio User Manual
Doodle picture and grid puzzle
Combination 3:Add/Remove
Ease of Usage: ★ ★ ★ ☆
Click to add the object or click to remove the object that has already been added, at this time the
plugin
Object will become a group object
Plugins: animation, slides and drag to collection
Combination 4:Click+Drag+Add
Ease of Usage: ★ ★ ★ ★
Use the panel to link to external
pages and after successfully linking
and display, one can use thumbnail
to further page layout and
refinement or add new buttons
Plugins: Insert Viedo and insert map
6
AppCross Studio User Manual
3.
Reminder
•
•
•
•
•
•
When working with modes, the object must be in its final form
(e.g., grouping objects, convert text to outlines, or adding light or
shadow effects) before plug-in effects are added.
Any objects that already have plug-in functionality added can't
be grouped or un-grouped again or the expected interactive
effect will not appear.
Objects that already have plug-in effects added can't be pasted
into a frame or the interactive effect will not appear (see Fig. 1).
If the object a plug-in effect is being added to contains light or
shadow effects, the frame tool
must first be used to create a frame
that is larger than the object with special effects. The object is then pasted into the frame
(shortcut: Alt + Ctrl + V). Check that the object is fully displayed in the blue-colored object
frame for it to be fully displayed in preview.
Undo/redo will not restore changed settings.
Make sure that the double quote used in the syntax or address for HTML embedding or
external hyperlinks is a half-character ("). If full character is used or it looks like a comma (”),
the expected interactive effects will not appear after exporting.
4.
Dynamic Object Display Hierarchy
The dynamic object display hierarchy is as shown below. A smaller number means a higher level:
1.
2.
3.
4.
5.
6.
7.
8.
9.
Interactive Button
Scrollable
Event Image, Drag to Collection
Insert Video
Insert Map
Slides
Post Card
Doodle Picture
Grid Puzzle
10. Web view related object
(No set order and is based on the corresponding
layer in InDesign)
Appearance Order
Moving Object
Insert Ad
Html Embed
Link Button
7
AppCross Studio User Manual
5.
Create new document
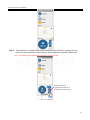
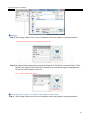
Step 1. Select File > New > Document (shortcut: Ctrl + N)
Step 2. Set document format: Click on webpage.
Tip: For readers such as smart devices and tablets the file must be produced as a webpage.
8
AppCross Studio User Manual
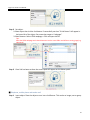
Step 3. Set page size: Select 1024 x 768 as the page size. (The default target reader is the iPad)
Tip: Different page sizes must be set for different readers.
For example: iPad1, 2 / 1024x768px;iPhone / 1136x640px;ASUS Nexus7 / 886x600px
Step 4. Set page orientation: The orientation can be set to Portrait or Landscape as required. Click
the border and columns.
Step 5. Set document border and columns: Use the default values for add border and columns
then select confirm.
9
AppCross Studio User Manual
IV.
Plug-ins Instructions
1. Moving Object
• When the user shakes the iPad, objects imbued with the Moving Object effect will shake based on
the set value.
• Can be used for micro-dynamic effects such as floating clouds, changes in light and shadow, or water
ripples.
Instructions
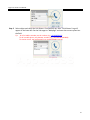
Step 1. Set moving object: Select an object (image, frame, text, or a group object) to set as moving
object then tick moving object.
Tips: Multiple objects can be selected at the same time with Checkbox to turn them into moving objects.
10
AppCross Studio User Manual
Step 2. Moving Object Settings: Once the moving object has been set then the "iiiMoveObject" tag
will appear in the object's lower left. The vertical and horizontal displacement can also be
adjusted. Finally, decide whether the object should move in the opposite direction.
Tips:
1.How much objects move depends on the vertical and horizontal displacement value set and is centered on
the middle of the iPad screen. For example, if the object tilts the iPad "to the right", Moving Object will
slide "to the right" as well.
2.Checking the Reverse Displacement box means that when the user tilts the iPad "to the right", Moving Object
will slide "to the left" instead.
11
AppCross Studio User Manual
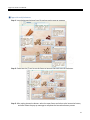
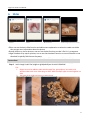
2. Scrollable
▲Scroll pictures
▲Scroll words
▲ Scroll grouped objects
• Scrollable allows more of the content to be viewed. Scrollable can appear in three forms: Scroll single
image, scroll text and scroll grouped objects.
• Horizontal large pictures and long content or hidden remark can be viewed by methods of scroll
grouped objects and not be limited by the screen size
12
AppCross Studio User Manual
Instructions
■ Scroll Single Image
Step 1. Insert the image to scroll (shortcut: Ctrl + D)
Step 2. Adjust the blue object frame and define the image's viewable area.
Tip: Only rectangular object frames are supported
Step 3. Double-tap the picture and the hand tool
appears. The location of the image within
the viewable area can then be adjusted. (This is the state seen by the user when the page
is first loaded)
13
AppCross Studio User Manual
Step 4. Set as scrollable object: Select blue object frame, tick scrollable and the "iiiScrollable" tag
will appear in the object's lower left.
Step 5. Set scroll method: Available scroll methods are Auto, Vertical Scrolling and Horizontal
Scrolling.
Tips: 1) Once Scrollable's settings have been set, a double-ended arrow graphic should be placed in an
appropriate location (e.g., this example scrolls horizontally so a left and right double-ended arrow can
be added below the image) to show the user that this object is scrollable.
2) To avoid mis-calculation, please do not set the picture and object frame scrollable
3) When export when the picture frame and the original picture size it’s the same, it will export the original
picture
4) If scroll setting is auto then the program will automatically decide to scroll horizontally, vertically or both
14
AppCross Studio User Manual
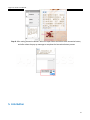
■ Scrollable Text
Step 1. Select Text tool > Create a text box of suitable size > Paste text into the text box.
Tips: Text must all fall fully within the text
box. The + symbol for additional text
must not appear (see left).
Step 2. Click on the rectangular frame tool > Create an object frame of suitable size (the viewable
area when page is first loaded on the iPad) > Cut the text created in Step 1 > Select object
frame > Right click then select paste.
15
AppCross Studio User Manual
Step 3. Open the Scrollable panel > Select object frame with text pasted > Tick the Scrollable
checkbox > Set the scrolling direction to vertical scroll > Once the object has been successfully
set up then the tag "iiiScrollable" will appear in its lower left corner.
■ Scrollable Group Object
Step 1. Insert the required graphics and text > Set "Group" to Scrollable (grouped objects will have a
dashed outline).
16
AppCross Studio User Manual
Step 2. Select the Rectangle Frame tool > Create an object frame of suitable size > Create an object
frame of suitable size (the viewable area when page is first loaded on the iPad) > Cut the
group object created in Step 1 > Select object frame > Right click then select paste.
Step 3.
Move the cursor to middle of the object frame which show both the circle icon and hand
cursor, one can move the grouped objects in the middle of the frame
Step 4. Open Scrollable panel > Select the object frame of the pasted group > Tick the Scrollable
checkbox > Set the scrolling direction to vertical scroll > Once the object has been successfully
set up then the tag "iiiScrollable" will appear in its lower left corner.
17
AppCross Studio User Manual
18
AppCross Studio User Manual
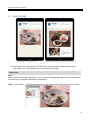
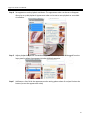
3. Event Image
▲Use 2 fingers to enlarge picture
▲After enlarge the picture will pop-up to full page
• Use two-finger zoom on the picture. Can be used to pop up another image to provide more
information. Use to two-finger pinch to close the pop-up image.
Instructions
Step 1.
Insert image (event image): Select [File > Insert] > select any supported image or use the [Select] tool
to choose any non-dynamic individual or group object.
Step 2. Select object >Tick the selection frame in the "Event Image" setup area to convert object.
19
AppCross Studio User Manual
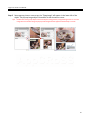
Step 3 Setup pop-up picture: once set up, the "EIpopImage" will appear in the lower left of the
object. The pop-up image object's thumbnail is then shown on screen.
Tips:
Double click on the group object to move the object. During preview, using two-finger zoom on an event
image will cause another image to pop-up. Both images will then appear simultaneously on screen.
20
AppCross Studio User Manual
4. Interactive Button
▲Grouped interactive button
▲Non-grouped interactive button
• Grouped interactive button under the same screen, press one time will only show one pop
picture
• Non-grouped interactive button, all pop up picture will stay and show in screen
• Select Interactive Button brings up a pop-up window that provides more product
information.
• When there are multiple interactive buttons in the same screen, only one button can trigger
a pop-up image at any time.
Instructions
Step 1 First place four types of different objects on the drawing board. (The objects can be text,
images, object frames or group objects):
1. Interactive buttons 2. Object to click on to start 3. Object after clicking on finish. 4.
Object with pop-up window.
Tips: Interactive buttons have three states: 1. Static button shown when page is loaded. 2. Button being clicked
on. 3. Button after clicking (pop-up object immediately after clicking).
21
AppCross Studio User Manual
Step 2 Set object : Select object to become a interactive button (1) and tick select (2). The
"iiiInteractive Button" tag will appear below the object to indicate the action was successful.
Step 3. Set button appearance and pop-up: Select a interactive button (1) then click on the object to
serve as the exterior and the object to reveal in pop-up (2). Click on the + button (3) to add
the object to the panel, and so on.
Tips: If the button object at start and end of click is not the same size as the static button, the preview will
resize the button (non-proportionally) based on the size of the static button frame.
Step 4. Move to pop-up image location: Double-tap group change its location.
Tips: A "Close" icon must be added to the pop-up window as a guide for user action.
Step 5. Repeat Step 1~3 to group all interactive buttons. Select all buttons and group.
Step 6. Check on interactive buttons: after setting you can view all of the grouped interactive
buttons. If you wish to remove pleas press the “-“ sign
22
AppCross Studio User Manual
Step 7.
Preset function is already clicked: when interactive button function is grouped you can
select from the menu that one of the button should appeared in already clicked status.
Note:v1.14.0918 Pluginhas updated the preset funtion is already clicked
Button list order of
appearance is same as in
the pull down menu order
23
AppCross Studio User Manual
■ Pages with multiple buttons
Step 1. Insert background picture from file and put up the pop-up message
Step 2. Please use the (F) tool to set the frame to become the touch area of the button
Step 3. After setting interactive button: select the open frame and select to be interactive button,
and after select the pop-up message to complete the interactive button process
24
AppCross Studio User Manual
Step 4. After setting interactive button: select the open frame and select to be interactive button,
and after select the pop-up message to complete the interactive button process
5. Link Button
25
AppCross Studio User Manual
• Link Button can be set to jump to a page set by the e-book, an exported e-book page, an external
hyperlink or a local webpage.
• Jump to page: Can be set to jump to a page in the same indd file.
• Jump to external page: Can be set to jump to any page in an App ZIP file exported by AppCross.
• Jump to webpage: Can be set to jump to an external webpage or a local page. If the link points to this
server, the folder where the local page is located will be bundled with the App ZIP file during
exporting.
• Supports syntax for send to e-mail address (Mailto:), dial number (Tel:) and dial mobile phone
number (phoneto:). The Tel: and Phoneto: functions are only supported on mobile phones.
Instructions
■ Jump to page
Step 1 Insert image: Object to turn into a link button can be text, graphics or grouped objects.
26
AppCross Studio User Manual
Step 2. Set object: Select object then tick to select the link button. Once set up is successful the
"iiiLink Button" tag will appear in the lower left and set to "Jump as page”. "Object
teleportation" will change to "Jump to page" and the pull-down menu can be used to
select the page to jump to.
■ Jump to external page
Step 1. Insert image: Object to turn into a link button can be text, graphics or grouped objects.
Step 2. Set object: Select object then check the Link button. If link button is successful then "iiiLink
Button" will appear in the lower left of the object. Now set the link target to "Jump to
external page". The select file window will now appear. Select the App ZIP file containing
the page to jump to and the panel will show the selected file name as well as the page
content. Now simply select the external page to jump to from the pull-down menu.
Tips: The exported App ZIP file should be uploaded as well when uploading to the platform in order for Jump
to Page to work.
27
AppCross Studio User Manual
■ Webpage
Step 1 Insert image: Object to turn into a link button can be text, graphics or grouped objects.
Tips: please use the tool to set the appropriate touch area
Step 2. Set object: Select object then check the Link button. If link button is successful then "iiiLink
Button" will appear in the lower left of the object. Set connection target to webpage then
fill out the correct address in the city.
Tips: The URL must include http://
■ Local page (This function is not shown in the AppCross Studio App)
Step 1. Insert image: Object to turn into a link button can be text, graphics or grouped objects.
28
AppCross Studio User Manual
Step 2. Set object:
1. Select object then tick the Link button. If successfully set then "iiiLink Button" will appear in
the lower left of the object. Set connection target to "webpage".
2. Select Browse > Select HTML webpage > Click and open old file.
Tips:
Place the HTML webpage and related elements into the same folder and define a starting page (e.g.
index.html)
Step 3. Once link has been set then the correct path will appear on the button panel.
■ Telephone, mobile phone and send e-mail
Step 1. Insert object: Place the object to turn into a Link Button. This can be an image, text or group
object.
29
AppCross Studio User Manual
Step 2. Select object and check the Link Button. If successfully set, then "iiiLink Button" tag will
appear in the lower left. Set the link target to "Webpage" and enter the correct syntax into
the field.
Tip:
To call a landline number, use tel: number. (e.g., tel:026607XXXX)
To call a mobile phone, use phoneto: number. (e.g., phoneto:0932164XXX)
To send an e-mail, use mailto:email (e.g., mailto:[email protected])
30
AppCross Studio User Manual
6. Slides
▲Basic
▲Dot
▲Thumbnail
▲Two finger pull to full screen
• Editor can use the basic slides function and add content explanation so when the reader use slides
they can get more information about the picture
• By-step pictures or similar pictures, one can use the dot function to make it like it’s in a sequence
• Larger numbers of by-step or pictures, one an use the thumbnail function so user will be able to use
thumbnail to quickly find the one they want
Instructions
Step 1. Insert image: Insert the images or grouped objects to set as slideshow.
Tips:
1. Objects that can be added to slides include image files, group objects, local video, and
YouTube videos with Insert Video plug-ins effect. Different object types can exist together in a
slide.
2. The frame of the slides can have an irregular shape.
31
AppCross Studio User Manual
Step 2. Set as slide object: Select object > Select + symbol again > Setup successful when
"iiiSlideObject" appears in lower left of object.
Tips:
1. Select all objects then click on + button to add all objects to the slide play list. They will then be
played based on the order of insertion.
2. When the inserted images or objects have different sizes, all objects will be resized based on the
frame of the first object to be added to the list.
Step 3. Delete a slide: select the slide and press “-“ minu button to delet the slides.
Step 4. Change slides order of appearances: you can pull up or down on the thumbnails to change
the order of appearance of the slides
Step 5. Set slide to full screen display: you can select to show in slide in full display mode
32
AppCross Studio User Manual
Step 6. Set slide title and description: select the slide in the menu
Tips: slide’s title and description will only be disply in full screen
Step 7. Set up slide type: in the pull down menu you can select basic, dot or thumbnail display for
slide
.
Step 8. Setup auto play by adding object into the slide list and select autoplay and the play time
Tips: v1.14.0917 plugin has added the autoplay function
33
AppCross Studio User Manual
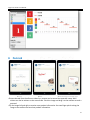
7. Appearance Order
▲General
▲Pop-up
• Create a frame by frame appearance order by playing images in sequence.
• Add a start button to start the appearance order sequence to attract viewer’s eye
Instructions
Step 1. Insert and adjust objects: Insert the images, text, individual objects or group objects to
34
AppCross Studio User Manual
appear in an appearance order in order then adjust the location where the event objects
will appear.
Step 2 Set appearance order images: Select the images to display in an appearance order based on
the order of playback. Click on the + button of the appearance order image list and added
objects will appear on screen. The playback time in seconds can also be played. Once
successful, "iiiPopSeqObject" will appear in the lower left of the object.
Images added first will appear at the bottom of the appearance order image list and have
the same sequence as the graphical panel. In the App, images added first will appear first.
Tips: Multiple objects can be selected before pressing the + button for Appearance Order. The objects will
then be added based on the order of insertion or creation.
▲加入物
件順序
▲播放
順序
Step 3 Set appearance order duration: The amount of time that selected appearance orders
appear on the panel can be adjusted by sliding or entering a number manually.
Tips: Use Shift to select multiple appearance order images from the appearance order list to set the playback
duration for multiple appearance orders at the same time.
35
AppCross Studio User Manual
Step 4. Set appearance order playback attributes: The appearance order can be set to disappear
after play or cycled playback. Appearance order can be set to auto-playback or controlled
via a button.
Step 5. Adjust playback sequence: The order of appearance order layers can be dragged from the
layer panel to adjust the appearance order playback sequence.
Step6. Add button: after finish the appearance order setting please select all and put & select the
button (to start the appearance order)
36
AppCross Studio User Manual
■ Animation Setting
Playback time and appearance time is measured by seconds, and there four type of 播放
combinations:
1. Continuous Appearance + Auto Play
37
AppCross Studio User Manual
2. Sequential Appearance + Auto Play
3. Continuous Appearance + Auto Play+ Sequential Playback
4. Sequential Appearance + Auto Play+ Sequential Playback
38
AppCross Studio User Manual
8. Postcard
▲Front
▲Back
▲Use two fingers to drop & send
• Photos selected from the album or taken by a camera can be turned into postcard covers. Well
wishes can also be written on the reverse side. Pinch the image and drag it to the mailbox to send a
postcard.
• Flip the image left and right to receive more product information. Use two-finger pinch to drag the
image to the mailbox and send out product information.
39
AppCross Studio User Manual
Instructions
Step 1 Insert object: Insert object to use as postcard (supportable image formats, individual or
team objects) Postcard/ Postcard instructions / Album icon / Camera icon / Mail icon /
Graffiti pen, eraser or text area.
Tips: The following actions can be performed in Postcard preview mode:
1. Take snapshot or select photo from album. (Can be a single or no selection at all to simply send out an
image.)
2. Use the slide left and right gesture to flip the postcard over.
3. Doodle or keyboard entry can be used on the reverse side of the postcard. (Only one mode can be used.)
4. Pinch the postcard and drag to mailbox to send. (When there are multiple postcard objects on the screen, all
can use the same mailbox.)
40
AppCross Studio User Manual
Step 2. Set postcard object: First, select the object to use as the basic background of the post card.
Click on the + button in turn to add other objects.
Tips:
1. Postcard object must be inserted into the drawing board.
2. Postcard's background and instructions must have identically sized objects. (The object can be irregular in shape
but the front and reverse must be the same.)
Step 3. If the backside of post card is to be used as tex area then use the text word tool and set the
frame
to be used for text
Tip: Graffiti and text inputs are not allowed to exist simultaneously on the postcard.
41
AppCross Studio User Manual
9. Html Embed
▲Insert iframe
▲Insert Html
▲Insert local page
• The HTML Embed function can be divided into "Custom Page" and "Local Page". Custom Page can use
iframe syntax to embed links that contain the embed tag. In the example, the embed is a YouTube
video. For Local Page a HTML page on the local machine can be chosen as the embedded content.
Instructions
■ Custom page
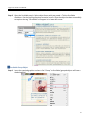
Step 1. Copy the required iframe codes (example of slideshare)
Tips:
1. Users with an understanding of web programming are given priority in this plug-ins.
2. Before inserting a webpage, check that it is compatible with iframe syntax.
42
AppCross Studio User Manual
▼ Example: Vimeo
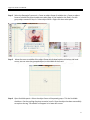
Step 2. Open InDesign and do direct pasting
- In InDesign Cs6.0, the iframe code can be copy and pasted in directly and if the codes is
corrected Indesign will automatically display the thumbnails in the object frame
- In InDesign Cs5.5, it will still show the original iframe codes
Step3. Open html embid and select in the step 2 object and select into webpage frame the coding will
be automatically added and if all correctly done on the left bottom side will
show ”iiiCustomIframe”
Tips:
1. Required to set the length and width all into 100% then the iframe material will suit the proportion of the
object frame
2. Required to confirm scr= include any website http://。
3. If need to editing iframe codes, please use the panel embed content to review
4.To insert pictures (Ctrl+D)in to object frame when users is with internet connections the photo will load
default picture
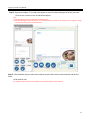
■ Self setting page: example Baido Map
43
AppCross Studio User Manual
Step 1. Enter to the Baidu API websitehttp://developer.baidu.com/map/ > select”tool”> map
generator
Step 2. After selecting the location position point > press to get code (label 1) and in the full window
mode of the html > select to copy the code (label 2)。
44
AppCross Studio User Manual
Step 3. Copy the html code and paste into InDesign
Step 4. Open the html embed plugin and paste coding into the iframe content box to become html
embed and if it’s successful the object frame on the left bottom side will
show ”iiiCustomIframe”
■ Local page
Step 1. Set frame : Select rectangular frame object
then set frame size.
Tips: select from the framework then you can call out the frame to set the width and length
directly
45
AppCross Studio User Manual
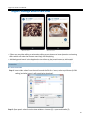
Step 2 . Set object as webpage frame:
1. Select frame > Tick insert webpage into frame.
2. For the content, select Local page > Select HTML file > open old file
Step 3 . Setup successful: Once the object frame has been successfully crafted, the file path shown
on the html embed signboard shows correctly.
46
AppCross Studio User Manual
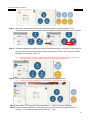
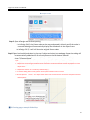
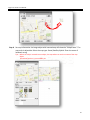
10.
Insert Map
▲Map
▲Map button
▲Pop-up Map
• Insert google map about the location’s exactly address/coordinates/location information for users to
find out.
Instructions
■ Show map directly from image
Step 1. Enter map information: At the "Enter location" field on screen, after enter the landmark
then select "Submit".
The location field can be used to enter the following content:
Detailed addresses such as No. 133, Sec. 4, Minsheng E. Rd., Songshan District, Taipei City
47
AppCross Studio User Manual
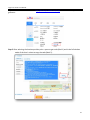
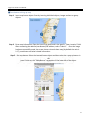
Share Google Map Link
After searching on google map on the location and confirming by the red coordination flag please press setting
and share and embed the map and copy and share the link
48
AppCross Studio User Manual
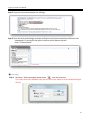
Google map coordinates (Accurate position)。
Use the right cursor of the mouse to select the position and where is this to get the coordinates of the
location
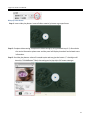
Step 2. Save preview thumbnail: After selecting submit, the save preview window will pop-up. Set
the preview thumbnail's storage file path and location.
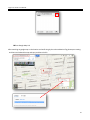
Step 3 Insert map: Once the image has been successfully saved, the screen shows a shrunk-down
map (by default the ratio is 1:17), coordinates and other related information. This means
"Acquire map information" is now complete. In the "Map Preview" area of the screen select
and drag a painting to the drawing board. After adjusting the map object's location and sizes,
release the preview map to finish inserting the map.
49
AppCross Studio User Manual
Step 4. Set map information: he image object with inserted map will show the "iiiMapFrame". The
map scale is adjustable. Select the map type: Street/Satellite/Hybrid. Enter the name of
landmark to tag.
Tips: Before the map is inserted into an object, the map editor can set the content of the map
object.
Streetview function is not available yet.
50
AppCross Studio User Manual
■ Press button to bring up map
Step 1. Insert map button object: Start by inserting individual objects, images and text or group
objects.
Step 2. Enter map information: Open the insert map panel and in the panel's "Enter Location" field.
After connecting the address/coordinates/URL address, select "Submit". Once the image
has been successfully saved, the screen shows a shrunk-down map (by default the ratio is
1:17), coordinates and other related information.
Step 5. Set map button: Select the inserted button object and then select the + pop-up button in
the
panel. Once set, the "iiiMapButton" tag appears in the lower left of the object.
51
AppCross Studio User Manual
11.
Insert Video
▲Movie
▲Movie button
▲ Pop-up movie
• The Insert Video function allows the insertion of YouTube videos and it can also be used with Slides.
• You can put a button function then user will be able to ready the content after press button to play
video
Instructions
Movie
Step 1.
Get video information: At the panel's "Video source" field, enter the video URL then press
the "Submit" button.
The video source can use the following legal URL:
YouTubeURL: https://www.YouTube.com/watch?v=yrJqyVsLIcw
YouTube sharing links, e.g.: http://youtu.be/yrJqyVsLIcw
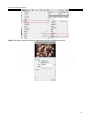
Step 2 Save preview: Set the preview thumbnail's storage file name and file path (default file name
is the video ID). Once saved, the panel will show that video's screen captures, titles and
52
AppCross Studio User Manual
other information.
Step 3. Insert video: Once "get video information" has been completed, select and drag maps into
the document from the "video information" area of the panel. Click and drag to adjust the
video object's location and size then release the preview to finish inserting the video. The
tag "iiiVideoFrame" will appear in the lower left of the inserted video.
Step 4. Set video information include:
[Playback time]: Set the video start and end
[Playback settings]: Auto play, repeating play
[Interface settings]:
1. Change preview
2. Show video information or not
3. Show playback control bar or not
[Play button]: The Play button has two modes.
1. Click on the button to start playing the video on screen.
2. Click on the button to open a video pop-up. The pop-up
video can be centered or full-screen.
Tips: if you wish to adjust play time of video, please use &
set the % on the time bar to adjust
53
AppCross Studio User Manual
Pop-up video button
Step 1. Insert video play button: insert all video material, pictures or grouped items
Step 2. Complete video setting: complete the video setting by using standard step 1~2, after obtain
the movie information please save and the panel will display thumbnail and related name
information
Step 3. Set video play button: select all inserted movie and use give the button “+” the object will
show the “iiiVideoButton” label, the setting can be pop-up or full screen two type
54
AppCross Studio User Manual
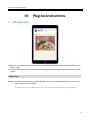
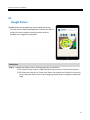
12.
Doogle Picture
• Doodle picture can be applied to picture books and he the
function can be used for drawing books. The plug-ins offers a
variety of colors to choose from and can also save the
doodles as an image file to the device.
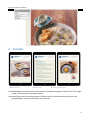
Instructions
Step 1. Prepare the Doodle Picture materials and place in the canvas:
1. The Doodle Picture must be a PNG file and the parts to color in must be transparent.
2. The Palette icon, Brush icon, Eraser icon, Resert icon and Save to Portfolio icon must all
be non-dynamic objects such as text, images, grouped objects or graphics drawn with
indd.
55
AppCross Studio User Manual
56
AppCross Studio User Manual
Step 2. Select the image to add and tick Doodle Picture. The "Doodle Picture" tag will appear in the
lower left once added and be also displayed on the panel.
Step 3. Once a doodle picture has been added, click on the + button to add objects such as Palette,
Brush, Eraser, Reset button and Save to Portfolio in order. Once the objects have been
successfully added, a tag will appear in the lower left corner of the object. It will also
appear on the panel as well.
57
AppCross Studio User Manual
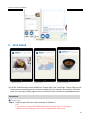
13.
Grid Puzzle
• The Grid Puzzle function can be used in illustrated books. The
plug-ins provides the editor with three cell counts of different
difficulty.
Instructions
Step 1. Prepare the Grid Puzzle material and place on canvas. This includes the jigsaw image,
original picture button, reset button and puzzle complete information. All objects must be
non-dynamic objects such as text, images, grouped objects or graphics drawn in indd.
Step 2. Select the image and tick the Grid Puzzle option. The "Grid Puzzle" tag will appear in the
lower left once successful and be shown on the panel as well. The puzzle difficulty can be
set from the pull-down menu.
58
AppCross Studio User Manual
Step 3. Once a grid puzzle image has been successfully added, click on the + button to add objects
such as the Original Image button, Reset button and puzzle complete message. Once an
object has been successfully added the tag will appear in the lower left corner of the
object and it will also appear on the panel.
14.
59
AppCross Studio User Manual
Support InDesign build-in functions
▲Local video
▲Local audio
• Editor can use video editing or animation editing to put pictures to have dynamics and moving
effect which will make the content more lively and interesting
• Add background music in the App book or use select to play music button to add sounds
Instruction
Insert local video
Step 1. Insert video: select from the tool bar and the file for > insert, select mp4 format (H.264
coding) and after insert it will auto display thumbnail
Step 2. Open panel: select from the view window > interact (V) > open multimedia (E)
60
AppCross Studio User Manual
Step 3. Set video: support all items for play/repeat play/preview/display control
61
AppCross Studio User Manual
Insert local audio
Step 1. Insert map button: insert single button to be for one object, picture or grouped objects
Step 2. Insert Audio: select from the ool bar > insert, select the mp3 source and after insert there will
be a transparent frame and the left upper corner will show the music icon and that’s the touch
area for start play the audio
Step 3. Adjust the touch area: hold ctrl and adjust the button touch area using the transparent frame
to cover the area in the step 1 button
Step 4. Open panel: select interact (V) > open multimedia (E)
62
AppCross Studio User Manual
Step 5. Set audio source: support all items for play/repeat play/preview/display control
63
AppCross Studio User Manual
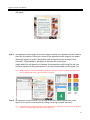
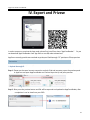
IV. Export and Privew
In order to export or preview the App made, please first install from itune “AppCrossReader”. Or you
can download AppCrossReader from App Store or use QR code to download
AppCross currently provide two methods to prview on iPad thorough “IP” preview or iTunes preview
InIs
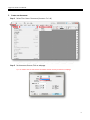
Instruction
1. Upload thorough IP
Step 1. Please use the same internet connection on both iPad and computer, open the preview panel
in AppCross and open AppCrossReader on iPad and input the ip and press preview
Step 2. After press the preview button and file will be exported and updated to AppCrossReader, after
completion it can be view from your iPAD
64
AppCross Studio User Manual
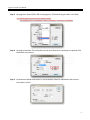
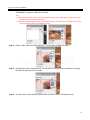
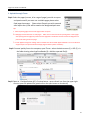
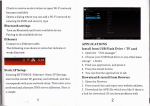
2. Upload thorough iTunes
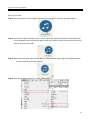
Step1. Select the pages (current, all or range of pages) you wish to export
and preview and if you want non scrollable pages please select
fixed page then export. Please select file path you wish save and
after export the zip file will be saved to the designated path area.
Tips:
1. When exporting page need to select pages under the panel
2. Fixed page will not allow user to scroll pages. Editor can use such function for puzzle games or tests pages
after passing then the page will jumb to the next page but a link button function need to be designed in th
process for linking to the next page
3. Current AppCross Plugin for indesign CS6 v.1.14.0623 must be used with AppCrossReader v.3.7.3 and above to
support expor t and preview of Retina Disply (High resolution photo and words)
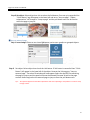
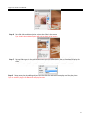
Step2. Connect ipad by line to the computer, open iTunes > select the device name (1) > APP (2) > in
the folder sharing select AppCrossReader(3) > Add the exported file(4)。
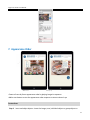
Step3. Open on iPad AppPreview APP > Preview button > press refresh icon from the upper right
corner> open the updated file (preview from the open button or thumbnail)
65