1
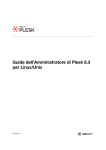
REFRESHWEB CMS – OWNERS MANUAL
Congratulations, your website is driven by REFRESH 2006 Edition. Our latest, and most
powerful CMS (Content Management System).
The CMS lets you create and edit the content on most pages of your site without needing
to know HTML.
Log In
In order to edit content you must first login.
Do this by visiting your website and clicking the ‘admin’ link located at the bottom of any
page.
Enter your username and password as provided to you. If you do not know these, email
us at [email protected] and we will re-send them to you. Username and
passwords are case-sensitive.
Whenever you’re logged in, you’ll see the minimised CMS Control Panel at the very top of
the page. Rolling your mouse over this panel causes it to pop-up and reveals the CMS
icons as illustrated below.
Structuring your website
The CMS displays your site Navigation according to the pages you create. The pages on
your website branch out in a tree-like manner as depicted in the diagram below.
Considering the structure of your website like a tree, the trunk is the Homepage and the
pages branching off this are the Primary Pages.
Child Pages
Child Pages
Primary Pages
About Us
Our People
Company News
News Article 1
News Article 2
News Article 3
Contact Us
News Article 4
Home Page
Our Specials
Child Pages
Product 1
Our Products
Product 2
Product 3
Smaller websites may only require Primary Pages as there is only a few pages to be
displayed. More complicated websites, however, contain many pages of information and
become more difficult for users to navigate. In these instances, grouping branches of
pages together is helpful. The pages that branch from other pages are known as child
pages.
Adding a Page
You can create a new page anywhere on your website simply by clicking this icon. The
page you were viewing when you clicked this icon, determines where in the navigation,
the new page is inserted.
For Example: If you wanted to create a Primary Page called “About Us”; you’d do this by
navigating to the Home Page, and clicking “Add a child page to this page”. A new Primary
page would then be created off the Home Page for you to edit as required.
If you then wanted to create a children for “About Us”; this would be done by browsing to
“About Us” and clicking “Add a child page to this page”, and so on.
You can create as many pages, and groups of child pages as you wish.
Editing a Page
To Edit the contents of a page, simply navigate to the page you wish to change and click
this icon. The editor will then be loaded. For more information on using the editor, see the
section titled “Using The Editor”
Deleting a Page
To Delete a page on your website, browse to the page you wish to display, and click this
icon. A query box will be displayed asking you confirm you wish to permanently delete this
page. If the page contains child pages, these will also be deleted and the query box will
also draw this to your attention. Once a page has been deleted it cannot be restored, so
always be sure to carefully read any warnings in the query box.
Webmail
Webmail allows you to check your emails from remote locations. This is handy if you are
working from home or on vacation. Simply click this icon and enter your email address
and password to login.
Only email still being stored on the server will be displayed. When you return to your
normal computer, be sure to download your email with Outlook (or your preferred email
software) and remove this from the server.
Traffic Stats
Click this button to see detailed statistical data relating to visitors of your website.
Hits represent the total number of requests made to the server during the given time
period (month, day, hour etc..).
Files represent the total number of hits (requests) that actually resulted in something
being sent back to the user. Not all hits will send data, such as 404-Not Found requests
and requests for pages that are already in the browsers cache.
Tip: By looking at the difference between hits and files, you can get a rough indication of
repeat visitors, as the greater the difference between the two, the more people are
requesting pages they already have cached (have viewed already).
Sites is the number of unique IP addresses/hostnames that made requests to the server.
Care should be taken when using this metric for anything other than that. Many users can
appear to come from a single site, and they can also appear to come from many ip
addresses so it should be used simply as a rough guage as to the number of visitors to
your server.
Visits occur when some remote site makes a request for a page on your server for the
first time. As long as the same site keeps making requests within a given timeout period,
they will all be considered part of the same Visit. If the site makes a request to your server,
and the length of time since the last request is greater than the specified timeout period
(default is 30 minutes), a new Visit is started and counted, and the sequence repeats.
Since only pages will trigger a visit, remotes sites that link to graphic and other non- page
URLs will not be counted in the visit totals, reducing the number of false visits.
Pages are those URLs that would be considered the actual page being requested, and
not all of the individual items that make it up (such as graphics and audio clips). Some
people call this metric page views or page impressions, and defaults to any URL that has
an extension of .htm, .html or .cgi.
A KByte (KB) is 1024 bytes (1 Kilobyte). Used to show the amount of data that was
transfered between the server and the remote machine, based on the data found in the
server log.
Server Controls
Server Controls allows you to login to your server to make changes to your physical
hosting setup. You can edit and setup email accounts (see tutorial here:
http://www.refreshweb.com.au/website/news/35/21/ ), make backups, setup sub
domains, etc. Full documentation on server controls, can be found here:
http://download1.swsoft.com/Plesk/Plesk7.5/Doc/plesk-7.5r-clients-guidehtml/index.html
Log Out
To log out of the CMS, click the LOG-OUT icon in the CMS Control Panel.
USING THE EDITOR
The Editor Overview
Whenever you create a new page or edit an existing page, you’ll be presented with the
Editor system. This editor provides you with a visual, Point`n`click interface, to manipulate
page content without needing to know HTML.
The Editor Toolbar
The Editor’s Toolbar contains all the tools you need to create various elements on your
page. The function of each icon is displayed by leaving your mouse pointer over the icon
for a few moments. A full explanation of each tool is described below:
Format
You can format text styles on your pages by dragging your mouse over text
passages and choosing a format from this dropdown menu. It is important (for
usability sake) that font colours, sizes, typefaces are consistent across your
site. If you are planning your page structure correctly, you should never require
any further formatting options than this.
Headline 1 is the format style for main page headlines. Generally speaking, it is
unlikely you would want to specify any text as being a headline 1 because this denotes
text is the main page headline, which has already been displayed.
Headline 2 is the format style for any sub-headers of paragraphs on your pages. Headline
3 is a sub header for points off Headline 2, and so forth.
Normal is the format style for paragraphs of text. Address and Formatted and generally
unused.
Text Alignment
You can specify if you wish your text to align left, centred, right of justified. Most text on the
site has a style Format (for example Headline 1 or Normal) already defined, which includes
it’s own default text alignment values. If applicable, these Style Formats will override any
alignment you specify.
Lists
You can format your text into a list by using these tools. You can have numerical lists or
number lists. Passages of text can also be indented or outdented respectively, using
these tools.
Font Appearance
You can Bold (hotkey: CTRL + B), Italic (hotkey: CTRL + I), Subscript or Superscript text to
suit your layout requirements by selecting text and clicking these tools.
Undo / Redo
If you make a mistake, simply click Undo (hotkey: CTRL + Z) to iterate back through the
steps you made. To iterate forward through steps you’ve undone, click Redo (hotkey:
CTRL + Y).
Cut / Copy / Paste
You can use these tools to move selected elements around the page.
CAUTION: Never paste passages of text into your pages directly from MS word. Microsoft
attempts to impose its own style and formatting values into the html and creates page
source riddled with errors and formatting issues that are virtually impossible to fix.
Whenever you need to copy content into your page from a word document (or email),
ensure you first paste it into notepad, then copy and paste it into the editor. This will clean
the text.
Link to File
This tool allows you to upload files (such as PDFs) to the server. Clicking it allows you to
see what files exist on the server and if you choose to link to them, a link will be created on
your page, with file size, icon, etc, displayed to the user. You may upload new files to your
server, we recommend only using PDFs or video files for this purpose. Most other formats
are blocked on the server to prevent security issues.
Horizontal Rule
Separate elements within your pages using a horizontal rule. Simply place the cursor
where you’d like the rule to appear and click this icon.
Link
Your can make text and images on your page clickable links to other pages on the
internet using the link tool. Simply select the elements that you want to make a link from
and click the link tool. A box will display like the one below.
Enter the address of the page you wish to link to in the URL field. Ensure you start the URL
with http://, never attempt to link to another page simply starting with www as this is not a
valid URL.
The title field is optional, but helpful if you want to indicate to users where they will be taken
when they click the link. This title will display if they leave their mouse over the link for a few
moments.
Target defines weather the page will open in a new window or the current window. For
most off-site links, we advise using a new window. For links to other pages within your
own website, set this to open in the same window.
To remove an existing link from an element, simply right click the element and select
‘Remove Link…’
Insert / Modify Image
This tool lets you upload, edit and place images into your pages. Place your cursor where
you want the image to be positioned, and click the icon. A box will display like the one
below.
To place an image, click on it’s thumbnail and click ok.
To upload a new image, click Browse to find the file on your own Hard Drive (it must be a
jpg) and click upload.
To remove an image from your server, click the trashcan icon displayed underneath it’s
thumbnail. Ensure the image is no longer used anywhere on your site before doing this,
otherwise it will appear as a broken image.
To resize or crop an image on your server click the pencil icon underneath it’s thumbnail.
An image editor will then be displayed. Enter the new desired height and width of the
image, or drag your mouse over the image to set crop. Then save the edited image.
Create Table
Occasionally, you’ll need to display information in tables. In these situations, use the Create
Table tool. A box will display like the one below.
Specify the number of Rows and Columns you require, the width of your table, any
padding and spacing desired and a border, if required.
You can edit an existing table by placing your cursor inside it and right clicking the
element.
Saving your page
When you’ve finished making your changes, you’ll need to save the page. Click the SAVE
AS button found at the bottom of the Editor to view your options. A box will then display
like the one below.
Page Name is the name you apply to the document. The name is very important as this is
used for the main headline of the page, the navigation link to the page, the breadcrumb
trail to the page, the sitemap connection to the page, and so forth. For this reason the
page name SHOULD include words you’d like the page to be indexed by Google with. The
page name should clearly communicate the page’s content and should never contain
illegal characters. To rename a page, simply enter a new name in the field.
Page Hero Image is a main image to be displayed on the page, You can select an image
off your server, upload one accordingly, or simply leave this field black to choose not to
display any image here at all.
Page Type defines what sort of document the page is. Most of your pages will be Content
pages. However you can also have: Link; Product; or News
If you set your Page to News, the headline will appear in the New Archive on your site
(assuming you have one).
If you set your page type to Link, you will be asked to supply a URL. Ensure you start the
URL with http://, The navigation item associated with this page will load the link you specify
rather than the content associated with that page. One a page has become a link, you will
no longer be able to reach this page via the navigation to edit its content, however it can
still be edited by entering the original URL for the page into your address bar and clicking
edit this page. If you