1
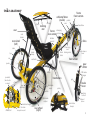
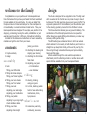
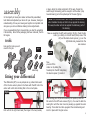
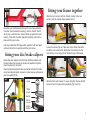
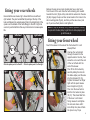
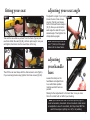
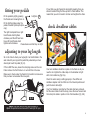
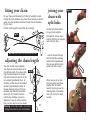
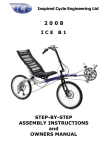
manual
trike anatomy
�����
����
��������
���
����
���������
����� ��������
������������ ������
������
������
����������
������
����
����
����
�����
�����
����
��������������
�������� ������
�������
�����
������
�����
�����
�������������
���
�����
����������
���
����� ������������
�����
�������������
�����
�����������
����������
������
����
�������
����������
�������
�����
���������
������������
���������
�����������
�����
����
����������
����������
�����
����
�����
�����
������
���
�������
������
����������
�������
�����������
�����������������
����������������
�������������
����������
�������
����������
������
������
�����
2
welcome to the family
Congratulations on your purchase of a Greenspeed Anura
trike. We believe that you have purchased the finest recumbent
tricycle available in the world today. It is also our belief that
the present level of motorised transport on this small planet is
not sustainable, in environmental and social terms. Thus your
Greenspeed has been designed for everyday use, whether it be
shopping, commuting, touring the world, rehabilitation or just
exercising and having fun! With care, it should last a lifetime.
Included in this manual are instructions on how to assemble,
maintain and get the most from your Anura.
contents
2 tricycle anatomy
3 design
assembly
4 tools
fitting your differential
5 fitting disc brake calipers
fitting your frame together
6 fitting your rear wheels
fitting your front wheel
7 fitting your seat
adjusting your seat angle
adjusting your handle bars
8 fitting your pedals
adjusting to your leg length
check derailleur cables
9 fitting your chain
adjusting chain length
joining your chain
10 attaching the steering rod
aligning your steering
11 attaching the front brake
final check
12 adjusting your gears
~ front derailleur
~ rear derailleur
design
The Anura is designed to be enjoyable to ride. The high seat
with one wheel at the front & two rear, make it easy to mount
& dismount. The high seat also gives a good view in traffic. The
ergonomic placement of the handlebars, and the attention paid
to the steering geometry means that it is effortless to steer.
The three wheel disc brakes give very powerful braking. The
combination of the Schlumpf speed drive & nine speed bar
shifter allows two speed shifting while stationary or under way
and easy shifting while riding.
The differential gives a balanced drive to both rear wheels
which enables it to turn easily in both directions, and track in a
straight line up steep hills. Finally, at the end of your trip, the
trike will go through a standard doorway and park vertically,
taking up little space.
A boss welded through the rear axle brace provides an
attachment point for attaching a trailer or another Anura with
special hitches available from your Greenspeed Dealer.
riding
13 steering, braking,
using your gears
14 1st ride, stamina, pedals
tools to have while riding
maintenance, chain,
tyre pressure
w h a t ’s n e x t
15 accessories, warranty,
community, resources
3
assembly
in place. Undo the collar and slide it off the axle, thread the
axle through the bearing just far enough to sit the collar (step
towards bearing) onto the splined part of the axle (fig 2a).
In the majority of cases your dealer will have fully assembled,
test ridden and adjusted your Anura for you. However, having an
understanding of how your Anura goes together is important and
also gives you more confidence making future adjustments.
If you are assembling from a boxed state, you start by unpacking
it all carefully. Once all the packaging has been removed, the fun
bit begins.
tools
Here are the tools you will
need for the job.
Note: The two axle collars have a step on one side of the
collar. Orientate the step so that it sits up against the bearing.
This way the collar will not rub against the stationary part of
the bearing.
Now we assemble the diff parts together (fig 2b). Check the big
collar (x) is sitting on the left hand (fatter) side of the
diff, and the black cluster spacer (y) is on the
x
right hand side, pressed onto the
axle receiver.
fig 1
fig 2b
10
Wrenches
15
4
8
6
y
2
5
Allen keys
fitting your differential
The differential (diff) is a very simple set up; collars holds each
of the the two axles in place in the frame with the diff unit in the
center with a 3rd collar holding that in the correct place.
Now
you can fit the
cluster on by sliding the
freebody into the diff and placing
the cluster spacer (z) inside it.
z
fig 2c
fig 2a
First we’ll sit the right hand axle (the longer of the two) loosely
Now holding your diff/cluster assembly into position, slide the
RH axle into the diff’s axle receiver (fig 2c). You need to slide the
axle right in until the rotor mount is pressing up against the outer
bearing. Then slide the collar up against the inside bearing and
lock it in place with the grub screw.
4
fitting your frame together
fig 2d
Mate the front section (with the forks & cranks) to the rear
section (with the triangle shape welded into it).
fig 4
Now slide your Left hand axle through the two frame bearings,
the collar (step towards the bearing), and into the diff. Push it
all the way in until the rotor receiver butts up against the outer
bearing. Then slide the collar against the bearing and lock it in
place with the grub screw.
fitting your disc brake calipers
Next install your calipers onto the frame. Slide the calipers onto
the disc brake rotor and use the screws and washers to tighten
them into place (fig 3a and b).
Anura has been designed to take one washer between the frame
mount and caliper bracket, however in some cases an extra spacer
may be needed (fig 3b).
a
screw
b
6
Last step is slide the diff’s large collar again the Left hand axle’s
collar and lock this into position with the grub screw.
fig 3
a
b
Loosen the screws (fig 4a). Take care not to disturb the shims
inside the rear section when sliding the front section into the
rear. Starting on an angle (fig 4b) makes things a little easier.
c
d
6
Slide the front section about ½ way in & tighten the two ALLEN
screws to hold it in place during assembly (fig 4c and d).
frame
mount
washer
spacer
(if needed)
5
caliper
bracket
5
fitting your rear wheels
Now install the rear wheels. Fig 5 shows that there are left and
right wheels. They can be identified by looking at the top of the
hub and following the outside spoke (that is the straight part of the
spoke is on the outside of the hub’s flange) to the left or right. Be
sure to try and install them this way in the future to increase spoke
life.
fig 5
left wheel
right wheel
Left hand wheel
Right hand wheel
Outside spoke points to the left
fig 6
Outside spoke points to the right
a
b
c
d
6
Remove the axle screw (some models also have a cap here)
from the end of the axle. Face the hub’s retaining pins inwards
towards the rotor (fig 6a circle) and slide the wheel onto the axle
(fig 6b). Engage the pins or Allen screw heads in the holes in the
disc mounting plate (fig 6c), and then put the axle screw (and
cap if you have them) back in and tighten it.
Note: It may be necessary to try different positions in fitting
the pins into the disc plate, to get them to mate properly and
go all the way in.
fitting your front wheel
Now fit the skewer to the axle of the front wheel if it is not
already fitted.
fig 7
a
Unscrew the nut & slide it
through the axle from the
opposite side to the disc, then
screw the nut on until the end
of the nut is flush with the
end of the skewer.
Then fit the front wheel by
b carefully sliding the disc into
the brake caliper, and the axle
into the dropouts (fig 7a).
Tighten the skewer nut finger
tight with the quick release
lever straight out (fig 7b).
Then turn the lever back to
c
lock the front wheel in place
(fig 7c). This should feel firm.
If the lever is not locked
firmly, release it and tighten
the nut some more until it
locks firmly into place. Inflate
the tyres to say 70 psi.
6
fitting your seat
fig 8
adjusting your seat angle
a
b
6
Take out the two allen key screws from the frame (fig 8a) and
use them attach the seat (fig 8b), do them just snug for now, we
will tighten them later. Use the lower holes in the tag.
4
10
c
6
d
Then fit the rear seat stays with the Allen screws & nuts (fig 8c).
If your seat angle looks okay, tighten the frame screws (fig 8d).
To adjust the angle of your seat, fig 9
loosen the two frame screws
one turn (fig 8d), and loosen
both of the seat brace’s clamps
(fig 9). Now you can slide the
seat angle fore and aft to your
desired angle. Then tighten the
clamps back up again.
3
Note: Make sure you have at
least 2” (54mm) of the upper
tubes into the lower tubes.
adjusting
your handle
bars
fig 10
4
Loosen the clamp on the
handlebars and adjust them
to a comfortable position
making sure both bars are
parallel.
Making further adjustments to the bars later on as you tune
them for comfort will not effect your steering.
Note: your handle bars need to be done up fairly tight to
prevent unnecessary movement. Some movement under duress
is acceptable in case of an accident, but they should NOT be
used for leverage in getting on or off, or in pedaling.
7
fitting your pedals
Fit the pedals by lightly greasing
the threads and screwing them in.
to tighten 15
Fit the shifting plates under the
pedals if desired (schlumpf option
only).
If you think you will change the leg length regularly, then you
should consider fitting the trike up with a Chain Gobbler. This
means that you will not need to shorten and lengthen the chain.
check derailleur cables
The right hand pedal has a right
hand thread which tightens
fig 11
clockwise, and the left hand one
has a left hand thread which
tightens anti-clockwise.
Please make sure that they are tight.
fig 13
a
b
5
adjusting to your leg length
Sit on the trike to check your leg length. Get comfortable in the
seat and with your leg and the pedal fully extended your heel
should just touch the pedal (fig 12).
If this is NOT the case, loosen the clamping screws on the rear
frame & move the front frame in or out until this is the case.
Make sure to check under the frame’s front section to make sure
that you have not exceeded the max point.
Your rear derailleur should be in place on the frame so all you
need to do is tighten the cable clasp on the derailleur is tight
with a 5mm Allen Key (fig 13a).
Check the outer casing is sitting properly in the shifter and
derailleur adjuster and the shifter is in the forward position and
pulls the inner cable tight.
Your front derailleur is similar but the cable has been removed.
Put the outer cable into all the stops, move the lever forward and
then clamp the cable in position in the front derailleur (fig 13b).
fig 12
Note: Once you ride the trike you may want to
adjust this position some more until it feels right for you.
8
fitting your chain
Fit your chain next following fig 14. Start by feeding the chain
through the front derailleur cage, down the chain tube, under the
pulley, over the sprockets and down through the rear derailleur
(fig 14, step1).
Put the rest through the lower tube (fig 14, step2).
joining your
chain with
split links
fig 16
a
Use the two joining links to
join your chain together.
���
fig 14
Slot each link into the chain
ends so that they are opposite
each other (fig 16a) ...
b
���
Note: Make sure the chain is not twisted inside the tubes.
...and slot the pins through
the links (fig 16b) and keep
pushing them towards each
other as you slide them into
position (fig 16b arrows).
adjusting the chain length
The chain should only be adjusted
once the front frame has been set for
fig 15
the right leg length. If you have chain
rings, move the chain to the largest
ring on the cranks (no need to do this
for a single ring Schlumpf drive). At
the back, put the chain to the smallest
sprocket (right hand gear shifter all
the way forward) and see if the rear
derailleur cage matches the position
cogs
here in (fig 15). Shorten the chain
until the two derailleur cogs are in
alignment. If you do not have a chain
tool, you may need to see your dealer.
Warning: if this chain length is not correct,
damage may occur to your rear derailleur.
When ever you do or undo
the links, always push them
together first so that the
head of the pins go over the
retaining teeth (represented
here in fig 16c by the black
arrows).
c
90º
9
attaching the steering rod
Then fit the steering rod on to the handle bars (fig 17a) and to
the front forks (fig 17b) with an Allen key screw through the rod
end at each end. The rubber o-ring goes between the rod end
and the front fork to keep the steering silent.
Generally the thicker section with the bend goes to the rear of
the trike with the bend inwards bringing the rod closer to the
trike.
However the steering rod may be fitted either way with the bent
end either bolted to the handle bars, or the front forks. Some
models may need to use the bend at the front end of the trike to
give extra clearance with the cranks. The bend will always face
inwards, bringing the steering rod closer to the frame.
fig 17
a
b
5
Sitting on trike you can then
hold the handle bars so that
they are evenly by your side,
and push the front wheel
Another technique we are
fond of is to push the front
wheel so that it points hard
right so that steering rod just
touches the frame. Turn your
handle bars hard right until
they hit the stop. With the
front wheel and bars both
hard right, tighten up the
clamp.
b
90º
Depending on the steering
rod inclination and design this
may not always work, but
if you are changing lengths
regularly, it is great to check
if it will work for you.
Note: be careful not to over tighten the clamp.
If you get the feeling that you steering alignment is changing
whilst riding, check first the leg length scale under the frame
to see if it has moved. More likely you need to tighten your
frame clamp bolts as the frame is sliding together from the
pressure of the chain, rather than the steering.
aligning your steering
Loosen the clamp on the rod
(fig 18a) so that it can slide
telescopically.
with your feet until it is in
alighnment with the frame.
You should end up with
the wheel 90 degree to the
handlebars (fig 18b).
fig 18
a
3
10
attaching your front brake
fig 19
a
b
Start by twisting the barrel screw and locking ring around so the
slots line up. Squeeze the brake lever to open it up and place the
head of the cable into the lever cradle.
c
d
Place the black outer cable into the barrel screw and close the
slot by twisting the barrel screw and locking of the locking ring,
hand tight only.
e
If you have cable issues
with the cable fixed to the
frame, you can cut that tie
and instead attach it to the
steering rod. Place two zip
ties onto the steering rod
as shown.
final check
Check all screws & nuts to make sure they are tight.
Check the brakes & steering to make sure they work OK
11
adjusting your gears
Now for the fun of gear adjustment. Your trike has also been
supplied with the component manufacturers instructions for
your reference. Set your trike so the rear wheel is off the ground
and can spin freely, and is stable enough that you can turn the
cranks.
~ front derailleur
We will start with the front
fig 20
derailleur, as it is easier to
adjust, and gives you a good
start for the rear. Firstly
L
determine the problem you are
H
having, is it A) will not go into
the large chain ring or B) will
not go into the smallest chain
ring?
A: The cable needs more
tension, or if you’ve been riding
for a while, may have stretched.
Check this by returning the chain to the smallest chain ring
(shifter all the way forward) and feeling the cable between the
cable stop and the derailleur, is it excessively slack? If so undo
the cable pinch bolt and pull through the excess cable and
tighten the pinch bolt. Try shifting to the large chain ring again.
If it still doesn’t work turn the ‘H’ limit screw (small screws on
top of the derailleur shown in fig 20 H) out by a quarter of a turn
each time and retry the shift. If you unscrew it too far, the chain
will fall off the outer side.
B: Loosen off the ‘L’ limit screw (fig 20 L) slowly and it should
drop down, if not the cable may be too tight. To check this, undo
the cable pinch bolt, loosen the limit screw again until it drops
down and reattach the cable. Double check that it still goes
into the large chain ring. Also check the cable to see if it is still
running smooth by undoing the pinch bolt, holding the cable in
+
one hand and shifting with the other hand. Lubricate or replace
the cable if it is hard or rough to pull through. If neither of these
things work, your derailleur could be worn or misaligned. See
your dealer for further assistance.
~ rear derailleur
The rear derailleur is similar
fig 21
in that if it won’t go into the
larger sprockets, there is not
enough cable tension, or into
the smaller sprockets if there
H
is not enough cable slack.
L
Turn the barrel screw (fig 21
AB) in for slack and out for
tension. As with the front
AB
derailleur, use the limit screws
only as a last resort, as these
don’t effect the indexing of
your gears.
Loosen the ‘H’ screw (fig 21 H) if it won’t go into the smallest
sprocket or tighten if it goes between the smallest sprocket and
the dropout. Loosen the ‘L’ screw (fig 21 L) if it won’t go into the
largest sprocket or tighten it so that the derailleur doesn’t go into
the spokes (not too good if this happens).
If you run out of adjustment with the barrel screw you will need
to wind it all the way back in, put the shifter all the way forward
and loosen the pinch bolt and pull through the excess cable and
tighten the pinch bolt again.
Also check the cable to see if it is still running smoothly by
undoing the pinch bolt, holding the cable in one hand and
shifting with the other hand. Lubricate or replace the cable if it is
hard or rough to pull through.
If neither of these things works, your derailleur could be worn
or your derailleur hanger misaligned (bent through an accident).
Contact you dealer for further assistance.
12
+
riding
both levers are fitted with locking buttons. Just squeeze the lever
and press the button to stop the trike from rolling away.
using your gears
steering
With its higher seat & narrower width than our “tadpole” (two
front. one rear wheel) tricycles, the ANURA is not as stable, and
care should be taken in cornering so as not to tip it over.
We recommend that you experiment in riding it in an empty car
park to see how quickly you can turn without tipping it right over.
Please wear gloves for safety while doing this.
Leaning into the turns will enable you to turn quicker without
tipping. Note that once one of the rear wheels lifts off the road,
the drive (pedalling) will be lost until two wheels contact the road
again.
fig 22
Left hand turn
braking
riding in a straight line
Right hand turn
The three wheel disc brakes fitted are very powerful so they
should be used carefully. The right hand lever operates the two
rear brakes, and the left hand lever operates the front brake.
For gentle braking, like slowing for a corner, either lever may be
used, as this will allow the other hand to be used for signaling.
For most braking it is best to get into the habit of using both
hands, as both are required for emergency braking. Please be
careful braking in a turn, especially going downhill, as the trike is
more likely to tip under those conditions. Once you have stopped,
Your trike’s gears match your efforts to the conditions, making
it easier and more enjoyable to ride. The low gears make it
easier to pedal uphill without having to push too hard, and the
higher gears enable you to go faster downhill and with the wind,
without having to pedal too fast.
Anura is set up with gears at the back controlled by gear shifter
(generally on the right), pulling this lever back will move the
chain to the large cogs, at the rear of the trike giving you a lower
gear & making the trike easier to push. Pushing the lever forward
moves the chain to the smaller cogs, so you can go faster.
Gears at the front, are either chain rings on your cranks, or the
Schlumpf Drive cranks. If your Anura has two shifting levers on
top of the bars, the left hand one will change your 3 chain rings
on the cranks. Pushing the lever forward gives you easier, lower
gears and pulling it back towards you get you into the higher,
faster gears.
Note: The chain will only change cogs while you are pedaling,
so it is a good idea to move a lower gear before you stop, so
you will have a low gear when you next start off again.
The Schlumpf drive has two speeds which can be changed at
rest, or in motion. You change it by kicking the side of the crank
with your heel, with your foot on the pedal (even if you use
clipless pedals). Push the left crank in, it is in direct drive or low
gear. Push the right hand crank in, it is in high gear.
Generally you will push the left hand crank in before starting off
or as you are coming up to hill, and then if when riding you find
yourself having to pedal too fast even with the right hand gear
lever all the way forward, kick the right hand crank in.
Note: NEVER try to change the rear gears when the trike is
rolling backwards, as this may damage the derailleur!
13
1st ride
The first ride is where you may notice yourself having a hard
time keeping a straight line at speed. Try relaxing your grip on
the handlebars, remember it is not a bike you are riding, so let
that killer grip off a bit. Try avoiding pulling on the handlebars as
well, you are riding a recumbent now, the seat provides a place
to exert all your energy.
Remember push into the seat, do not pull on the handlebars. If
the problem persists, try riding using only one hand to steer, as
this will stop you pulling unnecessarily on the handlebars.
stamina
With the seat behind you, you can exert a much greater force
with your legs, so beware of over exertion until you build up your
leg muscles. Non-recumbent riders seem to use their arms when
standing on the pedals, so recumbent riders develop larger leg
muscles.
After about a month of riding you should find that you are
quicker overall than say a mountain bike rider of the same
fitness, despite any extra weight of the trike. Also if you ride
together you should find you are less tired at the end of a day’s
riding. The difference will be most noticeable against a head
wind on level roads.
pedals
Greenspeed highly recommend the use of ‘clipless’ pedal systems, as they provide a safer attachment to your trike and help
to reduce leg fatigue. Remember you are on a trike now, so you
can crank the tension up on those adjusters, as you only have
to dismount at the end of your journey instead of at every set of
traffic lights.
tools to have while riding
We recommend carrying at least the following tools when riding.
1. Full set of allen keys to suit your trike.
2. A Puncture kit / Spare tube.
3. A Pump
Check with your dealer for products they recommend specific to
your area. If you aren’t confident changing tyres or making other
adjustments, most dealers also run courses at different levels to
help you get more confident in road-side repair and maintenance.
maintenance
Your dealer is the best person to suggest a maintenance schedule specific to your area and the style of riding you use your trike
for. Below we’ve covered the bare minimum for you. Any one
proficient in bicycle mechanics that are used to looking after their
own bikes will be comfortable looking after a trike as well, there
is only steering to add to your skills.
chain
The chain should be kept lubricated with a chain lube that suits
your particular climate/conditions (Greenspeed recommends
Prolink, www.progoldmfr.com); your local bike shop should know
the ideal lube for your particular requirements. If the chain ever
becomes dry and squeaks, it is crying out for lube, and will make
the trike harder to push!
tyre pressure
Try experimenting with pressures, lower tyre pressure will give
a more comfortable ride and higher speed on rough roads, but
higher tyre pressure will make it roll easier on smooth roads.
There is usually a good compromise at between 70-80psi. Check
your tyre pressure before each ride and you will find that your
trike will be easier to push.
14
what’s next?
warranty
Click onto www.greenspeedrecumbents.com and fill out a
warranty form.
accessories
Accessories can expand the usefulness of your trike and
therefore your horizons. We’ve listed some of the more popular
ones below but do check out the website for the full range.
You can also see our list of recommended products from other
manufacturers. We have fully tested these products and believe
they are the best on the market for both their designed purpose
and suitability to our trikes.
community
Join us on our Greenspeed facebook. All the latest new and
photos direct from the factory and shows are presented there
before getting polished up for the website.
Find a recumbent riders group, or cycling group in your area.
Your dealer is likely the best place to start but also check out
‘bentrider Online and the Recumbent Journal.
Take a BIG ride! There are hundreds of fully supported rides that
will carry all your gear for you and offer many great services and
entertainment along the way. It is a great way to meet people
doing what you love.
Come tell us your stories and share them with everyone on the
Greenspeed website. We love to hear how you are using your
trike and how it has enhanced your life.
GT Rack & Mudguards
Tandem Coupling
resources
Print
VeloVision
Recumbent and Tandem Rider Magazine
Web
Official Website
Greenspeed on facebook
‘BentRider Online
Recumbent Journal
Chain Gobbler
Wheel Motor
www.greenspeedrecumbents.com
company listing
www.bentrideronline.com
www.recumbentjournal.com
Photo credits ~ Jaime Ibarra, lifestyle photos of Christine and Paul.
~ Ian and Mick Sims, studio and product photos.
15
manual
����������������������������
����������������1
���������
16